Author Topic: 545" High Riser Build  (Read 201728 times)

0 Members and 1 Guest are viewing this topic.

cdmbill2

  • Jr. Member
  • **
  • Posts: 87
    • View Profile
Re: 545" High Riser Build
« Reply #180 on: March 12, 2012, 04:25:11 PM »
Jay, stability simply hasn't been a problem. I base the conclusion on having no issues at all with oil, supply, pressure, anything, and the neither the belt nor the pulleys show any unusual wear or witness marks that would indicate movement. I was able to watch it on the engine dyno and everything just spins, no deflection, no movement. In the car there is no indication of movement.

fetorino

  • Full Member
  • ***
  • Posts: 150
  • Tunnelport Cobra
    • View Profile
Re: 545" High Riser Build
« Reply #181 on: March 18, 2012, 02:34:00 PM »


BTW this setup just survived the Run to the Coast, road course, speed stop slalom and auto-x so I think I'm good for DW now. Fingers crossed, now for paint and new hood.


Not to hijack this but on the topic of dry sump.  What did you do for valve covers and breathers?

Are your VCs closed?  Do you only run a breather on the oil tank or are you running some type of breather on you VC.  To maintain vacuum in the crankcase and limit air in the oil I would think no breathers in the covers.  This could cause problems with condensation in the covers though.  I've been trying to do some research on this but haven't found a good discussion on VC breathers with a dry sum system. 

jayb

  • Administrator
  • Hero Member
  • *****
  • Posts: 7564
    • View Profile
    • FE Power
Re: 545" High Riser Build
« Reply #182 on: March 18, 2012, 02:39:39 PM »
You probably don't want to run a valve cover breather on an engine with a dry sump or even with a vacuum pump; the only breather should be on the vent can.  If you use a breather on the valve cover, you won't develop any crankcase vacuum, which of course is the point of running a vacuum pump and at least partially the point of running a dry sump.

Sometimes you will see some kind of a breather device on the valve cover of one of these engines, but in this case it usually contains a vacuum relief valve.  For example you may not want to exceed 15 inches of vacuum in the crankcase, because on a wet sump system this can cause oil control issues.  So, you put a vacuum relief valve set at 15 inches of vacuum on the valve cover, and then if your crankcase vacuum starts to exceed that, the vacuum relief valve will open and let some air into the crankcase to bring the vacuum back to 15 inches.

Hope that helps - Jay
Jay Brown
- 1969 Mach 1, Drag Week 2005 Winner NA/BB, 511" FE (10.60s @ 129); Drag Week 2007 Runner-Up PA/BB, 490" Supercharged FE (9.35 @ 151)
- 1964 Ford Galaxie, Drag Week 2009 Winner Modified NA (9.50s @ 143), 585" SOHC
- 1969 Shelby Clone, Drag Week 2015 Winner Modified NA (Average 8.98 @ 149), 585" SOHC


fetorino

  • Full Member
  • ***
  • Posts: 150
  • Tunnelport Cobra
    • View Profile
Re: 545" High Riser Build
« Reply #183 on: March 18, 2012, 03:02:42 PM »
Jay that is the logic I am following.  Sealed covers to maintain the crankcase vacuum created by my 4 stage pump. 

My car will see some street miles and in reading about sealed covers and dry sumps I have seen references that this will cause the potential of moisture buildup in the VCs.

jayb

  • Administrator
  • Hero Member
  • *****
  • Posts: 7564
    • View Profile
    • FE Power
Re: 545" High Riser Build
« Reply #184 on: March 18, 2012, 03:31:04 PM »
I can see that as an issue; any condensation in the engine will not be able to evaporate out without any valve cover breathers.  But solving the problem by adding breathers to the valve covers will defeat the purpose of the vacuum stages of your pump.  One solution is to run the engine at a high enough temperature so that the water evaporates; presumable the water vapor would then get sucked out of the crankcase by the pump.  Some of this always happens on my engines because the froth in the catch can always has some white foam in it.

Also, if you run on the street you can disconnect the vacuum stages of the pump, and stick a breather on the valve cover.  I do that on my engines where I'm running a vacuum pump, although I do not plan to do it with the Peterson pump/vacuum setup, or with the dry sump setup I'm going to put on my big SOHC. 

In any case, I don't think this is a real big issue.  Monitor your oil, and if you start to see too much evidence of condensation, change it.  I don't think you'll have a problem with it.
Jay Brown
- 1969 Mach 1, Drag Week 2005 Winner NA/BB, 511" FE (10.60s @ 129); Drag Week 2007 Runner-Up PA/BB, 490" Supercharged FE (9.35 @ 151)
- 1964 Ford Galaxie, Drag Week 2009 Winner Modified NA (9.50s @ 143), 585" SOHC
- 1969 Shelby Clone, Drag Week 2015 Winner Modified NA (Average 8.98 @ 149), 585" SOHC


cdmbill2

  • Jr. Member
  • **
  • Posts: 87
    • View Profile
Re: 545" High Riser Build
« Reply #185 on: March 18, 2012, 04:48:10 PM »
FeTorino, Jay is right on this one, whether its a dry sump deal or a vacuum pump or a an exeranl oil/pummp with two vacuum scavenge stages as jay and I have the engine needs to be sealed up as much as possible.

In my valve covers are only the vacuum lines going to the Peterson wide-vac set-up, and an o-ring selaed cap for adding oil.


In one of the vacuum lines I have an adjustable vacuum break made by Star Machine (there are others on the market, some requires shims which is a PITA) It is outside the VC as I don't want to pul air through the engine when it hits the targeted vacuum level.


The output of the two vacuum stages are routed to these paired Jaz breather tanks. Why two? I found that in some conditions, high humidity or rain and long days of driving, Drag Week for example, enough water and a little oil is puled out of the engine to fill a single breather which makes for a huge mess.


After the Run to the Coast event last weekend here in SoCal when it was quite dry I drained this stuff out of the two breather tanks. It is typical of what I see. The longer the mtoro has sat or run the more you get. Its maybe a half a beer can worth in volume.


I'm pretty religious about draining these now as when they get full and the stuff backs up into the breather elements themslves is a mess to clean up. I have my vacuum break set at 12" and have had no observed problems. The area of concern is generally drying out the wrist pins. I have my set up connected at all times and it pulls 3-5" just driving around. because the crankcase pressure is reduced the boiling point of the water that condenses in the engine is lower than normal and I find the oil in the engine stays clean, I never see any indication of rust or corrosion and I target 180* as a normal operating water temp and the oil temp is about the same once everything is warmed up.

The vacuum system itself does three things, reduce crank case pressure against the back of the pistons, keeps the engine clean, and it allows me to run thinner rings at modest tension and still get great ring seal and ring life. The total benefit of all that on my motor is around 40+ HP. One of our DW buddies runs a 496"pntiac and at the engine dyno recently we did back to back pulls disconecting his more typical three vane vacuum pump the difference was an average of 9 HP with a peak 15. But remember, this is just the benefit of the reduced crankcase pressure and yes we did rig up a conventional breather. Its the overall system approach that yields the larger gains.

On the importance of sealing up the engine we another buddy with a Brand X 525'" engine that was also dynoed recently at the same facility. We were seeing low crankcase vacuum numbers with a four vane external vacuum pump and it turned out that the gasket under the distributor was fully sealing. With a quick R&R and some Ultra Grey silicone the egine hit the intended 15" peak vacuum and made and averge improvement of 14 HP and 24 peak.

jayb

  • Administrator
  • Hero Member
  • *****
  • Posts: 7564
    • View Profile
    • FE Power
Re: 545" High Riser Build
« Reply #186 on: May 06, 2012, 11:41:41 PM »
This week my pistons came back from Polydyn for coating.  On Wednesday night I checked them for clearance to the bore, and was surprised that the clearance was only about .002"!  I thought I might have to have the block honed to fit the new pistons, but I was expecting more clearance than .002".  However, I looked at the piston data that came with them and rather than the .0065" piston to bore clearance that I'm accustomed to seeing, these pistons specified .0035".  Apparently they are a different aluminum alloy that expands less than other alloys normally used in forged pistons.  In any case though, the block needed to be honed, so on Thursday I ran the block, crank, rods, and pistons, along with all the other reciprocating assembly stuff up to the machine shop for fitting the pistons to the bores and balancing the reciprocating assembly.  My machinist said he would do his best to have everything ready by next Friday.

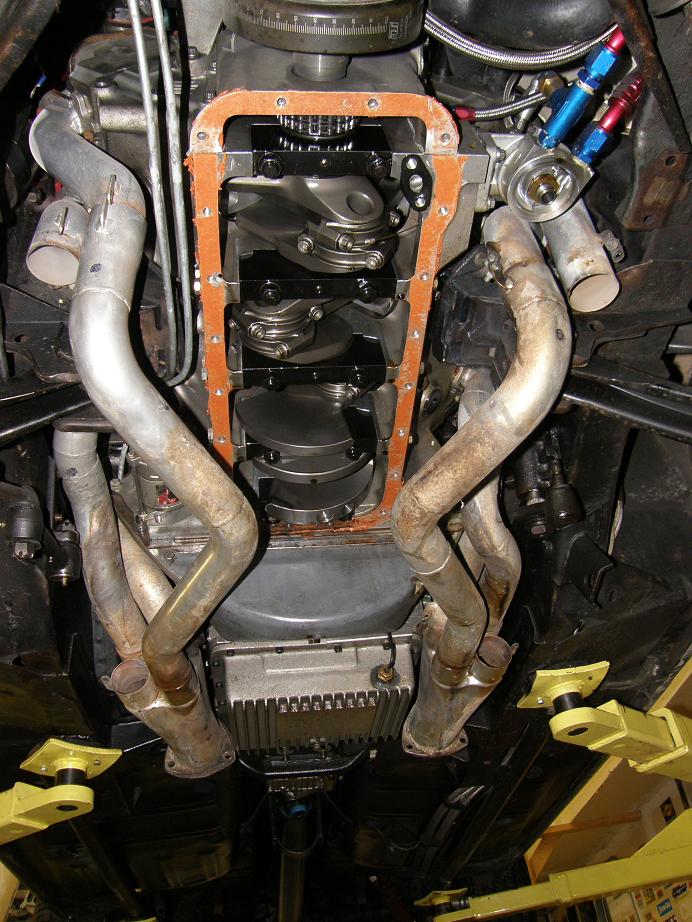
I still have some fabrication work to do on this engine before I can assemble it, so I got working on that this weekend.  First job, and the biggest job, was building the oil pan.  I already had the Mustang up on the lift, so I spent Friday night pulling the existing pan off the engine so I could fit the new pan on the car as I was building it.  This was going to be necessary for a couple reasons.  One was that the headers on the car have a somewhat unique design, and I wanted to keep them, so the pan was going to have to be made to fit.  Second was that I wanted to run a deep sump for the full length of the motor, like the Super Stock guys do on their early Mustangs, and this meant that the pan had to have a tube running through it so that the drag link would fit. 

The lower header tubes are a slip fit to make the oil pan removable without taking the headers loose from the car.  After the oil pan was removed I put the two inside tubes back in place to get an idea of how wide the pan could be at the back of the engine; here's a photo:


In this photo the drag link and tie rod ends have already been removed.  They are the reason for the configuration of the tubes.  The headers are a modified set of Hooker adjustable race headers with the 2 1/8" tubes, and those headers hang too far down to be practical for a street car, IMO.  So when I got the headers I modified them to give more ground clearance.  This involved making the lower tubes removable and kinking them to the inboard side of the car, so that the tie rods could move through their full travel without hitting the headers.  Normally these two tubes hang down below the tie rods, and in addition to hitting the ground in a street application when you go over a bump they will hit the tie rods when the steering wheel is turned one way or the other.  With the headers in this configuration I have zero ground clearance issues, but the primaries are no longer equal length. 

After getting the existing oil pan off the car I took some measurements and started drawing up the design of the new pan in CAD.  I wanted a kickout on the right side of the engine, but the headers and the drag link tube were going to get in the way to some extent.  On the kickout I wanted to make the first wall at 45 degrees to the oil pan rail, so that the oil that was stripped off by the windage tray was deflected down into the pan, rather than bouncing back off a straight wall and back into the crank.  As a result the pan rail itself didn't have the kickout.

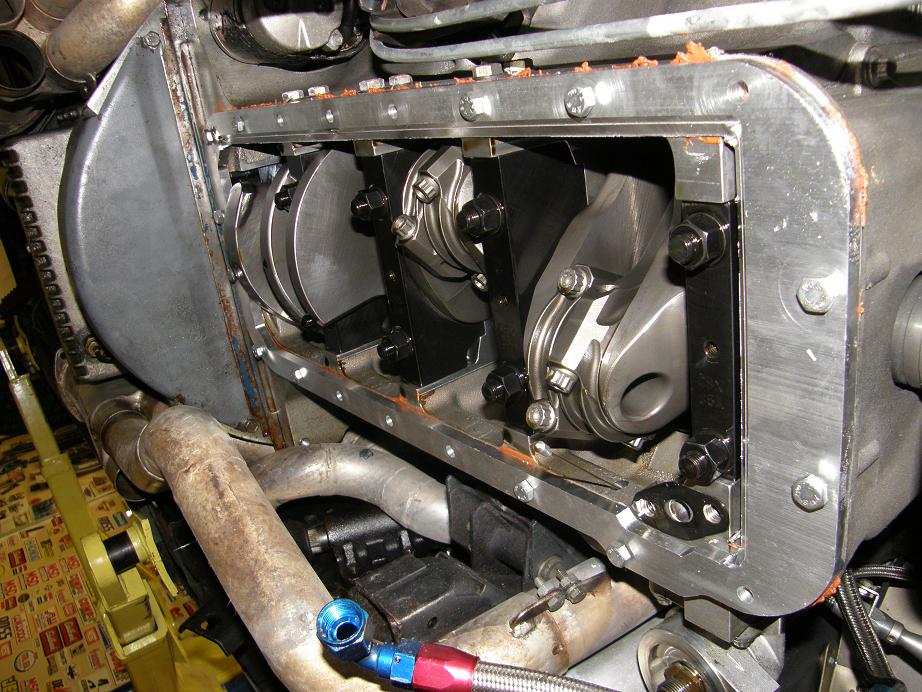
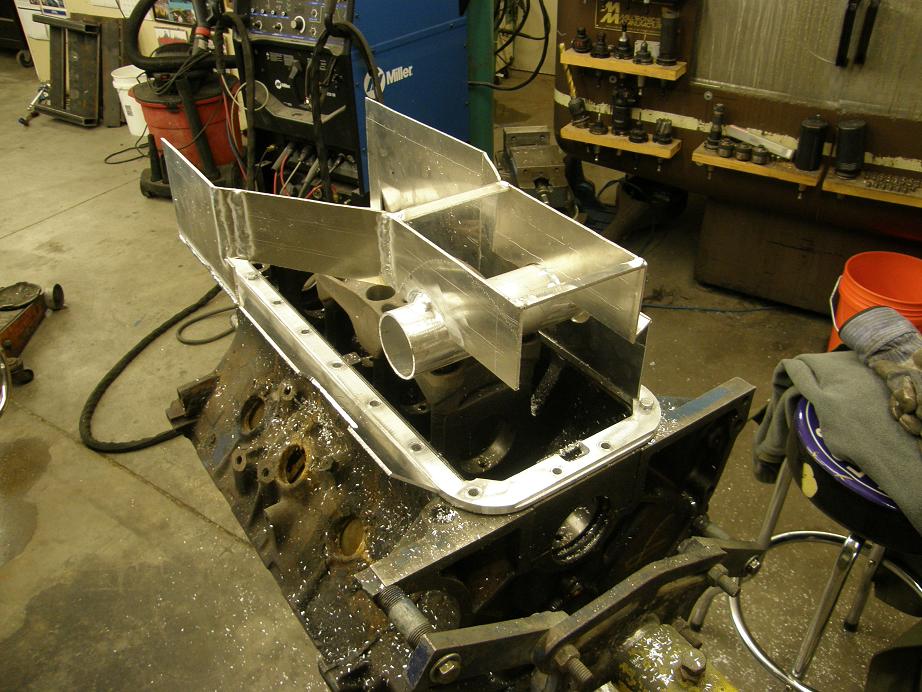
Saturday morning I programmed the pan rail into my CNC machine and cut it out from 3/8" aluminum that I happened to have on hand.  Here's a photo of the pan rail bolted in place on the engine in the Mach 1:


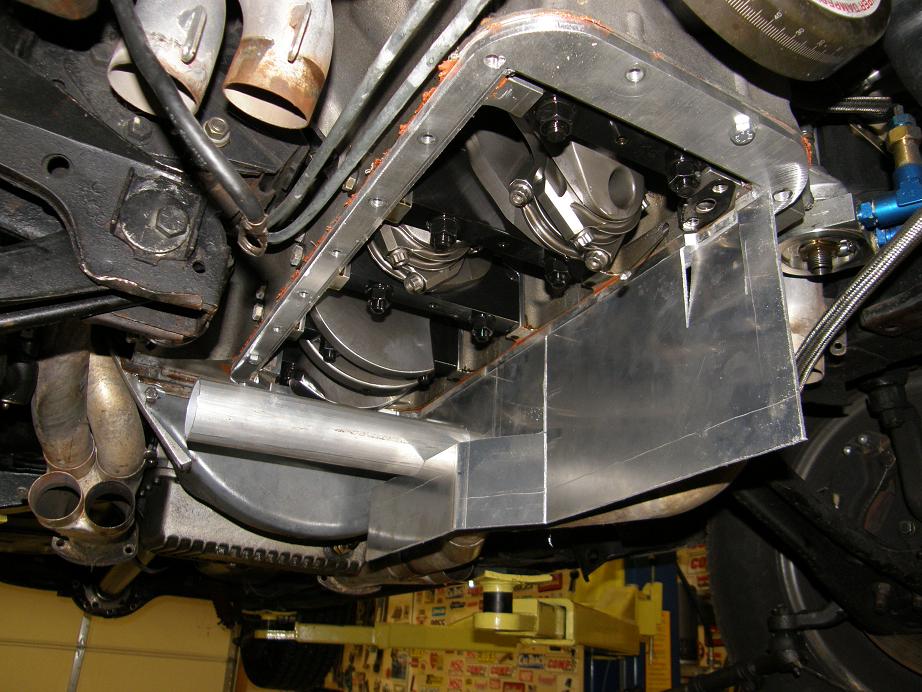
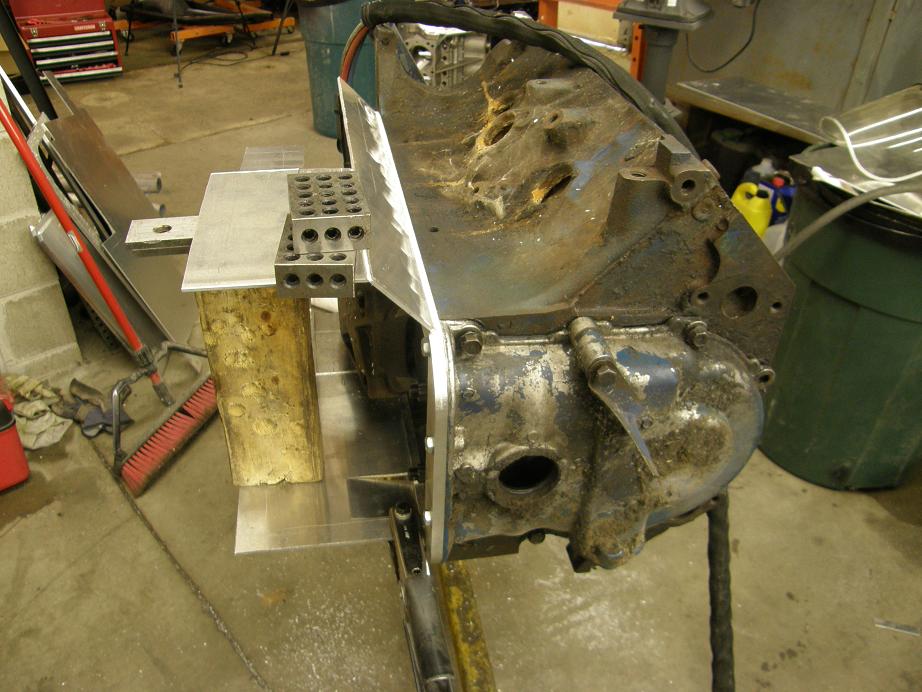
From there I started cutting and bending 1/8" 5052 aluminum sheet to begin fleshing out the pan.  By the end of the day Sunday I had a pretty good start, but it was fairly tedious work, especially once I got to the tube that the drag link has to go through.  For each test fit I had to assemble the steering and run it through the tube, and then to make any modifications for fit or clearance I had to pull the steering all apart again, make the change, and then test the fit again.  Here's some photos of the pan in various stages of construction.


Despite spending most of the weekend on this project, I'm probably only about half way done with this pan.  Hopefully I can get it finished up next weekend.  Then I still have the oil pump mount and the alternator brackets to complete before all the fabrication work is done for this engine.  I have to admit I'm getting kind of tired of the fabrication; I want to slam this engine together as soon as it comes back from the machine shop and get it on the dyno!  Hopefully I can get the fab work done and get the engine running at the end of this month...
Jay Brown
- 1969 Mach 1, Drag Week 2005 Winner NA/BB, 511" FE (10.60s @ 129); Drag Week 2007 Runner-Up PA/BB, 490" Supercharged FE (9.35 @ 151)
- 1964 Ford Galaxie, Drag Week 2009 Winner Modified NA (9.50s @ 143), 585" SOHC
- 1969 Shelby Clone, Drag Week 2015 Winner Modified NA (Average 8.98 @ 149), 585" SOHC


fetorino

  • Full Member
  • ***
  • Posts: 150
  • Tunnelport Cobra
    • View Profile
Re: 545" High Riser Build
« Reply #187 on: May 18, 2012, 11:55:31 PM »
Well what is this weeks progress.  I need my weekend High........  riser fix.   ;D

jayb

  • Administrator
  • Hero Member
  • *****
  • Posts: 7564
    • View Profile
    • FE Power
Re: 545" High Riser Build
« Reply #188 on: May 19, 2012, 12:47:32 AM »
Well, not a lot is going according to plan at this point.  Just today I got the block and reciprocating assembly back from the machine shop, so I can assemble the engine now.  Last weekend I worked out the brackets for mounting the Peterson pump and the alternator on the engine, but didn't quite get them machined all the way because I had to take some time to get prepared for the Boy Scout invasion last Tuesday night.  Every year I host my son's Scout troop and show the boys how to make a backpack ID tag with their name and troop number on it, using the bandsaw, drill press, Bridgeport, and CNC machine.  This year, though, after about 3/4 of the tags were done, I had an unfortunate CNC mishap; my toolchanger didn't rotate into the correct position prior to the tool change, and the head came down on the carousel between two tools.  It broke the whole toolchanger arm mount, which is a big cast aluminum piece.  So, instead of finishing up the machining on my brackets this week, I've been disassembling my CNC machine for repair.  Last night I welded the broken piece back together, and tonight I re-assembled it, but I found out that one of the position sensors got squashed in the carnage, so I'm only halfway functional on the machine at this point.  To top it off, my whole weekend this week is pretty well booked up with family stuff.

So, I'm delayed.  Hopefully I will get some significant project made over Memorial Day weekend...
Jay Brown
- 1969 Mach 1, Drag Week 2005 Winner NA/BB, 511" FE (10.60s @ 129); Drag Week 2007 Runner-Up PA/BB, 490" Supercharged FE (9.35 @ 151)
- 1964 Ford Galaxie, Drag Week 2009 Winner Modified NA (9.50s @ 143), 585" SOHC
- 1969 Shelby Clone, Drag Week 2015 Winner Modified NA (Average 8.98 @ 149), 585" SOHC


WConley

  • Hero Member
  • *****
  • Posts: 1221
  • No longer walking funny!
    • View Profile
Re: 545" High Riser Build
« Reply #189 on: May 19, 2012, 09:41:23 AM »
Yikes Jay!  I hate hearing stuff like that  :o

So far our Haas has been flawless, but I could see the 1-ton Z-axis servo force creating havoc with the tool changer if anything went wrong.

It sounds like you have the repair process well in hand.  It's just time and aggravation, right??  Best of luck to you.
A careful study of failure will yield the ingredients for success.

mike7570

  • Guest
Re: 545" High Riser Build
« Reply #190 on: June 06, 2012, 06:26:57 PM »
This week and today I finished up my adapters for the 385 water pump.  Here's a photo of the finished adapters (built without any setup errors this time LOL!), and also a shot with the water pump mounted on the engine:


I need to do a little hand grinding on these internally to smooth everything out, but they are essentially completed at this point. 


Hey those adapters look familiar except I had to build mine with a band saw, drill and a grinder LOL
Mine adapted a BBC to FE which is easy to do because the spacing is the same.


« Last Edit: June 06, 2012, 07:02:23 PM by mike7570 »

jayb

  • Administrator
  • Hero Member
  • *****
  • Posts: 7564
    • View Profile
    • FE Power
Re: 545" High Riser Build
« Reply #191 on: June 06, 2012, 06:57:39 PM »
I really wanted to use a BBC pump, but I didn't like the way I would have to bend the water pump inlet hose around.  The BBF pump that Meziere offers allows two different inlet hose locations, one of them on the standard FE side, so I went with that.  But I'm sure the adapters would have been easier with the BBC pump.
Jay Brown
- 1969 Mach 1, Drag Week 2005 Winner NA/BB, 511" FE (10.60s @ 129); Drag Week 2007 Runner-Up PA/BB, 490" Supercharged FE (9.35 @ 151)
- 1964 Ford Galaxie, Drag Week 2009 Winner Modified NA (9.50s @ 143), 585" SOHC
- 1969 Shelby Clone, Drag Week 2015 Winner Modified NA (Average 8.98 @ 149), 585" SOHC


mike7570

  • Guest
Re: 545" High Riser Build
« Reply #192 on: June 06, 2012, 07:12:49 PM »
Makes sense, the radiator I was using (scirocco) had the inlet opposite from the Ford.
I spent about 1/2hr trying to attached a larger photo. How do I do that?

Ford428CJ

  • Sr. Member
  • ****
  • Posts: 395
  • FE FREAK!
    • View Profile
    • Hillside Auto
Re: 545" High Riser Build
« Reply #193 on: June 11, 2012, 02:23:44 PM »
VERY IMPRESSIVE Jay!!! To say the least....  ;D
Wes Adams FORD428CJ 
Hillside Auto- Custom Curved, Blueprinted Distributors
03 F-250 Crew Cab 4x4 6.0 and 35's
64 Falcon 428FE
55 FORD Truck 4-link Rides on air with 428FE

jayb

  • Administrator
  • Hero Member
  • *****
  • Posts: 7564
    • View Profile
    • FE Power
Re: 545" High Riser Build
« Reply #194 on: June 11, 2012, 02:26:23 PM »
Makes sense, the radiator I was using (scirocco) had the inlet opposite from the Ford.
I spent about 1/2hr trying to attached a larger photo. How do I do that?

The link below will give you the basics for posting photos.  You have to host them somewhere online; Photobucket is a convenient choice and is free.

http://fepower.net/simplemachinesforum/index.php?topic=2.0
Jay Brown
- 1969 Mach 1, Drag Week 2005 Winner NA/BB, 511" FE (10.60s @ 129); Drag Week 2007 Runner-Up PA/BB, 490" Supercharged FE (9.35 @ 151)
- 1964 Ford Galaxie, Drag Week 2009 Winner Modified NA (9.50s @ 143), 585" SOHC
- 1969 Shelby Clone, Drag Week 2015 Winner Modified NA (Average 8.98 @ 149), 585" SOHC