Author Topic: FE Intake Adapter  (Read 327988 times)

0 Members and 1 Guest are viewing this topic.

machoneman

  • Hero Member
  • *****
  • Posts: 3855
    • View Profile
« Last Edit: May 23, 2013, 09:07:02 AM by machoneman »
Bob Maag

WConley

  • Hero Member
  • *****
  • Posts: 1165
  • No longer walking funny!
    • View Profile
Re: FE Intake Adapter
« Reply #106 on: May 23, 2013, 09:29:08 AM »
I am very lucky...I dont really know how i came through it with out more "serious" injuries...I have numerous fractures including a broken pelvis (3 spots)..I had 2 dozen stitches to the right side of my face.I was literally beaten black and blue.....I am just starting to move around now...Sitting is still limited and bending is out of the question...My F-250 diesel 4x4 looks like it got hit by a train.....

I got hit so hard it tore the front axel out,pushed the transfer case right out of the truck and I flipped twice and landed on my side.The roof was cut off and i was heli-jetted to the hospital..

Built "Ford" tough...

Cory

Cory - I too was saved by a tough Ford 4x4 truck in a 130+ mph (combined) head-on.  Heal fast!  Sorry you have to endure this pain.  It will be a process but with your commitment and the support of your family / friends you'll be back!
A careful study of failure will yield the ingredients for success.

427Fastback

  • Hero Member
  • *****
  • Posts: 604
    • View Profile
Re: FE Intake Adapter
« Reply #107 on: May 23, 2013, 10:21:33 AM »
Thank you sir......everyday is a new adventure in pain...I keep my head up and dont complain much as things could have been much worse........Cory
1968 Mustang Fastback...427 MR 5spd (owned since 1977)
1967 Mustang coupe...Trans Am replica
1936 Diamond T 212BD
1990 Grizzly pick-up

fe66comet

  • Guest
Re: FE Intake Adapter
« Reply #108 on: May 23, 2013, 04:33:17 PM »
I had a accident, on 294 doing about 70 and got cut off by a semi. Tore the cab off the frame on my 68 was fresh paint and looking good then with my rebuilt 410. The broken glass ls my face, did not wake up for a week from that one.....Jon

WConley

  • Hero Member
  • *****
  • Posts: 1165
  • No longer walking funny!
    • View Profile
Re: FE Intake Adapter
« Reply #109 on: May 24, 2013, 08:19:10 PM »
Yes I made a similar hole in the windshield of a 1995 F-150 4x4... with a seatbelt on!  That's how hard the guy hit me.  I guess I don't have to tell you how painful facial reconstruction surgery is... 

That picture really makes me shiver!  Seems like you came out of it OK though.  Sorry about the demise of such a nice old truck, but that's small potatoes in the grand scheme of things.

- Bill
A careful study of failure will yield the ingredients for success.

fe66comet

  • Guest
Re: FE Intake Adapter
« Reply #110 on: May 25, 2013, 08:05:37 AM »
Actually the remainder of the truck is in the barn, looking for a body for it. I ran across a delivery panel body of the same year but have not pursued it yet. The face, I was ugly before so no biggie LOL.....Jon

jayb

  • Administrator
  • Hero Member
  • *****
  • Posts: 7426
    • View Profile
    • FE Power
Re: FE Intake Adapter
« Reply #111 on: May 27, 2013, 01:53:41 PM »
I don't know about the rest of you guys, but I am having a FABULOUS Memorial Day weekend.  After starting this intake manifold project last April, it seems that for the last year all I've done is hurry up and wait.  Wait for the designer to get done with the model, wait for quotes from the foundries and pattern shops, wait for the pattern shop to make the master pattern and match plate, and wait for the foundry to cast the manifolds.  FINALLY, I have the first five intakes here and I don't have to wait for anybody anymore.  It's been great to start working on the tooling required for the machining operations, and programming the machine to cut the first manifolds.

When I got the first five manifolds, one of the things I was concerned about was the finish.  After the manifolds are solution heat treated to T6, they turn a little bit darker in color, as compared to a non heat treated part.  Here's a picture showing three manifolds, two of mine and one Edelbrock.  The darker manifold has been heat treated:


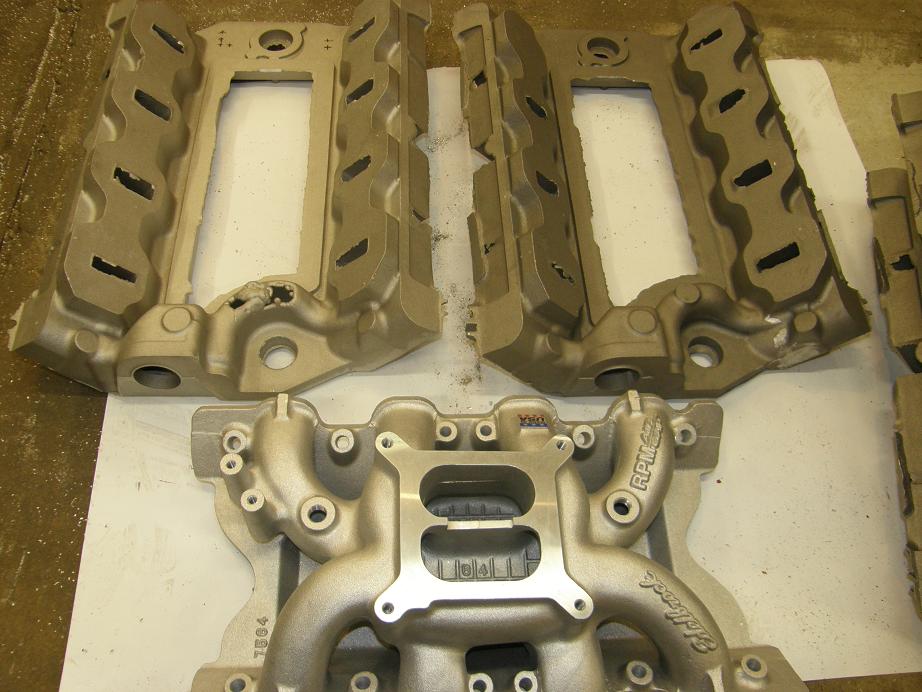
The Edelbrock manifold looks the nicest, and has the best shine.  The adapter manifold that has not been heat treated still looks OK, and I was figuring on just going with that finish.  But after heat treating the adapter manifold darkens up a lot, and I think it wouldn't look all that great on the car, especially with a shiny Edelbrock manifold bolted on top. 

The solution is glass bead blasting the manifold castings, but my foundry doesn't offer that service.  As it happens I have a cheap bead blaster in my shop, acquired back when I was buying manifolds for test purposes when writing my book (some of the manifolds I bought were so ugly that I didn't dare take pictures of them for the book without cleaning them up LOL!).  So, I took one of the manifolds and bead blasted the surfaces that were not going to be machined.  It turned nice and white again, about the same color as the Edelbrock manifold, but the finish was still a little bit different.  The Edelbrock manifold looks almost sparkly, whereas the manifold I bead blasted is kind of a flat white color.  Now, the glass beads have been in my bead blast cabinet for years, and as I understand it as glass beads are used they start to break and become finer.  I think that Edelbrock's manifolds are probably bead blasted with a large size glass bead to get that finish.  Anybody out there know on this?  I think I'm going to buy some more glass beads this week, change out the ones that I have and try some new ones, but I don't really know for sure if I want a coarse (large size) bead or a fine (small) bead. 

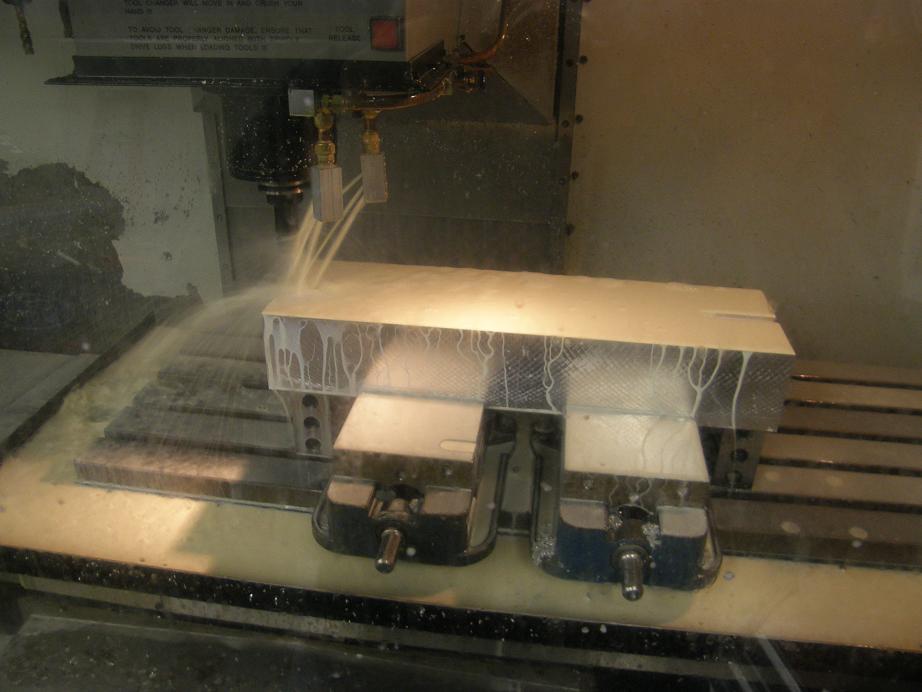
Anyway, on Saturday while I was glass beading the intake the CNC machine was happily working away on the first fixture for fixturing the casting.  I bought some cast aluminum material called Alimex that is dimensionally stable and stress relieved, and specifically designed for tooling and fixtures, so that I could maintain decent tolerances and repeatability on the manifolds.  First thing I did with the first block, which was 4" X 7" X 24" after squaring it up, was to cut the bottom side for keyways so that I could index the block on the grooves in the mill table.  Here's a shot of the block in the machine:


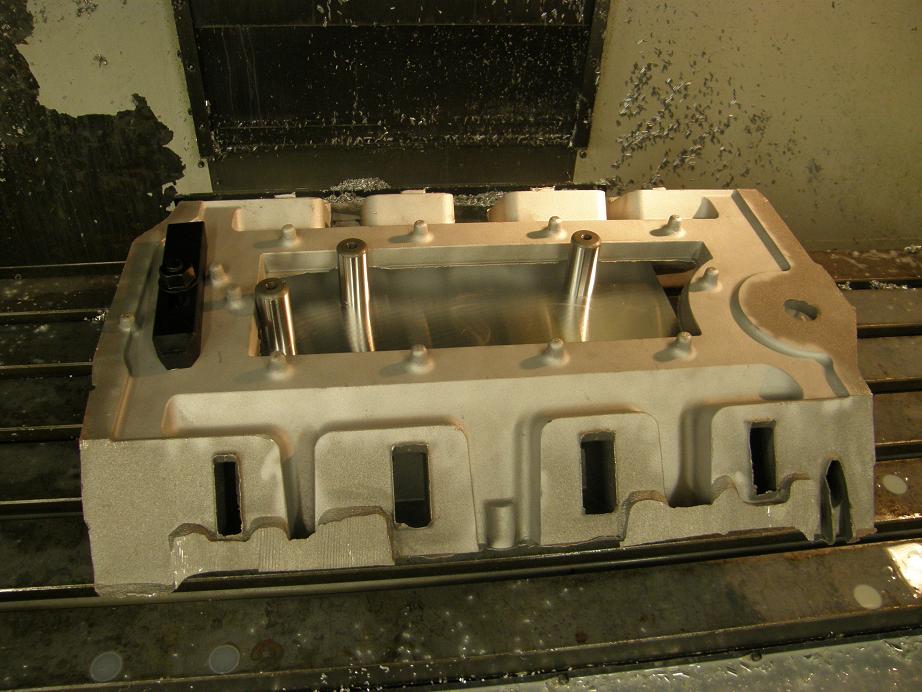
That is a big block of aluminum!  After getting this done and installing the keys I flipped the block over and bolted it to the table, then finished the remaining machining operations.  This took the whole rest of the day on Saturday, because there was a lot of material to be removed.  Also, the holes for the steel pins that support the manifold have to be machined very precisely, so I had to take some time to sneak up on those dimensions.  Finally around midnight on Saturday I got this done; here's a picture of the fixture block with the steel pins installed:


Three of the pins have threaded holes in the top so that they can be removed after the intake is clamped in place on the fixture. 

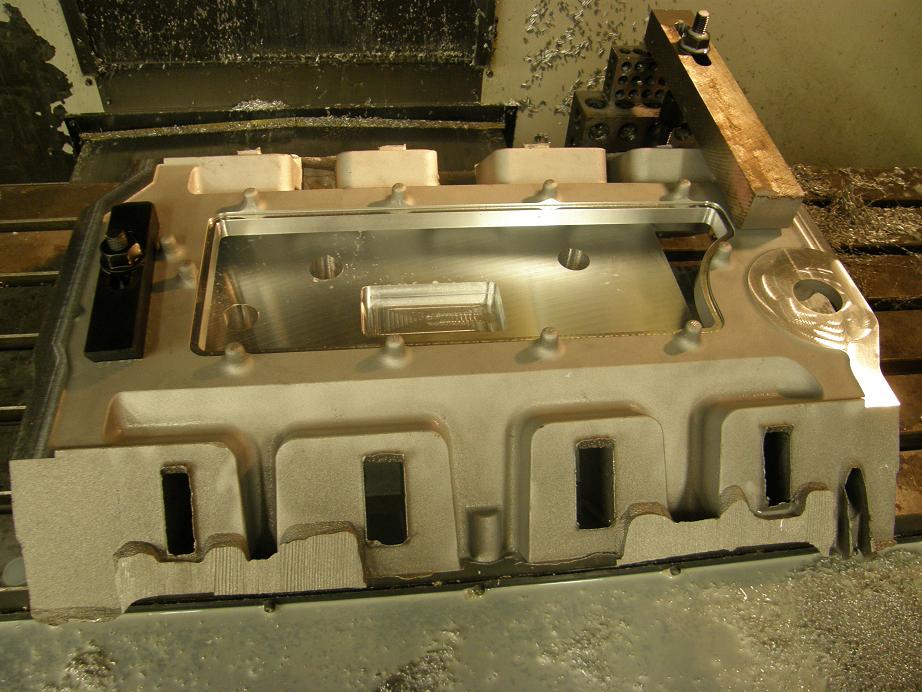
Saturday night after the machining on the fixture was finished I couldn't resist popping a manifold on there and seeing how it looked:


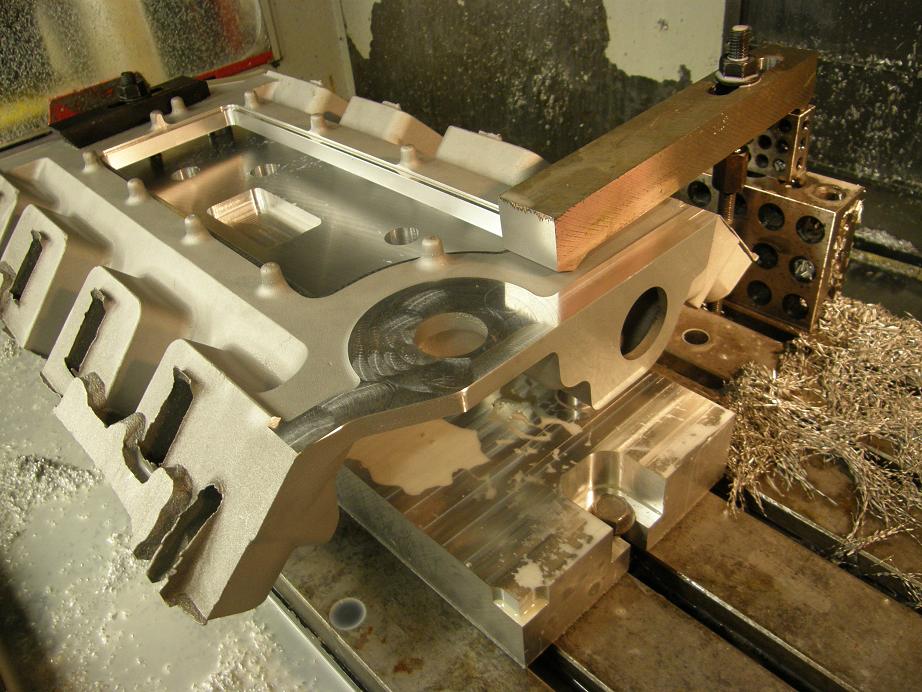
Note in this photo the bead blasted areas of the intake; they look a lot better after bead blasting.  The clamp for holding the intake manifold at the back was able to be made up with pieces from the standard clamping sets that I have, but to clamp the manifold at the front it turned out that the standard clamping bars were not long enough.  So, I had to machine one specifically for the fixture, out of 1.5" steel bar stock.  Sunday I set that up to run on my other CNC machine, and while that was running I worked on writing the programs for machining the bottom side of the first manifold.  Pretty much took all day to machine the steel clamp bar, but by around dinner time I was all ready to go.  I got the first intake clamped in the fixture and started, very slowly and cautiously, to run the first machining operations.  Here's a picture of the manifold being machined at this point:


One thing that I discovered pretty quickly was that the front right corner of the manifold had to be machined more cautiously than the rest of it, because of a lack of support in that area.  I didn't want to clamp this area for fear of putting a twist in the intake during machining, so I had to go pretty slowly and sneak up on the final finished dimensions in order to get a good finish, but in the end it came out pretty well.  I stepped through about half the machining operations before I went to bed on Sunday night, and the manifold was looking pretty good.

Today I got going again in the morning and finished up the machining operations by noon.  Again I had to watch what was happening, as it was happening, and make some adjustments in the program as I went, but by noon I had the first manifold completed on the bottom; here's a couple of pics:


I am very, very happy with the way the bottom side machining operations have come out on this first manifold.  It looks really good, and it feels great to be finally making some chips on one of these things.  Today I'm working on the other fixture that I need, to mount the intake on the trunnion table that is hooked up to my 4th axis.  Hopefully I can get that done by next weekend, so that I can start on the next machining operations next Saturday.  I still think this will take me at least another two weeks to get the first manifold finished, but I'm looking forward to getting the first one done and bolted onto my 428CJ, currently waiting patiently on the dyno for its new intake... :D
« Last Edit: May 27, 2013, 01:59:24 PM by jayb »
Jay Brown
- 1969 Mach 1, Drag Week 2005 Winner NA/BB, 511" FE (10.60s @ 129); Drag Week 2007 Runner-Up PA/BB, 490" Supercharged FE (9.35 @ 151)
- 1964 Ford Galaxie, Drag Week 2009 Winner Modified NA (9.50s @ 143), 585" SOHC
- 1969 Shelby Clone, Drag Week 2015 Winner Modified NA (Average 8.98 @ 149), 585" SOHC


babybolt

  • Hero Member
  • *****
  • Posts: 516
    • View Profile
Re: FE Intake Adapter
« Reply #112 on: May 27, 2013, 02:58:13 PM »
Jay, foundries usually shot peen cast aluminum before releasing the castings to the customer.  Sometimes stainless shot is used because steel shot may rust while not in use and stain the castings.  If the foundry is close by they may agree to re-shot peen the castings.  Or you could try the wheel cleaner stuff available at the local auto parts store but that would be a lot of work for 50 castings.

I don't think you could do your own shot peening at home with a siphon type blast cabinet.

Glass beading is usually not a good method to use on cast aluminum because it opens the pores and makes the surface more porous.  And if there is even the smallest of pits on the surface it will open them up and could make your castings look bad.  Shot peening does the opposite.


jayb

  • Administrator
  • Hero Member
  • *****
  • Posts: 7426
    • View Profile
    • FE Power
Re: FE Intake Adapter
« Reply #113 on: May 27, 2013, 04:55:12 PM »
Both castings in the first photo were shot peened at the foundry, but the darker one was also heat treated prior to shot peening.  So I think I need to do something to improve the appearance of the intakes, because as is they are too dark.  I've never heard that glass beading opens up the pores and reveals defects on a cast aluminum part; are you sure about that Doug?  Glass bead blasting has been done on cast aluminum parts like intake manifolds for years; I can't imagine there's any problem with it.  After I glass beaded the one casting, its appearance improved dramatically and there weren't any defects visible from the process.  In any case though, I don't plan on doing that kind of thing myself, my blast cabinet is definitely not up to that drill.  I just need to find out what should be done...

Jay Brown
- 1969 Mach 1, Drag Week 2005 Winner NA/BB, 511" FE (10.60s @ 129); Drag Week 2007 Runner-Up PA/BB, 490" Supercharged FE (9.35 @ 151)
- 1964 Ford Galaxie, Drag Week 2009 Winner Modified NA (9.50s @ 143), 585" SOHC
- 1969 Shelby Clone, Drag Week 2015 Winner Modified NA (Average 8.98 @ 149), 585" SOHC


thatdarncat

  • Hero Member
  • *****
  • Posts: 1870
    • View Profile
Re: FE Intake Adapter
« Reply #114 on: May 27, 2013, 05:03:47 PM »
Looking good Jay. There is a place in Northeast Mpls I go called Sterling Supply that seems knowledgable, maybe you could see what advice they have. I do know some guys absolutely do not want a manifold that has been glass beaded on their motor. They worry about imbedded glass coming loose later. And it seems like it would be a lot of work for you. Personally the difference in shade wouldn't bother me.
Kevin Rolph

1967 Cougar Drag Car ( under constuction )
1966 7 litre Galaxie
1966 Country Squire 390
1966 Cyclone GT 390
1968 Torino GT 390
1972 Gran Torino wagon
1978 Lincoln Mk V

fe66comet

  • Guest
Re: FE Intake Adapter
« Reply #115 on: May 27, 2013, 05:11:50 PM »
Chemically cleaning with alumi-brite for semi trucks works quite well and is cheap. It is quick and can be applied with a pressure washer nozzle or a pump sprayer for lawn and garden use. Afterword it leaves a cast blast sort of finish....Jon

bartlett

  • Sr. Member
  • ****
  • Posts: 258
    • View Profile
Re: FE Intake Adapter
« Reply #116 on: May 27, 2013, 05:34:45 PM »
WOW ! amazing talent you have jay !   

 Is there going to be a combo of this that will run under hood ? I would love to run something custom like this,but I would need it under hood.   


fe66comet

  • Guest
Re: FE Intake Adapter
« Reply #117 on: May 27, 2013, 06:42:57 PM »
There are a zillion Ford 351 Cleveland intakes to select from, I am going with the trick flow EFI  intake for my 445 cube 390 with Edelbrock heads. I think Jay mentioned some others that could be made to fit also???....Jon


Speaking of which Jay are the plates pretty well going to be lined up with the 4v Cleveland pattern and I just port match or do I send the lower plenum to you to work your magic? I do not have the proper equipment at my disposal to do the work myself anymore.
« Last Edit: May 27, 2013, 06:54:51 PM by fe66comet »

jayb

  • Administrator
  • Hero Member
  • *****
  • Posts: 7426
    • View Profile
    • FE Power
Re: FE Intake Adapter
« Reply #118 on: May 27, 2013, 06:55:52 PM »
Is there going to be a combo of this that will run under hood ? I would love to run something custom like this,but I would need it under hood.

The Edelbrock 351C Air Gap Performer RPM and the Edelbrock 351C Torker II come to mind as manifolds that will fit under the hood.  Some of the Yates style intakes, like the Edelbrock 2991 and 2865 might also fit, depending on the hood clearance.  The Weiand tunnel ram will NOT fit under the hood  ;D
Jay Brown
- 1969 Mach 1, Drag Week 2005 Winner NA/BB, 511" FE (10.60s @ 129); Drag Week 2007 Runner-Up PA/BB, 490" Supercharged FE (9.35 @ 151)
- 1964 Ford Galaxie, Drag Week 2009 Winner Modified NA (9.50s @ 143), 585" SOHC
- 1969 Shelby Clone, Drag Week 2015 Winner Modified NA (Average 8.98 @ 149), 585" SOHC


babybolt

  • Hero Member
  • *****
  • Posts: 516
    • View Profile
Re: FE Intake Adapter
« Reply #119 on: May 27, 2013, 08:45:46 PM »
Jay, yeah, if the casting is crappy glass beading will make it worst.  Way back in the day when I bought a new Offy Port-O-Sonic it was glass beaded and always stained badly with gas, etc until I learned to spray it with WD40 regularly.

If you find the right chemical, whether it is aluminum wheel cleaner, A/C fin cleaner used for roof top units, or toilet bowl cleaner, etc, maybe get enough of it to dip the whole intake.  The heat treatment company must be using a solution heat treating, ask your foundry about that, maybe they are recycling it too much.  Reminds when I took several Autolite 2100's to my local machine shop to run through their hot spray washer and they came out permanently stained dark - when I asked them about it they said did not have time to change the fluid (hot water with detergent) out for new stuff.  BTW, the detergent they use is basically commercial dishwashing powder.

Some years ago their was a website that listed all of the 351C intakes available at that time, about 100.  Except one intake that I have never seen but only heard about, DST made one with a removable top to convert it from a two, four barrel or trii-power.  And since then, Edelbrock, some Australian companies and other have released more Cleveland intakes.