Author Topic: 1962 F100 unibody drag truck  (Read 45667 times)

0 Members and 1 Guest are viewing this topic.

KMcCullah

  • Hero Member
  • *****
  • Posts: 733
    • View Profile
Re: 1962 F100 drag truck
« Reply #30 on: March 23, 2018, 10:39:09 AM »
We finished tacking together the drivers side header last weekend. It went fairly quickly after we developed a few assembly methods. And after that it became pretty fun actually.

 First we layed out our mandrel bends on a couple pieces of cardboard with marks every 22-1/2 degrees. Any bend that needed something finer than 22-1/2 degrees we made notes on so we could easily replicate it for the passenger side. I think we had 2 bends that came out less than 22 1/2 degrees. Another couple of handy visual reference items were pieces of mechanics wire cut to our different tube lengths, 10" and 14". We would bend them to the shape we thought we needed and then eyeball it. Bend and repeat. Much better than the Shop Vac hose we started with. We left the collector a slip fit, so I can pull the tubes off to TIG weld individually. So far we've got about 8 hours into the project.


« Last Edit: February 29, 2020, 04:42:00 PM by KMcCullah »
Kevin McCullah


KMcCullah

  • Hero Member
  • *****
  • Posts: 733
    • View Profile
Re: 1962 F100 drag truck
« Reply #31 on: March 26, 2018, 12:12:20 PM »
We tacked the passenger side header together last weekend. It went a lot faster than the drivers side. Mainly due to having all the pieces already cut. As we made the drivers side we cut the tubes for the passenger side once we were sure how each tube needed to be cut. It took us about 4 hours to tack it all together. And it came out much better than the drivers side too. Now its gonna be interesting to see how long it takes to TIG all the joints.

Don't be afraid of trying to build a pair of headers guys. All it takes is some imagination and fab experience. We spent months talking about it. And not much time actually building. We had a good laugh about what a huge, pain in the ass project we thought these headers were gonna be. Neither one of us had ever tried to build a set of headers. So it seemed like a bigger deal than it really was. In the end, this was a really fun and rewarding part of this project.

 
« Last Edit: February 29, 2020, 05:04:19 PM by KMcCullah »
Kevin McCullah


jayb

  • Administrator
  • Hero Member
  • *****
  • Posts: 7400
    • View Profile
    • FE Power
Re: 1962 F100 drag truck
« Reply #32 on: March 26, 2018, 04:40:28 PM »
I love building headers, at least the first side.  By the time I get to the second side it seems like a little less fun.  But I agree, with the mandrel bent tubing available now, and some basic welding experience, building headers is not that tough and it is very rewarding.  Your headers look great, Kevin!

By the way, building step headers is even easier than regular headers, because at the step you can just slide one tube over the previous one, rather than trying to cut them to line up for a good butt weld.  On my race car I did 3 step headers and actually taped most of them together with duct tape before starting to tack weld.
Jay Brown
- 1969 Mach 1, Drag Week 2005 Winner NA/BB, 511" FE (10.60s @ 129); Drag Week 2007 Runner-Up PA/BB, 490" Supercharged FE (9.35 @ 151)
- 1964 Ford Galaxie, Drag Week 2009 Winner Modified NA (9.50s @ 143), 585" SOHC
- 1969 Shelby Clone, Drag Week 2015 Winner Modified NA (Average 8.98 @ 149), 585" SOHC


KMcCullah

  • Hero Member
  • *****
  • Posts: 733
    • View Profile
Re: 1962 F100 drag truck
« Reply #33 on: March 26, 2018, 10:27:44 PM »
By the way, building step headers is even easier than regular headers, because at the step you can just slide one tube over the previous one, rather than trying to cut them to line up for a good butt weld.  On my race car I did 3 step headers and actually taped most of them together with duct tape before starting to tack weld.

Thanks for the kind words, Jay. We had miles of room compared to being confined to inside the frame, so we got little curvy.

 It's funny, dad and I had this same discussion. We both can't imagine NOT building stepped headers. Lol Building headers with just one size of primary tube would take a lot longer, especially if mandrel bends were used. The ends have to be square. And the tube has to be round. A guy with a tubing bender would have an advantage here. But having the ability to overlap the tubes is a handy thing. You can telescope, rotate and wiggle. If your bends are fairly rational, everything just lines up.
« Last Edit: March 26, 2018, 10:34:37 PM by KMcCullah »
Kevin McCullah


cjshaker

  • Hero Member
  • *****
  • Posts: 4449
    • View Profile
Re: 1962 F100 drag truck
« Reply #34 on: March 26, 2018, 11:31:08 PM »
We had miles of room compared to being confined to inside the frame, so we got little curvy.

Yeah, a little bit of an advantage when you can stand there and do the work in the open, with no linkage, inner panels or anything else to work around ;)

The headers look good. Nice job.
Doug Smith


'69 R-code Mach 1, 427 MR, 2x4, Jerico, 4.30 Locker
'70 F-350 390
'55 Ford Customline 2dr
'37 Ford Coupe

TimeWarpF100

  • Hero Member
  • *****
  • Posts: 683
    • View Profile
Re: 1962 F100 drag truck
« Reply #35 on: March 27, 2018, 01:16:36 PM »
Very Cool Build!

KMcCullah

  • Hero Member
  • *****
  • Posts: 733
    • View Profile
Re: 1962 F100 drag truck
« Reply #36 on: May 26, 2018, 10:07:43 AM »
One of the things we put on our list of projects for this build was a tilt front end. This is another one of those things that we've talked about doing for a long time. We just needed an appropriate build to try it out on. So here it is.


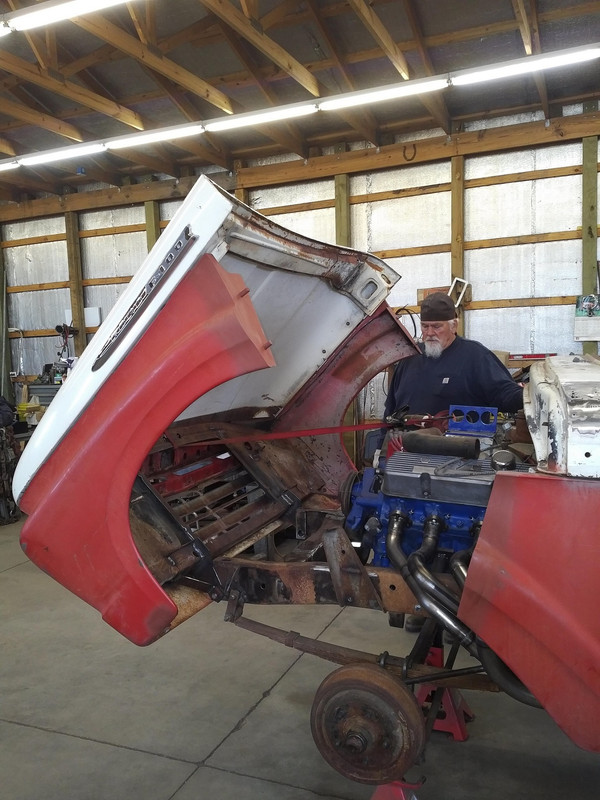
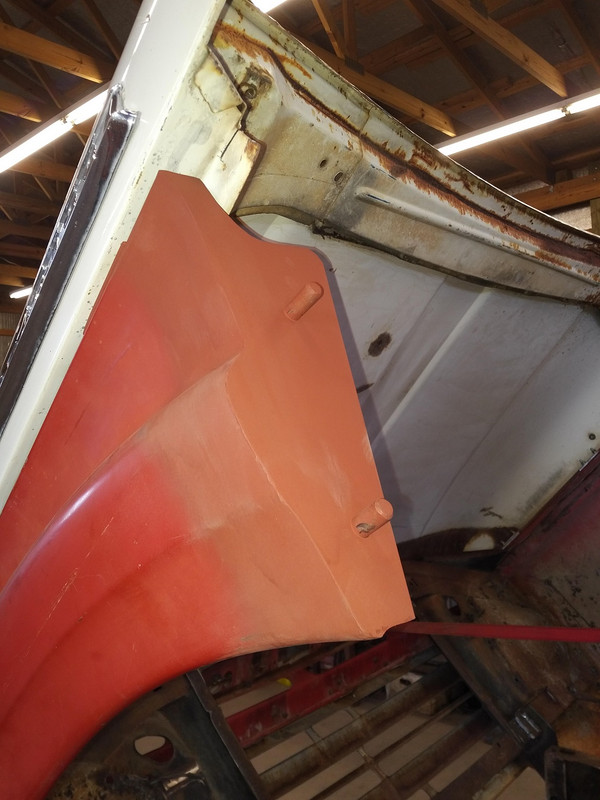
We cut all of the additional weight from the radiator support and the underside of the hood once we attached the hood to the fenders. To keep the body lines looking good we measured the thickness of the rubber stops that we're originally between the hood/fenders and made spacer blocks to bolt thru.


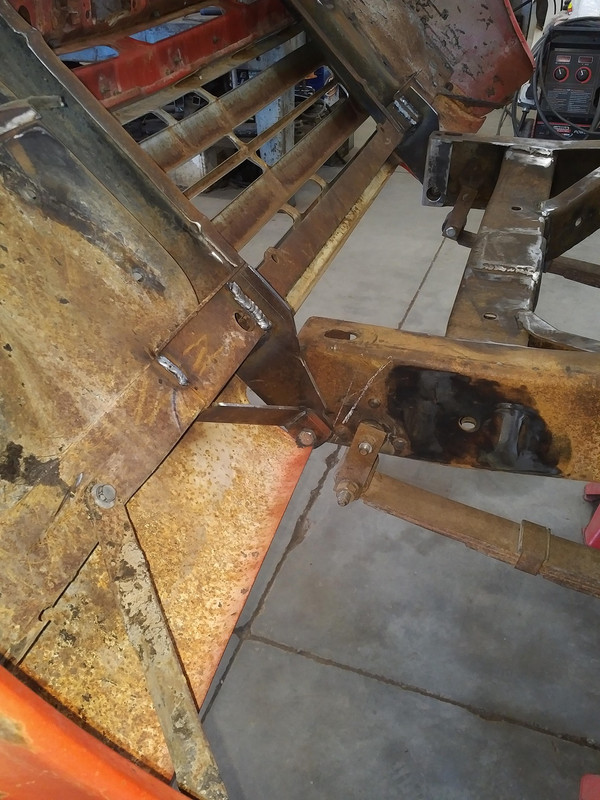
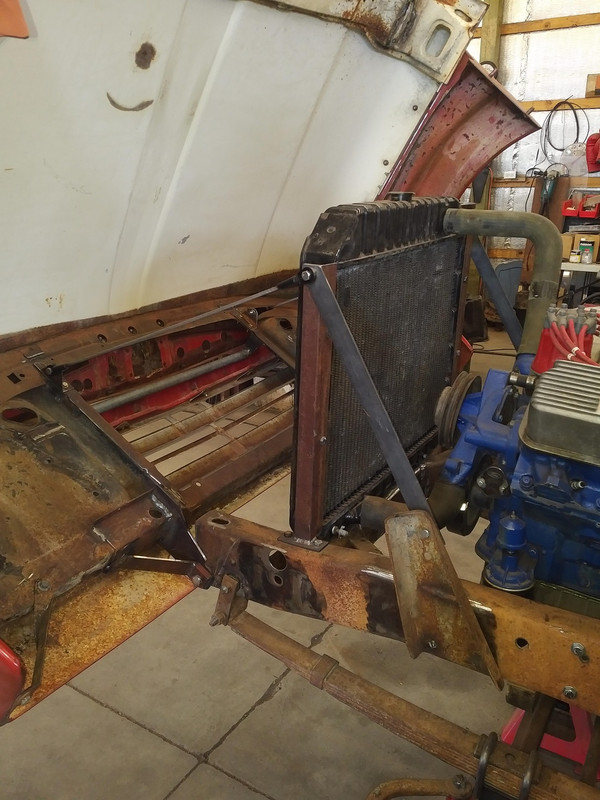
The frame horns were left just long enough to accommodate the bosses for the pivot point. Damn....we cut up tons of cardboard making templates for the pivot brackets. I think we had 4 or 5 versions before settling on the one in the pics. We welded them directly to the bottom of the radiator support.


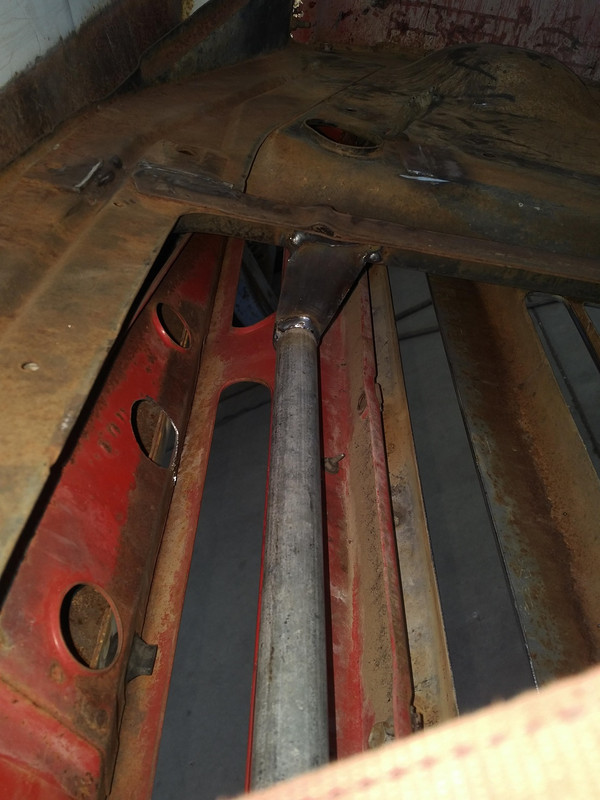
Once we had front clip tilting, we identified our next issue. The grill was NOT up to the stress of being yanked on when opening the hood. So we tucked a piece of 3/4 pipe behind the grill and made a couple of little brackets to attach the pipe to the radiator support. Now you wrap your fingers around the pipe to tilt the hood.


The radiator is a NOS unit that was still in its '70 something box. One of dad's estate sale treasures. We fabbed up a few brackets and ran some stiffeners down to the shock brackets. Then we attached our stop cables to the top of the radiator support brackets.


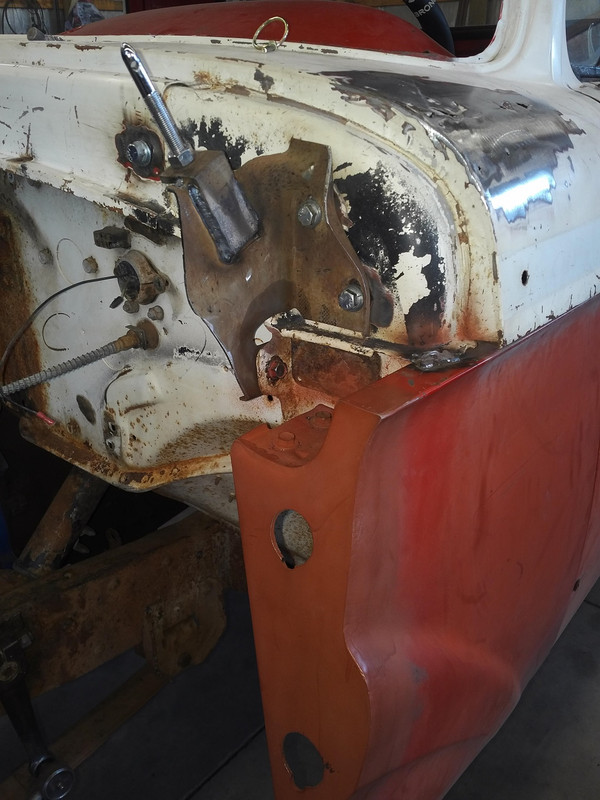
The old hood hinge brackets became the hood pin brackets. They also help support the hood.


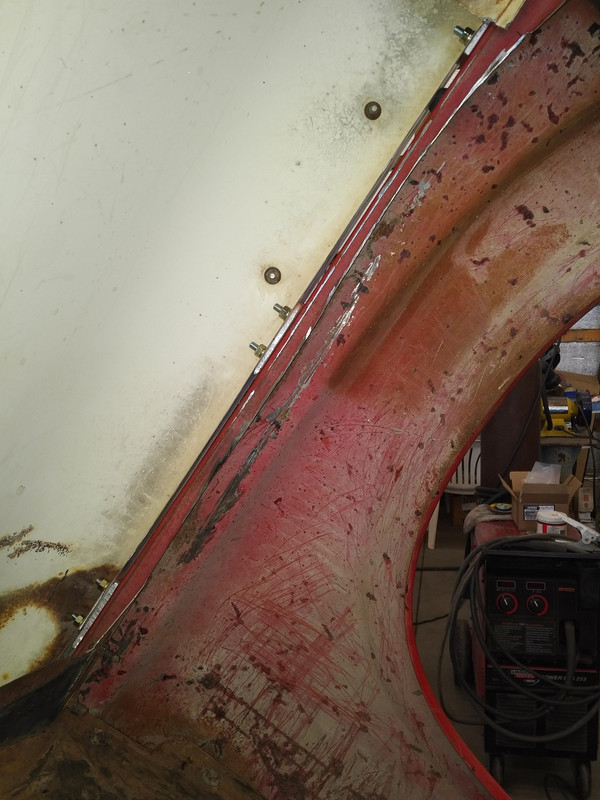
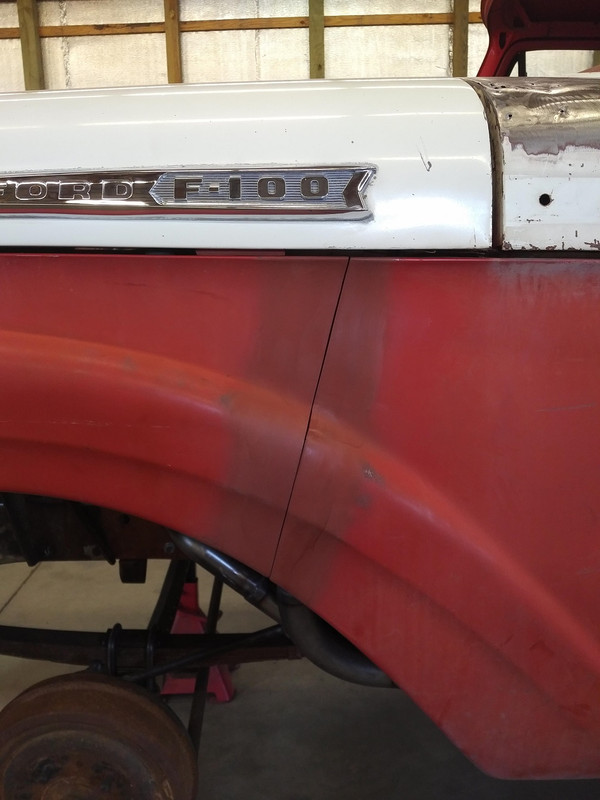
We wanted to make sure the parting line between the fender halves was as straight and clean as possible. So dad came up with a nifty way of doing this. He cut a 1/4" inch gap out of the fenders and made some 1/8" inch alignment pieces to weld back on each fender half. Pretty slick.


We're winding down on the fab work finally. Our next big step will be blowing the truck back apart and sand blasting the frame.


« Last Edit: March 14, 2020, 10:01:40 AM by KMcCullah »
Kevin McCullah


cjshaker

  • Hero Member
  • *****
  • Posts: 4449
    • View Profile
Re: 1962 F100 drag truck
« Reply #37 on: May 27, 2018, 07:18:29 PM »
I like it! Very nice work!
Doug Smith


'69 R-code Mach 1, 427 MR, 2x4, Jerico, 4.30 Locker
'70 F-350 390
'55 Ford Customline 2dr
'37 Ford Coupe

KMcCullah

  • Hero Member
  • *****
  • Posts: 733
    • View Profile
Re: 1962 F100 drag truck
« Reply #38 on: September 01, 2018, 12:32:07 PM »
Thanks Doug! It's been a ton of work getting to this point.

We finally got all the fab work done! We took some extra time and welded all of the holes in the firewall. On to tear down and sandblasting. And dads favorite, paint. He's pretty damn good at it.

We rigged up some tubing to lift the body off the frame. I welded a 3x3 tube to the hood pin brackets temporarily. Dad's winch truck worked great for this. The body was tied to the winch truck to keep it from swinging in the wind. It was left hanging for several weeks while we sandblasted and painted.


We chose our colors based on what was handy. The gloss red paint on the frame is about the same as the original F-100 XL truck. We didn't intend this. But kinda cool I think. The white paint on the firewall and underside is a satin finish. It was what we had. It's starting to grow on me actually.


I went through the front wheel bearings and brakes last weekend. New wheel cylinders and hoses. The brake shoes were probably 30 years old but were new. They still had writing on the surface that rubs the drums. The drums have been turned just .030. We have plans to go to disc brakes in the future. But for now the drums will have to do. May have to incorporate a parachute for this reason  ;D
« Last Edit: March 08, 2020, 07:41:45 PM by KMcCullah »
Kevin McCullah


jayb

  • Administrator
  • Hero Member
  • *****
  • Posts: 7400
    • View Profile
    • FE Power
Re: 1962 F100 drag truck
« Reply #39 on: September 02, 2018, 09:11:10 AM »
Looking good Kevin!  Nice to be working with clean, freshly painted parts...
Jay Brown
- 1969 Mach 1, Drag Week 2005 Winner NA/BB, 511" FE (10.60s @ 129); Drag Week 2007 Runner-Up PA/BB, 490" Supercharged FE (9.35 @ 151)
- 1964 Ford Galaxie, Drag Week 2009 Winner Modified NA (9.50s @ 143), 585" SOHC
- 1969 Shelby Clone, Drag Week 2015 Winner Modified NA (Average 8.98 @ 149), 585" SOHC


TimeWarpF100

  • Hero Member
  • *****
  • Posts: 683
    • View Profile
Re: 1962 F100 drag truck
« Reply #40 on: September 05, 2018, 09:32:01 AM »
Very cool project! Looking forward to seeing it done.

KMcCullah

  • Hero Member
  • *****
  • Posts: 733
    • View Profile
Re: 1962 F100 drag truck
« Reply #41 on: September 10, 2018, 02:29:50 PM »
Thanks for all the kind words and messages, guys. Will pass them along to dad. After all the work, it sure is nice to be putting this thing together "for keeps" finally.

We spent Labor Day finishing the rear end. The housing is what dad calls an "early big bearing" housing. Mark Williams made us some 31 spline axles with screw in studs to work with the housing.


I went through the brakes completely. New drums and wheel cylinders. All the emergency brake components were cleaned and reused.


 The 3rd member is from Moser. 4:57 Pro gears. Nodular case. Billet spool. We've built quite a few differentials over the years but this is the first one ever purchased ready to run. We typically shoot for a better contact pattern than what this chunk came with. (pinion appears a bit deep) But then again, this is the first set of pro gears we've ever seen too. So maybe they're slightly different to set up? What do you think guys?


« Last Edit: March 08, 2020, 07:45:24 PM by KMcCullah »
Kevin McCullah


turbohunter

  • Hero Member
  • *****
  • Posts: 2509
    • View Profile
Re: 1962 F100 drag truck
« Reply #42 on: September 10, 2018, 05:39:41 PM »
So cool you get to build a great project with your dad.
Awesome.
Marc
'61 F100 292Y
'66 Mustang Injected 428
'66 Q code Country Squire wagon


KMcCullah

  • Hero Member
  • *****
  • Posts: 733
    • View Profile
Re: 1962 F100 drag truck
« Reply #43 on: January 11, 2019, 03:56:30 PM »
Thanks Marc. Better late than never. :)

Minimal progress but it's better than none. We finally got our new tires and wheels. We went with steel wheels on back to save a few bucks. Had to roll it out in the sun for good look at it. Yep it's red. 8)


« Last Edit: March 23, 2020, 07:42:02 AM by KMcCullah »
Kevin McCullah


KMcCullah

  • Hero Member
  • *****
  • Posts: 733
    • View Profile
Re: 1962 F100 drag truck
« Reply #44 on: January 11, 2019, 04:16:25 PM »
We finally got our roller C6 done. What a long journey of modifications. No part went untouched.  First gear came out of a 4R100, it's quite a bit lower than stock. 2.72:1 I think. This should help get the heavy truck moving. The valve body is a manual with transbrake, reverse shift pattern, .400 pro tree unit from Broader Performance. The torque converter was made by a local guy. We'll be a couple of pleasantly surprised hillbillys if this hot mess actually works. Neither one of us has ever built a C6 before.


« Last Edit: March 14, 2020, 10:15:28 AM by KMcCullah »
Kevin McCullah