Author Topic: May 15, 2011 - The Road to Drag Week 2011  (Read 38546 times)

0 Members and 1 Guest are viewing this topic.

jayb

  • Administrator
  • Hero Member
  • *****
  • Posts: 7400
    • View Profile
    • FE Power
May 15, 2011 - The Road to Drag Week 2011
« on: May 15, 2011, 08:15:16 PM »
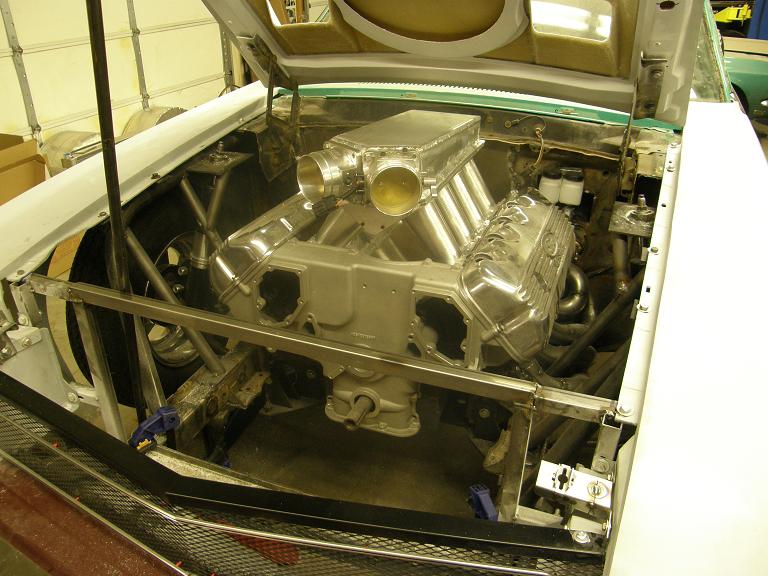
This week with help from a couple of friends I made a good dent in the bodywork on the car (pun intended).  Starting off the week, I took the sheet metal intake manifold off the jig and test fit it on the engine that is installed in the car.  It looks pretty cool on there; here's a picture:


Hopefully it will run as good as it looks.  Of course, the hood won't close with this manifold installed, so after getting it positioned on the engine I dug out the cut off wheel and started working over the hood.  This took a certain amount of intestinal fortitude, since the hood cost around $900, but I'd been planning on doing it all along so I just got in there and went to town.  First I laid out a pattern on the hood with a marker and started following the marks around with the cutoff wheel.  I repeatedly had to open and close the hood and trim the opening somewhat to clear the area around the throttle bodies, especially near the linkage arms.  I also had to cut away most of the fiberglass under the hood related to the factory ram air setup.  But finally I had an opening in the hood that the intake would fit through.

With the hood closed I measured and found that the intake stuck through the hood by about 2 1/2".  Part of my plan with this intake was to dyno test it with different runner lengths and plenum volumes, so I wanted to leave room over the top of the intake to add plenum volume and runner length in case that helped power production.  Thinking of the hood scoop, I decided I wanted to give myself an extra 2", so the hood scoop I build for the car would have to be 4 1/2" tall.  I also had to think about the width of the scoop.  I really wanted to make the scoop in such a way that it would pick up on the other style elements of the factory hood, particularly the NACA duct scoops on either side of the hood's center.  These ducts had body lines that were essentially straight front to back on the hood, and this would have been easy to build too, but the problem was the angle of the throttle bodies as they were mounted on the intake.  I had mounted them this way for clearance purposes.  If I had mounted them both in the same plane facing forward, they needed to be spaced pretty far apart for clearance between them.  The mounting I'd selected was more compact, but would require some room outboard of the throttle bodies for clearance for the air cleaners that mount on the throttle bodies.  So, the hood scoop couldn't really go straight back; it would have to have a lateral bulge in it where the throttle bodies were located.

By Friday this week I felt I had a pretty good idea on how I wanted the scoop to look, so Friday night I started getting the car ready for the bodywork.  I removed all the trim from the front of the car and set it aside, leaving only the fiberglass components.  In the rear of the car I removed the bumper and the taillight panel, and also the quarter panel end caps.  These needed to be scuffed prior to application of some body filler, because when they were aligned properly with the trunk lid they showed a mismatch of up to 1/4" with the quarter panel.  I also took out the rear end and four link setup, so the car was pretty much sitting stripped on the jackstands.  My plan is to do the bodywork with the car in this condition, and then after all the mud work, sanding, and priming is finished and the car is ready for paint, I'll clean and paint the undercarriage, reinstall the suspension, and roll it around into the booth.

My pals Steve and Jerry had promised to give me a hand with the bodywork on the car, but as it turned out this weekend Jerry was helping his son move, and Steve wasn't sure he could make it over because of some potential work obligations, and also because his house needed painting.  Fortunately for me, Steve's work over the weekend didn't pan out, and it was raining on Saturday making it impossible to paint the house, so he showed up at 9:00 AM ready to go on the bodywork.  Steve started out by grinding the welds on the quarter panels while I hung up plastic all around the area where the car was located, to try to keep the dust from the bodywork out of the rest of the shop.  After Steve was done with the grinding I fired up my sandblaster and blasted the recessed areas near the welds to make sure that everything was as clean as possible before applying the bondo.  This, of course, made a huge mess so I spent some time blowing off the car and sweeping the floor in the walled off area.  

Finally we were ready for the mud work.  I was trying out a new body filler called Rage Gold, which was supposed to sand a lot better than standard fillers.  Cost was around $45 for the gallon, which was about 3X the price of the standard Lite Weight body filler I had used before, but Jerry and Steve both said it was worth it, so we mixed it up and started with the quarter panel weld seams.  I had purchased a new air board and a new DA for this job, because my old stuff was on its last legs, but we ended up doing the quarter seams most by hand sanding with a board.  We also filled in the quarters towards the bottom rear of the wheelwell, where we'd previously extended the wheelwell somewhat to allow for a larger diameter tire.  Steve started going on the roof at that point, because there were some bumpy areas up near the windshield and on the sail panel on each side.  Digging into the front windshield pillar on the driver's side, Steve found that the car had been dinged up in that corner at one point, so he ground away all the old bondo.

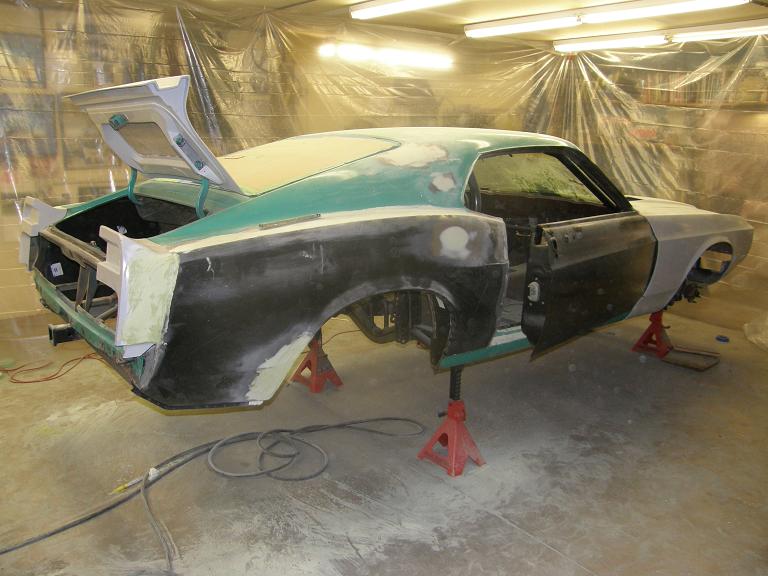
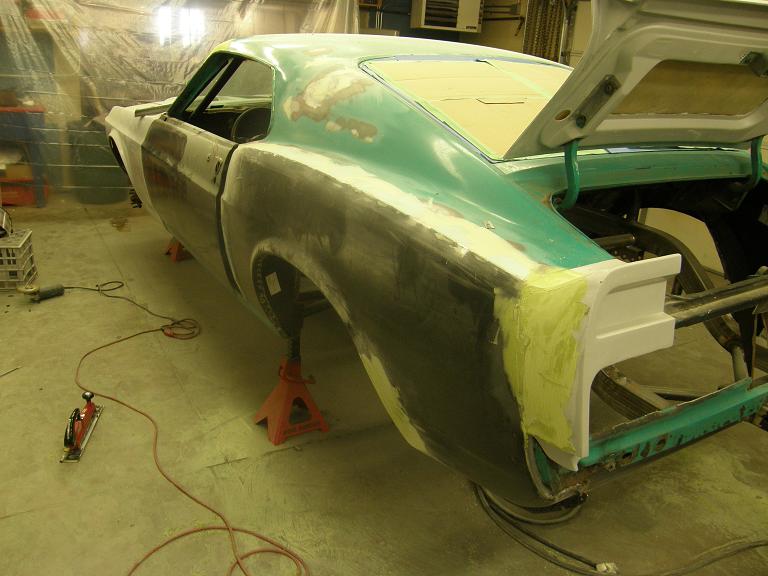
We worked until around 2:00 PM and then Steve had to go, but I took him out to lunch at Culver's first to thank him for his help.  When I came back I focused on the driver's side windshield pillar and the quarter panel end caps.  These were all going to require a significant thickness of bondo, and I had purchased a gallon of Duraglas for this purpose.  I spent the rest of the afternoon and some of Saturday evening working on these areas, and by the end of the night I pretty much had the whole car roughed in from a bodywork perspective.  Here's a couple of pictures of the car taken after I got done on Saturday evening:


Sunday I decided to try to get a start on the hood scoop.  I figured this would be a time consuming part of the project, and I wanted to at least get started on it so I could work on it in the evenings during the week.  My friend Denny was also going to stop by to pick up a copy of my book, so I figured I could draft him to help with the hood scoop, because it was going to require some hot wire foam cutting.

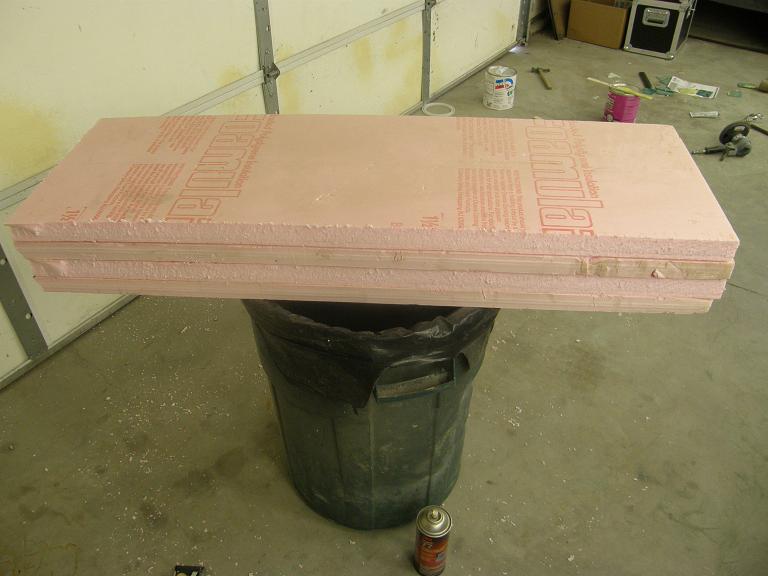
I was going back to my model airplane roots with this hood scoop.  I figured I would build a template for it using foam, and when I had this about right I would fiberglass over it with it positioned on the hood, then pull the foam out from underneath to the leave the shell of the scoop.  I started out with some spare 1 1/2" building foam I had left over from a remodeling project.  I cut the foam into four 16" X 48" sections, and glued them together into a block using 3M Super 77 spray adhesive.  Here's my hood scoop at this stage:


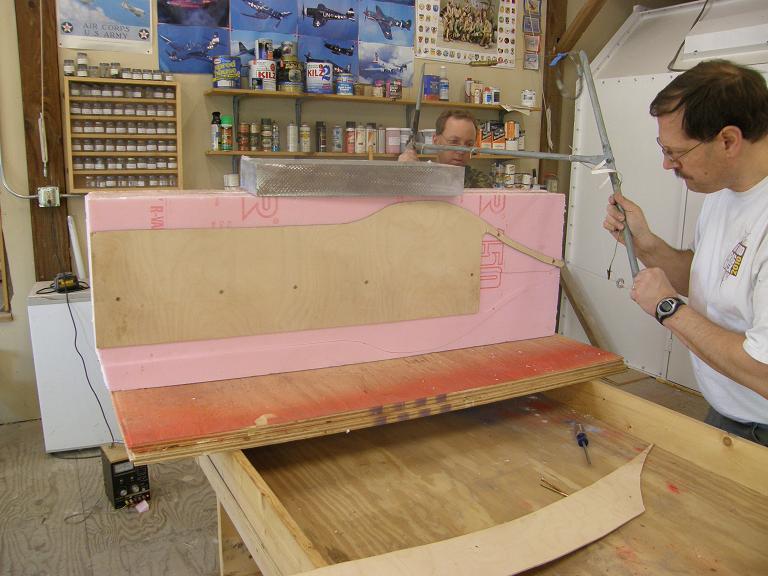
Next I drew some patterns on some old 1/8" aircraft plywood I had upstairs, to use as the guides for hot wire cutting the foam.  I had a basic shape and configuration for the scoop in mind after staring at the intake coming through the car's hood all week, so I drew that onto the plywood and cut it out on my wood cutting bandsaw.  These guides are then screwed to the side of the foam block, and used to guide the hot wire cutter.  Steve owns the cutter, and he'd brought it over to lend me this weekend.  Just about the time my friend Denny showed up I was almost done with the guides, so in short order Denny and I were using the hot wire cutter to cut out the foam block in the shape of the scoop.  Here's a couple of pictures, first with me and Denny using the hot wire, and then the scoop after it has been cut out, with the extra foam pulled away:


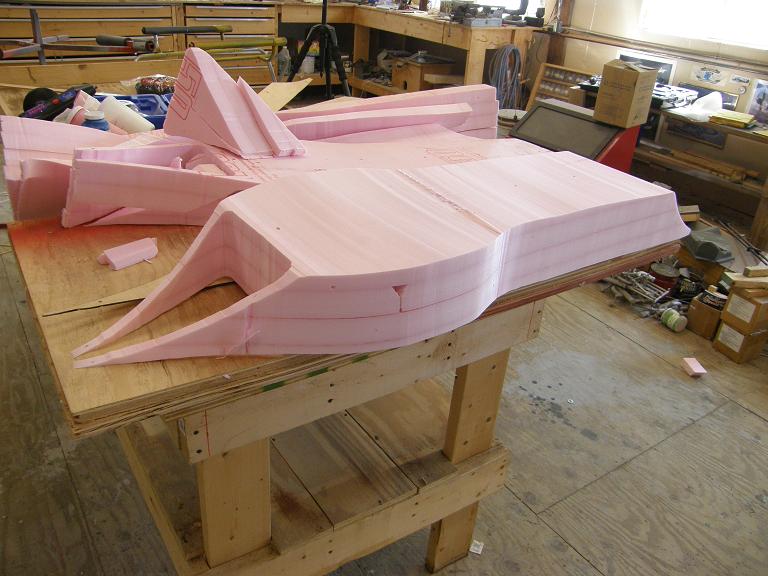
We test fit the scoop on the hood, and it seemed to fit the contour of the hood OK but it sure looked homely LOL!  The rest of the afternoon I spent working over the foam with a sanding block, trying to work it into the shape that I wanted.  Here's a picture of the hood scoop as it sits now:


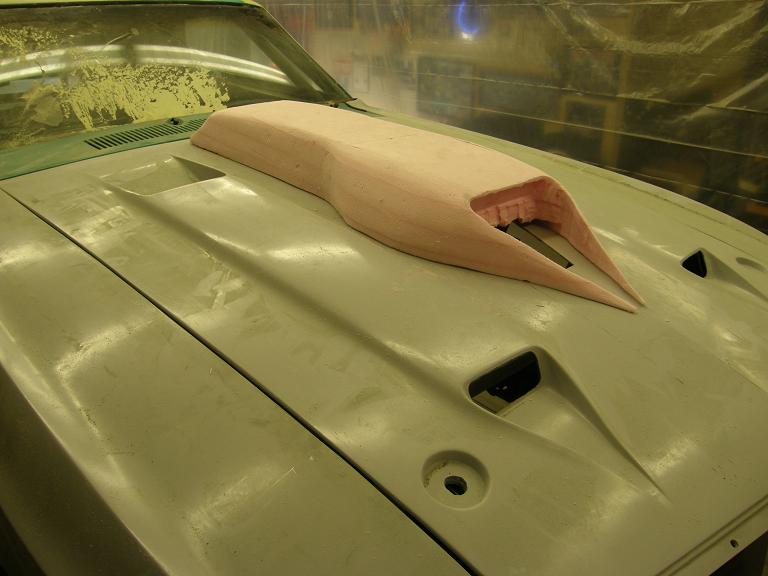
I'm still not quite happy with it.  I like the way the scoop's entry and exit reflect the other scoops on the hood, but the rounded area in the middle necessitated by the throttle body locations doesn't look that great.  I guess I'll have to live with that.  I'm also trying to decide whether to slope the rear of the scoop downward farther for appearance's sake.  

This week I'm planning on working the scoop a little bit more so I'm finished with roughing it out, and also getting some more body work done on the car, to the point where I can lay on the first batch of primer surfacer.  Next weekend I'll have limited time to work on the car, but I'm planning a big weekend of block sanding on Memorial Day weekend, and with luck the car will be ready for paint by Memorial day.  Then I can disassemble the removable panels and jam them in the booth, and also paint the undercarriage and get the suspension installed so that the car is ready for the move to the booth.  I'll post another update next Sunday.

« Last Edit: May 15, 2011, 08:19:23 PM by jayb »
Jay Brown
- 1969 Mach 1, Drag Week 2005 Winner NA/BB, 511" FE (10.60s @ 129); Drag Week 2007 Runner-Up PA/BB, 490" Supercharged FE (9.35 @ 151)
- 1964 Ford Galaxie, Drag Week 2009 Winner Modified NA (9.50s @ 143), 585" SOHC
- 1969 Shelby Clone, Drag Week 2015 Winner Modified NA (Average 8.98 @ 149), 585" SOHC


rcodecj

  • Sr. Member
  • ****
  • Posts: 474
    • View Profile
Re: May 15, 2011 - The Road to Drag Week 2011
« Reply #1 on: May 16, 2011, 12:59:45 PM »
I know you're not going to want to hear this but, what about moving the rear scoops outward, which would allow the middle scoop to be the same width all the way? Lots of work because you not only would have to move the rear scoops outward, you would have to recontour the raised part that connects the front scoop to the back. I'm not sure if it's even possible, not knowing what's underneath, but it sure would look better if the scoop was the same width all the way back. The easy way out would be to just get rid of the rear scoops, but I know you wanted to keep them.

Cyclone03

  • Sr. Member
  • ****
  • Posts: 338
    • View Profile
Re: May 15, 2011 - The Road to Drag Week 2011
« Reply #2 on: May 16, 2011, 04:36:23 PM »
Jay,
I understand the reason for covering the intake.
But is it required by rule?
If not the intake poking through the hood has to look better than that. I'm sorry bit your working around a lot of styling themes on that hood and adding the "Cobra Hood" shape with the NACA'ish opening just....looks...wonky.

I liked(I know,but you put the pics up) the "cover" better before it was shaped with the hard sharp strait lines,the taper just somehow draws a strange line to the eye....  


I know you already cut the hole,but it's glass rite?
Could you have cut inside the  "line" from the front scoop to the rear scoop,maybe 2" or so,then raised that cutout section and fillied the opening,adding some radias to blend it in.
Leave the center scoop intack,just blend the front down to the front edge of the hood,you could leave the rear open,cowl hood style or close it in. The old Camaro cowl hood comes to mind for the front,but more a"power bulge"(Mustang Cobra~2003 or so) type if it's closed in.

I know a ton of work and TIME.

Just let the intake hang out in the wind it's less work that way.

Hey look another edit...............
Ok I see the rear area behind the "head" is strait,so it's got to be that "Hood,snake head that just gives me that ugh........ 
« Last Edit: May 16, 2011, 04:50:25 PM by Cyclone03 »
Lance H

Pentroof

  • Guest
Re: May 15, 2011 - The Road to Drag Week 2011
« Reply #3 on: May 16, 2011, 06:54:41 PM »
I agree. Here's another vote for, well...uhm, perhaps a re-think.

Personally, I'd blend all the welds on the top section of the intake and then mill fins in the top and sides. Polish it up and then let it sit proud.

In my opinion, that scoop is not up to your own standards. I see where you're trying to go, but it's looking very retro...like something found on a metallic purple 1982 camaro.


Glenn N

  • Jr. Member
  • **
  • Posts: 35
    • View Profile
Re: May 15, 2011 - The Road to Drag Week 2011
« Reply #4 on: May 16, 2011, 07:16:03 PM »
Not an easy thing to re design.  ;D I kind of like the opening in front and how it mirrors the 2 on either side. I think I would have followed those contours more and not have the roundish bulge on the sides. It might look a little boxey but would follow the design of the hood better possibly. And as mentioned maybe taper the rear height down towards the back a tad. I'd shorten the "fangs" in the front maybe and spread them apart slightly. Smooth and taper the sides a little. All in all not a bad start.

Mario428

  • Guest
Re: May 15, 2011 - The Road to Drag Week 2011
« Reply #5 on: May 16, 2011, 07:44:05 PM »
Manifold looks great on the engine Jay. Put me down as a vote for hanging it in the breeze, run some tubing off the throttle bodies to your filters under the hood for the rain protection.
Body work sucks, did my T-Bird in a week, worst part of the whole project.
Leave the manifold just as it is, very very few people around who can do better and they would respect an amatuers efforts. Anyone cops an attitude say "Show me yours!!!!". LOL
« Last Edit: May 16, 2011, 07:47:29 PM by Mario428 »

jayb

  • Administrator
  • Hero Member
  • *****
  • Posts: 7400
    • View Profile
    • FE Power
Re: May 15, 2011 - The Road to Drag Week 2011
« Reply #6 on: May 16, 2011, 08:44:35 PM »
Thanks for the comments, guys.  Covering the intake is not required by the rules, but I kind of hate to leave it hanging out in the breeze.  One reason is that when it rains (and on Drag Week it will, and hard), the engine compartment is going to get totally flooded with a big hole in the hood.  It will be bad enough with just the scoop opening.  The other reason is that the local police will be much more drawn to a car with a big hunk of the motor hanging out of the hood than one with just a body colored scoop visible.

Nevertheless, I see the point about the appearance of the hood scoop.  That rounded area is just not right, and I don't think I'm going to be able to fix it.  So, tonight I went off on a different approach.  I figured out how I could reposition the throttle bodies so that the are close together and point straight forward, rather than angled off to the side like I have them now.  I even CNC'd the front mounting plate already to test how this will work, and it looks like if I cut the front off the intake and replace it with the flat plate, I can make the scoop go straight back without the unsightly bulge in the middle.

I'm going to cut another foam template this week to see how this looks.  I'll post a picture on the blog entry this week, and would appreciate any comments.  If it still doesn't look that great, I may end up letting the intake hang out of the hood anyway...
Jay Brown
- 1969 Mach 1, Drag Week 2005 Winner NA/BB, 511" FE (10.60s @ 129); Drag Week 2007 Runner-Up PA/BB, 490" Supercharged FE (9.35 @ 151)
- 1964 Ford Galaxie, Drag Week 2009 Winner Modified NA (9.50s @ 143), 585" SOHC
- 1969 Shelby Clone, Drag Week 2015 Winner Modified NA (Average 8.98 @ 149), 585" SOHC


rcodecj

  • Sr. Member
  • ****
  • Posts: 474
    • View Profile
Re: May 15, 2011 - The Road to Drag Week 2011
« Reply #7 on: May 16, 2011, 09:51:34 PM »
Repositioning the throttle bodies sounds like a great idea. I do think you might regret not having it covered when driving long distance.
Here's another vote for shortening up the "fangs" on the front of the scoop.  While they are proportional in length to the others, with the taller scoop, I think they would look better a bit shorter, (2-3 inches at most).

Cyclone03

  • Sr. Member
  • ****
  • Posts: 338
    • View Profile
Re: May 15, 2011 - The Road to Drag Week 2011
« Reply #8 on: May 16, 2011, 09:53:48 PM »
Are you going to have it breath underhood or from the top via the scoop?

Maybe to lessen the waterfall you can make a dam around the opening,about 1 inch or so would probably work well,while letting the top of the intake show.

If it ends up wanting longer runners,can you swap them at the track like the stacks on the Gal.? If so 2-2 1/2" of the intake sticking out will be much less noticeable than a scoop 6" off the hood,that looks like......

+10 on machining ribs into the top,maybe the sides too...  

If you can find some pics of the old front engine dragsters,they made a little "windscreen" type fairing infront of the engines,a shape like that in front of the intake would look clean... 
« Last Edit: May 16, 2011, 09:59:58 PM by Cyclone03 »
Lance H

plovett

  • Guest
Re: May 15, 2011 - The Road to Drag Week 2011
« Reply #9 on: May 16, 2011, 10:08:23 PM »
What if you left the intake sticking through the hood and uncovered, but had a scoop or just a cover that could be installed only in case of rain.  A temporary cover wouldn't have to be pretty, just keep the water out.

Just a thought,

paulie

cammerfe

  • Hero Member
  • *****
  • Posts: 1654
    • View Profile
Re: May 15, 2011 - The Road to Drag Week 2011
« Reply #10 on: May 17, 2011, 01:18:12 PM »
If you had a plain hood, the idea of allowing the manifold to stick through would have merit. But you have a hood that's all laid out with NACA ducts, etc, and just leaving a hole will simply create an impression of butchery. Your scoop design really does need a certain amount of development to look right, but you are on the right track.

KS

Glenn N

  • Jr. Member
  • **
  • Posts: 35
    • View Profile
Re: May 15, 2011 - The Road to Drag Week 2011
« Reply #11 on: May 17, 2011, 04:24:38 PM »
BTW I forgot the say the intake looks great!! Really nice job on everything so far.

country63sedan

  • Jr. Member
  • **
  • Posts: 96
    • View Profile
Re: May 15, 2011 - The Road to Drag Week 2011
« Reply #12 on: May 17, 2011, 09:26:33 PM »
Hey Jay. The intake looks good. The opening of the scoop looks like a good match to the other scoops, The rounded part just doesn't fit in with the other lines,  what if it was angled instead of rounded? Maybe some harder, more angular lines would fit the surroundings better. Just my opinion, take it for what its worth. Looks like the progress is coming along pretty good. Later, Travis.

jayb

  • Administrator
  • Hero Member
  • *****
  • Posts: 7400
    • View Profile
    • FE Power
Re: May 15, 2011 - The Road to Drag Week 2011
« Reply #13 on: May 18, 2011, 08:17:30 AM »
If you had a plain hood, the idea of allowing the manifold to stick through would have merit. But you have a hood that's all laid out with NACA ducts, etc, and just leaving a hole will simply create an impression of butchery. Your scoop design really does need a certain amount of development to look right, but you are on the right track.

KS

Ken, you kind of hit another point that I wasn't able to verbalize earlier, and that also is playing into my decisions on the hood scoop.  I'd like the car to reflect a stockish appearance, even though it will have a huge bulge in the hood compared to the stock version.  The manifold sticking through the hood is not really stockish.

So I think I've come up with a new plan now.  This hood scoop thing is kind of reminding me of all the twists and turns I went through as I was developing the plan for the intake manifold itself, and in the end I was happy with the intake, so hopefully the hood and hood scoop will turn out OK also.  Paulie suggested a removable cover on the hood, and that got me thinking about making the hood scoop a bolt on deal, instead of glassing it to the existing hood.  This would have several advantages for me.  One is that I'm not constrained to get the scoop done right away; I can just finish the hood, get the car painted, and leave the scoop for later.  This has some schedule advantages, of course, because I can see myself spending a couple weeks just getting the hood scoop right.  If I leave the scoop itself for later, there is some work that I will have to do to the hood, including getting the opening for the intake trimmed up properly, and also making the bottom of the scoop opening, which will have to countersink into the hood in front of the scoop, just like the other two front hood openings do.  But I have the existing center scoop that has already been cut out of the hood as a starting point for that, so I don't think that will be a big time consuming task like making the scoop itself.  The second advantage is that doing the scoop later buys me some time, so I can actually do it right, by building the foam plug, then making a mold, and then pulling the finished scoop from the mold.  This will be lighter than doing it the way I have been planning up to now.  A third advantage is that I can get the dyno work done on the intake before I finalize the scoop.  It may be that I don't need to add spacers to the plenum to get the most power out of the manifold, in which case the hood scoop can be shorter; if I build it now I have to design for a potentially taller manifold.  Finally, another advantage is that when I switch to the twin turbo engine for this car, the existing scoop can be unbolted from the hood, and a different scoop can be made up to fit the different intake manifold that will be required for the turbo motor.

I can design the scoop to include small studs in the bottom, so that I can drill small holes in the hood to mount the scoop with nuts underneath.  This would make it appear pretty seamless from the top, and if I wanted to remove the scoop I could just fill the holes with some rubber plugs and I think they would be relatively unobtrusive.

Right now this sounds like the best approach.  Coupled with moving the throttle bodies to point straight forward instead of off to the side, the scoop can go straight back without the bulge in the middle, and I can get it all finished and make sure I like it before I put it on the car.  And if I don't like it, I can leave it off and just have the manifold poking through, and live with it like that.  Thanks to all you guys for the comments on this; the ideas have been great for steering me straight on the scoop project.
Jay Brown
- 1969 Mach 1, Drag Week 2005 Winner NA/BB, 511" FE (10.60s @ 129); Drag Week 2007 Runner-Up PA/BB, 490" Supercharged FE (9.35 @ 151)
- 1964 Ford Galaxie, Drag Week 2009 Winner Modified NA (9.50s @ 143), 585" SOHC
- 1969 Shelby Clone, Drag Week 2015 Winner Modified NA (Average 8.98 @ 149), 585" SOHC


cdmbill

  • Newbie
  • *
  • Posts: 13
    • View Profile
Re: May 15, 2011 - The Road to Drag Week 2011
« Reply #14 on: May 18, 2011, 01:19:47 PM »
Jay, given the 'stockish' idea which I agree with, given how great everything else looks have you considered a rear facing 'cowl' type setup. Yes that is exactly what I have on the '71 but it can more cleanly reflect the original design with the rising clearance towards the back. It also works well in the rain (you know how I know) and lets you conceal other things, in my case six gauges so the interior looks as close to a street car as possible.

Its not as original to the 69 Shelby look but you could retain the center NACA duct even if it exits behind the intake.

You could hang the throttle bodies off the back of the manifold and pick up isolated external fresh air via rear mounted filters. On mine this has shown a 40 degree drop in IAT as the car moves down track in typical conditions. Not as cool when you open the hood, but easier to work on and better functionality. My $.02.

BTW the manifold looks great and the process you've shared is priceless.