Author Topic: My 427 SOHC Build..... Finally the time has come!  (Read 775886 times)

0 Members and 1 Guest are viewing this topic.

R-WEST

  • Full Member
  • ***
  • Posts: 136
    • View Profile
Re: My 427 SOHC Build..... Finally the time has come!
« Reply #1320 on: February 05, 2016, 08:34:25 PM »
I keep checking this thread, and have reached two conclusions:

Jason - you are the epitome of perseverance!!  8)

Jay - you rock!!  8)


turbohunter

  • Hero Member
  • *****
  • Posts: 2509
    • View Profile
Re: My 427 SOHC Build..... Finally the time has come!
« Reply #1321 on: February 05, 2016, 08:49:38 PM »
What he^^^^ said.
Marc
'61 F100 292Y
'66 Mustang Injected 428
'66 Q code Country Squire wagon


jayb

  • Administrator
  • Hero Member
  • *****
  • Posts: 7405
    • View Profile
    • FE Power
Re: My 427 SOHC Build..... Finally the time has come!
« Reply #1322 on: February 07, 2016, 11:14:12 PM »
Just a quick update on this project.  This weekend I was able to get the short block assembled; pic below:


Also, we got the cam bearings, and I picked up the heads at the machine shop.  Here's a picture of one of the heads:


The heads now have Brodix ductile iron seats, rather than the original powdered metal seats that chipped apart.  New guides have also been installed, and honed to the valve stem diameter.  We have new valves to install and a new valve job, new springs and retainers, and the machine shop honed the T&D rockers for the correct clearance fit on the new rocker shafts.  Before assembling the heads we need new spring seats, valve seals, and valve locks; those should be coming this week.  So at this point I expect to have the heads assembled and the heads and backing plate on the engine next weekend.

One delay has come from Comp Cams, where they are currently out of the cores they use to grind the SOHC camshafts.  The cores were supposed to come in mid January, but the latest from Comp is that they have now been delayed until the end of February.  So it looks like it will be another month before the engine is completely together and ready for the dyno.  With the extra time I'm going to make some modifications to Jason's rear sump oil pan, to increase the capacity by a couple quarts and also to tie the front and rear sections of the pan together with a #12 AN line, to make sure we don't leave a whole bunch of oil just sitting there in the front sump.

I'll post another update next weekend - Jay
Jay Brown
- 1969 Mach 1, Drag Week 2005 Winner NA/BB, 511" FE (10.60s @ 129); Drag Week 2007 Runner-Up PA/BB, 490" Supercharged FE (9.35 @ 151)
- 1964 Ford Galaxie, Drag Week 2009 Winner Modified NA (9.50s @ 143), 585" SOHC
- 1969 Shelby Clone, Drag Week 2015 Winner Modified NA (Average 8.98 @ 149), 585" SOHC


jayb

  • Administrator
  • Hero Member
  • *****
  • Posts: 7405
    • View Profile
    • FE Power
Re: My 427 SOHC Build..... Finally the time has come!
« Reply #1323 on: February 14, 2016, 10:23:31 PM »
This weekend I was able to get the heads on Jason's engine assembled, and then installed on the block.  On the heads, I left checker springs on the #1 cylinder so I can check piston to valve clearance on that one once the engine is more completely assembled.  After that I can replace the checker springs while the engine is still assembled.  The work today went pretty much completely by the book, no real issues to deal with.  The valve spring compressor knicked my finger once  ::); I'm always getting smacked by that thing when the tension on the spring is released.  I re-used Jason's Cometic head gaskets, gave them a coat of NAPA Copper Spray-A-Gasket, and installed them with no issues. 

Next weekend I think I will get the backing plate installed, and maybe try to make some modifications to the oil pan to increase capacity of that rear sump.  We are still waiting for the cams from Comp, so once the backing plate is installed I don't really have much more I can do until the cams arrive.  Assuming the cams arrive end of February or beginning of March, I should be able to get the rest of the assembly done within a week, and get on the dyno with this engine.  Looking forward to that!   :D

Here's some pictures from the assembly today:


« Last Edit: February 14, 2016, 10:27:12 PM by jayb »
Jay Brown
- 1969 Mach 1, Drag Week 2005 Winner NA/BB, 511" FE (10.60s @ 129); Drag Week 2007 Runner-Up PA/BB, 490" Supercharged FE (9.35 @ 151)
- 1964 Ford Galaxie, Drag Week 2009 Winner Modified NA (9.50s @ 143), 585" SOHC
- 1969 Shelby Clone, Drag Week 2015 Winner Modified NA (Average 8.98 @ 149), 585" SOHC


jayb

  • Administrator
  • Hero Member
  • *****
  • Posts: 7405
    • View Profile
    • FE Power
Re: My 427 SOHC Build..... Finally the time has come!
« Reply #1324 on: February 21, 2016, 10:10:56 PM »
More progress on this project this weekend, but at this point I'm stalled until the new cams arrive.  Jason had emailed me earlier in the week, expressing some concern about the threads in the front of each head that hold the fuel pump gear and stand on one side, and the chain tensioner on the other side.  On Saturday morning I checked them and sure enough, they were looking pretty marginal.  I tested-tightened them and the threads pulled right out, so I heli-coiled both sides to address that issue.  Then I got the backing plate cleaned up and flattened out, and installed it on the engine.  Picture is below.  The engine is going to stay looking like this until the new cams arrive.
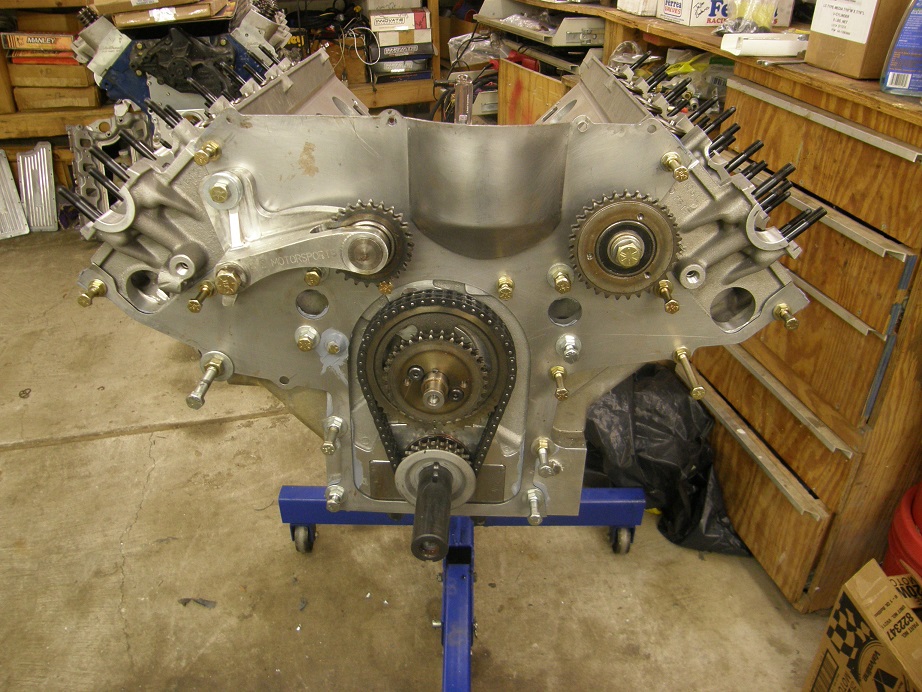


On Sunday I decided to tackle the oil pan project.  Because of the necessity of using a rear pan in Jason's installation, he is using a Canton pickup truck pan.  I have some experience with this pan, having used it on my first SOHC for my Galaxie back in 2008.  Unfortunately, it is not a good performance oil pan.  The oil volume that it contains is simply not enough to support one of these engines, and in fact when I dynoed with this pan in 2008, the oil pressure would nearly always fall off at the end of the pull, indicating that the engine was running out of oil.  I ended up removing the pan from the engine and adding some sheet metal to increase capacity, and then everything was fine.  I felt we should do the same thing for Jason's engine.  A picture of the pan before modifications is below:
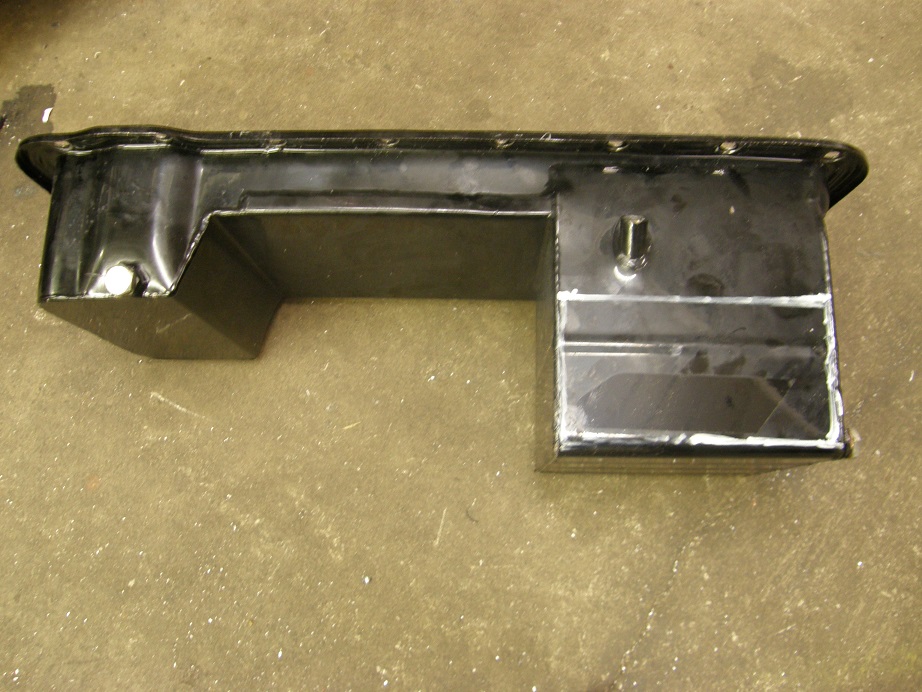


This is advertised as a six quart pan.  I did some calculations based on the measurements, and found that the front sump, where the oil pump goes, could hold 1.5 quarts, less the volume of the pump itself.  The rear sump, if filled all the way up to the flat bottom in the middle of the pan, would hold 5-1/2 quarts.  I wanted to increase the capacity of that rear sump, so that we could put 8-9 quarts in this engine and be sure we weren't running out of oil in the car. 

Jason had sent me a picture of the engine compartment in his car, so that I could see where the rear sump of the pan was located.  I took that picture and drew the outline of the existing sump in red, and then drew some kickouts I wanted to put on the sides of the plan in blue:
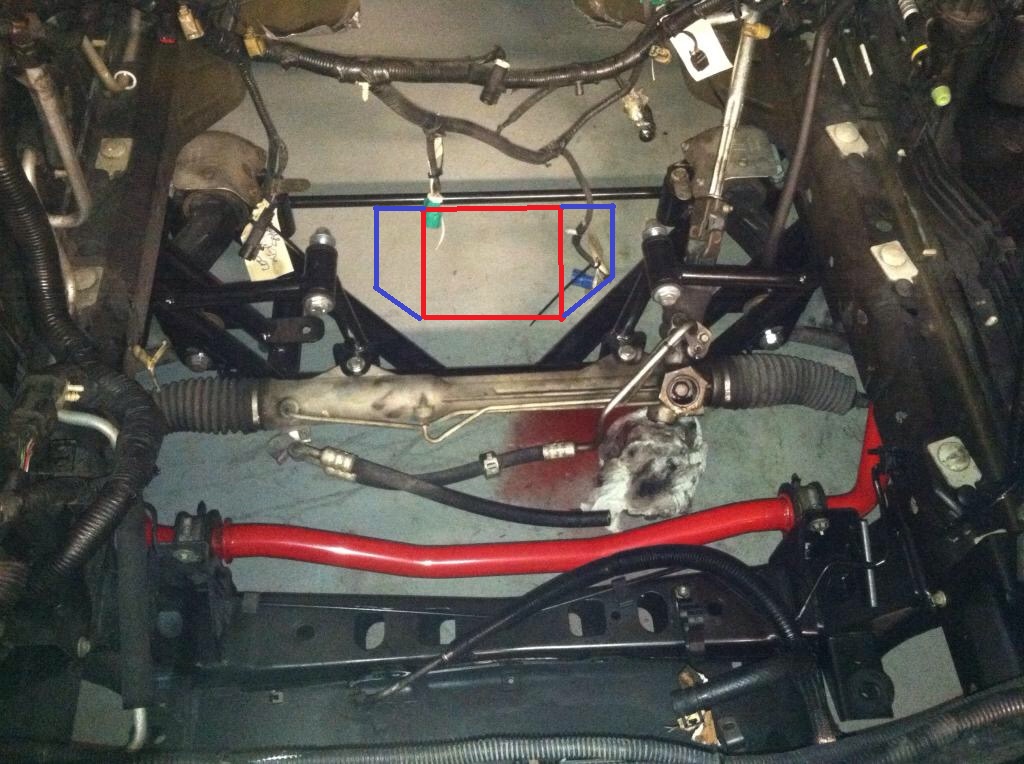


After making some measurements on the pan and calculating some volumes I decided to add kickouts that extended 3" on either side of the pan, and were 4" high.  This would add just about 2 quarts of capacity to the rear sump.  First step was to cut some windows in the side of the pan:
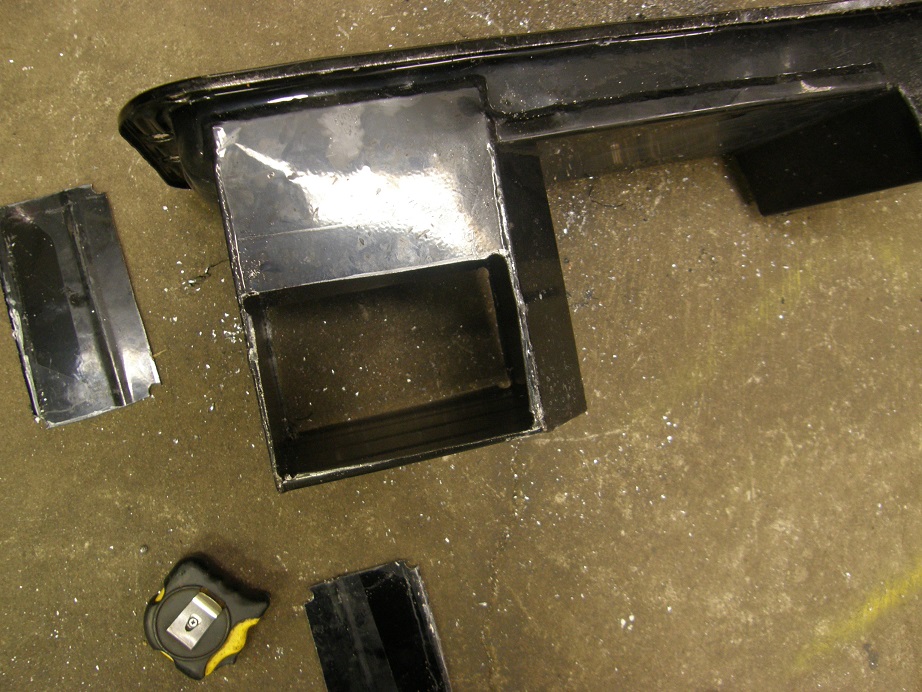


Next I took some sheet steel, and cut and bent it to shape in my brake, and tacked the pieces onto the pan:
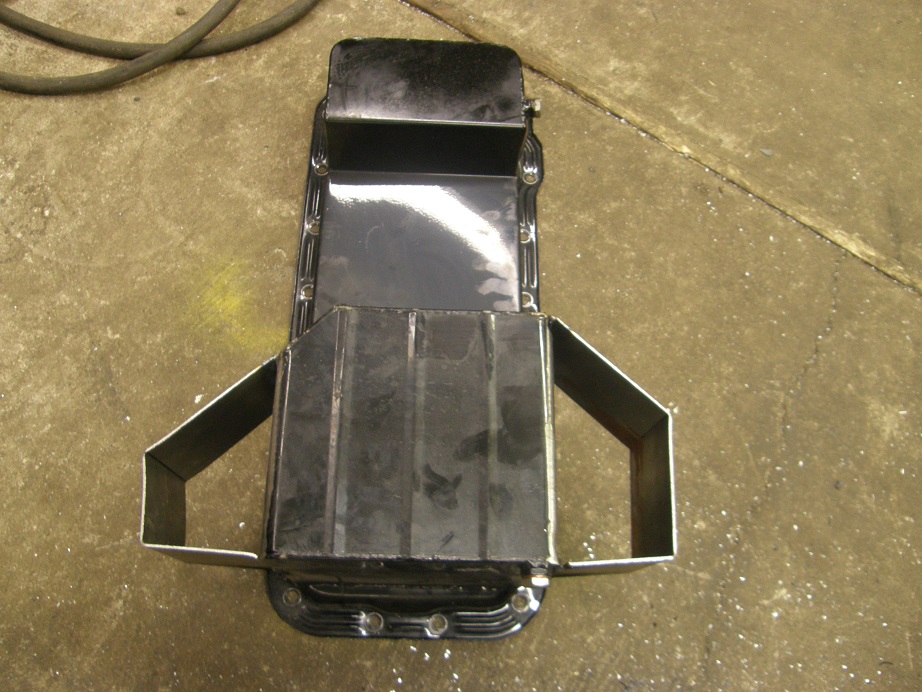


Notice how one side of the pan had that angle cut out of the corner as delivered.  I didn't want to take a chance on getting too close to the crossmembers under the car, so I just continued that angle.  It leaves the pan looking a little asymmetrical, but that won't matter.

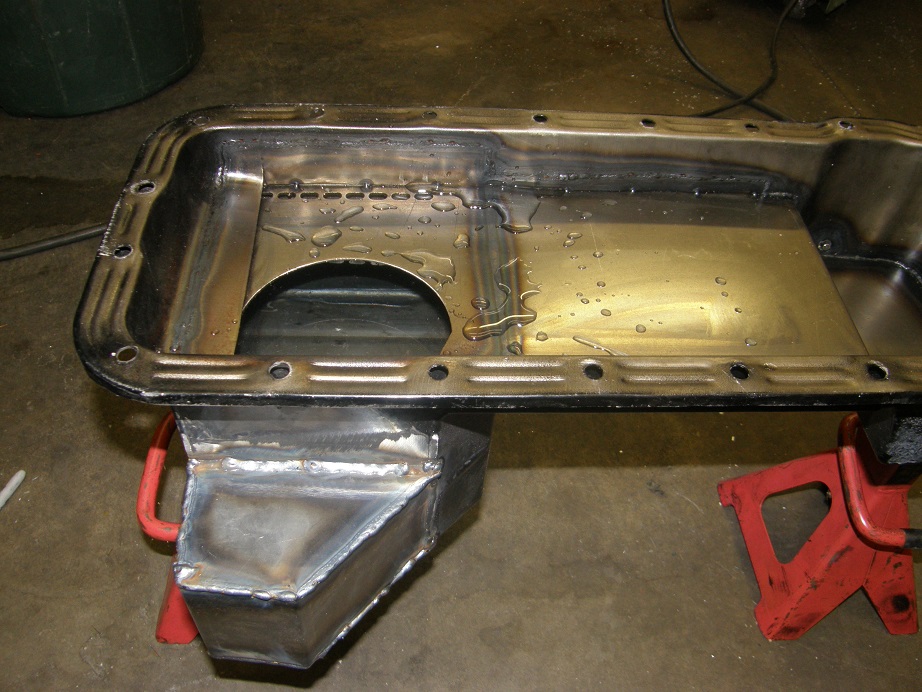
Next I cut the rest of the metal for filling in the top and bottom of the kickouts, and welded it all in place.  I've probably built 20 oil pans and gas tanks over the years, and after the initial welding I always fill them with water to check for leaks.  This is the first one I've done that didn't leak at all on the first test!  I couldn't believe it LOL!  Picture of the pan holding the water below:


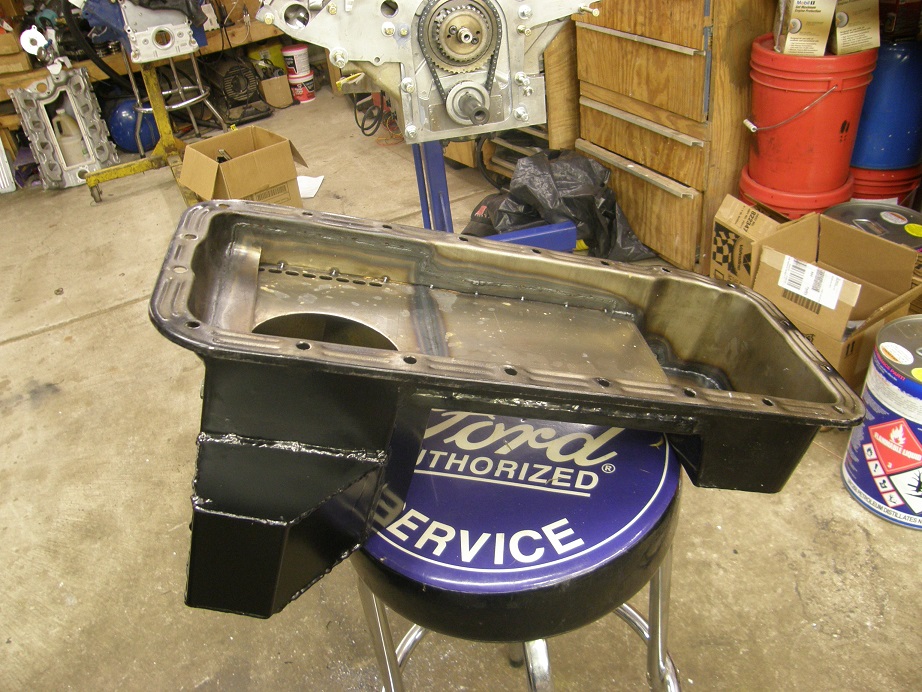
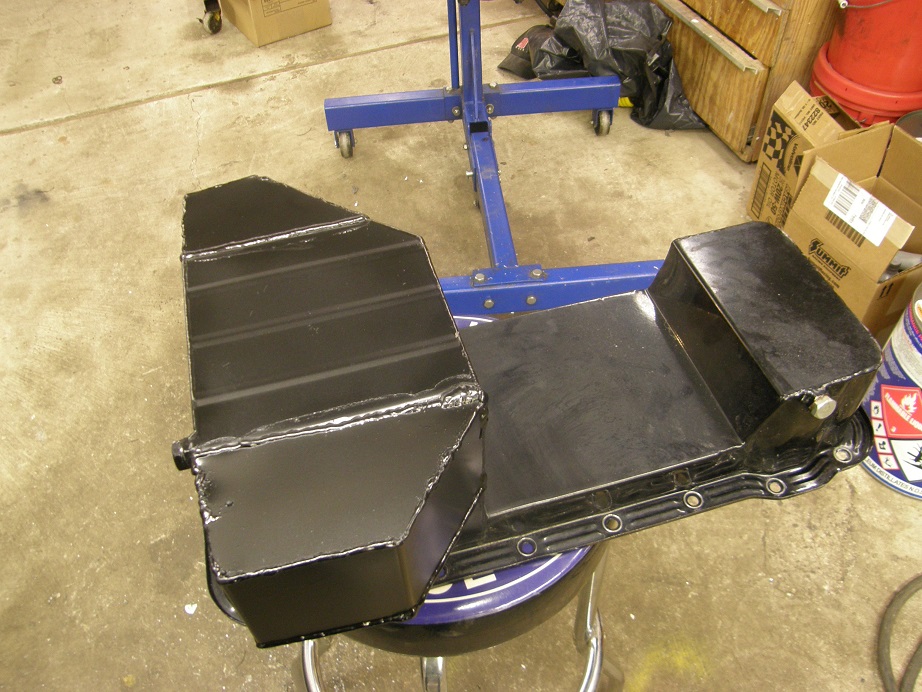
After clean up and paint it looks pretty good, and I don't think we will have an oil capacity issue now with the modifications:


I'll post some further updates once the cams arrive and we start getting the engine the rest of the way together - Jay
« Last Edit: February 21, 2016, 10:52:59 PM by jayb »
Jay Brown
- 1969 Mach 1, Drag Week 2005 Winner NA/BB, 511" FE (10.60s @ 129); Drag Week 2007 Runner-Up PA/BB, 490" Supercharged FE (9.35 @ 151)
- 1964 Ford Galaxie, Drag Week 2009 Winner Modified NA (9.50s @ 143), 585" SOHC
- 1969 Shelby Clone, Drag Week 2015 Winner Modified NA (Average 8.98 @ 149), 585" SOHC


Joe-JDC

  • Hero Member
  • *****
  • Posts: 1490
  • Truth stands on its own merit.
    • View Profile
Re: My 427 SOHC Build..... Finally the time has come!
« Reply #1325 on: February 21, 2016, 10:59:54 PM »
Hope the headers clear!  LOL  Neat.  Joe-JDC
Joe-JDC '70GT-500

newfalconowner

  • Guest
Re: My 427 SOHC Build..... Finally the time has come!
« Reply #1326 on: February 22, 2016, 09:11:29 AM »
is that pan good for a street driven 390? I have sorta the same pan (I made myself off measurements from one), or should I add more like you did

machoneman

  • Hero Member
  • *****
  • Posts: 3853
    • View Profile
Re: My 427 SOHC Build..... Finally the time has come!
« Reply #1327 on: February 22, 2016, 10:24:03 AM »
Nice Jay. Hey, no more excuses on your welding as your work looks pretty good, no kidding.   
Bob Maag

babybolt

  • Hero Member
  • *****
  • Posts: 516
    • View Profile
Re: My 427 SOHC Build..... Finally the time has come!
« Reply #1328 on: February 22, 2016, 11:59:37 AM »
Jay, what kind of spring compressor are you using?  I dislike all of them except for the fancy high priced compressed air aluminum bodied version.

jayb

  • Administrator
  • Hero Member
  • *****
  • Posts: 7405
    • View Profile
    • FE Power
Re: My 427 SOHC Build..... Finally the time has come!
« Reply #1329 on: February 22, 2016, 12:37:30 PM »
is that pan good for a street driven 390? I have sorta the same pan (I made myself off measurements from one), or should I add more like you did
Rick, I think it depends on the engine.  If its mostly stock, the pan probably would be OK, especially if you are restricting oil to the top end.  If its more racy, I would either run a whole bunch of oil with that pan, or modify the pan to increase the rear sump capacity like I did.  I have never seen any pan get sucked dry on the dyno except for that one.  Of course, that was with an 800 HP SOHC, but still...
Jay Brown
- 1969 Mach 1, Drag Week 2005 Winner NA/BB, 511" FE (10.60s @ 129); Drag Week 2007 Runner-Up PA/BB, 490" Supercharged FE (9.35 @ 151)
- 1964 Ford Galaxie, Drag Week 2009 Winner Modified NA (9.50s @ 143), 585" SOHC
- 1969 Shelby Clone, Drag Week 2015 Winner Modified NA (Average 8.98 @ 149), 585" SOHC


jayb

  • Administrator
  • Hero Member
  • *****
  • Posts: 7405
    • View Profile
    • FE Power
Re: My 427 SOHC Build..... Finally the time has come!
« Reply #1330 on: February 22, 2016, 12:40:56 PM »
Jay, what kind of spring compressor are you using?  I dislike all of them except for the fancy high priced compressed air aluminum bodied version.
I have a mechanical one with an over-center lever that has been modified to work on SOHC heads.  I really don't like it that much, it is difficult to release smoothly with a strong spring, and it will snap out of the over-center position and nick my fingers every now and then.  But its the only one I have, and I'm not sure if I can modify a different one to work on SOHC heads, so that's what I use...
Jay Brown
- 1969 Mach 1, Drag Week 2005 Winner NA/BB, 511" FE (10.60s @ 129); Drag Week 2007 Runner-Up PA/BB, 490" Supercharged FE (9.35 @ 151)
- 1964 Ford Galaxie, Drag Week 2009 Winner Modified NA (9.50s @ 143), 585" SOHC
- 1969 Shelby Clone, Drag Week 2015 Winner Modified NA (Average 8.98 @ 149), 585" SOHC


jayb

  • Administrator
  • Hero Member
  • *****
  • Posts: 7405
    • View Profile
    • FE Power
Re: My 427 SOHC Build..... Finally the time has come!
« Reply #1331 on: February 22, 2016, 12:42:43 PM »
Nice Jay. Hey, no more excuses on your welding as your work looks pretty good, no kidding.   
Thanks Bob, but I think you have low welding standards  ;)  There are a lot of guys who make their welds look a lot better than mine.  I was just happy that the pan didn't leak LOL!
Jay Brown
- 1969 Mach 1, Drag Week 2005 Winner NA/BB, 511" FE (10.60s @ 129); Drag Week 2007 Runner-Up PA/BB, 490" Supercharged FE (9.35 @ 151)
- 1964 Ford Galaxie, Drag Week 2009 Winner Modified NA (9.50s @ 143), 585" SOHC
- 1969 Shelby Clone, Drag Week 2015 Winner Modified NA (Average 8.98 @ 149), 585" SOHC


jayb

  • Administrator
  • Hero Member
  • *****
  • Posts: 7405
    • View Profile
    • FE Power
Re: My 427 SOHC Build..... Finally the time has come!
« Reply #1332 on: February 22, 2016, 12:50:42 PM »
Hope the headers clear!  LOL  Neat.  Joe-JDC
Joe, that's an excellent point; I'm glad you brought it up.  Jason has emailed me some pictures of the header installation from under the car, so I'm going to review those tonight with the oil pan temporarily installed and see how it looks.  There is clearly a lot of room on either side of the pan, but it might be close in some spots...
Jay Brown
- 1969 Mach 1, Drag Week 2005 Winner NA/BB, 511" FE (10.60s @ 129); Drag Week 2007 Runner-Up PA/BB, 490" Supercharged FE (9.35 @ 151)
- 1964 Ford Galaxie, Drag Week 2009 Winner Modified NA (9.50s @ 143), 585" SOHC
- 1969 Shelby Clone, Drag Week 2015 Winner Modified NA (Average 8.98 @ 149), 585" SOHC


newfalconowner

  • Guest
Re: My 427 SOHC Build..... Finally the time has come!
« Reply #1333 on: February 22, 2016, 01:21:59 PM »
I would either run a whole bunch of oil with that pan, or modify the pan to increase the rear sump capacity like I did.  I have never seen any pan get sucked dry on the dyno except for that one.  Of course, that was with an 800 HP SOHC, but still...

thanx,, im lucky if I have 200hp,, and wont race it (much).. I will see how this spring goes when its on the road and keep an eye on my gauges. thanx

WConley

  • Hero Member
  • *****
  • Posts: 1160
  • No longer walking funny!
    • View Profile
Re: My 427 SOHC Build..... Finally the time has come!
« Reply #1334 on: February 22, 2016, 06:09:55 PM »
Looks really good Jay!  I'm noting all of the tips and tricks on this build, many learned the hard way.  The other post up the page with the chain break fiasco is another expensive one!
A careful study of failure will yield the ingredients for success.