Author Topic: My 427 SOHC Build..... Finally the time has come!  (Read 775908 times)

0 Members and 1 Guest are viewing this topic.

rockittsled

  • Full Member
  • ***
  • Posts: 100
  • 1976 F-250 390 4v C6
    • View Profile
Re: My 427 SOHC Build..... Finally the time has come!
« Reply #525 on: February 27, 2015, 12:44:11 PM »
Please video the startup, cant wait  :D

cobracammer

  • Hero Member
  • *****
  • Posts: 1165
    • View Profile
Re: My 427 SOHC Build..... Finally the time has come!
« Reply #526 on: February 27, 2015, 03:40:54 PM »
OK, so last night (I forgot to mention), I have been researching a tube (Hard line) that runs from the engine compartment, along side the Fuel lines, all the way back to the rear of the car.  After much research, I figured out that it was the vacuum line that controlled the vacuum actuators on the mufflers.  Saleen designed the S281 with vacuum actuated exhaust.  Exhaust flows freely out of 2 of the 4 exhaust pipes at all times.  When enough vacuum is created, the actuators open so that exhaust flows from all 4 exhaust pipes.

Unfortunately, even though this was super high tech for Saleen in 2005, these systems gave them a ton of problems, so 2005 was the only year for the vacuum actuated exhaust.

Greatfully, it would seem that the previous owner took the car in to get a 2006 Saleen exhaust installed.  There are still 4 exhaust pipes, but exhaust freely flows from all 4 at all times.  It would seem that the tech just left the vacuum line in the car, and rather than disconnect, just looped the line with a soft hose and a T so that it didn't suck up debris.

This was welcomed news as I was able to rid the car of the unused vacuum line, and clean up the engine compartment that much more.
Jason
2005 Saleen S281 (427 SOHC 2 X 4 EFI swap), T56 Magnum XL 6 speed, 9" Currie rear with 3.89 Gears

cobracammer

  • Hero Member
  • *****
  • Posts: 1165
    • View Profile
Re: My 427 SOHC Build..... Finally the time has come!
« Reply #527 on: March 01, 2015, 04:06:51 PM »
GETTING CLOSER!


-Alternator belt- Ordered
-Power steering belt- Ordered
-Lower radiator hose- Ordered
-Fill trans with fluid (supplied by Modern Driveline)
-Wire the electric fans into the harness plug from OEN fan
-Install dual fan/shroud
-Install OEM fan shroud (modified) over the aluminum shroud (for the mounting points for the Coolant and PS reservoirs)
-Install upper radiator hose- Ordered
-Install reservoirs into radiator shroud
-Install front cover to Radiator/Grill
-Bring OEM P/S hose to Davie to get a custom one built
-Lengthen the 2 wires on the CHT sender so it reaches the harness
-Pull the Fuel pump power wire through the firewall and attach to battery terminal
-Purchase Battery
-Check Fuel system for leaks and then reinstall back seat
-Bring to Coral Springs for custom headers
-Install MSD 6 ignition box
-Install Throttle return bracket(s) with larder studs purchased from Jegs (and throttle linkage that came with dual quad kit)
-Install the wiring harness for FAST EFI
-Build resistor (designed by UM professor) to go between RMP feed and harness for the tachometer
-Start car!!!!!
« Last Edit: March 01, 2015, 05:05:42 PM by cobracammer »
Jason
2005 Saleen S281 (427 SOHC 2 X 4 EFI swap), T56 Magnum XL 6 speed, 9" Currie rear with 3.89 Gears

cobracammer

  • Hero Member
  • *****
  • Posts: 1165
    • View Profile
Re: My 427 SOHC Build..... Finally the time has come!
« Reply #528 on: March 03, 2015, 01:31:18 PM »
OK I know the fun part of this Forum is posting little tid bits of problems.....

So let me get started.  Before I dis assembled the Saleens Engine, I got labels and tie straps and labeled each connection I took off (even if I knew I wasn't going to use it later) just so I knew what was what.

While looking over a whiring diagram the other night, I realized that there are 2 "harness" lines that run to the Starter.  One that looks like it runs directly from the battery and one that comes across the front of the engine (possibly from the bussed electric center) and includes pigtails for the Oil temp sender, crank trigger sensor, etc.

The harness that runs directly from the battery had a Y at the end with 2 connections (Top picture-Below).  The red power cable (C197A) and a black cable (G106) (which at the time I thought was the signal wire).

So after a few hours of google searching this problem and looking at the diagram again.... I have come to this conclusion....

Short harness that comes directly from the battery wire is the starter power wire, and the other part of that "Y" is a ground wire that should be connected to the block.

The longer harness (Bottom Picture- Below)that runs from the Bussed electric center is the signal wire (I believe) and should be connected to the signal stud on the starter (C197B).

Luckily I have not started the car (Am keeping it at TDC for as long as I can)  LOL

I am going to go home and recheck again, and rewire.......I have attached the 2 diagrams I found


« Last Edit: March 03, 2015, 02:57:13 PM by cobracammer »
Jason
2005 Saleen S281 (427 SOHC 2 X 4 EFI swap), T56 Magnum XL 6 speed, 9" Currie rear with 3.89 Gears

cobracammer

  • Hero Member
  • *****
  • Posts: 1165
    • View Profile
Re: My 427 SOHC Build..... Finally the time has come!
« Reply #529 on: March 03, 2015, 05:24:34 PM »
I found this schematic along with the others.....  It seems my description above was correct.  The wire I have not linked in as a signal wire is a ground wire(G106).  I will detach and secure it down to the block or the motor mount.

The other wire (C197B) is the correct signal wire and I will crimp on the fitting that came with the MSD starter and secure it to the correct location.  It always bothered me that the wire I thought was a signal wire was so thick.  This confirms it.

Jason
2005 Saleen S281 (427 SOHC 2 X 4 EFI swap), T56 Magnum XL 6 speed, 9" Currie rear with 3.89 Gears

cobracammer

  • Hero Member
  • *****
  • Posts: 1165
    • View Profile
Re: My 427 SOHC Build..... Finally the time has come!
« Reply #530 on: March 04, 2015, 10:39:15 AM »
OK last night I got back under the car and now I feel a little better about the wiring on the starter.  I don't know how I didn't mark this one correctly since I was tagging them 1 at a time as I unhooked them (unless it got torn off somehow), but now we have the Signal wire (C197B) heat shrinked onto the connection fitting supplied by MSD and plugged onto the signal "stud" on the Starter.  Then we have the thick red power cable (C197A) which was hooked up correctly before on its correct stud.  Then the ground cable (G106) which I had mistakenly hooked up as the signal wire previously is now bolted to a spot on the tubular K member.

Feel better now that that is sorted.

Go the correct fitting for the power steering pump I was waiting on (a pressure side hose from a 1963 Galaxie).  The hydraulic hose place down here is going to remove the pump fitting from this hose and along with the fittings for the rack on the Saleens OEM power steering hose, crimp together a custom P/S hose good for up to 2600 PSI.  Once I have this done, the car can be moved on to the header shop without puddles of power steering fluid leaking out every time the wheels are turned.

Jason
2005 Saleen S281 (427 SOHC 2 X 4 EFI swap), T56 Magnum XL 6 speed, 9" Currie rear with 3.89 Gears

WConley

  • Hero Member
  • *****
  • Posts: 1160
  • No longer walking funny!
    • View Profile
Re: My 427 SOHC Build..... Finally the time has come!
« Reply #531 on: March 04, 2015, 12:06:20 PM »
Jason -

Pay close attention to those ground connections you're making to the frame.  Make sure they're good and secure!  I like to put a little bit of anti-seize on the interface as well to keep the corrosion gremlins at bay.

Nothing like a corroded, loose ground connection to make you crazy one day!
A careful study of failure will yield the ingredients for success.

cobracammer

  • Hero Member
  • *****
  • Posts: 1165
    • View Profile
Re: My 427 SOHC Build..... Finally the time has come!
« Reply #532 on: March 04, 2015, 03:13:46 PM »
tell me about it.  You could not imagine how many little ground wires snake out of the stock harnesses.  Even though I am sure many of them are for items I no longer have/use, I am going to make sure all of them are grounded to the chassis just to be sure.  :0)
Jason
2005 Saleen S281 (427 SOHC 2 X 4 EFI swap), T56 Magnum XL 6 speed, 9" Currie rear with 3.89 Gears

cobracammer

  • Hero Member
  • *****
  • Posts: 1165
    • View Profile
Re: My 427 SOHC Build..... Finally the time has come!
« Reply #533 on: March 07, 2015, 09:20:13 PM »
OK so its Saturday night.  I went over to the custom header place today.  Really nice guy, professional shop.  Staff were all busy with really beautiful cars...  the work they were doing was awesome.  Have them picking up the car this upcoming week.  Also getting the headers "Jet coated" in black.  Should take about 3 days in which I was guaranteed the car would be stored inside the whole time.

On a different note, I got some items done this weekend.  As always, its the small things.....

I got to the Hydraulic hose place early this morning.  Got my custom Power steering hose made.  One end is the OEM hose that works with the Saleen rack, and the second part is a 3 Ft. "gates" hose rated at 2600PSI... crimped to the 1963 pwer steering pump fitting......  Wanted a little long just incase.  All hooked up and tightened.

Then I moved on to the radiator fans\shroud(s)...

Installed the dual electric fans on the aluminum shroud.  Like I stated previously, I have about 1 inch to 3/4 inch clearance between water pump pulley and the fans.  Since I needed the top of the OEM shroud for mounting the coolant reservoir and the P\S reservoir.  I ended up cutting just the top quarter of the OEM shroud off with the angle grinder and polishing it up a but with a light sanding disk (Actually looks way better than I thought it would.)  Was able to mount it right over the aluminum one using slightly longer attachment bolts (M6-50MM).

Once that was done, I moved on to wiring the aluminum fans into the existing harness plug.  Got them all crimped and heat shrinked.  I plan on getting the black wire tubes to wrap the wires up and tie wrap them out of the way (to make sure they dont get damaged by the alternator pulley.)

Then I attached the P\S reservoir to the shroud, and attached it to its cooler line and return line, added P/S fluid and its good to go until I get the car running and then I can do the whole Clock to clock and add fluid.

I drilled/ Tapped and epoxied the barb fitting onto the coolant hose fitting.  This was needed to connect to the coolant reservoir so the system can be filled (and let air from the system escape.  I am going to wait 24 hours for it to dry and sand it smooth, and paint it black.  Not it wont be seen, but I might as well make it nice if I am going to do it.

I am going to wait until i  get the car back from the headers shop before I installl the MSD and the FAST computer. 

please see the pictures below....  difficult to get details now since the engine bay is so full now.

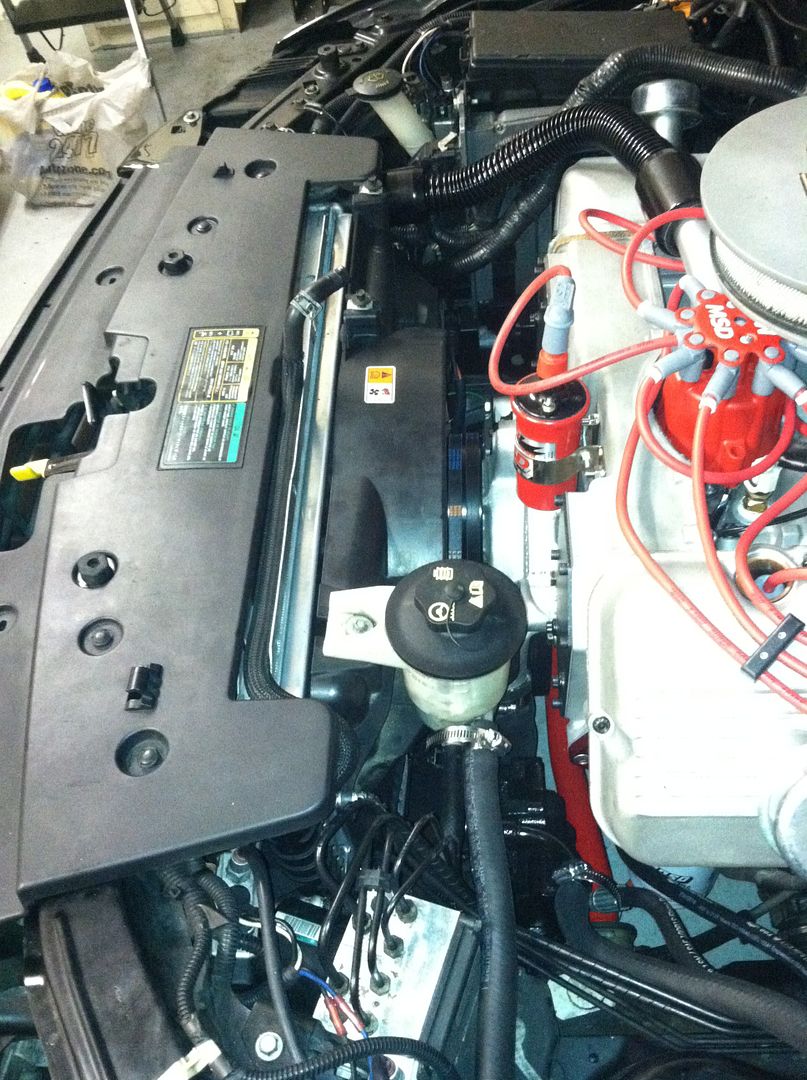
This is a shot of the water pump pulley (and its cover) and the aluminum shroud/fans.  Tight, but worked perfectly.


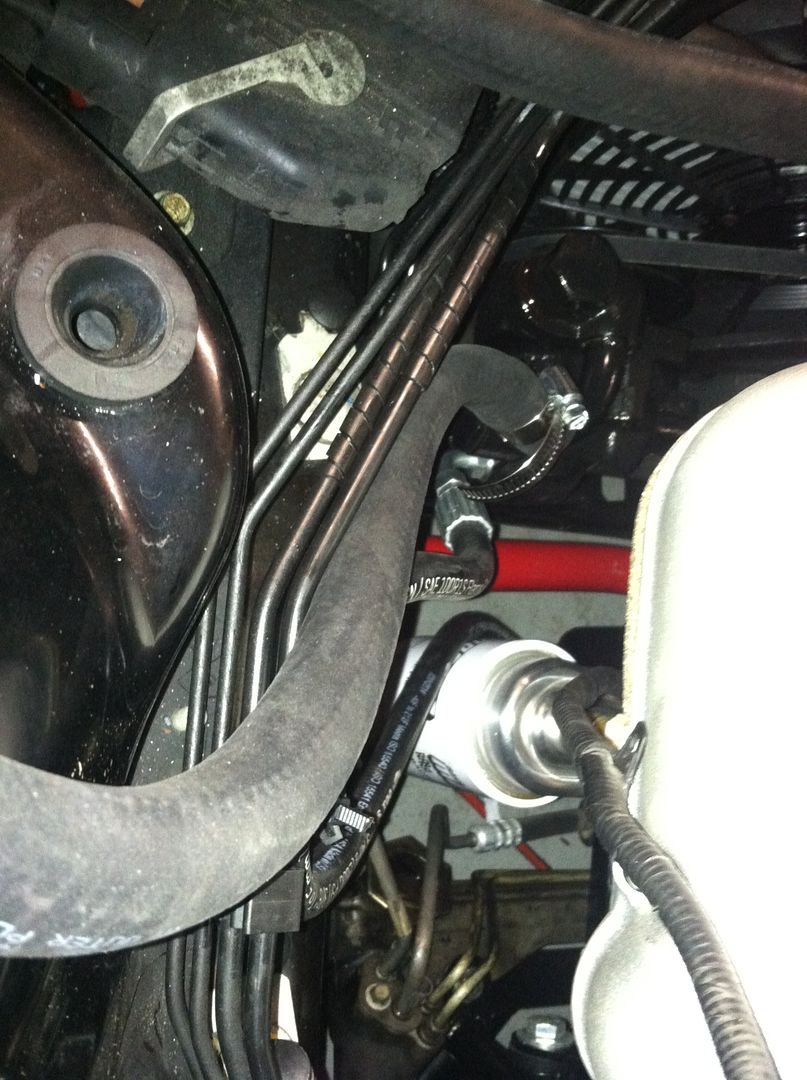
This is a picture of the new P\S hose.  It comes up from where the oil filter is, its cut a soft cushion clamp holding its arch and then dips down to connect to the 1963 Galaxie pump. 


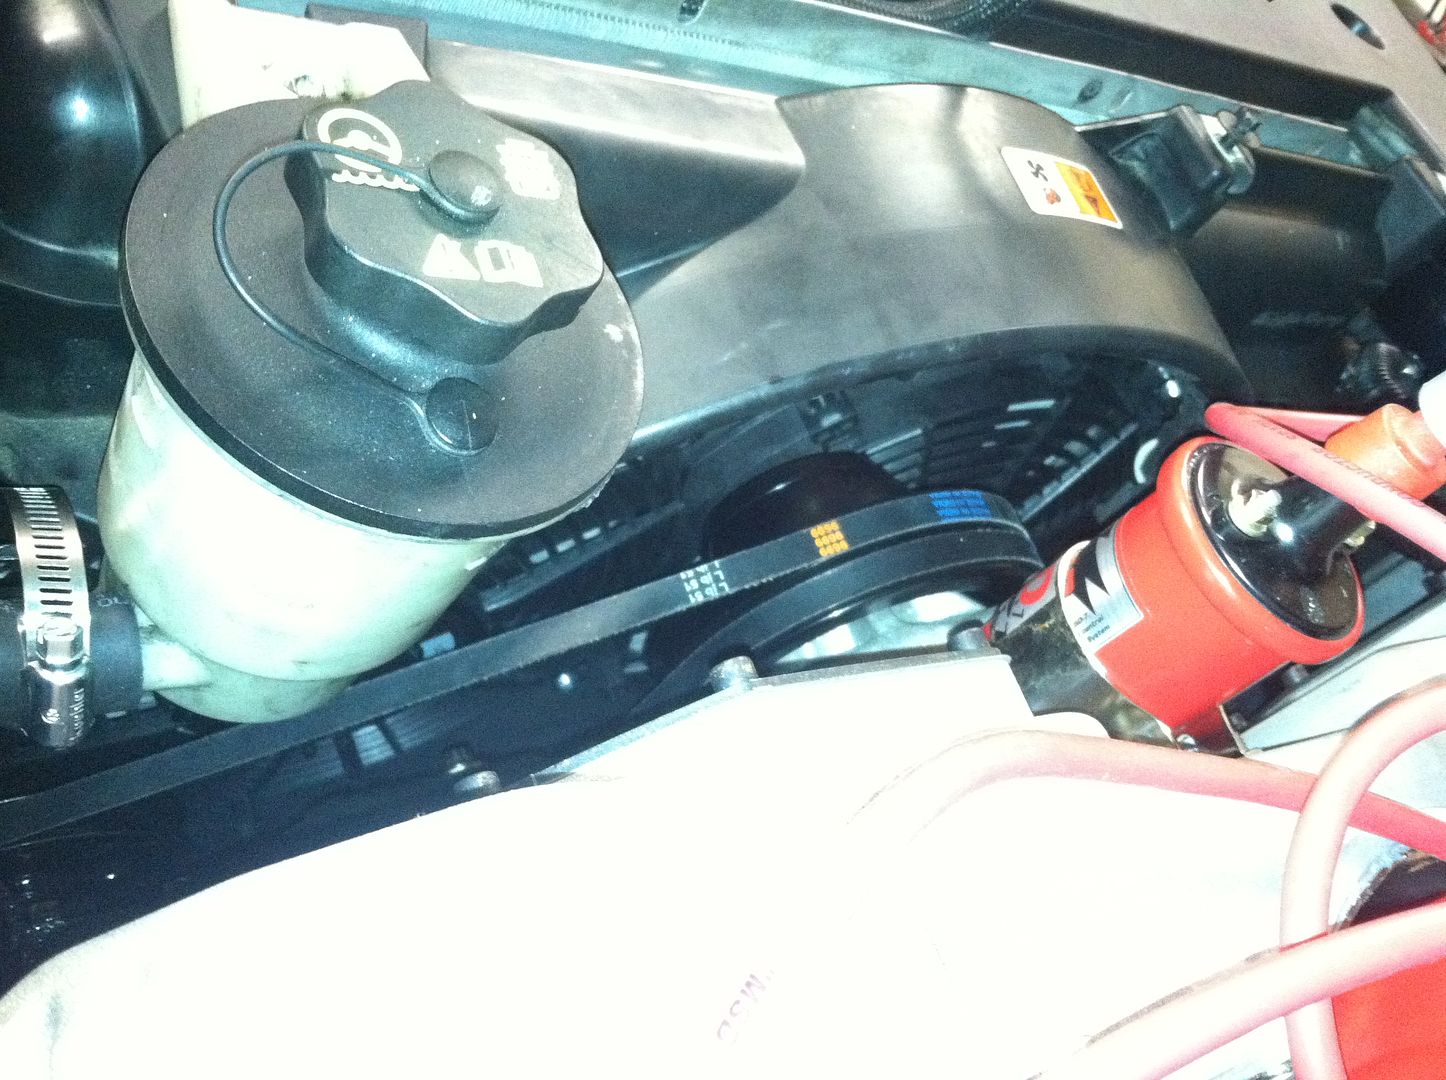
This is a shot of the P\S reservoir installed and connected.. and you can see across the top the 2 bolts that will hold the collant tank.  Also the front deck cover (where the latch is).


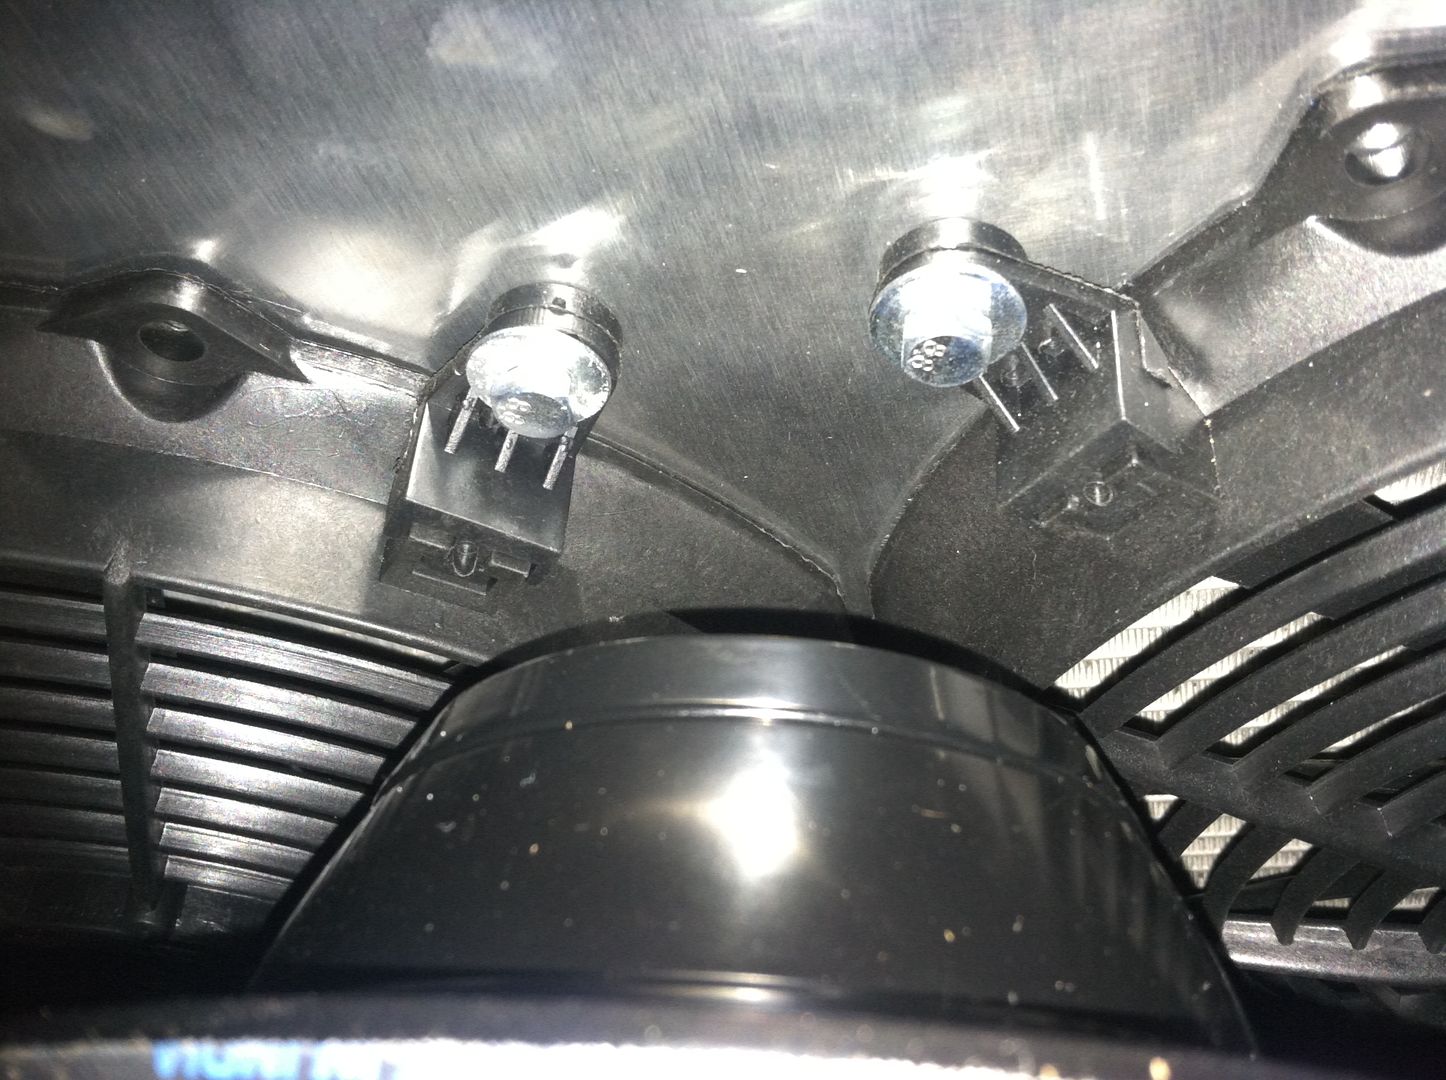
This last picture shows you how the OEM shroud is on top of the aluminum shroud.  From just about any angle, it looks completely stock, but if you stick your face down there, you will see the 2 electric fans.


-Alternator belt- Ordered
-Power steering belt- Ordered
-Lower radiator hose- Ordered
-Fill trans with fluid (supplied by Modern Driveline)
-Wire the electric fans into the harness plug from OEM fan
-Install dual fan/shroud
-Install OEM fan shroud (modified) over the aluminum shroud (for the mounting points for the Coolant and PS reservoirs)
-Install upper radiator hose- Ordered
-Install reservoirs into radiator shroud
-Install front cover to Radiator/Grill
-Bring OEM P/S hose to Davie to get a custom one built
-Lengthen the 2 wires on the CHT sender so it reaches the harness
-Pull the Fuel pump power wire through the firewall and attach to battery terminal
-Purchase Battery
-Check Fuel system for leaks and then reinstall back seat

-Bring to Coral Springs for custom headers
-Install MSD 6 ignition box
-Install Throttle return bracket(s) with larder studs purchased from Jegs (and throttle linkage that came with dual quad kit)
-Install the wiring harness for FAST EFI
-Build resistor (designed by UM professor) to go between RMP feed and harness for the tachometer
-Start car!!!!!
Modify message
« Last Edit: March 01, 2015, 05:05:42 PM by cobracammer »
« Last Edit: March 07, 2015, 09:32:35 PM by cobracammer »
Jason
2005 Saleen S281 (427 SOHC 2 X 4 EFI swap), T56 Magnum XL 6 speed, 9" Currie rear with 3.89 Gears

thatdarncat

  • Hero Member
  • *****
  • Posts: 1866
    • View Profile
Re: My 427 SOHC Build..... Finally the time has come!
« Reply #534 on: March 08, 2015, 12:58:13 AM »
It's a good idea waiting on the MSD and FAST computer until the header welding is done. Although I'm sure you'll have the battery disconnected and most of the header welding will be done off the car it's best not to take a chance of any delicate electronics getting damaged. I'd even suggest thinking if there are any other electronic systems on the car you may want to unplug before sending it off. Maybe others on the forum might want to weigh in with their opinion. Your project is really turning out well.
Kevin Rolph

1967 Cougar Drag Car ( under constuction )
1966 7 litre Galaxie
1966 Country Squire 390
1966 Cyclone GT 390
1968 Torino GT 390
1972 Gran Torino wagon
1978 Lincoln Mk V

fastback 427

  • Sr. Member
  • ****
  • Posts: 442
    • View Profile
Re: My 427 SOHC Build..... Finally the time has come!
« Reply #535 on: March 08, 2015, 09:29:14 AM »
We welded up a run stand some years back. The only thing we had for mock up was a running engine at the time so we used it. The stand got finished and all was good. A couple years later we tore the running engine down and upon inspection the bearings looked strange.  They had spots on about half of them . To us it looked like the voltage was "arcing" between the surfaces. Maybe a bad ground? Maybe it wasn't that at all, but I'm a little funny while welding with the engine in the car.
Jaime
67 fastback 427 center oiler 428 crank Dove aluminum
top end toploader
67 fairlane gta cross bolted 12:1 390 Dove aluminum top end c6 3600 stall
65 falcon straight axle project
67 mustang coupe project
76 f350 dually 390 mirror 105 4bbl 4spd
74 f100 xlt 390 c6 factory ac

cjshaker

  • Hero Member
  • *****
  • Posts: 4460
    • View Profile
Re: My 427 SOHC Build..... Finally the time has come!
« Reply #536 on: March 10, 2015, 09:19:43 AM »
I weld on computer controlled equipment all the time at work. Mostly because it's just near impossible to disconnect everything or it's impractical. Newer cars have so much electronics that the same can be said for them. The trick I use is to make double sure that the ground is attached VERY near, and preferably directly to, the piece you're welding. That keeps current surges from going throughout the vehicle since it is looking for the nearest path to ground, which should be to the grounding clamp very near. I have never had a problem, but I'm not implying any guarantees either.
Doug Smith


'69 R-code Mach 1, 427 MR, 2x4, Jerico, 4.30 Locker
'70 F-350 390
'55 Ford Customline 2dr
'37 Ford Coupe

cobracammer

  • Hero Member
  • *****
  • Posts: 1165
    • View Profile
Re: My 427 SOHC Build..... Finally the time has come!
« Reply #537 on: March 10, 2015, 09:05:27 PM »
OK update.  I spoke with the shop.  He expects Saturday will be the day in which he will be able to get my car in the shop (and keep it indoors).  He is calling tomorrow to get me a final price with the Black Jet hot coating and the headers with O2 bung.  Also he said these headers will be V-Band?  Meaning no gasket after the collectors?

2 days now with all of the fluids in the car.... Coolant, P/S, Oil, Window washing fluid, Trans fluid, Rear axle fluid......  NO leaks.  Yes its a small victory, but a step in the right direction.

Jason
2005 Saleen S281 (427 SOHC 2 X 4 EFI swap), T56 Magnum XL 6 speed, 9" Currie rear with 3.89 Gears

cobracammer

  • Hero Member
  • *****
  • Posts: 1165
    • View Profile
Re: My 427 SOHC Build..... Finally the time has come!
« Reply #538 on: March 16, 2015, 11:46:17 AM »
-Alternator belt- Ordered
-Power steering belt- Ordered
-Lower radiator hose- Ordered
-Fill trans with fluid (supplied by Modern Driveline)
-Wire the electric fans into the harness plug from OEM fan
-Install dual fan/shroud
-Install OEM fan shroud (modified) over the aluminum shroud (for the mounting points for the Coolant and PS reservoirs)
-Install upper radiator hose- Ordered
-Install reservoirs into radiator shroud
-Install front cover to Radiator/Grill
-Bring OEM P/S hose to Davie to get a custom one built
-Lengthen the 2 wires on the CHT sender so it reaches the harness
-Pull the Fuel pump power wire through the firewall and attach to battery terminal
-Purchase Battery
-Check Fuel system for leaks and then reinstall back seat

-Bring to Coral Springs for custom headers
-Install MSD 6 ignition box
-Install Throttle return bracket(s) with larder studs purchased from Jegs (and throttle linkage that came with dual quad kit)
-Install the wiring harness for FAST EFI
-Build resistor (designed by UM professor) to go between RMP feed and harness for the tachometer
-Start car!!!!!


In addition, I actually swapped out the sparkplugs on the engine this weekend.  I had Autolite sparkplugs in there and bout 8 E3 sparkplugs.  I like these new E3's because they are designed so you don't have to adjust the spark gap, and they are supposed to produce a more efficient spark(i.e. more off a fuel burn).  Saw them tested on Power nation TV, and thought with the combination of the FAST EFI and its associated O2 sensor, this would definitely be a plus.....

Still awaiting word from the header shop as to when he will have room to have my car up on a lift (and stored indoors).  Dying for it to be DONE!!!
« Last Edit: March 16, 2015, 11:52:36 AM by cobracammer »
Jason
2005 Saleen S281 (427 SOHC 2 X 4 EFI swap), T56 Magnum XL 6 speed, 9" Currie rear with 3.89 Gears

cobracammer

  • Hero Member
  • *****
  • Posts: 1165
    • View Profile
Re: My 427 SOHC Build..... Finally the time has come!
« Reply #539 on: March 17, 2015, 11:47:19 AM »
Just got off the phone with John over at Yellow Engine Supplies.  Jay turned me on to these guys for the spark plug well covers for the Cammer.  I originally got a set of well covers from Precision oil pumps, but when I finally got around to installing then, they were so small, that they went right down into the copper tubes and didn't even touch the sides! 

John  is expecting a new shipment of his covers in the next few weeks.  He took my Phone number and I am all set to receive a set as soon as they come in.  For my luck down here in Florida, I will have lizards living in them (and dying in them) if I don't have the plugs.
Jason
2005 Saleen S281 (427 SOHC 2 X 4 EFI swap), T56 Magnum XL 6 speed, 9" Currie rear with 3.89 Gears