So, after a lack of solid lifters last weekend stymied my attempt at a cam change, I got busy this weekend to git 'er done. The plan was to leave the intake adapter in place during the cam change, and check out this particular feature of the adapter. Once the cam was changed and broken in, I could dyno test a few more 351C intakes.
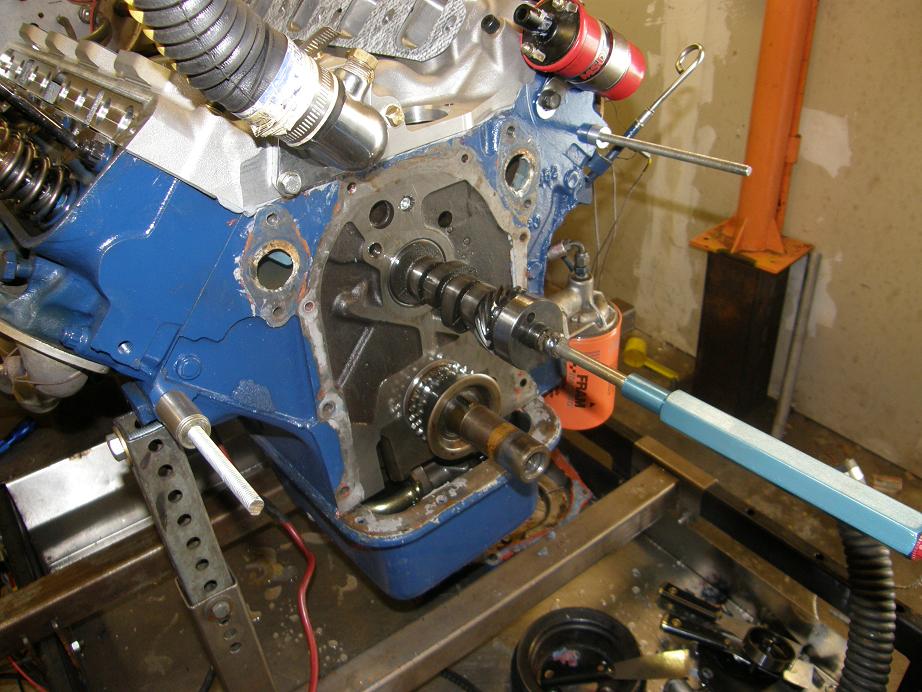
The cam change was more or less uneventful. Although the adapter stayed in place, I still had to remove the valvetrain and distributor, and also remove the water pump and timing cover of course. That two piece timing cover with an O-ring seal would have been nice here, and would have saved quite a bit of time. The water pump removal was kind of nice because I'm using the CVR pump with my billet aluminum adapters, and they are O-ringed, so no gasket to scrape or any sealer to deal with on re-assembly. Here's a photo of the engine taken apart and the old Edelbrock Performer RPM cam coming out:
Before installing the Comp 294S cam I took the time to read all the directions that came with it and the lifters. There have been so many flat tappet cam failures over the last few years that I wanted to make sure to refresh my memory on exactly what I should pay attention to. I used the lube that came with the cam to coat the lobes and the bottoms of the lifters, and engine oil to coat the cam journals and lifter bodies. I also went out and got some Shell Rotella T oil, which was recommended in the Comp instructions, and added a bottle of their cam break-in lube to the oil. The cam went in with no trouble and degreed at 106 ICL on the first try, which was where Comp recommended that the cam was run. When I buttoned the engine back up I decided to forego the factory timing cover and use a spare Shelby timing cover that I had here; more bling is good, right? The whole cam change process took me about six hours, working fairly leisurely.
After a cam change you'd like to have the motor fire right away, rather than having to grind on the starter for a long time and potentially wipe all the lube off the lobes and lifters, so I made sure I had the timing set just right before the break-in process. The motor fired instantly, and I kept it at 2000-2500 RPM for 30 minutes as Comp recommended. Oil temp rose all the way to 230 degrees during the break-in period, but that was more or less expected. After the 30 minutes were up I let off on the throttle and the engine settled down into a decent idle around 950 RPM. Pretty much sounded like the cam I'd taken out.
The springs that had been in the engine with the Performer RPM cam were left in for the break-in because they were single springs with dampers, about 105 pounds on the seat and 300 over the nose. After the break-in I wanted to swap to a set of Comp 930 springs, which have a higher seat pressure (around 150) and open pressure (around 375). After the engine cooled down from the break-in I went about swapping the valve springs. I was originally only planning to pull the valve covers and valvetrain to do this, but it dawned on me while I was getting started that I could easily pull the intake (2 fuel lines, throttle linkage, and 10 bolts) and access cover plate (10 bolts) and look at all the lifters to see how they fared during the break-in process. That was an advantage to my intake adapter I had not previously considered. Ten minutes later the valley of the engine was exposed and I was pulling the lifters to look at them; here's a picture of one of the lifters coming out, with a magnet through the pushrod hole:
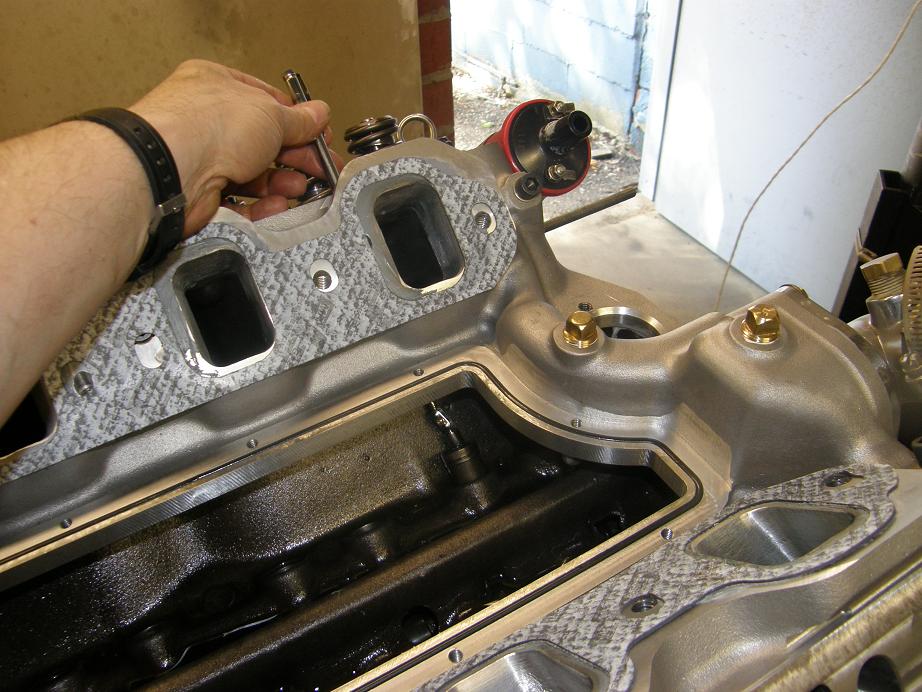
I was happy to see that all the lifters looked pretty much identical, with a nice shiny annular ring around the outside, indicating (I think) that they were rotating in the bores. I left the valley exposed as I went around changing the valve springs, and afterwards when I installed the rocker arm assemblies and pushrods I was able to make sure that the pushrods were all correctly seated in the lifters. Finally I reinstalled the intake and access cover plate, and the engine was ready to run again.
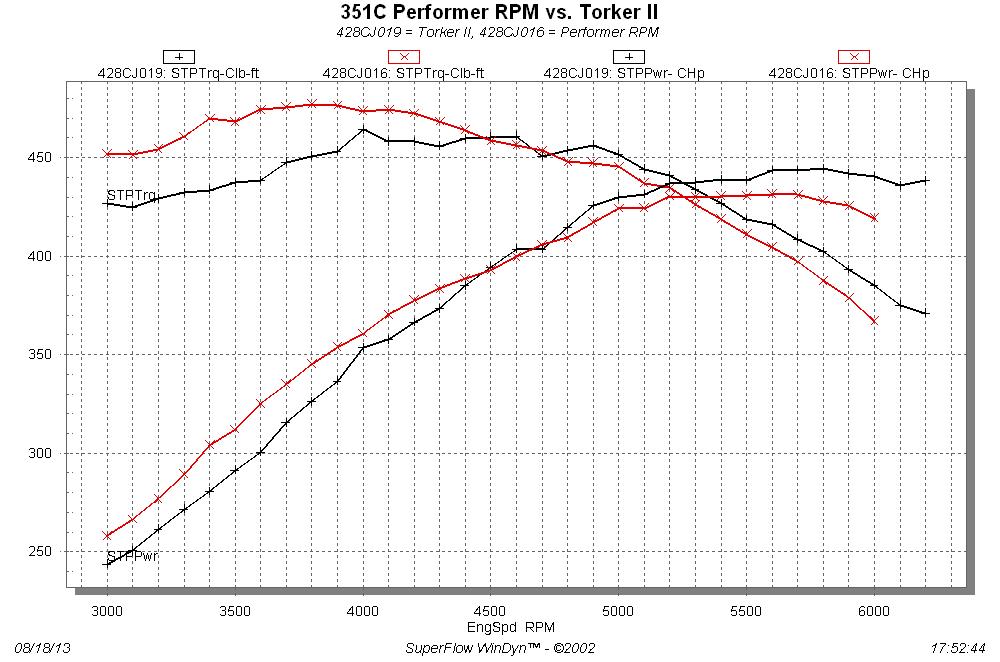
Today I got started a little late, but by 2:00 PM I had the engine running again. I warmed it up and then went around and lashed all the valves, double checked the timing, and started the dyno tests. First test was with the 351C Performer RPM, and was basically a cam comparison, between the Edelbrock Performer RPM cam and the Comp 294S cam. I expected the Comp cam to be down a little in midrange torque and up at peak horsepower. I also wanted to run the engine at some higher speeds, because with the hydraulic Edelbrock cam the power kind of takes a nosedive after 5300 RPM or so, and I wanted to see how long it would hang in there with the new cam. Here's a chart of the dyno results:

The Comp cam was definitely down in the midrange, but really wasn't up too much at the high end. But the fact that the Comp solid cam would actually hold power out past 5300 RPM was encouraging; the hydraulic Edelbrock cam would never do that.
Next, I swapped on the Edelbrock Torker II intake. This took me just a little less than 15 minutes. Sheesh, what a cakewalk; I should have done the Great 351C Intake Comparo. As a single plane intake I expected the Torker II to be down at the low end and up at the top end compared to the Performer RPM manifold. Sure enough, that's what we got; here they are on the same graph:
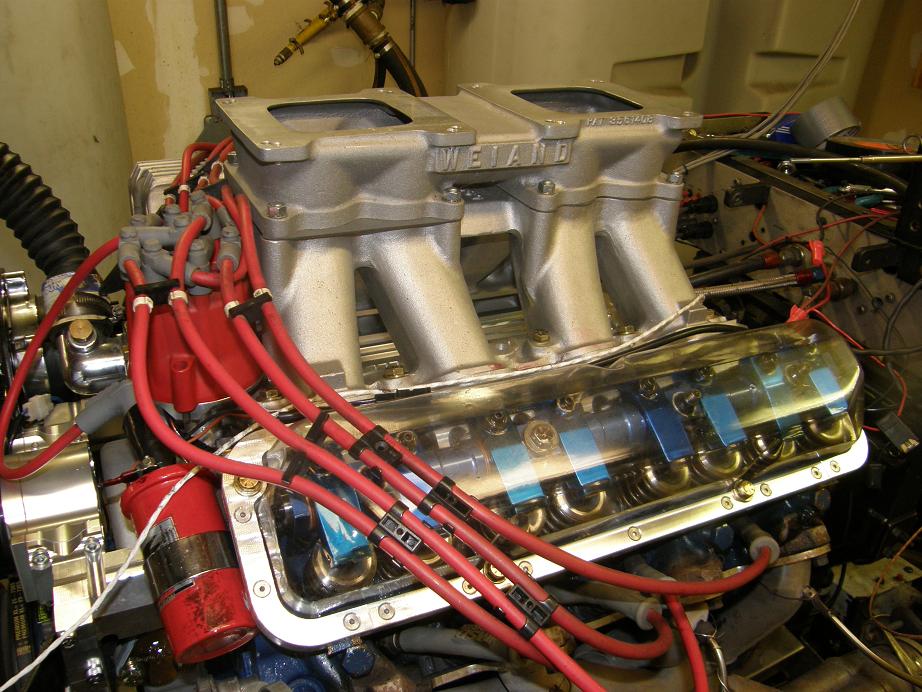
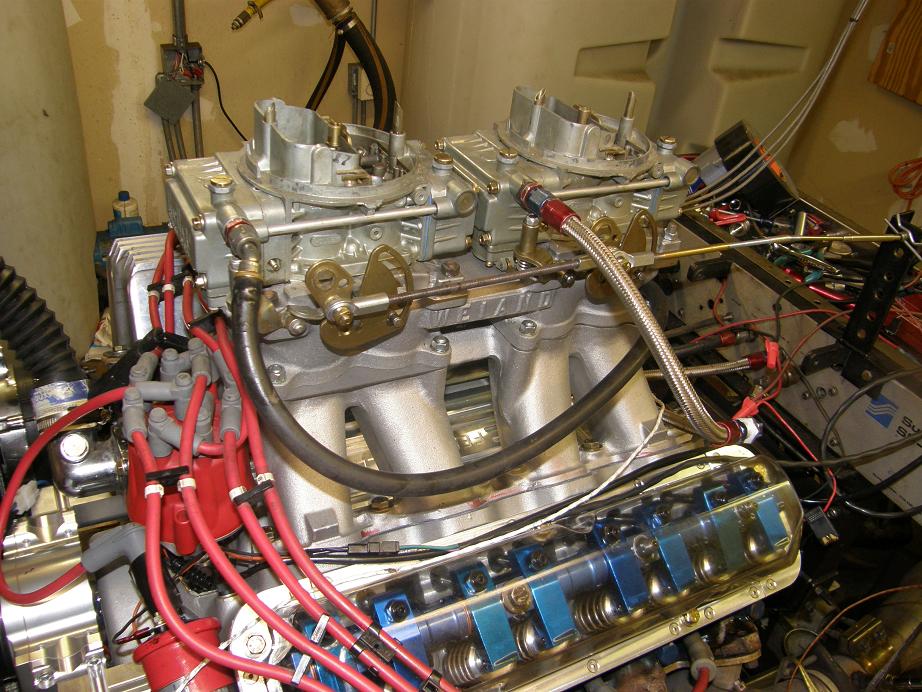
The dual plane intake is better up to about 4600 RPM, then the single plane takes over. Looks just like a standard FE Performer RPM vs. the standard FE Victor. Finally, I swapped on the Weiand tunnel ram. This took longer than the Torker II swap, because I had to dig out my 660 center squirter carbs, fab up some throttle linkage, extend one fuel line, etc. But it was still only an hour. I installed the Weiand manifold base first, then added the plenum and the carbs; here's some photos of the manifold going on the engine:
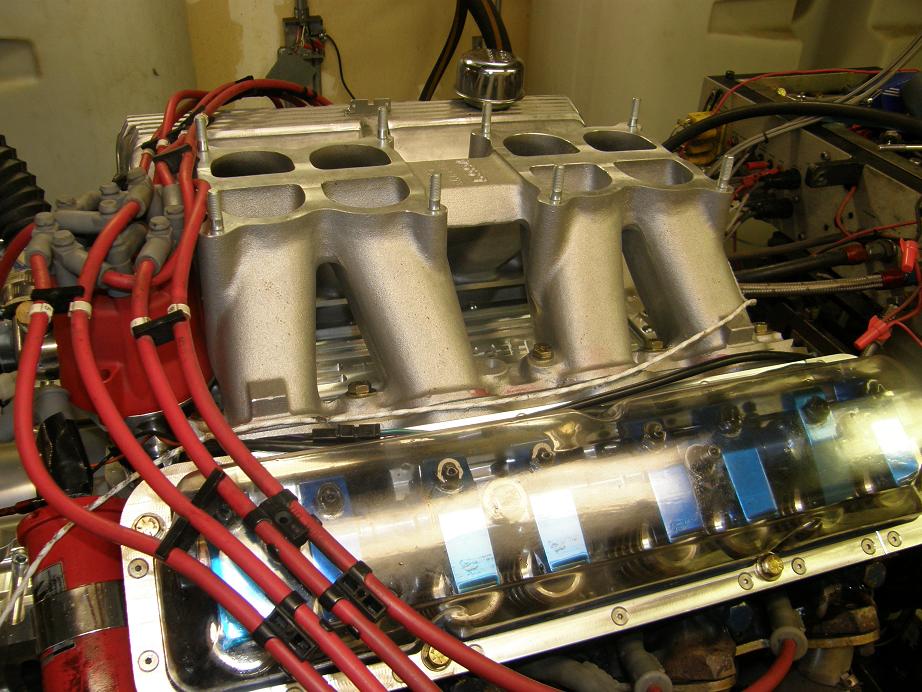
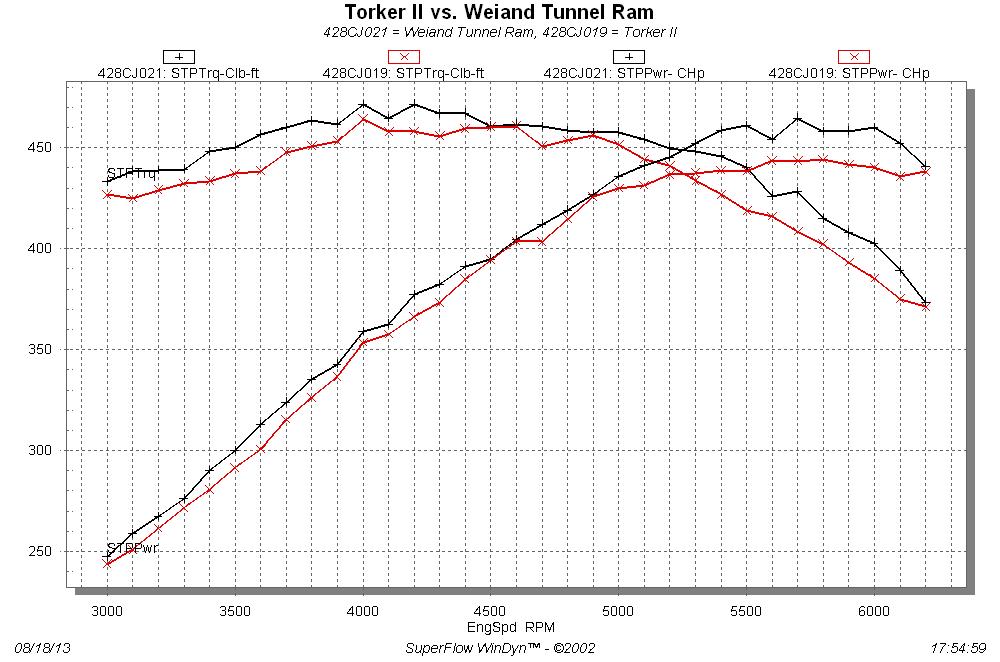
I have to say that tunnel ram looks pretty cool on there. When I tried to go into the first dyno pull, though, it was not cool; the engine went really lean and wanted to die. I didn't know what the jets were in the carbs, so I had to pull them off to check, and it turned out they were really small, 66 jets in the front carb and 59s in the rear! I replaced all the jets with number 70 or 72, and tried again. It still ran a little lean going into the pull, but it didn't want to shut off anymore, and holy buckets did it like the fuel! Horsepower with the tunnel ram peaked at 465, 20 HP higher than the Torker II and 35 higher than the Performer RPM. The tunnel ram made more power than the Torker across the entire RPM range; here's a chart:
Here's all three manifolds graphed on one chart:
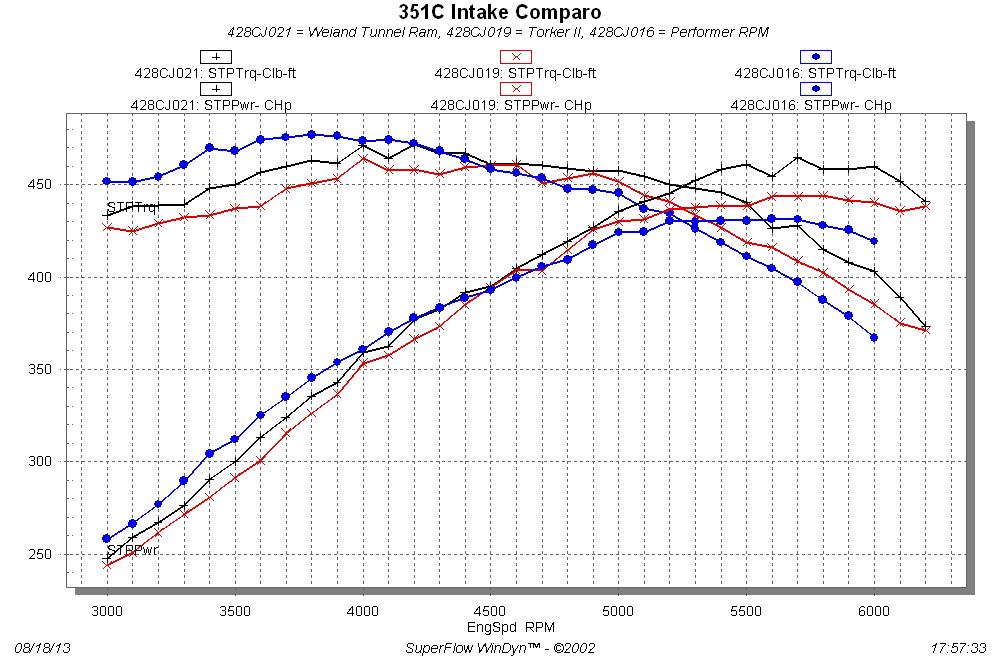
Looking at this data, you would want to run the Performer RPM intake around during the week, and then swap on the tunnel ram for the weekend's festivities LOL! I think with a carb and linkage setup ready to go and already installed on the tunnel ram, you could do the swap in 15 minutes.
Finally, I made a video of the rear of the clear valve cover during a 6200 RPM dyno pull; Jim Whitton had asked about this in another post, wanting to know if the oil level got really high. I didn't think that it did, but then again I had no proof, because I don't normally stand in the dyno room and watch while the engine is screaming along during the pull

So, I set up the camera, zoomed in on the rocker arms for #8, and took this video:
http://youtu.be/9vcWvp_DIWAThe oil level doesn't make it up to the clear portion of the valve covers, indicating that the factory drainbacks should be able to handle the oil flow even if the intake manifold doesn't allow for oil return (like a Victor intake, for instance). My intake adapter does have openings to allow the oil to return in that manner, but it looks like from this test that they may not really be necessary if you restrict oil to the heads.
Within the next few weeks I hope to have the machine work done on one of the adapters for an Edelbrock 2991 Yates style intake, and also perhaps the Edelbrock 2865 Glidden Victor with the Dominator carb flange. I probably won't run those on this engine, though; I will wait until I have a stronger engine available to really wring those manifolds out. When I do, I will post it on this thread.


