Author Topic: 68 Shelby GT-500 Convertible Project and Retrospective  (Read 33457 times)

0 Members and 1 Guest are viewing this topic.

jayb

  • Administrator
  • Hero Member
  • *****
  • Posts: 7399
    • View Profile
    • FE Power
Re: 68 Shelby GT-500 Convertible Project and Retrospective
« Reply #30 on: October 02, 2017, 12:49:36 PM »
Great read! The only tires you'll be able to find for those wheels are BFGoodrich "G-Force Sport Comp 2's". Write that down for when you go into the tire shop haha. I found out the hard way when I went to get tires about a month ago. That's what is on the 68 Cougar, 16x8 Vintage 45's. Big enough to be cool, but not so big that they look out of place. Actually....thinking about it.....the Cougar also has Global West suspension parts, subframe brace and all that stuff. I can send you over pictures of it if you're interested.

Those Sport Comp 2s are exactly what I was going to run, 225/50ZR-16 in the front and 255/50ZR-16 in the rear.  I'm a little concerned about front tire clearance to the fenders, using a 16X8 wheel with a 4-1/2" back space.  Looks like your wheels are the same; what tire size are you running and how do they fit the car?
« Last Edit: October 02, 2017, 12:54:27 PM by jayb »
Jay Brown
- 1969 Mach 1, Drag Week 2005 Winner NA/BB, 511" FE (10.60s @ 129); Drag Week 2007 Runner-Up PA/BB, 490" Supercharged FE (9.35 @ 151)
- 1964 Ford Galaxie, Drag Week 2009 Winner Modified NA (9.50s @ 143), 585" SOHC
- 1969 Shelby Clone, Drag Week 2015 Winner Modified NA (Average 8.98 @ 149), 585" SOHC


jayb

  • Administrator
  • Hero Member
  • *****
  • Posts: 7399
    • View Profile
    • FE Power
Re: 68 Shelby GT-500 Convertible Project and Retrospective
« Reply #31 on: October 02, 2017, 12:52:08 PM »
"I will try to post periodic updates on this project as I go along.  Any and all comments and suggestions are welcome, and
thanks for indulging my trip through the past with this car - Jay"....Where are you going to keep your paper work?

After I get it blasted I'm moving the car, Steve.  The 68 Mustang will go into the paint booth for the winter, the race car will go up on the lift, the GT will go underneath, and the 68 Shelby will go where the race car is now, so that I can get the work done on it over the winter.
Jay Brown
- 1969 Mach 1, Drag Week 2005 Winner NA/BB, 511" FE (10.60s @ 129); Drag Week 2007 Runner-Up PA/BB, 490" Supercharged FE (9.35 @ 151)
- 1964 Ford Galaxie, Drag Week 2009 Winner Modified NA (9.50s @ 143), 585" SOHC
- 1969 Shelby Clone, Drag Week 2015 Winner Modified NA (Average 8.98 @ 149), 585" SOHC


mbrunson427

  • Hero Member
  • *****
  • Posts: 912
    • View Profile
Re: 68 Shelby GT-500 Convertible Project and Retrospective
« Reply #32 on: October 02, 2017, 04:47:12 PM »
Those Sport Comp 2s are exactly what I was going to run, 225/50ZR-16 in the front and 255/50ZR-16 in the rear.  I'm a little concerned about front tire clearance to the fenders, using a 16X8 wheel with a 4-1/2" back space.  Looks like your wheels are the same; what tire size are you running and how do they fit the car?

Those are the same exact sizes. That's the biggest size you can get out back. With that wheel, I think the fronts actually have a better fitment than the rear. Rears are tucked inboard just a tad, fronts are out there pretty perfectly. I don't have a picture of the car after the new set of tires.... in this picture the rears are one size smaller than they are now (255/50/16). Only issue I have with those wheels......I hate the center caps that they have available.......but I think you have the equipment to make that issue go away. When I was in college I drew up a set of center caps in solidworks and sent them off to a few machinists. Everyone I sent them to kept giving me this "run around" about how they couldn't do anything with the file i was sending them. I now realize that I was working on the universities computers, their solidworks licenses were for education only and the files were encrypted. Those machinists weren't giving me the run around after all.....

« Last Edit: October 03, 2017, 08:19:05 AM by mbrunson427 »
Mike Brunson
BrunsonPerformance.com

jayb

  • Administrator
  • Hero Member
  • *****
  • Posts: 7399
    • View Profile
    • FE Power
Re: 68 Shelby GT-500 Convertible Project and Retrospective
« Reply #33 on: October 02, 2017, 06:31:37 PM »
Mike, your picture isn't showing up for me...

Edit:  Now it is, looks good!
« Last Edit: October 02, 2017, 09:17:50 PM by jayb »
Jay Brown
- 1969 Mach 1, Drag Week 2005 Winner NA/BB, 511" FE (10.60s @ 129); Drag Week 2007 Runner-Up PA/BB, 490" Supercharged FE (9.35 @ 151)
- 1964 Ford Galaxie, Drag Week 2009 Winner Modified NA (9.50s @ 143), 585" SOHC
- 1969 Shelby Clone, Drag Week 2015 Winner Modified NA (Average 8.98 @ 149), 585" SOHC


mbrunson427

  • Hero Member
  • *****
  • Posts: 912
    • View Profile
Re: 68 Shelby GT-500 Convertible Project and Retrospective
« Reply #34 on: October 02, 2017, 08:37:26 PM »
Try that. I've been using google photos for forum posting and obviously I'm not a champ yet.
Mike Brunson
BrunsonPerformance.com

WConley

  • Hero Member
  • *****
  • Posts: 1157
  • No longer walking funny!
    • View Profile
Re: 68 Shelby GT-500 Convertible Project and Retrospective
« Reply #35 on: October 02, 2017, 10:50:39 PM »
Cool story Jay!  I do remember gazing upon that car with the one repaired floorpan, and hearing your plans for it  :D

FYI, my '68 GT-350 fastback had much better aerodynamics.  Using the same method to calculate top speed, I attained 152 mph with a decently-built roller cam 5.0 smallblock.  This was in a foreign country where they say "eh" a lot, and have big long empty stretches of highway with numbers like "401"  ;)

Unlike you, I was foolish and let that car go.  Thanks for the good read!

Say Bill, at your top speed, do you remember if the steering got light..like scary light due to front end lift?

I ask since my '70 Mach 1 fastback did get scary light at speed. I have the OEM black plastic spoiler but when Ford backed the '69-'70's in the old Trans-Am series, all of the racers had a huge, well-braced, aluminum front spoiler that literally touched the track at speed. Think I know why now!

Not practical, darn it, for a streeter though.

Bob - Interestingly enough, the car did feel pretty good going up to that speed.  The front suspension was a bit lower than stock, but nothing radical.  The Shelby louvers on the hood may have helped get some of that air out from underneath (plenty of room around that small-block), combined with the stabilizing effect of the rear spoiler.  That's my best guess, plus being young-and-dumb with a clenched sphincter kept the steering inputs to a minimum.

Oh I've experienced total loss of steering at speed - in a '66 Corvette roadster.  At 120 you were just a passenger!  Again, young-and-dumb.
A careful study of failure will yield the ingredients for success.

machoneman

  • Hero Member
  • *****
  • Posts: 3846
    • View Profile
Re: 68 Shelby GT-500 Convertible Project and Retrospective
« Reply #36 on: October 03, 2017, 07:36:16 AM »
Thanks Bill and interesting on the Vette. Cousin Rich has a gennie 427 '67 convert. and yes, I also felt loss of steering in it long ago at speed...although I don't remember just how fast it was going.
Bob Maag

mbrunson427

  • Hero Member
  • *****
  • Posts: 912
    • View Profile
Re: 68 Shelby GT-500 Convertible Project and Retrospective
« Reply #37 on: October 03, 2017, 08:11:13 AM »
.
« Last Edit: October 03, 2017, 08:28:49 AM by mbrunson427 »
Mike Brunson
BrunsonPerformance.com

gdaddy01

  • Hero Member
  • *****
  • Posts: 656
    • View Profile
Re: 68 Shelby GT-500 Convertible Project and Retrospective
« Reply #38 on: October 03, 2017, 08:11:26 PM »
much better reading your post , Jay , and real history , than looking  at b.j. etc. auctions and seeing how much money crazy people have .

jayb

  • Administrator
  • Hero Member
  • *****
  • Posts: 7399
    • View Profile
    • FE Power
Re: 68 Shelby GT-500 Convertible Project and Retrospective
« Reply #39 on: October 12, 2017, 01:48:18 PM »
Over the last few days I've made a big step in the right direction with this project.  The car has been blasted, epoxy primed, and the underbody painted.  I thought I would relate my experiences with this process since I haven't ever had this done with a car before.

Let me start by saying that although I didn't set the car up on a rotisserie for this, it would have been a much easier process all the way around if I had.  The rotisserie has some advantages that I had not previously considered.  I didn't want to go that route because I was worried about bending the car; with the inner rocker panels complete shot, I felt that the only thing keeping it straight was the side bars that had been welded onto the factory roll bar.  With no hardtop to add additional support, I was worried that putting the car on a rotisserie would have led to it bending or warping out of shape.  So, despite the fact that one of my friends had one he could lend me, I didn't use a rotisserie.  Hindsight being 20/20, I should have put the car on a rotisserie as soon as I had the new inner rocker panels welded in solidly.  Between the inner rockers and the side bars, I think the car would have stayed straight.

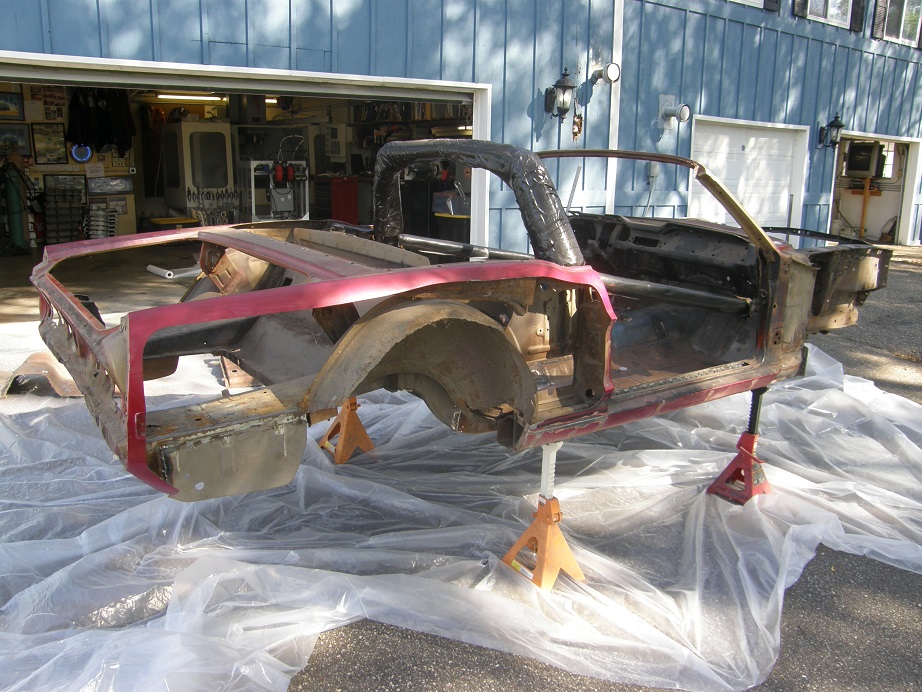
On Monday this week I contracted with a local guy to do dustless blasting on the shell of the car, plus the doors and some other parts.  Dustless blasting is where they use ground up glass, finer than sand, which is sprayed along with water to take off the paint and rust.  According to the guy who did the blasting, they put some kind of rust inhibitor in the water they use, to keep the freshly blasted car from rusting for the next 24-72 hours.  Sunday, in preparation for the blasting job, I rolled the car on jacks out into the driveway, and put it up as high as I could on jackstands.  I also put some plastic down under the car to catch as much of the sand as possible.  Here's a picture of the car out in the driveway:


On Monday when the guy showed up I found out one reason why the rotisserie would have been a better option.  The nozzle on his dustless blasting setup was at least a foot and a half long, and was rigid, with a 1-1/2" diameter hose attached.  No way he was going to be able to get under the car, point it straight up in the air, and get to all the nooks and crannies on the underbody of the car.  There was a lot of "I'll do the best I can underneath" from the guy, which didn't make me happy, but it had taken me a month to schedule the appointment with him and I didn't have time to re-schedule it, so we went ahead anyway.  Later, I ended up hand sanding and wire wheeling the areas under the car that he couldn't get to.  Of course with the rotisserie we could have flipped the car over and gotten the whole underside with no problem.

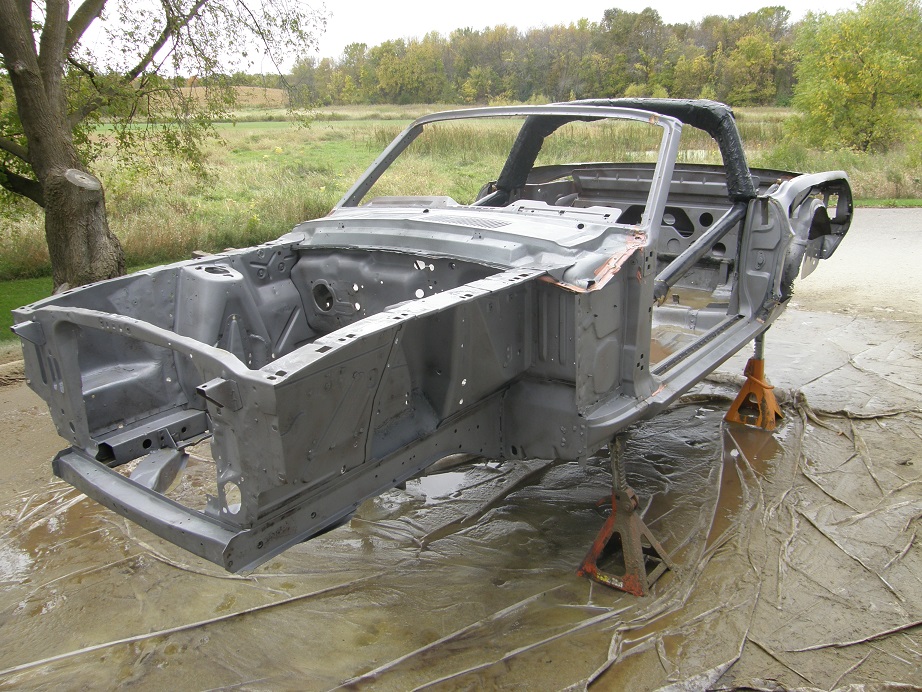
To do the shell and the other parts it was about a five hour process.  After blasting everything, checking for spots that were missed, and blasting again, he rinsed the whole car using my garden hose, and mixing in some of that anti-rust stuff with one of those bottles that screws onto the end of the hose, kind of like what you'd use for fertilizer on your lawn.  The sand, of course, gets everywhere, and it took over an hour to rinse the sand off the car.  And of course, we couldn't get it all.  I worked with the rinsing hose for a while, and you just couldn't chase it all down.  Finally we called it quits on the rinsing and blew off as much of the water as we could with an air hose.  Here's a picture of the car when this process was mostly complete:


We also tried the dustless blasting process out on a couple of the fiberglass pieces on the car, but that didn't work so well.  It looked like the gelcoat on the fiberglass parts was being eaten away by the abrasive, even if he kept the nozzle pretty far away from the part.  The guy said he had done dozens of Corvettes with no issues, but the Shelby parts must have a thinner or different gelcoat than a Corvette, because I just didn't like the looks of the areas where he had blasted.  He thought the same thing, so we stopped after a couple spots on the trunk and one of the front fascia pieces.

After we got all done he was nice enough to help me push the car back into the garage, where I spent more time blowing off the water and more sand.  I had erected a sheet of plastic around the car to keep the sand out of the rest of the shop, as well as the paint; I was planning to epoxy prime the whole car on Tuesday, and paint the underbody on Wednesday.

Later on Monday night I was out cleaning up the car some more, and around the spots where I had welded, I saw some faint traces of rust forming.  So much for no rust for the first 24-72 hours...

Tuesday morning I took all the separate pieces and the doors, cleaned all the sand off them with compressed air and a vacuum, and put them in my paint booth.  It took me about an hour for each door to get them completely free of sand, turning them over and over, continually blowing them out and vacuuming any sand that I found.  There didn't appear to be any rust forming on the doors or the other parts so I shot them all with two coats of epoxy primer by noon.  For years I have used a PPG product called DP40 as the epoxy primer, but I found out recently that it has been discontinued thanks to new EPA regulations  >:(  Reading online about the PPG replacement, I did not see a lot of good things.  I ended up going with an epoxy primer sold by Eastwood, which a friend of mine had used recently with success.  I also sprayed it with a new paint gun from Devillbiss, using something called their Dekups system.  This is basically a collapsible, gravity feed cup for the spray gun, and has the big advantage of allowing you to spray with the gun at any angle.  No vents to leak, and the cup kind of collapses around the paint as the paint is used up, making for a supply of paint to the gun no matter what angle you spray at.  Later on Tuesday when I sprayed the car, this system was invaluable; I really, really like it.  The Eastwood epoxy primer, on the other hand, gets medium marks from me.  It did not result in a particularly smooth finish on the parts in the booth, although it did spray on OK.  Now that its been a couple days I've been able to check the adhesion, and it seems to be good, although the blasted surface is an excellent surface for a primer and I would think nearly any paint would stick well on it.

Tuesday afternoon I started on the body.  I spent 7 hours in total cleaning and prepping the body of the car.  I must have vacuumed sand out of the interior a half dozen times.  There were places that I could not get the sand all the way out of, for example the cowl area under the vents.  I'd blow compressed air in from the top and the sides, in both directions, and no matter how many times I did it, when I blew the air in, more sand would come out.  I finally got it to a minimum after working that area for about 45 minutes, but it was clear that I'd never get it all out of there.  Under the car some of the sand was sticking to the sheet metal, so I scrubbed the whole underside with a Scotchbrite pad.  Up in the middle of the transmission tunnel, and between the frame rails and trunk drop downs in the rear, the blasting didn't reach, so I went in there with a wire brush and tried to clean those areas up as best as I could.  Obviously  they didn't look as good as the blasted areas but I figured at least the epoxy primer would stick.  Finally at about 7:00 PM I took some Metal-Prep, which I believe is phosphoric acid, and hit all the weld spots that looked like they were starting to rust.  There were a few more of them by this time, but it wasn't too bad.  I rinsed and dried after the Metal-Prep (actually I used PPG DX-579), and was ready to epoxy prime the shell.   

I had purchased one gallon each of the epoxy primer and activator, and it is mixed 1:1 so I had two gallons of sprayable material.  I had used about 25% of that on the parts in the booth, and I figured I had enough for the shell left over.  Wrong, I got one complete coat on the car, then about half the car with the second coat before I ran out.  All those nooks and crannies in the vehicle took a lot of paint.  And, of course, when I was painting around the cowl vents a little sand blew up and landed on the cowl  >:(  I will have to sand that area off and try to reprime it, then have another go at getting more sand out of there.  The painting took a long time; I was painting until 11:00 PM on Tuesday.  Again, that gun with the Dekups system was invaluable under the car, under the lips of the trunk, up under the dash, etc.  I don't know how I would have covered all those areas without it.  Of course, if the car had been on a rotisserie, it would have been no problem with a regular gun.

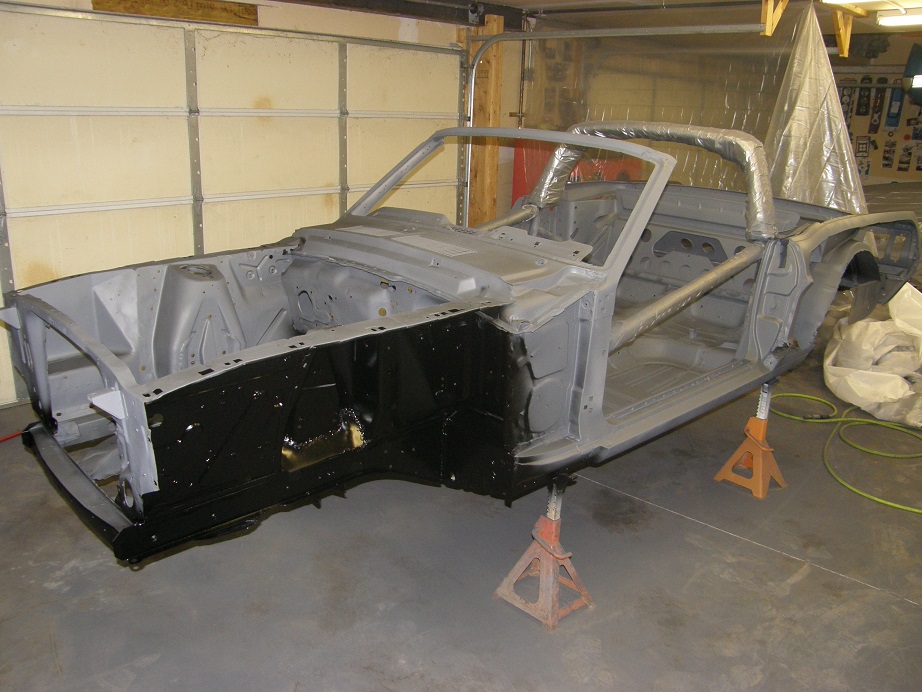
The epoxy primer can be recoated up to 4-5 days without scuffing, so on Wednesday I painted the underbody of the car.  I used Eastwood's Chassis Black, which I have used before with success out of a spray can.  This time I had purchased it in quarts for use in the gun.  You mix the paint 4:1 with the activator.  I found I needed to thin it with their recommend urethane reducer by 10%-15% to get it to spray out of the gun reasonably well; as mixed it is pretty thick.  I got two coats on the complete underside of the car and the outside of the inner fenders, using about 3/4 gallon of mixed sprayable material.  The paint went on very nicely and it looks good.  Here's a couple pictures of the car with the epoxy primer and paint on it:


So, now I'm back to more sheet metal work.  I have to weld in the seat support in the interior, then the pans that go underneath the seat support on convertibles, and then start on the quarter panels.  The blasting also blew a few holes open in the sheet metal that I didn't know about before, so I will have to patch those.  Also, there is some rust repair to do on the doors.  I'm sure all this will take me a few months before I can start the actual body work, but when this is all finished, for the first time since I've owned it the car will be completely solid.  I'm sure looking forward to that!
Jay Brown
- 1969 Mach 1, Drag Week 2005 Winner NA/BB, 511" FE (10.60s @ 129); Drag Week 2007 Runner-Up PA/BB, 490" Supercharged FE (9.35 @ 151)
- 1964 Ford Galaxie, Drag Week 2009 Winner Modified NA (9.50s @ 143), 585" SOHC
- 1969 Shelby Clone, Drag Week 2015 Winner Modified NA (Average 8.98 @ 149), 585" SOHC


Heo

  • Hero Member
  • *****
  • Posts: 3281
    • View Profile
Re: 68 Shelby GT-500 Convertible Project and Retrospective
« Reply #40 on: October 12, 2017, 02:50:07 PM »
Jay I would borrow the rotisseries and rotate the body to get more
sand out. How much you vaccum and blow there is still some sand
that will blow out when you start painting it....Ask me how i know ::)
The DP40 was gone here for a while banned for car painting. Me and the
paint shop found a loophole, I'm going to paint a boat,tractor,trailer whatever
then its not banned so i got some DP40 as late as June ,July ..
A blasted surface have around 40%more surface area so that's why you used
so much more paint than your calculation


« Last Edit: October 12, 2017, 02:59:26 PM by Heo »


The defenition of a Gentleman, is a man that can play the accordion.But dont do it

turbohunter

  • Hero Member
  • *****
  • Posts: 2509
    • View Profile
Re: 68 Shelby GT-500 Convertible Project and Retrospective
« Reply #41 on: October 12, 2017, 03:48:54 PM »
All I could think about was "man he puts in a lot of hours in a day".
Much respect dude.
Marc
'61 F100 292Y
'66 Mustang Injected 428
'66 Q code Country Squire wagon


cjshaker

  • Hero Member
  • *****
  • Posts: 4448
    • View Profile
Re: 68 Shelby GT-500 Convertible Project and Retrospective
« Reply #42 on: October 12, 2017, 08:51:09 PM »
Yes, DP 40 was the BEST stuff ever! Unfortunately, it would also kill you if you didn't wear a proper respirator! That's what I used on my Mach 15+ years ago, and my friend that owns a body shop bought quite a few gallons of the stuff before they took it off the market.

You should have asked here before doing the water blasting. Water and any type of sand just don't get it for blasting cars. The water will coagulate with the sand and make it darn near impossible to get completely out in the difficult areas where you can't reach. It also holds the moisture in, so it can be a double negative as that goes. Dry sand will remain loose and can be blown out much easier (it still takes LOTS of time, and air). Water blasting is meant for brick and building exteriors.

Also, there are still some very good modern epoxy primers, but you have to speak with guys that do this stuff on a daily basis, because many of the new products are hit and miss. Just going by recollection, my friends use DP 70 or something like that. I'd have to ask them to be sure though. And I think most are water based solvents now, although there are some good products using both types.

Also, concerning the remaining sand and seams, I'd highly suggest not stopping until you stop getting any sand out. Then I'd recommend using something like Eastwoods Corroless and going over EVERY seam on the car. It will seal the seams and stabalize any rust (including any sand/moisture) that's trapped between the seams. If you do that, I'd practically guarantee you that you will never have rust creep out of the seams, which is where it always starts. This is experience talking after helping my friends do MANY restorations, including doing my own car.

The trunk floors, drop offs, taillight panel and floor pans look remarkably solid! Are you going to cut the 1/4 panels completely off and replace them, or try to weld over what's remaining?
Doug Smith


'69 R-code Mach 1, 427 MR, 2x4, Jerico, 4.30 Locker
'70 F-350 390
'55 Ford Customline 2dr
'37 Ford Coupe

TimeWarpF100

  • Hero Member
  • *****
  • Posts: 683
    • View Profile
Re: 68 Shelby GT-500 Convertible Project and Retrospective
« Reply #43 on: October 12, 2017, 09:32:58 PM »
Like always a very good read!
Back in 1975 I bought a 1970 428scj Mach 1
For 500.00. 36k mi on it. It was in a guys driveway
And one night he saw someone trying to steal
The shaker hood. He brought shaker in house and forgot
About it. Of course many days of rain and engine filled
With water. Finally put car in garage but left water in engine.
Made for good deal for me. Had the car 15 yrs thought
I would never sell. I moved to az then year
Later lost storage. Let the car go.

My '66 F100 (482 ) I traded for a '71 f100 and 2800 cash.
I paid 2700 for the '71. In '66 for 100 to the good.
Still have it nearly 18 yrs later.

jayb

  • Administrator
  • Hero Member
  • *****
  • Posts: 7399
    • View Profile
    • FE Power
Re: 68 Shelby GT-500 Convertible Project and Retrospective
« Reply #44 on: October 12, 2017, 11:44:06 PM »
You should have asked here before doing the water blasting. Water and any type of sand just don't get it for blasting cars. The water will coagulate with the sand and make it darn near impossible to get completely out in the difficult areas where you can't reach. It also holds the moisture in, so it can be a double negative as that goes. Dry sand will remain loose and can be blown out much easier (it still takes LOTS of time, and air). Water blasting is meant for brick and building exteriors.

Also, there are still some very good modern epoxy primers, but you have to speak with guys that do this stuff on a daily basis, because many of the new products are hit and miss. Just going by recollection, my friends use DP 70 or something like that. I'd have to ask them to be sure though. And I think most are water based solvents now, although there are some good products using both types.

Also, concerning the remaining sand and seams, I'd highly suggest not stopping until you stop getting any sand out. Then I'd recommend using something like Eastwoods Corroless and going over EVERY seam on the car. It will seal the seams and stabalize any rust (including any sand/moisture) that's trapped between the seams. If you do that, I'd practically guarantee you that you will never have rust creep out of the seams, which is where it always starts. This is experience talking after helping my friends do MANY restorations, including doing my own car.

The trunk floors, drop offs, taillight panel and floor pans look remarkably solid! Are you going to cut the 1/4 panels completely off and replace them, or try to weld over what's remaining?

Well Doug, the people I know in my area who have done these sorts of restorations warned me off of dry blasting with sand, due to the heat buildup and coarser sand used, which tends to warp panels.  The only real good alternative was blasting with plastic media, but that meant transporting the car to another location, which I didn't want to do.  The blasting I had done did not warp anything at all, so I'm happy with that part of the process.  Also, I'm not buying your claim that the sand holds moisture.  I've seen no evidence of that in my car, or any evidence of the sand building up or caking anywhere.  And I'm also not buying the idea that a dry blasting of the car would let me get sand out any easier.  That enclosed area under the cowl vents is going to hold some sand no matter what, I think.  The local guys I know have all used the dustless blasting process, with good results.  The only real complaint I have about it is the start of a little rust in areas where I previously welded, and I was able to take care of that pretty easily.

I think once I get the metal work done I may take Heo's advice, and put the car on my friend's rotisserie and tip it upside down a few times to help with any last sand removal.  It would be nightmarish to have that sand come flying out when I was painting the final color.

I do plan to use seam sealer everywhere, and I'll look at that Eastwood Corolless that you mentioned.  On the trunk drop downs and floor pans, they have already been replaced, which is why they look good.  Both original floorpans were rusted through, and so were the original trunk drop downs.  I replaced them before moving the car for structural integrity purposes, and also because I've had the replacement panels since I started on the car in 2003, and there was some surface rust on them.  The taillight panel and trunk floors were in pretty good shape on the car as it was.  And I will not be replacing the entire quarter panel, just the outside face.  I have complete quarters for the car, but the corners of the replacement panels are noticeably rounder, not as sharp, as the factory corners, so I want to leave as much of that original metal as possible. 
Jay Brown
- 1969 Mach 1, Drag Week 2005 Winner NA/BB, 511" FE (10.60s @ 129); Drag Week 2007 Runner-Up PA/BB, 490" Supercharged FE (9.35 @ 151)
- 1964 Ford Galaxie, Drag Week 2009 Winner Modified NA (9.50s @ 143), 585" SOHC
- 1969 Shelby Clone, Drag Week 2015 Winner Modified NA (Average 8.98 @ 149), 585" SOHC