Author Topic: 68 Mustang Memorial Day Weekend Thrash  (Read 59695 times)

0 Members and 1 Guest are viewing this topic.

cobracammer

  • Hero Member
  • *****
  • Posts: 1173
    • View Profile
Re: 68 Mustang Memorial Day Weekend Thrash
« Reply #75 on: June 12, 2015, 09:00:02 AM »
Toss up between 2 awesome projects......  I don't envy you .... Or do I?

Just out of curiousity (and a little off topic with the 68 thrash).  Which Rods are you putting back in the SOHC? 
Jason
2005 Saleen S281 (427 SOHC 2 X 4 EFI swap), T56 Magnum XL 6 speed, 9" Currie rear with 3.89 Gears

jayb

  • Administrator
  • Hero Member
  • *****
  • Posts: 7577
    • View Profile
    • FE Power
Re: 68 Mustang Memorial Day Weekend Thrash
« Reply #76 on: June 12, 2015, 11:21:43 AM »
I went with Crowers again.  See the 577 SOHC Post Mortem post.
Jay Brown
- 1969 Mach 1, Drag Week 2005 Winner NA/BB, 511" FE (10.60s @ 129); Drag Week 2007 Runner-Up PA/BB, 490" Supercharged FE (9.35 @ 151)
- 1964 Ford Galaxie, Drag Week 2009 Winner Modified NA (9.50s @ 143), 585" SOHC
- 1969 Shelby Clone, Drag Week 2015 Winner Modified NA (Average 8.98 @ 149), 585" SOHC


jayb

  • Administrator
  • Hero Member
  • *****
  • Posts: 7577
    • View Profile
    • FE Power
Re: 68 Mustang Memorial Day Weekend Thrash
« Reply #77 on: November 30, 2015, 01:37:48 AM »
Finally, the mad thrash leading up to Drag Week is over, Drag Week is done, my business trip to Europe is over, the shop has been thoroughly cleaned (took a good three weeks!), and I've had my big Drag Week victory party.  FINALLY, I'm back now on this project.  I had Friday, Saturday and Sunday more or less free, so I got back to work getting all the new components for this car hooked up.

The biggest items were the hydraulic clutch setup and the master cylinder and brake lines, so I started there.  Figured it would take me a full day to get all this done.  What a joke LOL!  I'll bet I've got 20 hours in this part already, and haven't even started running the lines.  I started by removing the master cylinder in order to get access down below to mount the clutch cylinder.  After pulling the master cylinder, I knew I was in for more than I had originally bargained for:


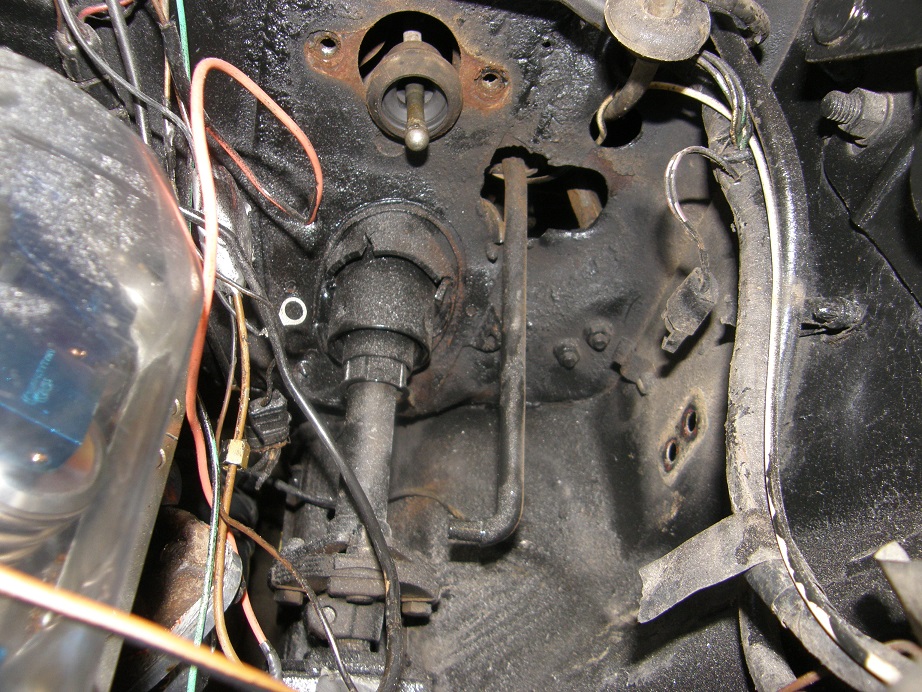
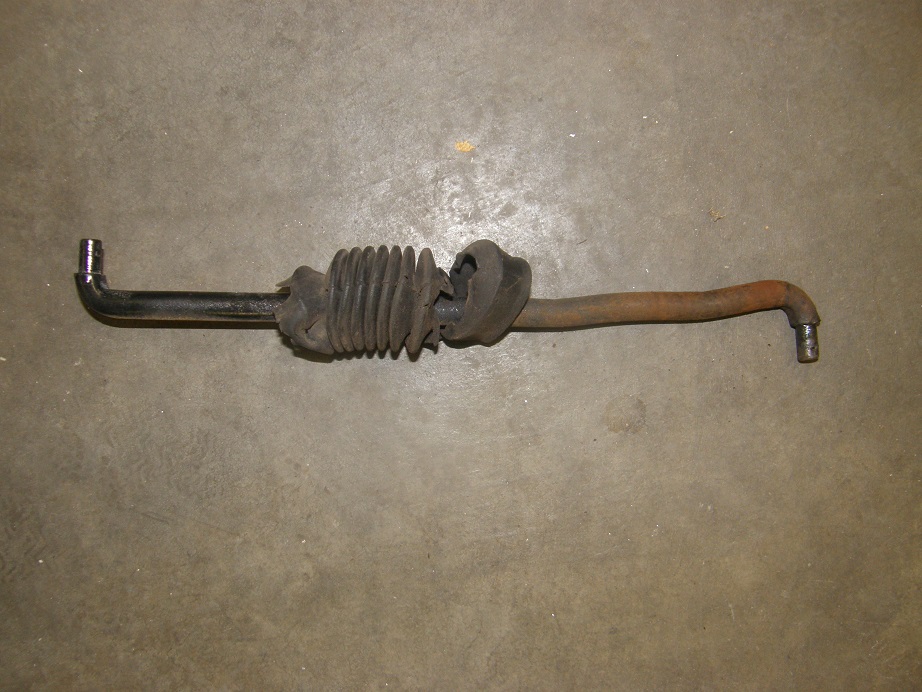
The firewall is totally hacked up.  To the right of the clutch rod you can see the remnants of the original hole where it came through the firewall, and it has been hogged out towards the middle of the car so that the clutch rod can come through.  Why was this done?  I have no idea.  But looking at the clutch rod itself, there have obviously been some "modifications":


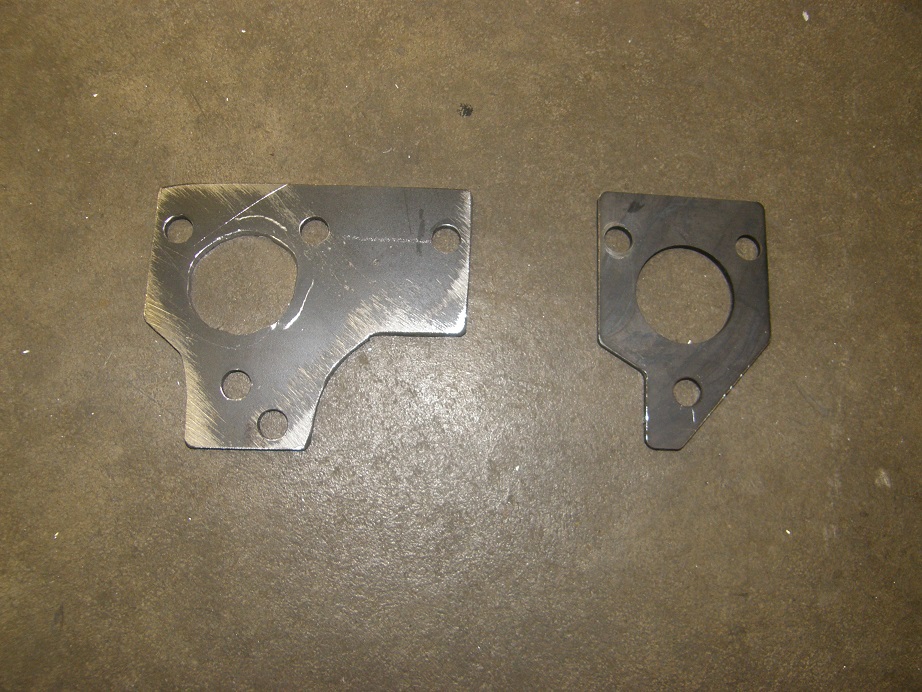
The problem here was that the new hydraulic clutch cylinder is supposed to bolt onto the firewall, around the original hole.  Since that area has been opened up, I had to fabricate a custom piece to bridge the enlarged hole, in order to support the hydraulic clutch cylinder.  The cylinder and the 1/8" steel backing plate that comes with it sandwiches the firewall to hold it in place.  I ended up making a whole new steel backing plate.  The picture below shows the original backing plate on the right, and the new one that goes across the hole and bolts to the firewall on the left:


Of course another issue with all this is that there's a fair amount of work to be done under the dash.  I'd forgotten how much fun that was  >:(  
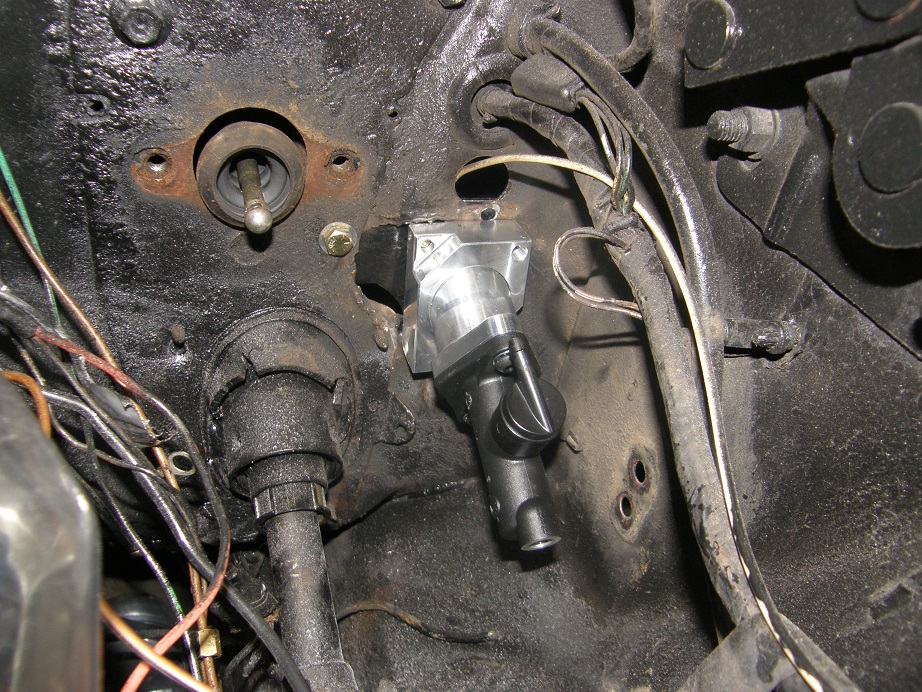
Trying to get the bolts through the plate from under the dash, while my son held the hydraulic clutch cylinder in place on the engine compartment side, caused lots of cramps in my arms and neck, and bumps on the head.  Finally, at the end of the day on Saturday, I got the clutch cylinder in position and bolted down:


Sunday morning I got out to the shop, expecting the Wilwood master cylinder installation to go much more quickly.  It did, sort of, but fabrication was required here also.  The Wilwood master cylinder just had a threaded rod coming out the end to attach to the brake pedal.  No way I could just screw on a rod end and bolt it to the Mustang brake pedal; the pedal has a fairly thick stud coming out of it, and of course the brake light switch is also integrated into this assembly.  After thinking about this for a while I decided to cut the end off the original master cylinder pushrod, and graft that onto the Wilwood master cylinder.  So I cut the end off the original master cylinder pushrod, and also cut the threaded portion off the 3/8" rod end.  Then I bored the rod end out to a depth of 1/8" or so, and pressed the original master cylinder pushrod end into place.  Here's a picture of the Wilwood master cylinder, and the original pushrod that was cut, the rod end that was cut, and the 3/8" original master cylinder end pressed into the threaded body of the rod end.  Also shown is the brake light switch:


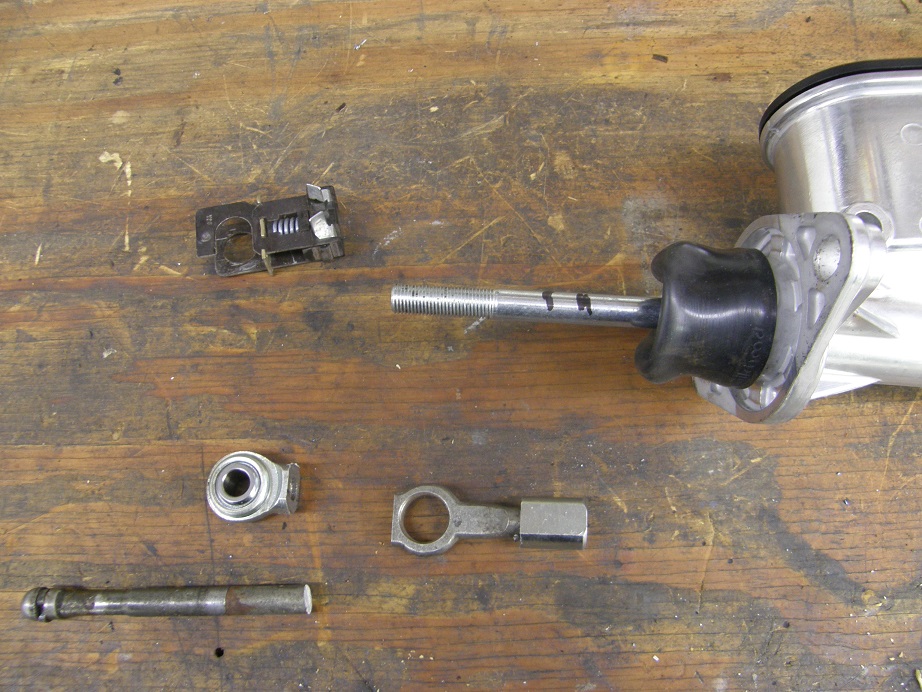
The Sharpie marks on the rod of the Wilwood master cylinder are where it needed to be threaded down to, so I took a tap and threaded the rod all the way down to the second Sharpie mark.  Then I welded the old master cylinder end into the piece of the rod end that I'd cut off.  Then I had to cut the Wilwood rod down to the correct length, but after filing that smooth I was able to thread the "new" rod end onto the Wilwood master cylinder, along with a jam nut:


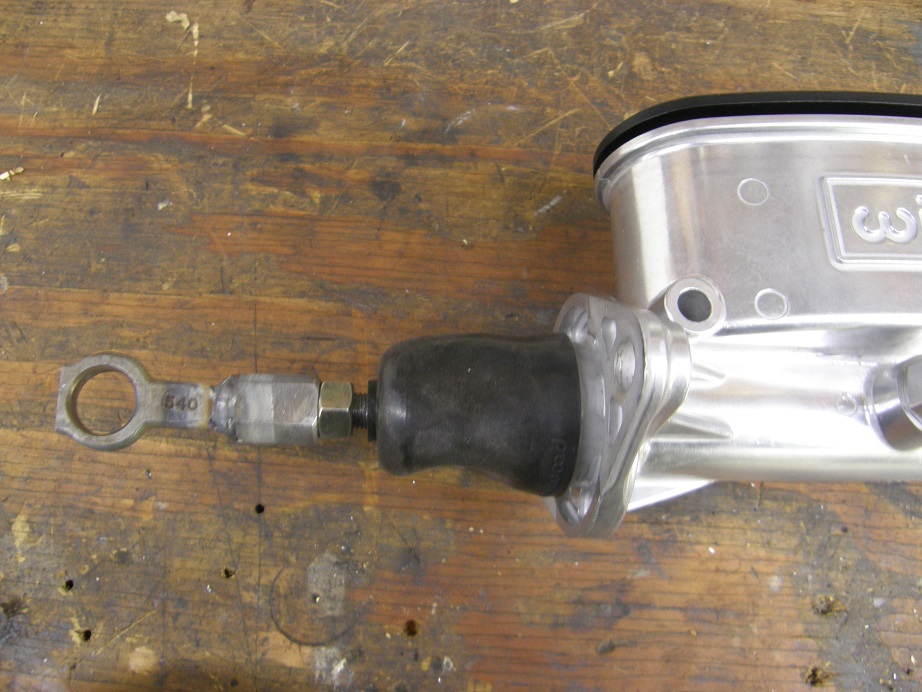
With this arrangement I can adjust the length of the master cylinder pushrod, lock it with the jam nut when I've got it correct, and still use the factory brake light switch.

After a break this afternoon to watch some football, I got back out to the shop tonight, and mounted the rear brake proportioning valve, and also the reservoir for the hydraulic clutch cylinder.  Here's a picture of everything bolted into place:


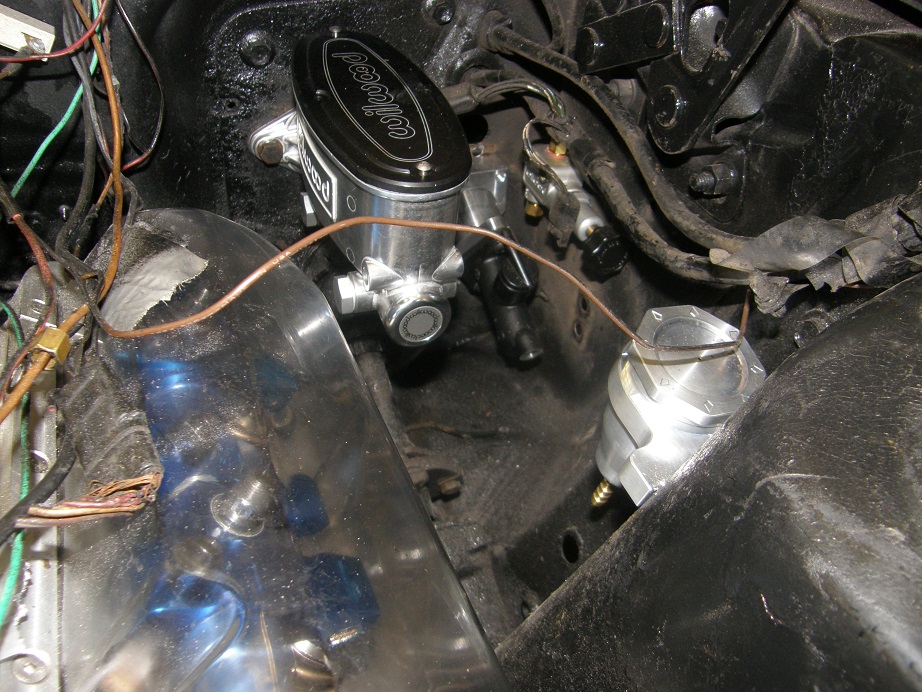
Despite the new parts this corner of the engine compartment is a real mess.  But this car is going to be a driver, not a show car, so at this point I'm satisfied that everything is solidly in place and functional.  I still need to finish the clutch rod and master cylinder rod hookup under the dash ( :(), and then run the lines and bleed the brakes, but hopefully the rest of this job won't be as bad the last couple days.  I'll try to post another update on this project next weekend - Jay
« Last Edit: November 30, 2015, 10:02:31 AM by jayb »
Jay Brown
- 1969 Mach 1, Drag Week 2005 Winner NA/BB, 511" FE (10.60s @ 129); Drag Week 2007 Runner-Up PA/BB, 490" Supercharged FE (9.35 @ 151)
- 1964 Ford Galaxie, Drag Week 2009 Winner Modified NA (9.50s @ 143), 585" SOHC
- 1969 Shelby Clone, Drag Week 2015 Winner Modified NA (Average 8.98 @ 149), 585" SOHC


machoneman

  • Hero Member
  • *****
  • Posts: 3859
    • View Profile
Re: 68 Mustang Memorial Day Weekend Thrash
« Reply #78 on: November 30, 2015, 06:08:19 AM »
Agree it makes no sense as to why someone made that hole. It looks, in the lower right corner, that a flame cutter was used to make that hole. Strange.

Your fix to the master cylinder rod is interesting. Still, I hate the idea of a weldment on such a critical part that even, with a great weld and the part being in compression,  a failure here could really hurt you or someone else. JMO! 
Bob Maag

jayb

  • Administrator
  • Hero Member
  • *****
  • Posts: 7577
    • View Profile
    • FE Power
Re: 68 Mustang Memorial Day Weekend Thrash
« Reply #79 on: November 30, 2015, 08:51:37 AM »
I'm not too concerned about it, Bob, because I counterbored the threaded sleeve and pressed the original master cylinder rod end into the sleeve, probably close to 1/4" deep.  I think it would probably have held just fine if the weld wasn't even there, but welding for sure makes it secure.
Jay Brown
- 1969 Mach 1, Drag Week 2005 Winner NA/BB, 511" FE (10.60s @ 129); Drag Week 2007 Runner-Up PA/BB, 490" Supercharged FE (9.35 @ 151)
- 1964 Ford Galaxie, Drag Week 2009 Winner Modified NA (9.50s @ 143), 585" SOHC
- 1969 Shelby Clone, Drag Week 2015 Winner Modified NA (Average 8.98 @ 149), 585" SOHC


ScotiaFE

  • Hero Member
  • *****
  • Posts: 1409
  • Howie
    • View Profile
Re: 68 Mustang Memorial Day Weekend Thrash
« Reply #80 on: November 30, 2015, 09:39:38 AM »
As always Jay that's some good engineering to make it work.
I've done a similar configger to a M/C push rod. Works for me.
Now would be the time to fit the line lock in.
It's hard to hold the car without one.
You know at the box and line. You know you will.  ;)

jayb

  • Administrator
  • Hero Member
  • *****
  • Posts: 7577
    • View Profile
    • FE Power
Re: 68 Mustang Memorial Day Weekend Thrash
« Reply #81 on: November 30, 2015, 09:42:20 AM »
Good idea, Howie, and I just happen to have a spare line lock on the shelf  ;D  I can get it installed in the brake line and just hook it up later, if (when!) I decide to take this thing to the track...
Jay Brown
- 1969 Mach 1, Drag Week 2005 Winner NA/BB, 511" FE (10.60s @ 129); Drag Week 2007 Runner-Up PA/BB, 490" Supercharged FE (9.35 @ 151)
- 1964 Ford Galaxie, Drag Week 2009 Winner Modified NA (9.50s @ 143), 585" SOHC
- 1969 Shelby Clone, Drag Week 2015 Winner Modified NA (Average 8.98 @ 149), 585" SOHC


BruceS

  • Hero Member
  • *****
  • Posts: 738
    • View Profile
Re: 68 Mustang Memorial Day Weekend Thrash
« Reply #82 on: November 30, 2015, 09:54:38 AM »
Gotta love that under-dash work!   ::)  I had a big dose of that this last summer when r+r-ing the AC/heat plenum on the Fairlane.   I went ahead and bit the bullet by removing the seat, carpet, etc.  so I could really get my "head" into it. 
66 Fairlane 500, 347-4V SB stroker, C4
63 Galaxie 500 fastback, 482 SO 4V, Cruise-O-Matic

machoneman

  • Hero Member
  • *****
  • Posts: 3859
    • View Profile
Re: 68 Mustang Memorial Day Weekend Thrash
« Reply #83 on: November 30, 2015, 09:58:07 AM »
I'm not too concerned about it, Bob, because I counterbored the threaded sleeve and pressed the original master cylinder rod end into the sleeve, probably close to 1/4" deep.  I think it would probably have held just fine if the weld wasn't even there, but welding for sure makes it secure.
Ah, got it. The depth helps. Just was concerned since I've heard of a few almost tragic incidents  and saw the results of one, where someone half-ass welded a relocated factory brake pedal pivot pin (the pin that engages the back end of the brake pushrod) and it broke over time. Each went for a wild ride for sure!
Bob Maag

cjshaker

  • Hero Member
  • *****
  • Posts: 4539
    • View Profile
Re: 68 Mustang Memorial Day Weekend Thrash
« Reply #84 on: December 01, 2015, 06:53:18 PM »
.....and I've had my big Drag Week victory party.

Hmm, our invitation must have been lost in the mail? I hate it when that happens :(


Gotta love that under-dash work!   ::)  I had a big dose of that this last summer when r+r-ing the AC/heat plenum on the Fairlane.   I went ahead and bit the bullet by removing the seat, carpet, etc.  so I could really get my "head" into it. 

THIS ^^^ is the answer, at least the seat anyway. Only takes a few minutes and is sooo much easier on the back and neck.

I can't remember if it was posted, but is this the hydraulic throwout bearing style or a cylinder that pushes against the throwout arm? I'll be curious how it feels when it's done. I've only been in one retro-fit job and it was pretty sensitive. I didn't care for it but I think it could have been made better with some fiddling. Is there any sort of adjustment on the pressure?
Doug Smith


'69 R-code Mach 1, 427 MR, 2x4, Jerico, 4.30 Locker
'70 F-350 390
'55 Ford Customline 2dr
'37 Ford Coupe

rcodecj

  • Sr. Member
  • ****
  • Posts: 474
    • View Profile
Re: 68 Mustang Memorial Day Weekend Thrash
« Reply #85 on: December 01, 2015, 07:05:07 PM »
They sell adjustable brake push rods but I would imagine you were in a hurry.
What you did looks good to me.

http://www.cjponyparts.com/ssbc-brakes-adjustable-master-cylinder-pushrod-kit-with-adapters-1964-1978/p/A1726/

jayb

  • Administrator
  • Hero Member
  • *****
  • Posts: 7577
    • View Profile
    • FE Power
Re: 68 Mustang Memorial Day Weekend Thrash
« Reply #86 on: December 01, 2015, 10:31:03 PM »
Gee, Doug, I would have invited you if I thought you'd be willing to drive 1000 miles to be here  ;D  It was a good party, but it wasn't that good...

I did have the front seats out when laying under the dash.  Still a pain though.  One of the issues I have is that I require bifocals in my old age, and getting your head into the right position to see what you are trying to see, while looking through the bottom half of the glasses lens, can be kind of difficult.  I end up taking my glasses off now for welding, or working with anything up close.  It just isn't that easy anymore...

The throwout bearing is the hydraulic style.  I'm kind of curious to see how that works out myself.  I do not know of any adjustment on the bearing or the clutch cylinder, except for the rod length going to the pedal.
Jay Brown
- 1969 Mach 1, Drag Week 2005 Winner NA/BB, 511" FE (10.60s @ 129); Drag Week 2007 Runner-Up PA/BB, 490" Supercharged FE (9.35 @ 151)
- 1964 Ford Galaxie, Drag Week 2009 Winner Modified NA (9.50s @ 143), 585" SOHC
- 1969 Shelby Clone, Drag Week 2015 Winner Modified NA (Average 8.98 @ 149), 585" SOHC


Joe-JDC

  • Hero Member
  • *****
  • Posts: 1574
  • Truth stands on its own merit.
    • View Profile
Re: 68 Mustang Memorial Day Weekend Thrash
« Reply #87 on: December 01, 2015, 10:51:19 PM »
Bifocals?  Wait until you absolutely have to have trifocals! LOL.  Now I use computer lenses when I need the lower part of my glasses.  You can order a pair of computer lenses(whole lens is bifocal) with the bi-portion of your prescription, and get them for any distance you need for close work.  They will actually measure the distance from your face to the monitor, work station, or work bench for best clarity.  It is a pain getting older.  Joe-JDC
Joe-JDC '70GT-500

Heo

  • Hero Member
  • *****
  • Posts: 3380
    • View Profile
Re: 68 Mustang Memorial Day Weekend Thrash
« Reply #88 on: December 02, 2015, 03:44:49 AM »
Yes nowadays i weld more by ears
And Old habits


The defenition of a Gentleman, is a man that can play the accordion.But dont do it

Bolted to Floor

  • Hero Member
  • *****
  • Posts: 602
    • View Profile
Re: 68 Mustang Memorial Day Weekend Thrash
« Reply #89 on: December 02, 2015, 08:16:30 AM »
  One of the issues I have is that I require bifocals in my old age, and getting your head into the right position to see what you are trying to see, while looking through the bottom half of the glasses lens, can be kind of difficult.

Tri-focal glasses can be the answer. The top area matches the bottom area. You won't have to tilt your head so far back. ::)
John D -- 67 Mustang 390 5 speed