Author Topic: Blue Thunder Plenum Modifications  (Read 8142 times)

0 Members and 1 Guest are viewing this topic.

jayb

  • Administrator
  • Hero Member
  • *****
  • Posts: 7406
    • View Profile
    • FE Power
Blue Thunder Plenum Modifications
« on: June 16, 2013, 12:54:08 PM »
Note:  I got the email below from Greg S, who was doing some plenum mods to his Blue Thunder intake.  As it happens I have some data on that, and thought this topic may be of general interest, so I posted it here - Jay

Hi Jay, I have your intake comparo and have been pouring over it for months.  I’m building a stroker motor to go in my 68 Mustang.  I’ve been looking for an intake that with fit under the ram air stuff and I settled on the Blue Thunder medium riser intake since it was a consistently good performer, matches the E’bock intake ports and has the closest to the stock CJ setback.  My brother-in-law and I worked over my Blue Thunder intake to fit under my ram air system.  We lowered the carb base 0.275”.  The medium riser BT does not have the exhaust cross-over so I will leave out the 0.28” phenolic spacer.  After cutting the carb base I ended up with a front height of 4.6” as compared to the CJ front base height of 4.405 (including the spacer which I will leave out).  Right now I have a PI intake on it, which has a front base height of 4.65 (including the spacer).  The BT intake will be a touch lower than the combination I’m running now, plus the setback is only 1/8” more than the stock CJ and is 1/8” less than the PI.  All in all this will be a pretty good fit under my ram air, less than 0.2” taller than stock and only 0.125” more set back than stock.  The BTInt4a and BTInt5a images show close ups of the base after the cut.  The minimum carb bolt depth is 0.45” so I should had plenty of thread strength (but probably not enough to lift the engine by the carb pad).  We set up the intake on the milling table using the line at the back base mounting flange and a 1.676” pin in the front locating pin mounting hole. We just used a trial and error method with a plumbers level to determine how long the pin should be (btw, I read/heard that the stock carb base was 7° off level, but our process ended up with 4.8°). The BTInt7a shows the locating pin socket on the bottom of the intake and BTInt6a shows the locating pin we made and the plug we made for the oil filler tube hole.  The plug is 0 .85” tall and 1 3/8” – 0.003”(for clearance).  When I get ready to install the plug I’ll put several center punch divots in the side to tighten up the clearance to a friction fit and coat it with silicone to seal it.  The BTInt3a shows the plug sitting in the hole.

I think I’m pretty happy with how this came out.  This intake will fit ok under any ram air system.  It’s only 1/8” more set back and 0.195” taller than the stock CJ(with spacer).  I think if I was doing it again I would take off 0.375”.  Then everything would be within 1/8”.

I hope this information will prove useful.   I didn’t write this email to brag about what we did , but to get some information.  Cutting down the base decreases the plenum volume that I probably want to restore.  I figured that if anyone had information on what the best plenum modification for the BT would be, it would be you.  So “help Mr. Wizard”.  Do you have any information or images of BT intake plenum modifications?  Would it ok to cut the back side of the plenum divider all the way down to the top of the highest runner?  Got any ideas on this?  Thanks in advance for any help you can give me.

Greg


Jay Brown
- 1969 Mach 1, Drag Week 2005 Winner NA/BB, 511" FE (10.60s @ 129); Drag Week 2007 Runner-Up PA/BB, 490" Supercharged FE (9.35 @ 151)
- 1964 Ford Galaxie, Drag Week 2009 Winner Modified NA (9.50s @ 143), 585" SOHC
- 1969 Shelby Clone, Drag Week 2015 Winner Modified NA (Average 8.98 @ 149), 585" SOHC


jayb

  • Administrator
  • Hero Member
  • *****
  • Posts: 7406
    • View Profile
    • FE Power
Re: Blue Thunder Plenum Modifications
« Reply #1 on: June 16, 2013, 01:09:50 PM »
Greg, I did some work on my BT intake back in 2005, when I was building my 492" FE.  At the dyno (not my dyno at the time) I wanted to be able to test several different plenum modifications, so I machined the divider completely out of my intake, then put a slot down the middle of the plenum where the divider used to be, and made some removable walls with different amounts of cutouts so that I could test different variations.  Here's a photo of the plenum of my BT intake with the three different plenum dividers that I used:


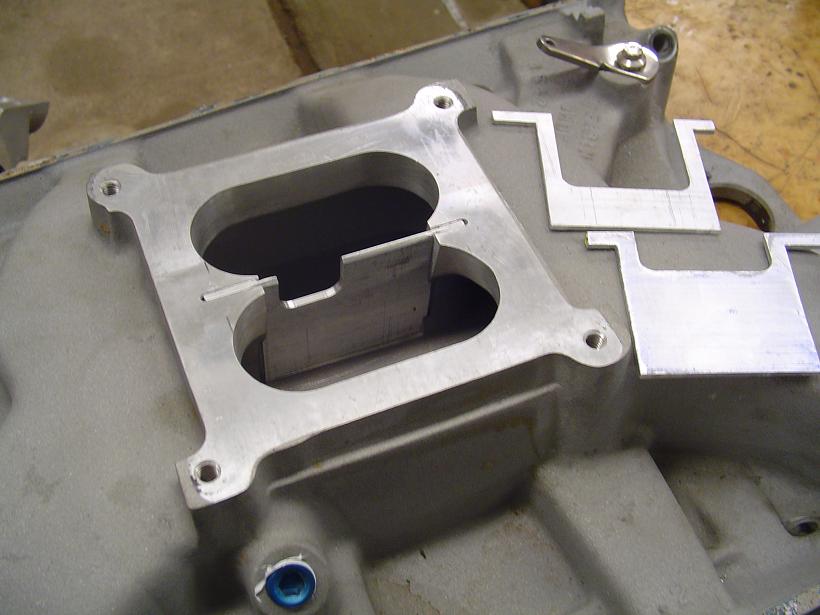
The divider with the smallest notch is close to the same as the stock notch in the BT intake, so I considered that to be the same as the stock plenum divider.  The other two removable plates show a 1" cut down across the entire plenum, and a 2" cut down.

I tested this setup with and without a 1/2" open spacer, and got the data shown in the graph below:


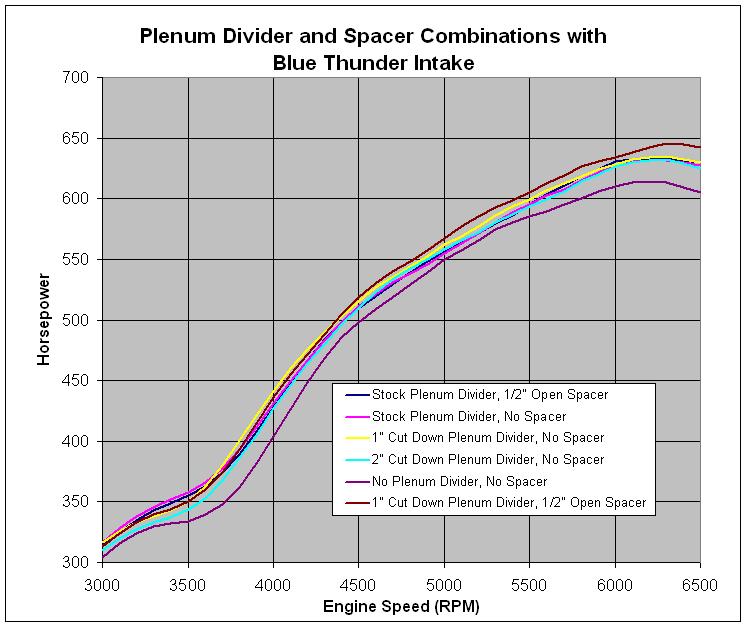
One thing for sure is that with no plenum divider, and no spacer, I lost power all across the RPM range, so I would not recommend completely removing the plenum divider in your intake.  I ended up going with the 1" cut down plenum divider, and a 1/2" open spacer.  If you will be running without a spacer, I think just cutting the plenum divider down 1" is your best bet.  FYI this engine was built with ported Edelbrock heads that flowed around 330 cfm on the intake, and a Comp 308R roller cam.  When I swapped to the Victor intake, I picked up 30 HP over the Blue Thunder, so that is what I ended up using in the car.

Hope that helps - Jay
Jay Brown
- 1969 Mach 1, Drag Week 2005 Winner NA/BB, 511" FE (10.60s @ 129); Drag Week 2007 Runner-Up PA/BB, 490" Supercharged FE (9.35 @ 151)
- 1964 Ford Galaxie, Drag Week 2009 Winner Modified NA (9.50s @ 143), 585" SOHC
- 1969 Shelby Clone, Drag Week 2015 Winner Modified NA (Average 8.98 @ 149), 585" SOHC


plovett

  • Guest
Re: Blue Thunder Plenum Modifications
« Reply #2 on: June 18, 2013, 12:24:14 PM »
Here's what I did with my BT.   I just used a dremel tool.  What I did was based on some posts Joe Craine made a long time ago on another forum, so if it looks good give him the credit.  If it looks crappy it's on me.   :D

Sorry I don't have back to back dyno testing or ET's before and after the mods.   I was concerned how it would work with different spacers which is why they are on there in the pic's.  I currently run a 1" cloverleaf spacer on this intake.

I seem to remember the number 7 intake port needed some work just under the plenum turn.   I remember trying to get in there and not having much luck.   How do you work on that area Joe?

just fyi,

paulie


« Last Edit: June 18, 2013, 02:04:12 PM by plovett »

plovett

  • Guest
Re: Blue Thunder Plenum Modifications
« Reply #3 on: June 18, 2013, 12:33:19 PM »
Oh yeah, when I first had an engine with this intake on it, it was dynoed and we tried different spacers.   The intake was port matched to the heads, but the plenum area was unmodifed. 

We tried a 1" 4 hole spacer and 3/4" open spacer as I recall.  The 4 hole worked better throughout the range.   Problem is that we optimized the jetting with the 4 hole first, then bolted on the open spacer with no other mods and it lost power.

I was a dork and didn't realize that the spacer would affect the optimal jetting significantly.   With the big signal from the 4 hole spacer we ended up dropping jet size from 80 at all corners to 76 at all corners (Holley 850).  If I were to dyno it today I would suspect the open spacer would require more jet for best power, maybe back up to 80.   

I'm running 80's all around right now with a cloverleaf spacer on this intake and it works well.  Again no back to back data to really quantify it though.

I realize all this is not necessarily directly related to your post.  I just thought I throw it in there in case it was useful at all.

paulie
« Last Edit: June 18, 2013, 12:35:28 PM by plovett »

jayb

  • Administrator
  • Hero Member
  • *****
  • Posts: 7406
    • View Profile
    • FE Power
Re: Blue Thunder Plenum Modifications
« Reply #4 on: June 18, 2013, 02:51:03 PM »
This kind of stuff is always interesting.  The funny thing about spacers and plenum dividers is that the results you have with them depend to a large extent on the engine underneath.  You can't, for example, make a blanket statement that a 1/2" open spacer will always give more power;  in some cases it will and in others it won't.  Greg's engine is going to be really close to the one I did my tests on, so I think my results would translate reasonably well to his engine.  On the other hand, on a 390 my results probably don't mean a thing...
Jay Brown
- 1969 Mach 1, Drag Week 2005 Winner NA/BB, 511" FE (10.60s @ 129); Drag Week 2007 Runner-Up PA/BB, 490" Supercharged FE (9.35 @ 151)
- 1964 Ford Galaxie, Drag Week 2009 Winner Modified NA (9.50s @ 143), 585" SOHC
- 1969 Shelby Clone, Drag Week 2015 Winner Modified NA (Average 8.98 @ 149), 585" SOHC


plovett

  • Guest
Re: Blue Thunder Plenum Modifications
« Reply #5 on: June 18, 2013, 06:05:28 PM »
All very true.

My take home message is you may to have to rejet for each spacer combo or the results may be meaningless.  Learn from my mistakes!   ;D  I thought my 4 hole 1" spacer was the best for my combo, but I didn't rejet with the open spacer so I have no idea if it's the best or not.   

paulie

gsali

  • Newbie
  • *
  • Posts: 3
    • View Profile
Re: Blue Thunder Plenum Modifications
« Reply #6 on: June 24, 2013, 05:28:11 PM »
Thanks for all the input folks.  I ended up going back and taking off some more and finished having intended to take off 0.40", which would leave me with a front height of 4.475".  My final measured front height was 4.471".  That is real good since I was aiming at 4.475".  That leaves me at 0.066" above the stock CJ carb front height of 4.405" (with CJ spacer).  I think I can easily live with this under any ram air hood.  This is what I ended up with after taking out the swirls and chatter marks with a piece of 150 grit mounted on a block of marble.

(I can't figure out how to embed images, so they are just attachments)

This looks to me to be very similar to Jay's "stock plenum divider, no spacer" combination which performed pretty well in his dyno test.

BTW Jay, after putting in the carb front and rear height measurements from you book into a spreadsheet, I noticed that the carb base angle is not the same among my candidate intakes.  I determined this by subtracting the front base height from the rear base height.  The CJ and the BT were the same, but both the PI and the Ed RPM were different from the CJ.

jayb

  • Administrator
  • Hero Member
  • *****
  • Posts: 7406
    • View Profile
    • FE Power
Re: Blue Thunder Plenum Modifications
« Reply #7 on: June 24, 2013, 06:39:08 PM »
Yes, there is actually a fair amount of variation to the angle of the carb pad from manifold to manifold. Go figure...
Jay Brown
- 1969 Mach 1, Drag Week 2005 Winner NA/BB, 511" FE (10.60s @ 129); Drag Week 2007 Runner-Up PA/BB, 490" Supercharged FE (9.35 @ 151)
- 1964 Ford Galaxie, Drag Week 2009 Winner Modified NA (9.50s @ 143), 585" SOHC
- 1969 Shelby Clone, Drag Week 2015 Winner Modified NA (Average 8.98 @ 149), 585" SOHC