Monday this week I got on the phone to Fatman Fabrications about the problems I found with the parts in my front strut conversion kit. I told them about the missing piece for the rack, and also about the nylon rack bushing that didn't fit. I emailed them some pictures of the rack and bushing and they said they would look into it. They called me back later in the day, and said that the rack bushing they sent was actually for a manual rack, because they thought I was going to use a manual rack with the setup! I don't know how they got that confused, unless it was because I talked to them about using the power rack as a manual. I also had asked them about using a manual rack, and they told me that they just weren't available. So somehow this got the whole issue confused, and I got the manual rack bushing set instead of the power rack bushing set.
In any case, though, they promised to send me the correct rack bushing, and also the missing steering rack stop piece. I was hopeful that these parts would show up this week.
I had also read a little further along in the instructions for the strut conversion kit, and found that if wanted to use the stock steering column I needed to use a teflon bushing to support the steering shaft at the bottom of the column. Normally the shaft is supported by the steering box at the bottom end, but with the rack conversion the only support for the shaft was the bearing at the top of the shaft. I had measured the diameter of the steering column tube last weekend, and I knew the shaft was 3/4" in diameter, so I ordered a hunk of round teflon bar that I could machine to fit in the end of the tube to support the shaft from Enco mfg. I figured I could get that machined over the weekend.
I also finally decided to go with the ATI Powerglide transmission this week, and called them to order it. They figured it would be a couple weeks, and I would have it before Christmas. I needed the transmission before I could finish welding the brackets to the rear end, because I wanted to have the engine and transmission dummied into position and the car at ride height to set the driveshaft angles before I tacked the four link brackets, rear coil over brackets, watts link, and rear sway bar brackets into place.
On Thursday I got the call from Discount Steel that my chrome moly tubing had finally arrived, so Friday on my lunch break from work I ran over there and picked it up. When I got home on Friday night, there was the UPS package from Fatman, so I was set to go for the weekend. Friday night I got started right away because I didn't have any family obligations, so I pulled the steering column out of the car and took it apart to figure out the best way to convert it to connect up to the DD tube on the steering u-joint. Inside the Mustang column the steering shaft starts out round, and the flattens on the side to the 3/4" DD shape. Then a sleeve fits over the shaft and slides along it, to provide for a collapsible steering column in case of a front end impact. The sleeve is welded to a flange that sticks out the end of the column, and bolts to the rag joint on the normal Mustang steering box.
I had some extra DD shaft from a previous project, so I cut off the end sleeve and pushed it up as far as it would go on the original shaft, and pinned it in place. Then I cut a piece of the spare DD shaft and slid it inside the sleeve far enough so that it still had over 6" to go before it bottomed against the original shaft, preserving the collapsibility of the column. Then I cut the shaft off about 1" past the end of the column tube so I had room to mount the steeing u-joint.
Over at the lathe, I chucked up the piece of round teflon stock that I had ordered earlier in the week and turned it down to fit inside the steering column tube. I left a ridge on one end so that it would stop after slipping inside the steering column for about an inch. Finally I bored a 3/4" hole through the center, and cut the piece off from the starting stock. I pushed it into the steering column tube, and added the u-joint on the end. Re-installed in the car, the end of the column looks like this:
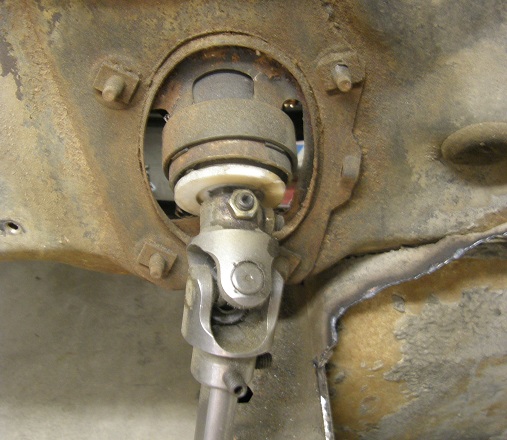
Saturday morning I opened the package from Fatman and found the missing steering rack stop. I installed the stop and the other inner tie rod end on the driver's side of the rack, installed the boot, and then using the new nylon bushing that also came in the package, installed the steering rack in the car. Before I tightened the rack I took another piece of DD steering shaft and connected the u-joint on the column to the u-joint on the rack. After it was installed, this setup looked pretty good.
Just to kind of get some of the parts off the floor, I installed the outer tie rod ends, the steering arms on the spindles, and hooked everything up. But before I could think about installing the struts, I had to get to the cage.
I spent the rest of the day on Saturday and all day Sunday on the roll cage installation. The back half frame crossmember made for a very nice place to put the main hoop, so after taking some careful measurements I bent the hoop up and test fitted it in the car. I had left it a little long, so I adjusted the position of the hoop so it was up against the headliner, marked where the bottom of the hoop should be cut off, and then removed it and cut off the bottom few inches of the legs. At that point I took the time to pull the headliner out of the car; it needed replacing anyway, and with the new hoop cut to the proper height in the car I had a reference point for the distance I wanted to keep the cage bars away from the roof. Then I reinstalled the main hoop and clamped it in place so it stayed in position.
From there I got the rear support bars for the main hoop bent up, cut in my new tubing notcher, and tacked in place on the main hoop. Finally I cut and notched a straight piece to be the main hoop crossbar, and after dummying in one of the fiberglass seats I was planning on using in the car, I set the height of the crossbar so that it would support the seat back per NHRA regulations, and tacked it in place. Since the roll bar is made of chrome moly tubing, all the welding has to be done with a TIG welder. I was able to get the crossbar welded all the way around with no problems, and about halfway around each of the rear support bars where they attached to the main hoop. At the end of the day Sunday I pulled the main hoop forward and dropped it down between the front of the back half frame crossbar and the floor where it had been cut away, so that the top of the main hoop dropped down about 12". This gave me plenty of clearance to weld around the top side of the rear support bar to main hoop junction. Finally I set the main hoop back up on the back half frame crossbar and called it a day.
Next week I should be able to finish up the cage work inside the interior, and start looking at how to position the bars that go forward to the front frame rails. After that I can tack in the top strut mounts to those bars, and see how the front suspension will work. I'm looking forward to getting to that point.


