Author Topic: August 26, 2012 - The Road to Drag Week 2012  (Read 10359 times)

0 Members and 1 Guest are viewing this topic.

jayb

  • Administrator
  • Hero Member
  • *****
  • Posts: 7400
    • View Profile
    • FE Power
August 26, 2012 - The Road to Drag Week 2012
« on: August 26, 2012, 09:45:45 AM »
I'm typing this Sunday morning before getting started on the days work.  The big question mark this week was would I get the parts I needed to get the big SOHC together, and finally everything showed up on Friday.  On the heads, they had to go back and forth to the welding guy four times before all the porosity got welded up; turned out that five of the exhaust ports and one intake port had serious porosity issues, with casting sand coming up out of the casting during the welding process.  My machinist was driven nuts by these events, continually having to get the castings rewelded after one porous section was fixed, and the porosity just showed up in another spot. What a nightmare; so much for the quality of Bill Coon's head castings!  These heads were worse than any of the Dove SOHC heads I've had problems with.  On these heads I also had to have new guides put in, and the guides had to be custom machined because of the oddball guides used in the heads.  The reason they had to be replaced was that the tops of the guides were significantly out of round; they appeared to have been hammered in during installation, and were distorted by nearly a thousandth at the top of the guide.  You can't hone that out on a guide, so they had to be replaced.  This is the second set of Coon heads I've had this problem with.  Warning to the other guys out there who have Coon heads; check your valve guides!  If your shop doesn't catch that during the valve job, you could be in for a nasty surprise when running the engine.

Finally, on Thursday, both heads passed a pressure check, so the shop finished the valve job and did a flow study on the heads.  This was another big surprise.  I had purchased some of the hollow stem Ferrea valves to run on these heads, and had also given my shop a sample intake and exhaust of the Manley valves I had run previously.  The Ferreas were very attractive due to their light weight; they are about 20% lighter than the Manley valves, which of course is a huge deal for valvetrain control.  Unfortunately, they were way, way down on flow numbers compared to the Manleys, with exactly the same valve job.  I will put a post in the technical forum detailing the differences, but as an example, at .800" lift on the intake the Manleys flowed 455 cfm, but the Ferreas only flowed 426 cfm.  That is a major difference.

Another hurdle I had to overcome appeared last Sunday, when I was trying to assemble the short block.  The first piston wouldn't go in the hole, despite all the coaxing I could muster.  I finally figured out that the second rings were not the correct ones.  They had a radial width of 0.170", and they were supposed to have been back cut to 0.145".  When installed in the piston and compressed, the ring groove in the piston wasn't deep enough to let the ring go all the way in.  So much for assembling the short block last weekend.  I got the pistons and rings through Blair Patrick, so I called him last Sunday to let him know what I'd found out, and he called CP and Total Seal on Monday to get the new second rings going.  They were supposed to ship directly to me via 2-day service for delivery on Thursday, but instead they got shipped to Blair!  He overnighted them to me so I finally got them on Friday.  With the heads, this gave me all the parts I needed to start getting the big SOHC put together.  Two weeks before the start of Drag Week LOL!

Also on Wednesday this week, I got the email from Hot Rod saying that enough people had dropped out so that the Galaxie could attend.  Sheesh, what a bummer.  I emailed them back and told them the car couldn't make it. 

Yesterday I had help all afternoon and into the evening from BradFORD and my friend Steve P.  Steve is going to come with us to Drag Week this year as well.  In the morning I'd planned to get some of the last things done in the engine compartment of the Mach 1, and then work on getting the SOHC together while Brad and Steve worked on getting the EFI system installed.  As usual, things didn't quite go according to plan, and I was working on the engine compartment stuff with Brad and Steve until mid afternoon.  Here's a photo of the engine compartment at this stage:


At this point I was going to start the SOHC, but when Brad pulled the EFI harness off the dyno it was obvious that it needed some cleaning up before we could put it in the car.  The only one who could really do that was me.  So, while Brad worked on getting the MS3X box and the big bypass capacitor mounted under the dash, I laid the wiring harness out on the floor and started to untangle and organize it.  Turned out to be a three hour job.  While I was sitting there on the floor I had a flashback to doing something similar with a stock Mustang wiring harness back in the early 1980s.  I remember thinking back then, "Boy, it sure would be nice to have a big shop, and maybe a 4X8 table, where I could lay all this stuff out and work on it without sitting on the floor!"  Well, now I have a big shop, and I also have a big 4X8 table.  The shop is a mess, and the table is stacked with parts and tools, so I'm still sitting on the floor organizing a wiring harness LOL!  Old habits die hard, I guess...

After getting the MS3X box and cap mounted, Brad cleaned up some other interior wiring items and then he and Steve assembled the rest of the headers underneath the car while I was finishing the harness.  Brad, Steve and I spent the rest of the evening on Saturday getting the wiring harness threaded through the firewall and hooked up.  I was in the shop until midnight working on that last night, and there is still quite a bit more to do on the harness.  BradFORD could finish it up, but he may not be able to make it over today.  I have to get going on the SOHC short block today, so depending on the schedule we may not be able to start the engine in the Mach 1 today as I had planned.  Two weeks from today is the Drag Week registration and test 'n tune.  We still have a shot to make it with both cars, but it is getting very, very tight.  I will try to post an update tonight on the work accomplished today, and see how things are looking for the next week.
« Last Edit: August 26, 2012, 06:20:37 PM by jayb »
Jay Brown
- 1969 Mach 1, Drag Week 2005 Winner NA/BB, 511" FE (10.60s @ 129); Drag Week 2007 Runner-Up PA/BB, 490" Supercharged FE (9.35 @ 151)
- 1964 Ford Galaxie, Drag Week 2009 Winner Modified NA (9.50s @ 143), 585" SOHC
- 1969 Shelby Clone, Drag Week 2015 Winner Modified NA (Average 8.98 @ 149), 585" SOHC


cdmbill2

  • Jr. Member
  • **
  • Posts: 87
    • View Profile
Re: August 26, 2012 - The Road to Drag Week 2012
« Reply #1 on: August 26, 2012, 03:29:33 PM »
Jay, you are a picture of perseverance in the face of adversity. I'm sure you'll them there, the HR looks great in the bay of the Mach 1.

I have had to drop a number of things off my prioritized lists to get to something reasonable before we head out on the sixth and Lord knows there will be more deletions before we head out.

See you in Tulsa.

jayb

  • Administrator
  • Hero Member
  • *****
  • Posts: 7400
    • View Profile
    • FE Power
Re: August 26, 2012 - The Road to Drag Week 2012
« Reply #2 on: August 26, 2012, 10:43:21 PM »
Hope you're right Bill, but it isn't getting any easier LOL!

Today my friend Steve S. came over with the modified shaker hood scoop; he stretched the opening so that it is 3" high to let more air into the scoop, and also built the base plate that sits on the throttle bodies.  It needed a little bit of a trim after the test fit, so Steve took care of that, and then we discussed the rest of the fiberglass hood modifications.  I wanted to make a foam block that sat up on the top of the hood and then surrounded the shaker, so that the bottom of the shaker was flush with the top of the foam block.  From there, the foam block could be used as a guide for the fiberglass work, and then discarded later.  Steve and I discussed this, and after settling on the dimensions Steve went to work on building the foam block from some 2" foam construction board that I had upstairs.  While he did that, I got started on the short block assembly.  About an hour later Steve had the block done and fitted to the top of the fiberglass hood.  We took another 15 minutes to look that over and decide some more details, then Steve grabbed the hood, the foam block, and the shaker and took off for home.  He is going to get the glass work finished up this week and rough in the bodywork so we can use the hood at the track next Saturday.  Steve is really good at this kind of stuff, and I'm looking forward to seeing the hood when it is roughed in.  After the trip to the track, Steve will finish the bodywork and paint the hood to match the rest of the car, so at least that particular project is in capable hands and I don't have to worry about it.

Just about the time Steve was leaving Joel showed up, and I got him going on some of the wiring on the car.  He and I were commenting on how long the simplest tasks seem to take.  Joel had to run two #10 wires from the battery in the trunk up to the EFI box, stopping next to the box to hook up to a bypass capacitor before continuing onto the MS3X.  It took Joel a good two hours to finish what seemed like it should be a 15 minute task.  But between fishing the wires through the quarter panel area of the car and running them all the way up under the dash, soldering on connectors at both ends, fighting with the wire connections to the capacitor, etc., it was a lot of work.  Joel went on to do more wiring under the hood after the power wire project; here he is working away on the car:


While Joel did this I continued on the shortblock.  By the time Joel left around 6:00, I had the shortblock finished up; here's a photo:


I spent an hour or so in the house after that, getting re-acquainted with my family, who I haven't seen much of for the last few weeks.  Then it was back to the shop to work on the SOHC heads.  Here the next delay appeared; in inventorying the parts I needed to assemble the heads, I found that I had the wrong spring seats.  The ones I had were too big in diameter to fit the heads, so I couldn't start the assembly tonight as I had planned.  As a result of this I decided to go through and inventory all the parts I needed for this engine, to make sure I had everything else needed, and that it was right.  An hour or so later I had all the parts collected, so at this point I don't think there's any other parts shortages that can hold me up.  I placed an order tonight with Summit for next day delivery of the spring seats, so I should have those on Tuesday.  Joel is coming over tomorrow night and hopefully between the two of us we can get all the wiring finished up on the Mach 1.  Even though we didn't fire it today we are very close, and I feel pretty good about our chances for making the track next Saturday.  That is important, because Joel needs to get his license passes in before Drag Week.  My schedule at this point is to try to get the SOHC together by the end of the night Friday, put it on the dyno Saturday night after we get back from the track, dyno the engine on Sunday, and stuff it in the Shelby clone on Labor Day.  There won't be too much to do on that car, because it is going together exactly the same way it came apart, except hopefully it won't leak water into the oil this year, like it did last year.  Although with those welded up, porous heads, I don't know.  We'll have to see what happens.  I'll try to do a mid-week report this week, if there is time.  Drag Week competition starts two weeks from tomorrow! 
Jay Brown
- 1969 Mach 1, Drag Week 2005 Winner NA/BB, 511" FE (10.60s @ 129); Drag Week 2007 Runner-Up PA/BB, 490" Supercharged FE (9.35 @ 151)
- 1964 Ford Galaxie, Drag Week 2009 Winner Modified NA (9.50s @ 143), 585" SOHC
- 1969 Shelby Clone, Drag Week 2015 Winner Modified NA (Average 8.98 @ 149), 585" SOHC


thatdarncat

  • Hero Member
  • *****
  • Posts: 1864
    • View Profile
Re: August 26, 2012 - The Road to Drag Week 2012
« Reply #3 on: August 30, 2012, 01:07:03 AM »
Work continues as Dragweek gets closer. The Mach 1 is almost ready to fire. I took a photo of the engine compartment tonight, and although it doesn't look much different than Jay's photo from a few days ago lots of projects have been crossed off the list. Throttle linkage has been fabricated by BradFORD and Jay. Joel has been working on shock tower braces. Hoses and wiring continue to be hooked up and so on. As Jay has posted before everything consumes more time than one would think. A few things are still temporary here since Jay thought we might be ready to test fire tonight so don't be too critical.

And here's the braintrust talking over what's left to do.

Kevin Rolph

1967 Cougar Drag Car ( under constuction )
1966 7 litre Galaxie
1966 Country Squire 390
1966 Cyclone GT 390
1968 Torino GT 390
1972 Gran Torino wagon
1978 Lincoln Mk V

JamesonRacing

  • Sr. Member
  • ****
  • Posts: 361
  • 1966 - What a great year for FOMOCO
    • View Profile
Re: August 26, 2012 - The Road to Drag Week 2012
« Reply #4 on: August 30, 2012, 06:51:34 AM »
Great to hear progress is being made, should be a wicked ride! 

Had a question about the throttle linkage.  The picture shows a bearing block between the throttle bodies...does the bearing block float, or how does it adjust to the change in linkage vertical height as the linkage sweeps through it travel?
1966 Fairlane GT, Silver Blue/Black 496/C4 (9.93@133)
1966 Fairlane GT, Nightmist Blue/Black 465/TKO (11.41@122)
1966 Fairlane GTA Conv, Antique Bronze/Black, 418EFI/C6
1966 F250 C/S, Rangoon Red, 445/T19
1965 Falcon Futura 4-door, Turquoise, EF! Z2363/4R70W

jayb

  • Administrator
  • Hero Member
  • *****
  • Posts: 7400
    • View Profile
    • FE Power
Re: August 26, 2012 - The Road to Drag Week 2012
« Reply #5 on: August 30, 2012, 07:33:02 AM »
That little block is threaded onto the shaft tying the two throttle bodies together, and held in place by jam nuts.  The stud on the side of the block hooks up to the factory throttle cable.  As the stud rises and falls throughout the throttle arm travel the stud end of the factory throttle cable rises and falls with it, just like it would do if you were to hook the factory linkage up to a normal carburetor.  We had to make a special plate that bolts onto the top of the sheet metal intake, and the factory throttle cable snaps into that.

We were all set to fire the engine last night about 10:00 PM, but as I turned the key and engaged the starter my EFI system shut off.  I realized immediately that the power-on wire I'd hooked up to the EFI system was not active when the key was in "start", only when it was in run.  We called it a night after that, but I reviewed the wiring late last night and now have the fix, so hopefully we'll get the engine cranked up pretty quickly tonight (Thursday).  Just a few more things to do to get the car ready for the track on Saturday, so that looks like a go, but I am definitely a little behind schedule on the big SOHC assembly...
Jay Brown
- 1969 Mach 1, Drag Week 2005 Winner NA/BB, 511" FE (10.60s @ 129); Drag Week 2007 Runner-Up PA/BB, 490" Supercharged FE (9.35 @ 151)
- 1964 Ford Galaxie, Drag Week 2009 Winner Modified NA (9.50s @ 143), 585" SOHC
- 1969 Shelby Clone, Drag Week 2015 Winner Modified NA (Average 8.98 @ 149), 585" SOHC


jayb

  • Administrator
  • Hero Member
  • *****
  • Posts: 7400
    • View Profile
    • FE Power
Re: August 26, 2012 - The Road to Drag Week 2012
« Reply #6 on: August 31, 2012, 10:07:32 AM »
It is Friday morning, the last day of August, as I type this update.  I took a vacation day today from work in order to try to get caught back up on the two Drag Week projects.  Over the last several nights, with a LOT of help from my Drag Week compatriots, we've managed to come pretty far towards the goals.  Here is a quick rundown:

On the big SOHC engine, I ran into more problems with the heads earlier in the week.  This was actually a known issue with the Coon heads, and I had to address it with the last pair I put together a few years ago, but I had forgotten about it until we started assembling these heads.  The background goes something like this.  Coon's original sets of heads were cut for a valve spring diameter of over 1.600".  During the machining operations on the heads, the cutter came in and machined a little crescent section in the valve cover rail all the way down to the spring seat, because of the fairly large diameter.  Coon didn't like this, so on his next batch of heads he changed the diameter of the machined pocket for the spring seat to 1.550".  Unfortunately, he failed to consider the other consequences of this action.  The larger diameter cutter had also clearanced the bottom of the cam towers, so that when the springs were installed there was clearance between the valve springs and the cam towers.  The smaller cutter essentially made this clearance go away.  So, when using a 1.550" diameter valve spring, on all four of the exhaust valve springs there is zero clearance between the head casting at the cam towers and the spring.  There is also very limited clearance on one of the intake springs.  Here is a photo showing this issue; I'm holding a 0.010" feeler gauge, which of course won't go through:


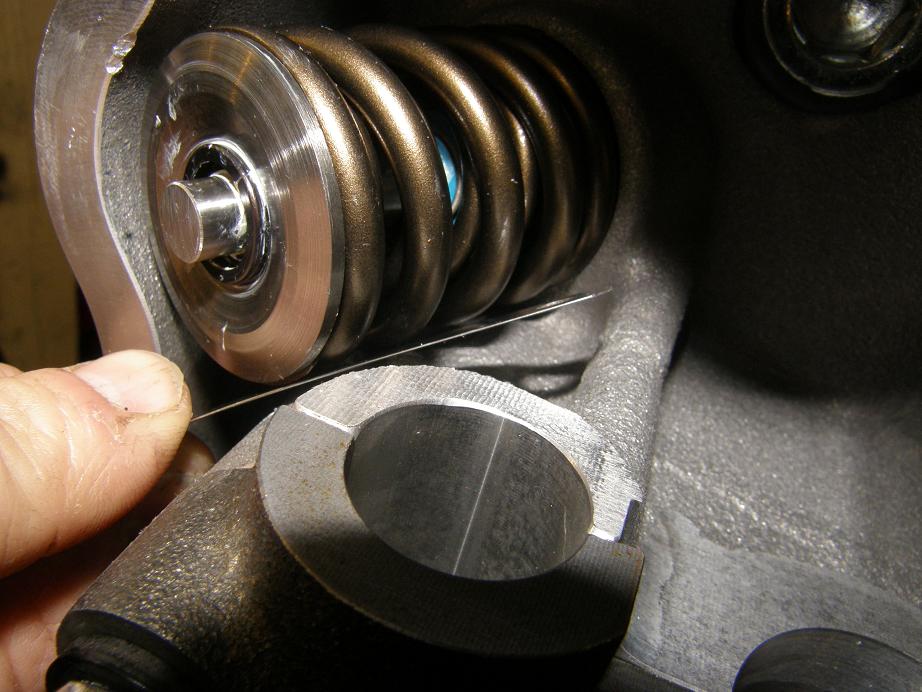
Here's another photo showing the area of the cam tower that is affected.  You can see that the cutter just barely nicks the cam tower on the way by; that is where the edge of a 1.550" valvespring will hit.


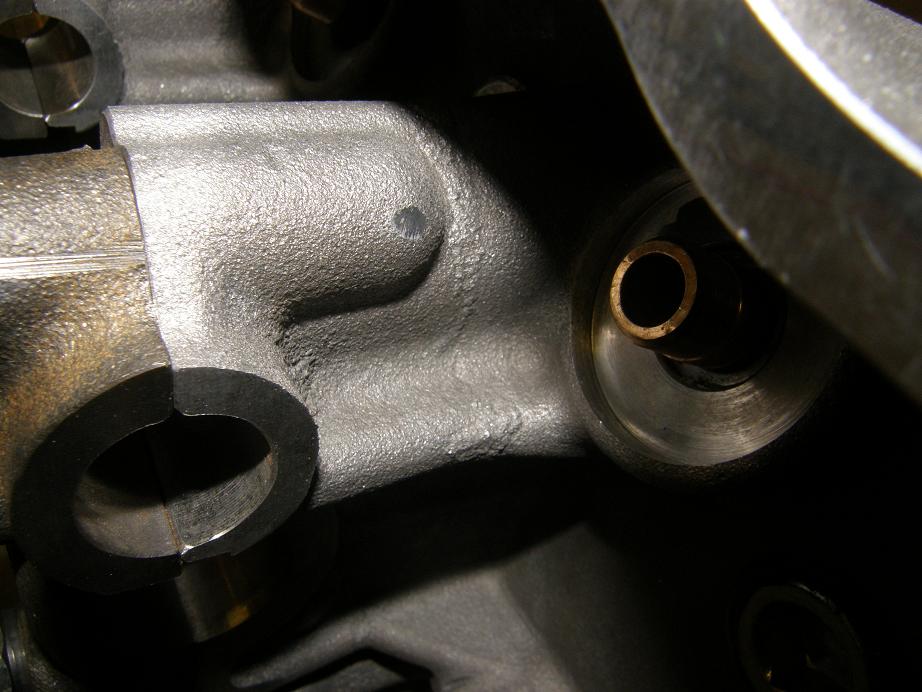
Joel was working on getting the heads assembled and of course he didn't know about this issue.  He had the first head most of the way assembled before I took a look at it and realized I'd forgotten about this problem.  So, we disassembled the exhaust valve springs that were installed, and the one intake spring, so that some clearance could be ground into the head.  Just the installation process aggravated the clearance problem, as shown by the mark on the cam tower of one of the exhaust valves:


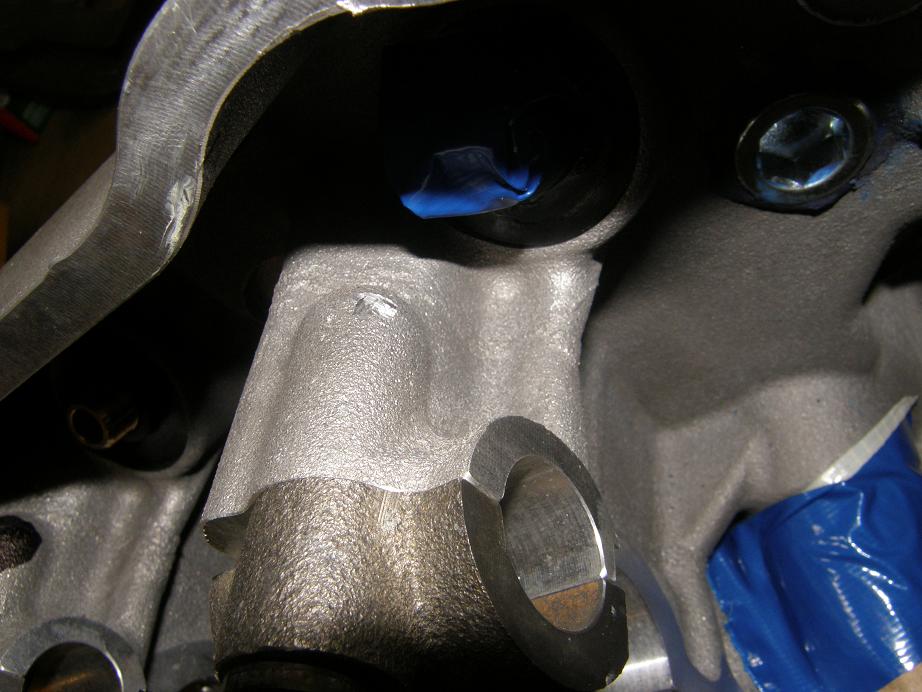
Warning to other users of these heads:  Make sure you clearance this area!  Even if you are only running a 1.50" diameter spring, you will only have 0.025" of clearance to the cam tower if you leave the castings as is.  After watching Bill Conley's videos of valve springs bouncing around like crazy, I think at least .050" clearance between the spring and the casting is required.  Fortunately, the fix is pretty easy for this problem; you just have to go in with a die grinder and cut back this area of the cam tower.  Here's another photo of the head with the valve spring installed; you can see the clearanced area behind the spring:


With that problem out of the way by Wednesday night, we finally got the heads assembled and installed on the short block by the end of the night Thursday.  Installing the heads on this particular shortblock, with its spread bore spacing and copper head gaskets, requires a special technique involving O-ringing all the water passages with thread.  Yes, sewing thread.  Mike LeFevers at Mitech Racing Engines turned me onto this technique as a way to make copper head gaskets live on the street, and I won't go into any detail here, except to say that it is a tedious, painstaking process; you don't just slam the heads onto this engine, that's for sure.  I've installed the heads on this particular shortblock three different times.  The first two times I used this technique, and had no water leak issues.  Last year, in the rush to get ready for Drag Week, I blew it off and just used the silicone sealer provided by the head gasket manufacturer.  When I disassembled the engine after the event, sure enough there was evidence of water leakage at the head gasket.  So I'm sold on this technique, despite the fact that it seems to be pretty hokey.

Steve and I worked together to get the heads on the engine, and we were finished by about 11:00 PM.  After the guys left also installed the backing plate for the front cover, because I like to install this with all the bolts in place and let the sealer dry overnight before assembling the gears and chain, etc.  Finally a little after midnight last night I called it a day, and plan to spend the day today getting this engine assembled the rest of the way.

Earlier last night we'd been working on the Mach 1, to get it fired up for the first time.  I solved the electrical issue that we'd had the previous evening, and also worked on getting the oxygen sensor controller hooked up so that the sensor was powered when the engine was running (you don't want to run the engine with the sensor unpowered, or you can ruin the sensor).  BradFORD worked on a few other engine compartment details, and finally by about 7:30 we fired the engine.  I didn't spend any time trying to tune the idle; that isn't required yet, because the first objective is to get the car track ready for Saturday.  We let it warm up and made sure that the electric water pump turned on properly and also that the electric fans turned on at the appropriate time; this is all controlled by the EFI box, and requires some parameters to be set properly in the software.  After the engine was warmed up, I broke in the rear end gears by running the car in first gear for five minutes, then second, then third.  Here's a video of a walkaround I did of the car during this process.  As you can see, there is still a lot of work to do...

 http://youtu.be/0Woc_dswPDY

There were some issues we had to resolve that appeared when the car was running.  First, the alternator wasn't working, and the tachometer and shift light were also not working.  I turned BradFORD loose on these problems after we shut the car off, and it turned out to be wiring errors in both cases, so Brad got them fixed.  Also, the ignition switch has turned out to be not reliably giving power to the starter solenoid on the Powermaster starter; I have to keep turning the key to start several times, until finally the starter engages.  Looks like I will need to get a new ignition switch.  Also, during this 25 minute run time the Peterson pump sucked a bunch of oil out of the engine, completely filling up the breather can.  I had seen this issue on the dyno, and last week I installed some baffles under the vacuum lines attached to the valve covers, in hopes of solving this problem.  No joy; the problem is still there.  This is not an issue for the track, but I will have to solve the problem prior to driving the car on the road, unless I want to add a quart of oil to the engine every hour or so.  I'm going to give Peterson a call today and see what they think about this issue.

Despite getting the engine running last night we still have quite a few things to do to get the car ready for Saturday morning.  I'm going to be tied up all day on the SOHC assembly, but lucky for me BradFORD thinks he can duck out of work a little early today, and help me for most of the afternoon and evening.  Nobody gets more work done than BradFORD, so I'm fairly confident at this point that the car will be ready for the track.  I'll try to post another update over the weekend with the results to date - Jay
Jay Brown
- 1969 Mach 1, Drag Week 2005 Winner NA/BB, 511" FE (10.60s @ 129); Drag Week 2007 Runner-Up PA/BB, 490" Supercharged FE (9.35 @ 151)
- 1964 Ford Galaxie, Drag Week 2009 Winner Modified NA (9.50s @ 143), 585" SOHC
- 1969 Shelby Clone, Drag Week 2015 Winner Modified NA (Average 8.98 @ 149), 585" SOHC


Royce

  • Hero Member
  • *****
  • Posts: 777
    • View Profile
Re: August 26, 2012 - The Road to Drag Week 2012
« Reply #7 on: September 03, 2012, 07:49:53 AM »
I hope no news is good news, and that the Mach 1 is performing like a champ and the 585 has made 1000 hp.
1955 Thunderbird Competition Coupe Altered Chassis "War Bird" 383 Lincoln Y block 520 hp
1955 Thunderbird 292 275 hp Y Block
1956 Ford Victoria 292 Y block

1957 Mercury 2dr Wagon "Battle Wagon" drag car 
1957 Thunderbird Glass body Tube Chassis drag car 333 cu in 500 hp Ford Y block
1961 Starliner 390/375 clone
1965 GT40 tribute w/FE
1966 Falcon Pro Touring project
Kaase Boss 547. 840 HP 698 Torque  pump gas
1992 BMW V-12 5.0
2001 Lincoln 5.4 4 cam.
1968 Cougar XR7

jayb

  • Administrator
  • Hero Member
  • *****
  • Posts: 7400
    • View Profile
    • FE Power
Re: August 26, 2012 - The Road to Drag Week 2012
« Reply #8 on: September 03, 2012, 08:44:55 AM »
Well, not quite Royce LOL!  But we are still moving forward.  I'll have a full report tonight - Jay
Jay Brown
- 1969 Mach 1, Drag Week 2005 Winner NA/BB, 511" FE (10.60s @ 129); Drag Week 2007 Runner-Up PA/BB, 490" Supercharged FE (9.35 @ 151)
- 1964 Ford Galaxie, Drag Week 2009 Winner Modified NA (9.50s @ 143), 585" SOHC
- 1969 Shelby Clone, Drag Week 2015 Winner Modified NA (Average 8.98 @ 149), 585" SOHC