Author Topic: 1969 Torino(?) Cobra Rebuild  (Read 30398 times)

0 Members and 1 Guest are viewing this topic.

FElony

  • Guest
Re: 1969 Torino(?) Cobra Rebuild
« Reply #15 on: June 12, 2018, 10:04:02 AM »
From the other forum:  https://www.fordfe.com/1969-cobra-question-t88957.html?sid=8d7e7ee4531dae8adfdd7a0fe585ec3d

The DP Cobra is the Ford equivalent of a Hemi Road Runner or an LS6 Chevelle. Maybe not as hyped, but still...

FElony

  • Guest
Re: 1969 Torino(?) Cobra Rebuild
« Reply #16 on: June 12, 2018, 10:12:38 AM »

GPR

  • Full Member
  • ***
  • Posts: 159
    • View Profile
    • Gillis Restorations
Re: 1969 Torino(?) Cobra Rebuild
« Reply #17 on: June 12, 2018, 01:32:48 PM »
My first race car bought new was a 1969 Cobra. When I saw the decal of the Snake on the fender on pre order photos I thought it was so cool but when it came in no decal only the Snake. Later Cobras had Cobra under the Snake. My Dad who was truck manager at Grant Ford in St. Petersburg Fl ordered it with the drag pack but it was holding up the order so he cancelled the drag pack. When I first got it I drove it to College but not for long because we went to the first Division II points race in April 1969. On the way to Phenix City Ala towing with a tow bar a tire blew out on the race car and bent the tow bar.  Not sure how many miles away we were but I drove it the rest of the way with open headers and 4.44 gear. We were rained out so we left it at a gas station and came back the next week only to have a problem with the clutch. We also bought a used trailer.

We went to the 1969 Springnationals in Dallas Texas where I ran 12.87 losing to the National record holder who ran 12.66. On the way Randy Payne was driving the Ford Drag Team truck and passed us and pulled over so we stopped. He thought we were someone he knew from Atlanta and said if you need anything come and see him. It's hard to believe but I broke a Detroit Locker and went to Randy and he got us a new one. Because of breaking that Detroit Locker I got to know Randy Payne and Hubert Platt and traveled with the Ford Drag Team for a couple of months after Indy. That is the only thing I ever got free from Ford. We bought Hubert's 1968 SS/FA Mustang November 1969.       
Rusty Gillis

Former NHRA SS/FA & SS/GA National Record Holder

FElony

  • Guest
Re: 1969 Torino(?) Cobra Rebuild
« Reply #18 on: June 12, 2018, 03:23:29 PM »
Great car and cool story, Rusty! I never had mine on the track, but...
I dug out this post I wrote around 2000. It is a true story on a street that I mentioned recently in the Poon Tang thread .

******

   It's a late spring night in the 1980's, and the 30-something man of Middle  Eastern descent is aglow with the bravado spawned by a mixture of cocaine and conceit. He is driving down a nearly empty, wide street in his brand new car, the t-tops stashed in the back. Several gold chains are draped upon his chest, their glittery hue almost matching the paint under a mile-deep wax job. He is on top of the world; surely a sight that would cause even the most stolid female to swoon.

   He is unaware that the section of road he is on has been nicknamed Fallbrook International Raceway by some of the locals. He is soon to discover why.

   Admiring the quartet of gold rings on each of his hands, he is suddenly aware of headlights approaching from behind at a spirited rate. He checks the speedo to be sure that the Man is not scooping him up for speeding. The lights pull up a few yards back and pace him. They are round, eliminating the possibility of belonging to a squad car. He does not guess that the other driver is taking note of the "Turbo" emblem accompanying the "280ZX" insignia on the back of his car. The headlights pick up speed again and the silhouette of a roofline bred for the Nascar high banks flashes by. To the relocated foreigner, it registers as nothing more than some hulking, uncouth American anachronism.

   The Ford's driver hauls down for the impending red light instead of busting the yellow. The Nissan pulls alongside, and dark eyes look past the lowered windows. Yards of oxidized Gulfstream Aqua meet his scrutiny, framing dulled chrome Rocket 5-spoke mags. There is a hood scoop with empty holes on the sides. There are no visible make or model emblems. Surely the snake adorning the fender is an affectation affixed by the owner. And then gaze meets gaze. The younger man, of lighter hair and hazel eyes, delivers a practiced scowl dripping with scorn and distaste. The scowl imperceptibly transforms into a sneer.

   The Iranian is momentarily caught off guard, but quickly decides to prove himself to this uncivilized person. He revs the huffed six cylinder and looks back at the Cobra pilot, who responds with like. A metallic slap is clearly audible as the flapper sitting atop the 428 briefly opens and snaps shut again. The Jet exhaust sounds almost innocent through the original mufflers. It's on; 4-speed against 5-speed.

   The Ford hesitates long enough to allow the Nissan the jump. It's jockey dumps the clutch, getting just a few feet of rubber while the turbo attempts to spool up to the task at hand. Next to it, 7 liters of rampaging Cobra Jet have been awakened. The clutch pedal is being metered out to balance the 4.11's against the soft compound retreads. The tires catch and the front suspension is jerked to the end of its travel. The Nissan is reeled in at the top of 1st gear. The right pedal gets an ankle stutter at 5600 and the tires haze and hook.

   Since there is no money on this race, the Ford driver decides that the usual sandbagging is out, and utter humiliation is in. Despite the turbo now pulling hard in its power band, it can do little but inhale the unfettered gasses from the intermediate's innocuous turn-downs. Another stutter and another gear, and the Land of the Rising Sun's finest is left far behind. The next red light is coming up quickly and the big Ford begins to lean on the power discs. A shift down barks the 60's.

   The Dearborn mauler comes to rest and resumes its watchlike idle. The Nissan's rider halts his steed 30 feet back, although there is no one ahead of him. At the green the dull taillights creep away, the hazel eyes watching the rear view mirror carefully. The Golden One opts not to rub salt on his own wound, and makes a hasty right turn. He looks back down the street, where the unknown American car with the upstart American driver fades away. He is unhappy at the turn of events, but glad there were no witnesses to his defeat. It doesn't really matter. After all, regardless, he still looks like a million dollars, and tomorrow is another night.


jayb

  • Administrator
  • Hero Member
  • *****
  • Posts: 7404
    • View Profile
    • FE Power
Re: 1969 Torino(?) Cobra Rebuild
« Reply #19 on: June 14, 2018, 09:21:29 PM »
This week all the parts began arriving for the car.  On Tuesday I got the other three wheels that I needed and all four new tires, plus the Detroit locker and the Wilwood brake stuff.  So, on Tuesday afternoon I made a trip down to my friend BradFORD's shop to drop it all off.  Brad will mount and balance all the tires and wheels, and set up the rear end with the same gears (3.91), but pull out the Traction-Loc and install the Detroit Locker in its place.  Seemed like everything was going according to plan.  But at the end of the day on Tuesday, just hours after I had dropped the stuff off, Brad called me with some bad news.  Remember in the first post where I said how impressed I'd been with those American mags that were made in China?  Turns out the other 15X7 mag that I received on Tuesday was bent.  Brad said there was no way it would balance.  >:(  Crap.  Can't drive the car with only three wheels and tires...

Wednesday morning I got on the horn to Summit Racing and explained the situation.  I ordered another 15X7 wheel, and they sent me a UPS label to use to send back the bent one.  Today I actually got an email from UPS saying it would be delivered tomorrow, so I might still have all four wheels and tires by the weekend.  After calling Summit Wednesday morning I decided to spend some time getting the new master cylinder and proportioning valve installed.  Before I started the power booster and master cylinder in the car looked like this:


What I really don't like about this setup is that it impedes access to the driver's side valve cover, and no way you could run a tall cover like a pentroof with this brake system.  I was looking forward to ditching the power booster and adding the Wilwood master cylinder.  I purchased the master cylinder with a 7/8" bore and also with a kit that mounts the proportioning valve directly to the master cylinder.  I hadn't used this setup before, but it looked like a nice compact arrangement.  Here is a picture of the proportioning valve:


You can see that the proportioning valve functions kind of like a distribution block, with two lines going in on the top from the master cylinder, and three lines coming out of the bottom, one for each front brake, and one for the rears.  The proportioning valve meters brake fluid to the rear line.  There is even a pressure switch integrated into the system for brake lights.

After removing the power booster and original master cylinder, I decided to fabricate a plate to bolt the new master cylinder to the original bracket.  This was a pretty simple project, involving a piece of 1/8" plate steel and seven holes, picture below:


Next, I bolted the plate onto the original bracket.  I had to drill two new holes in the original bracket, so I used the plate as a guide for the drill.  The two new holes are the ones in the middle vertically; here's a shot of the bracket with the new holes drilled, and the plate taken back off:


The Wilwood master cylinder comes with the pushrod, and it is a 3/8" rod with 3/8-24 threads on the end.  I used a 3/8" spherical rod end screwed onto the threads to check the length of the pushrod, but it was quite a bit too long.  I ended up threading another inch and a half or so down the 3/8" rod with a die, and then cutting that inch and a half off the end of the rod, leaving it with the same amount of threads on the end but about an inch and a half shorter.  When I got it all finished the spherical rod end went into the original spot where the power booster pushrod had gone, and since the original pushrod used a 3/8" pin to connect to the brake pedal bellcrank, the 3/8" spherical rod end fit nicely there as well.  I bolted it all up with plenty of Loctite; here are a couple of photos:


Now the master cylinder arrangement is nowhere near as obtrusive as the stock setup, and there is plenty of room to run a tall valve cover, or remove the valve cover for lashing the valves or whatever.  I really like this arrangement.

While I was working on getting the master cylinder installed, the UPS guy showed up on Wednesday with my new leaf springs.  I had been on the phone on Monday trying to find leaf springs locally in the Minneapolis area.  I only found one supplier, and they wanted $240 per leaf spring.  They didn't have them in stock, and would have to order them.  The guy on the phone told me that his springs were made in Pennsylvania, and that most of the springs you see on line were Chinese.  But there was an online outfit called General Spring that showed the leaf springs I needed, and at only $110 each.  I decided they were worth a call.  The sales guy said that all their springs were made in the US, Canada, or Mexico, and that shipping for the pair of springs would be about $55 from their facility in Kansas City to my place.  I decided it was worth a try.  Shipping only took two days, which was great, and when I got the springs they had USA stenciled on them, so I'm pretty sure they were made here.  They weren't painted or anything, so I shot them with some satin black paint; here's a picture:


On Wednesday evening, I took some new bolts I had purchased and installed the springs with the front bolts, leaving the backs on the ground for the moment.  It was a LOT easier putting them in than it had been taking the old ones out  ;D

Today was front disc brake day.  The Wilwood kit for the front brakes requires that you remove the original disc brake splash shield, drill out the three holes that bolt the splash shield to the spindle, and then tap the holes with a 3/8-24 tap.  That step is the only part of the installation that is not trivially easy; after that was done I had the front brakes completely installed in half an hour per side.  Here's a picture of the passenger side:


Finally, here's a picture of the car as it sits tonight.  Tomorrow night I will pick up the differential with Detroit Locker installed, and hopefully all four wheels and tires, and get ready to put the rear end back in this thing.  Last weekend I cleaned and painted the axle housing, traction bars, and all the assorted brackets from the rear of the car, so everything there is all set to go back together.  I also have all the rubber pieces, seals, and gaskets to reassemble the rear end.  The major remaining job after getting the differential back in the car is to run all new brake lines, so I've dug out my double flaring kit and will be picking up some brake line tubing tomorrow.  With luck, by Sunday evening the car will be back together, the brakes will work, and I can finally put it into my new trailer, where it may sit for several months or even a year before I get going on the body work.  I will post another update Sunday, or early next week - Jay

« Last Edit: June 14, 2018, 10:39:36 PM by jayb »
Jay Brown
- 1969 Mach 1, Drag Week 2005 Winner NA/BB, 511" FE (10.60s @ 129); Drag Week 2007 Runner-Up PA/BB, 490" Supercharged FE (9.35 @ 151)
- 1964 Ford Galaxie, Drag Week 2009 Winner Modified NA (9.50s @ 143), 585" SOHC
- 1969 Shelby Clone, Drag Week 2015 Winner Modified NA (Average 8.98 @ 149), 585" SOHC


cjshaker

  • Hero Member
  • *****
  • Posts: 4458
    • View Profile
Re: 1969 Torino(?) Cobra Rebuild
« Reply #20 on: June 15, 2018, 12:18:36 AM »
Since you've still got the stock power brake pedal, and have eliminated the booster, I'll be very interested to see how well that brake system works for you. Hopefully you'll report back on brake pedal effort and stopping ability. I like the distribution block/proportioning valve arrangement. Not a fan of the looks of the master cylinder, but I suppose that can be overlooked. And especially not a fan of how the cap is bolted down, making fluid checks somewhat of a pain.

Is that a stock type rotor, or a Wilwood piece? Also, is that a 4 piston design, or a floating caliper?
Doug Smith


'69 R-code Mach 1, 427 MR, 2x4, Jerico, 4.30 Locker
'70 F-350 390
'55 Ford Customline 2dr
'37 Ford Coupe

Stangman

  • Hero Member
  • *****
  • Posts: 1691
    • View Profile
Re: 1969 Torino(?) Cobra Rebuild
« Reply #21 on: June 15, 2018, 12:53:05 AM »
I have the same master and it drives me crazy to check fluid.
But it does match my engine compartment

Barry_R

  • Hero Member
  • *****
  • Posts: 1915
    • View Profile
    • Survival Motorsports
Re: 1969 Torino(?) Cobra Rebuild
« Reply #22 on: June 15, 2018, 06:34:46 AM »
Same master and disc arrangement on my car.

Manual brakes and four wheel disc system seems to work very well from 126 MPH at Beaver - and on the street around here.  Decidedly better that the factory replacement brakes I previously had.

I eliminated the offset bracket a long time ago when I first went manual brakes.  Without it, the Wilwood master gets up against the valve cover and needs trimming off on the fitting plugs on the unused inboard side.  The bolt on proportioning valve bracket gets in the way of the factory clutch linkage.  Probably should have kept that offset mounting deal - but that left the building 20+ years ago because I did not like the way it looked.

jayb

  • Administrator
  • Hero Member
  • *****
  • Posts: 7404
    • View Profile
    • FE Power
Re: 1969 Torino(?) Cobra Rebuild
« Reply #23 on: June 15, 2018, 07:47:43 AM »
I have that same master cylinder on my Mach 1 and my Shelby clone, both with four wheel discs.  My experience has been the same as Barry's, pedal effort is certainly acceptable and no problem stopping.  I will say that in the water box, I have to apply a lot of pedal pressure to get the front brakes to lock up before I hit the line lock switch.  If I don't, one or both wheels will move just a bit and the car will go a little sideways during the burnout.  But that is the only issue.  Now, this car with rear drums may be a different story, I don't know, but I'm betting against it.  Unfortunately it will be some time before the car is licensed and insured to drive on public roads, so I won't be able to report back on this right away.

Doug, the front rotors do appear to be identical to the stock rotors.  They are exactly the same diameter.  I wanted to go up to Wilwood's next larger size, but with the wheels I selected it appeared that there would be a slight interference with the calipers, so I ended up with this kit.  Probably one reason why this kit is the least expensive of the Wilwood front brake kits.  The calipers are fixed, four piston deals.

I'm surprised to hear that the lid hold-down on the master cylinder is objectionable to some of you guys.  Its just an Allen wrench, what's the big deal?  Its not like you're checking brake fluid as often as you're checking the oil...
Jay Brown
- 1969 Mach 1, Drag Week 2005 Winner NA/BB, 511" FE (10.60s @ 129); Drag Week 2007 Runner-Up PA/BB, 490" Supercharged FE (9.35 @ 151)
- 1964 Ford Galaxie, Drag Week 2009 Winner Modified NA (9.50s @ 143), 585" SOHC
- 1969 Shelby Clone, Drag Week 2015 Winner Modified NA (Average 8.98 @ 149), 585" SOHC


Stangman

  • Hero Member
  • *****
  • Posts: 1691
    • View Profile
Re: 1969 Torino(?) Cobra Rebuild
« Reply #24 on: June 15, 2018, 11:11:05 AM »
Very true Jay on the master cylinder lid. We gotta complain about something. You got a lot of work done in a short period of time. It’s great when things go well and start to roll.

cjshaker

  • Hero Member
  • *****
  • Posts: 4458
    • View Profile
Re: 1969 Torino(?) Cobra Rebuild
« Reply #25 on: June 15, 2018, 11:49:19 AM »
I'm surprised to hear that the lid hold-down on the master cylinder is objectionable to some of you guys.  Its just an Allen wrench, what's the big deal?  Its not like you're checking brake fluid as often as you're checking the oil...

I've driven old junk for so long that I have developed a habit of checking brake fluid fairly regularly, just to see if there's any issue developing. A pretty minor complaint I guess, and not sure how it could be done better without the factory type wire clamp.
Doug Smith


'69 R-code Mach 1, 427 MR, 2x4, Jerico, 4.30 Locker
'70 F-350 390
'55 Ford Customline 2dr
'37 Ford Coupe

Barry_R

  • Hero Member
  • *****
  • Posts: 1915
    • View Profile
    • Survival Motorsports
Re: 1969 Torino(?) Cobra Rebuild
« Reply #26 on: June 15, 2018, 11:55:53 AM »
I should note that mine has the larger 12.19 diameter rotors on all four corners.
Same deal in the water box - actually Jay told me to "stand on the pedal" and that helped a lot.

Took me a little while to realize that the calipers mounted to the front instead of the rear of the spindle like OEM.  No pictures of that in my instructions and it "almost fits" the other way....

jayb

  • Administrator
  • Hero Member
  • *****
  • Posts: 7404
    • View Profile
    • FE Power
Re: 1969 Torino(?) Cobra Rebuild
« Reply #27 on: June 19, 2018, 09:44:44 AM »
Well, after spending most of the weekend working on this car, it is almost ready to drive into the trailer.  Almost  ::)  On Friday, the UPS man came with my replacement 15X7 American Racing wheel.  My pal BradFORD had promised to have my gears set up with the Detroit locker on Friday, and he had the other three wheels and four tires at his shop, so around 5:00 on Friday I got down there to pick up the other wheels and tires and the differential, and get the last wheel and tire mounted and balanced.  When I arrived, the first thing Brad did was to take the new wheel out of the box and spin it up on the balancer to make sure it wasn't bent.  Unbelievably, this wheel was bent worse than the last one!! >:( >:( >:(  What the hell!  I immediately called Summit and complained.  Those people are always very helpful, and there's nothing they can do immediately because these wheels ship directly from the manufacturer.  The Summit guy sent me another UPS label to send the wheel back (again!), and while I was on the phone he called American Racing and told them to take the wheel out of the box and check to make sure it wasn't bent before they sent it this time.  Just today, I received the shipping notification on the wheel, its expected to arrive at my place on Friday this week.  So I'm still waiting...

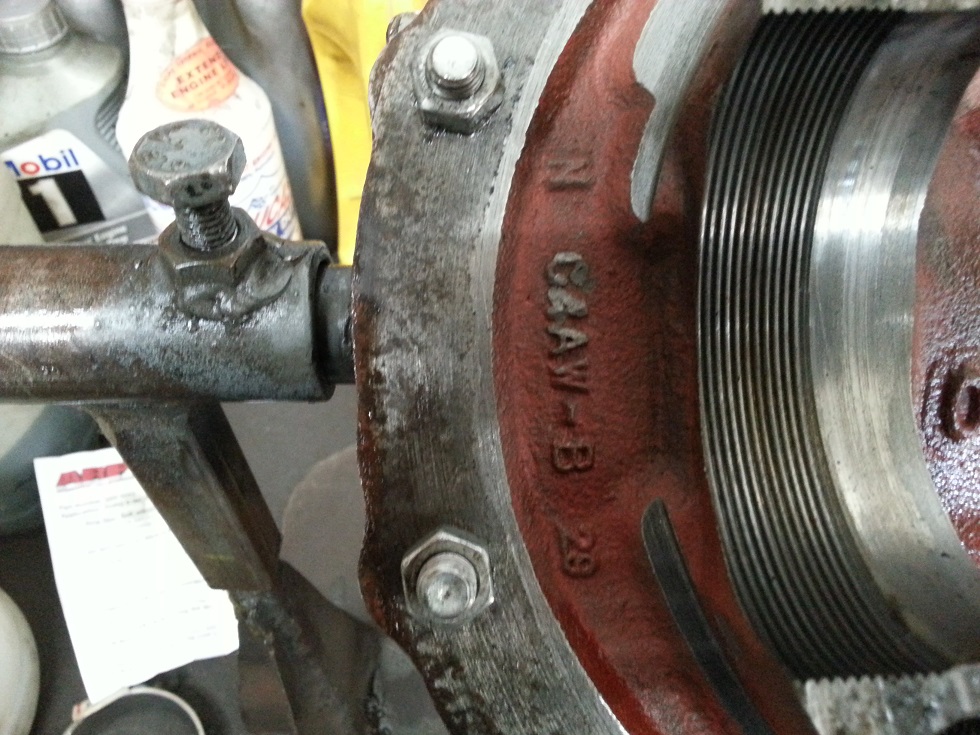
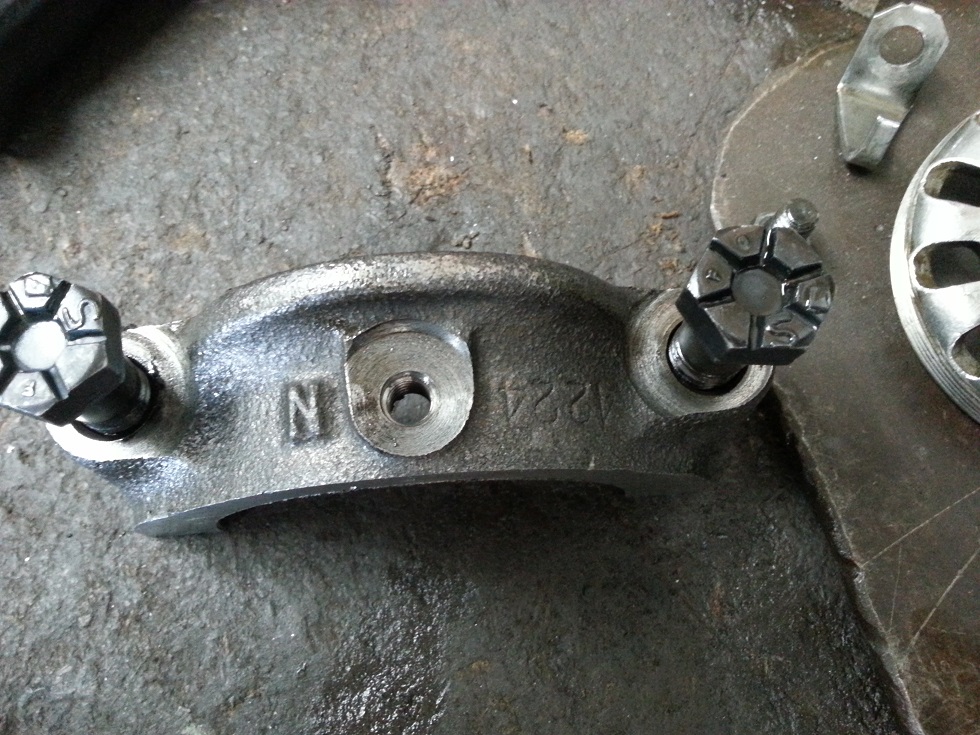
Back at Brad's shop, he hadn't finished setting up the differential yet so I hung around the shop while he got that done.  It gave me the opportunity to get some pictures of the differential going together.  I'm inclined to believe that this rear end has never been apart, so it was cool to see all the pieces.  This is one of the nodular cases that does not have the "N" cast into the front, but it does have the "N" inside the case.  Here's a few pictures of the inside of the case and one of the caps:


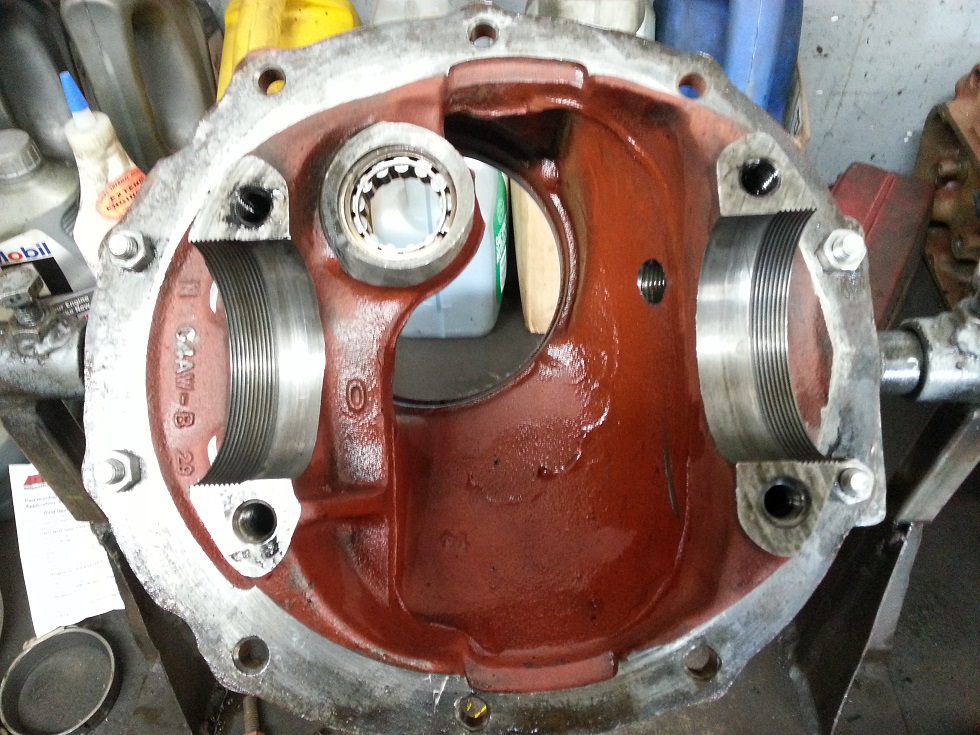
I was also pleased to see that the pinion had the spacer for the pinion bearings, rather than the crush sleeve.  I would have expected this, but nevertheless its good to actually see it:


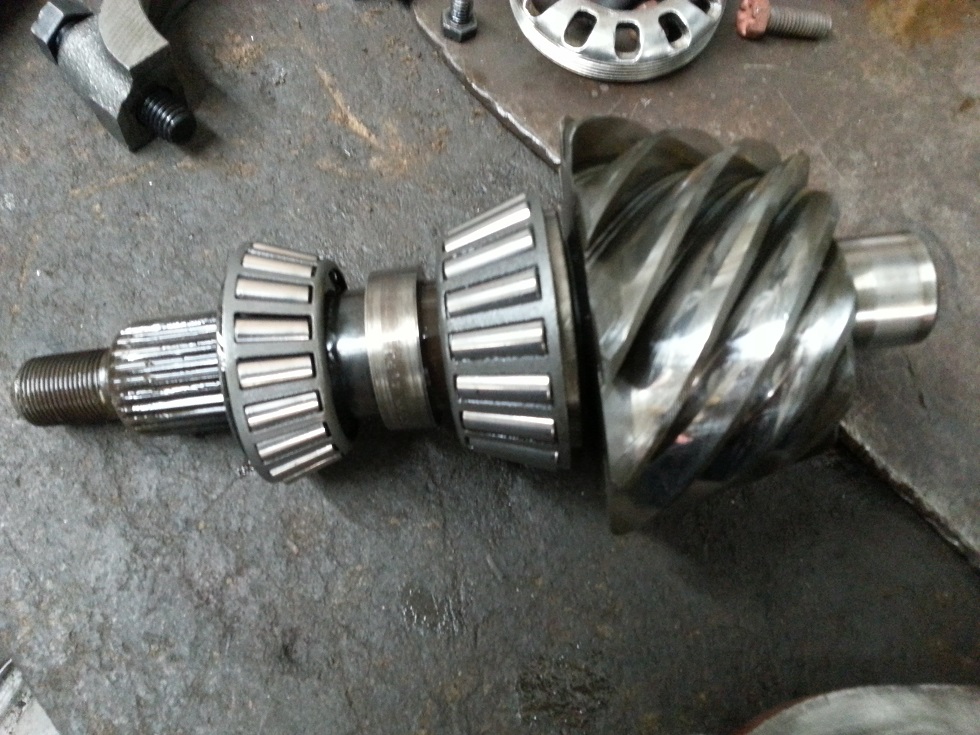
The gears went back together with new ARP bolts holding the ring gear to the Detroit Locker, and set up with the same pinion spacer and backlash (0.014") as it had when it came apart.  The gears looked good, and when I had disassembled the rear end there had been plenty of gear oil in the axle housing, despite a minor leak in one axle seal, so I don't expect any problems from this setup.

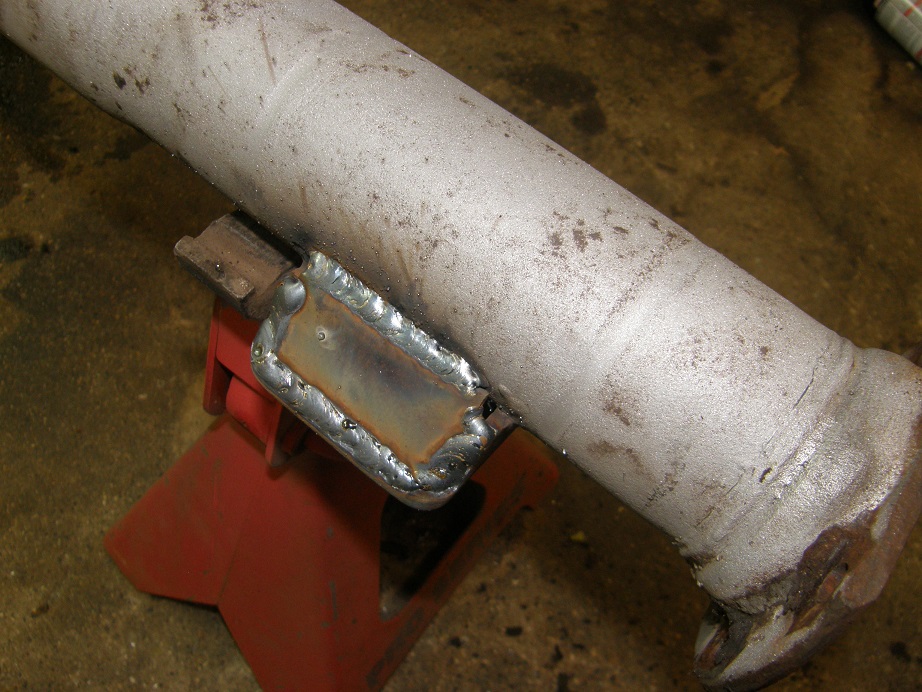
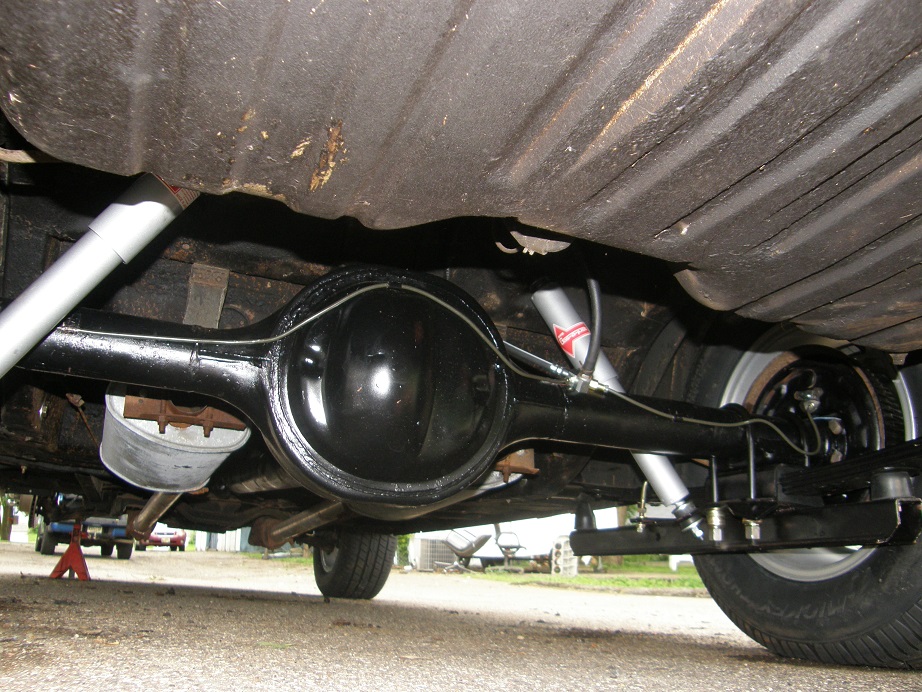
After getting back home on Friday night I got the axle housing ready for re-assembly.  First thing I did was to weld four supports into the leaf spring mounts, since under a lot of power these things have a tendency to bend.  Here's a picture of one side where I added a 3/16" plate, welded to the spring mount and the axle tube:


After the axle housing cooled I cleaned it up and painted it, and called it a night.

Saturday morning I installed the case with a new gasket, and pounded in the new axle seals with a seal driver.  Then I wrestled the axle housing onto one of my floor jacks and dragged it underneath the car to get it installed.  The new leaf springs had already been mounted with the front bolt, but were still down on the ground at the back, so the axle housing slid right into its general position.  Getting it lined up properly with the leaf springs was a big pain; I really need to make some kind of an attachment for one of my floor jacks that will hold a 9" axle housing steady, because they always want to roll off the jack as you are trying to jockey them into position.  I ended up using three floor jacks, one under the axle housing and one under each leaf spring, before I finally got the axle housing positioned properly.  I had purchased new U-bolts and nuts, along with new rubber insulators for the leaf springs, so I installed those with the traction bars that had originally been on the car. 

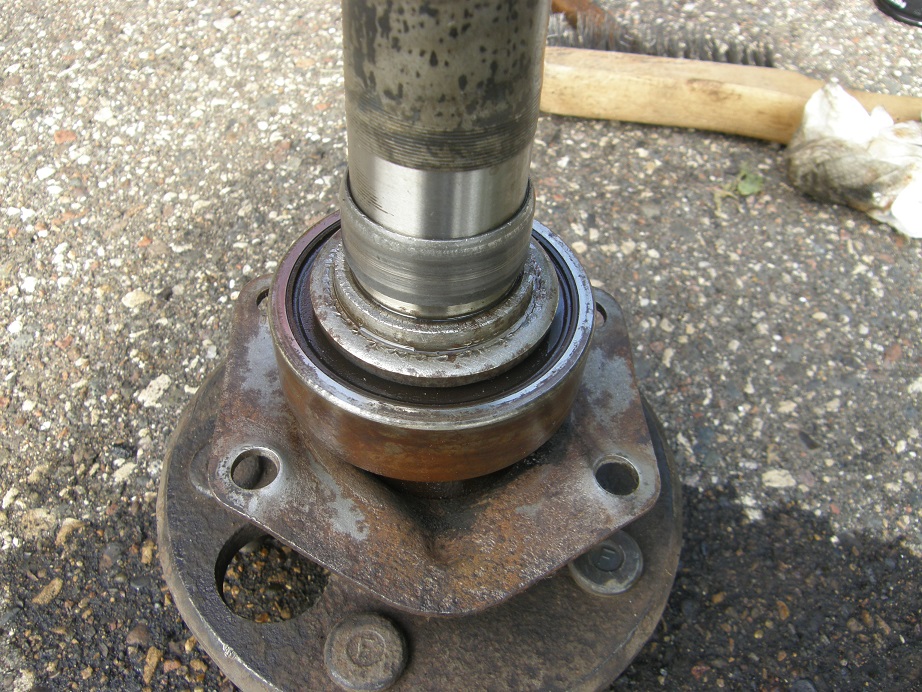
After the axle housing was all bolted in, I spent the rest of the day getting the axles and new brakes installed.  I found an interesting situation with the axles.  On Friday night, BradFORD had asked me if my axles had sleeves installed for the seals to ride on.  He said he'd had several reports of sleeves on 31 spline axles.  I responded that they did not; I hadn't remembered seeing anything like that.  But when I went to install them on Saturday, I took a close look, and sure enough, one of the axles had a sleeve installed for the seal to ride one.  A picture of both axles is below; the second picture shows the axle that has the sleeve installed:


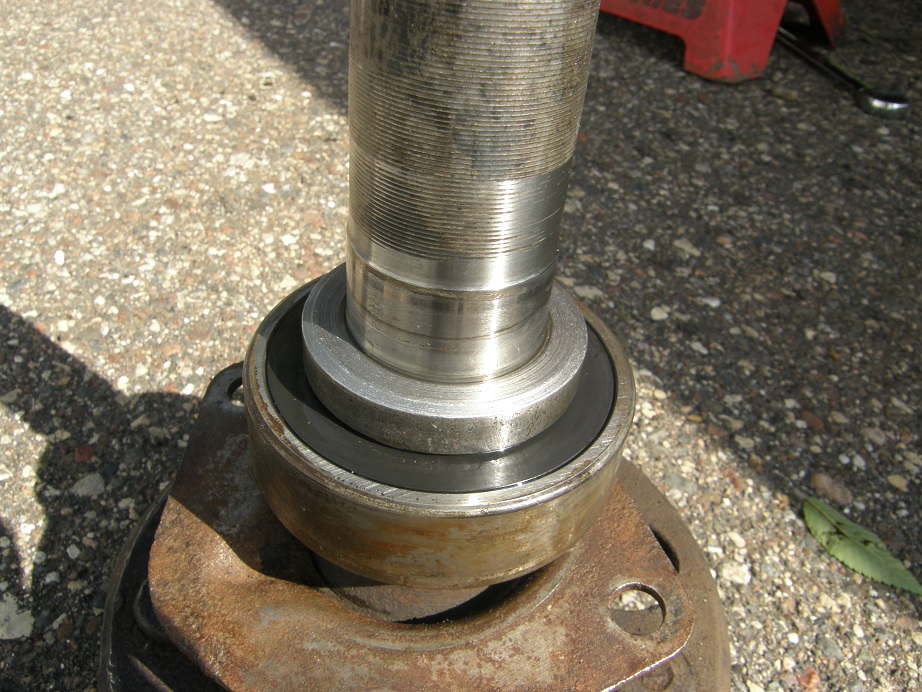
I'd never seen this before, but then I'd never really looked for it either.  Anybody know anything about this?  Was this a fix for a damaged axle?  Is it possible that this was done by Ford, or is it more likely it was done as a repair later?


On to the brakes.  It had been a while since I had done a set of drum brakes, and I found myself referring to the shop manual to make sure I had everything installed correctly, but I was happy to see that the parts all seemed to be correct and fit properly.  I had been a little worried about this because of the rear brake hose that I got from Napa.  I had taken it out of the box to install it on the axle housing a little earlier, and was surprised to see that it had two different sized inverted flare fittings on it.  The one on the hose that attaches to the car's body was 3/16" inverted flare, and the one on the block that bolts to the axle housing and goes to the driver's side brake line was 3/16", but the one going to the passenger side appeared to be 1/4" inverted flare.  What was up with that?  I dug the old brake hose out of the trash, and all three of the connections were 3/16".  So this hose was not a direct replacement.  Both wheel cylinders used a 3/16" inverted flare of course, so I was going to need an adapter for the 1/4" inverted flare socket on the brake hose.

Sunday morning I started on the brake lines.  I checked my stash of brake fittings but didn't see the adapter I needed.  I ran off to Napa and picked up a 25 foot roll of brake line tubing, so I could run one continuous line from the rear up to the master cylinder.  Then I started asking about the brake fitting.  The Napa store had a big Weatherhead box that was supposed to be filled with all kinds of different fittings.  Of course, most of the drawers were empty, including the one with the fitting that I needed.  The Napa guy was no help.  "Are you sure its a 1/4" fitting?  What if its metric?  Ford did some weird stuff back then, man..."  Right, in 1969.  And I got the brake hose from Napa, you moron, maybe Napa did the weird stuff.  Its tough to get good help these days  ::)  Anyway, I went back home without the fitting I needed, but I hadn't actually screwed a 1/4" inverted flare fitting into the brake hose to check it, and maybe Napa's part was metric for some reason.  So I decided I'd better check.  I went digging through my fitting stash looking for a 1/4" fitting to test fit, and lo and behold, there was the 1/4" to 3/16" inverted flare adapter that I needed!  Somehow I hadn't seen it the first time I dug through the box.  I screwed it into the brake hose and it fit perfectly. 

I started with the rear end and made the two brake lines I needed to connect the block on the end of the brake hose to the wheel cylinders.  Here's a picture of how it looked under the car at this point; a big improvement from before.  If you look close, you can see the 1/4 to 3/16 adapter screwed into the rear brake hose block:


Before I started the rest of the brake lines, I decided to test fit the new shocks.  I had purchased KYB gas shocks to replace the air shocks in the back of the car.  I put the floor jack under the axle housing and jacked the car up so it was resting on the rear leaf springs, not the jack stands.  But when I tried to fit the shocks into position, they were not long enough; they were fully extended and not close to fitting into both the body and the lower mounts.  It looked like I needed some long shock extensions to make them work.  Crap, you buy a part that's supposed to fit, and it doesn't.  However, turned out I was premature on this conclusion; more about this later.

I spent the rest of Sunday running all the brake lines.  I used the factory attachment points to make sure that the lines stayed securely positioned, and did my best to bend the lines to fit like the stock ones.  I also made a couple of small brackets to hold the flexible braided steel lines coming from the Wilwood front calipers in place in the stock location.  Overall I was very happy with the brake system now, everything was brand new and the installation had gone well.  Last thing I did on Sunday was bleed the master cylinder per Wilwood's recommendations.

Monday afternoon I opened the bleeders and gravity-bled the brake system.  When my son got home from work I had him pump the brake pedal for me while I went around the car twice cracking all the bleeder screws to get any remaining air out.  The system used almost two pints of brake fluid but after the bleeding process the pedal was nice and high, and felt very firm - perfect!

On Friday I had brought back the three wheels and tires that BradFORD had mounted and balanced for me.  The rear wheels are 15X8, with 255/60R-15 tires, and the fronts are 15X7 with 235/60R-15s.  I decided I had three of the four tires, why not install them.  I'd just keep the left front up on a jackstand until I got the next wheel and could get it installed.  Besides, I wanted to see how the car sat with the new springs in the back.  In the leaf spring thread in the technical forum, the general consensus seemed to be that the car would sit pretty low in the back, but the leaf springs I received had a pretty good arch, so I wanted to check that out.  I installed the three wheels and tires and dropped the car down off the jackstands, and I have to say that I was very happy with the way the rear end sat.  Here's a picture; the front end is still up somewhat because of the jackstand under the front left lower control arm, but you get the idea:


Assuming the front end comes down when I get the last wheel and tire installed, I think the stance will be about perfect!  I had actually been worried about it being too high in the back, but that didn't appear to be the case.  Then I started thinking about the rear shocks again; the rear end seemed to be lower than it had been when I'd had the jack under the axle housing; maybe that had been giving me a false reading.  Sure enough, when I crawled under the car with a shock, this time it appeared that the shock would fit perfectly.  So, I went ahead and installed them.  Here's a picture looking under the car with the shocks installed and the tires on:


So, now all I'm waiting for is the last wheel; when I get it (if its NOT BENT  >:( >:( >:(), I can get it mounted and balanced, and installed on the car.  Once the car is resting on all four wheels and tires I will adjust the traction bar U-bolts, and I can pull this thing into the trailer and forget about it for a while.  With the work I've done to it, I like this car a lot more now, so hopefully my time will free up fairly soon and I can get the bodywork done and get it painted.  I have a 492" FE pretty much ready to drop in, so once the paint is done I should be able to swap in that engine and start driving it.  Looking forward to that...
« Last Edit: June 19, 2018, 09:52:28 AM by jayb »
Jay Brown
- 1969 Mach 1, Drag Week 2005 Winner NA/BB, 511" FE (10.60s @ 129); Drag Week 2007 Runner-Up PA/BB, 490" Supercharged FE (9.35 @ 151)
- 1964 Ford Galaxie, Drag Week 2009 Winner Modified NA (9.50s @ 143), 585" SOHC
- 1969 Shelby Clone, Drag Week 2015 Winner Modified NA (Average 8.98 @ 149), 585" SOHC


afret

  • Guest
Re: 1969 Torino(?) Cobra Rebuild
« Reply #28 on: June 19, 2018, 03:15:19 PM »
« Last Edit: June 19, 2018, 03:24:53 PM by afret »

e philpott

  • Hero Member
  • *****
  • Posts: 922
    • View Profile
Re: 1969 Torino(?) Cobra Rebuild
« Reply #29 on: June 19, 2018, 03:34:40 PM »
Are you going to keep it Red ??... looks like a fun project , I like the fastback Torino's best