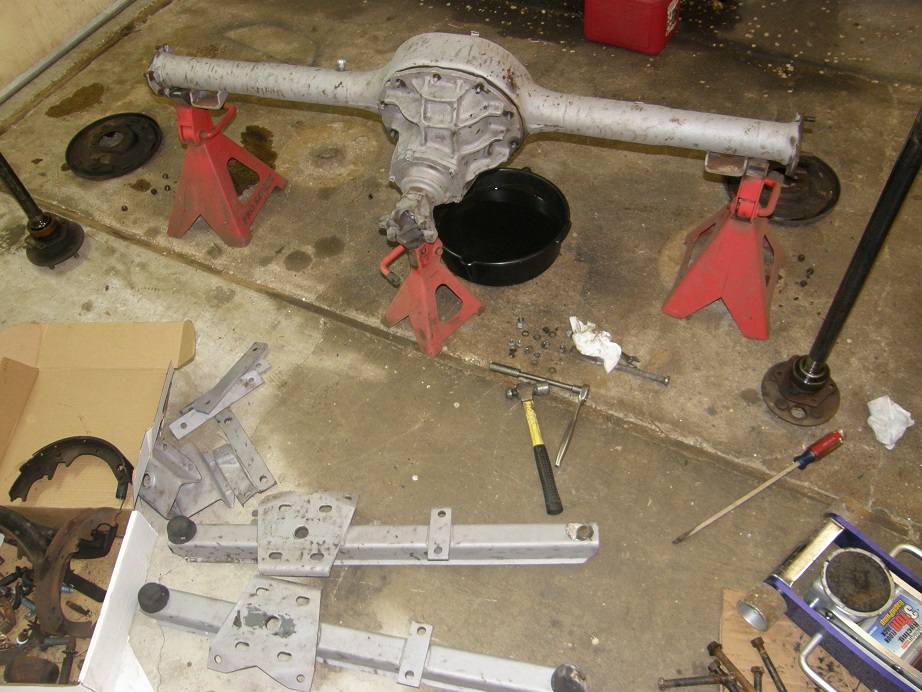
Author Topic: 1969 Torino(?) Cobra Rebuild  (Read 30397 times)

0 Members and 1 Guest are viewing this topic.

jayb

  • Administrator
  • Hero Member
  • *****
  • Posts: 7404
    • View Profile
    • FE Power
1969 Torino(?) Cobra Rebuild
« on: June 11, 2018, 04:56:42 PM »
Thanks to FElony I'm not sure what to call this thing, but you get the idea.  Three years ago I purchased this car from a guy who had owned it since 1975; the original thread from my Classifieds post on this car is below:

http://fepower.net/simplemachinesforum/index.php?topic=2795.0

Since then it has just sat here, because I'm still deluged with other projects.  However, recent events have forced me into some work on the car.  This all started because I had a hankering for an enclosed car trailer.  I ended up buying one in mid-April so I could haul a car and some FE Power stuff out to the FE Reunion; no way all the stuff I had would fit in my pickup while hauling a car on my open tandem axle trailer.  But now that I had the enclosed trailer, what to do with the open trailer?  Turns out my friend Steve wanted to buy it, so a couple weeks ago I pulled it out of it's parking spot.  The Cobra was sitting on the trailer, where it had been for about a year.  Like a good FE car, it fired right up when I turned the key.  I backed it off the trailer, hit the brakes and - NOTHING.  I was lucky to slam it into third and pop the clutch to stop it just at the edge of the driveway, before it would have rolled down a decent sized hill.  The car had brakes when I put it on the trailer.  They just don't like to sit, I guess.

My plan was to just pull it into my new enclosed trailer but I wasn't going to try that without the brakes working.  Long ago I had decided that when I went through this car, I'd replace the front Ford discs with Wilwoods, and replace the horrible master cylinder and power booster package on the car with a manual Wilwood master cylinder.  With the car sitting in the driveway, I figured this was as good a time as any to get this done.  So, up on jackstands it went.

The Keystone mags and tires were in terrible shape, and in order to make certain that the Wilwood front disc brake package would fit, I had to decide on wheels before I could specify the brakes.  I thought that American 200S wheels would look good on the car, but when I priced them out I found that they were ridiculously expensive, over $400 per wheel.  However, American offered a one piece version for about $160 for a 15X7.  They looked pretty good on the web site, so I ordered one to see if it looked OK in person, and to be able to measure for brake clearance.  I have to say that when I got the wheel, I was really impressed with it; the quality looked excellent.  Naturally, Made in China was cast into the back side, and I hate that, but to save $1000 over the 200S wheels I'll live with it.  I measured the wheel to figure out which Wilwood front disc kit would work, then got them on order last Friday, along with three more wheels and four tires.

This past weekend I crawled under the car to see what I was in for, regarding the brakes.  In the rear, first thing I noticed was that the flexible brake hose going to the differential was broken in two; apparently since I've had it, this car has never had rear brakes.  I also noticed that the rear leaf springs had seven leaves, and put a post up on this in the technical forum.  Turns out it should only have four leaves, so somebody was monkeying around with the rear springs on this car.  I had planned to do the rear drum brakes at the same time as the fronts, and from the looks of the brake lines they all needed to be replaced, so I planned to do that too.  In the back of the car I decided I'd better pull the drums and see what they looked like.  To my surprise, the drums looked really, really good, and most of the pad was still on the brake shoes, but the rust was pervasive, so I decided to completely revamp the rear brakes also, but keep the drums.  I disassembled the rear drum components and removed the wheel cylinders and lines.  Went to NAPA later that day and ordered all new parts, only about $100 for everything.  Lots cheaper than the front stuff, that's for sure.

Since the leaf springs needed to be replaced I was faced with completely tearing the rear end apart on the car.  What fun  :(  I started with the air shocks, and went into the interior to pull the rear seat so I could get to the upper mount on the left shock.  The troll-hair carpeting that had been installed on the rear deck was staring me right in the face the whole time, and after a few minutes I just couldn't stand it, so I loosed up some of the interior pieces and took it out.  Picture below:
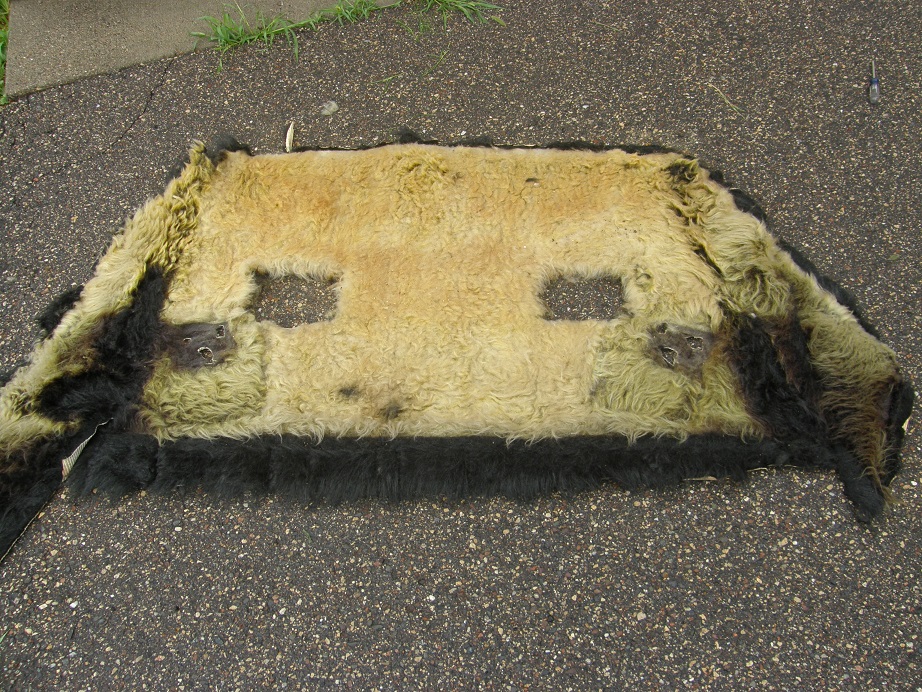


Imagine my surprise when after starting to pull it out I discovered that it had been originally black!  All of the carpet that saw direct sunlight had turned yellowish, but everything covered up was still jet black.  Must have been some pretty cheap stuff.

In order to get the carpeting all the way out I had to remove the two speakers cut into the rear deck.  I figured that these must have been some aftermarket speakers hacked in there, but after I got them out and the carpet removed, I saw that the rear deck cutouts had been done pretty nicely.  I took a closer look at the speakers and sure enough, they had Ford markings:


So now I'm wondering about the speaker grilles; are these Ford also?  Picture below:
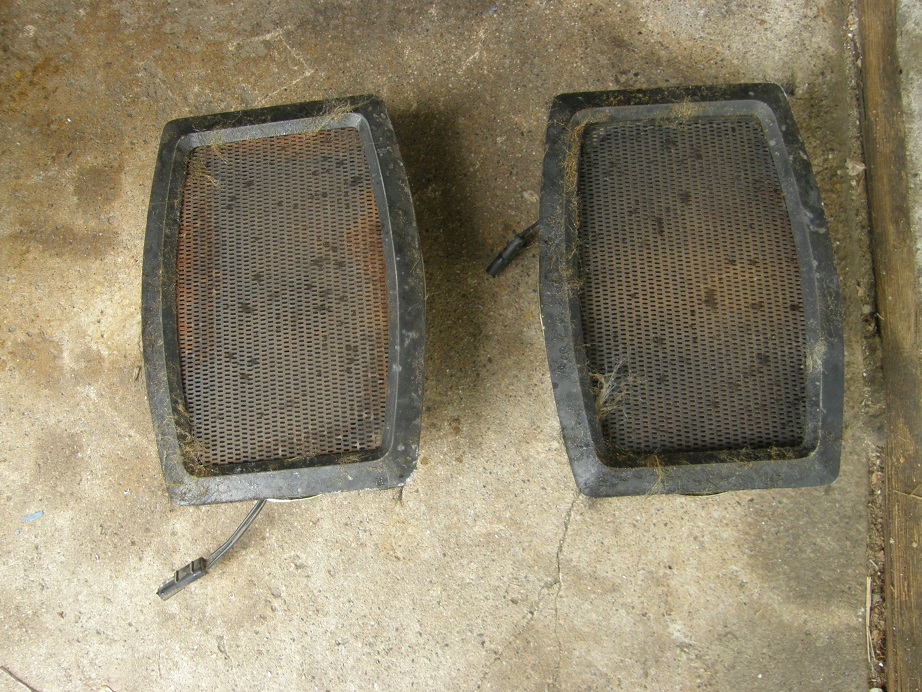


If this was Ford stuff that would be cool, even though the speakers are shot and I'm sure they don't work any more.  Just having the original grilles in the car would be pretty cool.

After getting the air shocks out of the car, I pulled the driveshaft and removed the lower bolt from the rear leaf spring shackles, and dropped the back of the leaf springs down.  I had to heat the nuts up with the torch to get them freed up, but after that it wasn't too bad to get the bolts out and drop the back of the leaf springs down.  Next I tried the U-bolts holding the differential in place.  Naturally, they wouldn't budge, so I dug out the heat wrench and cut them off; I wanted to replace the U-bolts anyway because they were pretty rusty.  From the bottom, the traction bars dropped off.  These things are kind of odd, they have a front bumper in the normal position, but also a flat bumper behind the axle.  Anybody ever seen a set like this before?  Who made them?  Picture below:
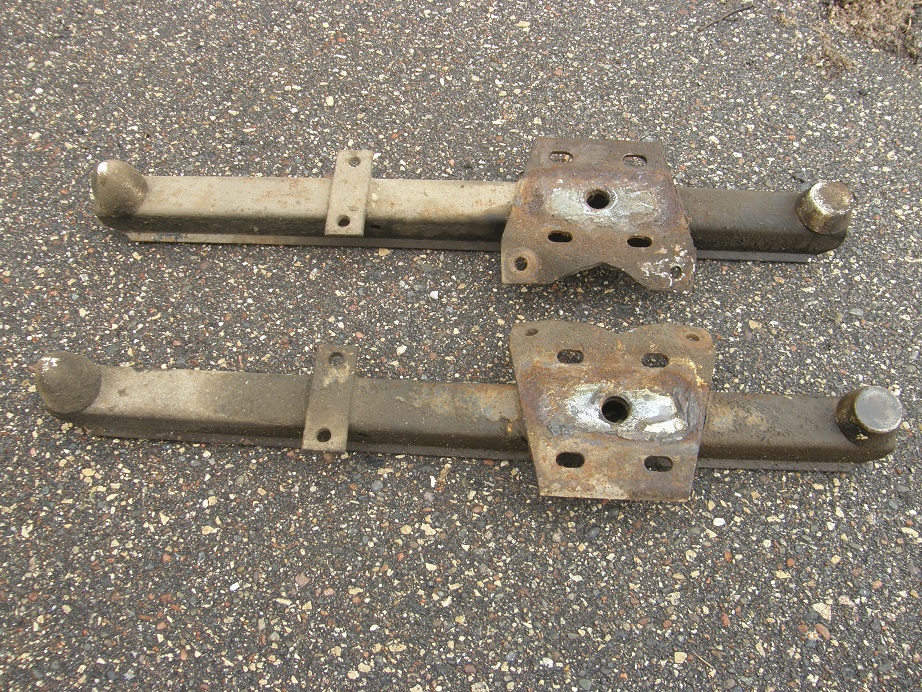


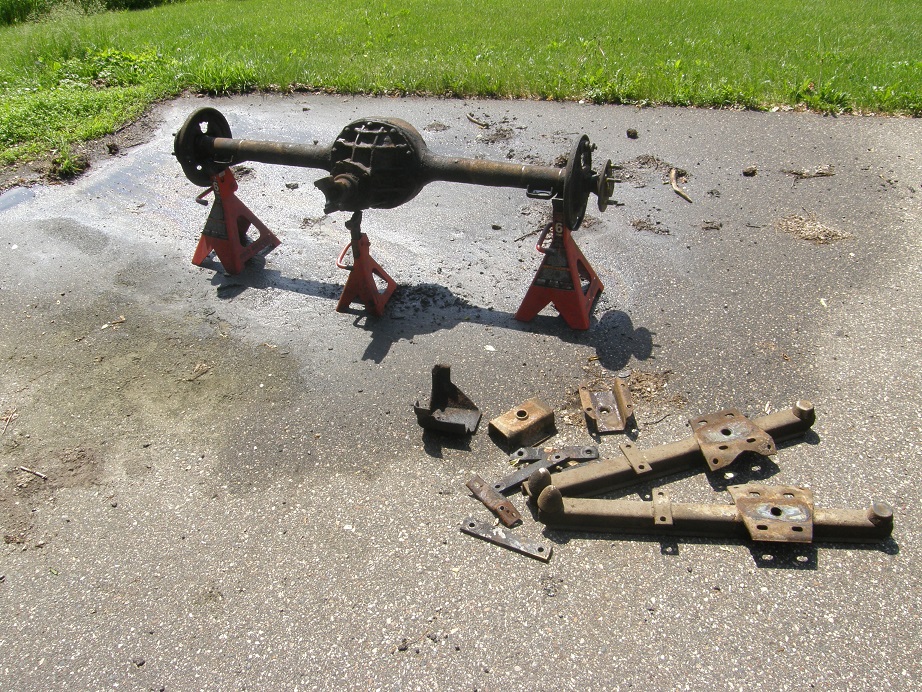
I think I'm going to replace the rubber bumpers and keep the traction bars, because they remind me of how the car probably looked back in the day.  I took the differential out and put it behind the car.  Here's a picture after it has been removed, and also one of the end of the axle showing the three dimples characteristic of 31 spline axles:

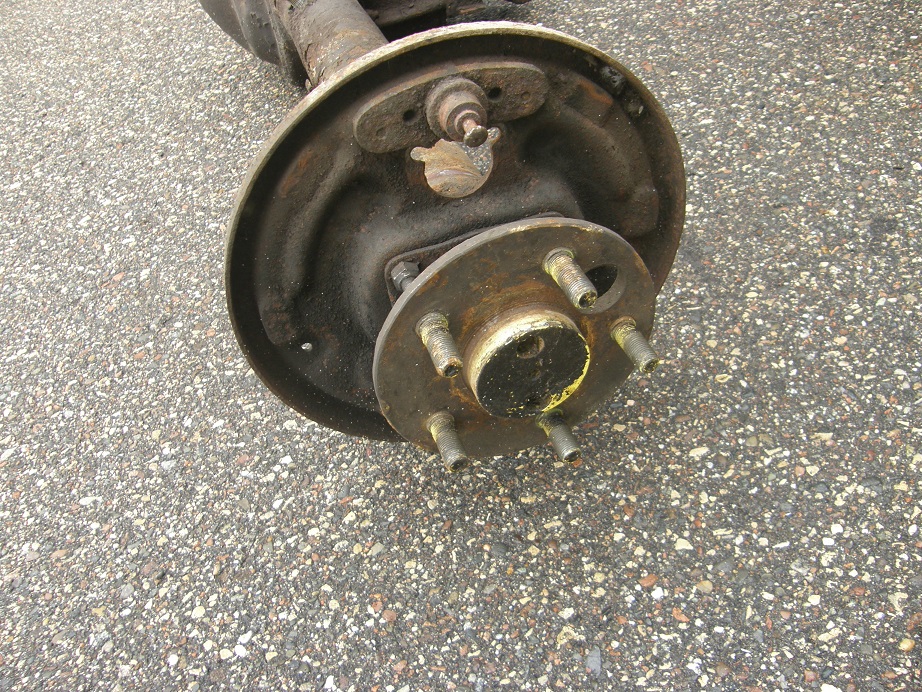


Last step was to remove the front bolt of the leaf springs.  One of my favorite jobs  ::)  I started with the driver's side, and heated up the nut to get it loose, but as usual the bolt was frozen to the steel sleeve that it slides through in the front leaf spring bushing, and it wouldn't come out.  To remove it I started by cutting off the spring up at the front eye.  Here's a picture of one of the 7 leaf springs, after the front eye was cut off:
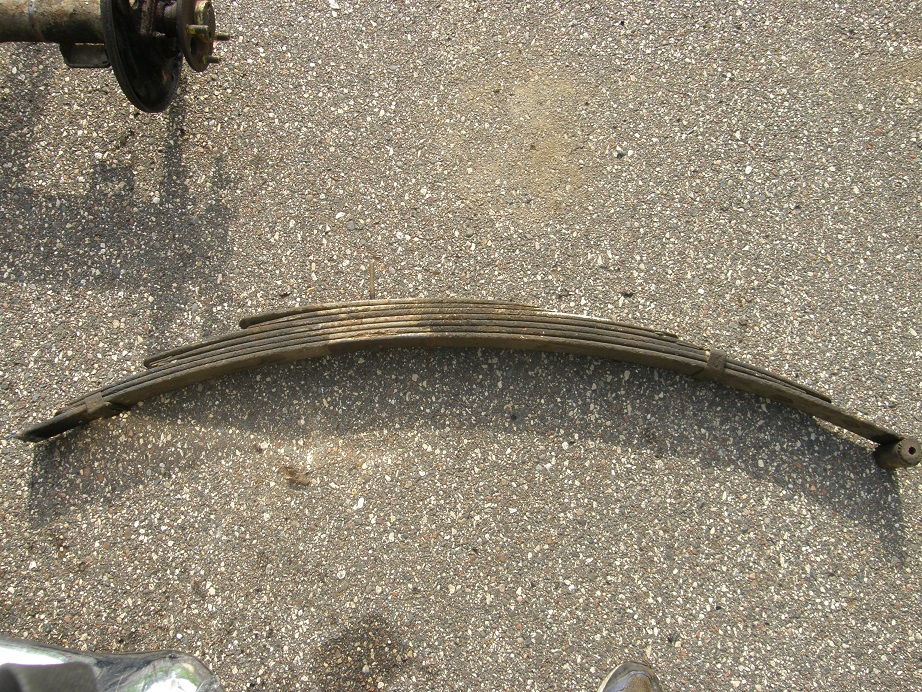


To get the bolt out I ended up cutting a slot through the front spring eye, then rotating it around and cutting a second slot so that the two halves would fall off.  Needless to say I was dealing with a rubber fire all the while, with the gas line inches away on the driver's side.  I kept having to stop and put out the fire, check the gas line to make sure it wasn't too hot, then cut some more with the torch.  After the spring eye fell away I had to cut a little more through a steel sleeve that surrounds the rubber bushing, but is not part of the spring.  Once I cut two slots through that it fell off, and I was able to grab what was left of the rubber bushing and pull it out of the way.  This finally exposed the steel sleeve that was in the middle of the bushing and was frozen to the bolt with rust; I heated it up cherry red then grabbed it with a vise grips and turned the bolt with a ratchet, and it finally came loose so that I could pull the bolt out of the hole.  What a struggle, took about an hour on each side of the car to get the front bolt out.

With the rear suspension completely out of the car, I decided to strip out the interior.  The blue and white shag carpeting in the car's interior was also pretty obnoxious (although not as bad as the troll hair covering the rear deck), and I thought it would be a good idea to see what was underneath it, so I had an idea of how much metal work there was to do on the car.  I figured this would be pretty easy, but of course nothing on a car likes this turns out to be easy.  I decided to unbolt the driver's seat first.  The first two nut snapped right off the studs.  I stopped to think, do I really want to get into this any further, because if I snapped off another one I'd have to repair the seat tracks before I could bolt the seat back into the car and drive it into the trailer, once all the work was done.  After a few minutes of indecision I decided to go for it.  Naturally the third nut snapped off too.  For some reason, the fourth nut came off with no problem, and I pulled the seat out of the car.  On the passenger side it was the same thing, three nuts snapped off but one came off with no trouble.  Go figure.

After removing the door sill trim and the shift boot, I was able to pull the hated blue and white shag carpeting out.  Then I pulled out the factory sound deadening pads, but when I pulled out the one under the driver's seat, I was surprised to see a sheet of paper stuck to the bottom.  I peeled it off, and lo and behold, there was another build sheet:
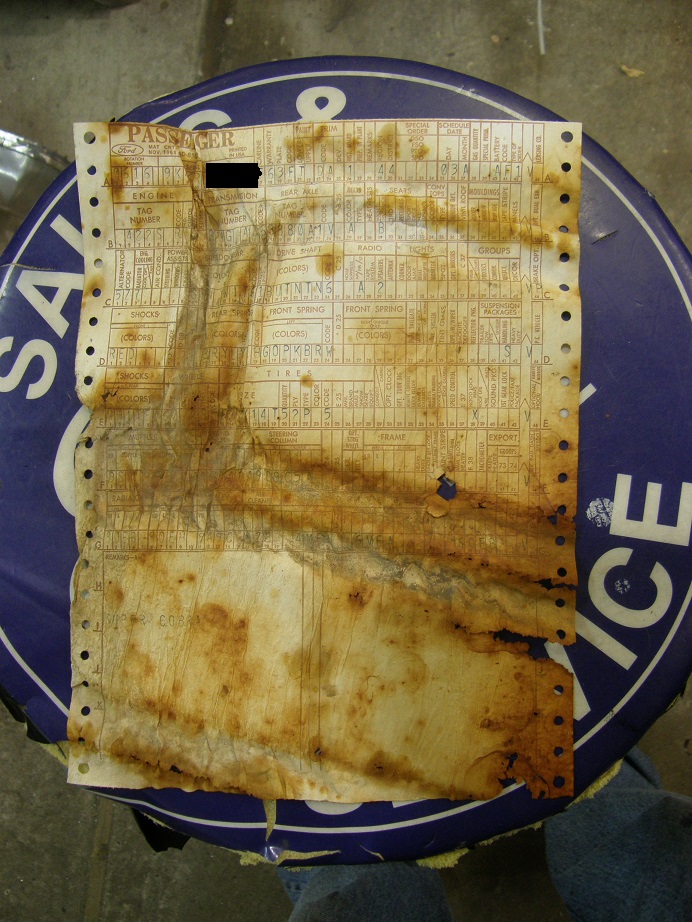


This was a big surprise.  I already had one build sheet for the car, that the previous owner said he'd found in the back seat springs.  I dug out that build sheet and it was the same as the one I'd just uncovered.  I can only conclude that this car was built with the rare dual build sheet option.  A value adder for sure  ;D  As I was looking at the build sheets, I happened to see under the Radio heading, the number "2" in the box labeled speakers.  So, it did make sense that the speakers I took out earlier were factory installed.

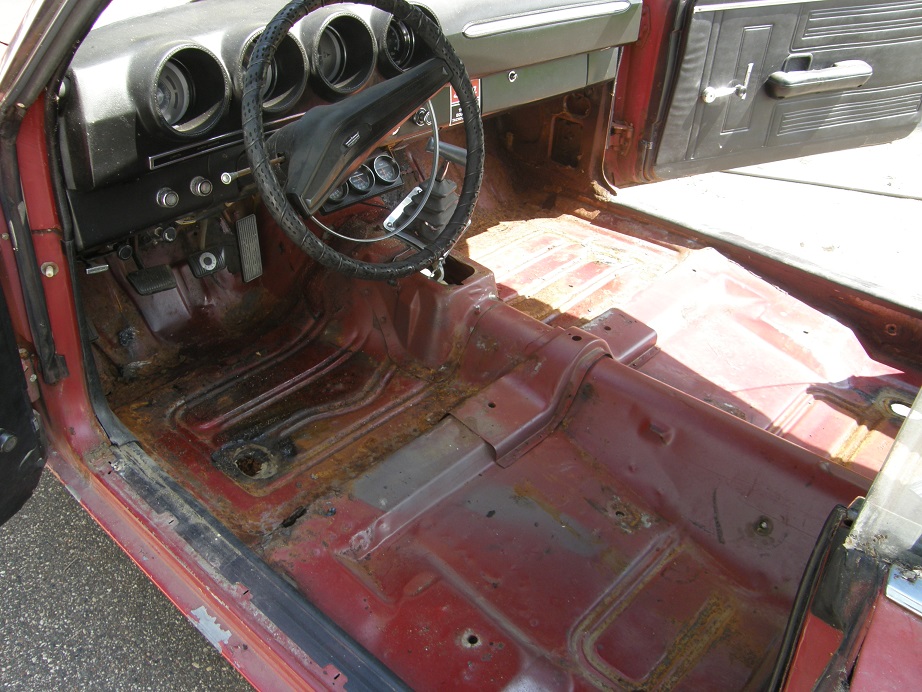
Examining the floorpan of the car it was not as rusty as I feared it might be.  There were rust holes in the seat pan right in front of the outboard front seat mounting hole, on both sides.  Also, there were rust holes on both sides of the floor where the floorpan meets the toe board, on the outboard side.  None of these is a difficult fix, and outside of some rust in the inner and outer rear wheelhouses down towards the bottom, the interior sheet metal  looks pretty solid.  A couple of days with the welder will take care of these issues when the time comes.  Here's a picture of the interior with all the parts removed:


Yesterday I dug out my Harbor Freight sandblaster and picked up some fresh sand, then went to town for a couple hours on the differential and some of the other small parts.  I like to do this with the differential fully assembled so that I don't get any sand inside, then blow it off and take it apart.  Here are some before and after pictures:


Now that the differential is apart I need to sandblast the drum backing plates, and get the center section out and off to my friend BradFORD.  I have a 31 spline Detroit Locker coming to replace the Traction-Loc unit in the car, and he will set that up for me.  I'm also going to take the driveshaft in for a couple new U-joints and balancing because there is one small ding in the tube, and I want to make sure its straight and won't cause a vibration when I'm driving the car.  All my new parts should be coming this week, so for the next couple days I'll be doing a final cleanup and paint on the blasted parts.  Next weekend I should be able to start getting it all back together.  I'll post another update at that time - Jay
Jay Brown
- 1969 Mach 1, Drag Week 2005 Winner NA/BB, 511" FE (10.60s @ 129); Drag Week 2007 Runner-Up PA/BB, 490" Supercharged FE (9.35 @ 151)
- 1964 Ford Galaxie, Drag Week 2009 Winner Modified NA (9.50s @ 143), 585" SOHC
- 1969 Shelby Clone, Drag Week 2015 Winner Modified NA (Average 8.98 @ 149), 585" SOHC


thatdarncat

  • Hero Member
  • *****
  • Posts: 1865
    • View Profile
Re: 1969 Torino(?) Cobra Rebuild
« Reply #1 on: June 11, 2018, 05:18:04 PM »
Those are original speaker grills, I pulled a pair including the speakers out of a '68 or '69 fastback Torino in a salvage yard about 35 years ago. What did your Marti report say about the radio? My '68 Torino GT has the factory AM/FM stereo radio, but didn't come with rear speakers. My '68 Torino GT also had a build sheet taped to the floor, under the carpet & sound deadening, although I remember mine being under the passenger seat.
« Last Edit: June 11, 2018, 05:37:11 PM by thatdarncat »
Kevin Rolph

1967 Cougar Drag Car ( under constuction )
1966 7 litre Galaxie
1966 Country Squire 390
1966 Cyclone GT 390
1968 Torino GT 390
1972 Gran Torino wagon
1978 Lincoln Mk V

jayb

  • Administrator
  • Hero Member
  • *****
  • Posts: 7404
    • View Profile
    • FE Power
Re: 1969 Torino(?) Cobra Rebuild
« Reply #2 on: June 11, 2018, 07:19:56 PM »
Marti report says AM radio.
Jay Brown
- 1969 Mach 1, Drag Week 2005 Winner NA/BB, 511" FE (10.60s @ 129); Drag Week 2007 Runner-Up PA/BB, 490" Supercharged FE (9.35 @ 151)
- 1964 Ford Galaxie, Drag Week 2009 Winner Modified NA (9.50s @ 143), 585" SOHC
- 1969 Shelby Clone, Drag Week 2015 Winner Modified NA (Average 8.98 @ 149), 585" SOHC


FElony

  • Guest
Re: 1969 Torino(?) Cobra Rebuild
« Reply #3 on: June 11, 2018, 07:53:26 PM »
Thanks to FElony I'm not sure what to call this thing, but you get the idea.

I'm sure Fairlane Cobra will work for most people.
 
Quote

 Next weekend I should be able to start getting it all back together.  I'll post another update at that time - Jay

I mistakenly thought this was going to be a repaint/correct resto with a hotter engine, since it is a stick SCJ. Stupid me.

Edit: I have seen claims of 5 or 6 build sheets in a single car.
« Last Edit: June 11, 2018, 07:56:59 PM by FElony »

jayb

  • Administrator
  • Hero Member
  • *****
  • Posts: 7404
    • View Profile
    • FE Power
Re: 1969 Torino(?) Cobra Rebuild
« Reply #4 on: June 11, 2018, 08:19:15 PM »
Well, if I ever get the stock restoration bug I can put it back, because I'll be keeping all the parts I took off.  But a stock resto seems kind of pointless without the original engine.  And thanks for bursting my bubble about the rare dual build sheet option  ;)
Jay Brown
- 1969 Mach 1, Drag Week 2005 Winner NA/BB, 511" FE (10.60s @ 129); Drag Week 2007 Runner-Up PA/BB, 490" Supercharged FE (9.35 @ 151)
- 1964 Ford Galaxie, Drag Week 2009 Winner Modified NA (9.50s @ 143), 585" SOHC
- 1969 Shelby Clone, Drag Week 2015 Winner Modified NA (Average 8.98 @ 149), 585" SOHC


FElony

  • Guest
Re: 1969 Torino(?) Cobra Rebuild
« Reply #5 on: June 11, 2018, 08:36:57 PM »
Well, if I ever get the stock restoration bug I can put it back, because I'll be keeping all the parts I took off.  But a stock resto seems kind of pointless without the original engine.

I wholeheartedly disagree. Huge number of stock appearing cheater-engine cars out there. Huuuge. IMO, the best approach. And, think of the F.A.S.T. series cars. Better yet, build this as a F.A.S.T. car. Want a competitive challenge, homie? There ya go.

Quote

 And thanks for bursting my bubble about the rare dual build sheet option  ;)


Hey, what are friends for? I find it emotionally disturbing that you are/were more jazzed about the build sheets than the rarity of the car outlined therein. Wake up, man!

jayb

  • Administrator
  • Hero Member
  • *****
  • Posts: 7404
    • View Profile
    • FE Power
Re: 1969 Torino(?) Cobra Rebuild
« Reply #6 on: June 11, 2018, 08:42:36 PM »
Speaking of rarity, any idea of how many SCJ Cobras were built?  Marti report says 1387, but I don't know if that is the number of cars with the 63E body style, or if that's the total number of Fairlanes/Torinos/ Cobras with the SCJ.
« Last Edit: June 11, 2018, 10:06:11 PM by jayb »
Jay Brown
- 1969 Mach 1, Drag Week 2005 Winner NA/BB, 511" FE (10.60s @ 129); Drag Week 2007 Runner-Up PA/BB, 490" Supercharged FE (9.35 @ 151)
- 1964 Ford Galaxie, Drag Week 2009 Winner Modified NA (9.50s @ 143), 585" SOHC
- 1969 Shelby Clone, Drag Week 2015 Winner Modified NA (Average 8.98 @ 149), 585" SOHC


BruceS

  • Hero Member
  • *****
  • Posts: 738
    • View Profile
Re: 1969 Torino(?) Cobra Rebuild
« Reply #7 on: June 11, 2018, 09:06:50 PM »
Jay, +1 that those are OEM rear speakers, but you better recheck the build sheet(s) to see if the troll hair package tray was an option!  Haha.  That troll hair seems so 70s!  ;D
66 Fairlane 500, 347-4V SB stroker, C4
63 Galaxie 500 fastback, 482 SO 4V, Cruise-O-Matic

FElony

  • Guest
Re: 1969 Torino(?) Cobra Rebuild
« Reply #8 on: June 11, 2018, 10:04:27 PM »
Speaking of rarity, any idea of how many SCJ Cobras were built?

I'm sure I have that number in a saved post (over 11,000 of those). However, I HIGHLY suggest (buckshot ---> cranium) that you get the Deluxe Marti on that car. You will receive faaar more recognition for the car than than anything you put under the hood.

Let me put this another way. We all know you gnarfed a Mach and a Shelby. No biggie; those are Mustangs. Those are the ponies that gay caballeros ride. Galaxies? Front bumper in a separate zip code than the rear. Torino/Cyclones are REAL Muscle Cars, which are built on 114-117-inch wheelbases. No more parading your frilly knickers at that swishy cabaret down in Little Somalia. You wearin' long pants now, boah. Bicep-flexin', Nascar-beatin', testosterone-laden, Blue Oval intermediate Muscle Car.

Got it? Now throw away the ticking hourglass, put a chair ten feet from the Cobra, and think. Put it on the side burner. You'll thank me later.

turbohunter

  • Hero Member
  • *****
  • Posts: 2509
    • View Profile
Re: 1969 Torino(?) Cobra Rebuild
« Reply #9 on: June 11, 2018, 10:17:34 PM »
No biggie; those are Mustangs. Those are the ponies that gay caballeros ride. Galaxies? Front bumper in a separate zip code than the rear. Torino/Cyclones are REAL Muscle Cars

Ohhhh, that hurts ;)
Marc
'61 F100 292Y
'66 Mustang Injected 428
'66 Q code Country Squire wagon


FElony

  • Guest
Re: 1969 Torino(?) Cobra Rebuild
« Reply #10 on: June 11, 2018, 10:47:54 PM »
No biggie; those are Mustangs. Those are the ponies that gay caballeros ride. Galaxies? Front bumper in a separate zip code than the rear. Torino/Cyclones are REAL Muscle Cars

Ohhhh, that hurts ;)

As they (((They))) say, "The truth hurts, don't it?"   8)

Rory428

  • Hero Member
  • *****
  • Posts: 1003
    • View Profile
Re: 1969 Torino(?) Cobra Rebuild
« Reply #11 on: June 12, 2018, 12:37:48 AM »
Jay, I have owned 2 69 Cobras, both R code fastbacks. Although technically closer to a Fairlane rather than a Torino, at least for 69, as far as I know, Ford simply called them "Ford Cobras", there is no "Torino" or Fairlane" nameplate anywhere on the car, inside or outside.Even on the registration paperwork, it said Ford Cobra. In 69, the Torno grill was noticeably different than a Fairlane grill, Cobras used the Fairlane grill. One of my Cobras I bought in California, and was amazingly solid and rustfree, but the other car was a local Western Canada car, that a buddy owned, and offered it to me in 1976, and at that time was pretty much mint. After I passed on the Cobra, it traded hands a couple of times, and ended up sitting outside in the weather for many years, and by the time I bought it in the mid 90s, the cowl rotted out, allowing water to get into the firewall pad, which also rotted out the firewall quite badly, along with the drivers side floor and toe boards. I also had a 68 Fairlane wagon I parted out a few years later, that also had some firewall rust. So you may want to take a close look at the cowl and firewall area to make sure you don`t have a similar issue.
1978 Fairmont,FE 427 with 428 crank, 4 speed Jerico best of 9.972@132.54MPH 1.29 60 foot
1985 Mustang HB 331 SB Ford, 4 speed Jerico, best of 10.29@128 MPH 1.40 60 foot.
1974 F350 race car hauler 390 NP435 4 speed
1959 Ford Meteor 2 dr sedan. 428 Cobra Jet, 4 speed Toploader. 12.54@ 108 MPH

e philpott

  • Hero Member
  • *****
  • Posts: 922
    • View Profile
Re: 1969 Torino(?) Cobra Rebuild
« Reply #12 on: June 12, 2018, 07:52:23 AM »
My friend had fastback Cobra in 1980 and his title just said Ford and Cobra like Rory , we called it Torino Cobra just for less confusion from the AC type Cobras

machoneman

  • Hero Member
  • *****
  • Posts: 3851
    • View Profile
Re: 1969 Torino(?) Cobra Rebuild
« Reply #13 on: June 12, 2018, 09:39:40 AM »
Ansen t-bars? If they were white, I do believe Ansen made those bars. Btw, they also made one style with holes drilled/punched across the length of the bars. Perhaps the link will allow you to match them up correctly.

https://www.google.com/search?q=ansen+traction+bars&rlz=1C1CHBF_enUS768US768&tbm=isch&source=iu&ictx=1&fir=86mbA0nrH4w_zM%253A%252ClAU1aBYUMj-ERM%252C_&usg=__TUALjVa1-RBL02d3knLsVqTQu4c%3D&sa=X&ved=0ahUKEwivz6y4rc7bAhWD8oMKHT3QCkAQ9QEILTAB#imgrc=uGA9A5hZUphOoM:

I wanted to replace the U-bolts anyway because they were pretty rusty.  From the bottom, the traction bars dropped off.  These things are kind of odd, they have a front bumper in the normal position, but also a flat bumper behind the axle.  Anybody ever seen a set like this before?  Who made them?  Picture below:
« Last Edit: June 12, 2018, 09:42:44 AM by machoneman »
Bob Maag

jayb

  • Administrator
  • Hero Member
  • *****
  • Posts: 7404
    • View Profile
    • FE Power
Re: 1969 Torino(?) Cobra Rebuild
« Reply #14 on: June 12, 2018, 09:58:57 AM »
You may be right, Bob, but all the Ansen bars shown in your search have U-bolts in the rear to clamp around the leaf springs, not a second bumper that is flat on top.  As I was sandblasting them I found that at one time they were painted white.  But in fact, the differential housing, leaf springs, and traction bars were all  painted YELLOW (Aaauuuggghhh!!) most recently, and prior to that all were painted white!  So it could be the traction bars were not painted white initially, if the whole undercarriage got that treatment at some point.  Who knows.  Again with this car, back to the 70s with the white and yellow paint on the undercarriage LOL!
Jay Brown
- 1969 Mach 1, Drag Week 2005 Winner NA/BB, 511" FE (10.60s @ 129); Drag Week 2007 Runner-Up PA/BB, 490" Supercharged FE (9.35 @ 151)
- 1964 Ford Galaxie, Drag Week 2009 Winner Modified NA (9.50s @ 143), 585" SOHC
- 1969 Shelby Clone, Drag Week 2015 Winner Modified NA (Average 8.98 @ 149), 585" SOHC


FElony

  • Guest
Re: 1969 Torino(?) Cobra Rebuild
« Reply #15 on: June 12, 2018, 10:04:02 AM »
From the other forum:  https://www.fordfe.com/1969-cobra-question-t88957.html?sid=8d7e7ee4531dae8adfdd7a0fe585ec3d

The DP Cobra is the Ford equivalent of a Hemi Road Runner or an LS6 Chevelle. Maybe not as hyped, but still...

FElony

  • Guest
Re: 1969 Torino(?) Cobra Rebuild
« Reply #16 on: June 12, 2018, 10:12:38 AM »

GPR

  • Full Member
  • ***
  • Posts: 159
    • View Profile
    • Gillis Restorations
Re: 1969 Torino(?) Cobra Rebuild
« Reply #17 on: June 12, 2018, 01:32:48 PM »
My first race car bought new was a 1969 Cobra. When I saw the decal of the Snake on the fender on pre order photos I thought it was so cool but when it came in no decal only the Snake. Later Cobras had Cobra under the Snake. My Dad who was truck manager at Grant Ford in St. Petersburg Fl ordered it with the drag pack but it was holding up the order so he cancelled the drag pack. When I first got it I drove it to College but not for long because we went to the first Division II points race in April 1969. On the way to Phenix City Ala towing with a tow bar a tire blew out on the race car and bent the tow bar.  Not sure how many miles away we were but I drove it the rest of the way with open headers and 4.44 gear. We were rained out so we left it at a gas station and came back the next week only to have a problem with the clutch. We also bought a used trailer.

We went to the 1969 Springnationals in Dallas Texas where I ran 12.87 losing to the National record holder who ran 12.66. On the way Randy Payne was driving the Ford Drag Team truck and passed us and pulled over so we stopped. He thought we were someone he knew from Atlanta and said if you need anything come and see him. It's hard to believe but I broke a Detroit Locker and went to Randy and he got us a new one. Because of breaking that Detroit Locker I got to know Randy Payne and Hubert Platt and traveled with the Ford Drag Team for a couple of months after Indy. That is the only thing I ever got free from Ford. We bought Hubert's 1968 SS/FA Mustang November 1969.       
Rusty Gillis

Former NHRA SS/FA & SS/GA National Record Holder

FElony

  • Guest
Re: 1969 Torino(?) Cobra Rebuild
« Reply #18 on: June 12, 2018, 03:23:29 PM »
Great car and cool story, Rusty! I never had mine on the track, but...
I dug out this post I wrote around 2000. It is a true story on a street that I mentioned recently in the Poon Tang thread .

******

   It's a late spring night in the 1980's, and the 30-something man of Middle  Eastern descent is aglow with the bravado spawned by a mixture of cocaine and conceit. He is driving down a nearly empty, wide street in his brand new car, the t-tops stashed in the back. Several gold chains are draped upon his chest, their glittery hue almost matching the paint under a mile-deep wax job. He is on top of the world; surely a sight that would cause even the most stolid female to swoon.

   He is unaware that the section of road he is on has been nicknamed Fallbrook International Raceway by some of the locals. He is soon to discover why.

   Admiring the quartet of gold rings on each of his hands, he is suddenly aware of headlights approaching from behind at a spirited rate. He checks the speedo to be sure that the Man is not scooping him up for speeding. The lights pull up a few yards back and pace him. They are round, eliminating the possibility of belonging to a squad car. He does not guess that the other driver is taking note of the "Turbo" emblem accompanying the "280ZX" insignia on the back of his car. The headlights pick up speed again and the silhouette of a roofline bred for the Nascar high banks flashes by. To the relocated foreigner, it registers as nothing more than some hulking, uncouth American anachronism.

   The Ford's driver hauls down for the impending red light instead of busting the yellow. The Nissan pulls alongside, and dark eyes look past the lowered windows. Yards of oxidized Gulfstream Aqua meet his scrutiny, framing dulled chrome Rocket 5-spoke mags. There is a hood scoop with empty holes on the sides. There are no visible make or model emblems. Surely the snake adorning the fender is an affectation affixed by the owner. And then gaze meets gaze. The younger man, of lighter hair and hazel eyes, delivers a practiced scowl dripping with scorn and distaste. The scowl imperceptibly transforms into a sneer.

   The Iranian is momentarily caught off guard, but quickly decides to prove himself to this uncivilized person. He revs the huffed six cylinder and looks back at the Cobra pilot, who responds with like. A metallic slap is clearly audible as the flapper sitting atop the 428 briefly opens and snaps shut again. The Jet exhaust sounds almost innocent through the original mufflers. It's on; 4-speed against 5-speed.

   The Ford hesitates long enough to allow the Nissan the jump. It's jockey dumps the clutch, getting just a few feet of rubber while the turbo attempts to spool up to the task at hand. Next to it, 7 liters of rampaging Cobra Jet have been awakened. The clutch pedal is being metered out to balance the 4.11's against the soft compound retreads. The tires catch and the front suspension is jerked to the end of its travel. The Nissan is reeled in at the top of 1st gear. The right pedal gets an ankle stutter at 5600 and the tires haze and hook.

   Since there is no money on this race, the Ford driver decides that the usual sandbagging is out, and utter humiliation is in. Despite the turbo now pulling hard in its power band, it can do little but inhale the unfettered gasses from the intermediate's innocuous turn-downs. Another stutter and another gear, and the Land of the Rising Sun's finest is left far behind. The next red light is coming up quickly and the big Ford begins to lean on the power discs. A shift down barks the 60's.

   The Dearborn mauler comes to rest and resumes its watchlike idle. The Nissan's rider halts his steed 30 feet back, although there is no one ahead of him. At the green the dull taillights creep away, the hazel eyes watching the rear view mirror carefully. The Golden One opts not to rub salt on his own wound, and makes a hasty right turn. He looks back down the street, where the unknown American car with the upstart American driver fades away. He is unhappy at the turn of events, but glad there were no witnesses to his defeat. It doesn't really matter. After all, regardless, he still looks like a million dollars, and tomorrow is another night.


jayb

  • Administrator
  • Hero Member
  • *****
  • Posts: 7404
    • View Profile
    • FE Power
Re: 1969 Torino(?) Cobra Rebuild
« Reply #19 on: June 14, 2018, 09:21:29 PM »
This week all the parts began arriving for the car.  On Tuesday I got the other three wheels that I needed and all four new tires, plus the Detroit locker and the Wilwood brake stuff.  So, on Tuesday afternoon I made a trip down to my friend BradFORD's shop to drop it all off.  Brad will mount and balance all the tires and wheels, and set up the rear end with the same gears (3.91), but pull out the Traction-Loc and install the Detroit Locker in its place.  Seemed like everything was going according to plan.  But at the end of the day on Tuesday, just hours after I had dropped the stuff off, Brad called me with some bad news.  Remember in the first post where I said how impressed I'd been with those American mags that were made in China?  Turns out the other 15X7 mag that I received on Tuesday was bent.  Brad said there was no way it would balance.  >:(  Crap.  Can't drive the car with only three wheels and tires...

Wednesday morning I got on the horn to Summit Racing and explained the situation.  I ordered another 15X7 wheel, and they sent me a UPS label to use to send back the bent one.  Today I actually got an email from UPS saying it would be delivered tomorrow, so I might still have all four wheels and tires by the weekend.  After calling Summit Wednesday morning I decided to spend some time getting the new master cylinder and proportioning valve installed.  Before I started the power booster and master cylinder in the car looked like this:


What I really don't like about this setup is that it impedes access to the driver's side valve cover, and no way you could run a tall cover like a pentroof with this brake system.  I was looking forward to ditching the power booster and adding the Wilwood master cylinder.  I purchased the master cylinder with a 7/8" bore and also with a kit that mounts the proportioning valve directly to the master cylinder.  I hadn't used this setup before, but it looked like a nice compact arrangement.  Here is a picture of the proportioning valve:


You can see that the proportioning valve functions kind of like a distribution block, with two lines going in on the top from the master cylinder, and three lines coming out of the bottom, one for each front brake, and one for the rears.  The proportioning valve meters brake fluid to the rear line.  There is even a pressure switch integrated into the system for brake lights.

After removing the power booster and original master cylinder, I decided to fabricate a plate to bolt the new master cylinder to the original bracket.  This was a pretty simple project, involving a piece of 1/8" plate steel and seven holes, picture below:


Next, I bolted the plate onto the original bracket.  I had to drill two new holes in the original bracket, so I used the plate as a guide for the drill.  The two new holes are the ones in the middle vertically; here's a shot of the bracket with the new holes drilled, and the plate taken back off:


The Wilwood master cylinder comes with the pushrod, and it is a 3/8" rod with 3/8-24 threads on the end.  I used a 3/8" spherical rod end screwed onto the threads to check the length of the pushrod, but it was quite a bit too long.  I ended up threading another inch and a half or so down the 3/8" rod with a die, and then cutting that inch and a half off the end of the rod, leaving it with the same amount of threads on the end but about an inch and a half shorter.  When I got it all finished the spherical rod end went into the original spot where the power booster pushrod had gone, and since the original pushrod used a 3/8" pin to connect to the brake pedal bellcrank, the 3/8" spherical rod end fit nicely there as well.  I bolted it all up with plenty of Loctite; here are a couple of photos:


Now the master cylinder arrangement is nowhere near as obtrusive as the stock setup, and there is plenty of room to run a tall valve cover, or remove the valve cover for lashing the valves or whatever.  I really like this arrangement.

While I was working on getting the master cylinder installed, the UPS guy showed up on Wednesday with my new leaf springs.  I had been on the phone on Monday trying to find leaf springs locally in the Minneapolis area.  I only found one supplier, and they wanted $240 per leaf spring.  They didn't have them in stock, and would have to order them.  The guy on the phone told me that his springs were made in Pennsylvania, and that most of the springs you see on line were Chinese.  But there was an online outfit called General Spring that showed the leaf springs I needed, and at only $110 each.  I decided they were worth a call.  The sales guy said that all their springs were made in the US, Canada, or Mexico, and that shipping for the pair of springs would be about $55 from their facility in Kansas City to my place.  I decided it was worth a try.  Shipping only took two days, which was great, and when I got the springs they had USA stenciled on them, so I'm pretty sure they were made here.  They weren't painted or anything, so I shot them with some satin black paint; here's a picture:


On Wednesday evening, I took some new bolts I had purchased and installed the springs with the front bolts, leaving the backs on the ground for the moment.  It was a LOT easier putting them in than it had been taking the old ones out  ;D

Today was front disc brake day.  The Wilwood kit for the front brakes requires that you remove the original disc brake splash shield, drill out the three holes that bolt the splash shield to the spindle, and then tap the holes with a 3/8-24 tap.  That step is the only part of the installation that is not trivially easy; after that was done I had the front brakes completely installed in half an hour per side.  Here's a picture of the passenger side:


Finally, here's a picture of the car as it sits tonight.  Tomorrow night I will pick up the differential with Detroit Locker installed, and hopefully all four wheels and tires, and get ready to put the rear end back in this thing.  Last weekend I cleaned and painted the axle housing, traction bars, and all the assorted brackets from the rear of the car, so everything there is all set to go back together.  I also have all the rubber pieces, seals, and gaskets to reassemble the rear end.  The major remaining job after getting the differential back in the car is to run all new brake lines, so I've dug out my double flaring kit and will be picking up some brake line tubing tomorrow.  With luck, by Sunday evening the car will be back together, the brakes will work, and I can finally put it into my new trailer, where it may sit for several months or even a year before I get going on the body work.  I will post another update Sunday, or early next week - Jay

« Last Edit: June 14, 2018, 10:39:36 PM by jayb »
Jay Brown
- 1969 Mach 1, Drag Week 2005 Winner NA/BB, 511" FE (10.60s @ 129); Drag Week 2007 Runner-Up PA/BB, 490" Supercharged FE (9.35 @ 151)
- 1964 Ford Galaxie, Drag Week 2009 Winner Modified NA (9.50s @ 143), 585" SOHC
- 1969 Shelby Clone, Drag Week 2015 Winner Modified NA (Average 8.98 @ 149), 585" SOHC


cjshaker

  • Hero Member
  • *****
  • Posts: 4458
    • View Profile
Re: 1969 Torino(?) Cobra Rebuild
« Reply #20 on: June 15, 2018, 12:18:36 AM »
Since you've still got the stock power brake pedal, and have eliminated the booster, I'll be very interested to see how well that brake system works for you. Hopefully you'll report back on brake pedal effort and stopping ability. I like the distribution block/proportioning valve arrangement. Not a fan of the looks of the master cylinder, but I suppose that can be overlooked. And especially not a fan of how the cap is bolted down, making fluid checks somewhat of a pain.

Is that a stock type rotor, or a Wilwood piece? Also, is that a 4 piston design, or a floating caliper?
Doug Smith


'69 R-code Mach 1, 427 MR, 2x4, Jerico, 4.30 Locker
'70 F-350 390
'55 Ford Customline 2dr
'37 Ford Coupe

Stangman

  • Hero Member
  • *****
  • Posts: 1691
    • View Profile
Re: 1969 Torino(?) Cobra Rebuild
« Reply #21 on: June 15, 2018, 12:53:05 AM »
I have the same master and it drives me crazy to check fluid.
But it does match my engine compartment

Barry_R

  • Hero Member
  • *****
  • Posts: 1915
    • View Profile
    • Survival Motorsports
Re: 1969 Torino(?) Cobra Rebuild
« Reply #22 on: June 15, 2018, 06:34:46 AM »
Same master and disc arrangement on my car.

Manual brakes and four wheel disc system seems to work very well from 126 MPH at Beaver - and on the street around here.  Decidedly better that the factory replacement brakes I previously had.

I eliminated the offset bracket a long time ago when I first went manual brakes.  Without it, the Wilwood master gets up against the valve cover and needs trimming off on the fitting plugs on the unused inboard side.  The bolt on proportioning valve bracket gets in the way of the factory clutch linkage.  Probably should have kept that offset mounting deal - but that left the building 20+ years ago because I did not like the way it looked.

jayb

  • Administrator
  • Hero Member
  • *****
  • Posts: 7404
    • View Profile
    • FE Power
Re: 1969 Torino(?) Cobra Rebuild
« Reply #23 on: June 15, 2018, 07:47:43 AM »
I have that same master cylinder on my Mach 1 and my Shelby clone, both with four wheel discs.  My experience has been the same as Barry's, pedal effort is certainly acceptable and no problem stopping.  I will say that in the water box, I have to apply a lot of pedal pressure to get the front brakes to lock up before I hit the line lock switch.  If I don't, one or both wheels will move just a bit and the car will go a little sideways during the burnout.  But that is the only issue.  Now, this car with rear drums may be a different story, I don't know, but I'm betting against it.  Unfortunately it will be some time before the car is licensed and insured to drive on public roads, so I won't be able to report back on this right away.

Doug, the front rotors do appear to be identical to the stock rotors.  They are exactly the same diameter.  I wanted to go up to Wilwood's next larger size, but with the wheels I selected it appeared that there would be a slight interference with the calipers, so I ended up with this kit.  Probably one reason why this kit is the least expensive of the Wilwood front brake kits.  The calipers are fixed, four piston deals.

I'm surprised to hear that the lid hold-down on the master cylinder is objectionable to some of you guys.  Its just an Allen wrench, what's the big deal?  Its not like you're checking brake fluid as often as you're checking the oil...
Jay Brown
- 1969 Mach 1, Drag Week 2005 Winner NA/BB, 511" FE (10.60s @ 129); Drag Week 2007 Runner-Up PA/BB, 490" Supercharged FE (9.35 @ 151)
- 1964 Ford Galaxie, Drag Week 2009 Winner Modified NA (9.50s @ 143), 585" SOHC
- 1969 Shelby Clone, Drag Week 2015 Winner Modified NA (Average 8.98 @ 149), 585" SOHC


Stangman

  • Hero Member
  • *****
  • Posts: 1691
    • View Profile
Re: 1969 Torino(?) Cobra Rebuild
« Reply #24 on: June 15, 2018, 11:11:05 AM »
Very true Jay on the master cylinder lid. We gotta complain about something. You got a lot of work done in a short period of time. It’s great when things go well and start to roll.

cjshaker

  • Hero Member
  • *****
  • Posts: 4458
    • View Profile
Re: 1969 Torino(?) Cobra Rebuild
« Reply #25 on: June 15, 2018, 11:49:19 AM »
I'm surprised to hear that the lid hold-down on the master cylinder is objectionable to some of you guys.  Its just an Allen wrench, what's the big deal?  Its not like you're checking brake fluid as often as you're checking the oil...

I've driven old junk for so long that I have developed a habit of checking brake fluid fairly regularly, just to see if there's any issue developing. A pretty minor complaint I guess, and not sure how it could be done better without the factory type wire clamp.
Doug Smith


'69 R-code Mach 1, 427 MR, 2x4, Jerico, 4.30 Locker
'70 F-350 390
'55 Ford Customline 2dr
'37 Ford Coupe

Barry_R

  • Hero Member
  • *****
  • Posts: 1915
    • View Profile
    • Survival Motorsports
Re: 1969 Torino(?) Cobra Rebuild
« Reply #26 on: June 15, 2018, 11:55:53 AM »
I should note that mine has the larger 12.19 diameter rotors on all four corners.
Same deal in the water box - actually Jay told me to "stand on the pedal" and that helped a lot.

Took me a little while to realize that the calipers mounted to the front instead of the rear of the spindle like OEM.  No pictures of that in my instructions and it "almost fits" the other way....

jayb

  • Administrator
  • Hero Member
  • *****
  • Posts: 7404
    • View Profile
    • FE Power
Re: 1969 Torino(?) Cobra Rebuild
« Reply #27 on: June 19, 2018, 09:44:44 AM »
Well, after spending most of the weekend working on this car, it is almost ready to drive into the trailer.  Almost  ::)  On Friday, the UPS man came with my replacement 15X7 American Racing wheel.  My pal BradFORD had promised to have my gears set up with the Detroit locker on Friday, and he had the other three wheels and four tires at his shop, so around 5:00 on Friday I got down there to pick up the other wheels and tires and the differential, and get the last wheel and tire mounted and balanced.  When I arrived, the first thing Brad did was to take the new wheel out of the box and spin it up on the balancer to make sure it wasn't bent.  Unbelievably, this wheel was bent worse than the last one!! >:( >:( >:(  What the hell!  I immediately called Summit and complained.  Those people are always very helpful, and there's nothing they can do immediately because these wheels ship directly from the manufacturer.  The Summit guy sent me another UPS label to send the wheel back (again!), and while I was on the phone he called American Racing and told them to take the wheel out of the box and check to make sure it wasn't bent before they sent it this time.  Just today, I received the shipping notification on the wheel, its expected to arrive at my place on Friday this week.  So I'm still waiting...

Back at Brad's shop, he hadn't finished setting up the differential yet so I hung around the shop while he got that done.  It gave me the opportunity to get some pictures of the differential going together.  I'm inclined to believe that this rear end has never been apart, so it was cool to see all the pieces.  This is one of the nodular cases that does not have the "N" cast into the front, but it does have the "N" inside the case.  Here's a few pictures of the inside of the case and one of the caps:


I was also pleased to see that the pinion had the spacer for the pinion bearings, rather than the crush sleeve.  I would have expected this, but nevertheless its good to actually see it:


The gears went back together with new ARP bolts holding the ring gear to the Detroit Locker, and set up with the same pinion spacer and backlash (0.014") as it had when it came apart.  The gears looked good, and when I had disassembled the rear end there had been plenty of gear oil in the axle housing, despite a minor leak in one axle seal, so I don't expect any problems from this setup.

After getting back home on Friday night I got the axle housing ready for re-assembly.  First thing I did was to weld four supports into the leaf spring mounts, since under a lot of power these things have a tendency to bend.  Here's a picture of one side where I added a 3/16" plate, welded to the spring mount and the axle tube:


After the axle housing cooled I cleaned it up and painted it, and called it a night.

Saturday morning I installed the case with a new gasket, and pounded in the new axle seals with a seal driver.  Then I wrestled the axle housing onto one of my floor jacks and dragged it underneath the car to get it installed.  The new leaf springs had already been mounted with the front bolt, but were still down on the ground at the back, so the axle housing slid right into its general position.  Getting it lined up properly with the leaf springs was a big pain; I really need to make some kind of an attachment for one of my floor jacks that will hold a 9" axle housing steady, because they always want to roll off the jack as you are trying to jockey them into position.  I ended up using three floor jacks, one under the axle housing and one under each leaf spring, before I finally got the axle housing positioned properly.  I had purchased new U-bolts and nuts, along with new rubber insulators for the leaf springs, so I installed those with the traction bars that had originally been on the car. 

After the axle housing was all bolted in, I spent the rest of the day getting the axles and new brakes installed.  I found an interesting situation with the axles.  On Friday night, BradFORD had asked me if my axles had sleeves installed for the seals to ride on.  He said he'd had several reports of sleeves on 31 spline axles.  I responded that they did not; I hadn't remembered seeing anything like that.  But when I went to install them on Saturday, I took a close look, and sure enough, one of the axles had a sleeve installed for the seal to ride one.  A picture of both axles is below; the second picture shows the axle that has the sleeve installed:


I'd never seen this before, but then I'd never really looked for it either.  Anybody know anything about this?  Was this a fix for a damaged axle?  Is it possible that this was done by Ford, or is it more likely it was done as a repair later?


On to the brakes.  It had been a while since I had done a set of drum brakes, and I found myself referring to the shop manual to make sure I had everything installed correctly, but I was happy to see that the parts all seemed to be correct and fit properly.  I had been a little worried about this because of the rear brake hose that I got from Napa.  I had taken it out of the box to install it on the axle housing a little earlier, and was surprised to see that it had two different sized inverted flare fittings on it.  The one on the hose that attaches to the car's body was 3/16" inverted flare, and the one on the block that bolts to the axle housing and goes to the driver's side brake line was 3/16", but the one going to the passenger side appeared to be 1/4" inverted flare.  What was up with that?  I dug the old brake hose out of the trash, and all three of the connections were 3/16".  So this hose was not a direct replacement.  Both wheel cylinders used a 3/16" inverted flare of course, so I was going to need an adapter for the 1/4" inverted flare socket on the brake hose.

Sunday morning I started on the brake lines.  I checked my stash of brake fittings but didn't see the adapter I needed.  I ran off to Napa and picked up a 25 foot roll of brake line tubing, so I could run one continuous line from the rear up to the master cylinder.  Then I started asking about the brake fitting.  The Napa store had a big Weatherhead box that was supposed to be filled with all kinds of different fittings.  Of course, most of the drawers were empty, including the one with the fitting that I needed.  The Napa guy was no help.  "Are you sure its a 1/4" fitting?  What if its metric?  Ford did some weird stuff back then, man..."  Right, in 1969.  And I got the brake hose from Napa, you moron, maybe Napa did the weird stuff.  Its tough to get good help these days  ::)  Anyway, I went back home without the fitting I needed, but I hadn't actually screwed a 1/4" inverted flare fitting into the brake hose to check it, and maybe Napa's part was metric for some reason.  So I decided I'd better check.  I went digging through my fitting stash looking for a 1/4" fitting to test fit, and lo and behold, there was the 1/4" to 3/16" inverted flare adapter that I needed!  Somehow I hadn't seen it the first time I dug through the box.  I screwed it into the brake hose and it fit perfectly. 

I started with the rear end and made the two brake lines I needed to connect the block on the end of the brake hose to the wheel cylinders.  Here's a picture of how it looked under the car at this point; a big improvement from before.  If you look close, you can see the 1/4 to 3/16 adapter screwed into the rear brake hose block:


Before I started the rest of the brake lines, I decided to test fit the new shocks.  I had purchased KYB gas shocks to replace the air shocks in the back of the car.  I put the floor jack under the axle housing and jacked the car up so it was resting on the rear leaf springs, not the jack stands.  But when I tried to fit the shocks into position, they were not long enough; they were fully extended and not close to fitting into both the body and the lower mounts.  It looked like I needed some long shock extensions to make them work.  Crap, you buy a part that's supposed to fit, and it doesn't.  However, turned out I was premature on this conclusion; more about this later.

I spent the rest of Sunday running all the brake lines.  I used the factory attachment points to make sure that the lines stayed securely positioned, and did my best to bend the lines to fit like the stock ones.  I also made a couple of small brackets to hold the flexible braided steel lines coming from the Wilwood front calipers in place in the stock location.  Overall I was very happy with the brake system now, everything was brand new and the installation had gone well.  Last thing I did on Sunday was bleed the master cylinder per Wilwood's recommendations.

Monday afternoon I opened the bleeders and gravity-bled the brake system.  When my son got home from work I had him pump the brake pedal for me while I went around the car twice cracking all the bleeder screws to get any remaining air out.  The system used almost two pints of brake fluid but after the bleeding process the pedal was nice and high, and felt very firm - perfect!

On Friday I had brought back the three wheels and tires that BradFORD had mounted and balanced for me.  The rear wheels are 15X8, with 255/60R-15 tires, and the fronts are 15X7 with 235/60R-15s.  I decided I had three of the four tires, why not install them.  I'd just keep the left front up on a jackstand until I got the next wheel and could get it installed.  Besides, I wanted to see how the car sat with the new springs in the back.  In the leaf spring thread in the technical forum, the general consensus seemed to be that the car would sit pretty low in the back, but the leaf springs I received had a pretty good arch, so I wanted to check that out.  I installed the three wheels and tires and dropped the car down off the jackstands, and I have to say that I was very happy with the way the rear end sat.  Here's a picture; the front end is still up somewhat because of the jackstand under the front left lower control arm, but you get the idea:


Assuming the front end comes down when I get the last wheel and tire installed, I think the stance will be about perfect!  I had actually been worried about it being too high in the back, but that didn't appear to be the case.  Then I started thinking about the rear shocks again; the rear end seemed to be lower than it had been when I'd had the jack under the axle housing; maybe that had been giving me a false reading.  Sure enough, when I crawled under the car with a shock, this time it appeared that the shock would fit perfectly.  So, I went ahead and installed them.  Here's a picture looking under the car with the shocks installed and the tires on:


So, now all I'm waiting for is the last wheel; when I get it (if its NOT BENT  >:( >:( >:(), I can get it mounted and balanced, and installed on the car.  Once the car is resting on all four wheels and tires I will adjust the traction bar U-bolts, and I can pull this thing into the trailer and forget about it for a while.  With the work I've done to it, I like this car a lot more now, so hopefully my time will free up fairly soon and I can get the bodywork done and get it painted.  I have a 492" FE pretty much ready to drop in, so once the paint is done I should be able to swap in that engine and start driving it.  Looking forward to that...
« Last Edit: June 19, 2018, 09:52:28 AM by jayb »
Jay Brown
- 1969 Mach 1, Drag Week 2005 Winner NA/BB, 511" FE (10.60s @ 129); Drag Week 2007 Runner-Up PA/BB, 490" Supercharged FE (9.35 @ 151)
- 1964 Ford Galaxie, Drag Week 2009 Winner Modified NA (9.50s @ 143), 585" SOHC
- 1969 Shelby Clone, Drag Week 2015 Winner Modified NA (Average 8.98 @ 149), 585" SOHC


afret

  • Guest
Re: 1969 Torino(?) Cobra Rebuild
« Reply #28 on: June 19, 2018, 03:15:19 PM »
« Last Edit: June 19, 2018, 03:24:53 PM by afret »

e philpott

  • Hero Member
  • *****
  • Posts: 922
    • View Profile
Re: 1969 Torino(?) Cobra Rebuild
« Reply #29 on: June 19, 2018, 03:34:40 PM »
Are you going to keep it Red ??... looks like a fun project , I like the fastback Torino's best

jayb

  • Administrator
  • Hero Member
  • *****
  • Posts: 7404
    • View Profile
    • FE Power
Re: 1969 Torino(?) Cobra Rebuild
« Reply #30 on: June 19, 2018, 04:34:02 PM »
The Ford 31 spline axles I had before had those sleeves.
 
https://www.mustangsetc.com/9-31-spline-rear-axle-seal-sleeve/

http://www.boss302.com/smf/index.php?topic=40857.0

Wow, that is very interesting.  Maybe the driver's side axle in this car is just missing the sleeve.  I just ran upstairs to look at the stock axles from my 69 R code Mach 1, and they both have those sleeves.  I had test fit the seal on both axles, and it was tighter on the one with the sleeve but it was making contact with the one with no sleeve.  I think I might order one of those sleeves, pull that axle back out, and see if it can be pressed on.  Thanks for that info, Earl!
Jay Brown
- 1969 Mach 1, Drag Week 2005 Winner NA/BB, 511" FE (10.60s @ 129); Drag Week 2007 Runner-Up PA/BB, 490" Supercharged FE (9.35 @ 151)
- 1964 Ford Galaxie, Drag Week 2009 Winner Modified NA (9.50s @ 143), 585" SOHC
- 1969 Shelby Clone, Drag Week 2015 Winner Modified NA (Average 8.98 @ 149), 585" SOHC


jayb

  • Administrator
  • Hero Member
  • *****
  • Posts: 7404
    • View Profile
    • FE Power
Re: 1969 Torino(?) Cobra Rebuild
« Reply #31 on: June 19, 2018, 04:34:43 PM »
Are you going to keep it Red ??... looks like a fun project , I like the fastback Torino's best

Red was the factory color and I'm going to keep it that way.  Also keep the interior black.
Jay Brown
- 1969 Mach 1, Drag Week 2005 Winner NA/BB, 511" FE (10.60s @ 129); Drag Week 2007 Runner-Up PA/BB, 490" Supercharged FE (9.35 @ 151)
- 1964 Ford Galaxie, Drag Week 2009 Winner Modified NA (9.50s @ 143), 585" SOHC
- 1969 Shelby Clone, Drag Week 2015 Winner Modified NA (Average 8.98 @ 149), 585" SOHC


afret

  • Guest
Re: 1969 Torino(?) Cobra Rebuild
« Reply #32 on: June 19, 2018, 04:56:11 PM »
The sleeve needs to be removed to put new bearings on so I wonder if that axle had the bearing replaced and the sleeve wasn't put back on?

Landlubberatsea

  • Jr. Member
  • **
  • Posts: 76
  • Jan
    • View Profile
Re: 1969 Torino(?) Cobra Rebuild
« Reply #33 on: June 19, 2018, 08:10:59 PM »
Hi Jay, could you please tell me the part no for that Wilwood front disc kit? I would like to upgrade the front discs on my 68 Torino as well and I reckon what is good for mr Brown is plenty good for me
-68 Torino GT with a 390 that turned out to be a 360 but now is becoming a 445....

Kirk Morgan

  • Jr. Member
  • **
  • Posts: 43
    • View Profile
Re: 1969 Torino(?) Cobra Rebuild
« Reply #34 on: June 19, 2018, 08:57:16 PM »
When we had a machine shop we considered those sleeves to be crush sleeves. They helped to keep the bearing in place.

Kirk

jayb

  • Administrator
  • Hero Member
  • *****
  • Posts: 7404
    • View Profile
    • FE Power
Re: 1969 Torino(?) Cobra Rebuild
« Reply #35 on: June 19, 2018, 10:01:05 PM »
Hi Jay, could you please tell me the part no for that Wilwood front disc kit? I would like to upgrade the front discs on my 68 Torino as well and I reckon what is good for mr Brown is plenty good for me

It's Wilwood part number 140-13476.
Jay Brown
- 1969 Mach 1, Drag Week 2005 Winner NA/BB, 511" FE (10.60s @ 129); Drag Week 2007 Runner-Up PA/BB, 490" Supercharged FE (9.35 @ 151)
- 1964 Ford Galaxie, Drag Week 2009 Winner Modified NA (9.50s @ 143), 585" SOHC
- 1969 Shelby Clone, Drag Week 2015 Winner Modified NA (Average 8.98 @ 149), 585" SOHC


427Fastback

  • Hero Member
  • *****
  • Posts: 603
    • View Profile
Re: 1969 Torino(?) Cobra Rebuild
« Reply #36 on: June 19, 2018, 11:34:22 PM »
Nice stuff Jay...now I may have missed a few things quick reading it all but was the dif tag still attached ??.Also I have done  dozens of disc brake conversions and power to manual brake conversions...The disc brake pedal is about 2 1/2 to 1 pedal ratio,the manual pedal is about 7 to 1 if I remember correct..Huge mechanical advantage with the manual pedal.......
1968 Mustang Fastback...427 MR 5spd (owned since 1977)
1967 Mustang coupe...Trans Am replica
1936 Diamond T 212BD
1990 Grizzly pick-up

jayb

  • Administrator
  • Hero Member
  • *****
  • Posts: 7404
    • View Profile
    • FE Power
Re: 1969 Torino(?) Cobra Rebuild
« Reply #37 on: June 20, 2018, 08:25:23 AM »
Yes, I still have the diff tag, here's the picture that was posted in the original thread on this car in the classifieds. 


That's interesting about the pedal ratio, I will have to try to measure that on this car.  One thing about that on this car is that the bracket in the engine compartment that the master cylinder is bolted to has a 2:1 ratio, but in the wrong direction for manual brakes.  In other words, 1/2" of travel of the rod coming through the firewall results in 1" of travel for the master cylinder pushrod.  Wouldn't surprise me if Ford used the same pedal on manual and power brake cars, but just eliminated the bracket on the manual steering cars.  We'll see how it behaves when I get it on the road...
Jay Brown
- 1969 Mach 1, Drag Week 2005 Winner NA/BB, 511" FE (10.60s @ 129); Drag Week 2007 Runner-Up PA/BB, 490" Supercharged FE (9.35 @ 151)
- 1964 Ford Galaxie, Drag Week 2009 Winner Modified NA (9.50s @ 143), 585" SOHC
- 1969 Shelby Clone, Drag Week 2015 Winner Modified NA (Average 8.98 @ 149), 585" SOHC


Heo

  • Hero Member
  • *****
  • Posts: 3284
    • View Profile
Re: 1969 Torino(?) Cobra Rebuild
« Reply #38 on: June 20, 2018, 09:16:03 AM »
The ones without Booster i have seen have the master
directly on the fire wall ....


The defenition of a Gentleman, is a man that can play the accordion.But dont do it

Barry_R

  • Hero Member
  • *****
  • Posts: 1915
    • View Profile
    • Survival Motorsports
Re: 1969 Torino(?) Cobra Rebuild
« Reply #39 on: June 20, 2018, 10:26:36 AM »
Did not change the pedal on mine.
Did not know about that pedal ratio stuff when I pitched the booster 20 or so years ago.
Just knew that it was in the damn way when I was lashing the valves.
« Last Edit: June 20, 2018, 11:34:24 AM by Barry_R »

jayb

  • Administrator
  • Hero Member
  • *****
  • Posts: 7404
    • View Profile
    • FE Power
Re: 1969 Torino(?) Cobra Rebuild
« Reply #40 on: June 20, 2018, 11:22:47 AM »
Heo, thanks, that makes sense.  Barry, if I'm correct about this, since you mounted yours directly to the firewall you got a better ratio, probably the same ratio that any manual brake setup would have.  Mine will have half that ratio due to that bracket and the associated linkage.  Might have to start doing right leg presses  :o
Jay Brown
- 1969 Mach 1, Drag Week 2005 Winner NA/BB, 511" FE (10.60s @ 129); Drag Week 2007 Runner-Up PA/BB, 490" Supercharged FE (9.35 @ 151)
- 1964 Ford Galaxie, Drag Week 2009 Winner Modified NA (9.50s @ 143), 585" SOHC
- 1969 Shelby Clone, Drag Week 2015 Winner Modified NA (Average 8.98 @ 149), 585" SOHC


427Fastback

  • Hero Member
  • *****
  • Posts: 603
    • View Profile
Re: 1969 Torino(?) Cobra Rebuild
« Reply #41 on: June 20, 2018, 12:35:20 PM »
You may be right about the way it was done in those cars and I am not familiar with it.I have only done Mustangs .
1968 Mustang Fastback...427 MR 5spd (owned since 1977)
1967 Mustang coupe...Trans Am replica
1936 Diamond T 212BD
1990 Grizzly pick-up

Heo

  • Hero Member
  • *****
  • Posts: 3284
    • View Profile
Re: 1969 Torino(?) Cobra Rebuild
« Reply #42 on: June 20, 2018, 05:51:21 PM »
I think you just use the lower set of bolts for the mastercyl
the two upper just bolts the pedal assembly to firewall


The defenition of a Gentleman, is a man that can play the accordion.But dont do it

Landlubberatsea

  • Jr. Member
  • **
  • Posts: 76
  • Jan
    • View Profile
Re: 1969 Torino(?) Cobra Rebuild
« Reply #43 on: June 21, 2018, 01:28:35 PM »
That is correct Heo. At least if you use a MC from a Maverick like I did when I went manual. No changes to pedal but had to buy an adjustable rod from Scott Drake. Brakes are better now than with booster and little vacuum but I still don't think I would manage to lock them on a dirt road
-68 Torino GT with a 390 that turned out to be a 360 but now is becoming a 445....

jayb

  • Administrator
  • Hero Member
  • *****
  • Posts: 7404
    • View Profile
    • FE Power
Re: 1969 Torino(?) Cobra Rebuild
« Reply #44 on: June 21, 2018, 02:49:59 PM »
Thanks for the picture, that helps me visualize the stock setup a little better...
Jay Brown
- 1969 Mach 1, Drag Week 2005 Winner NA/BB, 511" FE (10.60s @ 129); Drag Week 2007 Runner-Up PA/BB, 490" Supercharged FE (9.35 @ 151)
- 1964 Ford Galaxie, Drag Week 2009 Winner Modified NA (9.50s @ 143), 585" SOHC
- 1969 Shelby Clone, Drag Week 2015 Winner Modified NA (Average 8.98 @ 149), 585" SOHC


Heo

  • Hero Member
  • *****
  • Posts: 3284
    • View Profile
Re: 1969 Torino(?) Cobra Rebuild
« Reply #45 on: June 21, 2018, 03:35:17 PM »
That is correct Heo. At least if you use a MC from a Maverick like I did when I went manual. No changes to pedal but had to buy an adjustable rod from Scott Drake. Brakes are better now than with booster and little vacuum but I still don't think I would manage to lock them on a dirt road
I sent you a PM Jan about the rattrapp between booster and firewall


The defenition of a Gentleman, is a man that can play the accordion.But dont do it

Landlubberatsea

  • Jr. Member
  • **
  • Posts: 76
  • Jan
    • View Profile
Re: 1969 Torino(?) Cobra Rebuild
« Reply #46 on: June 21, 2018, 04:09:12 PM »
No problem Jay, thanks for the part no, I think I will try one of those kits as well.
-68 Torino GT with a 390 that turned out to be a 360 but now is becoming a 445....

Kirk Morgan

  • Jr. Member
  • **
  • Posts: 43
    • View Profile
Re: 1969 Torino(?) Cobra Rebuild
« Reply #47 on: June 21, 2018, 05:43:35 PM »
A manual brake master cylinder from a Ford Ranger works well and gives more clearance for valve covers.

Kirk

FElony

  • Guest
Re: 1969 Torino(?) Cobra Rebuild
« Reply #48 on: June 21, 2018, 10:30:58 PM »
That is correct Heo. At least if you use a MC from a Maverick like I did when I went manual. No changes to pedal but had to buy an adjustable rod from Scott Drake. Brakes are better now than with booster and little vacuum but I still don't think I would manage to lock them on a dirt road

My CJ car was switched over from power discs at some time, probably when it was a class legal SE car. They put finned front drum brakes on with the manual master mounted as yours is. Car stops well, no need for non-stock-appearing, funny-shaped, in-your-face logo, Henry Ford spinning in his grave parts. Also still has line lock, which I'll eventually get rid of. Darn race cars   ::)

57 lima bean

  • Guest
Re: 1969 Torino(?) Cobra Rebuild
« Reply #49 on: June 26, 2018, 02:36:34 PM »
Saw this Torino GT three weeks back.Surprised to see it run as high as B/S.Owner said that only the GT could make it that far.A Cobra could only make C at best.Ran 10.70's.I do believe your traction bars are from MAS....4500 series.
« Last Edit: June 26, 2018, 08:35:03 PM by 57 lima bean »

jayb

  • Administrator
  • Hero Member
  • *****
  • Posts: 7404
    • View Profile
    • FE Power
Re: 1969 Torino(?) Cobra Rebuild
« Reply #50 on: June 26, 2018, 09:09:42 PM »
Steve, please see the email I sent you regarding posting copyrighted material.
Jay Brown
- 1969 Mach 1, Drag Week 2005 Winner NA/BB, 511" FE (10.60s @ 129); Drag Week 2007 Runner-Up PA/BB, 490" Supercharged FE (9.35 @ 151)
- 1964 Ford Galaxie, Drag Week 2009 Winner Modified NA (9.50s @ 143), 585" SOHC
- 1969 Shelby Clone, Drag Week 2015 Winner Modified NA (Average 8.98 @ 149), 585" SOHC


57 lima bean

  • Guest
Re: 1969 Torino(?) Cobra Rebuild
« Reply #51 on: June 26, 2018, 09:25:00 PM »
I understand.These were on FB.Saw this as a non issue.Thank you for the heads up.

57 lima bean

  • Guest
Re: 1969 Torino(?) Cobra Rebuild
« Reply #52 on: June 26, 2018, 09:42:28 PM »
Here's one my friend Mike took.Should be alright as I just spoke with him.

jayb

  • Administrator
  • Hero Member
  • *****
  • Posts: 7404
    • View Profile
    • FE Power
Re: 1969 Torino(?) Cobra Rebuild
« Reply #53 on: June 29, 2018, 04:37:02 PM »
I finally made it to a stopping point on this car today.  On Monday this week the THIRD 15X7 wheel came for the car.  I took it right down to BradFORD's shop and took a video of him taking it out of the box, mounting it on the wheel balancer, and spinning it up.  I was prepared to send the video to Summit Racing in case the third wheel in a row was bent, but thankfully this one was straight.  I got the tire mounted and balanced, and by Monday night the car was sitting on all four wheels.  Hallelujah!

However, I was still a little concerned about the rear end of the car, in particular the axles and axle seals.  As pictured previously, one of my axles had a sleeve pressed on behind the bearing retainer, and the other did not.  After some commments from the forum and my friend Kevin, and checking my 69 R code Mach 1 original axles, I concluded that my axles should both have those sleeves.  Thanks to Earl (afret) who pointed me towards a source for them, I had ordered one last week and it arrived on Tuesday.  Here's a picture:


I had to machine a steel donut with a 1.340" inside diameter to press the sleeve onto the axle, but that was no big deal.  So now both axles had the sleeves.

Now, the outside diameter of the sleeve is just about 1.5".  But the rear axle seals that I had put in the car had a 1.375" inside diameter.  When I had purchased the new seals, I had taken one of the old ones into the local NAPA store and matched up the number, so that I would be sure to get the right seal.  But the OD of the sleeve and the ID of my new seals did not compute.  The 1.375" ID seal actually looked like it worked on the axle without the sleeve installed.  All the original stuff from when I took this apart a few weeks ago is in the trash now, but I suspect that the axle without the sleeve was replaced with the 1.375" ID seal, and the correct 1.5" ID seal was used on the axle with the sleeve.  And, it just so happened that I took the seal with the 1.375" ID in to NAPA to get new ones.  So, I probably had the wrong axles seals in the rear end.

As a result of this train of thought I bought two new axle seals from Mac's specifically for this car.  They came with a 2.26" OD and a 1.5" ID, which looked to be correct for the axles with the sleeves on them.  Today I replaced the axle seals I'd just put in a few weeks ago.  The one on the side where the axle had the sleeve was beat up pretty good, probably just from the installation, and would have certainly leaked.  The other one looked fine, but of course that axle didn't have the sleeve.

After the new seals were installed the rear end went back together without any drama.  After dropping the car down on its wheels I took a couple of pictures of it from the side, with the new wheels and tires.  I was thinking that the stance looked just about right when the left front was still up on the jackstand, but now I don't think so.  Looks to me like both the front and the rear could come down 1"-2".  What do you guys think?  Here are the pics:


In the rear, I still have the extended shackles on the car that came with it when I bought it.  I have one more hole I could drop them down into, or I could just go back to the stock shackles, to get the back end down.  In the front, I think I'm going to have to cut the coil springs somewhat, but I will replace them with new springs before I decide to do that.  But at this point the stance is a project for another day; right now the car has good brakes and runs, so its going on the back burner for a while yet.  I will post more on this thread when I start working on the car again.


Jay Brown
- 1969 Mach 1, Drag Week 2005 Winner NA/BB, 511" FE (10.60s @ 129); Drag Week 2007 Runner-Up PA/BB, 490" Supercharged FE (9.35 @ 151)
- 1964 Ford Galaxie, Drag Week 2009 Winner Modified NA (9.50s @ 143), 585" SOHC
- 1969 Shelby Clone, Drag Week 2015 Winner Modified NA (Average 8.98 @ 149), 585" SOHC


turbohunter

  • Hero Member
  • *****
  • Posts: 2509
    • View Profile
Re: 1969 Torino(?) Cobra Rebuild
« Reply #54 on: June 29, 2018, 04:43:45 PM »
I like low.
But I’m from California. ;D
BTW I’d give my eye teeth to find a Cobra that nice.
Marc
'61 F100 292Y
'66 Mustang Injected 428
'66 Q code Country Squire wagon


jayb

  • Administrator
  • Hero Member
  • *****
  • Posts: 7404
    • View Profile
    • FE Power
Re: 1969 Torino(?) Cobra Rebuild
« Reply #55 on: June 29, 2018, 06:04:06 PM »
I'm with you Marc, even though I'm NOT from California ;D  This car will look more NASCAR-ish with the stance set down a little, and I like that look for these cars.  But compared to how it looked with 7 leaf springs, air shocks, and L60-15 tires on those rusty old Keystones, it is already an improvement LOL!
Jay Brown
- 1969 Mach 1, Drag Week 2005 Winner NA/BB, 511" FE (10.60s @ 129); Drag Week 2007 Runner-Up PA/BB, 490" Supercharged FE (9.35 @ 151)
- 1964 Ford Galaxie, Drag Week 2009 Winner Modified NA (9.50s @ 143), 585" SOHC
- 1969 Shelby Clone, Drag Week 2015 Winner Modified NA (Average 8.98 @ 149), 585" SOHC


Heo

  • Hero Member
  • *****
  • Posts: 3284
    • View Profile
Re: 1969 Torino(?) Cobra Rebuild
« Reply #56 on: June 29, 2018, 07:14:27 PM »
I dont know  mayby a litle higher profile on the rear tire
and slight drop in the front...but thats me i like the stinkbug stance
How was the brakepedal with the "rat trap" and no booster?


The defenition of a Gentleman, is a man that can play the accordion.But dont do it

BruceS

  • Hero Member
  • *****
  • Posts: 738
    • View Profile
Re: 1969 Torino(?) Cobra Rebuild
« Reply #57 on: June 29, 2018, 08:18:19 PM »
+1 with Marc, needs to be at least 1" lower maybe more all around.  Btw I grew up in SoCal too, haha
66 Fairlane 500, 347-4V SB stroker, C4
63 Galaxie 500 fastback, 482 SO 4V, Cruise-O-Matic

FElony

  • Guest
Re: 1969 Torino(?) Cobra Rebuild
« Reply #58 on: June 29, 2018, 09:55:25 PM »
I have been petitioning Satan hisself from devouring your soul for actually welding gussets onto a real SCJ housing. I was shocked. Still am. With your money, and with the expected horsepower going in, an aftermarket housing with double-welded tubes and a back brace would have been the ticket. Not much I can do; your demise will be of Biblical fury.

66FAIRLANE

  • Hero Member
  • *****
  • Posts: 558
  • Andy
    • View Profile
Re: 1969 Torino(?) Cobra Rebuild
« Reply #59 on: June 30, 2018, 04:55:32 AM »
About another 15"lower for my liking  ;D


Heo

  • Hero Member
  • *****
  • Posts: 3284
    • View Profile
Re: 1969 Torino(?) Cobra Rebuild
« Reply #60 on: June 30, 2018, 04:59:04 AM »
The wifes SL Mercedes is that height ;D ;D


The defenition of a Gentleman, is a man that can play the accordion.But dont do it

jayb

  • Administrator
  • Hero Member
  • *****
  • Posts: 7404
    • View Profile
    • FE Power
Re: 1969 Torino(?) Cobra Rebuild
« Reply #61 on: June 30, 2018, 02:10:50 PM »
I dont know  mayby a litle higher profile on the rear tire
and slight drop in the front...but thats me i like the stinkbug stance
How was the brakepedal with the "rat trap" and no booster?

Just took it around the driveway a few times (not registered or insured yet), but I would say that the brake pedal effort is overly high.  Its driveable, but it could be a handful in a panic situation.  I'll have to do something to get that ratio back...
Jay Brown
- 1969 Mach 1, Drag Week 2005 Winner NA/BB, 511" FE (10.60s @ 129); Drag Week 2007 Runner-Up PA/BB, 490" Supercharged FE (9.35 @ 151)
- 1964 Ford Galaxie, Drag Week 2009 Winner Modified NA (9.50s @ 143), 585" SOHC
- 1969 Shelby Clone, Drag Week 2015 Winner Modified NA (Average 8.98 @ 149), 585" SOHC


Heo

  • Hero Member
  • *****
  • Posts: 3284
    • View Profile
Re: 1969 Torino(?) Cobra Rebuild
« Reply #62 on: June 30, 2018, 02:44:33 PM »
Mmmm  The rat trap about double the ratio so
i guess you have to  remove the trap and mount
the master at the firewall as stock


The defenition of a Gentleman, is a man that can play the accordion.But dont do it

machoneman

  • Hero Member
  • *****
  • Posts: 3851
    • View Profile
Re: 1969 Torino(?) Cobra Rebuild
« Reply #63 on: June 30, 2018, 03:03:49 PM »
Too high at both ends. The top of the front tires should be equal to the fender's edge (looking from a dead level side view).  At that from the pic looks to be an easy 1.25-1.50".

I don't think just moving the rear spring eye up one hole will bring it down as far as needed. Worth a try b/4 going back to stock.   

 
« Last Edit: June 30, 2018, 04:52:02 PM by machoneman »
Bob Maag

jayb

  • Administrator
  • Hero Member
  • *****
  • Posts: 7404
    • View Profile
    • FE Power
Re: 1969 Torino(?) Cobra Rebuild
« Reply #64 on: June 30, 2018, 03:12:43 PM »
Mmmm  The rat trap about double the ratio so
i guess you have to  remove the trap and mount
the master at the firewall as stock

I could do that, but then its closer to the valve cover again.  I'm going to try to figure out a way to change the linkage around to get back the ratio while keeping the master cylinder in the same spot.  If I can't do that, then it will have to go back on the firewall.
Jay Brown
- 1969 Mach 1, Drag Week 2005 Winner NA/BB, 511" FE (10.60s @ 129); Drag Week 2007 Runner-Up PA/BB, 490" Supercharged FE (9.35 @ 151)
- 1964 Ford Galaxie, Drag Week 2009 Winner Modified NA (9.50s @ 143), 585" SOHC
- 1969 Shelby Clone, Drag Week 2015 Winner Modified NA (Average 8.98 @ 149), 585" SOHC


FElony

  • Guest
Re: 1969 Torino(?) Cobra Rebuild
« Reply #65 on: June 30, 2018, 04:13:12 PM »
I dont know  mayby a litle higher profile on the rear tire
and slight drop in the front...but thats me i like the stinkbug stance


Bingo. Day Two cars need more rubber in back. Yes, slight drop in front. Remove the front wheel well trim because it draws the eyes forward, accenting the mismatch. Big drop for a Nascar look is no-no with flat spokes, slapper bars, and hood scoop. Stay consistent with your theme.

Heo

  • Hero Member
  • *****
  • Posts: 3284
    • View Profile
Re: 1969 Torino(?) Cobra Rebuild
« Reply #66 on: June 30, 2018, 04:18:57 PM »
Probably you can drill new holes here and there and move things around
to gain some ratio  in a couple of places and that may be enough

I made a entirely new rat trap for the galaxie when i mounted a dual diafragm
booster From a Volvo 740 works perfect with 11 inch/hg vaccum
« Last Edit: June 30, 2018, 04:23:26 PM by Heo »


The defenition of a Gentleman, is a man that can play the accordion.But dont do it

cjshaker

  • Hero Member
  • *****
  • Posts: 4458
    • View Profile
Re: 1969 Torino(?) Cobra Rebuild
« Reply #67 on: July 05, 2018, 10:33:00 AM »
Just my opinion, but I'd put a bigger tire in the back to fill the wheelwell, lower it back down to where it currently sits, or maybe even an inch lower if the tire will fit ok, then lower the front an inch or two. The rear well would look better filled up, and the lowered front would give it a nice stance. But it's your car, so do what looks pleasing to you.

Oddly enough, I agree with FElony that it doesn't look right with just front well trim. Not sure if you have the rear trim, but I'd at least match them front and rear. But I'm guessing you already have plans for that when the body work comes.
Doug Smith


'69 R-code Mach 1, 427 MR, 2x4, Jerico, 4.30 Locker
'70 F-350 390
'55 Ford Customline 2dr
'37 Ford Coupe

FElony

  • Guest
Re: 1969 Torino(?) Cobra Rebuild
« Reply #68 on: July 05, 2018, 02:04:12 PM »

...Oddly enough, I agree with FElony...


Heaven forbid you or anyone else here be odd by agreeing with an opinion of mine.  ::)

Personally, I'm not a huge fan of wheel well mouldings on some cars, as they tend to introduce a "bright" contour that conflicts with the roundness of the wheel. The lighter the paint color, the less this clash is noticeable. However, it really is personal preference on a car-by-car basis. I did buy a set of the current repros, and they are very nice quality. If the originals for this car are hammered, then that's a viable option.

cjshaker

  • Hero Member
  • *****
  • Posts: 4458
    • View Profile
Re: 1969 Torino(?) Cobra Rebuild
« Reply #69 on: July 05, 2018, 02:10:19 PM »

...Oddly enough, I agree with FElony...


Heaven forbid you or anyone else here be odd by agreeing with an opinion of mine.  ::)


Don't worry, FElony, I'm pretty sure I was a bit on the odd side before that.
Doug Smith


'69 R-code Mach 1, 427 MR, 2x4, Jerico, 4.30 Locker
'70 F-350 390
'55 Ford Customline 2dr
'37 Ford Coupe

AlanCasida

  • Hero Member
  • *****
  • Posts: 1099
    • View Profile
Re: 1969 Torino(?) Cobra Rebuild
« Reply #70 on: July 05, 2018, 02:22:59 PM »
I always liked those fastbacks sitting low and level. Oh yeah...and green.  :)


FElony

  • Guest
Re: 1969 Torino(?) Cobra Rebuild
« Reply #71 on: July 05, 2018, 02:28:21 PM »

...Oddly enough, I agree with FElony...


Heaven forbid you or anyone else here be odd by agreeing with an opinion of mine.  ::)


Don't worry, FElony, I'm pretty sure I was a bit on the odd side before that.

I'm too much of a gentleman to have brought up that possibility.   ;D

I wondered after the post whether mouldings were standard on the Cobra, as my Gulfstream car does not have them. I went and checked, and the screw holes are indeed there. So they were removed prior to my buying the car in the 80's. I also looked at the New Lime Cobra, and they are present. NL is a light color; think of Grabber Lime in a pastel shade, perhaps. You can't really see the mouldings until you are up close. The white GT still has its mouldings. All three of these cars came from the factory with the 14x6 "GT" steel wheels with trim rings. I'm trying to remember if the mouldings were tied into these upgraded wheels. Standard wheels on the Cobras were the body-color steelies with Ford crest poverty caps. I "think" cars so equipped did not have wheel well trim. Been a while since I studied the option list. I'll have to yank that info out and have at it.

FElony

  • Guest
Re: 1969 Torino(?) Cobra Rebuild
« Reply #72 on: July 05, 2018, 02:59:00 PM »
I always liked those fastbacks sitting low and level. Oh yeah...and green.  :)

I've never been a fan of Black Jade. Too military-looking, I think. It replaced Highland Green from '68, which is much nicer. However, 1971 Dark Green is much mo twitchiner.

http://paintref.com/cgi-bin/colorcodedisplay.cgi?type=sample&paint=13736&ditzler=2291&syear=1971&smanuf=Ford&smake=&smodel=&sname=Dark%20Green&rows=50

Otherwise, that's a nice Cobra.

jayb

  • Administrator
  • Hero Member
  • *****
  • Posts: 7404
    • View Profile
    • FE Power
Re: 1969 Torino(?) Cobra Rebuild
« Reply #73 on: July 05, 2018, 03:41:11 PM »
Just my opinion, but I'd put a bigger tire in the back to fill the wheelwell, lower it back down to where it currently sits, or maybe even an inch lower if the tire will fit ok, then lower the front an inch or two. The rear well would look better filled up, and the lowered front would give it a nice stance. But it's your car, so do what looks pleasing to you.

Oddly enough, I agree with FElony that it doesn't look right with just front well trim. Not sure if you have the rear trim, but I'd at least match them front and rear. But I'm guessing you already have plans for that when the body work comes.

That's a 255/60R-15 tire in the back, on an 8" wheel.  I just didn't want to go any bigger than that, given how close that tire is to the fender lip.  I suppose I could've gone with a 70 series tire to get some more height, but I'm sure I'll be needing the 60 series footprint.  And I agree about the front wheelwell trim, I'm thinking when I paint it I'll put the trim on all four.  I don't know what happened to the trim on the rear, it didn't have it when I bought the car, but from the looks of the previous wheel and tire combo it might have been pulled off for clearance.
Jay Brown
- 1969 Mach 1, Drag Week 2005 Winner NA/BB, 511" FE (10.60s @ 129); Drag Week 2007 Runner-Up PA/BB, 490" Supercharged FE (9.35 @ 151)
- 1964 Ford Galaxie, Drag Week 2009 Winner Modified NA (9.50s @ 143), 585" SOHC
- 1969 Shelby Clone, Drag Week 2015 Winner Modified NA (Average 8.98 @ 149), 585" SOHC


jayb

  • Administrator
  • Hero Member
  • *****
  • Posts: 7404
    • View Profile
    • FE Power
Re: 1969 Torino(?) Cobra Rebuild
« Reply #74 on: July 05, 2018, 03:46:07 PM »
I always liked those fastbacks sitting low and level. Oh yeah...and green.  :)

I think the rear height is just about right on that car, but it is still too high in the front.  Still looks pretty darn good, though...
Jay Brown
- 1969 Mach 1, Drag Week 2005 Winner NA/BB, 511" FE (10.60s @ 129); Drag Week 2007 Runner-Up PA/BB, 490" Supercharged FE (9.35 @ 151)
- 1964 Ford Galaxie, Drag Week 2009 Winner Modified NA (9.50s @ 143), 585" SOHC
- 1969 Shelby Clone, Drag Week 2015 Winner Modified NA (Average 8.98 @ 149), 585" SOHC


mbrunson427

  • Hero Member
  • *****
  • Posts: 920
    • View Profile
Re: 1969 Torino(?) Cobra Rebuild
« Reply #75 on: July 05, 2018, 04:47:55 PM »
related story.....

Recently found a NOS front set of wheel lip mouldings for the 69 Fairlane Cobra, paid a good bit of dough for them. The guy sent them in a bubble wrap type envelope, Fedex folded said envelope in half.
Mike Brunson
BrunsonPerformance.com

FElony

  • Guest
Re: 1969 Torino(?) Cobra Rebuild
« Reply #76 on: July 05, 2018, 07:45:09 PM »
related story.....

Recently found a NOS front set of wheel lip mouldings for the 69 Fairlane Cobra, paid a good bit of dough for them. The guy sent them in a bubble wrap type envelope, Fedex folded said envelope in half.

Where oh where do you find bubble envelopes that big?

FirstEliminator

  • Sr. Member
  • ****
  • Posts: 456
    • View Profile
Re: 1969 Torino(?) Cobra Rebuild
« Reply #77 on: July 05, 2018, 07:58:22 PM »
related story.....

Recently found a NOS front set of wheel lip mouldings for the 69 Fairlane Cobra, paid a good bit of dough for them. The guy sent them in a bubble wrap type envelope, Fedex folded said envelope in half.

Where oh where do you find bubble envelopes that big?

   They folded them up to make them fit...
Mark
Berkshire Transmissions
North Adams, Massachusetts

70 Cougar XR-7 460 C-6
70 Cougar XR-7 conv 351c 4v FMX
69 Cougar SS 351w AOD
69 Cougar Sunroof Eliminator 351w FMX
69 Cougar XR-7 390 C-6
68 Monterey 390 C-6
68 Monterey conv 390 C-6
64 Montclair Marauder 390 Merc-O
58 Monterey 383 Merc-O
58 Parklane 430 MultiDrive
68 Colony Park 428 C-6
68 Colony Park 390 C-6
58 Parklane 430 MultiDrive
70 Cougar Eliminator 351c 4 speed
I don't feel like a hoarder.

FElony

  • Guest
Re: 1969 Torino(?) Cobra Rebuild
« Reply #78 on: July 05, 2018, 08:27:10 PM »
related story.....

Recently found a NOS front set of wheel lip mouldings for the 69 Fairlane Cobra, paid a good bit of dough for them. The guy sent them in a bubble wrap type envelope, Fedex folded said envelope in half.

Where oh where do you find bubble envelopes that big?

   They folded them up to make them fit...

Seller should be shot, not FedEx. Every trim piece I ever bought came in a cardboard box. You should assume that shipping monkeys take intense pleasure from ruining packages.

gdaddy01

  • Hero Member
  • *****
  • Posts: 656
    • View Profile
Re: 1969 Torino(?) Cobra Rebuild
« Reply #79 on: July 07, 2018, 02:43:11 PM »
let the new rear springs "settle" before making any changes , I like the way it sits now .  easier on the back getting in and out , but I did like the picture of the lady getting into the low car .  I am afraid I would not look that pleasing and  do not want to .

cjshaker

  • Hero Member
  • *****
  • Posts: 4458
    • View Profile
Re: 1969 Torino(?) Cobra Rebuild
« Reply #80 on: July 09, 2018, 09:00:33 AM »
let the new rear springs "settle" before making any changes , I like the way it sits now .  easier on the back getting in and out , but I did like the picture of the lady getting into the low car .  I am afraid I would not look that pleasing and  do not want to .

In my experience, new springs don't really "settle" until they've got some years and quite a bit of use on them. As long as nothing is in a bind, I'm pretty sure that's where they're going to stay.
Doug Smith


'69 R-code Mach 1, 427 MR, 2x4, Jerico, 4.30 Locker
'70 F-350 390
'55 Ford Customline 2dr
'37 Ford Coupe

machoneman

  • Hero Member
  • *****
  • Posts: 3851
    • View Profile
Re: 1969 Torino(?) Cobra Rebuild
« Reply #81 on: July 09, 2018, 09:18:26 AM »
let the new rear springs "settle" before making any changes , I like the way it sits now .  easier on the back getting in and out , but I did like the picture of the lady getting into the low car .  I am afraid I would not look that pleasing and  do not want to .

In my experience, new springs don't really "settle" until they've got some years and quite a bit of use on them. As long as nothing is in a bind, I'm pretty sure that's where they're going to stay.

Maybe settle is the wrong word here. In my experience, one must drive the vehicle a bit to ensure the springs (all types btw) take what I'll call a 'set'. I agree that springs really don't settle...as in getting a tad weaker...for a long time. But I'd not try any final wheel alignment, with new springs, until I took a few turns around the block. 
Bob Maag

FElony

  • Guest
Re: 1969 Torino(?) Cobra Rebuild
« Reply #82 on: August 28, 2018, 10:18:28 PM »
I bet you thought I'd forgotten about this car. Dinnncha, Jay. Huh? I never forget about anything. Scoff away, but true. The cognizant see this over time. There is always one of us here and there.

 So...... whus happenin'?

jayb

  • Administrator
  • Hero Member
  • *****
  • Posts: 7404
    • View Profile
    • FE Power
Re: 1969 Torino(?) Cobra Rebuild
« Reply #83 on: August 29, 2018, 08:38:40 AM »
Nothing happening at the moment, the car is back in the trailer awaiting bodywork and paint.  It will be a while before I get back to it...
Jay Brown
- 1969 Mach 1, Drag Week 2005 Winner NA/BB, 511" FE (10.60s @ 129); Drag Week 2007 Runner-Up PA/BB, 490" Supercharged FE (9.35 @ 151)
- 1964 Ford Galaxie, Drag Week 2009 Winner Modified NA (9.50s @ 143), 585" SOHC
- 1969 Shelby Clone, Drag Week 2015 Winner Modified NA (Average 8.98 @ 149), 585" SOHC


gdaddy01

  • Hero Member
  • *****
  • Posts: 656
    • View Profile
Re: 1969 Torino(?) Cobra Rebuild
« Reply #84 on: August 29, 2018, 10:01:38 AM »
I have been enjoying the thread , got me looking for one .

bobb428

  • Full Member
  • ***
  • Posts: 106
    • View Profile
Re: 1969 Torino(?) Cobra Rebuild
« Reply #85 on: May 14, 2021, 11:35:56 AM »
I really dig this project!

jayb

  • Administrator
  • Hero Member
  • *****
  • Posts: 7404
    • View Profile
    • FE Power
Re: 1969 Torino(?) Cobra Rebuild
« Reply #86 on: May 14, 2021, 02:34:45 PM »
Bodywork is almost done, courtesy of my pal Steve.  Should be painted in a month or so...
Jay Brown
- 1969 Mach 1, Drag Week 2005 Winner NA/BB, 511" FE (10.60s @ 129); Drag Week 2007 Runner-Up PA/BB, 490" Supercharged FE (9.35 @ 151)
- 1964 Ford Galaxie, Drag Week 2009 Winner Modified NA (9.50s @ 143), 585" SOHC
- 1969 Shelby Clone, Drag Week 2015 Winner Modified NA (Average 8.98 @ 149), 585" SOHC


bobb428

  • Full Member
  • ***
  • Posts: 106
    • View Profile
Re: 1969 Torino(?) Cobra Rebuild
« Reply #87 on: May 14, 2021, 03:16:28 PM »
IMO, that's your coolest car! I love me some big girl 68/69's!

machyoung

  • Jr. Member
  • **
  • Posts: 78
    • View Profile
Re: 1969 Torino(?) Cobra Rebuild
« Reply #88 on: May 14, 2021, 04:51:36 PM »
Mine prefers to be called an "Intermediate Girl". Ha!

Stangman

  • Hero Member
  • *****
  • Posts: 1691
    • View Profile
Re: 1969 Torino(?) Cobra Rebuild
« Reply #89 on: May 16, 2021, 02:29:19 PM »
That intermediate girl sits nice

jayb

  • Administrator
  • Hero Member
  • *****
  • Posts: 7404
    • View Profile
    • FE Power
Re: 1969 Torino(?) Cobra Rebuild
« Reply #90 on: May 16, 2021, 04:21:49 PM »
As it is at the moment...

Jay Brown
- 1969 Mach 1, Drag Week 2005 Winner NA/BB, 511" FE (10.60s @ 129); Drag Week 2007 Runner-Up PA/BB, 490" Supercharged FE (9.35 @ 151)
- 1964 Ford Galaxie, Drag Week 2009 Winner Modified NA (9.50s @ 143), 585" SOHC
- 1969 Shelby Clone, Drag Week 2015 Winner Modified NA (Average 8.98 @ 149), 585" SOHC


Stangman

  • Hero Member
  • *****
  • Posts: 1691
    • View Profile
Re: 1969 Torino(?) Cobra Rebuild
« Reply #91 on: May 16, 2021, 06:21:28 PM »
It’s really not bad 1 maybe 1.5 inches in the back 2 in the front and that should do it. I’m not a fan of it being to low.

Jb427

  • Sr. Member
  • ****
  • Posts: 348
    • View Profile
Re: 1969 Torino(?) Cobra Rebuild
« Reply #92 on: May 16, 2021, 11:22:58 PM »
looks good Jayb

I do like the stance on this one

bobb428

  • Full Member
  • ***
  • Posts: 106
    • View Profile
Re: 1969 Torino(?) Cobra Rebuild
« Reply #93 on: May 22, 2021, 07:49:44 PM »
Looking good! When I was 16, after I was involved in a accident with my first 68 Mustang, I went to south Denver to look at a original R-code 69 Cobra that had a built 460 with a tunnel ram sticking thru the hood! Beautiful Candy Brandywine paint, Oh it looked awesome! 5,000$ and my Dad thru a fit saying I couldn't get it Insured. I was heartbroken! I still have never seen or heard about that car since.

WConley

  • Hero Member
  • *****
  • Posts: 1160
  • No longer walking funny!
    • View Profile
Re: 1969 Torino(?) Cobra Rebuild
« Reply #94 on: May 23, 2021, 01:49:54 PM »
Here's a pretty cool collection of Ford ads from back in the day.  I don't know if those dudes in the white slacks would convince me to buy though...

https://www.youtube.com/watch?v=ZN5uUIvoL_w
A careful study of failure will yield the ingredients for success.

jayb

  • Administrator
  • Hero Member
  • *****
  • Posts: 7404
    • View Profile
    • FE Power
Re: 1969 Torino(?) Cobra Rebuild
« Reply #95 on: November 21, 2021, 10:37:38 AM »
Finally hit the paint milestone with this project so I thought I'd post some pictures.  After Steve got the body work done he brought it back over to my place and we took it all apart, removing the doors, hood, trunklid, and scoop, so that they could be painted in the jamb and underside areas, and also the top side of the scoop.  I painted the parts on a Saturday in October; here's a picture of the parts in the booth after painting:


From there, I took the parts out of the booth and rolled the car into the booth.  A few days later Steve came over and between the two of us we scuffed the underhood and under trunk areas, and the door jambs of the car, so that all those areas could be painted before we re-assembled the car for final paint.  There was some surface rust in the door jambs that we treated with metal prep, and also some minor bodywork that had to be done, but a day in the booth took care of all that and we were ready to re-assemble the car.  We did that a few days later, and then left the car because I was planning to tweak the panels for fit a little bit.

One of the things that always bothered me about the car was that the left front fender appeared to droop down a little at the front.  It was obvious when looking at the car in the front, from a distance, but when doing the bodywork in a garage, and assembling the car in the booth, you really couldn't see it.  Finally I figured out that if I opened the hood and laid a 6 foot straightedge across the front fenders, the issue was clear.  The straightedge contacted the hood side of both fenders, and on the right side there was a half inch gap between the straightedge and the top of the outside edge of the fender, but on the left side the same gap was over one inch.  From a distance it makes the car look funny.  At some point in the past the car was probably dinged or damaged in the front, so the left front fender didn't align properly.

I used a jack under the left fender eyebrow to get it up in the correct position, put some new holes in the fender where it mounts to the chassis, and got the fenders looking symmetrical side to side.  Unfortunately, when I did that the gap between the left fender and the left door opened way up at the bottom, and where it had looked pretty good before I started, now it was way off.  I was so tired of screwing around with the car that I was ready to let that go; it's never going to be a show car, and I felt that I could live with that gap.  But Steve came over and thankfully insisted that we fix it; he welded an 1/8" welding rod to the edge of the fender, and then filled the gap between the rod and the fender in with more weld, then ground it straight along the edge.  One application of body filler was all that was required to get it nice and straight, and now the gap is back where it belongs. 

At this point we threw some primer surfacer on the area and got that nice and flat, and also fixed a minor issue on the left rear quarter, that showed up under the lights in the booth.  Finally, ready for paint!  Here's a picture of the car at this point:


Saturday November 6 was paint day.  We got going with a coat of PPG DAS 3021 sealer, then painted the base coat of PPG Deltron, Ford Candy Apple Red, paint code T.  Base coat went on beautifully:


Finally we got to the clear.  I used a PPG high performance clear called VC5700, same stuff that I used on my Shelby.  We put nearly two full gallons of clear mix on the car, in four separate coats.  When I painted my Shelby I had laid it on a little too thick on the last coat, trying to smooth it out, and had gotten a couple runs that needed to be sanded out later, so I made a point of not doing that on this paint job.  The paint came out looking great, but because I put it on a little dryer there was orange peel evident:


Of course, the big advantage of a base coat and clear coat system is that you can color sand and buff the car after the painting is completed.  I got going on that yesterday, with my friend Jeff (JericoGTX on this forum) giving me a hand.  We are going to do this in steps, since with this clear there really doesn't seem to be any big hurry to get the buffing done.  We started with 600 grit to get the paint flat, then went to 1000, 1500, and finally 2000.  Jeff buffed with 3M 36060 buffing compound, then finished with 3M 06064 polishing compound.  We got most of one side of the car done yesterday, and it is beautiful:


Over the next month or so I plan to get the buffing finished up, and then I'll start on the exterior trim and the interior.  The car currently has a running 390 in it, but I've got a 492" FE waiting in the wings, for installation next summer.  With luck I'll be driving the car next summer with that engine in it.  I'll post some updates when the trim is on the car, and the interior as it is getting done.  I'm kind of a Mustang guy, but I really do like this car... :D
Jay Brown
- 1969 Mach 1, Drag Week 2005 Winner NA/BB, 511" FE (10.60s @ 129); Drag Week 2007 Runner-Up PA/BB, 490" Supercharged FE (9.35 @ 151)
- 1964 Ford Galaxie, Drag Week 2009 Winner Modified NA (9.50s @ 143), 585" SOHC
- 1969 Shelby Clone, Drag Week 2015 Winner Modified NA (Average 8.98 @ 149), 585" SOHC


WConley

  • Hero Member
  • *****
  • Posts: 1160
  • No longer walking funny!
    • View Profile
Re: 1969 Torino(?) Cobra Rebuild
« Reply #96 on: November 21, 2021, 10:54:53 AM »
Jay - That paint and body work look really nice  :D

Sometimes those oddball projects end up being the most satisfying!
A careful study of failure will yield the ingredients for success.

Gregwill16

  • Sr. Member
  • ****
  • Posts: 468
    • View Profile
Re: 1969 Torino(?) Cobra Rebuild
« Reply #97 on: November 21, 2021, 01:12:45 PM »
Looks great!

My dad and I are Mustang guys as well. But he had a 69 Cobra just like this years ago that was his favorite to drive. He has told me several times, once you drive a Cobra, you will throw rocks at a Mustang.

TimeWarpF100

  • Hero Member
  • *****
  • Posts: 683
    • View Profile
Re: 1969 Torino(?) Cobra Rebuild
« Reply #98 on: November 21, 2021, 03:47:23 PM »
Looking good Jay! Can't wait to see it done.

Looking at google earth the other day realized you are only about 1 mile away from my sister in law and have driven by your place without realizing that!

jayb

  • Administrator
  • Hero Member
  • *****
  • Posts: 7404
    • View Profile
    • FE Power
Re: 1969 Torino(?) Cobra Rebuild
« Reply #99 on: November 21, 2021, 04:58:28 PM »
You should stop in next time you are here, just give me a day or two notice in advance.  For my part, I was just in Phoenix visiting my Dad; keep thinking about making it up to Cave Creek, which is where you are if I'm not mistaken.  Used to go to the Satisfied Frog every now and then...
Jay Brown
- 1969 Mach 1, Drag Week 2005 Winner NA/BB, 511" FE (10.60s @ 129); Drag Week 2007 Runner-Up PA/BB, 490" Supercharged FE (9.35 @ 151)
- 1964 Ford Galaxie, Drag Week 2009 Winner Modified NA (9.50s @ 143), 585" SOHC
- 1969 Shelby Clone, Drag Week 2015 Winner Modified NA (Average 8.98 @ 149), 585" SOHC


mbrunson427

  • Hero Member
  • *****
  • Posts: 920
    • View Profile
Re: 1969 Torino(?) Cobra Rebuild
« Reply #100 on: November 22, 2021, 12:11:52 PM »
Sweet! Looks great
Mike Brunson
BrunsonPerformance.com

Gaugster

  • Sr. Member
  • ****
  • Posts: 396
    • View Profile
Re: 1969 Torino(?) Cobra Rebuild
« Reply #101 on: November 23, 2021, 09:54:08 AM »
Nice progress! Looks great in red. Should be a fun ride.
John - '68 Cougar XR7 390 FE (X-Code) 6R80 AUTO

jayb

  • Administrator
  • Hero Member
  • *****
  • Posts: 7404
    • View Profile
    • FE Power
Re: 1969 Torino(?) Cobra Rebuild
« Reply #102 on: June 04, 2023, 04:58:59 PM »
It's hard to believe that it has taken this long for me to get this car almost roadworthy again.  Over a year and a half.  FE Power has kept me scrambling, changing foundries, updating foundry tooling and CNC programs, testing intake manifolds and designing the tooling for those, etc. etc.  Plus, getting the parts for this car took forever.  But a few weeks ago I finally got a bunch of intake adapter and cylinder head castings that I've been waiting for, and the CNC machines have been humming away, so I've finally had a few weekends to get after this project.

Most of the time was spent on the interior and trim.  My pal Steve did a lot of it for me.  Took six months to get new upholstery for the front buckets, but when they arrived Steve grabbed the seats and the upholstery, and took it all home to recover the seats there.  A couple of days later, he came over to show me what he had found stuffed up under the driver seat.  Cracked us both up.  Did I mention that this car was a relic from the 1970s?


The interior went together slowly as the parts arrived over the last year or so, but had been stalled since January.  Over the last two weekends I hit it hard, and managed to get it mostly finished up.  The car still is in desperate need of fender and hood alignment on the driver's side; I think the hood hinge on that side might be bent, because I can't get it to sit down properly.  It also needs a radio antenna, a wiper motor, the mounting nuts for the side mirror, and a few other odds and ends.  Today before pulling it out of its home in the paint booth I changed oil, and found some bits of cast piston in the drain oil.  Not what I was hoping for.  There is a  390GT engine currently in the car, the 428SCJ being long gone before I got it, so I'm going to replace that engine anyway, but I was hoping it was in better shape than this.  It smokes like a chimney but doesn't sound bad, no knocks or anything.  The accelerator pump on the Holley 780 vacuum carb leaks, but oil pressure is reasonably good and it doesn't overheat, so I'm going to drive it a little and see what happens.  By the way, the Cobras never came with a C stripe on them, but I like them, so I put one on.  Purists be damned  ;D

Some pictures are below.  It's no show car, being a rusted out POS when I got it, but at this point I'm pretty happy with it.  I will post again once I get the new engine installed and the engine compartment cleaned up.  I do have an original oil cooler setup for the car, and I bought one of those fiberglass reproduction ram air setups from fordramair.com, so along with the polished aluminum CJ valve covers I think it will look pretty good, and at least somewhat original, under the hood.  Also have a new set of headers to replace the old rusty and leaky ones, and they are FPAs, so the oil cooler setup will fit.  Looking forward to cruising around a little in the next week or so...


Jay Brown
- 1969 Mach 1, Drag Week 2005 Winner NA/BB, 511" FE (10.60s @ 129); Drag Week 2007 Runner-Up PA/BB, 490" Supercharged FE (9.35 @ 151)
- 1964 Ford Galaxie, Drag Week 2009 Winner Modified NA (9.50s @ 143), 585" SOHC
- 1969 Shelby Clone, Drag Week 2015 Winner Modified NA (Average 8.98 @ 149), 585" SOHC


427Fastback

  • Hero Member
  • *****
  • Posts: 603
    • View Profile
Re: 1969 Torino(?) Cobra Rebuild
« Reply #103 on: June 04, 2023, 11:05:12 PM »
Looks good Jay...well done
1968 Mustang Fastback...427 MR 5spd (owned since 1977)
1967 Mustang coupe...Trans Am replica
1936 Diamond T 212BD
1990 Grizzly pick-up

My427stang

  • Hero Member
  • *****
  • Posts: 3929
    • View Profile
Re: 1969 Torino(?) Cobra Rebuild
« Reply #104 on: June 05, 2023, 06:39:12 AM »
Looks great!  Nothing left over in the barn to swap old smokey out of there? 
---------------------------------
Ross
Bullock's Power Service, LLC
- 70 Fastback Mustang, 489 cid FE, Victor, SEFI, Erson SFT cam, TKO-600 5 speed, 4.11 9 inch.
- 71 F100 shortbed 4x4, 461 cid FE, headers, Victor Pro-flo EFI, Comp Custom HFT cam, 3.50 9 inch

6667fan

  • Hero Member
  • *****
  • Posts: 719
  • Every Second Counts
    • View Profile
Re: 1969 Torino(?) Cobra Rebuild
« Reply #105 on: June 05, 2023, 08:26:25 AM »
Hmm, is that a pcv component under the seat? 70s machine, go figure.

Drive her around, have some fun.
« Last Edit: June 06, 2023, 09:59:40 AM by 6667fan »
JB


67 Fairlane 500
482 cid 636/619.
Tunnel Wedge, Survival EMC CNC heads, Lykins Custom Hydraulic Roller, Ram adjustable clutch, Jerico 4-spd, Strange third member with Detroit Locker, 35 spline axles, 4.86
10.68@125.71 1.56 60’

WConley

  • Hero Member
  • *****
  • Posts: 1160
  • No longer walking funny!
    • View Profile
Re: 1969 Torino(?) Cobra Rebuild
« Reply #106 on: June 06, 2023, 12:26:33 AM »
I think everyone is waiting for Heo's comment on the 1970's cultural artifact  ;D

Looks good Jay!  Glad to see it come together.
A careful study of failure will yield the ingredients for success.

Heo

  • Hero Member
  • *****
  • Posts: 3284
    • View Profile
Re: 1969 Torino(?) Cobra Rebuild
« Reply #107 on: June 13, 2023, 04:15:56 PM »
I think everyone is waiting for Heo's comment on the 1970's cultural artifact  ;D

Looks good Jay!  Glad to see it come together.


Fore once im speacles ;D....
Looks nice Jay, the red colour and c stripe suits it


The defenition of a Gentleman, is a man that can play the accordion.But dont do it

AlanCasida

  • Hero Member
  • *****
  • Posts: 1099
    • View Profile
Re: 1969 Torino(?) Cobra Rebuild
« Reply #108 on: June 17, 2023, 12:22:52 PM »
Very nicely done, Jay! When I saw the "accessory" Steve found in the car it reminded me of when I bought my 66 F100 on auction from the Ford County Sherriff's Dept.. They told me they got it as a drug seizure. When I was cleaning it out I found an small test tube with a bulb on the end in unused condition. Since it was unused I didn't classify it as a crack pipe but I destroyed it none the less. Had it been used I would have called the Sherriff's dept.   

jayb

  • Administrator
  • Hero Member
  • *****
  • Posts: 7404
    • View Profile
    • FE Power
Re: 1969 Torino(?) Cobra Rebuild
« Reply #109 on: June 17, 2023, 03:44:39 PM »
A crack pipe under the seat would scare me LOL!  I kept the pipe Steve found as a souvenir of the times, and Minnesota actually just legalized cannabis, so I don't think its even illegal to own at this point.

A few days ago I called the previous owner of the car.  I had kept his number for the last 8 years and wanted to send him some pictures; so many people buy project cars and let them languish forever, I figured he would appreciate it that I actually did something with the car I bought from him.  He laughed out loud when I told him about the pipe; he said that it wasn't his, but the kid he bought the car from seemed like the type.  He also told me that he had asked the kid about how the original 428SCJ engine got damaged.  Apparently the kid had bought a new Sun Super Tach II (which is still in the car and still works), saw 8000 RPM on the dial, and with a carload of his buddies decided to show them that the engine could bury the tach needle!  Needless to say, he failed LOL!  Apparently the kid traded the broken 428SCJ for a running 390GT motor, and put that in the car before he sold it. 
Jay Brown
- 1969 Mach 1, Drag Week 2005 Winner NA/BB, 511" FE (10.60s @ 129); Drag Week 2007 Runner-Up PA/BB, 490" Supercharged FE (9.35 @ 151)
- 1964 Ford Galaxie, Drag Week 2009 Winner Modified NA (9.50s @ 143), 585" SOHC
- 1969 Shelby Clone, Drag Week 2015 Winner Modified NA (Average 8.98 @ 149), 585" SOHC