Wow, it has been a LONG time since I posted an update in this thread. Figured it was about time since I just hit the paint milestone, which has really been the biggest obstacle to getting this project completed. In the three year interim since the last post I've been buried in making several dozen sets of custom valve covers, getting the cylinder head project off the ground, painting my 68 fastback and working some on my 69 Torino, preparing and attending a couple PRI shows, etc. etc. etc.! This project has continually been started, then stopped and placed on the back burner, as more immediate concerns surfaced. But the stops and starts finally have led to a painted car, and at this point the rest of the project seems downhill. Of course, I say that...

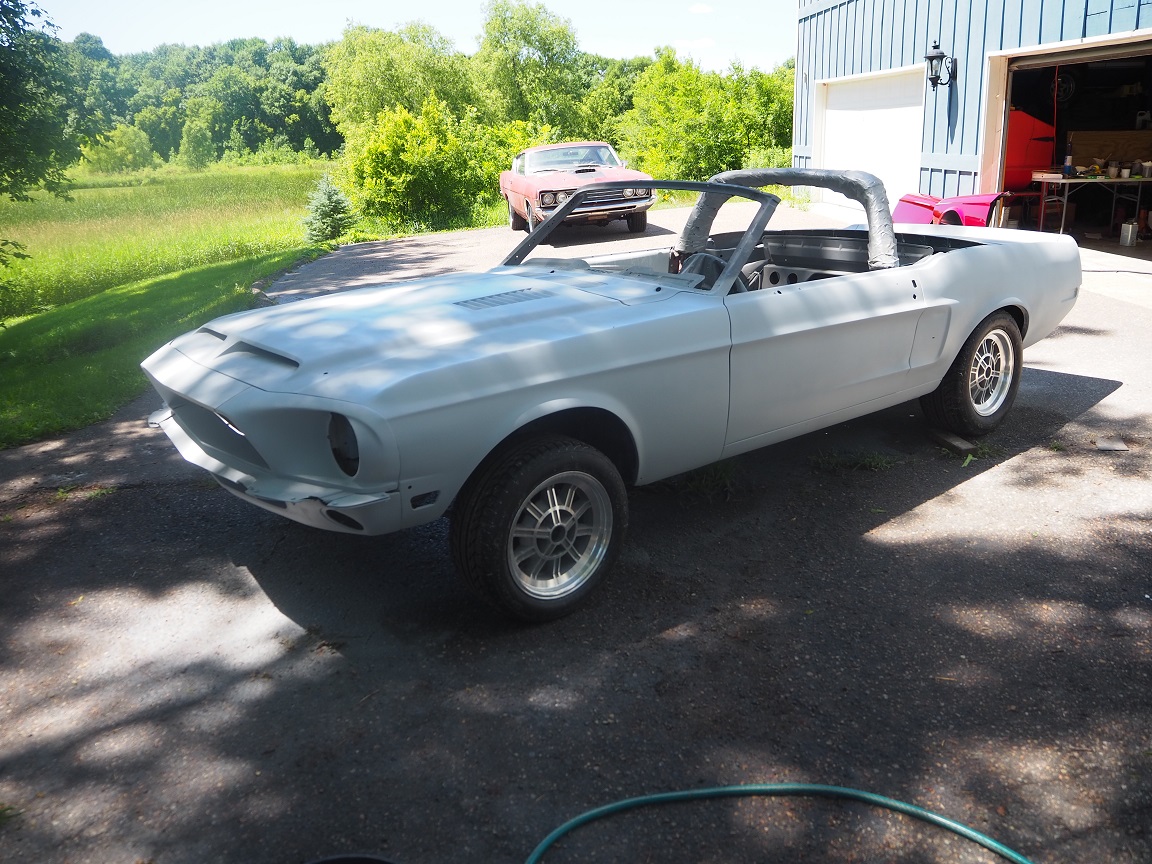
At the end of 2017 I had the car completely stripped, dustless blasted, and epoxy primed, ready for the remaining sheet metal work. Of course, it sat pretty much all winter that year, because I hate sheet metal work

A break in the FE Power action came during the summer of 2018, but rather than doing the sheet metal work I decided to work on the fiberglass. Previously I had mentioned here that I'd sent the fiberglass off to be plastic media blasted at a local company. Unfortunately, that did not work out very well. The blasting company did a test on a couple panels, and found that since there was no gelcoat on the 68 Shelby parts, the plastic media bit deep into the fiberglass and would have ruined it completely if they had continued. So, I brought it all back home, knowing that my only real option was chemical stripping.
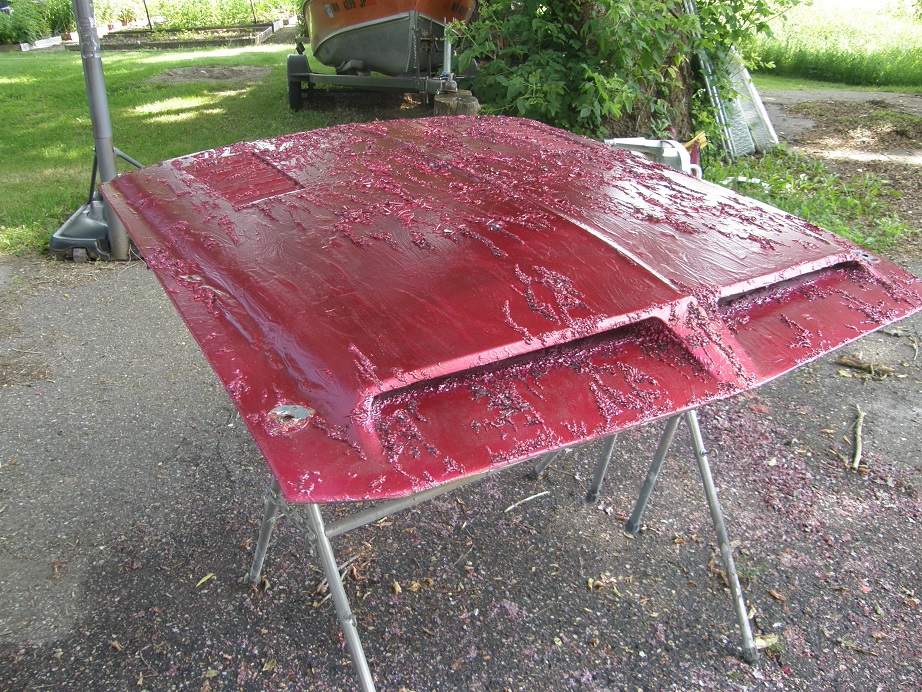
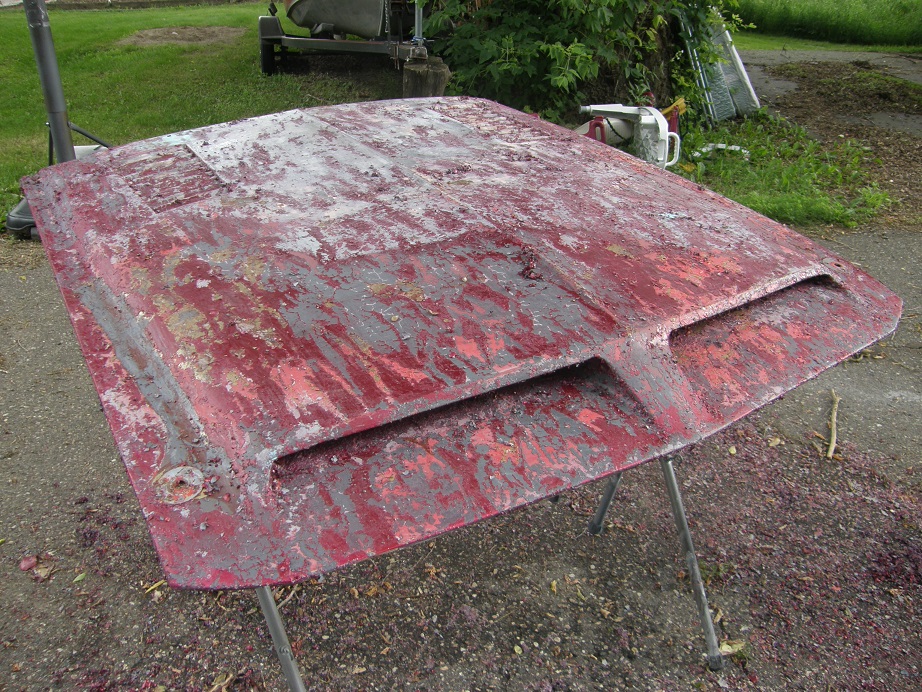
I bought a couple gallons of a chemical stripper specifically designed for fiberglass, and spent a good chunk of the summer, off and on, stripping the paint off the fiberglass parts. This was a huge, huge pain in the ass, and I'd never recommend it to anyone unless there was no other alternative. My car had a total of four paint jobs on it, the last one a multi-coat candy paint, and it was easily 5 to 7 separate applications of the stripper to finally get it all off. In fact, on the trunk lid I never did get it all off; the factory paint just would not lift on that panel. I figured if I couldn't get it off with the stripper, it would be OK as a base for the new paint, so I just sanded it and left it. The hood was extremely challenging to strip, because of the louvers and scoop openings, and also because the hood had been damaged by a carb fire back in the 1980s (thank-you, leaking tripower induction system

), and so it had some separating of the fiberglass laminating layers and also some body filler in it to smooth it out prior to the last paint job. Here are a couple of pictures of the hood during the stripping process. The original gold paint, and the original gray colored primer, are visible in the second photo:
After stripping it was clear that every single fiberglass part on the car needed some sort of minor repair. The hood was the worst, and when I started the body work in earnest this past summer, I ended up re-fiberglassing a center part of the hood, where the carb fire had done the most damage. But after getting the paint stripped during the summer of 2018 I just parked all the pieces in the shop for a while and went on to other projects.
At the start of 2019 a couple of my friends volunteered to give me a hand with the critical work of hanging the quarter panels on the car, so that got me off the dime and moving on the metal work. My philosophy on this was to leave as much of the original metal as possible, so rather than replacing entire panels (like the outer wheelhouses, for example), I cut the aftermarket replacement panels, and trimmed them to fit . This was done in the trunk and wheelhouse area, and also for the quarters. Most of the quarter panels have been replaced, but we left the original seams and the original body lines that defined the edges, because looking at the replacement full quarters, you can obviously see that those are nowhere near as sharp as the originals. Of course this took a lot more time, and all the seams were butt welded rather than overlapped, but I was happy with the result. My friends Steve and Jerry were a huge help during this whole process, and once the quarters were on it seemed like the rest of the sheet metal work went much easier. Here's a picture of the driver's side quarter after it was installed, and the welds were ground:

As I moved on through the sheet metal work, it became clear that most of the aftermarket parts were all just a bit different than the factory parts, so rather than use them I tried to get original parts for the car wherever possible. I had already concluded this about the aftermarket front fenders I'd acquired, and one of our forum members had been kind enough to forward me a contact in Arizona for those parts. The original front fenders were just not worth saving (although I've kept them, and every other original part on the car that I have), so I was able to acquire a nice pair of front fenders from the guy in Arizona. When I got working on the doors, I decided to cut the skins off to get to some rust holes in the door jamb areas, but when I did this I found that some of the internal support structure was going to get in the way of the repairs, and besides that the texture of the metal in the jamb and interior areas of the doors was not going to be easily duplicated. So, I contacted the guy in Arizona again and was able to get a pretty nice pair of doors for the car, that didn't need any major body work or rust repair.
By the end of 2019 I had all the sheet metal work done, which was a huge milestone for this project. In the spring of this year I spent a month or so on the fiberglass parts, repairing them where any cracks or breaks had appeared. There were a total of 3 fiberglass parts that I had to replace. One was the nose panel that has the Shelby letters, one was the passenger side side scoop (which was lost along a freeway between gas stops during a 1980s road trip), and the third was the driver's side headlight bucket. Again, despite claims of excellent quality, all of the replacement fiberglass parts needed work in order to fit like the originals. The nose panel did not conform to the same contour as the hood, and I had to saw it and crack it in the middle, then re-fiberglass it, in order to make it match. The headlight bucket didn't have the correct alignment of the studs to fit into the factory front fender, so that had to be fixed, plus it didn't have quite the correct contour to line up with the fender down near the bumper. The side scoop was OK, but there are two versions of the side scoops that were used on the 68 Shelbys; mine is an early car, and the side scoop that is available is for the later cars, so I had to do bodywork on that one to make it right.
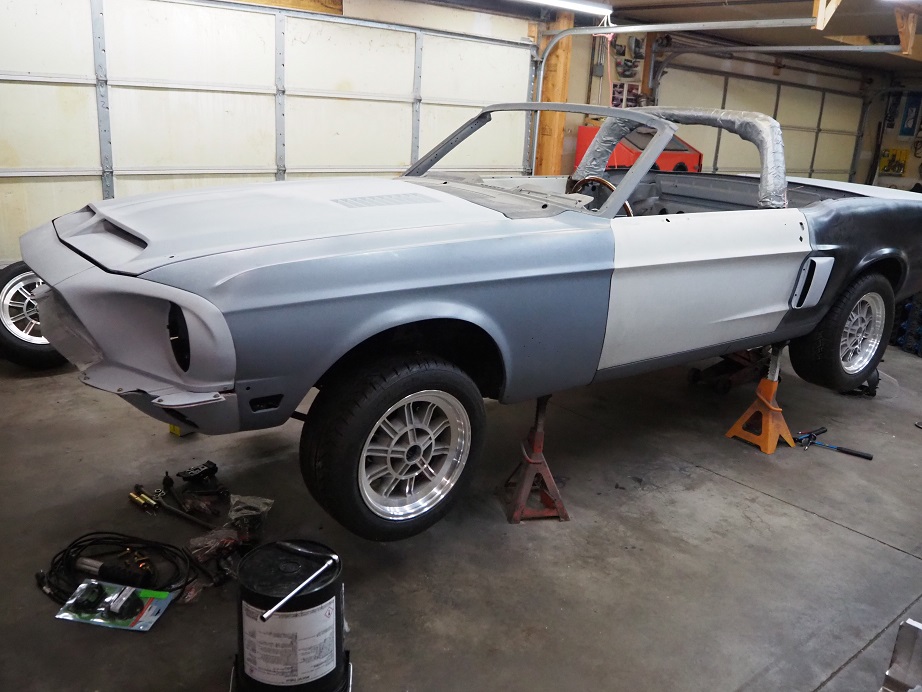
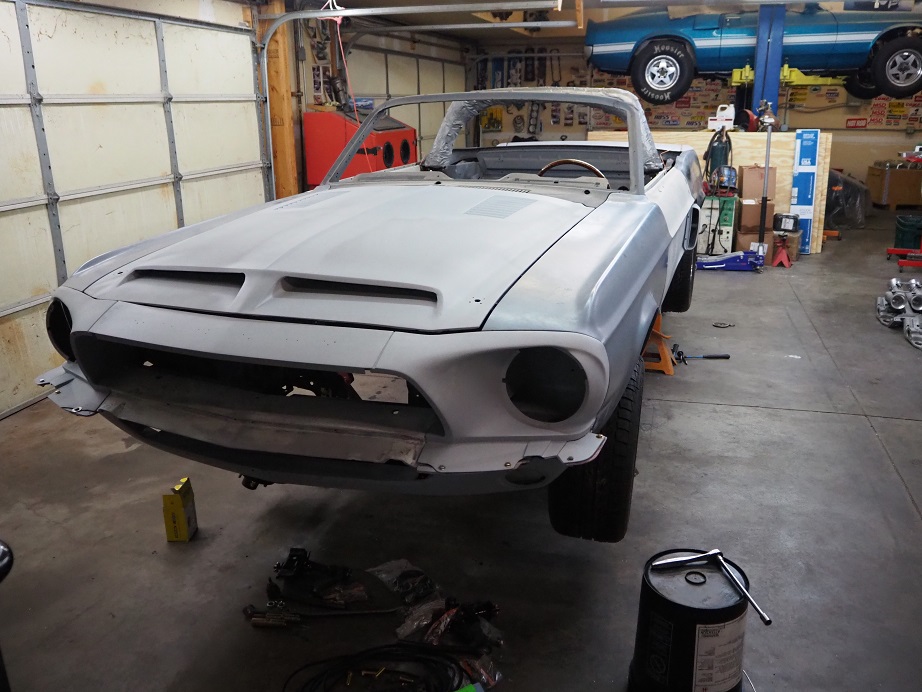
Finally, after getting the fiberglass work done, I was able to completely assemble the body of the car for the first time since I took it apart back in 2003. Nothing is lined up, but at least it's all there. Another milestone:
Thanks to the pandemic and the inability to get the parts I needed for the cylinder head project, I finally got to the bodywork on the car starting in June. Again my friends Steve and Jerry, and also my friend Jeff who is on this forum, were a huge help in making this part of the project successful. I am not a great bodyman, and getting some qualified help to identify problems and correct them was very important. Since a good part of the car was fiberglass I used Evercoat Featherfill for all the primer-surfacer needs. It was the first time I used that product and I was pleased with the build charateristics and sandability of the primer surfacer. In the end I think we block sanded the car six or seven times to get it really straight. Jeff turned me on to a product call Guide Coat, which is fogged on to the car after the primer surfacer and helps to identify low spots. I went through a couple cans of that stuff and it really made identifying the problem areas much easier. Here's a couple of photos of the car in primer during this process, with all the gaps right and panels aligned:

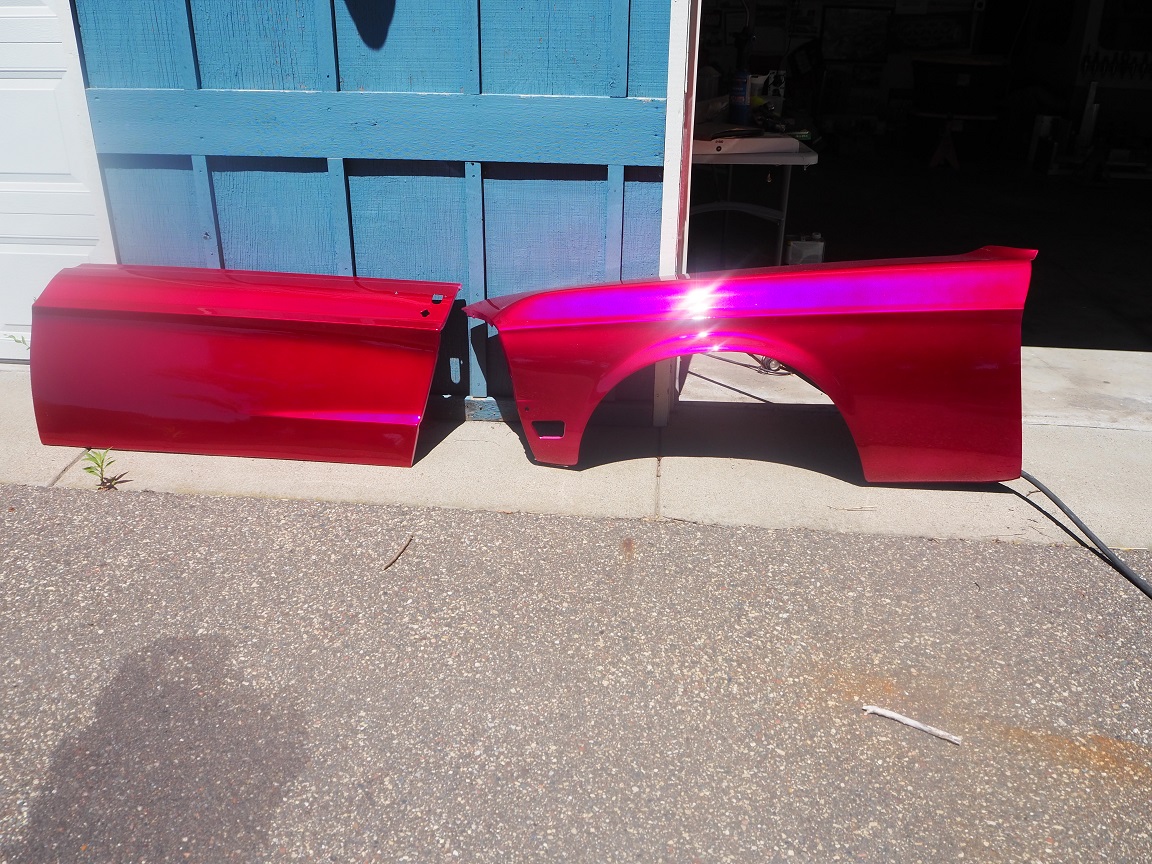
All during the bodywork process I'd been waffling back and forth about what color to paint the car. I really wanted to paint it the way it had been done the previous time, with a candy red color, but I wanted to do it myself and was not confident that I could get the candy color on the car correctly. The other option was a straight, bright red paint job, which I was confident I could get on the car without any issues. It would also be easier to repair any issues that came up on paint day, or match the color later on down the road. In order to help me decide, I elected to purchase some of the candy paint and spray it on a couple test panels, to see if I had any trouble getting a nice even coat on the panels. The paint I used is from PPG, called their Radiance II line. This is the same paint that was used when I had the car professionally sprayed with it back in the early 1980s. The base coat color is called Sterling Silver, and the translucent red coat is called Romanesque Crimson. I went to my local paint store and picked up a quart of each to paint some test panels.
One thing about these candy paints is that the color changes as you spray on more coats. The major concern I had was being able to lay the paint on evenly, so there wasn't any shadowing or mottling in the final result. This turned out to be much, much easier than I thought it would be. I painted one of the aftermarket front fenders I had decided not to use, plus a door skin, using exactly the same process as I planned to during the actual paint. I also tried different numbers of coats on different areas of the test panels, just to see how the finished colors would look in the sunlight. In the end I settled on five coats of the translucent red as the color I wanted for the car. After doing this I decided for sure that I wanted to use this paint as the color for the car. A picture of the test panels is below. The blue on the fender is an artifact of the photograph, not the actual color on the fender:
About this time the valvesprings for my cylinder head project came, so I dropped the Shelby project again and spent the next several weeks on the cylinder head dyno mule. After having problems with the aluminum rockers, I redesigned them in steel and sent the files off for some prototypes to be cast in 4140. This was early September, and I figured I'd better get back on the Shelby, because I did NOT want to look at it unpainted for another winter. A few more coats of primer surfacer and some help block sanding from my friends, and I was ready to start the painting process.
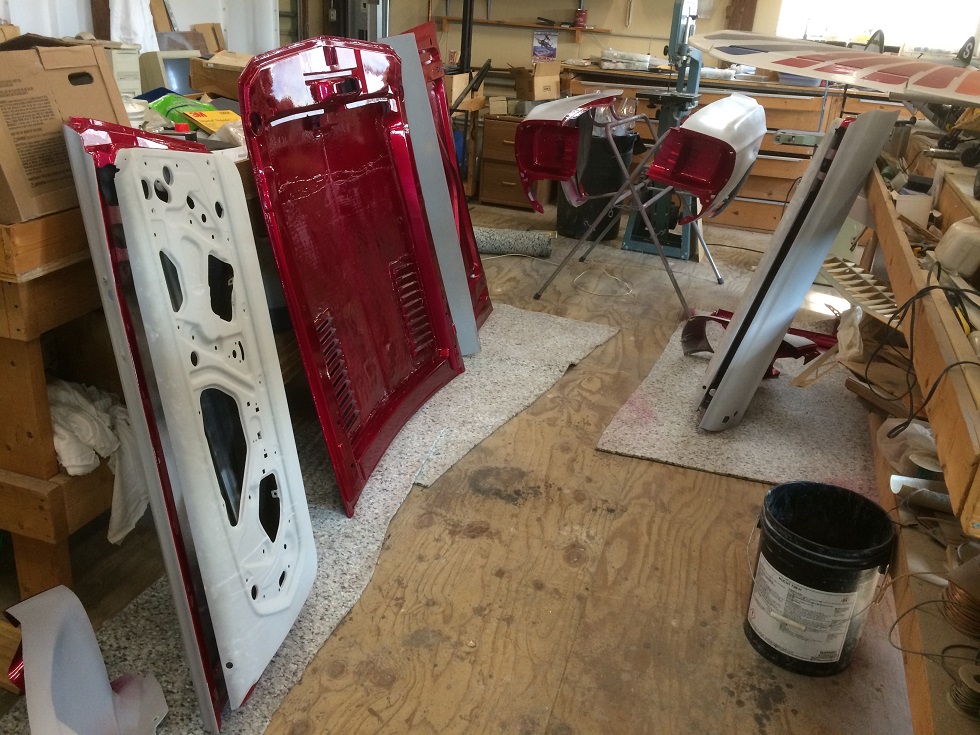
This car is the first one I've ever done where it has been blown completely apart to get painted, and so the painting was in four separate steps. First, I disassembled the body and took the parts up into the paint booth, so I could paint the underside of the hood and trunk lid, the jamb areas of the doors, the back side of some of the other fiberglass parts, etc. Taping off the parts that were not going to get painted was a very time consuming and tedious task. The picture below shows these parts sitting in my shop outside the paint booth, after this part of the painting process was finished and the tape had been removed:
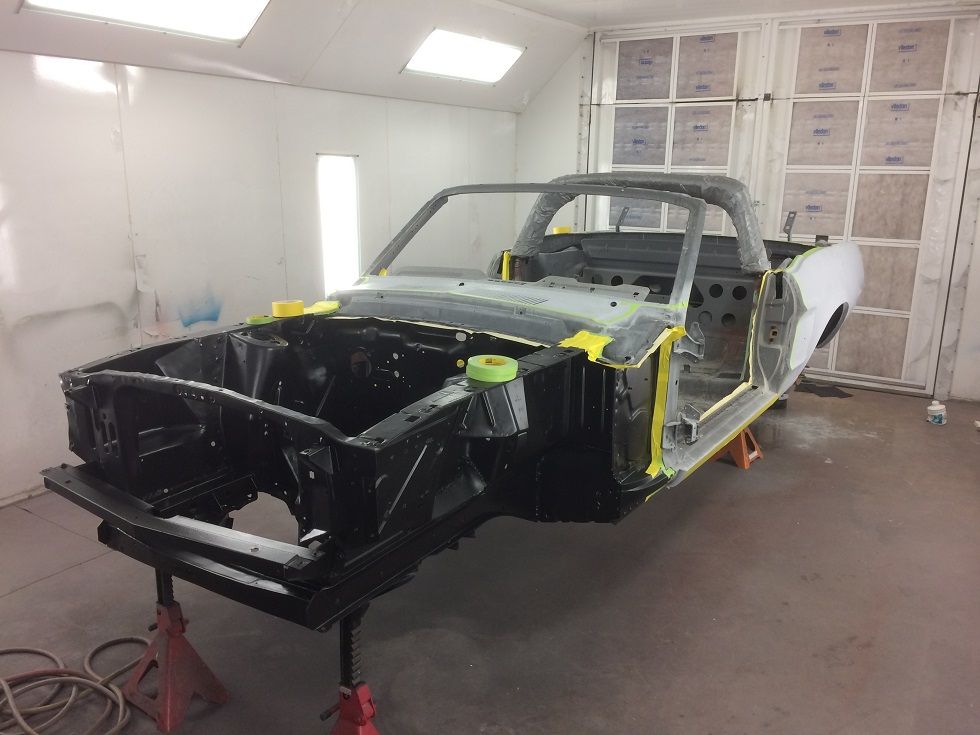
Next with a little help I rolled the chassis and body of the car into the booth. I had previously done some welding and bodywork on the engine compartment, and there had been some overspray from the primer surfacer that got onto the chassis inside the fenders, so I wanted to get all this painted satin black. I completely disassembled the front suspension on the car, gave the front area a final scuffing, and shot Eastwood Chassis black in the engine compartment and other front chassis areas. Again, it took at least a day to get everything taped up and masked prior to painting:
The third step in this process was to paint the door jamb areas, the underhood areas, and the inside of the trunk of the car. By this time I was on my fifth roll of 3/4" masking tape, and had burned through a couple rolls of 1-1/2" and 2" also, not to mention a whole bunch of masking paper. But after another couple of days, the car was ready and I shot the the jamb and trunk areas. The biggest issue I had with the whole paint job was in the trunk, where it was difficult to get the gun positioned to hit all the surfaces the same. I certainly did not get that perfect, but in the end it still came out looking pretty good. And I'll probably be the only one who sees it LOL

In addition to the jamb areas, I also decided to paint some of the lower sections of the front part of the car separately, so the lower valance panel and some of the panels inside the grille area were painted at this time also. Getting into those areas when the whole car was assembled would have been difficult.
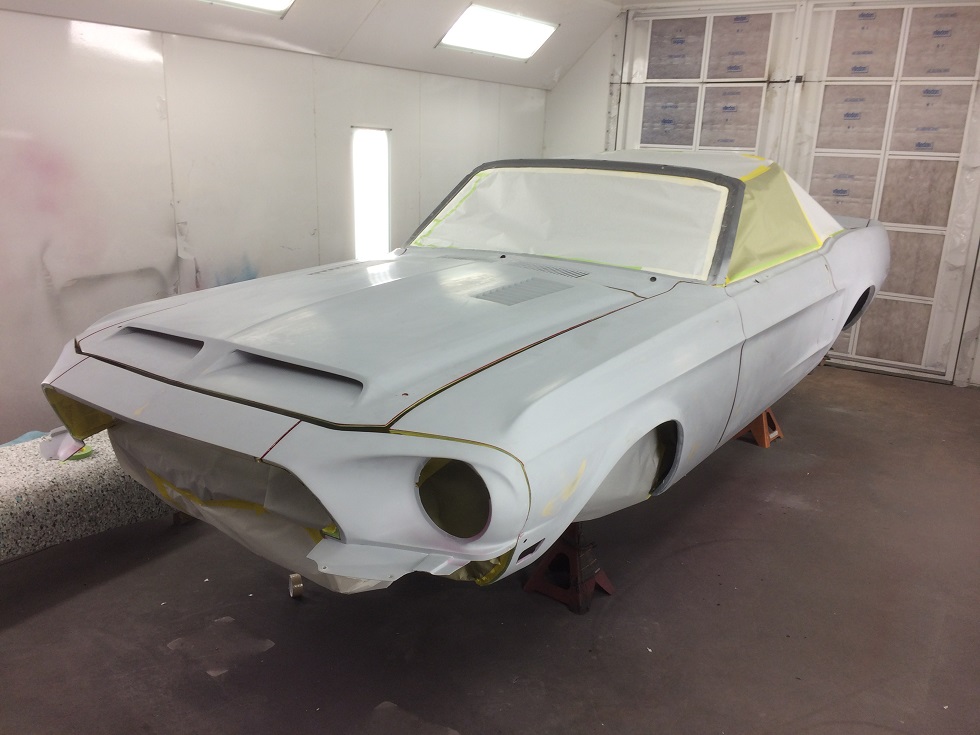
Finally, it was time to put the body back together and do the fourth and most important step, painting the outside of the body. Because of the tape lines on the previously painted parts, I masked the underside of the hood, trunk, and doors back just a small amount from the paint edge, then used some 400 grit paper to sand those edges smooth, so that the new paint would go on without any kind of ridge showing. Once again taping took about three days of part time work before I finally got it all ready to go. Here's a picture of the car assembled in the booth, and almost ready for paint:
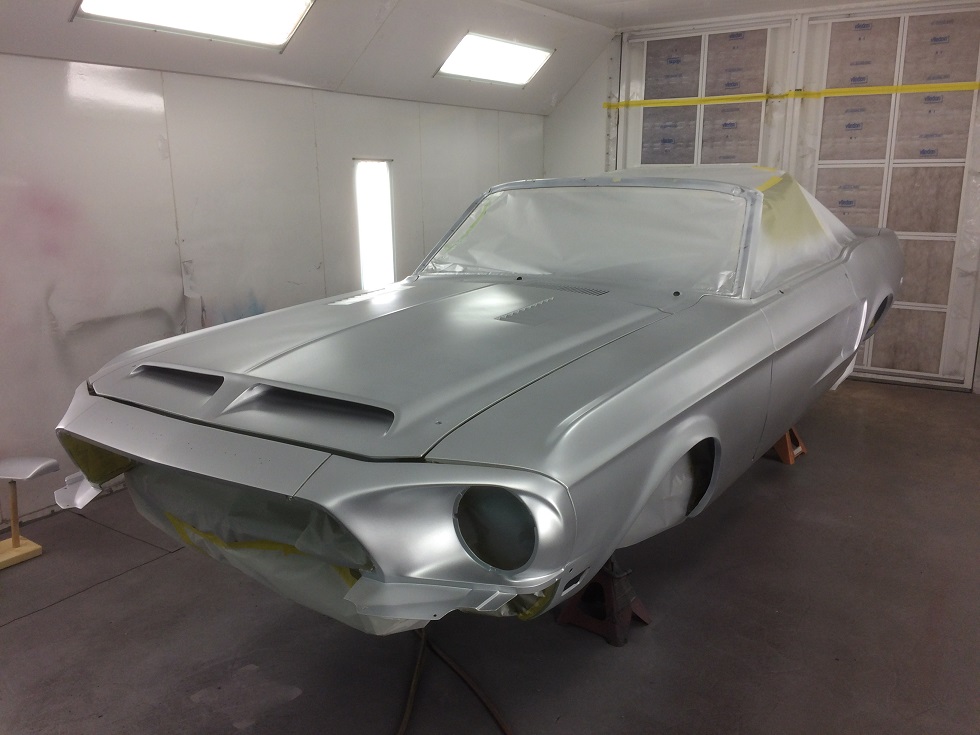
Paint day finally arrived on October 9. My friend Steve had taken the day off to help me in the booth. He and I have done several cars together, and have a procedure we go through where we wet the floor of the booth down between coats, and one guy (the car owner, me in this case) shoots the paint while the other guy guides the hose around the booth and watches to make sure that the painter doesn't get his clothes or the hose into the fresh paint. This was going to be a long paint job, comprising one layer of sealer, three layers of silver base, five layers of translucent color, and five layers of clear; pretty much an all day job. Steve brought over a couple of Tyvek suits for us to wear, again to try to keep inside the booth as clean as possible, and after a few minor touch-ups on the assembly and edges, we got started painting around noon.
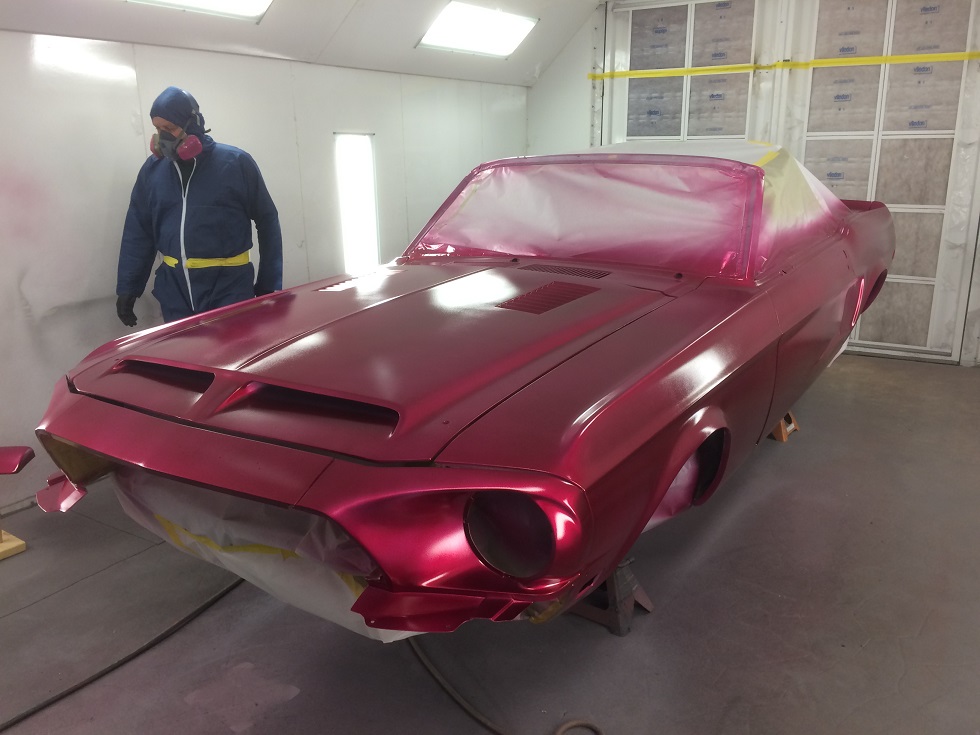
I had the car up on jack stands for the paint job but even so, when I started at the back of the car I had to get down on my knees to completely paint the bottom of the rear valance panel. Back on my feet for the trunk lid and driver side, then on my knees again for the rocker panel and lower part of the front fenders and quarters, back up to paint the hood and front end, then the passenger side, then on my knees again for the passenger side rocker panel, and finally back up to finish the passenger side of the trunk. If I was 40 years old this wouldn't have been so bad, but after 14 coats of paint and a 7 hour painting session, my knees were shot LOL! Here's how the car looked after the three silver base coats were on:
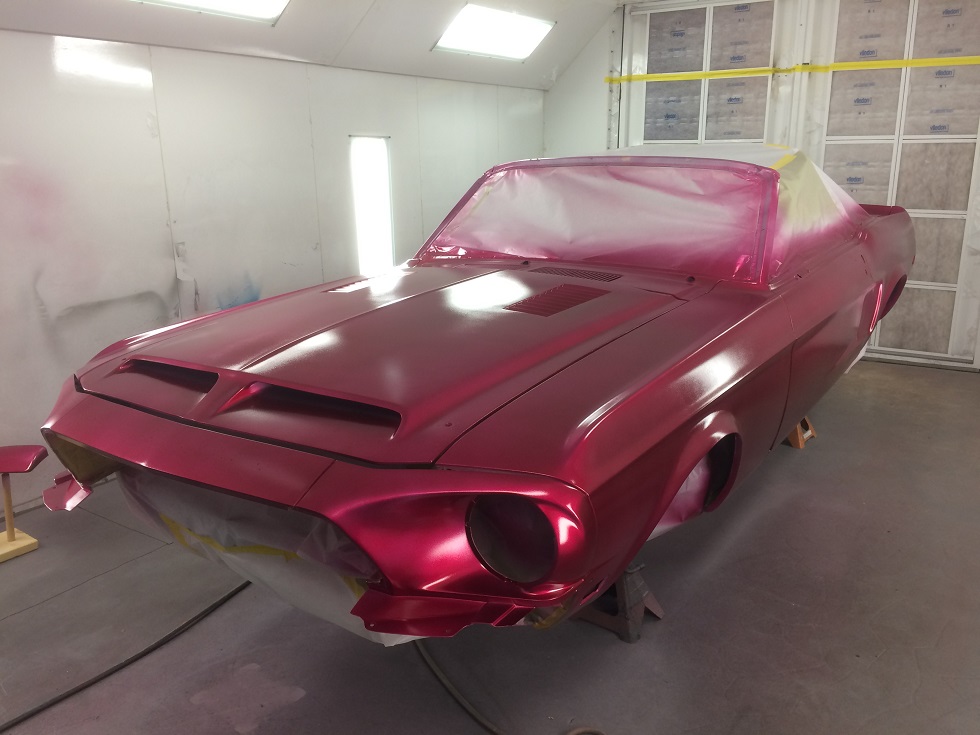
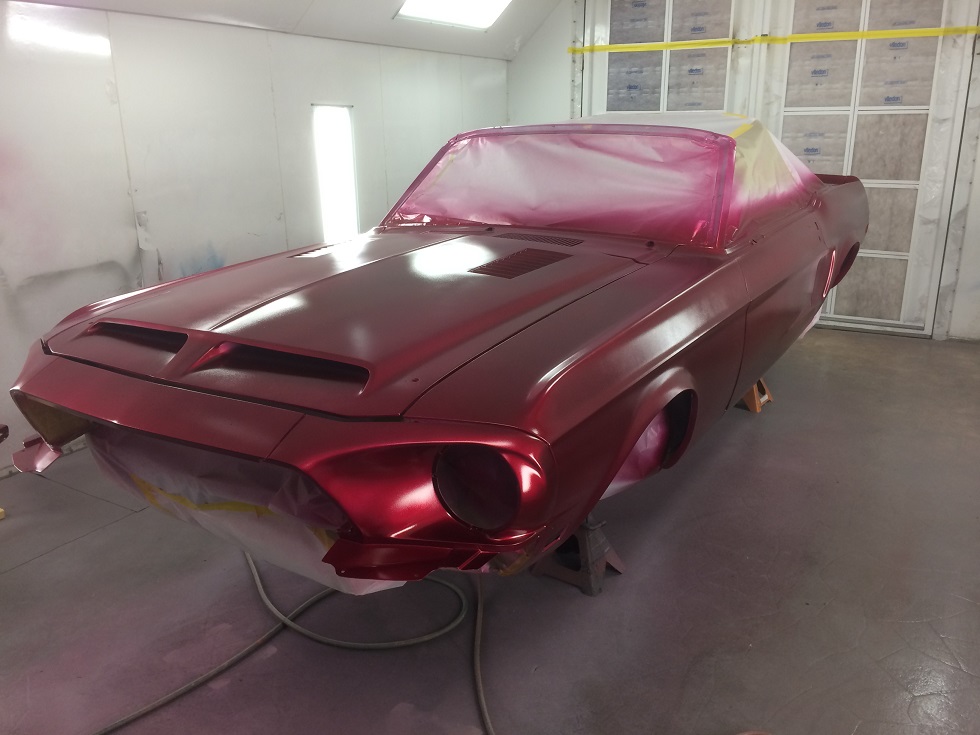
One thing about this translucent candy paint is that several coats are required to get the color you want. The first coat, shown in the photo below, tends to make one a little nervous LOL! Fortunately, after doing the test panels I knew what to expect, but it is still a disturbing sight:
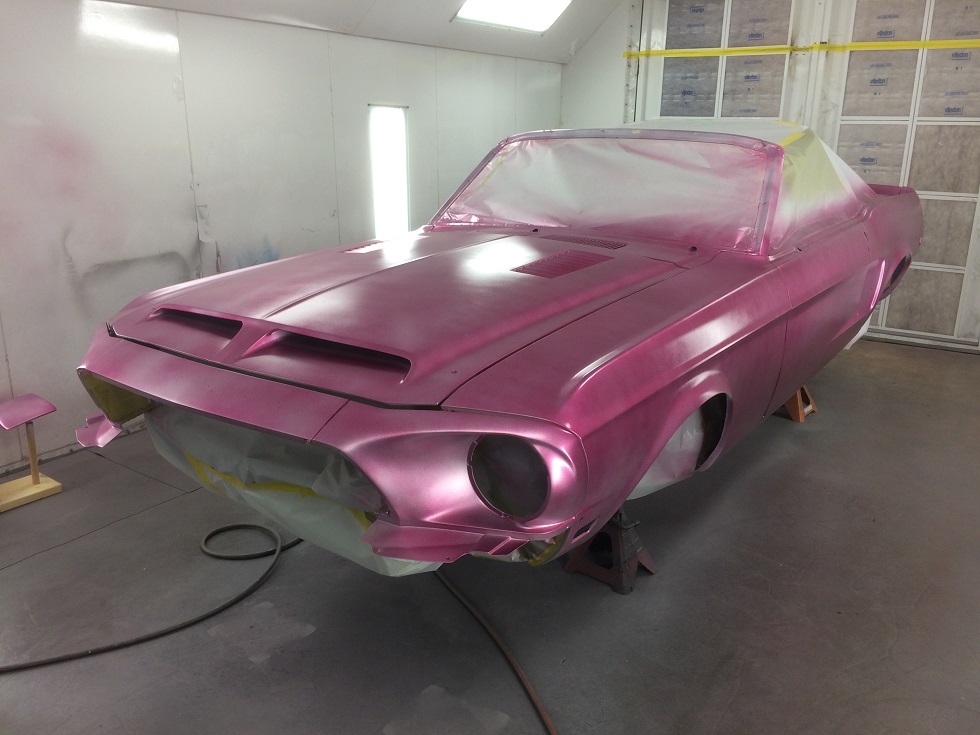
Things improve with the second, third, fourth, and fifth coats, as shown in the photos below:
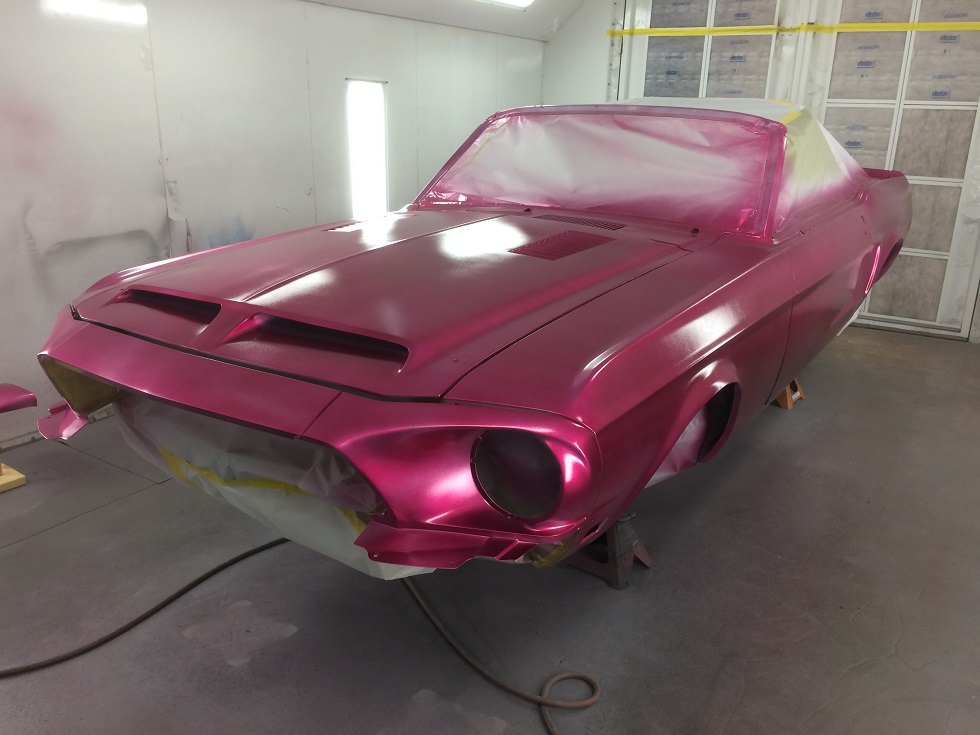
After all that the paint still has the satin finish, but a few coats of clear add the gloss. I was paranoid about buffing into the color, so I put five coats of clear on the car, a total of two full gallons of the clear mix:

Naturally, on the fifth and last coat, I ran the clear in a couple spots

Oh well, that really
will buff right out.
I spent the next few days taking the body all apart again, in order to remove all the tape and masking paper. Then I got started with reassembling the front suspension of the car for the next few days, but before I could get done the wife hauled me off for a week long road trip. The first day after we left to head South, Minnesota got a big snowstorm. There is still snow on the ground today, so the car is currently trapped in the booth until the snow melts and I can get the car assembled and rolled around to the regular shop, hopefully this weekend, weather permitting. I'll get a couple pictures of it before I stash it away and post them here. With luck I can get it all put together and be driving again next year, with a supercharged 490" FE and T56 Magnum transmission. It has been a 20 year hiatus for this car, and I have missed driving it, and now that the paint job is done, the rest will be easy. Right??


