Sorry I haven't been keeping up on this blog. I like to provide an update once a week, for myself if nobody else,
because it is always interesting to go back and re-read this stuff to familiarize myself with whatever problems
this year's Drag Week thrash uncovered. A good learning experience, if nothing else. Anyway, after a pretty
brutal three weeks since the last update, I am now about one week behind where I wanted to be, and it is clear
that I am not going to be able to make a trip to the track next weekend. But unless some serious problems
come up over the next two weeks, I think I will be making it to the event with the Shelby clone again
this year.
As of August 8 I had the sheet metal intake pretty much done, and the cylinder heads were finally in my
possession, so I was planning to start the engine assembly. But before I did that I really wanted to finish
the wiring in the car for the new EFI system. I figured that this might take me a couple evenings, because
a lot of it was already done. Of course, I should know better than this by now. By the time I got done,
I had burned every evening that week, and didn't get finished until Saturday about noon. But, the good news
was that I was able to completely remove the EFI system wiring from the car, in one big harness, so that
it could be easily transported over to the dyno for hookup on the engine. Here's a picture of the wiring
harness on the floor, after I removed it from the car.
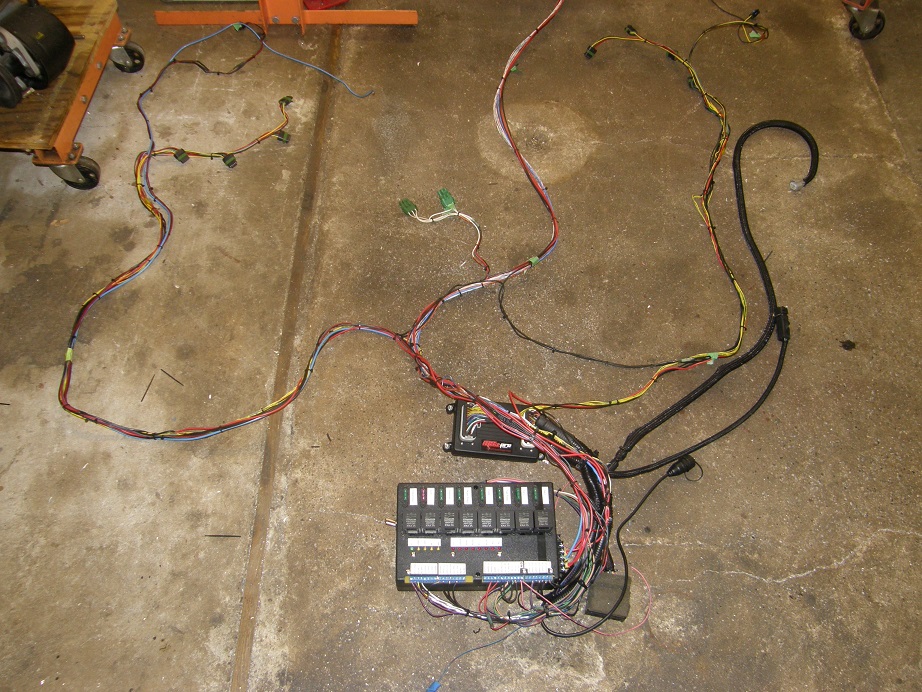
Doesn't look like much, but it took a long time to put together. The area around the car looked like a disaster LOL!
On Saturday afternoon the 13th I finally got going on assembling the cylinder heads. First thing was to check
clearance around each valve at the pistons. My last set of "no-name" cylinder heads had one chamber that for
some reason was shifted off center from the standard bore spacing, and had caused some piston to valve issues
on cylinder #4. I assembled both heads with the valves and checker springs on all valves, installed them on
the engine with clay on all the pistons, then brought each piston to TDC and compressed the valves into the
clay. Thankfully, the valves were all centered properly in the valve reliefs.
I was using new springs and spring seats, so I had to check the installed height on every valve and then assemble
them with the new valves in the heads. This took me most of the rest of the day Saturday, but by Saturday night
I had both heads assembled.
Sunday I had limited time, because at 6:00 PM we were planning to go off on a brief family vacation. But I did
manage to get both heads installed, and also the timing cover backing plate installed, before we left. I had
taken the whole next week off, but was only going to be gone through Wednesday, so I had a four day weekend
coming up after the vacation. I figured I could get the rest of the engine together on Thursday and Friday,
be on the dyno on Saturday and finish all the tuning on Sunday, then pull the engine off the dyno and get it
in the car on Sunday night.
Naturally, this didn't quite happen as planned. It took me all day Thursday, all day Friday, and most of the day
Saturday to get the engine completely put together. I had to spend some time machining a new part for the dry
sump drive, then I tried to rebuild my ATI harmonic balancer, but failed (couldn't get the shells apart to
replace the O-rings), had some trouble getting the cams degreed correctly, etc. etc. etc. As usual, seemed like
one thing after another. My friends Steve and Kurt were over to help on Saturday, but couldn't do too much until
I had the engine finished. Finally on Saturday evening, with their help, I got the engine mounted on the dyno. I
worked late on saturday night starting the hookup.
Sunday morning I got going early but again it took me most of the day to finish the hookup on the dyno. I had to
install a different fuel pump than the one on the dyno for use with the EFI system, get the coils taken out of
the car and installed on the dyno so they could be hooked up, set up the whole dry sump system, etc. etc. Its
always a lot of screwing around getting this engine running on the dyno, and after three solid 14 hour days on
it I was moving kind of slow by Sunday. My friends JC and Royce came over that afternoon to give me a hand,
and JC was so horrified by the condition of the area around the car that he cleaned it up for me LOL! Anyway,
by 6:00 PM or so on Sunday, we were finally ready to run. But all I had time for was a warm-up run; after the
warm-up I wanted to do a bunch of checks, like lashing the valves and checking the chain tension, and by the time
I was done with that, it would be too late to run any dyno pulls. In any case, though, after some struggles with
the starter, I was glad to see that the engine started right up and seemed to run fine. It sounded good, oil
pressure was good, it was cooling normally, etc. After the 20 minute warm-up run, JC and Royce took off, and I
started taking the valve covers off for checking the lash and the chain tension. This is when the real trouble
started.
On the right side of the engine there is a chain tensioner arm for the SOHC secondary timing chain (the long one).
Here is a picture of this tensioner:
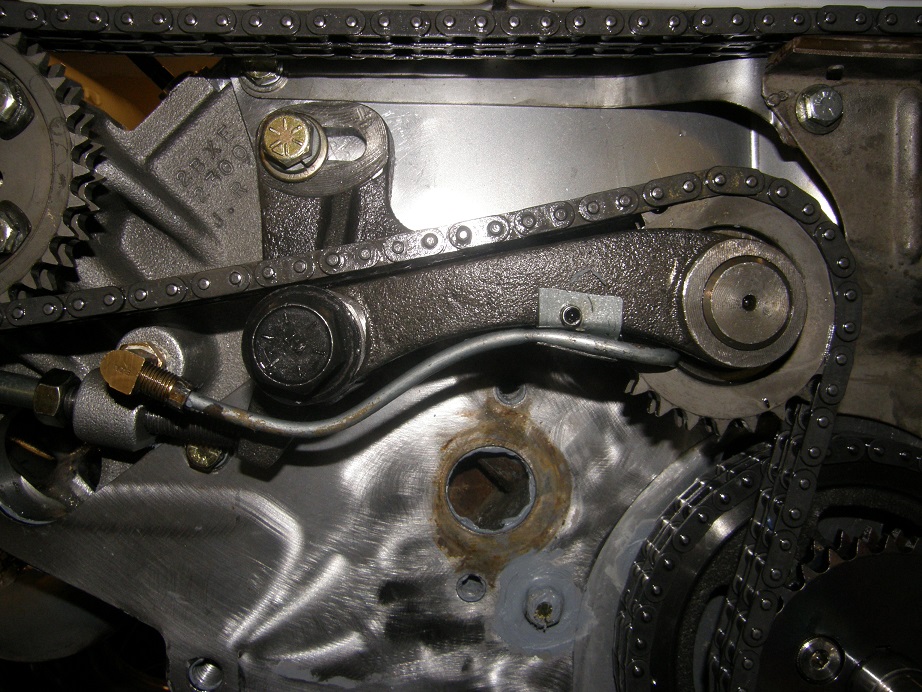
There is a large, 9/16" bolt that goes into the cylinder head, that this chain tensioner pivots on. There is
a smaller, 7/16" bolt that is accessible from the right valve cover, that contacts a part of the tensioner;
you screw in this bolt to tighten the chain. Then, there is another 7/16" bolt, above the large bolt, that screws
into the head and locks the chain tensioner in place, once the chain is correctly tensioned. When I had
put the engine together on the stand, I had torqued the large bolt to 60 foot-pounds, and the smaller locking
bolt to 35 foot-pounds, which are the normal torque measurements I use for these two bolts. The adjuster
bolt that is accessible through the valve cover isn't torqued, because it is only used to tension the chain. After
re-tensioning the chain on the dyno, I went to torque the large bolt to 60 foot pounds. And - it stripped.
Crap! Now I had to figure out how to heli-coil that hole, with the engine all together. I always worry about
the chain tensioner bolts, because they seem to be prone to stripping. I had already heli-coiled the one on
the left head, that holds the fuel pump gear with another 9/16" bolt, because it had stripped at one point.
I wasn't going to try to address that on Sunday night; I gave up and figured I'd hit that problem on Monday
after work.
Monday evening I tackled the problem. It turned out that I needed to remove the right cam sprocket and free up
the chain before I could move the tensioner arm out of the way, to get access to drill the hole in the
head. I tried to remove the tensioner arm out of the inspection cover but couldn't get it out there; I
ended up tying it up out of the way with some tie wraps, up near the right cam. Then I cleaned off the
area around the bolt hole, taped it up, and taped paper in place to keep all the drill shavings from
going into the motor. Finally, I was able to drill and tap the hole. I kept stopping to vacuum out the chips,
being fully paranoid about having a bunch of those metal shavings in the engine. But by the end of the
night Monday, I had the hole heli-coiled and was ready to re-assemble the engine.
It took me three hours on Tuesday night to get the engine back together. I had to re-time the cams, to make
sure that nothing had moved after I had take the chain and sprocket off the right cam. But at the end of
the night the engine was ready to run again.
I could have run on the dyno Wednesday and Thursday nights, but after looking at the EFI logs from the warm-up
on Sunday, I wanted to check and confirm several things. Also, for some reason, I had a bad feeling about the
engine. I figured I was just nervous, but something was telling me that there were more problems ahead. So,
I temporized by using Wednesday and Thursday nights to do a detailed evaluation of all the EFI system settings.
I went through every screen, and most of the manual, checking to make sure that I had all the settings correct.
I found a couple of areas where I made changes, but nothing really significant.
Friday night I had run out of excuses and started the engine. Warm-up went fine. First pull was from 3000 to
5000 RPM, and everything seemed fine except that the engine was running a little lean. I added fuel in the VE
table and ran another pull from 4000 to 5500. Again everything seemed fine, but the engine was still lean.
I made another VE table change and ran a pull from 4500 to 6000 RPM. This time, I heard some noises coming
from the engine, which were especially pronounced as the engine decelerated from the dyno pull. The engine
made 895 HP at 6000 RPM, which was in the ballpark of where it should be, but something wasn't right. Sounded
kind of like valvetrain.
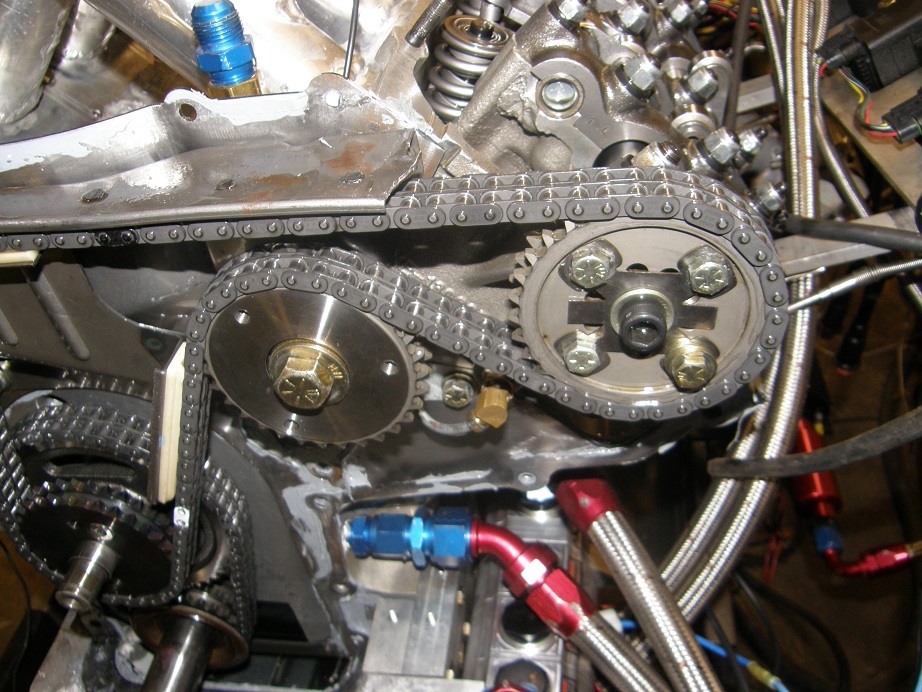
I let the engine cool for a few minutes and then pulled the valve covers. On first glance the right side valvetrain
looked fine, but when I pulled the left side valve cover, a piece of the upper chain guide was laying in
there, broken clean off! Then, I noticed that the timing chain was really, really loose on the right side. I
moved the crank a little, and it was clear that the chain was intact, but extremely loose. I pulled the right
side inspection cover, and the problem became clear. The tensioner arm had come loose. It appeared that the
7/16" locking bolt had come loose, the 7/16" bolt used to adjust the tension had backed out, and now there was no
tension on the timing chain. I suspected that the chain had balled up as it went into the upper chain guide,
and broken off part of the guide. Here's a picture of the broken chain guide:
I was baffled by this result; how could this have happened?? When I had re-assembled the engine on Tuesday,
I had torqued the 7/16" locking bolt to the usual 35 foot-pounds. I went in there again with the torque wrench
to tighten the bolt, and - sure enough - the threads were now stripped. Crap!
Without good control of the cams, I was now worried that there had been piston to valve contact. I decided that
I'd better do a leakdown check. I rotated the engine to TDC and checked leakdown on #1 and #6. No problem there.
I went another 90 degrees, and checked #5. Again no problem. But, when I checked #3, the first problem I found
was that the intake rocker had seized on the shaft. Probably bent from piston to valve contact, I figured. When I
got the rocker out of the way, I checked and I had 55% leakdown on that cylinder. Crap, bent valves. I also
checked #4, and had 60% leakdown there. The engine was wounded.
How to recover from this? One problem was valves; I had four spare intakes and four spare exhausts. Maybe I had
enough, but it was Friday night and if I was going to use them, they would have to be cut. Also, due to the
cracked rod on #5, I wanted to use 0.050" head gaskets, and I didn't have any. Lead time on those is 1-2 weeks;
no way I could wait that long, then get the engine back together in time for Drag Week. I couldn't see any way that
I could get the engine back together in time.
I left the shop, went into the house and drank a couple beers. I had a little work to do on my Mach 1 to get it
Drag Week ready, and I figured I could start on that Saturday morning, but I'll confess I wasn't too enthusiastic
about the prospect. I had spent a lot of time working on the Shelby clone, and I really wanted to bring that
one back. After a couple beers I opened up the datalogs from the three dyno pulls I ran, because I wanted to see
the cam sensor data. I have a timing sensor on both cams; only one of them is used for the EFI system, but they are useful
for showing how much the cams retard at high engine speeds. Here is the datalog from the first dyno pull; the right
cam is shown in white, and the left cam in red, in the lower left graph. Notice how stable the traces are while the engine is running:
Now, here is the datalog from the last dyno pull. Quite a difference on the right cam:

I went to bed pretty depressed on Friday night. But at 3:00 AM, I woke up with an epiphany - it
hit me that the left cam timing had been very stable in all three of the dyno pulls. Maybe the left head was
unscathed. I drifted back to sleep thinking that I should check leakdown on #7 and #8 in the morning.
Saturday morning I went back out to the shop and did just that, and was heartened to see that #7 and #8 both had
very low leakdown numbers. So any damage was likely confined to the right cylinder head, where the cam timing had
gone crazy. Another piece of good news was that I did have a 0.042" copper head gasket on the shelf. So, I could run
the 0.042" head gasket on the right side, just like last year, because I'd never had a problem with the rods on that
side of the engine.
Last thing was that my machinist friend Bryan, who did the head work, is also going to Drag week this year and
I figured he'd be at the shop on Saturday, working on his car. I decided to roll the dice and make a mad scramble to repair
the engine. My friend Kurt volunteered to track down Bryan, and bring my valves up to him to get cut on Saturday
morning. I started tearing down the engine. By noon on Saturday Kurt had come by to pick up the spare valves,
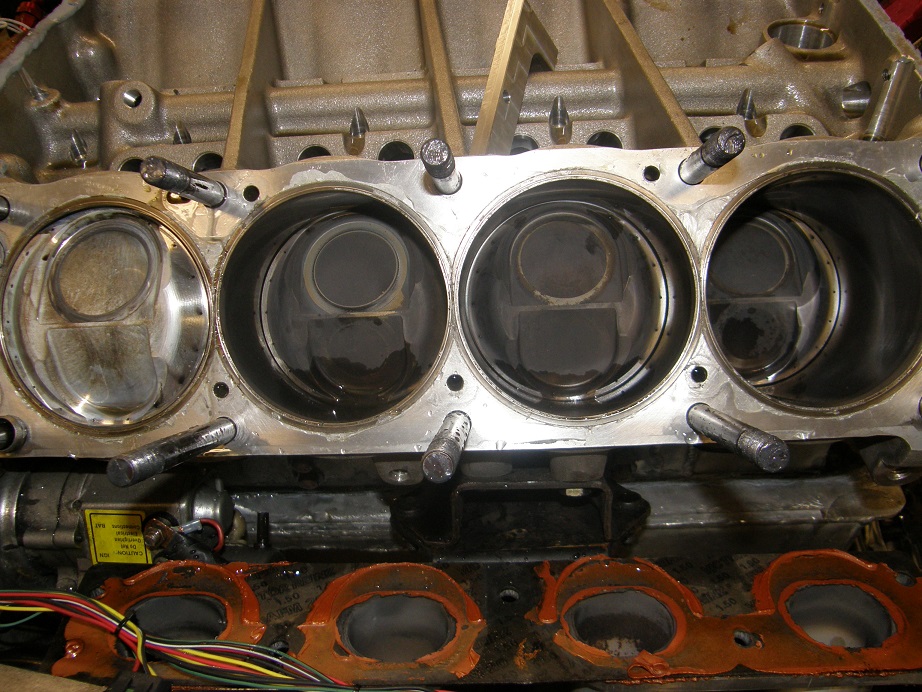
and I had the front cover off and the left head off, and was disassembling the head. Here's a picture of the
pistons after the head came off. It appeared that all four intake valves, and two exhaust valves, had made
contact with the pistons. The intake contact was especially severe:
After taking all the valves out of the head, I chucked them into my lathe with a dial indicator to measure the runout.
I was surprised at how small it was; all the exhausts were within 0.003" of flat, and the worst intake was only 0.007"
out. I could have probably run with them the way they were! But, I had it apart now so I was going to replace them.
Next, I addressed the stripped 7/16" locking bolt hole in the head. With the head off the engine it was easy to put
a heli-coil in the stripped hole. After I installed the heli-coil, I tightened the bolt and - the heli-coil pulled
right out! Sheesh, what next!
When Kurt made it back with the valves I showed him the problem, and he thought he had a solution. He went back home
while I installed the new valves in the head with no major issue. Kurt came back with a steel insert, 9/16-20 on the
outside and 7/16-14 on the inside. He also brought the required drill and tap to install it. We re-drilled the hole
again, threaded it for the insert, and installed it with a coat of JB weld on the threads. It looked like a reasonable
repair, but I didn't want to test it until the JB Weld had set up.
Steve showed up about then, and Kurt and Steve set to work scraping gaskets in preparation for re-assembly of the engine,
while I worked on getting the right head installed (could have never got this all done without the help from Steve
and Kurt). Installing the head is a couple hour job, and very tedious, with the copper head gaskets, but I finally got
that done around 7:00. After that was done Steve and I installed the intake manifold; this was after Steve had cut new
gaskets from some blank gasket material, because I had used my last intake gaskets when the engine had been assembled
last weekend. We were all done with that about 9:00, and Steve and Kurt took off, while I went into the house for
a break. I was back out to the shop at 10:30, and got the backing plate for the timing cover installed, so that the
sealer had a chance to dry overnight. I finally crashed at midnight, feeling like I had a shot to get the engine back
together in time for Drag Week after all.
Sunday morning I was out the shop again by 8:00 AM. As usual, putting the rest of the engine together took longer than
expected for a variety of reasons. One was that when I started assembling the rocker arms and shafts, I noticed a tranfer
of the bronze bushing onto the shaft in nearly all rocker arm positions. Well, I've seen that before, and that means
there is not enough clearance between the rocker shaft and the rocker. That was probably the reason why the #3 intake rocker
was seized on the shaft. As a result I decided to switch to the rockers I used last year, which had worked fine on these
shafts. But it took extra time to check and install those. I figured I'd be running the engine by 2:00 or 3:00 when I
started Sunday morning, but it ended up taking until 7:00 before it was ready to fire. The last thing I did before
buttoning everything back up was torque the bolts on the tensioner arm through the front cover inspection hole. Thankfully,
both bolts torqued to spec with no problem. Hopefully they will stay that way.
For some reason, I was much more confident about the engine this time. Warm-up went fine, and I decided to skip the valve
lash check and chain tension check, and just run a couple of pulls because it was getting close to 8:00. The first pull
was a duplicate of the last one, but was down about 20 HP at 875. However, A/F was way, way lean, over 15:1. This made
sense to me, because the right cam had been flopping around last time and obviously not allowing as much air in the
engine. I decided to overkill the A/F, so I cranked the fuel up in the VE table by 10%, and ran again. The engine was
still lean, measuring 13.5 to 14.0 A/F, but horsepower was up by 60 at 6000 RPM, to 935! This was a little better than
last year's engine already, even running as lean as it was. At that point on Sunday, I called it a night.
Tonight I finished the dyno testing. Had some unanticipated problems with the starter, again (!), but finally got the engine tuned
and the pulls in. To be honest, I'm not real happy with the results, but at least I made the big number. The engine peaked at
1005 HP at 6800 RPM. It looked pretty much like last year's dyno results, with 10-15 HP on top of all the numbers, from 6000
to 7400 RPM. I was hoping for maybe 1030 HP, and a shift in the RPM peak up because of the shorter intake runners, but that
didn't happen. Pretty sure I'm cam limited at this point, so I might have to go to a different custom cam next time around. Here's a
shot of the engine on the dyno and the screen where peak horsepower occurred:
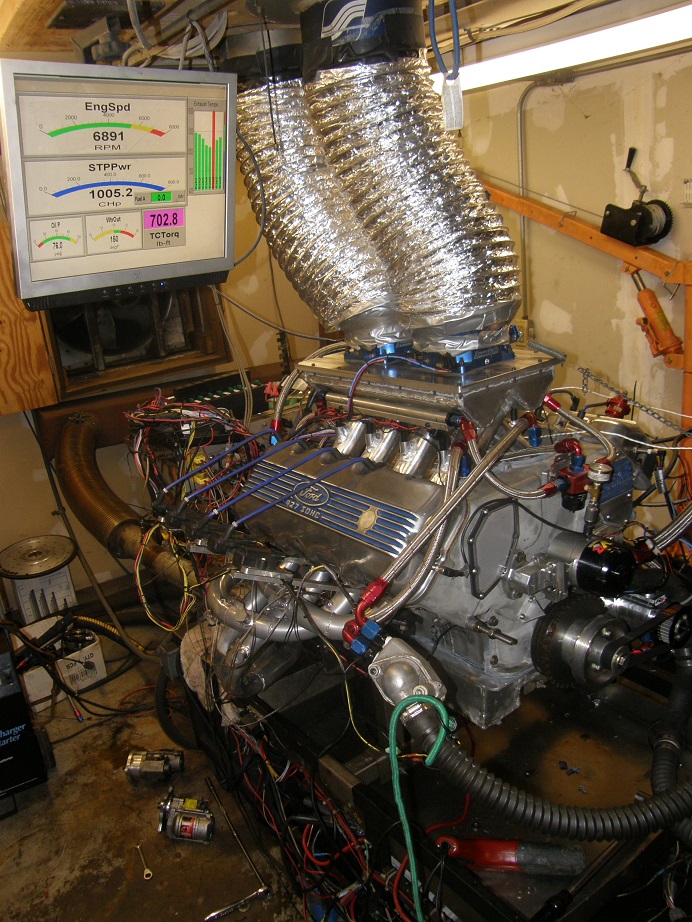
For anybody who keeps track of this stuff, correction factor on the dyno tonight was 6.3%. Temperature 80 degrees, barometric pressure 29.15, humidity 54%.
In two weeks I will be on Drag Week, barring any further unforeseen delays. The engine is coming off the dyno this week and will
go back in the car probably Wednesday night, and hopefully the car will be running and driving on Sunday. Just enough time to get
the front end aligned and get packed for the event. I'll try to post another update on Labor Day - Jay


