This post is the first of a series of weekly blog entries chronicling my efforts to build a new street/strip car and prepare it for some race track action during the summer of 2011, culminating in a return to Hot Rod magazine's Drag Week event in September. Please note that the first entries, up through January 23, 2011, were written after the fact. As I learned about building web sites in January of 2011, it became clear that adding regular new content to a site would help keep visitors coming back. A lot of people had expressed interest in my new car project, so I thought a weekly blog detailing progress on the car would be of interest. Of course, by the time I discovered this the car had already been under construction for more than two months, but fortunately I had a written schedule of tasks that I had been keeping, allowing me a record to refer to for the earlier blog entries. I have recreated the salient events of the build as accurately as I can with this record, but the timeline may be off a little from actual because of this process. All blog entries from January 30th forward are real time. Jay Brown, January 30, 2011--------------------------------------------------------------------------------
My book is done! Seems like it has taken me forever to get the thing written, get all the pictures and graphs finished and arranged in the text, collect all the data for the appendices, etc. All the dyno testing was finished by January of this year, and it is obvious that I seriously underestimated the amount of time it would take to finish the writing. The layout of the book, especially, took much longer than I had anticipated. But now it's finished, save for a cover design and an edit from a service that I hired. I can finally start thinking about a new car project.
This year was the first year that I'd missed Drag Week since its inception in 2005. The event had become a yearly highlight for me, giving me the opportunity to run a car at a race track on consecutive days that I would not normally get at home. The closest quarter mile track to where I live is about 120 miles away, and with a family and the associated busy schedule, it's hard to break free on any given weekend to go to the track. Plus, most of the track events revolve around bracket racing, and I'm not a big bracket racer, preferring instead to make modifications to the car and see how it affects the ET and MPH, and participating in the occasional heads up grudge race. For me, Drag Week addressed these issues, and came with the added benefit of a community of participants that were, for the most part, top shelf racers. The week long get together with like minded individuals was about the best vacation I could imagine.
Unfortunately a variety of events conspired to prevent me from attending this year. The time required to get the car ready was hard to come by last summer, and it would have taken away from the time I spent working on the book. The book had become a monkey on my back, and I simply had to get it done. Plus I didn't want to go back with essentially the same combination as the year before; a lot of the guys at Drag Week like to do that, but I prefer to have something new. Early last summer I'd tried to run the 585" SOHC that I took on Drag Week 2009 on methanol, to at least have something a little bit different and go a little faster at the track, but I was unable to get the engine to work properly on methanol with the Hilborn injector setup converted to EFI. So if I was going to return to Drag Week in 2010, it would be with essentially the same 585" SOHC / '64 Ford Galaxie combination.
In the weeks leading up to Drag Week I'll confess that I also felt a little burned out on drag racing in general. I hadn't gotten to the track at all last summer, and not having to worry about getting the Galaxie prepared for a week of racing was appealing. So I decided to skip this year's event.
I regretted that decision just as soon as Drag Week 2010 started, and the coverage started showing up at Bangshift.com and the Hot Rod web site. I missed my friends from the event, and wanted to be there racing! Too late, dammit.
I threw renewed effort into finishing my book, promising myself a new car project as soon as it was completed. While writing I began looking around for a 1965 Mercury Comet project car. Given Dyno Don Nicholson's extremely successful Mercury Cyclone SOHC match racer that ran in 1965, I thought it would be fun to do a Nicholson tribute car, upgraded with some modern components. I searched ebay, craigslist, and the high performance car and racing sites for the last several weeks, looking for a suitable candidate. I had previously found fiberglass front end components, bumpers, and doors at the Crites web site, and I figured Iwould use those on this car, so what I was looking for was a car that was relatively straight and rust free in the floors, quarter panels, and roof. I had decided that for this car, I was going to abandon the sleeper strategy that I employed with my '69 Mach 1 and the Galaxie, and put in a spartan interior and racing buckets to save some weight. So, the interior of the project car didn't matter either.
Unfortunately, after several weeks of searching a suitable candidate had not appeared. I saw plenty of cars in the $6000-$8000 range that would have been fine, but they were mostly complete, nice cars that I would have had to disassemble and sell a bunch of good parts off of before I could use them. I didn't want to do that, and the prices were more than what I wanted to pay anyway. Then there were a lot of cars in the $500-$2000 range that had rusty floorpans and quarters, and I didn't want to mess with the rust if I could avoid it. I did find a few candidates that looked pretty good in the $2500-$3500 range, but they were post cars, and I wanted a hardtop. So, after the unsuccessful search process of the last several weeks, this week I began to rethink my options.
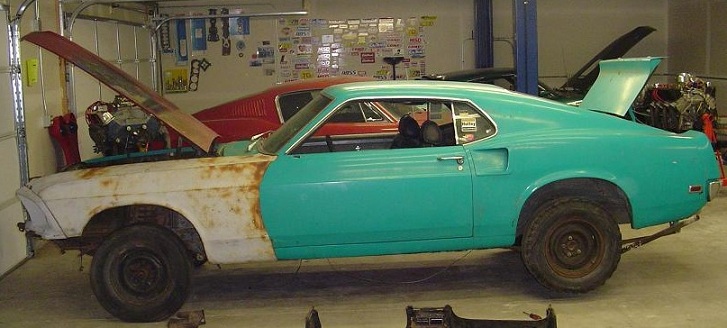
Since 2004 I'd had a 1969 Mustang shell sitting in one of my garage bays. Here's a picture of the car I took when I first got it home:
I bought this car to turn it into a pro-street style vehicle, with an SOHC engine. The original concept was to put two turbos on the car, and remove the two inboard headlights to let the turbos get their air right from the headlight openings. I thought I could turn the car into a Boss 429 clone, but with the SOHC engine instead. The Mustang was purchased in Kansas and was relatively clean, and when I got it home the first thing I'd done was pick up an S&W race cars back half kit and cut the back half of the floor out of the car. Photos below:

But then the project got stalled because I was spending more time working on my '69 Mach 1, and then Drag Week 2005 was announced and I spent a bunch of time getting ready for that. Shortly after DW05 I finally got my first SOHC motor together, and that occupied a bunch of my time also. Work on that original cammer engine also made it clear to me that I needed to do some development work on the SOHC before I could feel comfortable building a twin turbo version. Slowly, the '69 Mustang fell down the list of priorities until finally I stuck it off in a separate garage as a future project.
As the ongoing search for a '65 Comet seemed more and more futile, I began thinking more about the '69 Mustang. I had become familiar enough with the SOHC so now the turbo motor seemed like a possibility, and I had acquired most of the necessary parts. However, I was still waiting for the cylinder heads to be done, and the porting work was going slowly at my local shop. It was not clear that I would have time to build the car, and build and tune the turbocharged SOHC engine, in time for use this summer at the race track or at Drag Week.
Early this week I decided to look more seriously at the '69 Mustang as a candidate for the new car. I opened up the storage garage where the car was sitting, and gave it a good once over. I took an inventory of the parts that I had for it, and what I was missing, and then started searching online for some things I needed. I was primarily looking for fiberglass front end parts, and maybe a trunk lid. Most of the fiberglass parts I found didn't exactly fill me with confidence in terms of appearance and durability; I at least wanted the car to look pretty stock on the outside, maybe with a Boss 429 flavor, and be durable for street use. The fiberglass fenders I found didn't appear to be real high quality, at least from what I could tell from the online descriptions. I found one company that offered fiberglass doors for the car, but claimed they only weighed 10 pounds each! In my opinion this wouldn't work well on a street car.
On Wednesday night I was looking at the Branda Performance web site when a big flashbulb went off in my head. There was the Shelby Mustang fiberglass section, and everything required to build a Shelby clone was listed on the web site! This included fiberglass fenders, hood, and all the other front end components, plus the trunk lid, quarter end caps, and taillight panel. I had investigated building a '69 Shelby clone around 2002 or so, but found that not all of the parts were available. Since I didn't want to do a half-way job on it, I decided not to pursue one at that time. But now, at least according to the Branda site, all the parts were available, including the chrome trim that goes around the grille mouth and had been so difficult to get for so many years, even on the used market.
I've had a spot in my heart for '69 Shelbys for many years. Back in 1976 and 1977 I had just started my hot rodding career, and was driving around in my Dad's old 1967 Mustang fastback. That was a great car, with an orange-red paint called Poppy Red and the black deluxe interior with the brushed aluminum decor panels. The car only had a 289 and a C4, but for a kid just out of high school it was great! I filled all the rust holes with bondo and gave it a paint job with some black racing stripes down the hood and trunk lid, slapped on a set of Cherry Bombs and a Holley two barrel carb, and thought I was the fastest thing on the street. I found out different, of course, but I drove that car for two years and it cemented my attachment to old Mustangs. Back then, on my way to work every day I drove right by a house with a '69 Shelby GT-350 sitting in the driveway. It was painted Gulfstream Aqua, and appeared to be in excellent shape, which was entirely possible in 1977. I longed for a car like that, and this eventually led me to buy my '68 Shelby convertible, but ever since those days I've wanted a '69 Shelby fastback painted Gulfstream Aqua. Driving by that Shelby every day burned the appeal of that car into my mind.
The trip through the Branda website made it appear that building a Shelby clone was now possible by buying all the required parts. The Boss 429 clone theme was forgotten for the '69 Mustang, and visions of the five NACA ducts on the hood of the '69 Shelby, and those '65 T-Bird taillights, filled my thoughts for the next 24 hours.
Thursday I called Branda to try to confirm on availability of the parts. It turned out that ALMOST all the parts were available from stock. Most importantly, all the fiberglass parts, including fenders, hood, trunk lid, taillight panel, and side scoops werein stock. Most of the trim items were available also, with the exception of the lace trim that goes under the Shelby lettering on the trunk lid, and two of the chrome "eyebrows" that go around the grille. According to Branda those parts came in and out of availability, because they were normally made by a small manufacturer in small production runs, and only on an irregular basis. When I expressed an unwillingness to buy almost all the parts, and be stuck waiting years for the pieces to finish the car, the guy I talked to at Branda steered me towards an ebay auction for a pair of the eyebrows, and they looked to be going for a reasonable price. I decided that I could fake the lace trim if it came down to it, so I bit the bullet and ordered all the parts needed for my '69 Shelby clone. Just this weekend I won the auction for the chrome "eyebrows", so after the parts from Branda arrive all I'll be missing is the lace trim for the trunk lid.
I felt pretty excited now that I had a solid direction to pursue with my new car, and was itching to get going on the car right away. Usually when I start a big project I put together a plan and schedule; this is just one of those things that I've been doing since I was a kid, because it helps me figure out everything that has to be done and how long its going to take. This weekend I tried to specify the project a little better, so I could schedule it out and see how long it was going to take me to get it done. The first thing I did was move the car from its storage garage into my normal shop, so I could work on it over the winter. This entailed moving a few other cars around, and rolling the Mustang in on three floor jacks because all the running gear had been removed when I cut the floor out of the car. Once I had it in the shop, I set up the S&W race cars back half kit next to the car to try to figure out a plan. Since I'd originally bought the back half kit I had been educated somewhat on the ability of many drag cars to run fast on fairly small tires. I had never really liked the looks of the big steamroller tires on the back of a car, and after learning about proper chassis and suspension setup over the last five years, I'd decided that I didn't want to run those big tires on this car. But here I already had the back half kit. What to do?
The back half kit contained a replacement rear frame with the mounts already welded in for the four link system, so I still wanted to use it. I decided that what I would do was install the back half kit, but retain the stock outer wheelhouses, and replace the inner wheelhouses with the aluminum wheel tubs I had. I felt that this would give me a little more structural rigidity in the rear quarter and trunk area, since the quarters and trunk drop downs tied into the factory outer wheelhouse. The tires I was planning on running were 29.5" tall, and 10.5" wide, so they would fit into the factory outer wheelhouse just fine. This approach would also give me a little bit more room in the trunk, which of course is rather limited in a Mustang to begin with. I had to start from scratch for a rear end for the car, so I would narrow the rear end to match the tire sizes I wanted to use.
Next I thought a little bit about the engine. The solution here seemed obvious. The 930 horsepower SOHC that I ran in my Galaxie at Drag Week 2009 was sitting on a stand in my shop. It would have been nice to put the turbo motor together and run that in this car, but I was less and less sure that I would have time to build that complicated engine and the car in time for racing this coming summer. So, I would bank on using the big SOHC engine in the Shelby clone, and if the turbo motor turned out to be available, so much the better.
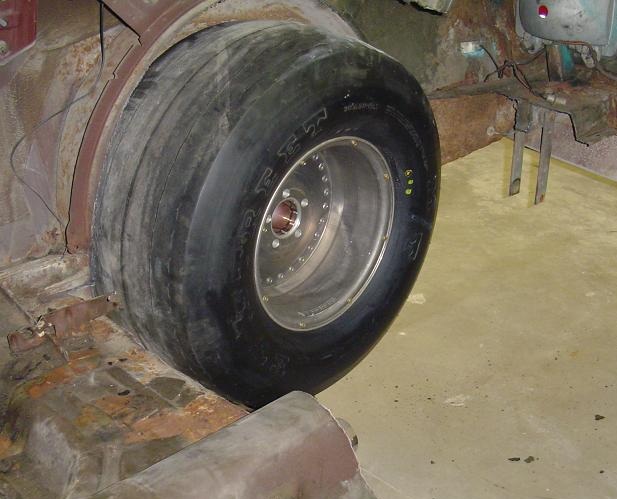
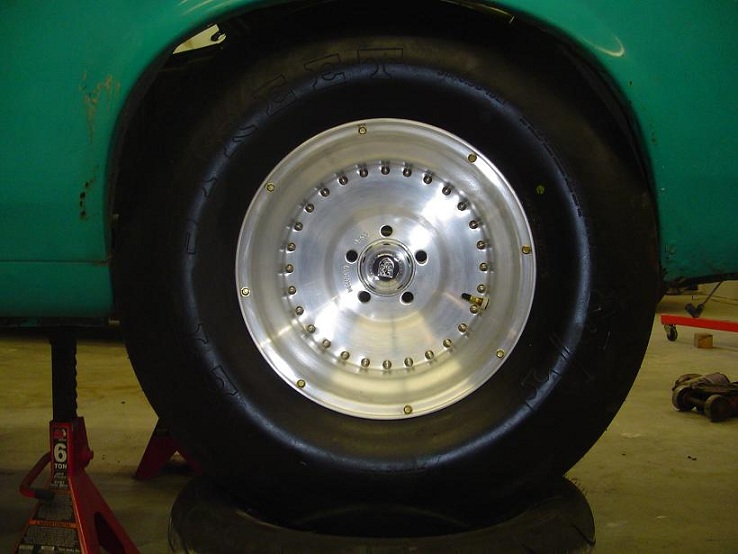
The next item up for consideration was the rear quarters. Although this car was relatively clean, it still had some rust issues both ahead of and behind the rear wheelwells, at the bottom of the quarters. The trunk drop downs were also a little rusty. I hate rust, and had figured to just cut these sections out and weld in some patch panels. I had the car jacked up in the air, and so I test fit the wheels and tires I was planning to use under the car. As I suspected, the rear wheelwells were not long enough for these tires, even though they weren't the big ones. Here's a photo showing the tires in the wheelwells:
I had run across this problem before with my Mach 1, where the small tire size seriously limited the ability of the car to hook at the track. I wanted to avoid this issue with this car. After looking at this I decided that I would trim the wheelwell opening at the rear by cutting a pie shaped section out of the quarter just behind the fender lip, and then bend the lip back and weld the quarter back together. But doing this after already welding in a patch panel back there seemed like it might be problematic.
Mustang sheet metal is usually pretty cheap, so I got on the Mustangs Unlimited web site to see what complete quarter patch panels would cost. They were even cheaper than I thought they'd be at $89 per side! I decided that rather than weld in patch panels in front of and behind each wheelwell, it would be easier and require less body work if I just hung the entire quarter. This would have the additional advantage of allowing me to make the modification to the fender lip while the quarter panel was off the car, which I thought would make the job much easier.
Doing a little more research on the Mustangs Unlimited site, I found that the trunk dropdowns were dirt cheap, and so were new outer wheelhouses. Although my wheelhouses were pretty good, there were a few spots that were questionable, and give the low cost of replacements, I decided that I would replace all this stuff together, so I was working with clean sheet metal.
Now I felt I had a pretty good handle on a plan for the back half of the car, so I moved to the front half of the car to try to figure out the best way to proceed. The distance between the shock towers on a stock '69 Mustang is 28 inches, and the SOHC engine is 32 inches wide, so the shock towers either had to be cut back to allow the engine to fit, or removed entirely. A Boss 429 engine compartment conversion would be one solution; on those cars, the shock towers were moved out and if I recall correctly some modifications were made to the suspension system in order to allow the Boss 429 engines to fit. This would make for a nice stock looking setup, and there is an outfit in Cannon Falls Minnesota that I believe will sell part or all of the components needed for this conversion. But one issue is that even with the widening of the engine compartment, there is still pretty limited room for headers with this arrangement. I wanted to get some good headers on this car, with straight pipes coming out of the ports for a few inches before turning to the back. That wouldn't be possible with the Boss 429 engine compartment.
On my Galaxie, I had purchased an Art Morrison front clip assembly to replace the front section of the frame, and give me more room under the hood for headers. This clip used a Mustang II style double A-arm suspension, with a front mounted rack and pinion setup, and Wilwood spindles and brakes. The downside of this setup was that I had to change to a rear pickup on the engine's oil pump and a custom aluminum rear sump pan, but overall this setup worked really well. The most important thing was that it freed up a bunch of rooom in the engine compartment for the headers, which was the primary reason I installed the kit. However, on the Galaxie I was able to weld the Morrison clip into place directly to the original frame. I wasn't confident about doing this on the Mustang, because the front subframe rails are pretty much just heavy sheet metal. The Mustang chassis relies on the shock towers and the shock tower braces to distribute the front end load into the unibody structure. If I installed the Morrison kit I would want to cut the shock towers completely out of the car, but I thought this would make the front end substantially weaker than stock because of the requirement to weld the front clip to the thin factory subframe rails with no additional support. As a result I wasn't sure that a Morrison kit would be a good solution.
One potential band-aid for this problem would be to run a roll cage bar from the forward cage uprights down to the factory subframe, to provide an additional support. I had done this on the Galaxie even though it probably didn't need it. But on the Mustang I felt that this bar would support the Morrison front clip and take some of the load off the sheet metal factory frame rails. This is the solution that I'm most favorably inclined towards at this point.
Another alternative that I'm still considering is to forget about the Morrison package, and try to piece together my own Mustang II suspension for the front. In this case I would mount the suspension components directly to the front subframe rails, rather than try to weld in a front clip kit. Again, this would be a little marginal because of the limited strength of the factory subframe, but again with support from the roll cage this may be acceptable. However, I would have to come up with my own rack and pinion conversion if I went this route, and of course mounting the rack is rather critical for proper steering. But I've seen this done on a couple race cars, and I like the idea of keeping the front subframe intact rather than chopping it off and welding on a rectangular steel tube frame rail section.
The last thing I considered over the weekend was the roll cage. The car will need a full cage because I want it to be legal to run 8.50s at the track. The cage would also have to be chrome-moly to keep the weight down. Installation of the cage is always a little tricky, and I don't weld with mirrors all that well, so it was important to have a strategy of how I was going to build the cage and fit it into the car, and also get it welded together correctly. On a typical unit body car, what is done is to cut holes in the floor where the main hoop and front uprights are located, then take 6" X 6" 1/8" steel plates and cover the holes; these plates eventually get welded to the floor, and the roll cage bars are welded to the plates. But prior to welding the plates to the floor, they can be moved out of the way so the cage falls through the floor. So, you build the cage in the car and weld the required seams from underneath, then pull out the plates, drop the cage through the floor, and presto, you have access over the top of the cage to weld the bars together on the top side. Using this approach you can get a very tight fit up against the roof of the car, without having to go through any welding gymnastics.
With this car, the back half kit would allow the cage to be moved back slightly and be dropped over the forward frame crossmember of the back half kit. So, the plate trick with the holes in the floor underneath was only required for the front roll cage uprights. I figured I could build the cage and weld the bottom sides of the seams at the top, then drop it through the floor and weld the top sides of these seams, then weld in the front frame supports that would have to slide through the firewall by fitting them in place with the cage in its final position, tacking the tubes in place, and then sliding the cage backwards about six inches to get access all around the tube for the final welding. Then the cage could be pushed back to its final position, and welded to the floor and frame rails.
As I was thinking about the cage construction though, I started noticing some issues with the front floorpan where the 6" X 6" steel plates would go. I had thought that what I had was surface rust in this area, but as it happened I had a trouble light laying under the car, and from certain angles I could see pinholes through the front floorpans. I took an awl and started punching away at the floorpan, and found it was much weaker than I had thought. The subframes underneath looked good, but the floors definitely needed replacement. I added a pair of front floorpan sections to my Mustangs Unlimited sheet metal list.
Sunday night I put this entire plan into a spreadsheet with a schedule, giving myself some extra time for unknowns like the front suspension, and figured out that if I started soon I would need until the end of February to get the chassis work completed on the car. Then it would be time for bodywork and paint, and then electrical and trim, before I was ready to install the engine and take the car racing. One other item that I haven't yet settled on is the transmission; I will think about the best approach for that this coming week. I will be doing more front suspension research and transmission research, so hopefully in a week the concept for thiscar will come together a little more.


