I made more good progress on the car this week, but I'm still about a week behind where I want to be with my schedule. This means that next weekend instead of starting my sheet metal intake, I'll need to spend at least a day finishing up getting all the body panels fitted on the car, and then probably another day making the swing out sidebars on the roll cage, adding seat belt tabs, welding on the trailer hitch, and in general finishing up the roll cage and chassis work. I might be able to cut that time down somewhat if I can get some things done in the evenings this week; we will see.
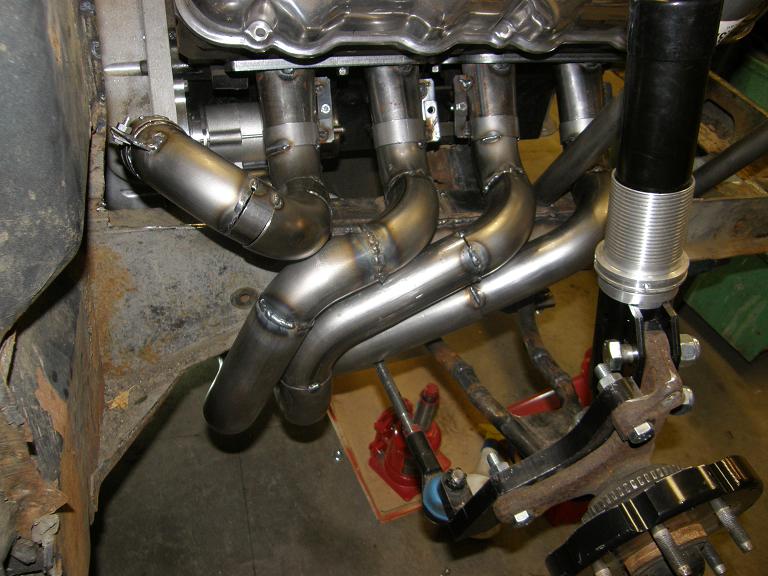
After my last update Mario428 commented that the donut exhaust pipe that I was going to use to make a sharp bend in the #8 header tube could cause a power loss as compared to lengthening the primary pipe and using the normal radius bends. I did a little research on this and found that there is indeed a consensus in some circles that this is true. But I wasn't 100% convinced, and decided that this would be an interesting thing to test on the dyno. Monday night last week I did the machine shop demo for my son's Boy Scout troop, which the kids loved but which didn't leave me any extra time to work on the car. So Tuesday night I broke free for a couple of hours and fabricated my #8 tube out of the standard J-bends I'd been using to build the headers. I split the #8 primary tube into two halves, with a coupler in the middle, so I could remove the new section of pipe. Wednesday my exhaust donuts arrived from the Chassis Shop, but I was tied up with family stuff so I couldn't get back to the shop until Thursday night. But on Thursday I managed to get the sharper, correct length primary pipe completed. Here's a photo of the left side header with this pipe in place on number 8:

During the week I'd been talking to Steve and Jerry, trying to get a time arranged when we could all get together and thrash on the body assembly of the car. I'd been hoping for Saturday night, because I still had the right side header to get completed, and I figured it would be easier to get that done without the front fenders on the car. Saturday night would have left me Friday night and all day Saturday to get the right side header completed. But scheduling conflicts intervened, and it turned out that Saturday morning through the early afternoon were the best times for Steve and Jerry. So on Friday night I got right out to the shop and started on the right side. Saturday morning I was back out to the shop early, by 7:30, and by the time Steve and Jerry arrived at 9:00 I was done with two of the primary tubes. After going over what we wanted to get accomplished, we decided that I would just keep going on the right side header, and Jerry and Steve would start by getting the new doors hung on the car.
The new doors were purchased from Mustangs Unlimited, and although they were new, they were made in Taiwan or China, so we figured there might be some installation issues. Sure enough, Steve found that the bolts weren't tapped for the right size holes for the hinges! Seemed like they were 10mm or something, so Steve drilled and tapped them to the correct size, and then swapped the latching mechanism into the new doors so we could still close and latch them for alignment purposes. Jerry worked on grinding some of the welds on the rear quarters where the rear fiberglass parts were to be installed, and then helped Steve hang the doors after the latches had been installed and the hinge holed redrilled and tapped. By 11:00 they were finished with the door installation, but I was still working on the last header tube, so Jerry and Steve started on the rear end fiberglass. Around noon my wife came home with lunch, so we took a short break to eat before getting back to work.
By 1:00 I finally had the right side header finished. On this side I needed to run three of the four tubes outside the frame rail, otherwise there would have been no room to drop the starter with the headers on the car. One of the tubes is a little too close to the tire when the steering wheel is at full lock, and I don't like that, but I think it will be OK; here's a photo:
At that point I pitched in to help Jerry and Steve with the back side fiberglass. I noticed right away that the fiberglass components for this car were nowhere near as good as the ones I'd received from Crites for my Galaxie, despite the fact that these parts had been about twice as expensive. First thing that Jerry and Steve pointed out was that the fiberglass taillight panel was warped by a good inch, and had to be bent into place in order to fit against the back of the car. Jerry and Steve had gone ahead anyway at my direction, but after installation we noticed one spot on the panel where the stress of bending the panel had caused the gelcoat to crack. More bodywork.
We also saw poor fit issues with the end caps that bolt onto the back of the rear fenders, and the trunk lid, which we needed to shave on the forward edge to get it to fit properly. After screwing around with this for quite a while, we decided to leave it and get to work on the front clip, because Steve and Jerry had to leave around 2:30. (Jerry was going to pick up his new car, a Ford Fiesta. He was giddy about the 40 miles per gallon! In an attempt to bring him back to reality, Steve asked how much it would tow. Jerry was not amused. Those guys are a riot.)
Several weeks back I had already installed the front clip on the car, and knew from that experience what a pain in the neck it was going to be. Compounding the problem was the fact that now the inner fenders were gone, so there was nothing to bolt the front fenders to except for the tabs I'd welded on the front roll cage extension bars. We put the fenders on anyway, and had trouble getting them to even align at the back of the fenders where they met the door. I finally realized that I had one of the captive nuts that was supposed to go on the fender on the chassis bracket instead, and this was keeping the fenders from sliding forward to their proper position. After we fixed that, we were able to get the fenders put on and at least aligned with the front of the doors. Sighting down the body lines, it looked nice and straight with the body line on the doors, so at least there was hope.
Just before Jerry and Steve had to leave they helped me put the hood on the hinges, so the three major front end components were mounted. After the guys left I took a break in the house to visit with my kids for a while, then was back out to the shop on Saturday night. I spent the evening working on getting the rear fiberglass fit to be as good as possible. It was a semi-hopeless task, and I can see that there will be a lot of added Duraglass to a few sections of the fiberglass, because no matter what there was no way I was going to be able to adjust the panels to fit properly. The area right at the back of the car, where the trunk panel had to line up with the end caps, was particularly bad. But it looked familiar somehow; I went back to my computer to look at some photos of 69 Shelbys that I'd saved off the internet, and sure enough, at least one of them had the same alignment issue! The telltale sign of aftermarket fiberglass parts.
In any case, after doing the best that I could with the rear end fiberglass, I decided I wanted to see what the rear end of the car would look like with the taillights and bumper installed. I had to hang the old bumper in place, which was kind of ugly, but I did have new taillight lenses and frames. After I put them on I snapped the following photo:
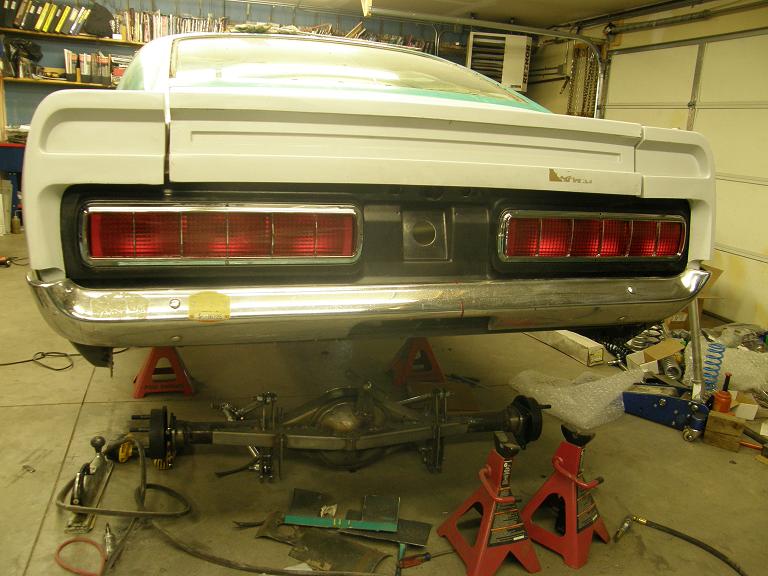
I've always really liked the 68-70 Shelby taillights. Staring at the back of the car was a pretty good motivational tool, and I went in on Saturday night feeling like I was making some progress.
Sunday morning I was back out at the shop again, this time to work on the front end. I could see that the front left fender needed some more alignment work back at the door, so I took it off and replaced it a few times, trying to work it into the correct position. Finally I realized that the problem was the door, not the fender. The door gap along the rocker panel was 3/8" at the back of the door, and about zero at the front of the door. I loosened the hinges and pried to door up to even the gap. Next fit of the front left fender looked much better, and after a few more tries loosening and tightening the mounting bolts while adjusting the fender I finally had an acceptable fit.
I spent the rest of the morning and part of the afternoon on Sunday getting the front end of the car more put together. Most of this work focused on the headlight buckets, which were a huge pain in the butt to get fitted with the hardware for the headlights, and bolted correctly into the front fenders so that they fit properly and were aligned with the fenders. I also worked on installing the fender bolts into the tabs I'd welded onto the roll cage extension bars, and repositioned the front crossbar of the radiator mount a little to line up with the fenders better. I had to call it a day at 3:00 PM because I had other commitments, but I was finished with the front end work up to the front bumper. Here's a couple of photos of the car as it is now:
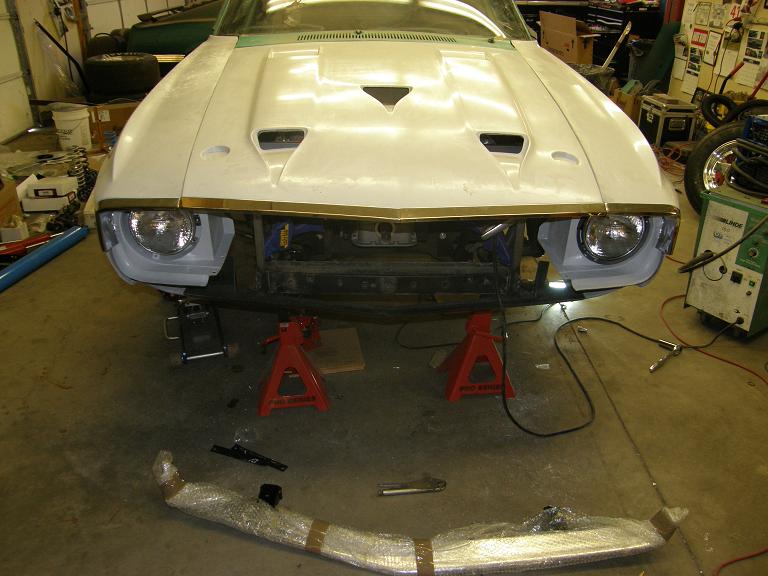

Despite this progress, I still have a good eight hours of work to do on the front end fiberglass. I need to build brackets for the bumper, plus add the small fiberglass panel underneath, and then add tabs to mount the grille and front marker lights. I also have to add brackets for the hood pins, and cut the hood for the hood pin installation. Hopefully I can get this done during my free evenings this week, so that I can spend a day next weekend on the rest of the roll cage work, and then start the sheet metal intake next Sunday. We will see what happens; I'll post another update next weekend.


