This week I spent some time thinking about the wheel position issue on my Shelby clone. This was the biggest disappointment I had encountered so far in this project, and I wasn't sure exactly how to proceed with it. On Wednesday night I decided to pull the wheels and tires off the Shelby clone, and measure the track width from brake rotor hat to brake rotor hat. The measurement I got was 56". Then, with my Mach 1 sitting right next door, I took the front wheels and tires off that car, and measured the track width at 60 1/2". So, the Fatman kit had reduced the stock track width on the '69 Mustang by 4 1/2". I went back to the literature on the kit and the instructions, but could find no mention of this change.
I was pretty disappointed with this information, and gave some consideration to just pulling the whole Fatman kit off the car. It had given me nothing but trouble. But my alternative was to go to a race car type strut front suspension. There were a lot of reasons I didn't want to do that, not the least of which was I would be mounting the lower control arm to the sheet metal subframe rail. I wasn't sure how this would hold up to the suspension loads. Further, I really didn't want to run spherical rod ends on the front suspension on the street. Some guys get away with this, but I've seen too many broken suspension parts over the years to ever trust those joints completely. In fact, I was already a little uncomfortable using the spherical rod ends in the four link setup at the back of the car; it seemed to me that the front suspension points would be an even higher stress application for these parts. So in the end I decided to stick with the existing setup, and try to modify it to move the wheels outboard in the fenderwells.
I figured I needed about two inches on each side to get back to the stock Mustang track width. I gave some consideration to machining up some spacers to fit between the front hubs and the wheels, but I didn't like what this would do to the load on the front wheel bearings. I also thought about modifying the K member to make it four inches wider, but this would mean adding more spacers to the rack to keep the inner tie rod ends in the correct location. Finally, I settled on lengthening the lower control arms as the preferred solution. Going this route, I would have to replace the inner tie rod ends with some new ones, and cut them down less, maybe by 2 1/2" instead of the 4 1/2" specified in the kit. If I did this I felt I could maintain the front suspension geometry and keep bump steer out of the equation.
On Thursday this week I got the final proofs for my book from the printer, and got a finished project date of January 28, so the books should arrive at my place the first week in February. This added a great deal of urgency to my web site project, so this weekend I didn't spend too much time working on the car, spending my time on the web site instead. But over the weekend it came to me how I could fixture the lower control arms so I could extend them without adding any twist. The pictures below shows the setup I used:
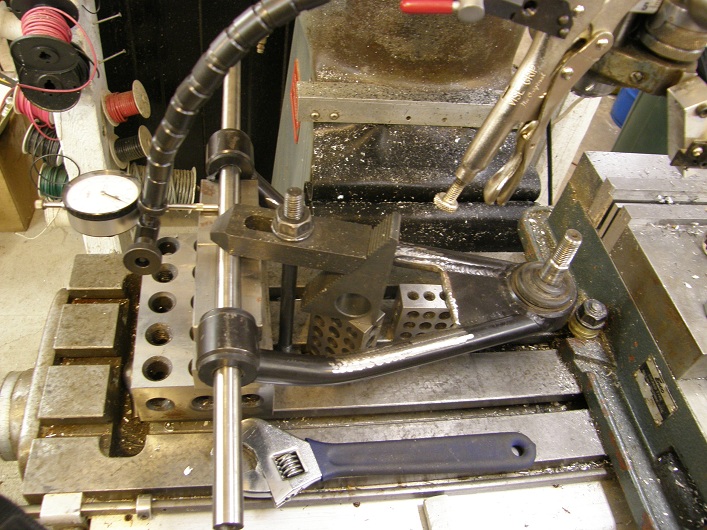

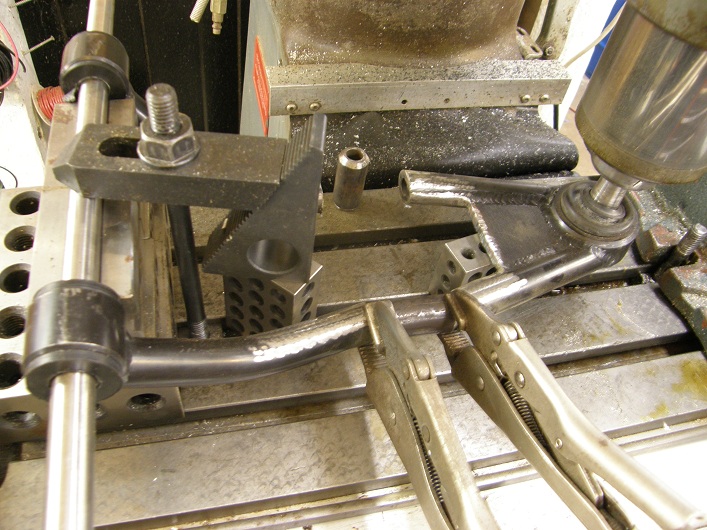
The 5/8" bar through the ends of the control arm shown is being checked for squareness to the mill table in the first photo. After I got the bar square, I moved the table until the ball joint stud was directly under the quill, and locked it in place with a 5/8" collet, as shown in the second photo. Once I had this all set up, I cut through the lower control arm bars with a cutoff wheel, and then moved the mill table exactly two inches to space the ball joint half away from the remaining half. I cut a couple of 2" long sections of 7/8" 3/16" wall DOM tubing, clamped them into place between the two halves of the control arm as shown in the third photo, and tacked them in place with the TIG welder while everything was still fixtured on the mill. Finally I pulled the control arm off the mill and finished TIG welding the extensions. The end result wasn't pretty, and the arm will get some serious reinforcement before I trust it, but I'm fairly confident it isn't twisted or warped. So, this modification should move the wheel out two inches on each side, restoring a halfway decent appearance to the car.
On Sunday after I did this I decided to head off to NAPA and buy two more tie rod ends, so I could have them on hand when I finally got the lower control arms finished up. On the way there I began thinking about the power rack I was using in the car. Fatman had told me that the manual racks weren't available, but I felt their advice was suspect at this point. They had sent me the passenger side mounting bushings for the manual rack by mistake; if I managed to come up with a manual rack, I could probably bolt it right in. When I got to NAPA, I asked about the manual rack, and sure enough they showed a part number. They said they had to order it and it would take 4-5 days to come in. I was a little skeptical, but they didn't require a deposit, so I had them order it for me. They promised to call if for some reason the rack was unavailable.
Next couple of weeks I probably won't have too much time to work on this car; I need to get my web site up and do a bunch of other things so I can put my books up for sale at the beginning of February. But I'll be very curious to see if Napa comes through with the manual rack by next weekend. We will see...


