This week was a major, major thrash, with lots of progress, lots of setbacks, and finally success on Sunday night. Over the last two weeks I've probably worked harder on this project than I have in the last several months. The Drag Week dates are really starting to come up fast, and I really need to get the car to the track a few times and sorted out before the event, so I need to have the car on the road sometime in August. This week I took a big step in the right direction, though, so I'm feeling pretty confident right now about getting to the event with the new car.
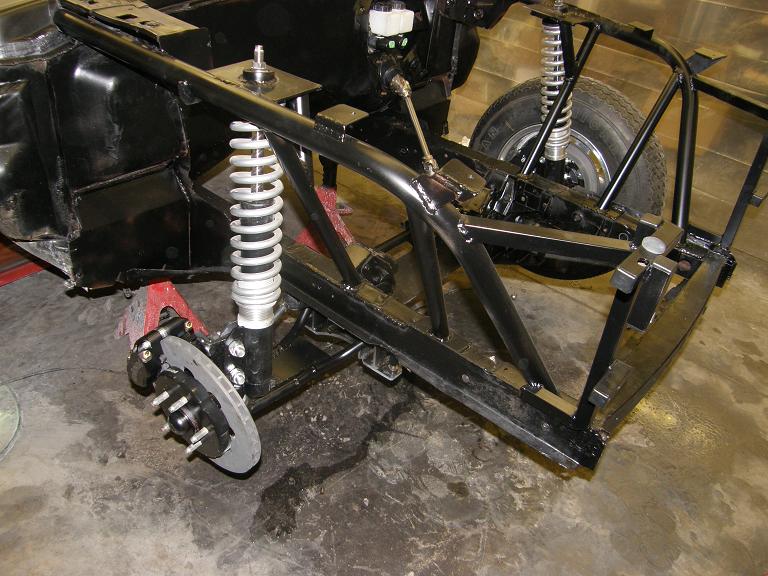
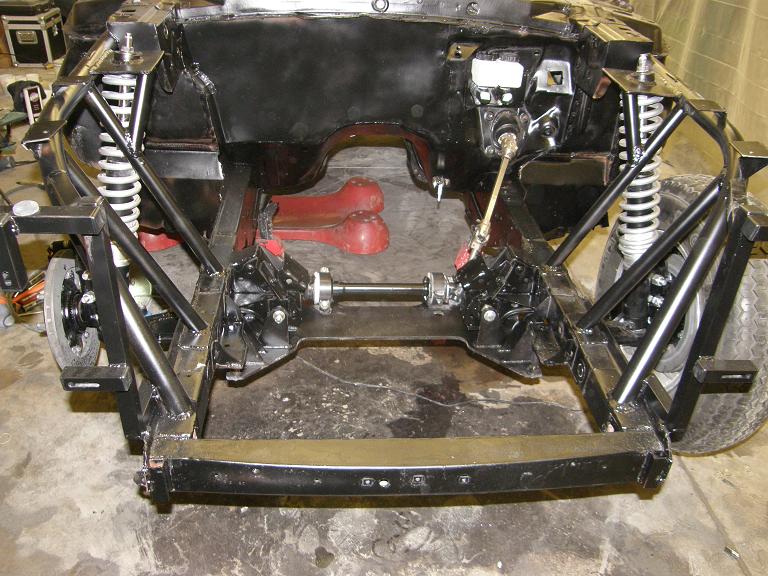
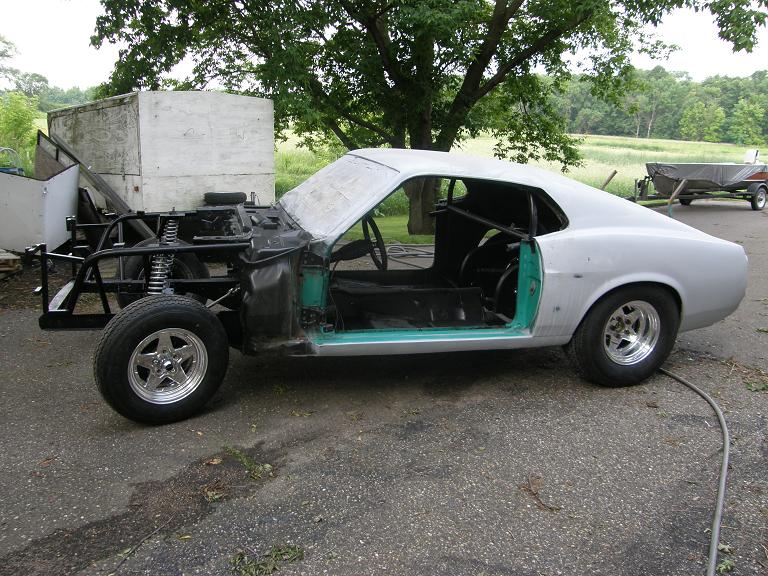
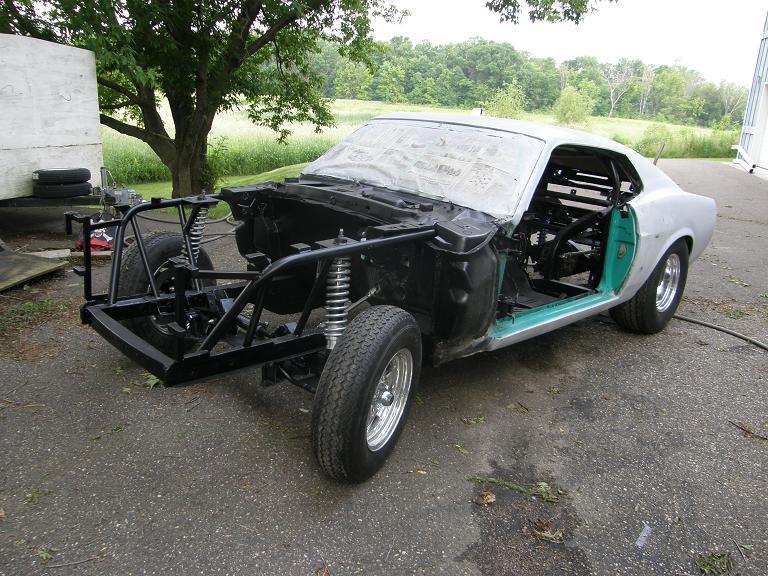
This week the kids were out of school, and didn't have a lot of extracurricular activities planned, which resulted in me being able to spend every night this week working on the project. Monday night I was out to the shop until close to midnight, working on getting the front suspension installed. Tuesday night was the same drill, and by about 11:00 PM I had the front suspension and brakes completely installed. Here's a couple of pictures of the front end:
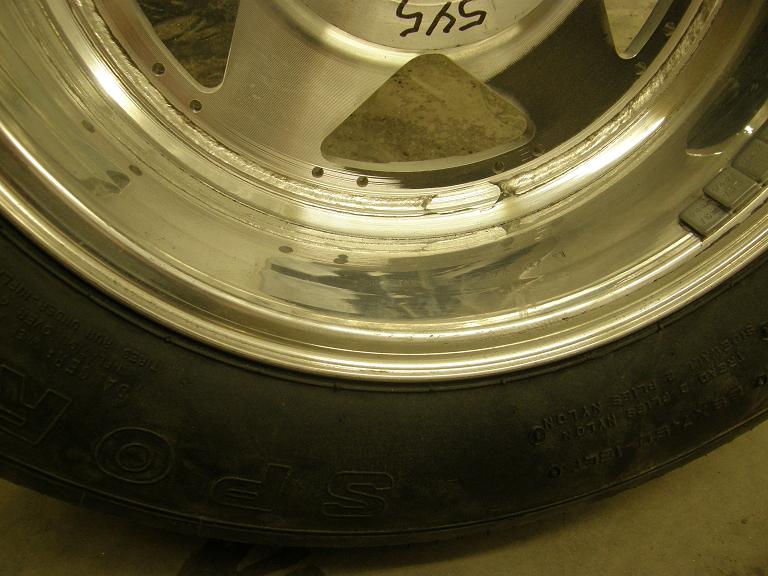
At the end of the night on Tuesday, with the whole front end put together, I tried to bolt on the front wheels. Here was the week's first setback. I knew that I was going to need to use some spacers on the front wheels to gain the required clearance to the Wilwood disc brake caliper, and after some experimentation on the driver's side I concluded that a 3/8" thick spacer was required. The driver's side wheel bolted on just fine with this spacer. However, when I went to the passenger side, the wheel wasn't close to bolting on. It was obvious that no reasonable spacer was going solve the problem with the passenger side. After looking at this situation for a few minutes, I unbolted the wheel on the driver's side to compare with the passenger side wheel. Lo and behold, the wheels were different! Here's a picture from the back side of the wheels, and then a close up of the wheel that fits, and the one that doesn't:
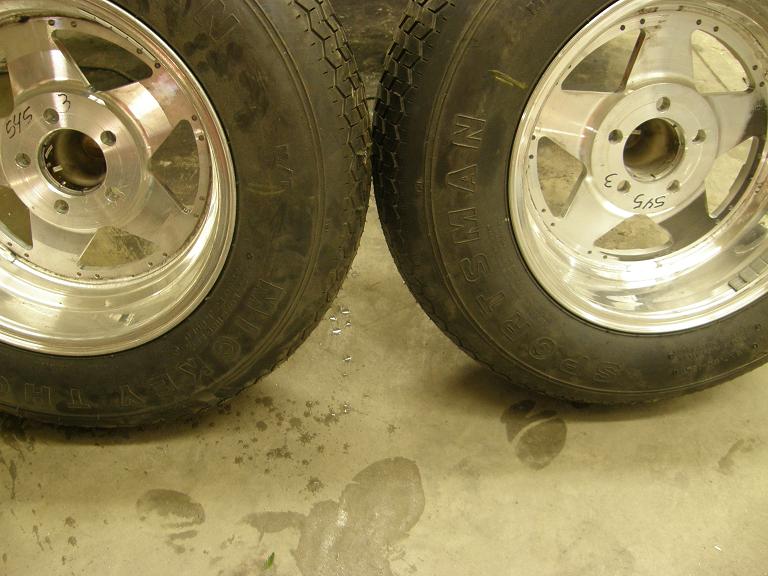
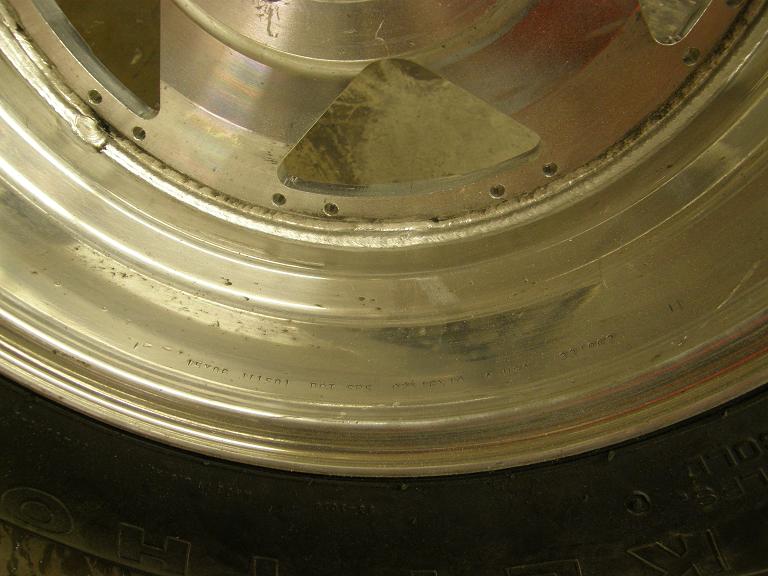
What the hell? I had purchased both wheels at the same time, from Summit, and they were different? Then it dawned on me that BradFORD had pointed this out to me when I had the tires put on these wheels. I didn't think much of it at the time, but now it was obvious that one of the wheels was going to cause a problem.
Wednesday at noon I put in a call to Centerline Wheels, to try to figure out why two of the same wheels were actually different. The guy I talked to couldn't figure out what I was talking about, and asked me to email him some photos of the wheels showing the differences. Wednesday night I got the photos together and emailed them off to Centerline, and got back to work on the body of the car, in preparation for painting. I did some finishing body work on the side scoops, and also on the external mirrors that go on each door. I also worked on getting all the old foam and weatherstrip adhesive off the door jam areas.
Thursday I didn't receive an email or a call from Centerline, and I was kind of irked about that, since the guy I'd talked to had told me he'd respond as soon as he saw the pictures. Thursday night I kept going on the bodywork, spending the night repairing the damage to the passenger side rear wheel lip area that I'd caused last week when I rolled the fender lips in. This ended up taking me the whole night to get right; it was not just some cracked body filler and primer. I'd ended up putting a bend on the base sheet metal, so it took me several applications of body filler, sanding it to shape, realizing I didn't have it right, and starting again. Finally by midnight I had it the way I wanted, and laid on a final coat of K-36 before going in for the night.
Friday at lunch I called Centerline and got hold of the guy who I'd talked to Wednesday. Seemed like he looked at the email I sent but didn't take any action. He pulled it up again and looked at it while I was on the phone, and told me that the wheel that didn't fit was the normal version of the wheel, and the other one was an unusual version. He said that sometimes if Centerline runs out of the normal inner wheel halves used on the 15X6 wheels, they will take the inner half for a 15X8 wheel, cut it down by 2" in width, and use that to build a 15X6 wheel. It appears that what I got from Summit was one of the normal 15X6 wheels, and one with the cut down 15x8 inner half. Since the wheel with the cut down inner half was the one that I needed, I asked the guy at Centerline if I could just order one of those. He said it would be a special order and he had to talk their engineering department, but he promised to get back to me on Monday with an answer. It was not clear to me from our conversation why they would not be able to make another wheel like the one I have, but I guess I'll just have to wait until Monday to figure out how to proceed on this.
During the week I'd talked to my friends Steve and Jerry about coming over to help me out with the final body prep and paint work on the car. Jerry was going to be out of town so he couldn't make it, but Steve was available for most of the day both days, and he wanted to give me a hand. Steve likes painting cars, and I do too; there's just nothing like the transformation from ugly duckling to beautiful shining jewel during a couple hours in the paint booth. Steve had some plans in the afternoon both days, so we agreed to start early on Saturday and Sunday morning. Friday night, I installed the rear valence panel on the car, pulled the front disc brake calipers off so that both wheels would bolt on, did some more finish work on the side scoops, and basically got the car ready to roll out of the garage. The plan for Saturday was to finish sand the shell out in the driveway with Steve's help, then roll it up into the booth and shoot the door and trunk jam areas. The rest of the day Saturday would be devoted to finish sanding the hood, trunk lid, front fenders, and the other pieces that had previously been removed from the car and painted on their interior surfaces. Sunday we would reassemble the car and paint all the exterior surfaces. Friday night at midnight I finally got everything I wanted done, and went to bed looking forward to getting the car painted.
6:30 seemed awfully early to be getting up on the weekend LOL! I was out to the shop by 6:45 and started cleaning up around the car so we could move it outside. Steve arrived promptly at 7:00 and we pushed the car outside to start wet sanding the shell. Out in the daylight a couple of minor problems with the bodywork became apparent, so we fixed those with some Metal Glaze as we went along wet sanding, first with 240 grit, and then finishing with 400. Here's a couple of pictures of the car at this stage:
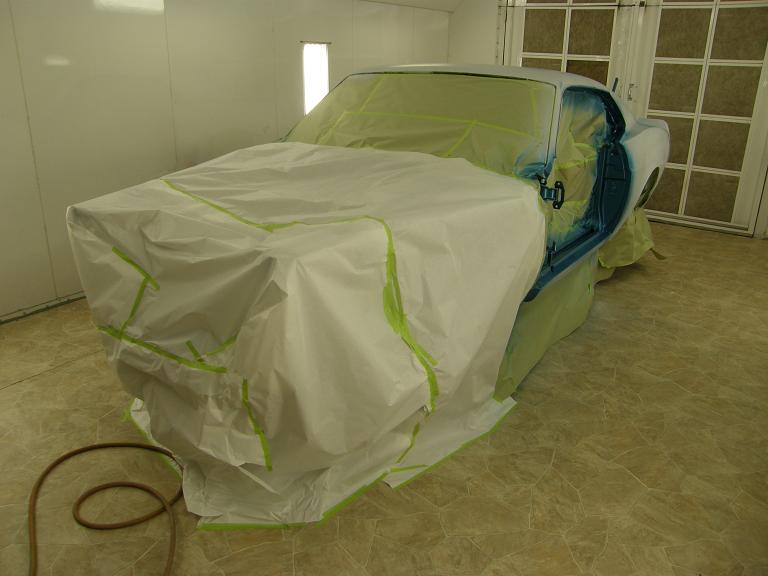
By around 10:30 we were ready to move the car into the booth. I towed it up to around the side of my shop, where the booth door is, using a nylon strap and my pickup. We pushed it the last few feet after moving the truck out of the way; the car sure looked small inside the booth, with no body panels installed. I shot some K-36 on some of the body areas where we had discovered problems earlier once the car was up on jackstands with the wheels and tires removed, then Steve and I ran off for lunch. When we came back we spent until 2:00 masking everything except the jam areas that were going to get painted. Steve took off at 2:00, and promised to be back on Sunday morning at 7:00 for paint day. After he left I got the jam areas scuffed and by around 5:00 I had the shell jammed; here's a couple of pictures:

After dinner I was back out to the shop again, for what I thought would only be a couple of hours of finish sanding on the fenders, hood, trunk lid, doors, and a few other small parts. Unfortunately, I discovered more small problems, particularly on the front fenders, and I ended up doing some minor filling and priming to make everything just right. I finally got done again around midnight, and went to bed completely exhausted.
I was up again this morning at 6:30; it was paint day! There was a lot of work to do before the paint could go on, but it was definitely do-able, especially with Steve giving me a hand. He arrived at 7:00, and we got started by removing all the masking we had done on the car where the body panels would have to bolt on. For the next few hours we worked on getting the doors hung, front fenders installed, and hood and trunk lid bolted on. This was not a real simple task, because we were trying to get the panels more or less adjusted correctly prior to painting, and although they had been on the car before, there had been some clearance problems between the doors and the front fenders, the trunk lid didn't fit just right, etc. We also had to tape off the areas on these panels that had already been painted, such as the underside of the hood and trunk lid. It was 11:00 before we finally got done with all this.
Next we had to finish sand some more, on the panels that I had worked on Saturday night, and also the main shell where we had put the last bit of primer on Saturday afternoon. After that, we had to mask again, to protect the painted undersurfaces of the car from the paint that was going to go on the body shell. But finally, all the work was done and we were ready to paint!
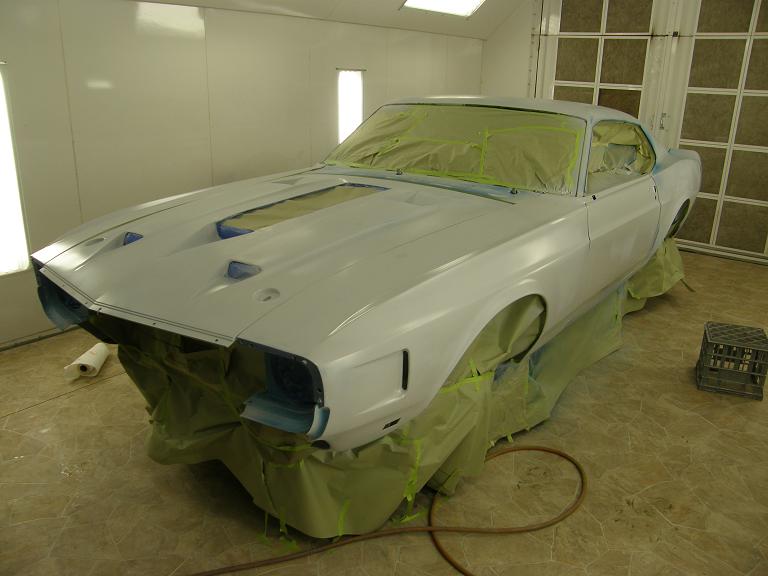
There were several areas on the car where we had exposed some bare metal or fiberglass, and I decided I wanted to shoot those areas with some sealer before we started laying on the color coats. I mixed up a half quart of sealer and sprayed it on the car, but much to my chagrin on the bare fiberglass areas, several spots showed the presence of pinholes in the fiberglass! After all this work I wasn't going to let that go without fixing it, but it was another delay. Steve needed to go to a graduation party for one of his daughter's friends that was going on until 5:00; he'd planned to go late, but now with this latest issue, he changed his plans, and took off to go to the party earlier. He said he'd be back around 5:00, which gave me the time I needed to fix the fiberglass pinholes. This was just fill the pinholes with Metal Glaze, wait for it to cure, sand them down, shoot the area with K-36, wait for it to dry, and wet sand everything smooth. It wasn't a lot of work, but it took about an hour and half because of the wait times. Here's a picture of the car, assembled in the booth and waiting for paint:
At 5:15 Steve returned, and we were ready to get started on the paint. He had made me promise I wouldn't start without him LOL! Turned out that it was a good thing I respected his wishes on that. We got the paint mixed up, and I started with the first coat, going all around the car. The first thing I saw when I hit the trunk lid with paint was a bunch of fisheyes! This is NOT what you want to see when you lay on the color coat. I stopped painting for a bit and Steve and I discussed the situation. We had both used wax and grease remover on the whole car, and were sure that we hadn't missed the trunk lid. It was properly primed, so we weren't sure what the problem could be. We decided to keep going, and hope for a better result with the second coat of color. I went all around the car with the gun, and also painted the side scoops and the mirrors, which we'd hung on a panel tree in the booth. When I started the second coat, the first area I did was the trunk lid, and surprisingly enough, with the second coat of paint all the fisheyes disappeared! I was relieved at that, and still don't know what the problem was with the first coat. I got about half the car done with the second coat, and then handed the gun off to Steve so he could shoot for a while. Steve likes to shoot the paint, and after all the work he'd done to help me this weekend it was the least I could do. But shortly after Steve started spraying, he said the gun wasn't acting right. He tried to increase the air pressure, but turning up the pressure regulator knob had no effect. WTF was going on? I poked my head outside the booth, and didn't hear my air compressor running upstairs. Ruh roh...
I ran over to the breaker box, and sure enough the breaker was tripped. But when I reset it, I head a groan coming from the air compressor and then the breaker tripped again. I went back in the booth and told Steve we had to hold on; there was some problem with the compressor. We went upstairs to look at it, and the electric motor was hot to the touch. It seemed clear that the electric motor on the compressor had just failed. Now what? I had a bunch of paint all mixed up, and a half painted car, and no air compressor to run the gun!
Steve saved the day, by volunteering to run home and grab his air compressor to fill in. He took off right away, and while he was gone I cleaned the gun and emptied the unused paint back into the mixing container, so we could refill the gun with it later. I got to thinking about the electric motor on my compressor, and realized that I bought it sometime in the 1982-1984 time frame. It sure didn't owe me anything, but it had picked a hell of a time to give up the ghost! Fortunately, it looked like we might be able to recover if Steve's compressor could be set up to do the job temporarily. I worked on a few different methods to connect Steve's compressor into my air system while I waited for him to return.
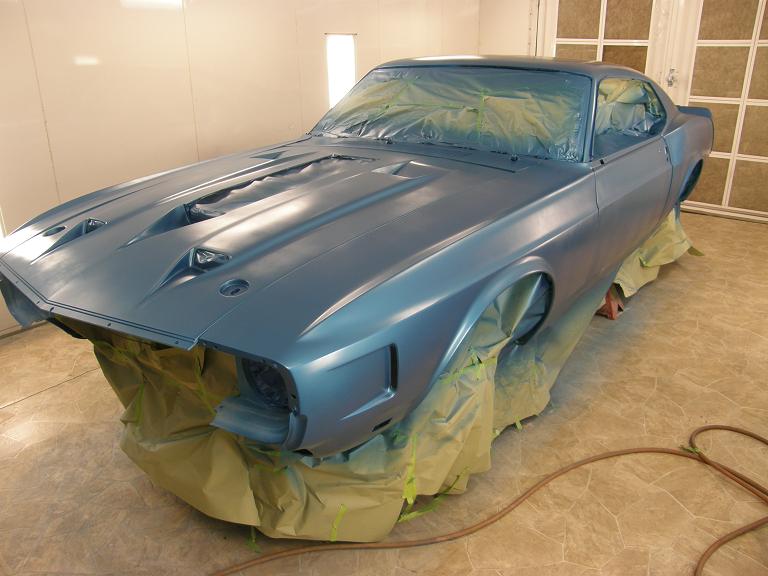
Forty-five minutes later Steve was back, and had brought two compressors, a 110V 2HP Sears unit and also a gasoline powered portable compressor. We were able to get them hooked into my air system with no problem, and within a few minutes we had air pressure again, and were back to shooting paint on the car. Steve finished the second coat that he had started earlier, and then I took over from there and shot a third coat on the car. Steve did a little more spraying at the end, fogging in some areas where he thought he saw some paint stripes. Finally, with both of Steve's compressors working, we had the base coat on the car. Here's a picture:
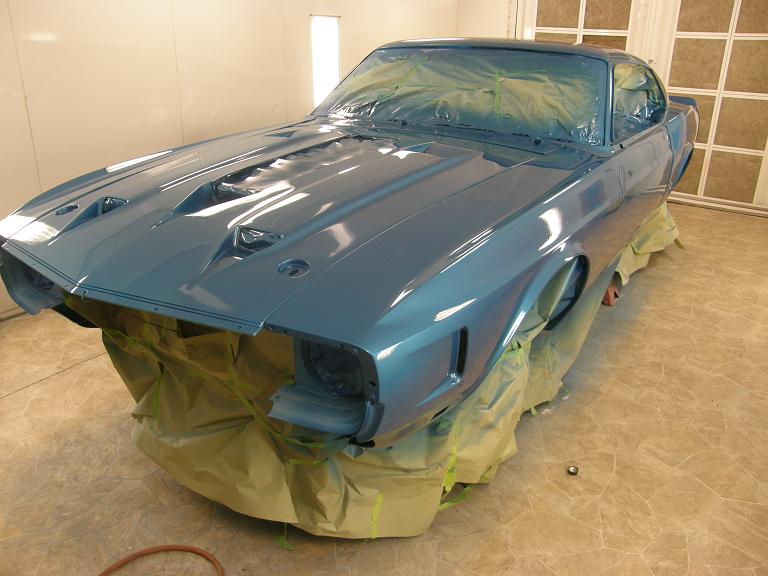
The base coat had to dry for 20 minutes before we could put on the clear. By now it was nearly 8:00 PM, but we sure weren't going to quit now! We waited the 20 minutes, then got back in the booth to shoot the clear. I put on the first coat, and Steve put on the second. The base coat dries to kind of a matte finish, so you really don't get the full effect of the paint job until the clear goes on. Boy, did it look nice! The bodywork we did really seemed to pay off; all the panels looked straight, and the color was fabulous! The only thing that went wrong was we ran the clear in one spot on the left front fender, but it will be easy to sand and buff it out when the paint hardens. Here's a picture of the painted car:
It sure feels good to have that paint job behind me. This week I'll get the car back down to the shop area, and get all the masking tape and paper removed so I can start working on assembly. But first, I think I'm going to take a break on the car itself and finish up the sheet metal intake. I'd like to get it bolted on the engine next weekend, and maybe get the engine on the dyno so I can tune the engine with the manifold. I'll post another update next weekend.


