Author Topic: Rebuilding a Ford Thompson Power Steering Pump  (Read 22435 times)

0 Members and 1 Guest are viewing this topic.

66FAIRLANE

  • Hero Member
  • *****
  • Posts: 558
  • Andy
    • View Profile
Rebuilding a Ford Thompson Power Steering Pump
« on: April 29, 2013, 07:21:46 AM »
I recently rebuilt the pump on my 67 Fairlane and took some photos along the way to help anyone who may also want to do this themselves. I will preface this by saying I am not an expert and this is the first ps pump I have ever rebuilt so I am not saying THIS IS HOW TO DO IT, just how I did it. So if your looking for an insight into whats involved please follow along.

When I bought my Fairlane it had a noisy and leaking (fancy that  ;D) ps pump. The prevoius owner had bought a secondhand one off ebay and it was in the boot (sorry, trunk). I installed it and it too was noisy and leaking. I threw in a bottle of power steering stop leak/conditioner and it shut up but of course did not stop leaking. This was 3 1/2 years ago and it has been quiet ever since but still leaking. It really made a mess of the sway bar rubber and I want to replace it but of course a bit pointless with the pump still leaking so I decided to have a go at the one I took off 3 1/2 years ago and then rebuild the one I take off as a spare.

Internet research and a phone call to a very friendly and helpful gentlemen at http://www.stangerssite.com/FPparts.html uncovered the fact that once the campacks are noisy thats it, they are noisy forever. They are also no longer available, hard to come by now and there are two different sizes. I thought I would have a go anyway.

So I am after 2 kits and 2 bushes. I found the kits and bushes at Driveline Auto Parts (ok guys I am in Oz).
http://www.drivelineap.com.au/contact.html
Not sure how easy the bushes are to get now days. They had one in stock and the other had to come from interstate. I asked for a third as spare but this hasn't materialised yet.

Driveline part numbers.
Gasket and seal kit: PSK8034 SEAL KIT PUMP FORD C1 (TIN RESERVOIR) = au$15.95 + GST
Bush: 86280 BUSH PUMP FORD C1 (CAST IRON) = AU13.65 + GST

First thing to do is probably the hardest part. Get the pulley off. DO NOT pull on the pulley or lever it with screwdrivers etc. it must be pulled or pressed off holding the boss on the front designed for this. Clean out the hole (I had to run a tap through mine, 3/8 UNC), screw a bolt in as far as you can and press on that. Here is my rudimentary set up.


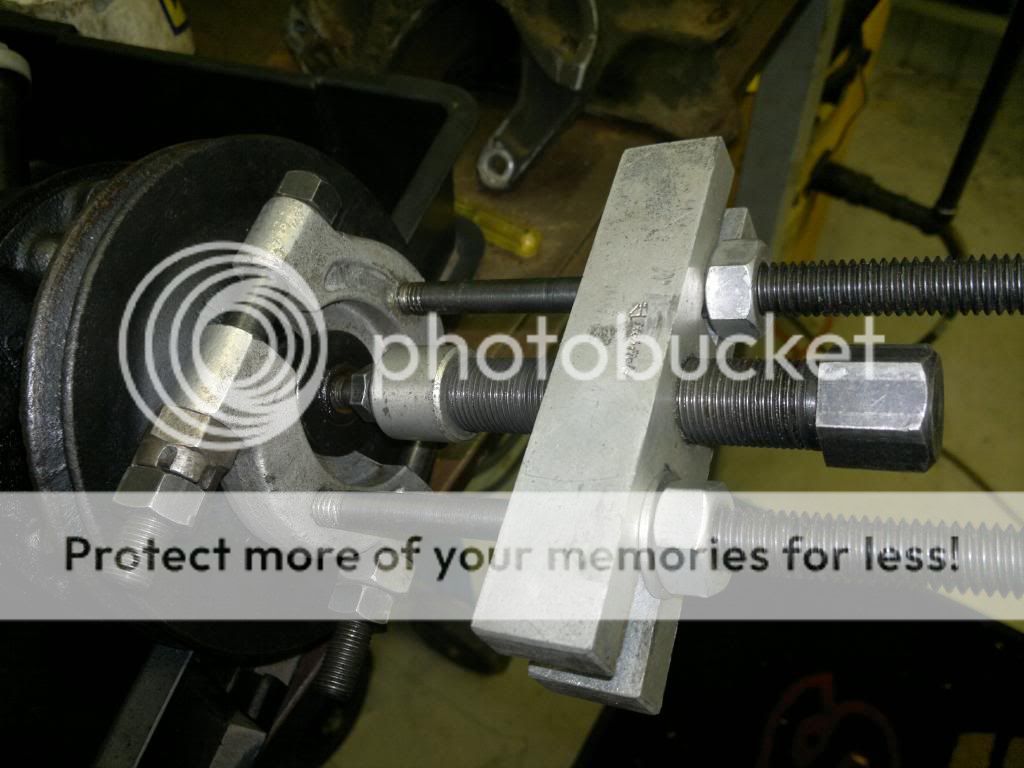
It really takes some effort to shift this and I wasn't sure this set up had the ooomph. It was a bit scary so I donned saftey glasses. It took a great deal of effort and I actually bent one grade 5 bolt as the puller was a bit off centre!


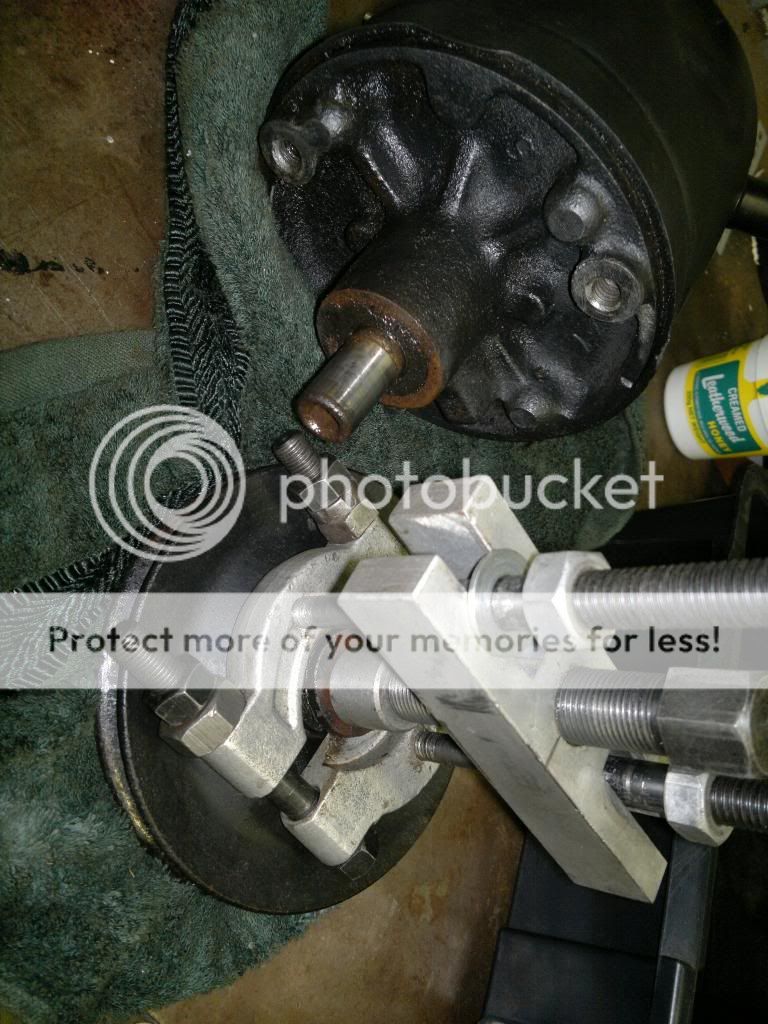
After much persistance it finally came. Before going any further note the position of the large square chung of casting coming off the spigot area. This is the return hole from the seal area. On mine viewed from the front with the fill tube verticle it sits about 45 degrees to the right, about the 1.30 position.


Someone had obviously used the can to lever pressure on the belt when tightening. Not cool.


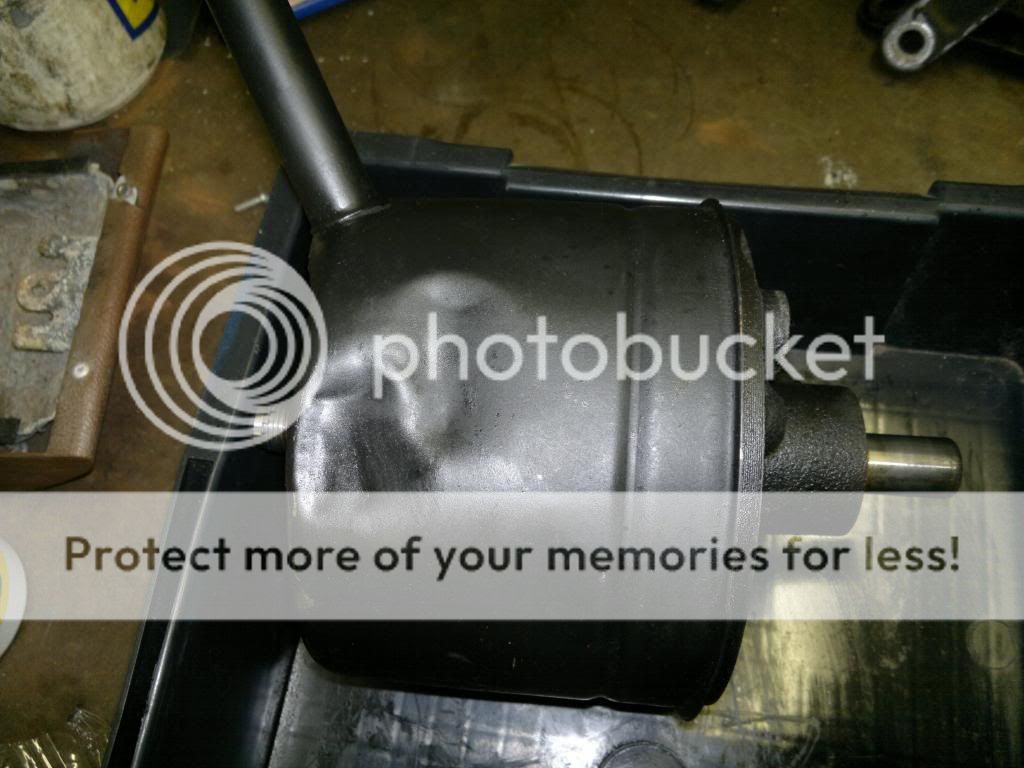
After undoing the large nut on the pump outlet fitting the reservoir slips off with some persuasion. Then unbolt the pump housing and you are left with this.


The pressure valve stayed in the pump housing. Just held in with friction from its O ring seal. A few taps of the hosing on a block of wood and it fell out along with the two large springs behind it.


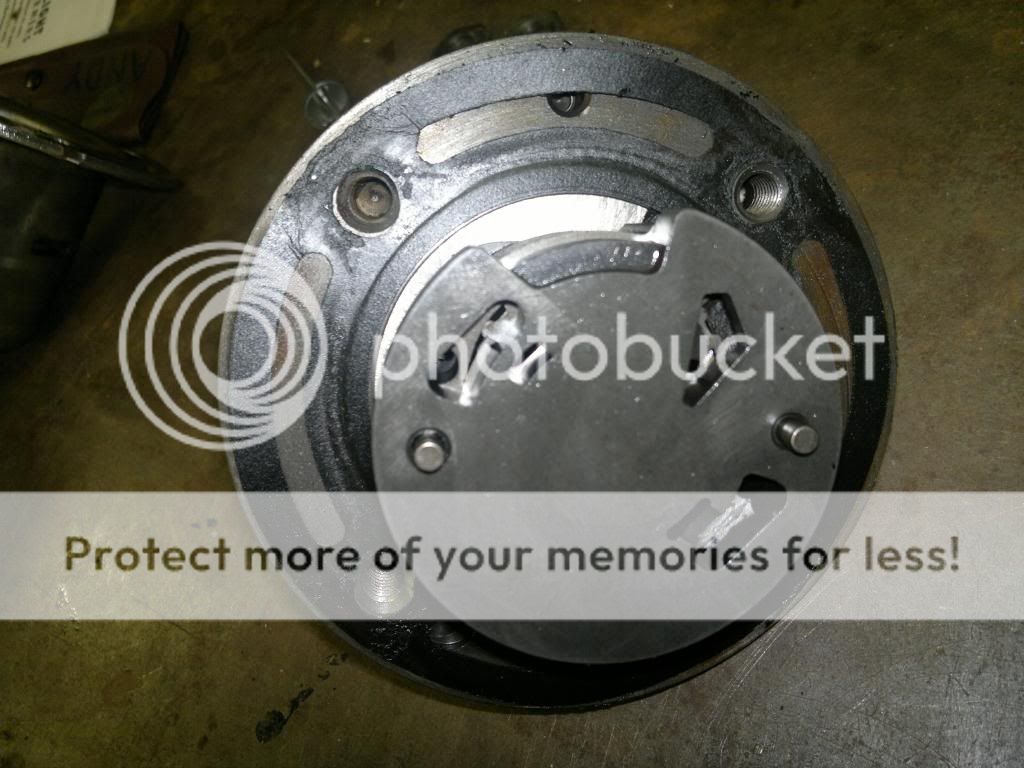
The end plates and all pump bits merely slip off the dowels. You can see the noisy campack here. Note the orientation of the little slippers.


« Last Edit: April 29, 2013, 05:49:17 PM by 66FAIRLANE »

66FAIRLANE

  • Hero Member
  • *****
  • Posts: 558
  • Andy
    • View Profile
Re: Rebuilding a Ford Thompson Power Steering Pump
« Reply #1 on: April 29, 2013, 07:42:17 AM »
With everything apart the internals looked pretty good considering the bush had started to disintergrate and little bits of white metal were through the pump. No broken springs or big chunks out of anything so I was pretyy happy with that.

They said it couldn't be done, but I had other ideas!! This where I thought I would have a go at silencing the noisy campack. I had no idea if this would work and you will have to wait until the end to find out  :). I polished the housing where the campacks run, first with Autosol metal polish and then with a polishing rouge I usually use on mop wheels. I spent about half an hour doing this until I thought it was getting no better.


End result. Flash shows up imperfections. Looked a lot better just under my flouro lights.


I also cleaned up the ends of the rotor on a mop wheel (not that they should touch anything but just to identify and knock down any pick up marks etc) and also cleaned up each end plate by rubbing them on fine wet and dry lubed with WD-40 on a flat face plate. They came up pretty good.

Cam pack ready to reassemble.


Assembly of the campack is easy and just needs careful attention paid to the orientation of the slippers.


« Last Edit: April 29, 2013, 06:31:17 PM by 66FAIRLANE »

66FAIRLANE

  • Hero Member
  • *****
  • Posts: 558
  • Andy
    • View Profile
Re: Rebuilding a Ford Thompson Power Steering Pump
« Reply #2 on: April 29, 2013, 07:58:21 AM »
Before I could reassemble I had to deal with the offending bush so made up a tool to press (read hammer, I don't have a press) it out and in.


Housing painted, bush ready to go.


There is a block of wood wrapped in that blue towel and I had to do it on a solid surface, ie floor. It took some driving, more than I thought.


Installed to the correct depth. The fluid return hole can also be clearly seen here. This is an important feature to note as it will help orientation later upon reassembly.


I then put a light (light, very light) coat of Permatex No.3 around the outer edge of the new seal and tapped that in flush. It probably doesn't need the sealer around the outside but it also acts as a lube to stop the seal picking up on anything on the way in. Put the sealer on the seal and not the bore as this will wipe the sealer 'out' and not push it 'in'.

« Last Edit: April 29, 2013, 08:16:10 AM by 66FAIRLANE »

66FAIRLANE

  • Hero Member
  • *****
  • Posts: 558
  • Andy
    • View Profile
Re: Rebuilding a Ford Thompson Power Steering Pump
« Reply #3 on: April 29, 2013, 08:36:45 AM »
With the bush in place and everything cleaned up the pump can be reassembled.


One of the end plates goes on before the shaft slips in.


Then apply a little ATF to the seal and bush and slip the shaft in. You can then slip the assembled campack over the dowels and splined driveshaft. Note the position of the fluid return hole (from the seal area) at the bottom next to one of the threaded holes. Use this hole to make sure you have the pump bit back in the right spot. The first end plate can go either way but the rest must be orientated correctly.


Install the other end plate correctly orientated. Then slip the pressure relief valve over the dowels also. I did not not disassemble this valve as it is a prick of a job. I merely checked the plunger for smooth action, worked it a few times and pronounced it good to go. Note how the pressure valve goes on in relation to the seal return hole. Lubricate a new O ring from the seal kit and slip it into position on the pressure valve. The only thing that holds the pump together is the spring pressure from the two big springs between the pressure valve and the pump cover. Sorry forgot to photograph these but there position is obvious. They sit in the round cast area on the back of the pressure valve one of which is clearly visible here.


The housing also came in for some attention as I had read that a missing or insufficient chamfer on the pump outlet hole also contributes to noise. So I enlarged the chamfer slightly. Hard to see here.

« Last Edit: April 29, 2013, 06:33:38 PM by 66FAIRLANE »

66FAIRLANE

  • Hero Member
  • *****
  • Posts: 558
  • Andy
    • View Profile
Re: Rebuilding a Ford Thompson Power Steering Pump
« Reply #4 on: April 29, 2013, 08:41:41 AM »
With the pump all assembled correctly suupport the pump on something to hold it flat and verticle. Lay a new gasket on the pump flange being careful to line it up correctly with the return hole. Also sit the two springs in their nests on the pressure valve. Wipe some ATF on the inside of the housing and new O ring on the pressure valve. Slip the housing over the pump again being careful to line up the seal area return hole.


Push the housing down as far as it will go being careful not to damage the O ring. It will have to be pulled down the last 3/8 or so against the springs.


Place a new large O ring in the groove of the front housing. Check your orientation of reservoir to housing before installation. This is important! You should have taken notice of this during disassembly. With the fill tube verticle on mine (and most likely all) the square chunk (drain hole) sits at about the 1.30 position when viewed from the front. Also as a bit of extra insurance and the fact that the reservoir tins are now getting old and may not be perfectly pristine at that O ring area I applied a small (.080ish) bead of the Right Stuff around the new O ring. I tried to apply it erring on the outside of the pump so it would be wiped toward the outside and not have any on the iside of the reservoir. I was happy with the bead. The outlet fitting seals to the reservoiur via a gasket that sits over the fitting flat onto the housing before the reservoir is slipped on. Install this now. I was concerned that the original seal that came out was a steel washer that had rubber bonded over it. The new seal kit only had a 'paper' gasket which can be seen above. The old seal looked like a much better idea. So I applied some permatex No.3 to this gasket, then pretty much wiped it all off. Just leaving enough so that you could see it had been there. I will have to wait and see how this seals. I have a couple of issues with this. The sealing surface of the reservoir had been cleaned with thinners and it was now slipped on.


I then put on the cleaned up tag, tightened the fitting nut and flipped the pump to wipe the excess Right Stuff that was pushed outside the joint. The drain hole orientation can also be seen here.


Only thing left was to put the pulley back on. I just applied a small wipe of WD-40 to the bore and shaft and pulled it back on with a piece of threaded bar fully screwed in and a nut. Don't just use a bolt, you can tear the thread out. To stop things turning I had to grip the collar which did unfortunately leave some damage, although minor, to this area. In hindsight the pulley could probably be pressed onto the shaft during assembly of the pump before the campack goes on. I blocked the return nipple and filled the pump with Dexron 3 and spun it over by hand on the bench to both lubricate the campack and make sure fluid was squirting from where it should. It was.

Installed on the vehicle I then started it up. After an initial whirring for about 10 seconds it fell silent. Great I thought! The next day I started it and it whirred constantly. Damn I thought and resigned myself to quickly rebuilding the one I had taken off. Then I started it the next day to go for a drive and it was silent again! Anyway to help keep it quiet I pulled out some ATF and added a bottle of the power steering conditioner as it had worked so well at keeping the other pump quiet for nearly 4 years. It hasn't made a noise since and does not leak. Time to attack the sway bar rubbers!


« Last Edit: May 04, 2013, 08:48:43 PM by 66FAIRLANE »

sixty9cobra

  • Sr. Member
  • ****
  • Posts: 274
    • View Profile
Re: Rebuilding a Ford Thompson Power Steering Pump
« Reply #5 on: April 29, 2013, 08:00:40 PM »
Very nice!!! Just so happens mine went bad at Beaver Springs reunion. Do you see anything that can be replaced to eliminate in and out play on the shaft?  They also make a tool to remove and install the pulley.

BruceS

  • Hero Member
  • *****
  • Posts: 738
    • View Profile
Re: Rebuilding a Ford Thompson Power Steering Pump
« Reply #6 on: April 29, 2013, 08:14:43 PM »
Great job, thanks for posting. Btw you can buy the pulleys repro too. On my Fairlane, when i bought it the pump had seized, then bent the shaft and pulley when the belt pulled on it without the pulley turning!  Was tough getting that old pulley off and the new one on... Seeing how you pulled the old one off was a good tip on how to do it next time!
66 Fairlane 500, 347-4V SB stroker, C4
63 Galaxie 500 fastback, 482 SO 4V, Cruise-O-Matic

jayb

  • Administrator
  • Hero Member
  • *****
  • Posts: 7406
    • View Profile
    • FE Power
Re: Rebuilding a Ford Thompson Power Steering Pump
« Reply #7 on: April 29, 2013, 08:17:37 PM »
Great how-to posts, and very clear!  Hmmmm, the pump on my 68 Mustang is a little leaky...
Jay Brown
- 1969 Mach 1, Drag Week 2005 Winner NA/BB, 511" FE (10.60s @ 129); Drag Week 2007 Runner-Up PA/BB, 490" Supercharged FE (9.35 @ 151)
- 1964 Ford Galaxie, Drag Week 2009 Winner Modified NA (9.50s @ 143), 585" SOHC
- 1969 Shelby Clone, Drag Week 2015 Winner Modified NA (Average 8.98 @ 149), 585" SOHC


66FAIRLANE

  • Hero Member
  • *****
  • Posts: 558
  • Andy
    • View Profile
Re: Rebuilding a Ford Thompson Power Steering Pump
« Reply #8 on: April 29, 2013, 10:36:57 PM »
Very nice!!! Just so happens mine went bad at Beaver Springs reunion. Do you see anything that can be replaced to eliminate in and out play on the shaft?  They also make a tool to remove and install the pulley.

No I saw nothing to control end float. But as the rotor rides on splines it probably isn't critical and doesnt load anything much anyway. The end float is pretty large but if its huuuge then it may have started wearing stuff.

babybolt

  • Hero Member
  • *****
  • Posts: 516
    • View Profile
Re: Rebuilding a Ford Thompson Power Steering Pump
« Reply #9 on: April 30, 2013, 07:01:17 AM »
There is a special tool to remove power steering pulleys, usually around $30 for the better one.  It has a split sleeve that surrounds the groove on the pulley snout.  An impact gun works good unless you like building up your arm muscles.  The shaft is threaded on the inside for using a bolt to re-install the pulley.  After the pump is installed it should be turned by hand both directions to get the air out of the system.

More info here:

http://www.stangerssite.com/CanIFordPump.html

I am not sure about these early Thompson power steering pumps, but the later plastic ones Ford used starting in the eighties must be used with Type F fluid - that what the owners manual calls for - check your manual.  If you use the store bought "power steering fluid" it will eventually cause problems.  A turkey baster can be used to pull out the old fluid.

66FAIRLANE

  • Hero Member
  • *****
  • Posts: 558
  • Andy
    • View Profile
Re: Rebuilding a Ford Thompson Power Steering Pump
« Reply #10 on: April 30, 2013, 05:44:23 PM »
I wanted to use Dexron for the extra lubricity. Also it feeds an integral box not a ram. I know you can buy a tool but rather not for just two pumps. Pulled the other one tonight. Same method.