Author Topic: 482" Street SOHC  (Read 10332 times)

0 Members and 1 Guest are viewing this topic.

jayb

  • Administrator
  • Hero Member
  • *****
  • Posts: 7405
    • View Profile
    • FE Power
482" Street SOHC
« on: August 20, 2018, 12:01:54 AM »
Just over a year ago I was contacted by a local guy who wanted to build an SOHC engine and put it in a 64 Galaxie.  A man after my own heart  ;D ;D  I usually don't build engines for other people, but in this case, since it was an SOHC and the guy was local, I decided to take on the project.  I hate the idea of someone spending a bunch of money on one of these engines and then getting tripped up by something like what happened to Jason, where the machine shop the installed the cam bearings in his block incorrectly. 

For most of the last year my friend has been collecting parts for this build, including a BBM cast iron block, a 4.25" stroker kit from Barry R with the forged Scat crank and H-beam rods, and the whole SOHC setup from Robert Pond, including heads, front cover, and timing chain setup.  So this was not a rebuild of an existing engine, it was one put together with new parts from scratch.  I figured there would be some massaging of some of the parts required to make everything fit properly, but I was surprised at how easily this one went together.

After the machine work was done, at the beginning of June he brought all the parts over to my place so that I could get started.  And, naturally, we ran into the first delay.  Inexplicably, after prepping the block and installing the crank, I went to start putting the pistons and rods together and there were no spiro-locks included with the pistons.  So, the pistons had come from Diamond, to Barry R, to my friend, then to R&R Performance, then back to my friend, and finally to me.  They either got misplaced or lost somewhere along the way, or they were never included from the manufacturer.  Everything else was there, just no spiro-locks.  I called Barry up and he contacted Diamond to get a replacement set.  And then we waited.  And waited.  It took almost four weeks to get a single set of spiro-locks.  At the end of all this I was emailing Diamond, Barry was emailing them and copying me on the emails, and Diamond just didn't seem to be in any hurry to respond.  No idea why, since I've had good luck with them in the past.  By the way, I think things like this are a fairly common occurrence for the guys who build engines for a living; they get promised a delivery date for pistons or cranks or heads, whatever, then it goes way past that date before they finally get the parts.  Meanwhile their customer is wondering what's going on and can't understand the delay.  The engine builders can get a bad rap this way, and undeservedly so in a lot of cases.  I know Barry R personally and he was just as exasperated by this delay as I was, but sometimes there's a limit to what any of us can do.

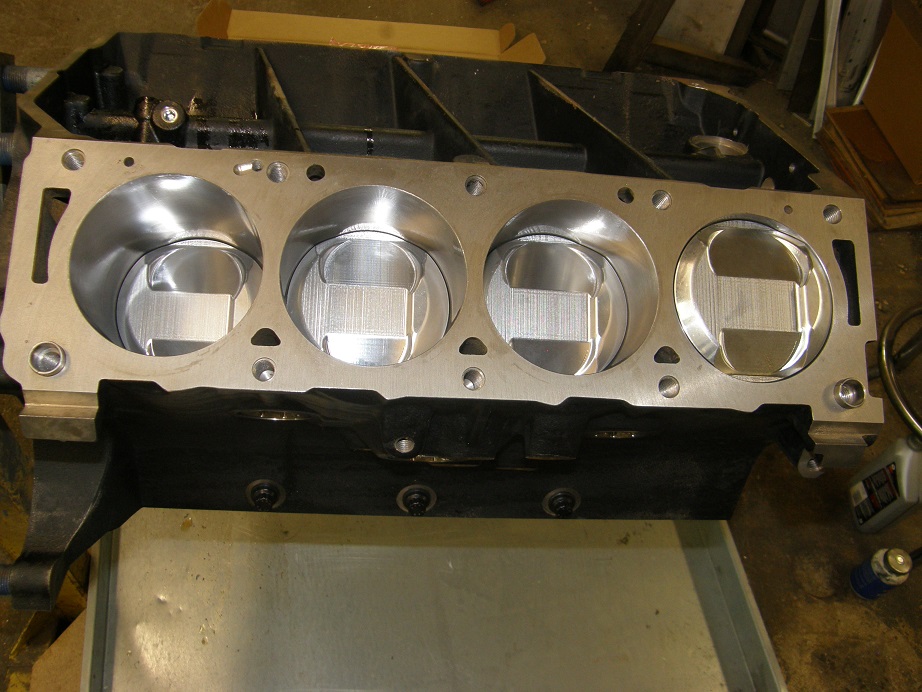
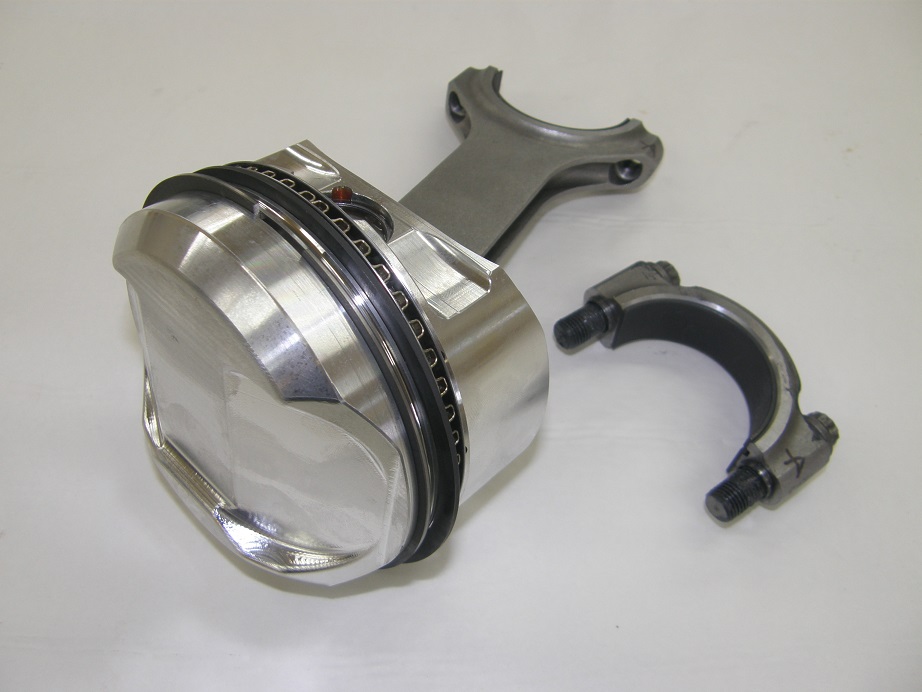
Regardless, at the beginning of July I was finally able to get the short block together.  Here's a couple of photos of a piston and rod assembly from this engine, and then four of the pistons installed in the block.  I'll put more detail in the FE Engine Dyno Results section, but basically this is a street motor designed to run on pump premium fuel, so compression was limited to 11.5:1.  With the cams we selected, this gave us a dynamic compression ratio of 8.25:1, which should be very friendly on pump gas. 


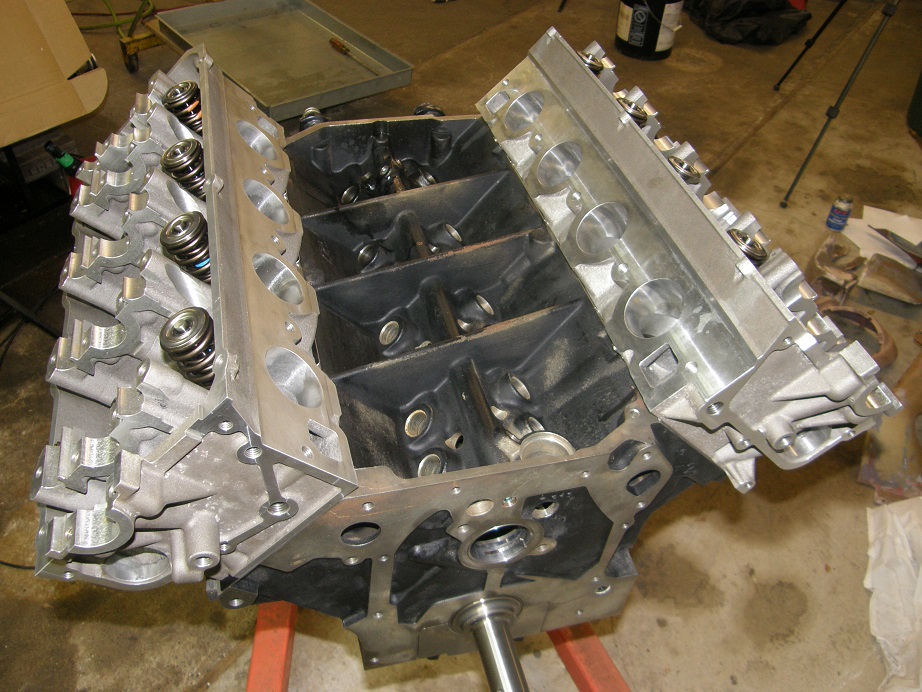
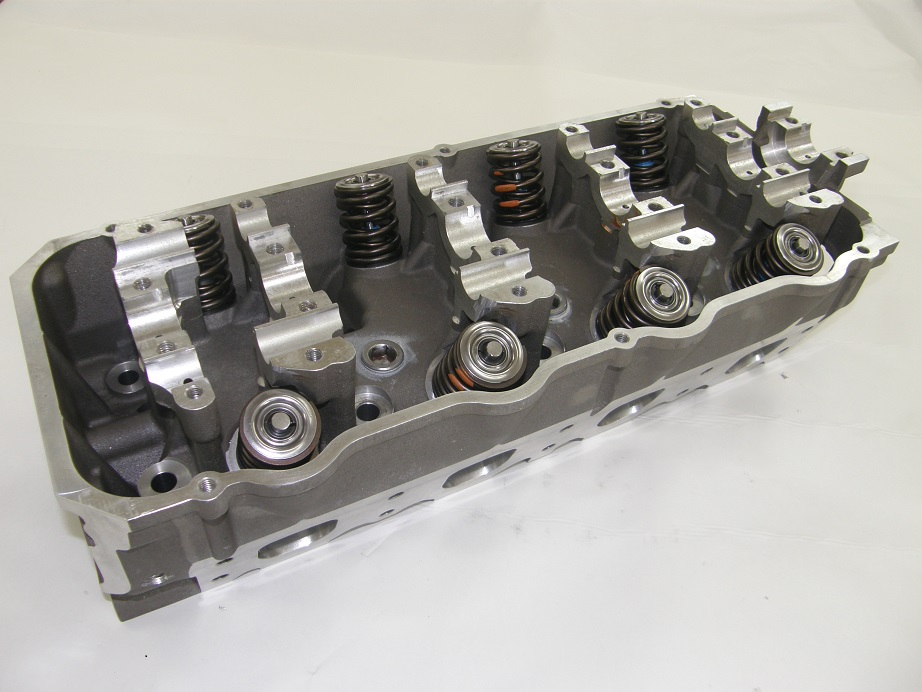
From a parts acquisition standpoint, the cylinder heads were the longest lead time item.  We were waiting for a set of Robert Pond's heads from a new casting batch that he was expecting, but when this was delayed, we managed to get a set of new Pond heads from my friend Kurt Neighbor in Ohio.  Because this was not a max effort build, we chose to go with the Ferrea hollow stem valves for the SOHC.  These don't flow as well as the Manley valves I've used before, or the Trick Titanium valves I have now, but they are reasonably priced and lightweight, allowing us to keep the valve spring pressure in a reasonable range.  After the valve job, the intakes flowed about 370 at 0.700" lift, and I fitted the heads with Comp 943 springs, set up with about 220 pounds on the seat and 585 pounds at peak lift.  Based on previous tests, these heads would have flowed over 400 cfm with the Manley valves, but would have required a heavier spring setup.  Here is a picture of a completed head, and then the heads mounted on the short block:


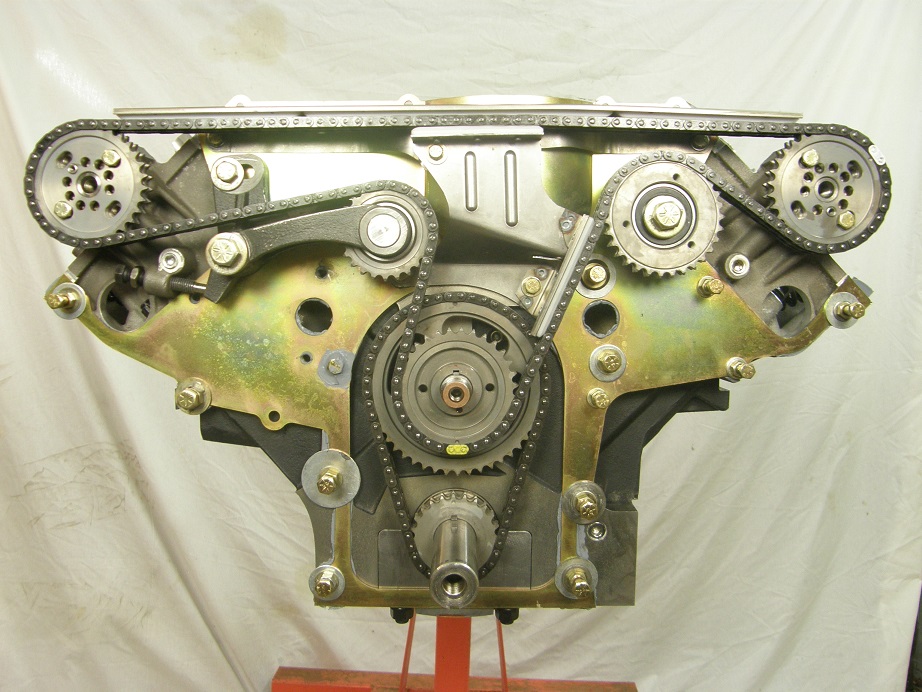
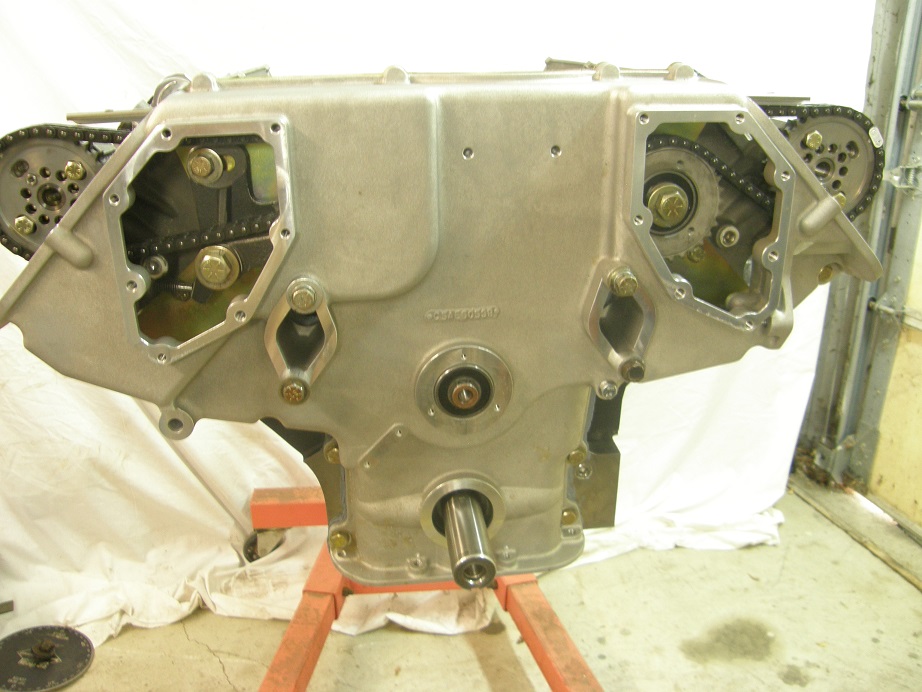
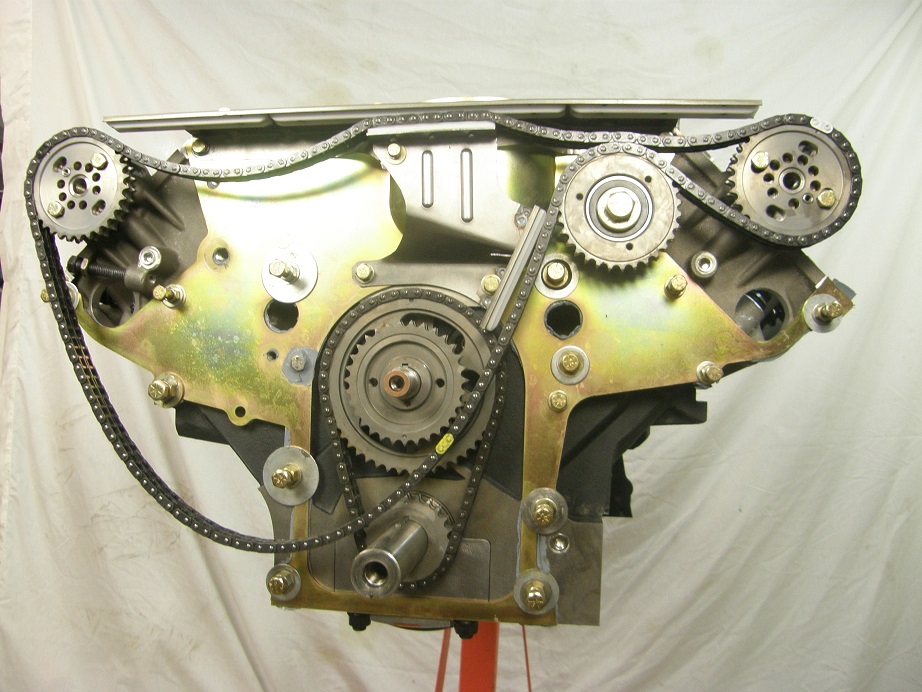
After the heads were installed I spent a few days getting the timing setup done.  This is a two step process, where the backing plate is installed and sealed to the heads and block, the sealer is allowed to dry, and then the timing setup is installed, and then finally the front cover.  I checked piston to valve clearance after mocking up the timing setup, and was surprised by how much there was, over 0.200" on the intake and at least 0.170" on the exhaust.  With the cam timing varying due to chain stretch, you'd like to have as much clearance as possible, so this was a great result.  Finally after getting the timing setup done I installed the front cover, and was really surprised at how well it fit.  I'm used to fighting with these things to make them go together at this point, but this front cover just slid right into place with no drama at all.  After buttoning it all up, I was very confident that it would be leak-free.  On the dyno, of course, it turned out that my confidence had been unwarranted  :(  More on that later.  Pictures below show some of the steps of assembling the timing setup and front cover:


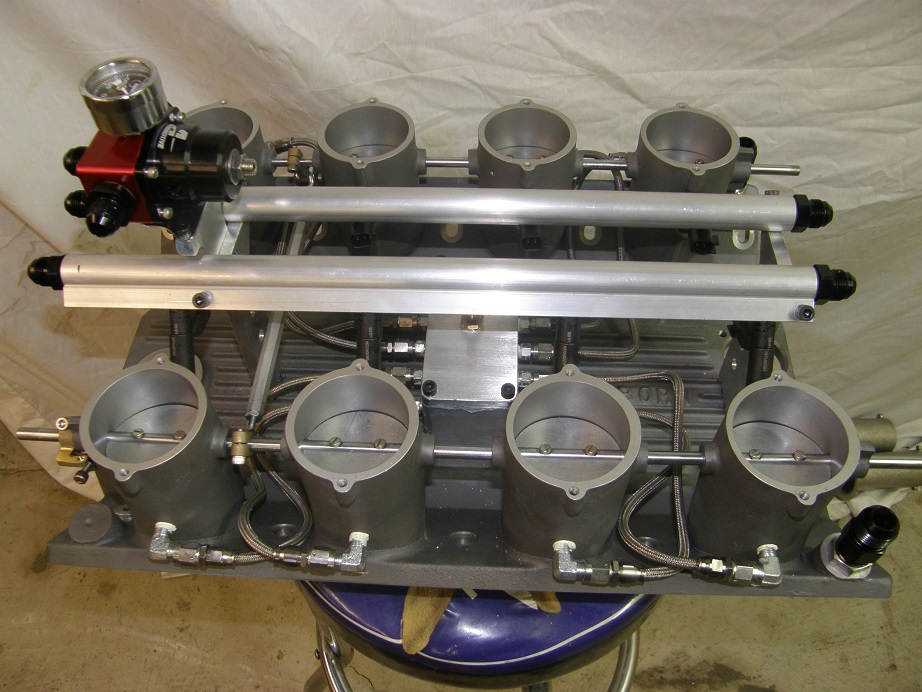
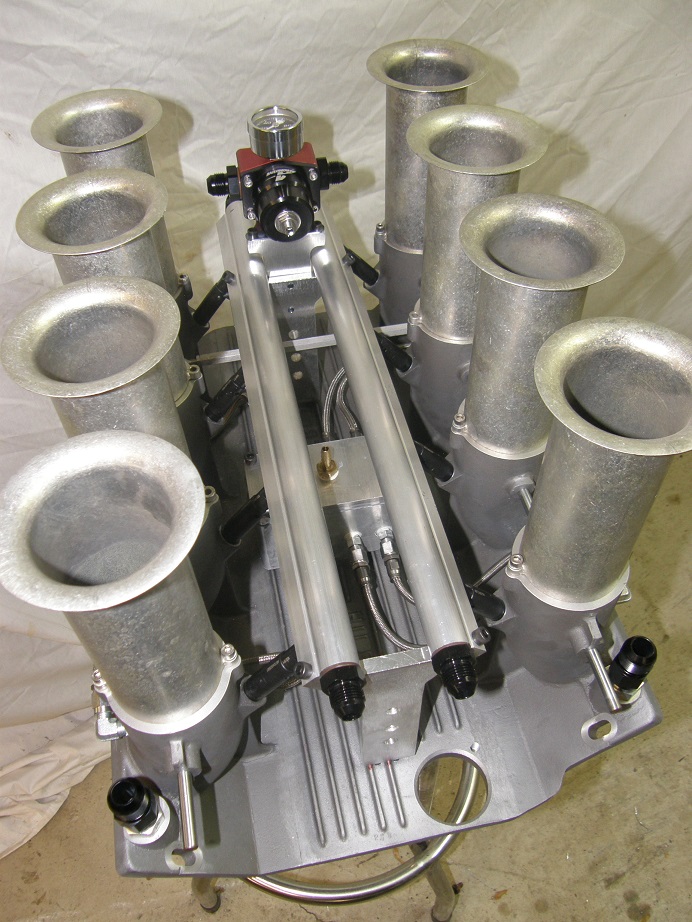
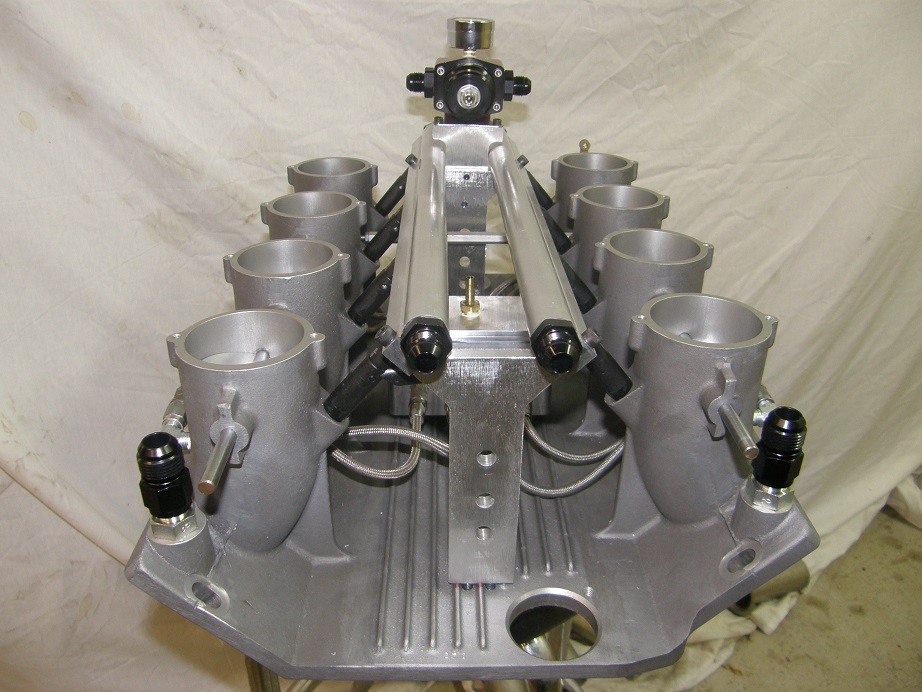
For induction, my friend wanted to go with a setup similar to the one I used on my 64 Galaxie in 2009, which is the Hilborn injector setup converted to EFI.  This setup made lots of power and was very easy to handle in normal street driving applications, plus of course the eye appeal can't be beat.  He purchased the base Hilborn mechanical injector setup and gave it to me to convert to EFI.  This involved machining the Hilborn manifold to accept EFI injectors, making up fuel rails to match the manifold, machining brackets that bolt to the base of the Hilborn setup and support the fuel rails, machining a bracket to mount the fuel pressure regulator, fitting the supplied throttle position sensor to the Hilborn manifold, and finally machining a vacuum box, where a vacuum line from each intake runner feeds in to a common volume.  From this volume, you can get a stable vacuum signal for use by the EFI system; if you try to use just one of the runners for this signal, there is too much pulsing and it will lead to erratic control by the EFI system.  The Hilborn setup with the modifications I made is shown in the photos below:


After mounting the HIlborn setup on the engine, it looked something like this:


Last step was to install the valvetrain.  The cams we selected for this engine are Comp Cams grind 8594 on both intake and exhaust, with a 112 LSA.  These cams have a 300 degree advertised duration, 277@0.050" lobe lift, and 0.723" gross lift with a 1.3:1 rocker arm ratio.  This is probably equivalent to about a 265@0.050" lobe lift wedge FE cam, given the difference in rocker ratio between the SOHC and a wedge engine.  For rocker arms, we selected my new FE Power SOHC rocker arms.  If you have read about my Drag Week exploits with these engines, you know all about the problems with rocker arms I've had, all related to the fact that the needle bearings in stock and aftermarket SOHC rocker arms rely on splash oiling for lubrication, and at low engine speeds and during idling, there is not enough splash to keep the needle bearings lubricated.  So, they fail, with somewhat disastrous consequences.  My new SOHC rockers do away with the needle bearings in favor of a bushing, and they are designed to provide direct, full time pressure oiling to the bushing.  They should last as long, or longer, than any bushed roller lifter with a similar system; the Morel Black Mamba lifters come to mind. 

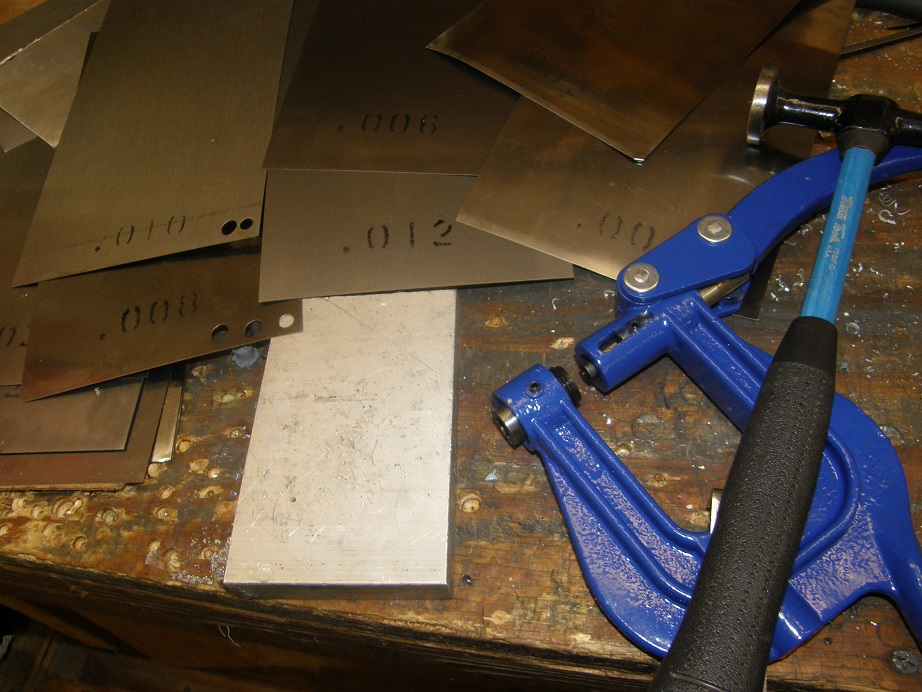
Although I plan to do some of these SOHC rocker arms with normal adjusters, my first versions use a roller tip to decrease weight over the valve stem, and avoid the scrubbing action of the adjustable tip across the valve tip, which Bill Conley has shown can cause excessive heat buildup.  Back in the day, this was done with lash caps of varying thicknesses, but I didn't have access to any way of grinding the lash caps to the proper thickness.  So, when I had first assembled the heads I had mocked up the valvetrain, then cut the valve stems so that with the lash caps and rockers installed, lash would be around 0.030" to 0.040".  Then, after getting the engine all assembled, I punched out steel discs, 5/16" in diameter and of varying thicknesses, and put them under the lash caps, to get the valve lash into the 0.020" range.   The punch I bought was a cheap one from Eastwood, and the metal circles that came out needed to be hammered flat, but after installing them I was able to get the lash right where I wanted it.  The pictures below show the punch tool and shim stock I used to get the lash set up correctly, then some photos of the valvetrain:
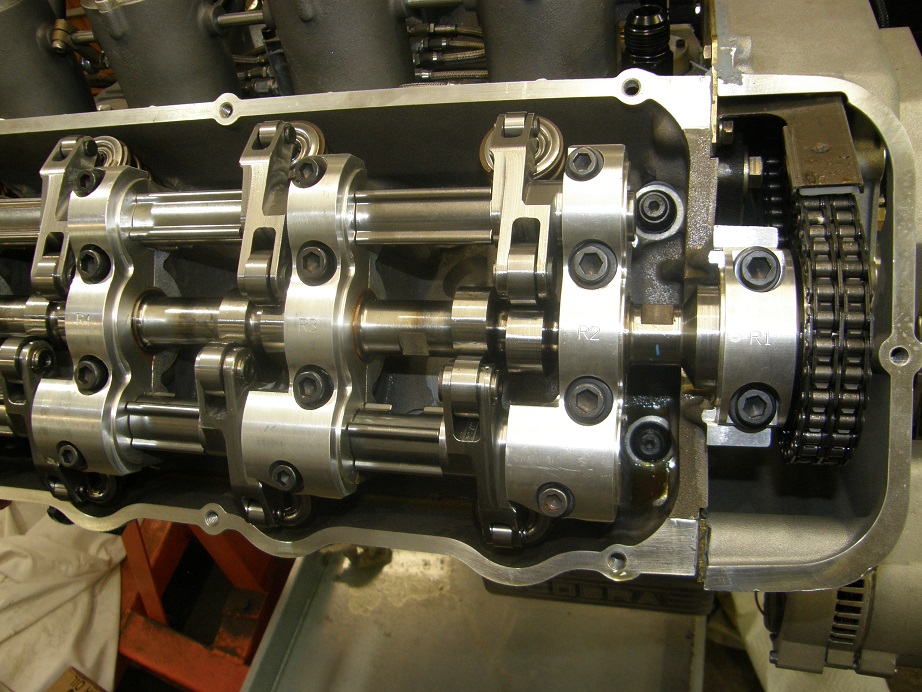

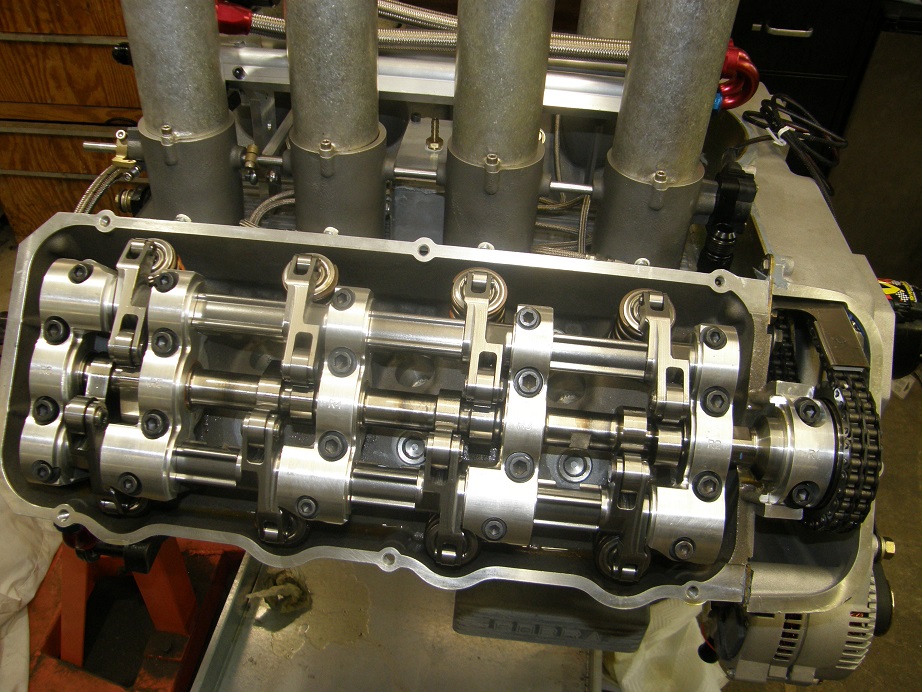


By the way, I have heard some reports that the Pond SOHC heads don't clamp the rocker arm shafts like they should; that if the pin that holds the shaft in place fails for some reason, the shafts can come sliding out.  I was prepared to machine 0.010" off the ends of the caps on these heads if I found that problem, but that was not the case here; as delivered, these heads clamped the shafts very securely, so no issues with that.

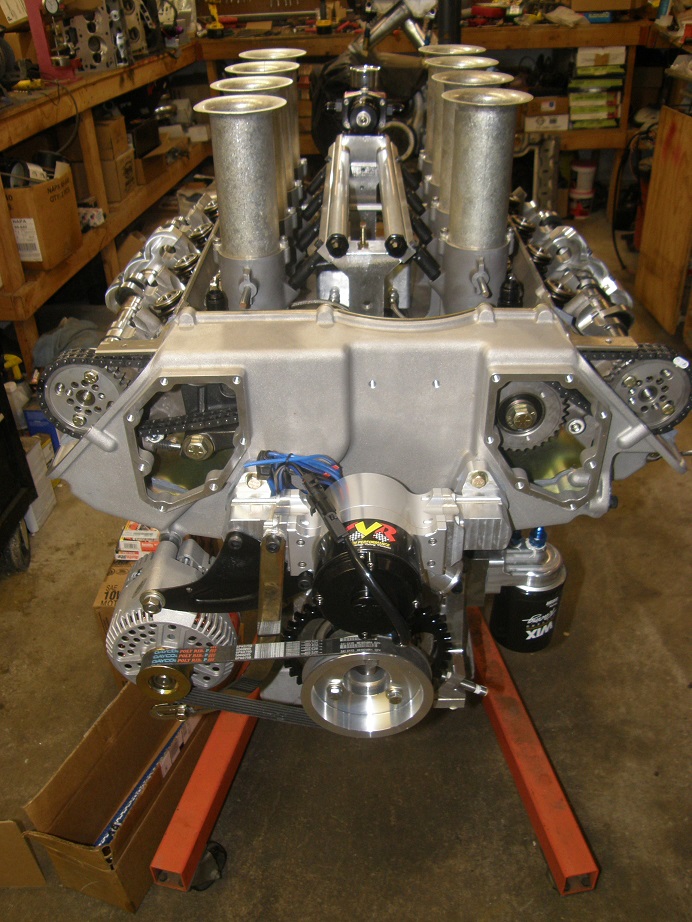
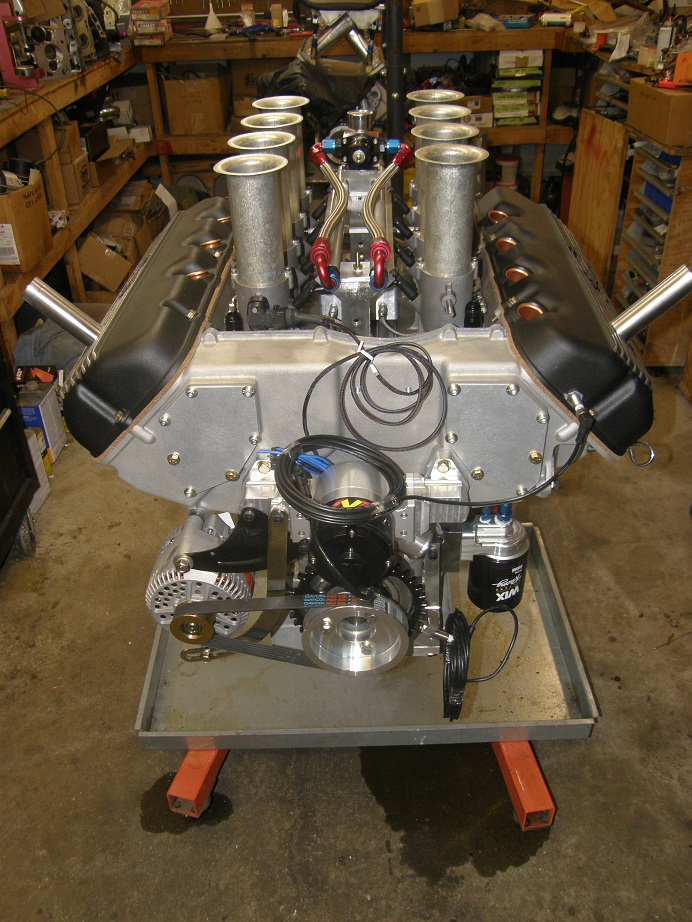
I finally got the engine all buttoned up last weekend, here's a picture:


Last Sunday night I got it installed on the dyno and completed most of the mechanical hookup on Monday.  Tuesday, I spent the entire day wiring up the EFI system.  This engine is similar to my race engine and the dyno mule I did last year, with full sequential fuel injection featuring a crank sensor, a cam sensor, 60 pound Ford injectors, and 8 individual coil packs.  In order to do a neat job wiring it all up, I mounted some of the required electronic parts on a board, and put them on the back of the dyno stand.  The picture below shows this board with two MSD capacitors that function as noise filters for the EFI setup; electrical noise is the enemy of EFI, so these caps ensure a clean power supply to the EFI box, coils, and injectors.  There are also three fused relays (one for the EFI box, one for the injectors, and one for the coils), plus an Innovate Motorsports wideband oxygen sensor controller.  And of course, the MS3-Pro EVO fuel injection system.
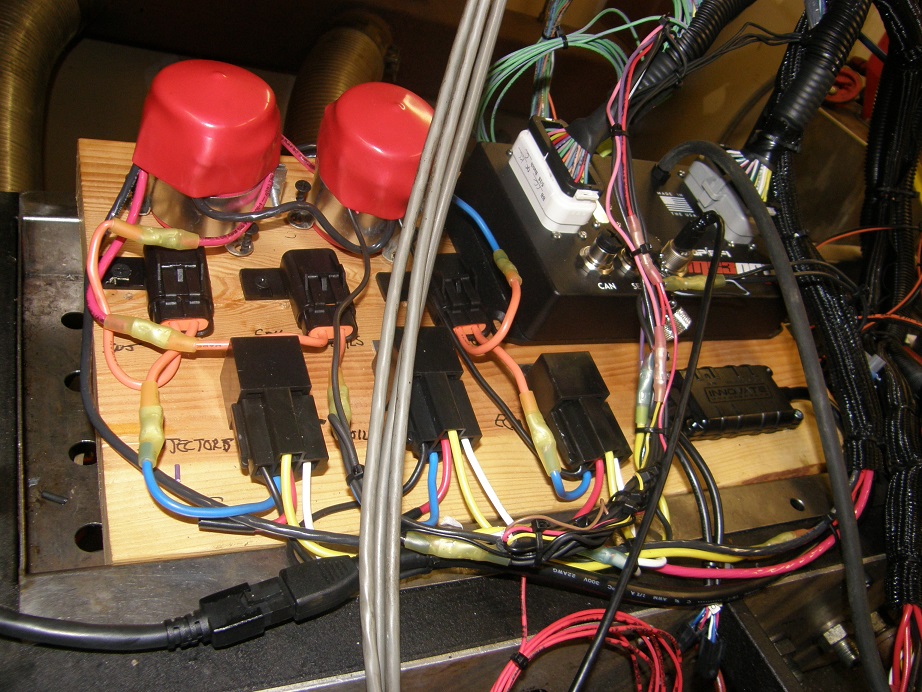


Note that in this picture, the three gray wires in the foreground are dyno related and not related to the EFI system.  Also a USB cable is attached to the MS3-Pro, and a vacuum line from the vacuum box on the intake manifold is also connected to the MS3-Pro.  The two large cables coming out of the MS3-Pro go to the coils, fuel injectors, and all the sensors.

Finally late on Tuesday night I got the last of the wiring done; I had not had time to make up the spark plug wires and we were going to dyno on Wednesday, so I figured we could just make them up in the morning. 

Some dyno session go easily, and some don't.  This one did not.  Wednesday morning my friend arrived, with his headers and engine mounts which we thought we might use.  However, test fitting the headers showed some obvious fit issues, so we decided to use my dyno headers instead.  After getting them installed, we got to work on making up the plug wires.  The SOHC uses a special grommet that fits over the plug wires and keeps water out of the spark plug tubes, so these have to be slid on to the plug wires before you put the ends on.  This turned out to be a huge pain, and very unexpected, because I'd never had an issue with these before.  The plug wires just didn't want to go through those grommets.  Maybe the rubber was too hard, or the hole in the grommet was too small, or something, but in any case it seemed like we spent hours working on this.  Finally what seemed to work the best was running a drill through the middle of the grommets to take out some of the rubber; then the wires slipped through fairly easily.  In the end it was after noon before we finally got the spark plug wires installed.

Next up was some computer issues.  My friend had brought his son's laptop, which uses Windows 10.  I don't have a Windows 10 computer, so I'm not familiar with the setups, and after hooking it up to the EFI box, I couldn't get the communication link between the computer and the EFI box to work.  My friend did a search online and we figured that out fairly quickly, and I uploaded a starting tune into the MS3-Pro.  After getting the software configured to my satisfaction, I tried to start up the dyno computer.  Unfortunately, it was dead.  I had smelled some burning electronics a few days earlier, and was suspicious of the dyno computer, but it had been working OK on Tuesday.  Wednesday, it failed completely.  So, no dynoing the engine on Wednesday.  We decided to start it anyway, and after correcting an error in the MAP sensor setup, the engine fired right off and sounded pretty good.  We played around with it a little on Wednesday, but quit about 5:00 PM.  I needed to get the dyno computer fixed, and resolve a couple of other problems, including an oil leak at the front cover, and also a water leak by the front bolt of the Hilborn manifold.  The oil leak was a surprise, because the front cover had installed so nicely, but there are a couple of large gaps between bolts on the left side of the front cover, and these engines can be prone to leaking there; that is where the leak was coming from.  We also had an oil leak at the left front of the intake manifold, but that was easily sealed up.  However, the Hilborn manifolds are FAMOUS for leaking water at the front bolts, so if you install one of these be very careful when sealing it.  Despite my best efforts we still had an occasional drip of water coming from that front bolt on Wednesday.

The dyno computer was a concern.  Superflow doesn't support the 901 dyno anymore, and the dyno software will not run on any operating system past Windows XP.  So, you can't just transfer the software to a new computer.  And Superflow wants some exorbitant amount of money, more than $30,000 if I recall correctly, to update the dyno software so it will run on Windows 7.  So if the dyno computer failure had been the motherboard or disk drive, there was no fast way for me to fix it.  Fortunately, late on Wednesday night I plugged in a spare computer power supply, and the computer came right up, so that problem went away fairly quickly.  On Thursday I worked on getting the front cover leak fixed and the water leak sealed up, and also addressed some issues with the throttle linkage and the oxygen sensor, which had not been reading correctly. 

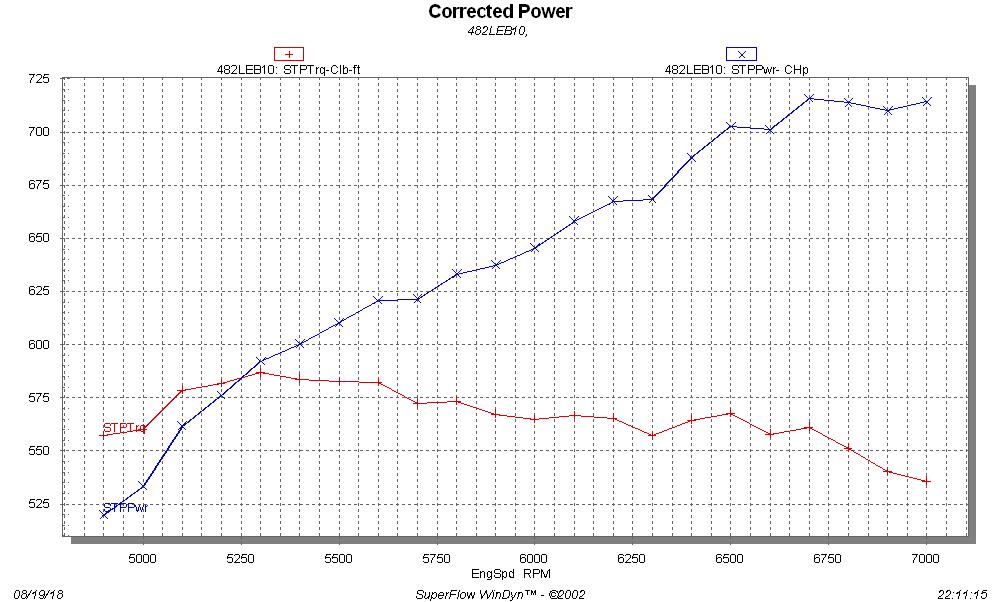
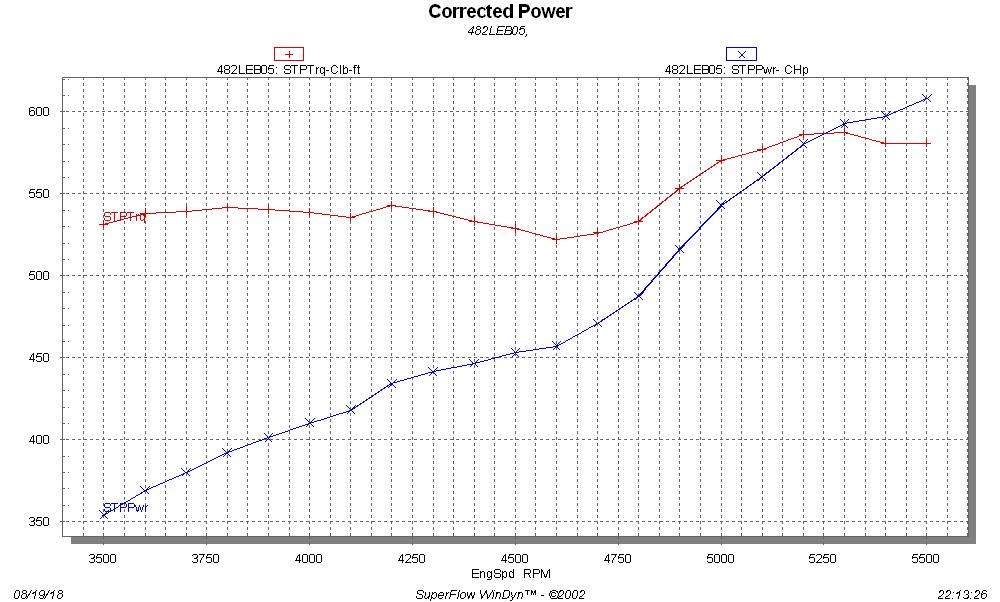
Friday afternoon, we tried again, and this time had pretty good luck.  Before my friend arrived I worked on getting the engine to idle and transition into the dyno pulls smoothly.  My 585" SOHC would idle at about 750 RPM with the Hilborn setup, and I was able to get this engine down to 750-800 RPM, but it felt better at around 900 RPM so that's where I left it.  The O2 sensor hooked to the EFI system still wasn't working right, but eventually this was traced to an intermittent power connection to the Innovate Motorsports O2 sensor controller; once that was corrected, the O2 sensor readings from the two dyno oxygen sensor and the oxygen sensor connected to the EFI system were very close.  I ran one checkout pull from 3000 to 5000 RPM before my friend arrived, and the engine sounded great and was making good power.  After he arrived, it was a simple matter to advance the RPM range and tune the air/fuel system using the three O2 sensors and the VE table on the computer.  In the end, the engine sounded great and made about 587 lb-ft of torque at 5300 RPM, and 715 HP at 6700 RPM.  A low RPM pull and  high RPM pull are shown in the graphs below.  Note that this engine wants to rev even higher, and it would not surprise me if it kept making 700+ HP well past 7500 RPM. 


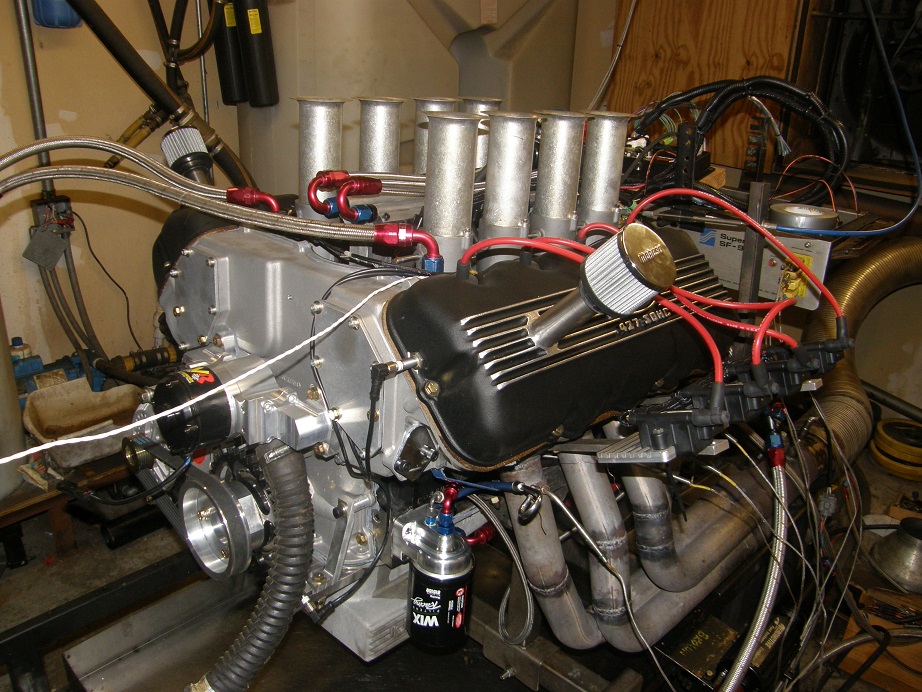
Here's a picture of the engine on the dyno:


I have a video of one of the dyno pulls, so I will post that in this thread a little later.

Lastly, as some of you may noticed we had a little dust-up over correction factors on the dyno a few weeks ago.  The numbers in the graphs are corrected to standard dyno conditions, which are 29.92" of mercury (sea level), zero humidity, and 60 degrees Fahrenheit.  For this dyno session, the correction factor was 7.3%.  Inlet air temperature was 86 degrees F, barometer was 29.18 inches of mercury, and vapor pressure was 0.60.  There is no inertia correction on this Superflow dyno, but all tests were run at a speed of 300 RPM/second.

More details on this engine are in the Dyno Results board, see the link below.  Any questions on these results, please let me know - Jay

http://fepower.net/simplemachinesforum/index.php?topic=6370.0
« Last Edit: August 20, 2018, 10:31:20 AM by jayb »
Jay Brown
- 1969 Mach 1, Drag Week 2005 Winner NA/BB, 511" FE (10.60s @ 129); Drag Week 2007 Runner-Up PA/BB, 490" Supercharged FE (9.35 @ 151)
- 1964 Ford Galaxie, Drag Week 2009 Winner Modified NA (9.50s @ 143), 585" SOHC
- 1969 Shelby Clone, Drag Week 2015 Winner Modified NA (Average 8.98 @ 149), 585" SOHC


WConley

  • Hero Member
  • *****
  • Posts: 1160
  • No longer walking funny!
    • View Profile
Re: 482" Street SOHC
« Reply #1 on: August 20, 2018, 12:47:49 AM »
Jay - That is so nice!  What a sweet street combo with great torque for a heavy car. 

I'm looking forward to hearing more about the double roller bushed rockers.  Those will be on a Christmas list for sure!
A careful study of failure will yield the ingredients for success.

jayb

  • Administrator
  • Hero Member
  • *****
  • Posts: 7405
    • View Profile
    • FE Power
Re: 482" Street SOHC
« Reply #2 on: August 20, 2018, 09:55:08 AM »
Click on the link below for the 5000-7000 RPM dyno pull, that netted the results shown in the second graph above.

https://youtu.be/jO8pmZqfMo8
Jay Brown
- 1969 Mach 1, Drag Week 2005 Winner NA/BB, 511" FE (10.60s @ 129); Drag Week 2007 Runner-Up PA/BB, 490" Supercharged FE (9.35 @ 151)
- 1964 Ford Galaxie, Drag Week 2009 Winner Modified NA (9.50s @ 143), 585" SOHC
- 1969 Shelby Clone, Drag Week 2015 Winner Modified NA (Average 8.98 @ 149), 585" SOHC


cjshaker

  • Hero Member
  • *****
  • Posts: 4460
    • View Profile
Re: 482" Street SOHC
« Reply #3 on: August 20, 2018, 10:58:00 AM »
Are those rockers aluminum or steel? They look kinda thin if they're aluminum, at least compared to what I'm used to seeing. If steel, that explains it.

Nice build, with an incredibly flat torque curve!
Doug Smith


'69 R-code Mach 1, 427 MR, 2x4, Jerico, 4.30 Locker
'70 F-350 390
'55 Ford Customline 2dr
'37 Ford Coupe

jayb

  • Administrator
  • Hero Member
  • *****
  • Posts: 7405
    • View Profile
    • FE Power
Re: 482" Street SOHC
« Reply #4 on: August 20, 2018, 11:12:21 AM »
They are 4130 steel rocker bodies.  They should be good for well over 1500 pounds of valve spring pressure (like anyone is ever going to go THERE  ;D)
Jay Brown
- 1969 Mach 1, Drag Week 2005 Winner NA/BB, 511" FE (10.60s @ 129); Drag Week 2007 Runner-Up PA/BB, 490" Supercharged FE (9.35 @ 151)
- 1964 Ford Galaxie, Drag Week 2009 Winner Modified NA (9.50s @ 143), 585" SOHC
- 1969 Shelby Clone, Drag Week 2015 Winner Modified NA (Average 8.98 @ 149), 585" SOHC


e philpott

  • Hero Member
  • *****
  • Posts: 923
    • View Profile
Re: 482" Street SOHC
« Reply #5 on: August 20, 2018, 11:20:34 AM »
Beautiful !! Love the Rocker Arms too !

FElony

  • Guest
Re: 482" Street SOHC
« Reply #6 on: August 20, 2018, 11:23:27 AM »
Finally! A Grassroots Cammer build! Oh boy, I'm gonna build one just like it! Let's see... I have an oil filter, a fuel pump block-off, and a lower radiator hose! I'm halfway there! Yippee!

Seriously, awesome engine.   8)

Heo

  • Hero Member
  • *****
  • Posts: 3287
    • View Profile
Re: 482" Street SOHC
« Reply #7 on: August 20, 2018, 03:44:17 PM »
 
Finally! A Grassroots Cammer build! Oh boy, I'm gonna build one just like it! Let's see... I have an oil filter, a fuel pump block-off, and a lower radiator hose! I'm halfway there! Yippee!

Seriously, awesome engine.   8)
I think i have material for a board for the Electronics ... Jay can i use  slow grown pine?
knot free i supose... or shall i aime for oak right away ;D ;D
Love the engine 8)


The defenition of a Gentleman, is a man that can play the accordion.But dont do it

Leny Mason

  • Sr. Member
  • ****
  • Posts: 368
    • View Profile
Re: 482" Street SOHC
« Reply #8 on: August 21, 2018, 07:12:10 AM »
Cool Jay, Can you show were the inherit leaks are so I can address them early on I was thing about making studs for the water pump so they will hold the back cover tight when you remove the front cover, I know on some engines when you loosen the cover they pull the seal loose on the back, we are still putting mine together thanks for the pictures. Leny Mason 

machoneman

  • Hero Member
  • *****
  • Posts: 3853
    • View Profile
Re: 482" Street SOHC
« Reply #9 on: August 21, 2018, 08:20:59 AM »
Very cool Jay! Thanks for sharing.  8)
Bob Maag

preaction

  • Sr. Member
  • ****
  • Posts: 257
    • View Profile
Re: 482" Street SOHC
« Reply #10 on: August 21, 2018, 11:05:09 AM »
Jay, thanks for sharing a great build from parts to dyno testing your attention to deatail is awesome could there be a book to written around this kind of info for Cammers ?

TimeWarpF100

  • Hero Member
  • *****
  • Posts: 683
    • View Profile
Re: 482" Street SOHC
« Reply #11 on: August 21, 2018, 11:37:28 PM »
very cool Jay! Did watch the vid when you first posted it.

cobracammer

  • Hero Member
  • *****
  • Posts: 1165
    • View Profile
Re: 482" Street SOHC
« Reply #12 on: August 22, 2018, 09:46:15 AM »
Awesome!  Thank you for posting Jay!  Might upgrade to your rockers too when they are available
Jason
2005 Saleen S281 (427 SOHC 2 X 4 EFI swap), T56 Magnum XL 6 speed, 9" Currie rear with 3.89 Gears

ToddK

  • Sr. Member
  • ****
  • Posts: 437
    • View Profile
Re: 482" Street SOHC
« Reply #13 on: August 22, 2018, 09:53:56 AM »
Nice write and and result Jay. Should make the big car move out. I know what you mean about coolant leaks with the Hilborn manifold, took a couple of attempts to get mine water tight.

Any idea when your rocker arms will be available for sale?

turbohunter

  • Hero Member
  • *****
  • Posts: 2509
    • View Profile
Re: 482" Street SOHC
« Reply #14 on: August 22, 2018, 10:27:53 AM »
Drool worthy.
« Last Edit: August 22, 2018, 02:30:13 PM by turbohunter »
Marc
'61 F100 292Y
'66 Mustang Injected 428
'66 Q code Country Squire wagon


MRadke

  • Full Member
  • ***
  • Posts: 135
    • View Profile
Re: 482" Street SOHC
« Reply #15 on: August 22, 2018, 11:07:57 AM »
Do you anticipate any fretting of the shims that are under the lash caps?  I like the look of the roller rockers, which appear to be a great solution to adjuster problems on previous efforts.

Barry_R

  • Hero Member
  • *****
  • Posts: 1915
    • View Profile
    • Survival Motorsports
Re: 482" Street SOHC
« Reply #16 on: August 22, 2018, 11:13:09 AM »
Double roller rocker arms definitely work.
Have been running those for several years now.
I ran/made selective thickness lash caps - a bit more work (OK - more than a bit...)
I definitely prefer the bushing fulcrum - same general idea - problematic parts that are not on the engine cannot fail in service.

jayb

  • Administrator
  • Hero Member
  • *****
  • Posts: 7405
    • View Profile
    • FE Power
Re: 482" Street SOHC
« Reply #17 on: August 22, 2018, 08:14:08 PM »
Jay, thanks for sharing a great build from parts to dyno testing your attention to deatail is awesome could there be a book to written around this kind of info for Cammers ?

I'm planning to write one, I've got an outline and a bunch of technical drawings and photos from my own engines, but I haven't really gotten started on the text yet.  Too many other things going on, but I will get it done at some point...
Jay Brown
- 1969 Mach 1, Drag Week 2005 Winner NA/BB, 511" FE (10.60s @ 129); Drag Week 2007 Runner-Up PA/BB, 490" Supercharged FE (9.35 @ 151)
- 1964 Ford Galaxie, Drag Week 2009 Winner Modified NA (9.50s @ 143), 585" SOHC
- 1969 Shelby Clone, Drag Week 2015 Winner Modified NA (Average 8.98 @ 149), 585" SOHC


jayb

  • Administrator
  • Hero Member
  • *****
  • Posts: 7405
    • View Profile
    • FE Power
Re: 482" Street SOHC
« Reply #18 on: August 22, 2018, 08:22:25 PM »
Nice write and and result Jay. Should make the big car move out. I know what you mean about coolant leaks with the Hilborn manifold, took a couple of attempts to get mine water tight.

Any idea when your rocker arms will be available for sale?

I remember you mentioned the issue you had with the Hilborn manifold, and it didn't surprise me LOL!  Every time with those I've had some kind of a minor water leak issue; I thought I had it licked with this one, but it ended up dripping just a little.  I think it has to do with how they slot the bolt holes in the manifold;  the slot comes very close to the water jacket hole in the head and the manifold and it's tough for the sealer to hold.  What I've done, in this case and with my own engines, is make a steel or aluminum plate with a hole in it for the front bolt.  I cut a bevel into that hole, and put an O-ring around the bolt, so that when the bolt tightens up the O-ring seals around the bolt head and the bevel in the plate.  The plate covers up the entire slot in the manifold, so that if water does leak into that bolt slot, it has to try to go up the hole, where it is stopped by the O-ring.  Seems to be an effective fix.

I actually have five more sets of my rockers in process but they are all spoken for.  I think I will make up more early next year, but before I do I will get a list together of people who want them.  Watch the Vendor Classifieds section for that.
Jay Brown
- 1969 Mach 1, Drag Week 2005 Winner NA/BB, 511" FE (10.60s @ 129); Drag Week 2007 Runner-Up PA/BB, 490" Supercharged FE (9.35 @ 151)
- 1964 Ford Galaxie, Drag Week 2009 Winner Modified NA (9.50s @ 143), 585" SOHC
- 1969 Shelby Clone, Drag Week 2015 Winner Modified NA (Average 8.98 @ 149), 585" SOHC


jayb

  • Administrator
  • Hero Member
  • *****
  • Posts: 7405
    • View Profile
    • FE Power
Re: 482" Street SOHC
« Reply #19 on: August 22, 2018, 08:27:24 PM »
Do you anticipate any fretting of the shims that are under the lash caps?  I like the look of the roller rockers, which appear to be a great solution to adjuster problems on previous efforts.

No, I'm pretty sure that won't happen, the lash cap should settle into position after the shim is installed and not move. 
Jay Brown
- 1969 Mach 1, Drag Week 2005 Winner NA/BB, 511" FE (10.60s @ 129); Drag Week 2007 Runner-Up PA/BB, 490" Supercharged FE (9.35 @ 151)
- 1964 Ford Galaxie, Drag Week 2009 Winner Modified NA (9.50s @ 143), 585" SOHC
- 1969 Shelby Clone, Drag Week 2015 Winner Modified NA (Average 8.98 @ 149), 585" SOHC


jayb

  • Administrator
  • Hero Member
  • *****
  • Posts: 7405
    • View Profile
    • FE Power
Re: 482" Street SOHC
« Reply #20 on: August 22, 2018, 09:38:30 PM »
Cool Jay, Can you show were the inherit leaks are so I can address them early on I was thing about making studs for the water pump so they will hold the back cover tight when you remove the front cover, I know on some engines when you loosen the cover they pull the seal loose on the back, we are still putting mine together thanks for the pictures. Leny Mason

Leny, the front covers tend to leak on the bottom at the outboard sides of the cover.  I like your idea of making studs for the water pump attachment, but wouldn't you have to counterbore the cover to put a nut on each stud?  If you can do that, it would probably work pretty well.
Jay Brown
- 1969 Mach 1, Drag Week 2005 Winner NA/BB, 511" FE (10.60s @ 129); Drag Week 2007 Runner-Up PA/BB, 490" Supercharged FE (9.35 @ 151)
- 1964 Ford Galaxie, Drag Week 2009 Winner Modified NA (9.50s @ 143), 585" SOHC
- 1969 Shelby Clone, Drag Week 2015 Winner Modified NA (Average 8.98 @ 149), 585" SOHC


Leny Mason

  • Sr. Member
  • ****
  • Posts: 368
    • View Profile
Re: 482" Street SOHC
« Reply #21 on: August 23, 2018, 09:07:49 AM »
Jay I was thinking of putting a step on the stud were the backing plate is then make room for that on the back of the cover then it would be long enough to hold the water pump, can you think of any problems with that, can you show with an arrow were the leaks are thanks. Leny Mason

wowens

  • Sr. Member
  • ****
  • Posts: 442
    • View Profile
Re: 482" Street SOHC
« Reply #22 on: August 25, 2018, 03:41:01 PM »
I had about  given up on the dream of having a cammer.  This has re-energized me.
Thanks
Woody

wcbrowning

  • Jr. Member
  • **
  • Posts: 82
    • View Profile
Re: 482" Street SOHC
« Reply #23 on: August 26, 2018, 10:05:03 AM »
Jay, what size stacks did you use here, and will they fit under his hood?  If they will fit under the hood, will he need the teardrop?  How much clearance will he have?  Thanks.


jayb

  • Administrator
  • Hero Member
  • *****
  • Posts: 7405
    • View Profile
    • FE Power
Re: 482" Street SOHC
« Reply #24 on: August 26, 2018, 10:35:46 AM »
I didn't measure them, but as is they won't fit under the Galaxie hood.  They would probably fit under a teardrop hood though.  He was going to cut them off and add K&N or equivalent air cleaners I think.  Here's a couple of pictures of the SOHC in my Galaxie, which has longer stacks than the ones on this engine.  You can see how far these stacks poke through the stock flat hood.


Jay Brown
- 1969 Mach 1, Drag Week 2005 Winner NA/BB, 511" FE (10.60s @ 129); Drag Week 2007 Runner-Up PA/BB, 490" Supercharged FE (9.35 @ 151)
- 1964 Ford Galaxie, Drag Week 2009 Winner Modified NA (9.50s @ 143), 585" SOHC
- 1969 Shelby Clone, Drag Week 2015 Winner Modified NA (Average 8.98 @ 149), 585" SOHC


My427stang

  • Hero Member
  • *****
  • Posts: 3929
    • View Profile
Re: 482" Street SOHC
« Reply #25 on: August 26, 2018, 10:39:23 AM »
Jey, what was the mildest cammer you ever built and how did it perform?

Not that I have any ideas in mind, I just wonder how they do if shifting the peak down a bit.  It's amazing the power they make

If I caught you before you reply, I was thinking stroker, not stock displacement
« Last Edit: August 26, 2018, 10:46:02 AM by My427stang »
---------------------------------
Ross
Bullock's Power Service, LLC
- 70 Fastback Mustang, 489 cid FE, Victor, SEFI, Erson SFT cam, TKO-600 5 speed, 4.11 9 inch.
- 71 F100 shortbed 4x4, 461 cid FE, headers, Victor Pro-flo EFI, Comp Custom HFT cam, 3.50 9 inch

Barry_R

  • Hero Member
  • *****
  • Posts: 1915
    • View Profile
    • Survival Motorsports
Re: 482" Street SOHC
« Reply #26 on: August 26, 2018, 01:40:10 PM »
Not Jay....but I did one that was stock heads, stock 2x4 intake and carbs, stock replacement cams from LSM.  Had 10.5:1 compression and a 428 crank - probably offset each other a bit.  Made about 614....

jayb

  • Administrator
  • Hero Member
  • *****
  • Posts: 7405
    • View Profile
    • FE Power
Re: 482" Street SOHC
« Reply #27 on: August 26, 2018, 02:04:26 PM »
I think the lowest HP one that I did was Jason's, made about 625 HP and 550+ lb-ft of torque if I recall correctly.  Nice, streetable engine with a huge torque band...
« Last Edit: August 26, 2018, 03:22:48 PM by jayb »
Jay Brown
- 1969 Mach 1, Drag Week 2005 Winner NA/BB, 511" FE (10.60s @ 129); Drag Week 2007 Runner-Up PA/BB, 490" Supercharged FE (9.35 @ 151)
- 1964 Ford Galaxie, Drag Week 2009 Winner Modified NA (9.50s @ 143), 585" SOHC
- 1969 Shelby Clone, Drag Week 2015 Winner Modified NA (Average 8.98 @ 149), 585" SOHC


turbohunter

  • Hero Member
  • *****
  • Posts: 2509
    • View Profile
Re: 482" Street SOHC
« Reply #28 on: August 26, 2018, 02:22:16 PM »
Hah that’s awesome, 625 streetable.
I know these days that’s not a big deal with blowers and such but that’s supposedly “old” tech.
Makes me smile.
Marc
'61 F100 292Y
'66 Mustang Injected 428
'66 Q code Country Squire wagon


My427stang

  • Hero Member
  • *****
  • Posts: 3929
    • View Profile
Re: 482" Street SOHC
« Reply #29 on: August 26, 2018, 02:54:02 PM »
Pretty wild what a good set of heads does
---------------------------------
Ross
Bullock's Power Service, LLC
- 70 Fastback Mustang, 489 cid FE, Victor, SEFI, Erson SFT cam, TKO-600 5 speed, 4.11 9 inch.
- 71 F100 shortbed 4x4, 461 cid FE, headers, Victor Pro-flo EFI, Comp Custom HFT cam, 3.50 9 inch

Barry_R

  • Hero Member
  • *****
  • Posts: 1915
    • View Profile
    • Survival Motorsports
Re: 482" Street SOHC
« Reply #30 on: August 26, 2018, 03:18:39 PM »
I think that was Jason's, made about 625 HP and 550+ lb-ft of torque if I recall correctly.  Nice, streetable engine with a huge torque band...

Actually the one I am referencing belongs to a guy name Tom here in Michigan.  He has it in a black 63.5 Galaxie with a TKO600 and drives it around as if it were a stock 352 car - freeway, road trips, local grocery runs, etc.

jayb

  • Administrator
  • Hero Member
  • *****
  • Posts: 7405
    • View Profile
    • FE Power
Re: 482" Street SOHC
« Reply #31 on: August 26, 2018, 03:23:20 PM »
Sorry Barry, I was talking about one of the ones I did.  I edited my post to make that clearer.
Jay Brown
- 1969 Mach 1, Drag Week 2005 Winner NA/BB, 511" FE (10.60s @ 129); Drag Week 2007 Runner-Up PA/BB, 490" Supercharged FE (9.35 @ 151)
- 1964 Ford Galaxie, Drag Week 2009 Winner Modified NA (9.50s @ 143), 585" SOHC
- 1969 Shelby Clone, Drag Week 2015 Winner Modified NA (Average 8.98 @ 149), 585" SOHC


Barry_R

  • Hero Member
  • *****
  • Posts: 1915
    • View Profile
    • Survival Motorsports
Re: 482" Street SOHC
« Reply #32 on: August 26, 2018, 08:16:41 PM »
No problem at all.  Similar builds and similar results back up both the results and the dyno data - - good in all ways.

Can you imagine how impressive those numbers must have been in 1965?

wowens

  • Sr. Member
  • ****
  • Posts: 442
    • View Profile
Re: 482" Street SOHC
« Reply #33 on: August 28, 2018, 02:47:17 PM »
Jay, do you have a image showing the oil ring supports installed you can post ?
Woody

jayb

  • Administrator
  • Hero Member
  • *****
  • Posts: 7405
    • View Profile
    • FE Power
Re: 482" Street SOHC
« Reply #34 on: August 28, 2018, 04:48:34 PM »
Sorry, I don't have a picture showing them installed separately.  They are installed in the first picture in the thread though...
Jay Brown
- 1969 Mach 1, Drag Week 2005 Winner NA/BB, 511" FE (10.60s @ 129); Drag Week 2007 Runner-Up PA/BB, 490" Supercharged FE (9.35 @ 151)
- 1964 Ford Galaxie, Drag Week 2009 Winner Modified NA (9.50s @ 143), 585" SOHC
- 1969 Shelby Clone, Drag Week 2015 Winner Modified NA (Average 8.98 @ 149), 585" SOHC


preaction

  • Sr. Member
  • ****
  • Posts: 257
    • View Profile
Re: 482" Street SOHC
« Reply #35 on: August 29, 2018, 09:58:20 AM »
Jay, do you have a image showing the oil ring supports installed you can post ?
What are the oil ring supports ?

cjshaker

  • Hero Member
  • *****
  • Posts: 4460
    • View Profile
Re: 482" Street SOHC
« Reply #36 on: August 29, 2018, 10:14:26 AM »
Jay, do you have a image showing the oil ring supports installed you can post ?
What are the oil ring supports ?

They support the oil rings when the piston pin hole intrudes on the oil ring lands. Usually happens on big stroker engines where there is a short compression height (area between the piston pin and top of piston) and not enough room to get all three rings squeezed into that area.
Doug Smith


'69 R-code Mach 1, 427 MR, 2x4, Jerico, 4.30 Locker
'70 F-350 390
'55 Ford Customline 2dr
'37 Ford Coupe

wowens

  • Sr. Member
  • ****
  • Posts: 442
    • View Profile
Re: 482" Street SOHC
« Reply #37 on: August 30, 2018, 09:53:33 AM »
What are the oil ring supports ?
[/quote]
Kinda like a extra heavy duty ring that goes below the bottom oil ring wiper and supports the oil ring across the pin bore gap in the piston. They are kept from rotating by a dimple of some sort that protrudes downward into the pin gap.
Woody