Today I got the engine running and dyno tested with the MS3-Pro running the MSD. Before I go into how to do that, please note that one of the tables in my preceding post had a wrong entry; the Ignition Options table has been updated on that post to be correct. You may have to refresh your browser window to see the change.
To get the timing set about where it needs to be to start, I like to turn the engine over without fuel while watching the timing light. As mentioned previously in this thread, a fully degreed balancer, or a timing tape on a stock balancer, is invaluable. Looking at the ignition options menu, on the left side you can see an entry labeled Cranking Advance. This is the timing advance that the MS3-Pro commands when the engine is cranking over. What we would like to see is this value when the timing light flashes. Mine is set at 10 degrees BTDC.
First, the MSD Digital 6 can be set up for a 20 degree spark retard when cranking. Mine was set up this way, so I disabled that feature by turning the screw on the side of the MSD (You set the cranking timing in the MS3-Pro, so there is no need for the spark retard from the MSD). Turn on the ignition key, but don't pump the accelerator, or give the engine any fuel. Crank the engine while using the timing light. Again, you would like to see 10 degrees BTDC, but if you are like me you won't be close

Mine read something like 45 degrees BTDC. You have already locked down the distributor so that the reluctor is properly phased with the pickup, so we won't twist the distributor. Instead, we will go to the Ignition Options menu and change the value in the Trigger Angle Offset box. Mine was originally set to 25 degrees. I bumped it up to 45 and checked the timing with the timing light again. For some reason, the degrees in the box don't match what you see with the timing light, so you can't expect to see a reduction of exactly 20 degrees, with a 20 degree change in the trigger angle. I was reading something like 17 degrees BTDC at this point with the timing light. Close enough to start, though. I turned on the fuel pump and started the engine up.
Once started, what you want to do is put the engine in a spot where the timing commanded by the MS3-Pro is stable. For my engine, one spot for that was between 1600 and 2000 RPM; at that speed, the timing table says that total timing has to be 25 degrees. With the engine running, there is a marker on the timing table (and on every other table, for that matter) showing you where the engine is operating. Here's a picture of the timing table that I captured with the engine running; you can see an oval right between 1600 and 2000 RPM, and at about 60 kPa. This is where the engine was operating when I captured the picture:
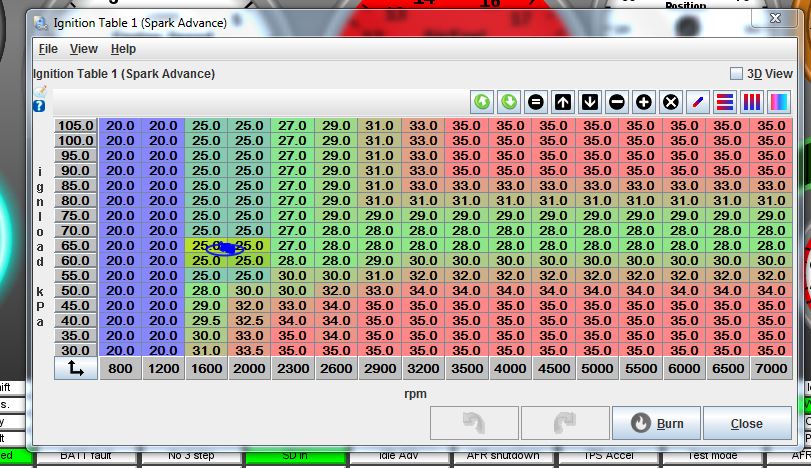
Also notice the little blue gob of color inside the oval. This is actually a bunch of blue lines, that represent a track of where the engine has been for the last few seconds.
To finalize the timing, you should wait until the engine is warmed up, because there are some parameters in the software that will alter the timing for a cold engine. So, I waited until the engine was at 150 degrees before making any adjustments. Then I pulled up the Trigger Wizard menu in the MS3-Pro, which is under the Ignition Settings menu:

This screenshot was captured with the engine not running, but if you are at a stable point in the timing map, the timing that is being commanded by the timing table is in the big black Advance box. Mine said 25 degrees at this point. Next I put the timing light on the engine, and it read a little advanced, 30-something. In the Ignition Offset angle box in the Trigger Wizard, I changed from 45 to 55, Burned the new setting, then checked again with the timing light. In order to get it exactly at 25 degrees, I ended up with 58 degrees for the offset angle. But that's all there is to it, now the engine is perfectly timed and we never had to touch the distributor!
One note of caution here, and that is that if you need to put a negative offset angle into the ignition offset box, the MS3-Pro won't be able to recognize it and save it with the software. If you find yourself decreasing the angle to zero, and you are moving in the right direction but still not at the timing that the table is commanding, then you WILL have to twist the distributor to compensate. Just twist it in the normal direction to increase or decrease timing advance and give yourself some more range, then lock it down again and go back to the Trigger Wizard to dial it in.
Now I was ready to run a dyno pull. I ran a checkout pull from 3500 to 5000 RPM, and the engine sounded fine and made essentially the same power as it had before. Then, I tried a 4500-6500 RPM pull, and was surprised to find that the engine fell flat on its face at about 5400 RPM. This issue would end up frustrating me for a full day; I re-checked wiring, reviewed all the software settings, etc. When I switched back to running just off the distributor and MSD, the engine returned to normal behavior, so I figured I had something wrong in the settings, maybe a rev limiter was coming on or something. But everything seemed correct. Finally, I tried swapping out MSD boxes, and what do you know, the engine ran great with the new MSD box. The only thing I can conclude is that the points input on the one MSD Digital 6 doesn't work correctly. In truth, I have never used the points input until this engine, and I've had the MSD for at least 10 years. It works fine when triggering off the MSD distributor, but not when using the points wire. Something wrong in the circuitry I guess, because the replacement MSD works fine.
So, now that I had that issue resolved I decided to do another dyno pull and get some data. One of the big advantages of any good EFI system is datalogging. For the MS3-Pro you can do this a couple of different ways, through the computer, or with an external button that starts and stops a datalog that records internally in the unit, and can be retrieved later. Since I was on the computer already I just used that. Under the Datalogging menu at the top of the screen, click on Start Logging. A screen will come up asking you to name the log:
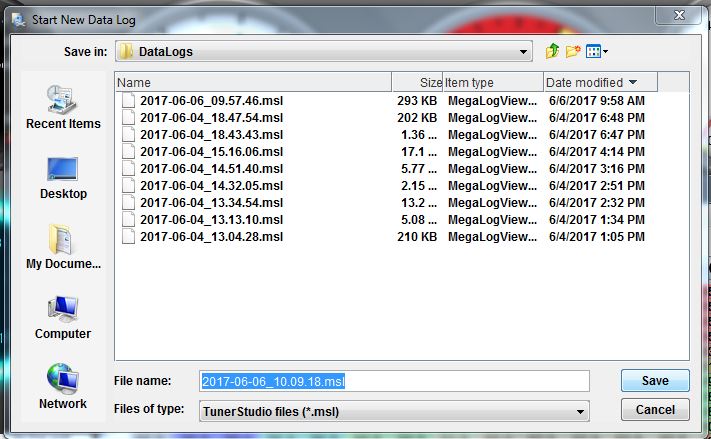
The default file name that comes up is time based; in the screen shot above, this is June 6, 2017, 10:09:18. I usually just accept the default because it is convenient to have the datalogs in chronological order. Click Save in the box, and the datalogging starts.
To stop the datalog you can either shut off the ignition, or click Stop under the Datalogging menu. To view the datalog, open up the other piece of software that you downloaded earlier, Megalog viewer. When this software opens up, go to File and then Open, and navigate to where your datalog file is. If you accepted all the defaults when you set up the software, it will go right to the correct location. When the datalog opens up, it will look something like this:
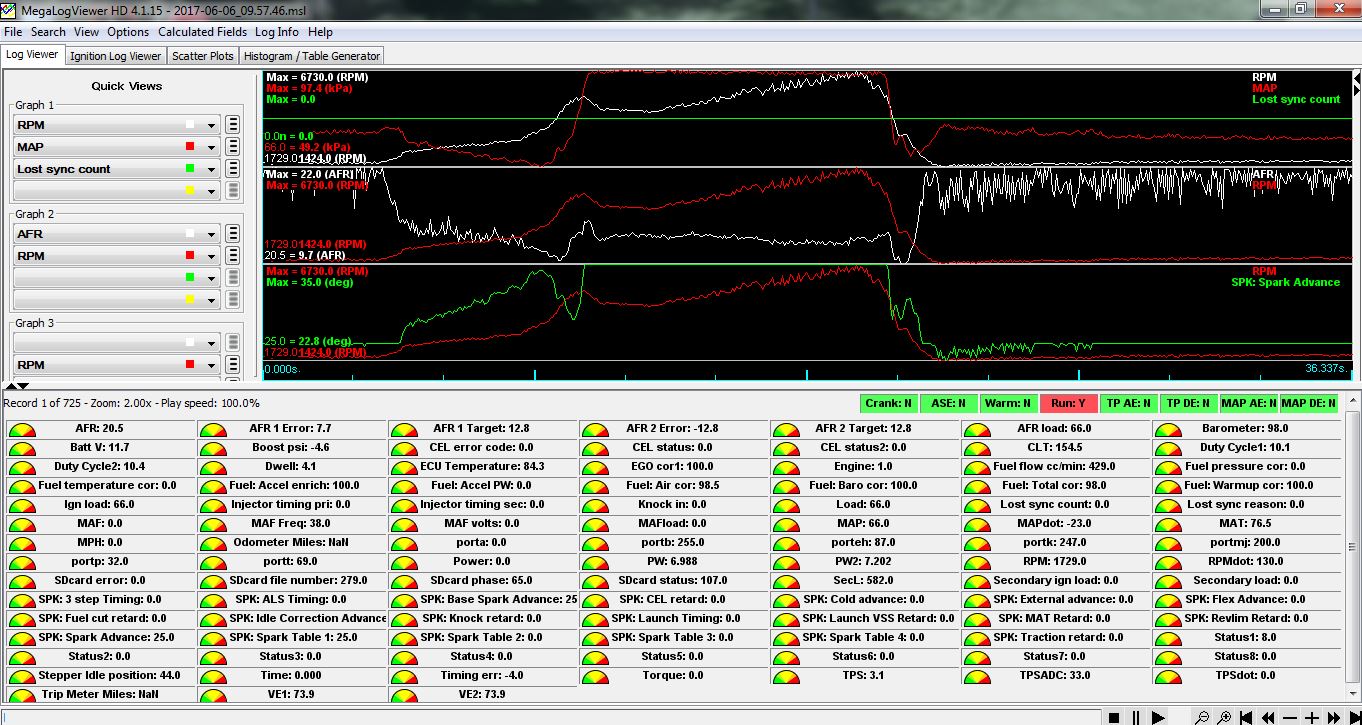
This is kind of a confusing screen, but its easy to simplify. All the boxes at the bottom represent different parameters that are logged by the datalogger. At the top, there are some default graphs that come up, showing various parameters. Grab the top edge of the boxes showing the parameters and move it down so that you have more room for the graphs. You can add more graphs, or delete them by removing all the parameters in them. In the screen below I have made the graph area bigger, changed to one graph, and the graph shows RPM, Timing, MAP, and A/F from the O2 sensor:
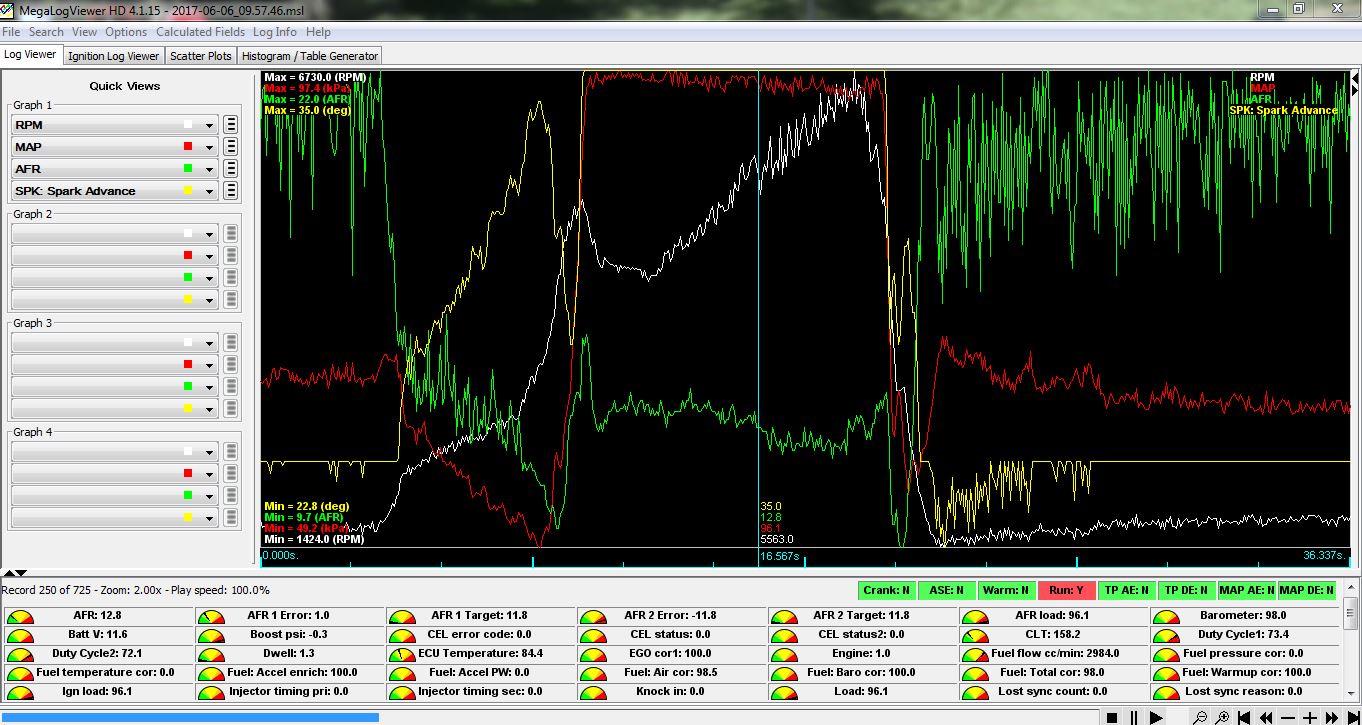
Notice the thin blue vertical line in the middle of the graph. You can click anywhere in the graph to place that line, or move it left and right with the arrow keys. Down at the bottom of the line are the numbers that represent the data. The line is positioned in the middle of the dyno pull in this picture. So, timing is peaked at 35 degrees, A/F is reading 12.8, MAP is 96.1kPa, which is very close to atmospheric pressure, and engine speed at this point is 5563 RPM. Also, on the left side of the graph you will see minimum and maximum numbers recorded for all the parameters during the datalog.
A few other comments. First, notice that before and after the pull, the A/F is reading very lean. This is a function of the leaks in the dyno exhaust system; air gets into the exhaust and makes the O2 sensor think that the engine is running lean. Another reason to be a little wary of O2 sensors; if your exhaust develops a leak, and you are relying on the O2 sensor to deliver the correct amount of fuel, you could be overfueling the engine. Of course, during the pull, the reading looks pretty good. This is because there is so much exhaust flowing that an air leak in the exhaust system makes very little difference. This is why you can probably trust the O2 sensor in an open collector while you are going down the racetrack, but not on the return road or the pit lane.
Also, look at the RPM signal in this graph. It is very, very noisy. This is typical with distributor-based systems. When we move this engine to the 36-1 toothed wheel, I expect a big improvement in the smoothness of the RPM signal.
So, how did the engine do with respect to power? I was expecting no change, since triggering was still being controlled by the MSD distributor and spark by the MSD ignition box. However, that's not how it came out. The power and torque curves were a little smoother with the MS3-Pro, and torque was up, while horsepower was down. In the graph below the red lines are the previous best pull, and the black lines are the pull with the MS3-Pro installed:
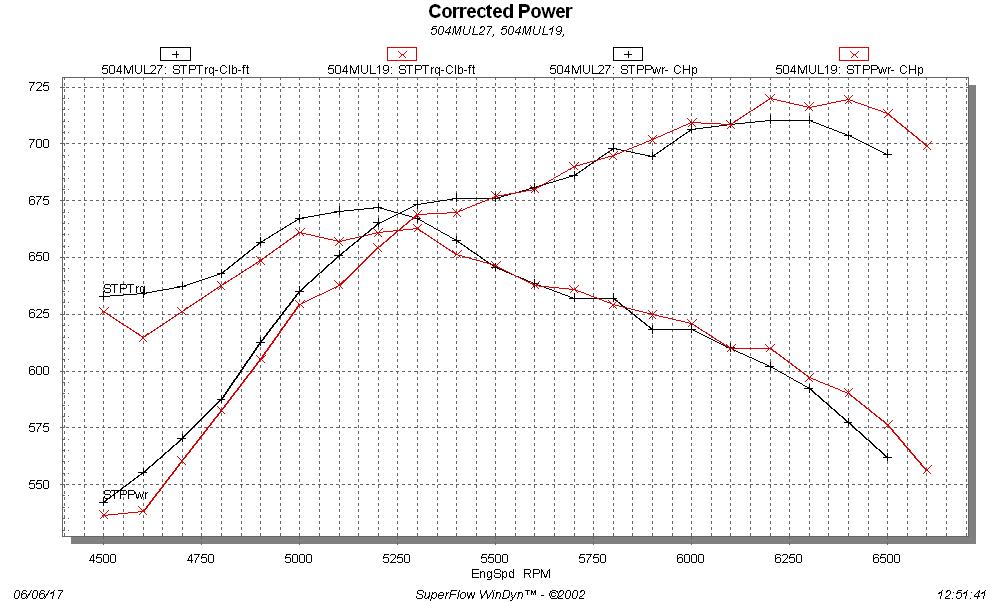
If I had to guess, I'd say that the reason that the curves were smoother is that the distributor is locked in this case; I noticed a lot of jumping around with the timing when running with the centrifugal advance in the distributor, but much less when it was locked and timing was controlled by the MS3-Pro. The difference seen in horsepower and torque is anybody guess, but mine would be that the timing is not rock solid throughout the pull with the centrifugal advance distributor, so maybe variations in timing made the difference.
Also, one more comment about dyno curves. Many dynos will add in a "smoothing" function to the data, and actually alter the data to make it look smoother than it really is. This is not a good idea in my opinion, because if the raw data curve is not smooth, the engine is trying to tell you something. All the dyno plots that I have posted, online and in my book, are raw curves, not smoothed. In this case, you can see how much difference there is due to the change in ignition control. This would not necessarily be obvious with a smoothed dyno curve.
Next test will be hooking up the crank and cam sensors, and running off the 36-1 toothed wheel. It will be interesting to see how that plays out...


