I'm now working on setting up the MS3-Pro EFI system on my 504" dyno mule. This is going to be a dedicated
system, for use on the dyno only, but I thought it would still be a good opportunity to explain in great detail
exactly how one of these EFI systems is installed and wired up. I'm going to try to use a lot of pictures and
screen shots from the computer to make this as easy to follow as possible, so I apologize in advance for this
long, detailed post. I hope that for anyone contemplating an EFI system, this gives you the information you need to install
a fully functional and fully tunable EFI system on your vehicle.
Now that I have the engine running correctly with the MSD distributor and MSD Digital 6 box plus HVC II
coil, I will start adding in the EFI system to control the ignition. I've always wanted to do this, in steps, to
see where the ignition might make a difference in power. So, I will be using the MS3-Pro EFI system, and adding in
ignition control in the following steps:
- Connect the MSD distributor to trigger the MS3-Pro, and have the MS3-Pro control the MSD Digital 6.
- Change to the 36-1 trigger wheel and crank sensor, use the distributor to distribute spark only, and have
the MS3-Pro control the MSD Digital 6.
- Disconnect the MSD Digital 6 and install 8 individual coil packs, triggered by the MS3-Pro.
When I ran the third option described above on my big SOHC, high RPM power really smoothed out and the engine picked
up 20+ horsepower. I will be curious to see if the same thing happens on this dyno mule.
Today we will set up as described in the first point above. Right behind the dyno stand is a tray where you can put electronics stuff. In the shot below,
you can see two boxes, a relay box that I designed and built myself, and the MS3-Pro EFI box.
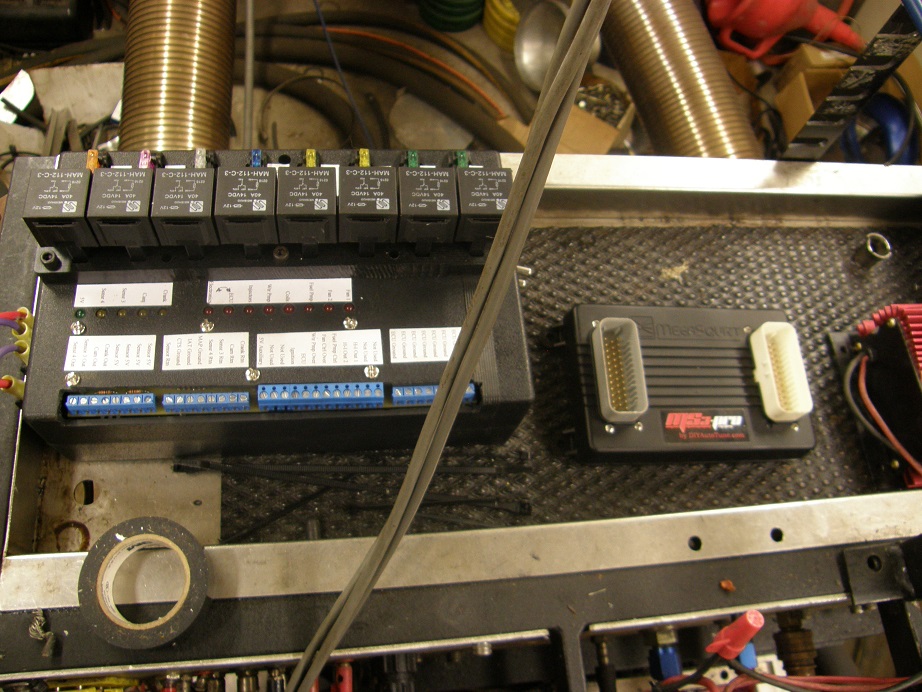
(By the way, those thick gray wires in the front go up to the air turbines and air temperature sensor used by the dyno,
and are not related to the EFI system.)
I designed the relay box so it can be used for most of the functions in a race car or street rod, so it is a little
bit of overkill on the dyno. It contains 8 30 amp relays, each one fused, a couple of large bypass capacitors to filter
any noise in the vehicle before the power wires to the EFI box, plus a small circuit board with some simple
circuits used to power LED indicator lights. Since most of the functions of the car can be controlled with the EFI
system, many of the wires going into the relay box come from the EFI box. Here's another picture of the relay box,
from the top showing the labels on the screw-terminal connections:
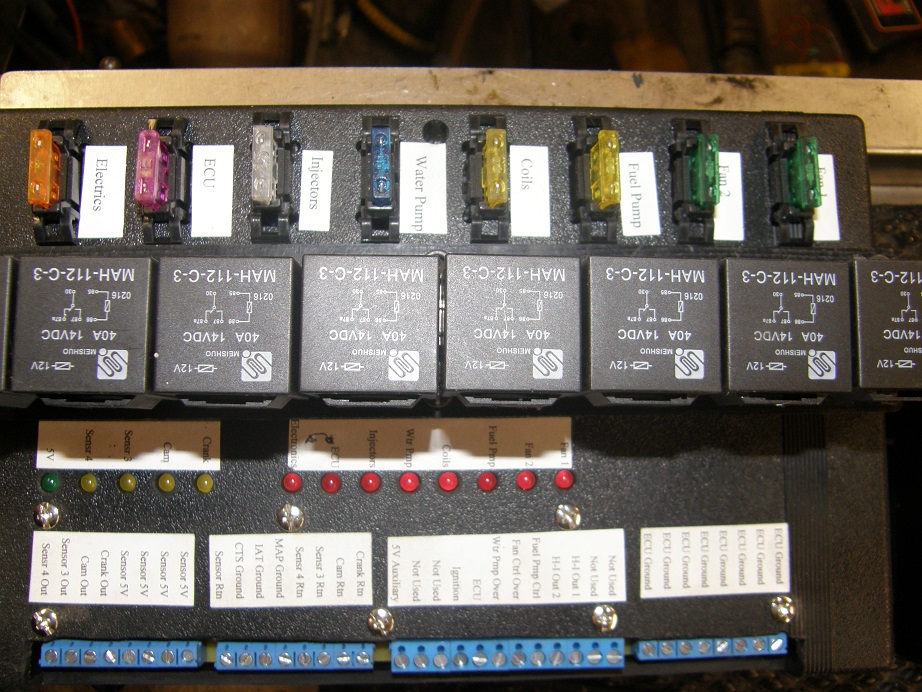
Not all of these terminals will be used for every system, but I wanted to make this box as universal as possible.
This was the first one I built, and after building it I decided to make a few changes, so I made an updated
version and installed it in my race car last year. It worked beautifully during Drag Week, giving me no trouble
at all, but there was one feature that I found would make it more useful, and that is having the LEDs on a panel,
rather than directly on the box, because then they could be mounted where they could be more easily seen. I plan
to make another revision of the box that adds that feature, and make it available for sale at some point.
In any case, don't get thrown by the presence of the relay box; it is not required for the EFI installation, because
stand-alone relays can be used instead.
On the side of the box are two terminal strips, as shown in the photo below. These are the main, high current
input and output terminals of the relay box, where power comes in and goes out. The top terminal strip is for the
input power. I already have the input power wires hooked up in the photo. The two wires on the left are the power
and ground wires that are dedicated to the EFI system. This is important: to minimize electrical noise, always
run separate, #10 or #12 power and ground wires directly from the battery. In my case I'm running them to the
relay box, and then from the relay box to the EFI box, but that won't matter because the EFI box is right next door.
Without the relay box, you would just run the wires to a 30 amp relay. Also, it is a very good idea to put a
capacitor across the power and ground wires to the EFI box, to make sure that the EFI box gets a stable, clean
voltage supply. I have a large capacitor just for this purpose built into the relay box, but if you are not using
the relay box you can also use one of the MSD filter capacitors, MSD part number 8830.
The other two power wires coming in to the top terminal strip are for the non-EFI functions in the relay box, like
the electric fans, electric fuel pump, electric water pump, etc. etc. These wires can also be run directly from
the battery, but its not as critical. There is room for two additional 12V wires, not just the one I have connected,
in case you need two wires to handle all the current going through the relays. In the photo, you can't see the
labels for the top terminal strip, but they are all marked.
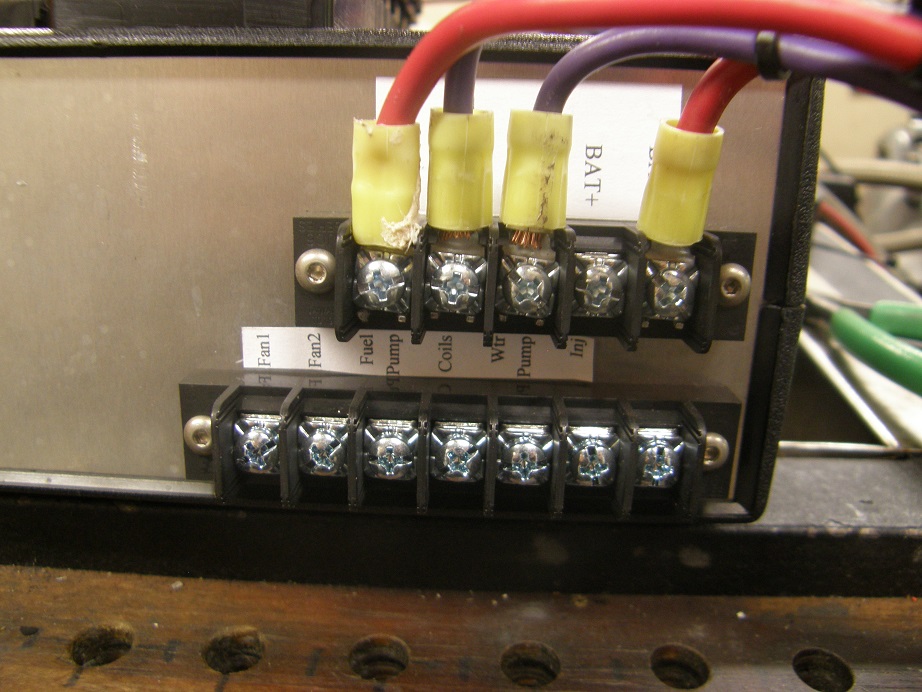
The bottom terminal strip shows all the outputs from the relay box. These are all 12V 30 amp outputs that run through
the fuses and relays mounted on the box. On the dyno the only ones we will be using are the output for the electric
water pump and the electric fuel pump, but obviously in the car all of the outputs could be used.
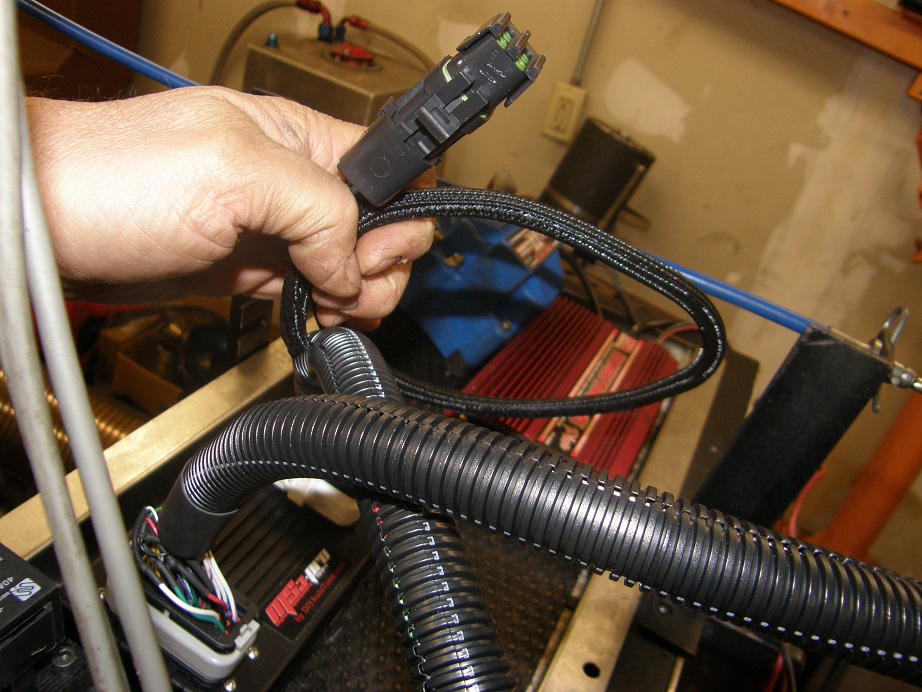
Next, below there is a photo of the MS3-Pro with the two large wiring harness cables plugged in:
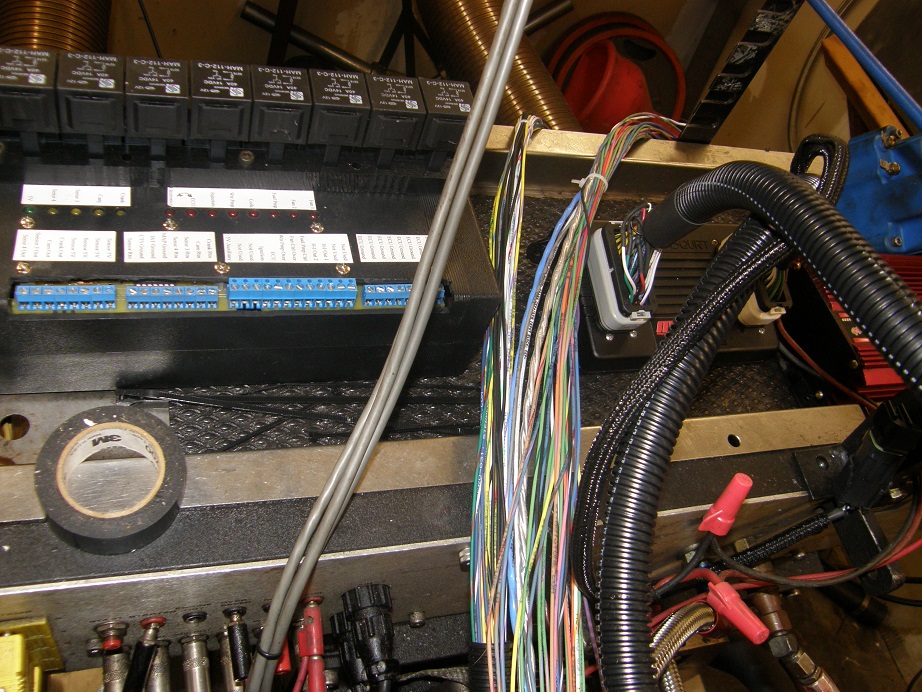
Yep, lots of wires LOL! Don't panic though, depending on the system, probably 1/2 to 3/4 of them won't even be used.
They are there to allow all of the options of the EFI system to be used. Different ignition strategies use different wires,
and the MS3-Pro is set up to work with almost any conceivable engine combination, so the wires for each have to be
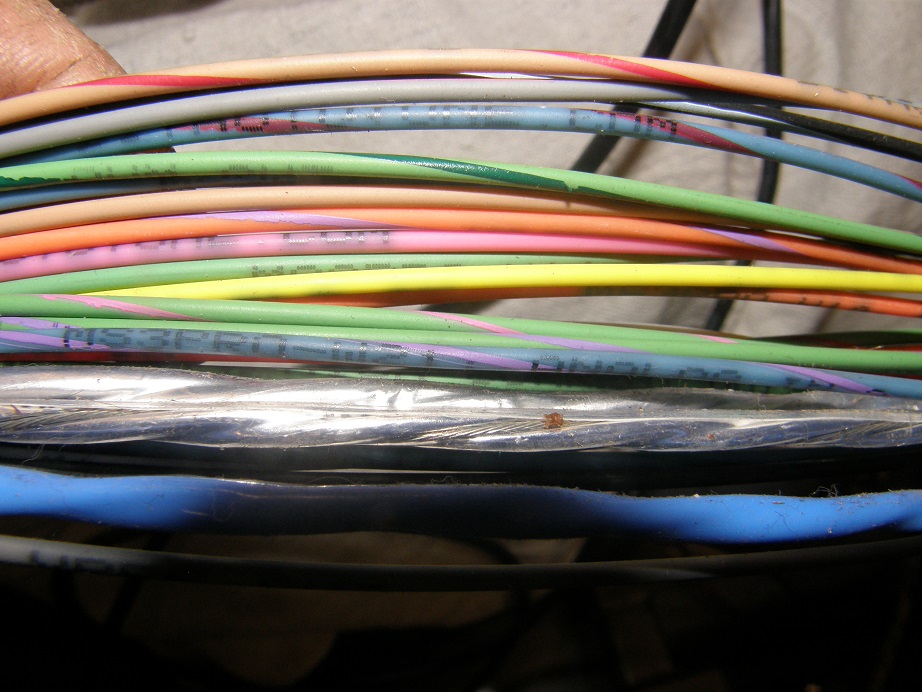
available. Telling the wires apart is easy, because each one is color coded, and also labeled in print with its
purpose. I find myself having to take my glasses off to read some of the print, but despite that it is not too
difficult to tell the wires apart. See the close-up of one bundle of wires below:
So, now we'll get started hooking everything up. First, we have to have a way to communicate with the EFI box from
a computer. The easiest way is via the USB port. Notice that there are two connectors on the MS3-Pro, one white
and one gray. The USB port is in the cable from the gray connector. It has an end that allows for a panel mount,
and the USB cable you need also comes with the MS3-Pro. Here's a picture of the USB port with the cable plugged
into it:

The other option for connecting up to the EFI box from the computer is the older RS232 method; here's a picture of
that connector, which is found in the wiring bundle from the white connector on the MS3-Pro:
Plugging the USB cable in is easier, so we won't be using the RS232 connector. I just hung it out of the way, over
the back of the dyno shelf.
Now we'll get started hooking up the necessary wires. Here's a picture from the MS3-Pro manual, showing the basic
power, ground, and fuel wiring of the EFI system:
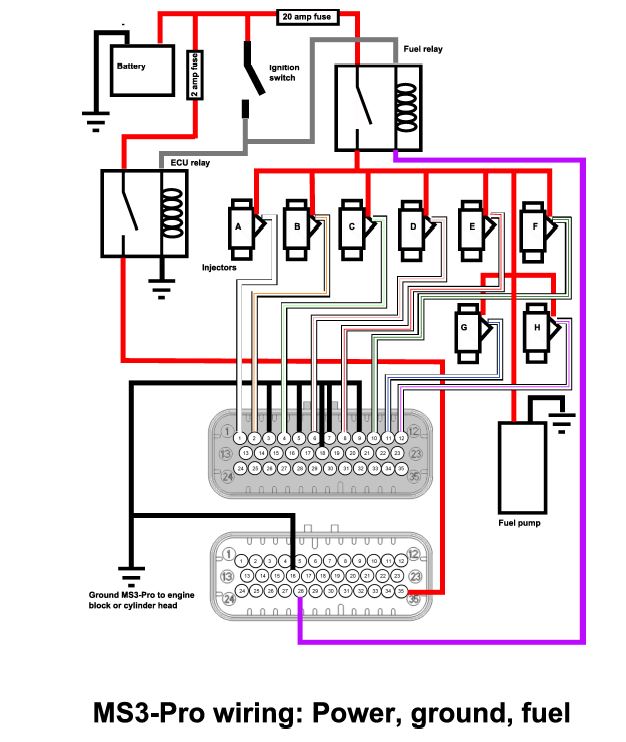
Looking at this wiring diagram, you can see that some of the parts are not part of the MS3-Pro, the car battery and
ignition switch for example. But you do need two fuses and a couple relays; I've found that automotive style 30
amp relays, available at any auto parts store, work fine. The two relays and the two fuses are built into my relay
box, but if you haven't got that you have to source the parts from NAPA or some other auto parts place. There's
nothing complicated here, the ignition switch just energizes the relays when you turn it on. One of the relays is
marked ECU, and that is just another name for the MS3-Pro box. Notice that the while the relay that energizes the
MS3-Pro turns on immediately with the ignition switch, the relay that controls the fuel pump doesn't; it is controlled
by the purple wire from the white connector. The reason for this is that on power-up the MS3-Pro cycles through
the fuel injectors and the ignition system to make sure it is working, and if the fuel pump was on you'd be shooting
fuel out of the injectors, and potentially causing a backfire. So, the MS3-Pro doesn't connect that purple wire to
ground (allowing the fuel pump relay to turn on) until that power-up system check is complete.
Now let's look at the other important wiring diagram, for the sensors:

Again, not everything shown here is going to be required for every engine. You do need a minimum of five sensors to
run the EFI system. First is the crank sensor. This can be the electronic pickup in a Ford or MSD electronic
distributor, or some other type of pickup in an electronic distributor, or a crank trigger, or a 36 or 60 toothed
wheel with an external sensor. Something has to provide the tach signal to the MS3-Pro, so that it knows the engine
is turning, and how fast.
Next, you need a MAP (Manifold Absolute Pressure) sensor, which is basically a vacuum sensor connected to the intake,
under the throttle plates. You need a throttle position sensor, so the MS3-Pro knows how far the throttle is open.
Finally, you need a coolant temperature sensor and an air temperature sensor, because tuning the engine requires
knowing how hot the incoming air is, and what the engine temperature is.
Outside of these five sensors, an oxygen sensor is also a really good idea. The oxygen sensor tells you what your
air/fuel ratio is, and you can use that information to tune the engine. It can also be used in a feedback loop, so
that if you want your engine to be constantly running at, for example, an air/fuel rato of 13:1, you can put 13 in the
software in something called the Target A/F table, and the MS3-Pro will constantly adjust the fuel going to the
injectors to keep the oxygen sensor reading 13:1. Now, here's the problem with an oxygen sensor: they need to be
regularly re-calibrated, and they can wear out. I'm referring here specifically to wide-band oxygen sensors, which
can read A/F mixtures between 9:1 and 16:1. Narrow band oxygen sensors are used on production cars, and only read right
around 14.7:1 (which is the ideal mixture), and seem to last forever. In my experience, though, the wide-band oxygen
sensors don't last that long and are often inaccurate, unless regularly calibrated. So, my preference with EFI systems
is to use the oxygen sensor to fill in fuel table in the software, and then run the engine in open loop, not in the
feedback loop or "closed loop" mode. That way, if your oxygen sensor goes bad, it won't matter, because the engine
is getting its instructions from the fuel table.
If you want to run fully sequential fuel injection, you will also need a cam sensor. You can run batch fire (all 8
injectors opening to release fuel at once, during every other revolution), or bank fire (4 injectors one one cylinder bank
opening at once, then waiting 360 degrees, and the four injectors on the other bank opening), with only the crank
sensor. But if you want full sequential fuel injection, where each injector squirt is timed to each cylinder, you
need a cam sensor so that the MS3-Pro knows when each cylinder is at TDC on the firing stroke. A cam sensor can be
built into the engine in a variety of ways, for example as shown previously in this thread, through the timing cover
inspection plate. You can also use a Ford distributor as a cam sensor, by knocking off 7 of the 8 teeth on the
reluctor, and then using a crank trigger setup or a 36 tooth wheel with a crank sensor. The single tooth left on the
Ford distributor will give you one output pulse for every other crankshaft revolution.
The MS3-Pro diagram above also shows knock sensors, which are available on some engines, but we won't cover those
here; for the purposes of this build we will ignore the knock sensors.
One last thing to note before we leave this wiring diagram, and that is the ground connection for all the sensors.
Note that all the grounds are connected together, to a wire called Sensor Return. This is important for an accurate
result from all the sensors, and has to do with making sure that all the sensor outputs are referenced to a common
ground voltage.
So, let's start wiring this all up. In the MS3-Pro instructions there are two tables describing the purpose of all
the wires from the connectors. I have reprinted the tables below:
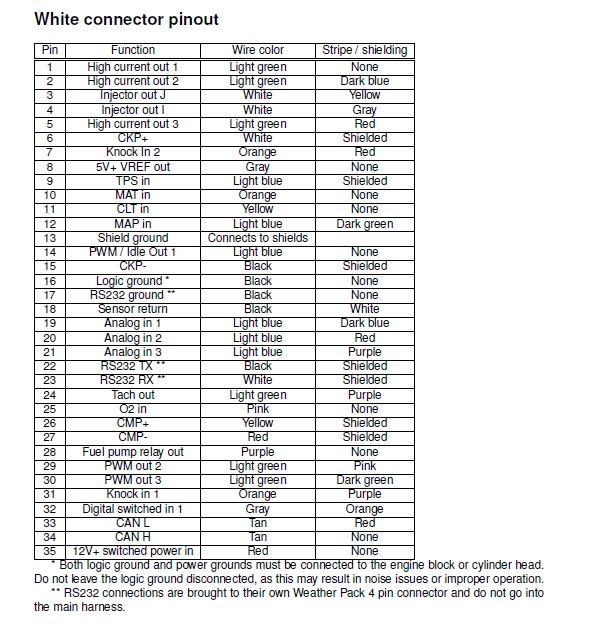
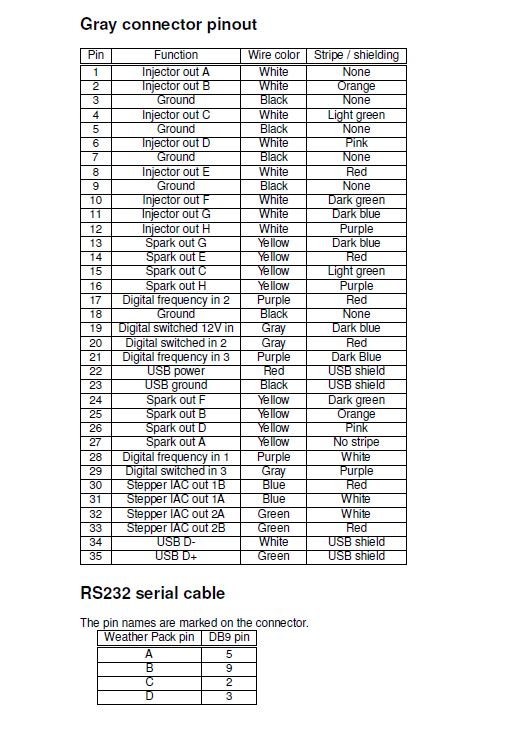
All we have to do is go down the list for each connector, decide if we need to use each wire, and hook it up if we
do. Before you start, disconnect the battery so that you don't inadvertently short something out with battery power.
We'll start with an easy one, which are the ECU grounds. These are pins that need to be tied together to the negative
wire coming from the battery, that powers the MS3-Pro. They are all black, with no stripes. There is one wire from
the white connector (pin 16), and five from the gray connector (pins 3, 5, 7, 9, and 18). Hook these all together, and
connect them to the negative wire from the battery. On my relay box I have a separate terminal strip for them, with
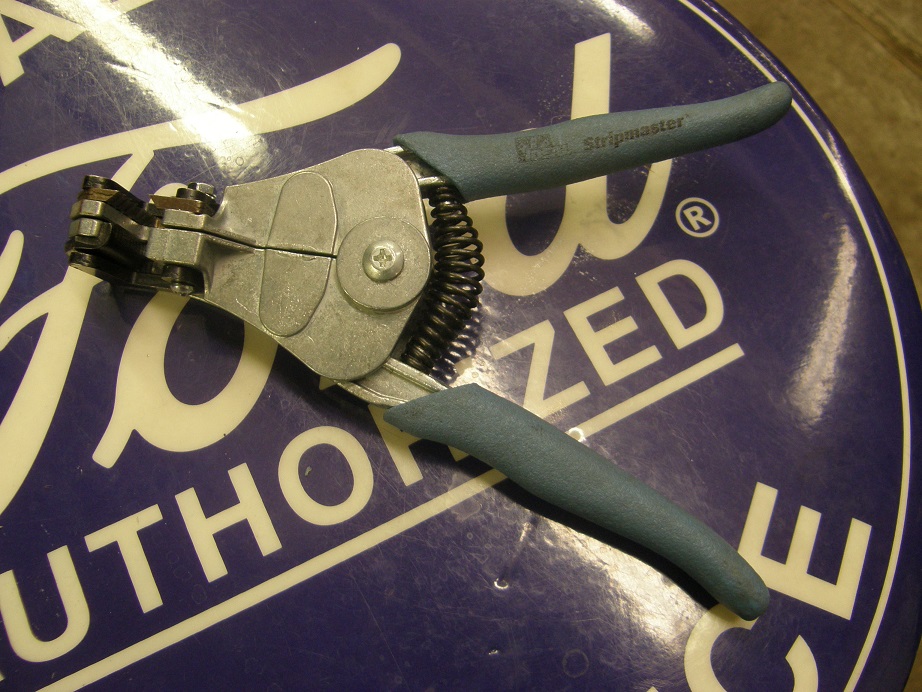
8 stations, labeled ECU Grounds. Shorten and strip the wires as necessary, and make the connections. By the way, when
you are stripping wires, it pays to have one of these automatic strippers, which are about $18 at my local building
supply store:
Also in the white connector bundle you will find a black wire with a white stripe; this is the sensor return wire,
pin 18 on the connector. Pull that one out of the bundle and set it aside, because you will need it when you hook
up all the sensors. On my relay box I have a separate line of screw terminals for all the sensor grounds, so I
stripped mine and hooked it into that line of terminals.
Now let's run the ignition wire. Remember that the ignition wire has to have 12V both in the run AND in the start
positions. If you don't have power in the start position, the fuel pump will shut off and the MS3-Pro will power
down, and the engine won't start. Make sure you confirm this with a test light after you have made this connection.
If you are sourcing your own relays, the ignition wire goes to one side of the coil of both relays. On the dyno I
have an ignition switch on the console, and a dedicated screw terminal for that on my relay box, so I just ran a wire
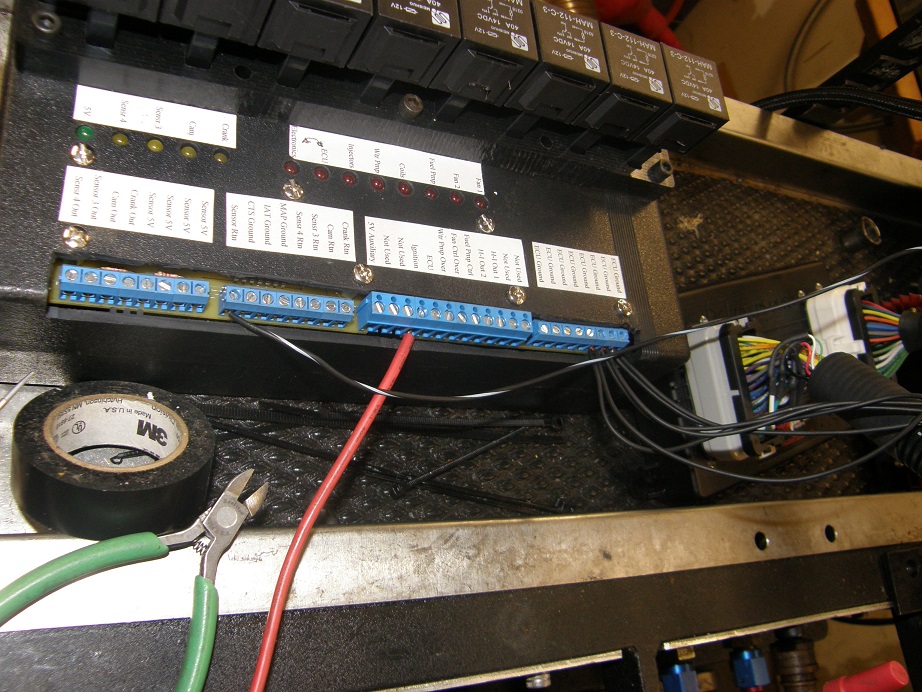
from the switch to the box. Here's a picture of the relay box as it stands at this point, with the six ECU grounds,
the sensor return wire, and the ignition wire connected:
After you connect the ignition wire to the relay, you have to connect the switched 12V wire on the MS3-Pro (pin 35,
red wire) to the ECU relay, as shown in the wiring diagram. The other side of the relay should go to the 12V wire
you installed from the battery, through the 2 amp fuse. On my relay box the fuse and relay are internal, so I just
connect the wire from the MS3-Pro to one of the screw terminals.
Let's keep going with wires from the white connector. Next up is the fuel pump control wire, purple from pin 28.
This goes to the fuel pump relay coil, as shown in the wiring diagram. Again in my relay box this is all internal,
so I just attach the purple wire to the screw terminal on the box labeled Fuel Pump Control.
Now find the gray wire, labeled 5V VREF, from pin 8 and pull it out of the bundle. You will need that one when we
hook up the sensors. Again, I have the connections to the sensors internally in my relay box, so I will attach it
to the appropriate screw terminal.
To control the electric water pump, we will use one of the MS3-Pro's programmable outputs. I selected the one called
High Current Output 2. What this output does is act like a switch, that can sink up to 5 amps of current. It is
normally open, meaning the switch isn't flipped. Under a certain set of conditions, though, that you program in
the software, the switch closes, allowing current to flow. If we had an electric water pump, or an electric fan,
that required 5 amps or less of current, we could run it directly from this output. We would simply attach a constant
12V supply to one side of the pump or fan, and then wire the other side to the output. When the conditions that we
programmed are met, the switch flips or closes, and the pump or fan turns on. I will go through the programming in
detail later, but for this particular output I programmed it to turn on after the engine reaches 500 RPM. So, if you
have the key on to check something in the EFI system with the laptop, or even while
the engine is cranking at 100 RPM or so, the electric water pump stays off, to minimize drain on the battery. As
soon as the engine fires and exceeds 500 RPM, the electric water pump turns on. You can also wire in an override
switch on this circuit, so that if you want to sit with the engine off but the water pump turning, to cool the engine
down, you can do that too.
Electric water pumps and fans will normally take more than 5 amps, so its a good idea to use the programmable outputs
to energize the coil of a relay, and run the current from the water pump or fans through the high current relay contacts.
In case you don't know how a relay works, any internet search ought to bring up all the info you need.
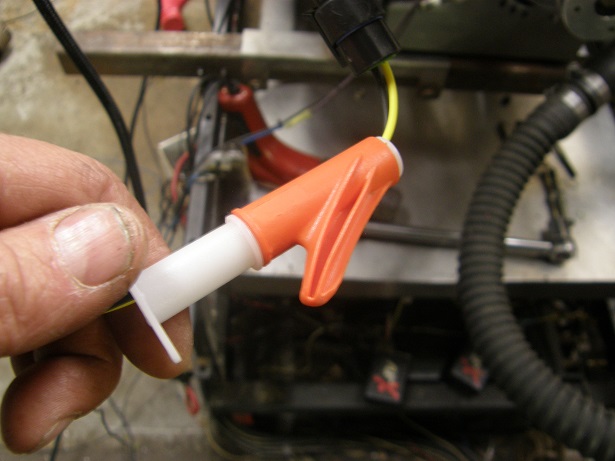
Now let's hook up some of the sensors. Since we will still be running with carbs to start with, we won't need the throttle
position sensor, but we may as well hook up the coolant temperature sensor (CTS), inlet air temperature sensor (IAT or MAT),
and the manifold pressure sensor. For both the CTS and IAT sensors, these are two wire devices. Here's a picture of the IAT
sensor, complete with the pigtail connector with the two wires:
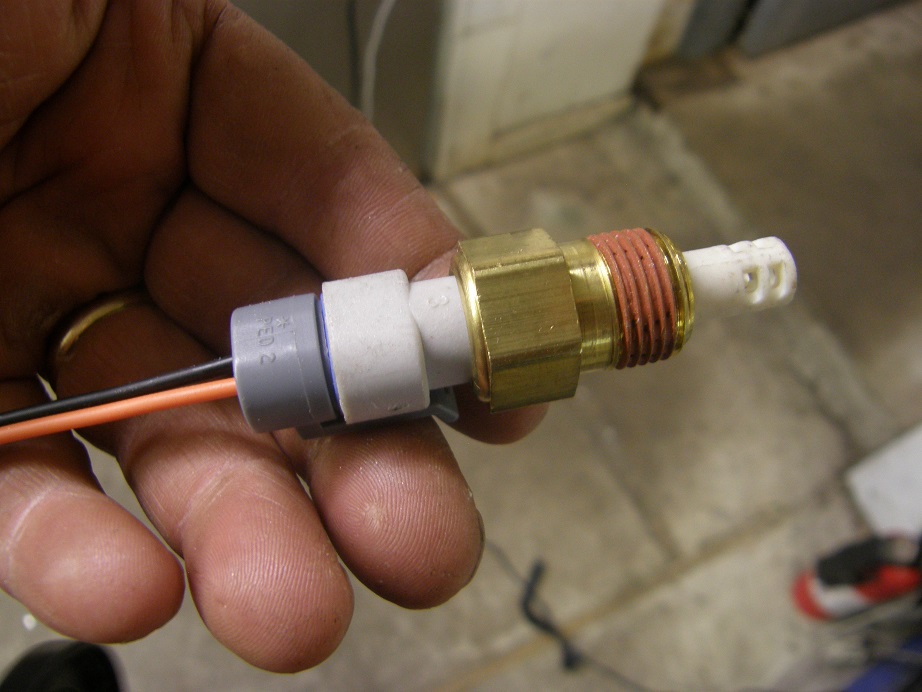
The black wire goes to ground, at the sensor return wire that we pulled out earlier. The other sensor grounds also go to sensor
return wire, so that wire will have several other wires attached to it when we are finished. The orange wire is a signal wire, and
goes to the orange wire in the white connector bundle from the MS3-Pro (wire #10, labeled MAT). Notice that the end of the
IAT sensor is open to expose the sensor element. This sensor must be installed where it is not subject to water or fuel, like
in the air cleaner. I like this style of IAT sensor because they respond quickly. There is another style, though, with a
closed off end, that can be installed in a vacuum port on the intake manifold. They don't respond as fast, but they still work
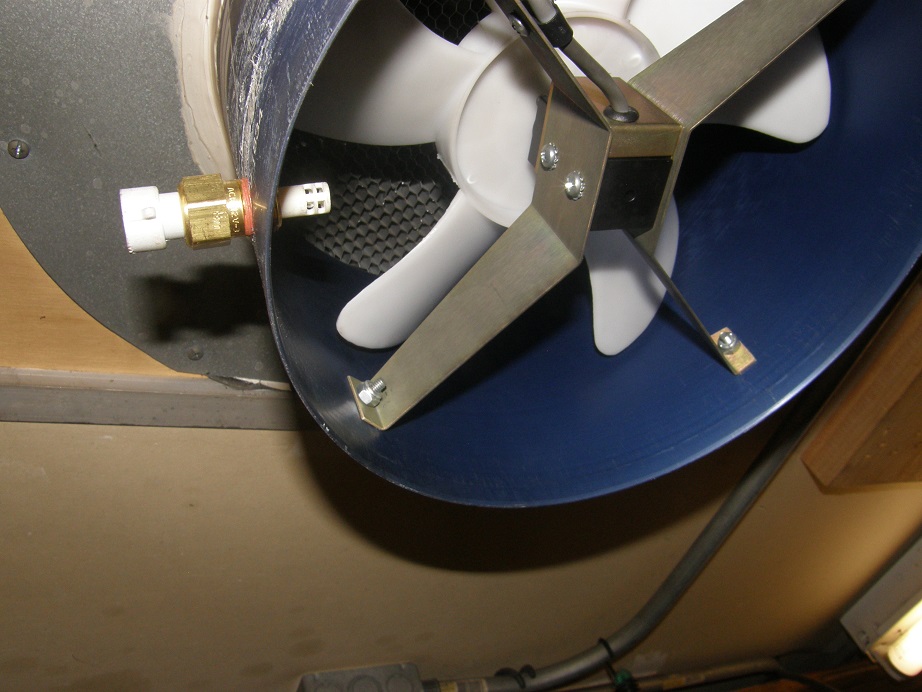
fine. So, choose the sensor style based on where you want to install it. Since my installation is on the dyno, I put it up
in the dyno turbine housing that feeds air to the engine:
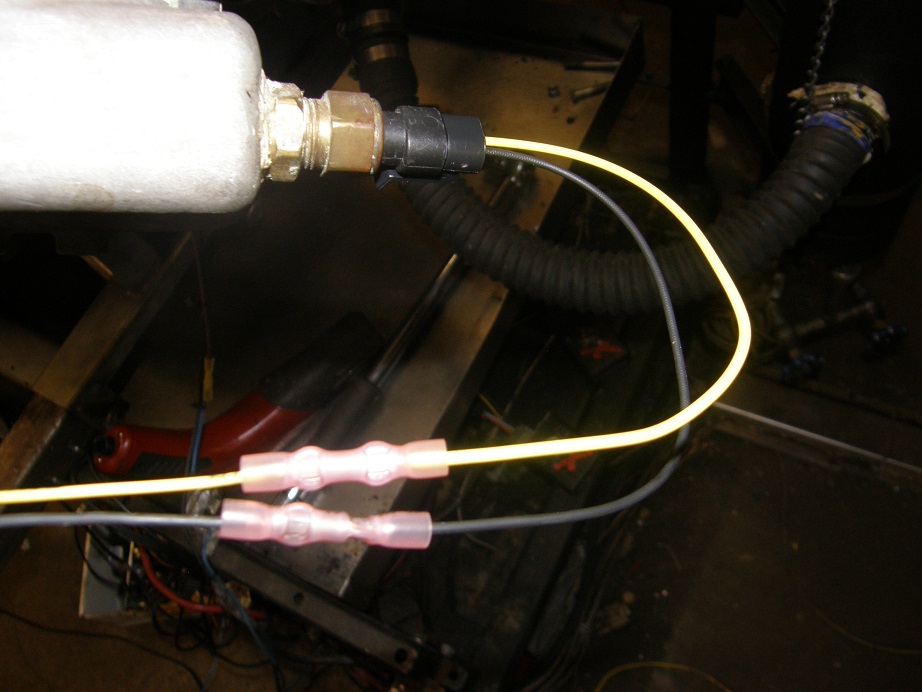
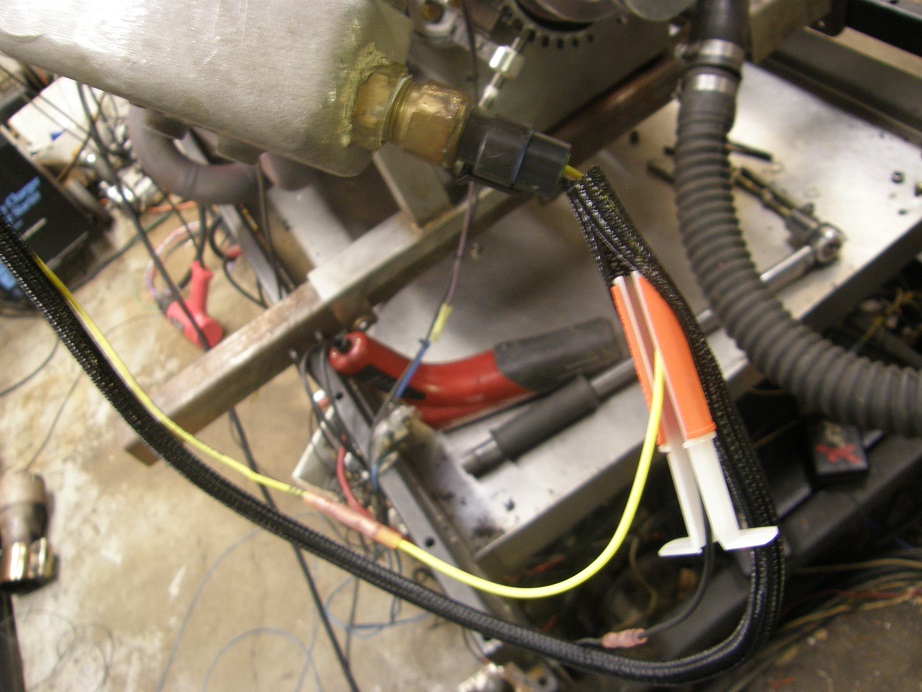
The coolant temperature sensor (CTS) looks just like the IAT, except they all have a closed end because they are exposed to the
coolant in the engine. The wires coming off the connector on this one are yellow and black. Again the black wire connects
to sensor return, and the yellow wire connects to the yellow wire (#11) from the MS3-Pro white connector. I installed the sensor
in the remote thermostat housing I'm using on the dyno:
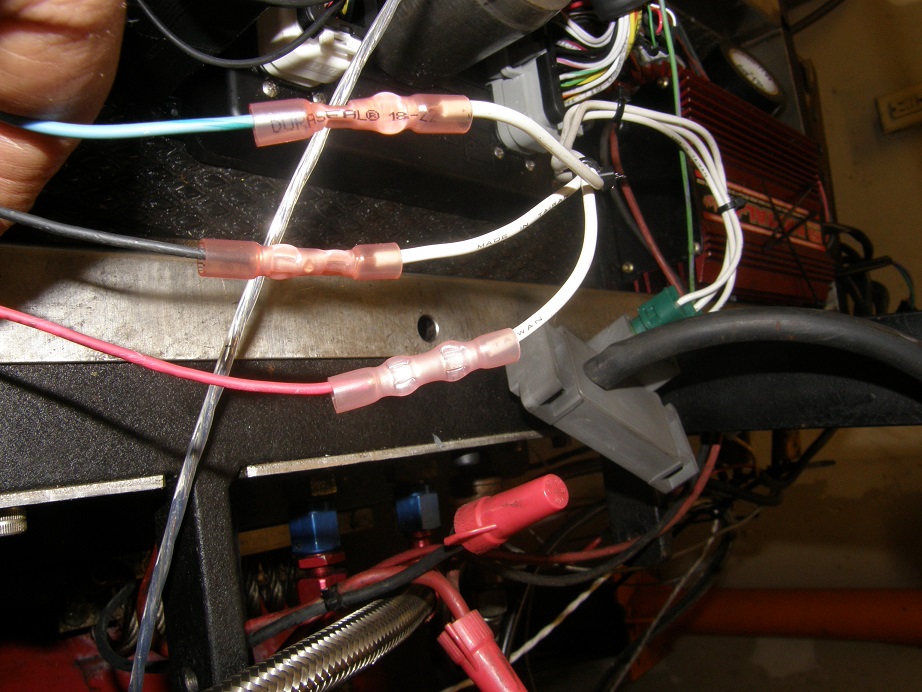
Notice that I'm using crimp style connectors on these wires. I used to be a solder and heat shrink guy, but that is a whole
bunch of work compared to the crimp connectors. Further, I have been told of cases where vibration will cause the end of a
solder joint to break the wire, leading to various electrical problems. For the last couple of years I've been using these
crimp connectors, that come with heat shrink tubing over them, and have not had any issues. The previous photo was before
heat shrink; here's what the connections look like after heat shrink:
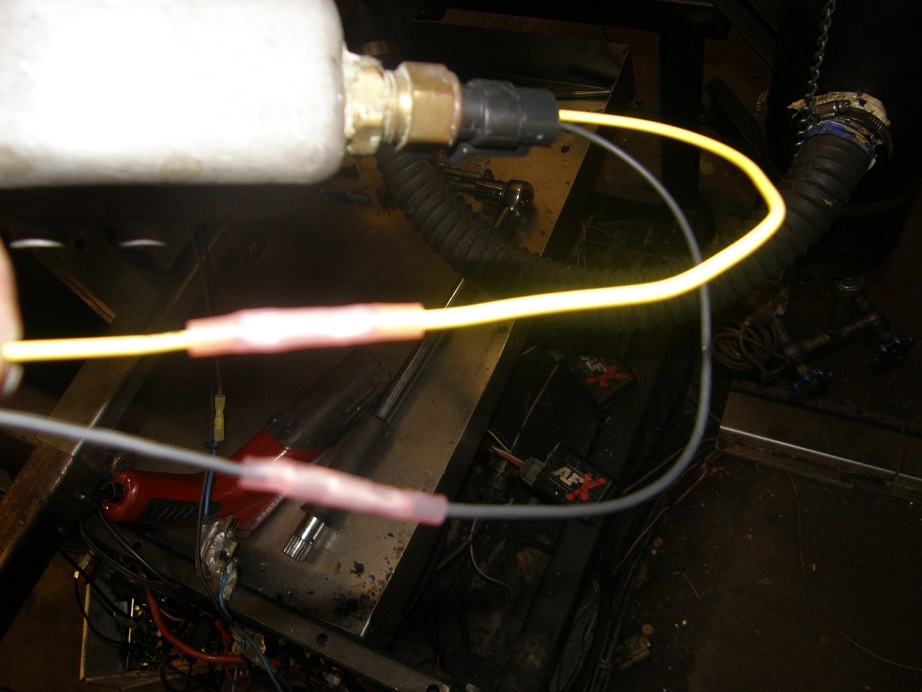
Sorry for the poor photo quality, but you get the idea. The heat shrink tube seals the end of the connectors to keep water out,
plus it holds the wires rigidly in place so vibration won't bend them back and forth at the joint. Just make sure you have a
good crimping tool to really put a crimp on those connectors; here's the one I use:
It's pretty heavy duty, and I squeeze the heck out of it when I crimp the wires. I think it cost about $20 at the local building
supply store (Menards), which is also where I buy the crimp connectors.
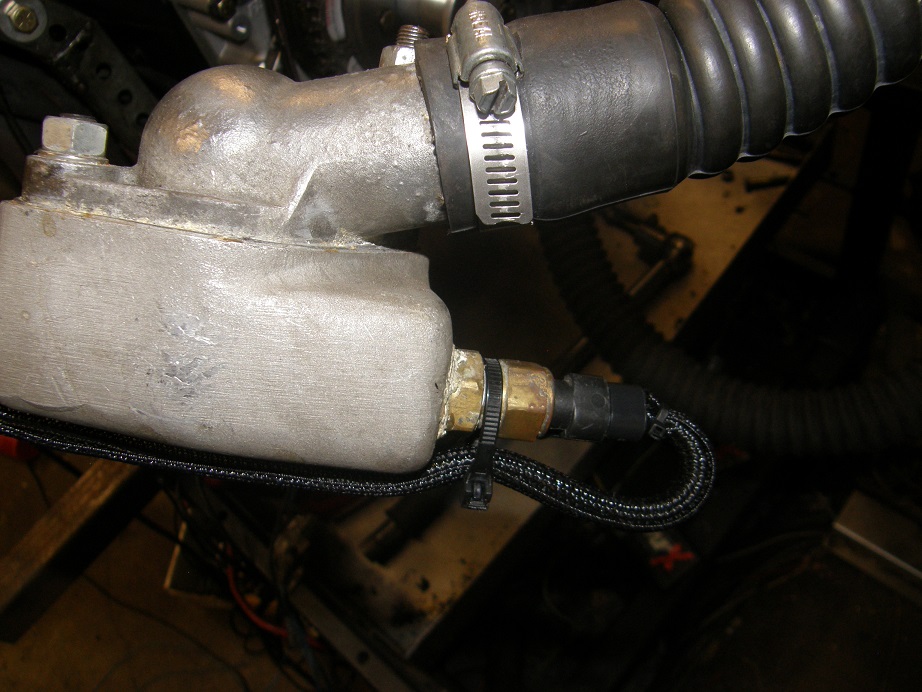
Since the CTS sensor is going to be out there where you can see it in the engine compartment, we want the wiring to it to look
nice. So, I usually cover it with a heat and abrasion resistant covering. This stuff is sold as Powerbraid by Painless Wiring,
but it turns out you can buy it a lot cheaper at McMaster Carr. It's on this page, and is called Wrap-Around Sleeving:
https://www.mcmaster.com/#catalog/123/857/=17xa1djThis stuff just curls around the wire and makes a nice, clean installation, not like that plastic stuff that you see so much.
It can be hard to install, though, and Painless makes a nice set of installation tools to make this part much easier. See the
link below:
https://www.summitracing.com/parts/prf-70941/overview/Here's one of them installed on the CTS sensor wires. The plastic installation tool is in two pieces and rotates around so that
a slot is open to install the wires. Then, you rotate it closed, feed the wrap over the little nub on the tool, and it slides on
right over the wires. Here's a couple of pictures:
Using this tool you just slide it along the wire, and the wrap goes on without any trouble. You can tie wrap or heat shring
the end of the wrap at the connector to make a nice, neat installation:
Next let's do the MAP sensor. This sensor has three wires; it needs a 5V power supply from the MS3-Pro. This is the gray wire
marked 5V VREF that you pulled out of the bundle earlier. Here's a picture of the sensor with the wires hooked up; the sensor
is the small gray box in the background with the vacuum hose attached to it:
Obviously you plug the vacuum line into a manifold vacuum source. In the picture the black wire goes to sensor return, and the
blue wire with the dark green stripe goes to pin #12 on the white connector. The red wire in this photo goes to my relay box,
but if you were hooking up without that it would go to the 5V VREF wire. This is a GM MAP sensor, and the wiring is shown in
the picture below:
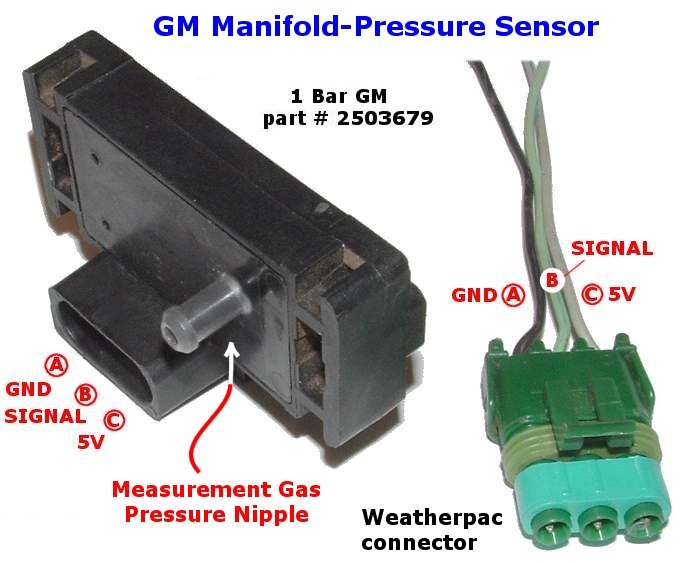
Notice that this sensor is a 1 Bar sensor. One bar is equal to one atmosphere, which means that this sensor is good for naturally
aspirated applications. If you are using a supercharger or turbos, and you want to run up to 14.7 psi of boost, you need a two bar
sensor. Three, four, and five bar MAP sensors are also available, to handle higher boost levels. Choose the sensor that is
closest to your expected range of operation.
Also, for moving between manifold pressure units, the following conversions may be helpful:
Standard atmospheric pressure = 29.92" of mercury = 14.7 psi = 100 kPa
The EFI units typically use kPa in their fuel and timing tables, which is convenient because of how close the kPa atmospheric
number is to 100.
One other thing to remember is that people tend to think of manifold pressure as vacuum, i.e. you have 10" of vacuum at idle.
Remember that when we are walking around we are all under atmospheric pressure. So, as I sit here I'm under about 29.92 inches
of mercury pressure, or 14.7 psi of pressure, or 100 kPa of pressure. A vacuum condition in the manifold means that
there is less pressure in the manifold than atmospheric pressure. So, 10" of vacuum is the same as 19.92" of mercury for
pressure (29.92" - 10"), or about 9.8 psi, or about 66 kPa. When tuning the engine the fuel and ignition tables will make sense
if you think of manifold pressure, rather than vacuum.
As a first step in converting this engine to EFI we are going to retain the distributor, but have the timing controlled by the
EFI system. So, I pulled the distributor on the engine and replaced it with a locked MSD distributor, no mechanical advance. Next
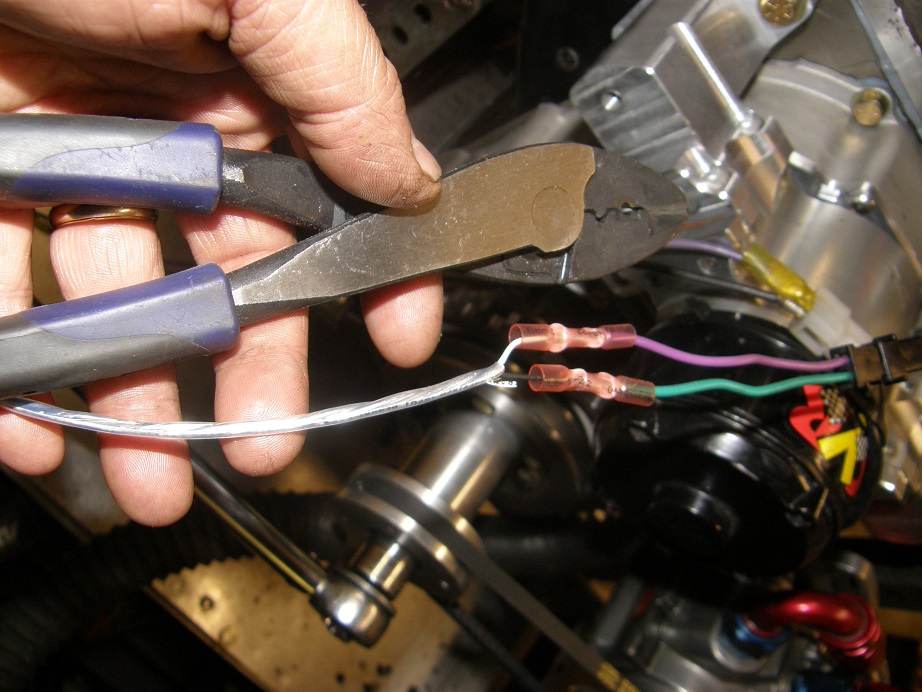
I hooked up the MSD distributor pickup to the CKP+ and CKP- wires from the white connector on the MS3-Pro, pins 6 and 15. These
wires come together in a shielded cable. The white wire is CKP+. It is important that these are hooked up correctly to the two
wires coming from the MSD pickup. MSD says that the black wire with the orange stripe from the distributor pickup is +, and the
black wire with the purple stripe is -. I don't know why, but the MSD extension wire that plugs into the distributor pickup
connector has different color coding, solid purple wire for + and solid green wire for -. Go figure. Anyway, the white wire
from the MS3-Pro should go to the solid purple wire on the connector, or the black wire with the orange stripe if you choose to
cut the connector off and wire it up directly. Here's a picture of the wiring to the distributor, also showing my crimp tool
again:
To make sure the engine start, turn the engine to the maximum advance point, say 35 degrees BTDC. Then adjust the distributor
so that at the maximum advance one of the tangs on the reluctor wheel is pointed straight at the pickup, and then make sure that
the rotor is pointing toward the #1 plug wire. You can then tighten the distributor; further timing adjustments will be made
in the software.
The last sensor we will hook up will be the O2 sensor. I used an LC-1 wideband sensor and control unit from Innovate Motorsports
on this engine. I've had this setup for a while, and now the LC-1 has been replaced by the LC-2; I assume the hookup is about
the same. You just have to follow the instructions with the unit, and hook the wideband output wire (brown wire on the LC-1) to
the pink wire, pin 25 on the white connector. Also, the wideband O2 sensors are heated, and there is a fair amount of electrical
current running through them as a result. So, rather than ground the LC-1 to the sensor return wire, I grounded all the wires
that require a ground connection to the ECU power inputs at the relay.
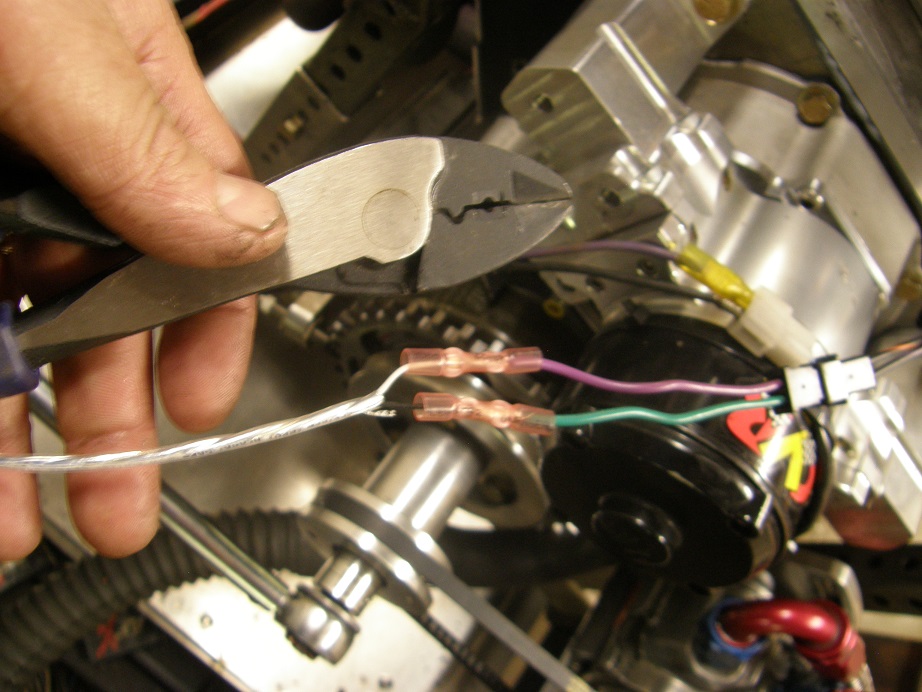
We have one more wire to connect, and that is the tach out wire. Normally this wire would hook to your vehicles tachometer, or
any other place where you need a tach signal. However, when running an MSD ignition, this wire is the trigger wire, so it is
connected to the white points input wire on the MSD. Once that wire is connected, the MSD distributor will feed into the MS3-Pro,
and the MS3-Pro will trigger the MSD to create the spark.
This pretty much completes the wiring required for this type of ignition setup. The remaining wires are not used, and can be cut
off and moved out of the way. I would recommend leaving about 12"of wire from each connector, and taping all the ends up so that
they don't short to each other somehow. Then you could still connect to them if you change your ignition setup later. In my
case I will be using these wires later as I move from one ignition setup to the next, so I will just tie them up out of the way
on the back of the dyno stand.
Next we will power up the ignition, start up the software package, connect to the MS3-Pro and configure it to work with the wiring
we have installed.
First, you need to install Tuner Studio and Megalog Viewer on your laptop. These are available at this link:
http://www.tunerstudio.com/There are free versions of both these programs, but you can also buy them together for about $90 to get all the features. I've
done that, so the screen shots you will be seeing below are from those versions. You will also need the most recent version of
Java installed on your laptop; most people have this already.
After installing the software, connect your USB cable between the MS3-Pro and your laptop, and open up Tuner Studio. (FYI, some
virus checkers will really slow this software down when opening it up; I have a virus checker called ESET and it will take up to
10 minutes to open a project in Tuner Studio if it is active, so I temporarily disable it when running Tuner Studio). Click on
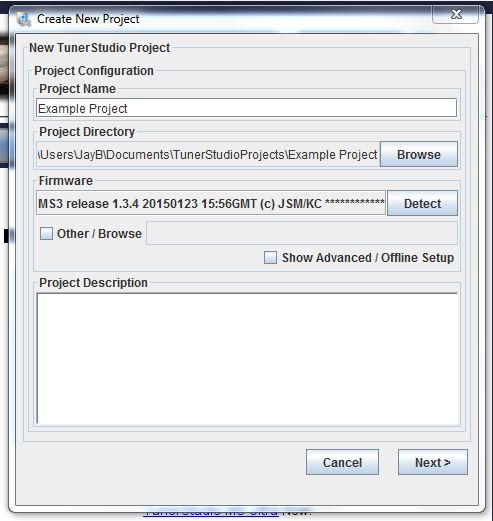
Create New Project. A screen comes up for you to enter the project name and the directory where the project data will be stored.
I usually use the default directory. Then, there is a box called Firmware where you need to detect the MS3-Pro. Click the little
Detect button next to the box. The Tuner Studio software will try to connect to the MS3-Pro through the USB cable. It will
probably find two connections, one via the USB port and one via the RS-232 port, as shown below:
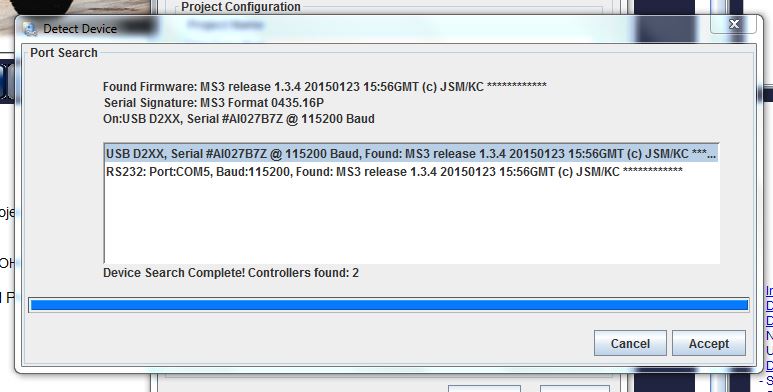
Make sure the one with the USB port is enabled
and click Accept. You will then be back at the previous screen, as shown below. Click next.
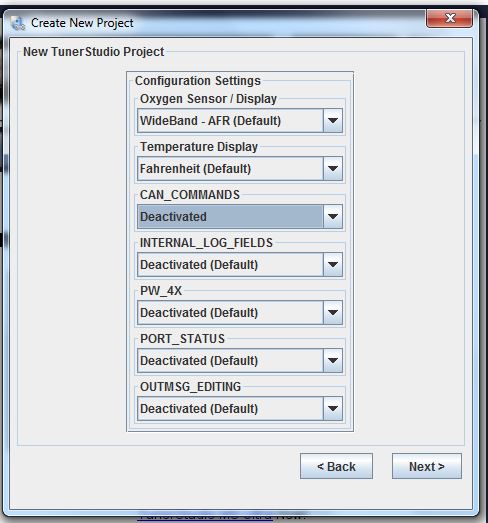
Next is a screen to set up some of the key functions in the software. The first two items are probably the one ones you need to
worry about, using a Wideband oxygen sensor, and Fahrenheit for the temperature scale. You can deactivate all the other
functions, as shown in the screen below. When finished, click Next.
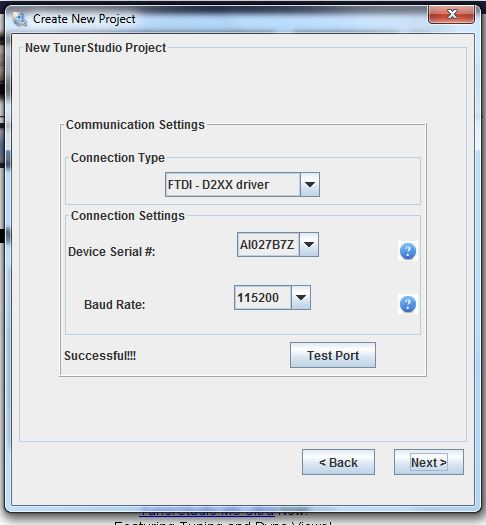
The next screen is mostly filled in for you, and all you are looking for is to see if the computer port you are using will work.
Click Test Port; if it says Successful, you are in good shape. If not, you may have to work on getting the USB ports set up
properly in the Device Manager of your computer.
Assuming you have a successful connection, Tuner Studio will now ask you to select a dashboard. There are a bunch of different
ones you can preview and pick from, but I usually just go with the default at this point, since you can modify the dashboard any
way you want later. Here's a picture of the default dashboard, which comes up as soon as you click the Finish button in this
screen:

Now its time to configure the software so that the engine will run. There are dozens of menus that allow use of all the options
that the MS3-Pro is capable of, but we only need to concern outselves with a few. As an overview of the menus, I made this brief
video, link below. I took this with my camera pointed at the computer screen, so its a little fuzzy, but I'm sure you'll get the
idea:
https://youtu.be/PpGirKgaMXUSo, we'll get started by pulling down the Basic/Load Settings menu and opening up the Engine/Sequential settings. A picture of
this menu is below:
Everything on the left side of the menu relates to fuel, so we won't be using it yet, but we might as well
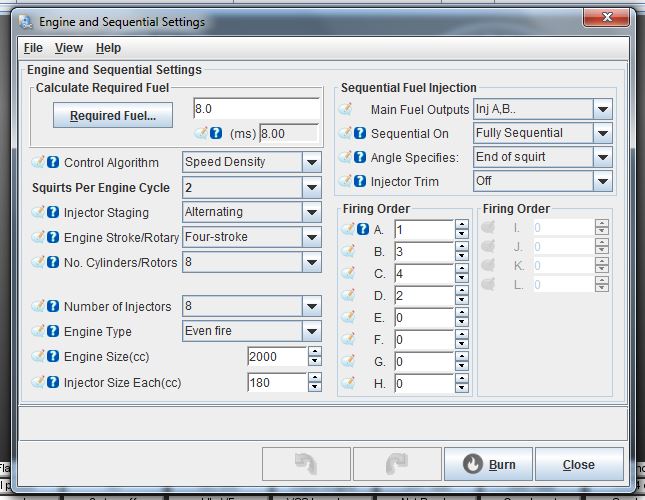
configure it now. First thing is to click on the Required Fuel button. This calculates a typical pulse width for your fuel
injectors; in other words, how long they stay open. You will need to input the size of the engine in cubic inches, the number
of cylinders, the flow rate of your injectors, and the perfect A/F ratio (14.7). Here's what mine looked like:

Click OK and the required fuel value will appear in the menu, along with the engine size and injector size in cc. You can leave
the rest of the parameters as-is for now, but we will be using the Speed Density approach to control the engine, which I believe
is the default filled in to the menu.
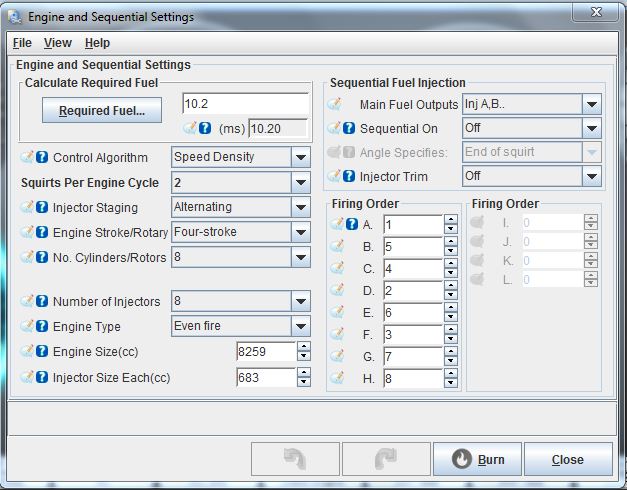
On the right side of the screen, modify it to turn sequential EFI off for now (since we are starting with carbs), and also turn
off the injector trim (which allows different injectors to inject different amounts of fuel, to fine tune the engine). Also, you
have to fill in the engine's firing order. The Engine and Sequential Settings box should look something like this when you are
done:
After making all the changes, click Burn; this saves the changes to the program in the MS3-Pro.
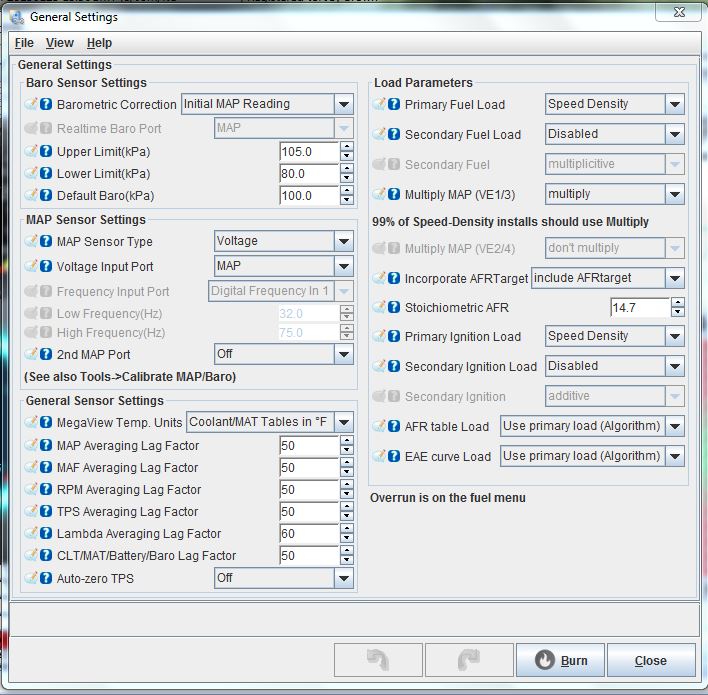
Next lets open General Settings under the Basic/Load settings tab. Here we are going to set up the MAP sensor. Just change the
values in the menu to match those in the picture below:
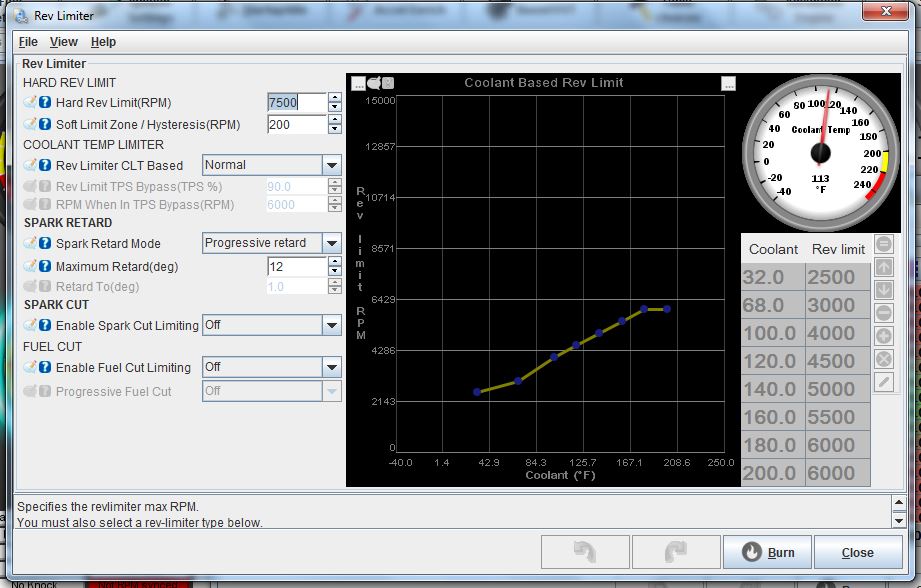
Click Burn, and close. Next go to the Rev Limiter menu, and set the rev limit where you need to be with your engine. The soft
limit zone comes in the specified RPM below the hard rev limit, to slow the engine down a bit before it hits the hard rev limit.
The Coolant Temp Limiter will adjust the rev limit based on engine coolant temperature, for example to keep the engine from
revving way up when it is cold. If you select Normal here, it is disabled, but if you choose to enable it, you can then adjust
the graph points on the right. The rev limiter works by removing engine timing, and the progressive retard does this
progressively. Imagine that. You can also specify a spark cut-off or fuel cut-off to enforce the rev limit. I set mine up as
shown in the picture below:
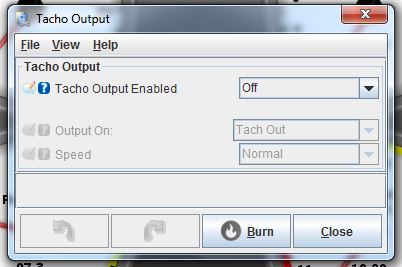
Click Burn, and close this window. The last screen under this menu that we will address is the Tacho Output screen. Normally this
output is used to drive your tachometer or other device that needs a digital tach input. However, since we are setting the
engine up to run off the MSD, we will use the Tacho Output to drive the white points wire on the MSD. So, we have to tie it to
the ignition table. In order to do this, we have to disable it here, as shown in the screen below:
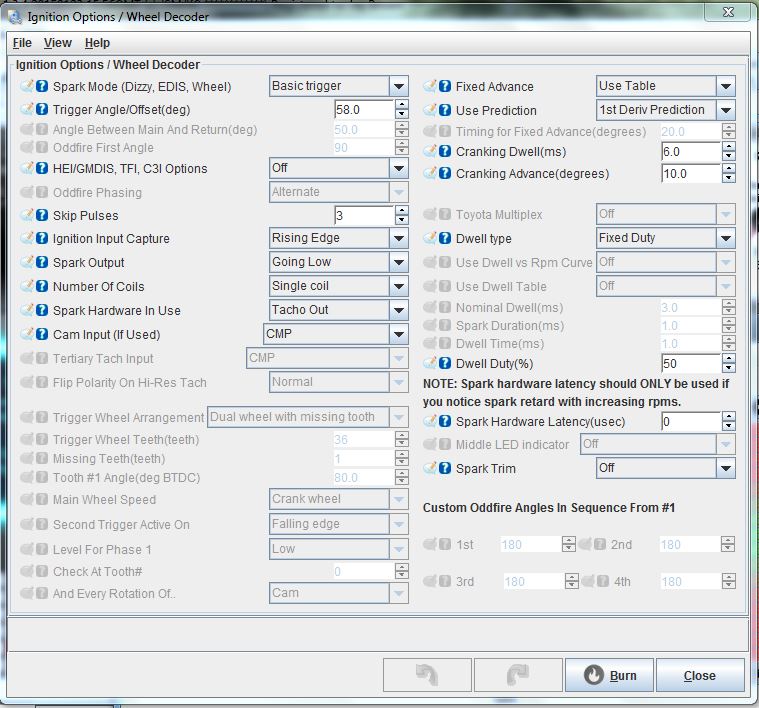
Burn and close this window. Now we will set up the ignition triggering. Under the Ignition Settings tab, click on Ignition
Options/Wheel Decoder. You will get this window:
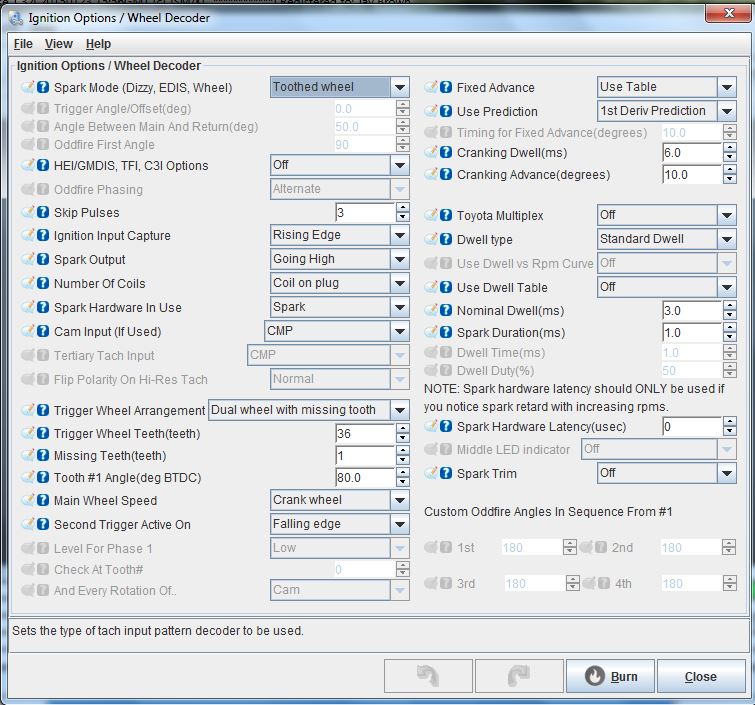
To make this work with the MSD distributor we have to set the spark mode as a Basic Trigger, with capture on the rising edge,
spark output going high, and specify a single coil. For the Spark Hardware in Use box, we have to change this to Tacho Out; this
makes the Tacho out wire obey the timing setup in the timing table. One other thing to note here is the Trigger Angle/Offset
box. This is where you can adjust the base timing in the computer, rather than by twisting the distributor. When finished the
Ignition Options screen should look like this, when configured for an MSD distributor:
 Edit 6/6/17:
 Note that the diagram above has been updated, there was one parameter that was incorrect when I captured the screen
the first time.
Spark Output should be Going Low, not Going High. Also note that the Trigger Angle shown above is what I ended up
with, not what I started with. I believe I started with 10 degrees for a trigger angle. See my next instructional post for setting that up.
Now, under the same tab, open up the Ignition Table. It will look something like this:

The gray boxes on the left side of the table (Y axis) show the manifold pressure, from the MAP sensor. These can easily be changed
for customization purposes. When I first opened this table it was set up for a 4 bar MAP sensor, so it went all the way up to
400 kPa. You can just click on each box and fill in whatever number you want; for a naturally aspirated engine, a range of 30
to 105 kPa, in 5 kPa increments, is sufficient. This is equivalent to about 20 inches of vacuum to zero inches. The gray boxes
on the bottom side of the table (X axis) show RPM values. All the numbers in the table show ignition advance. So, for example at
5000 RPM and 100 kPa (zero vacuum), timing is 35 degrees BTDC. This would correspond to an engine with wide open throttle at
5000 RPM. Another example, at 800 RPM regardless of manifold pressure, timing is 20 degrees BTDC. Tuning the engine involves
driving the vehicle and adjusting these values for best performance.
To change the numbers in any of the boxes, you can just click on the box and type in a new number. Or, you can highlight a string
of boxes, then click the = sign at the top of the map, and type in your number, and all the boxes that were highlighted will get
that number. You can also select boxes and add, subtract, or multiply the numbers in them using the operators at the top of the
table.
Sometimes it may be easier to see what the timing table looks like if it is presented in graphical form. Click the 3D View box
at the top of the timing table and you will see this:
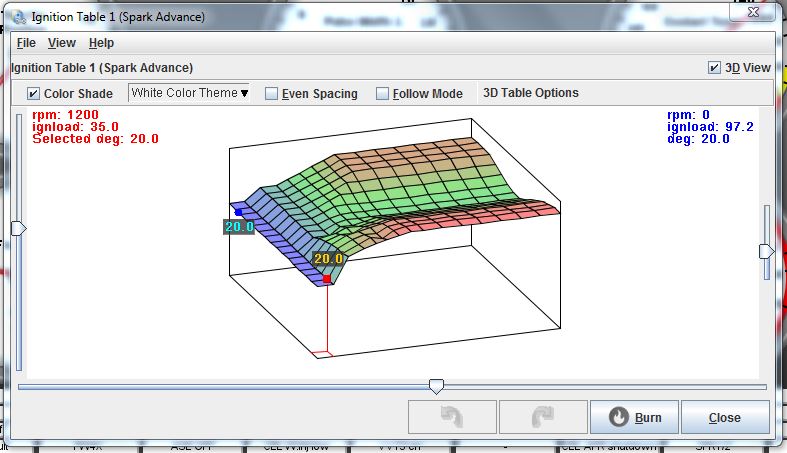
This view can make it easier to see major discontinuities in the table, and point you to the cells that may need to be modified.
Generally, a smoother table is better.
When you get done setting up the timing as best you can at this point, click Burn and close the table. Sometimes when you make
these changes you will get this message across the dash:
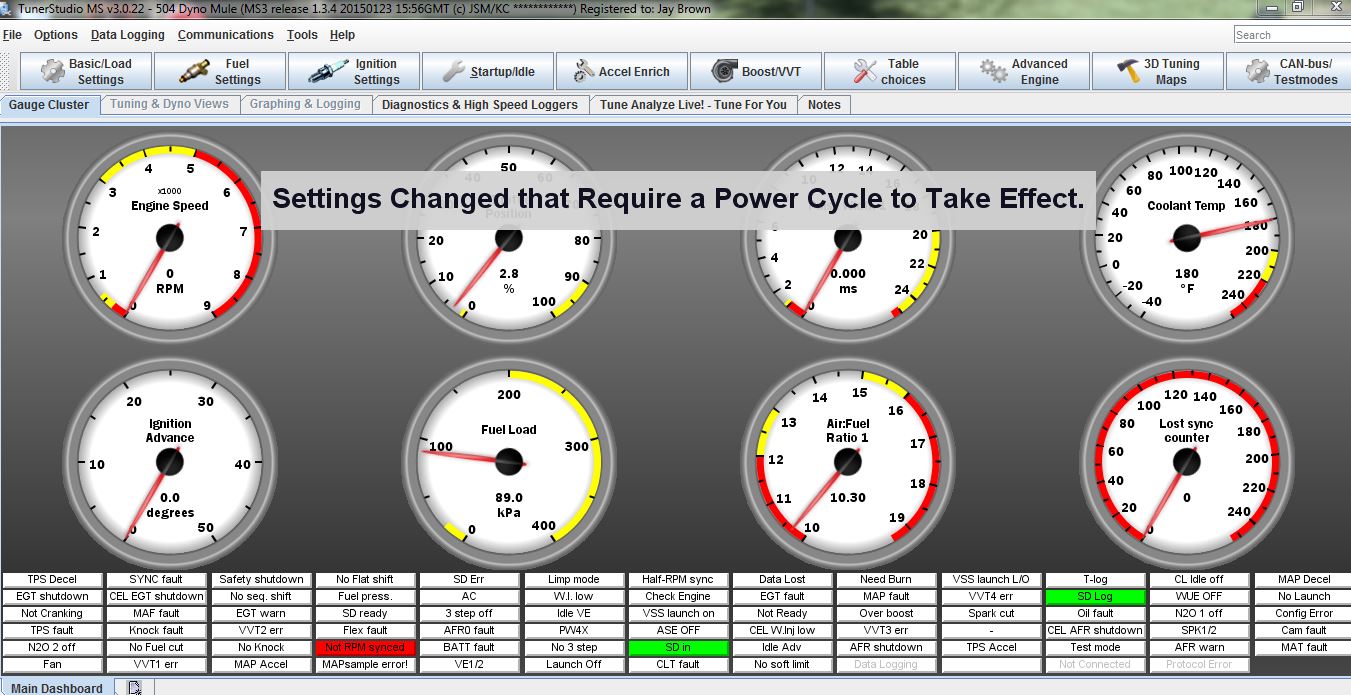
When you see this, just flip the ignition off for 3 seconds or so, then turn it back on. The MS3-Pro needs the power cycle to
store the new data.
Under the fuel settings tab, you can also look at the fuel table, or VE Table. Since we are not fueling with the EFI setup yet,
you don't need to do anything to it at this point. But you will notice it has the same axes as the timing table. Probably a
good idea to set the manifold pressure and RPM levels the same as you set them in the timing table. Notice that this table came
in with up to 400 kPa (4 Bar) on the left side. Just change those numbers, and the RPM numbers, to match the other table.
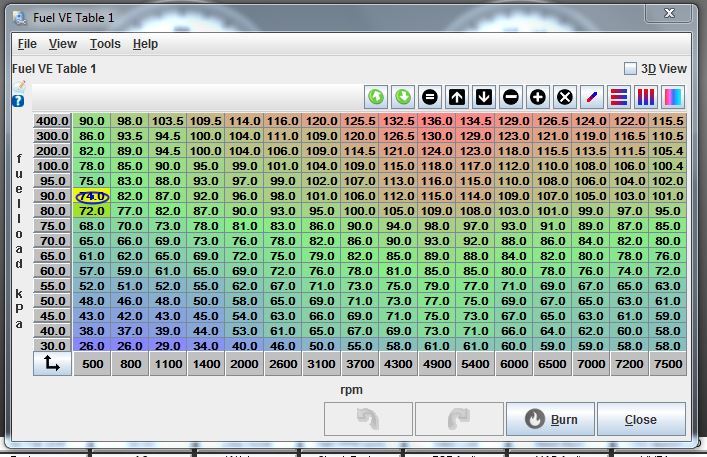
The numbers in the VE table represent Volumetric Efficiency, hence the name VE table. In practical terms, when you increase a
VE number in the table, you are adding fuel to the engine. We won't mess with this table again until we are actually injecting
fuel with the MS3-Pro.
Now let's set up the O2 sensor. To do this we need to go to the Tools menu up at the top of the board. Tuner Studio keeps these
calibrations locked, so that an errant keystroke won't result in a significant calibration change on the engine. Under Tools,
go to Unlock Calibrations, select Unlock from the drop-down box, then burn and close. Now, again from the Tools menu, select
Calibrate AFR Table. From the drop-down menu, select your wideband O2 controller. I am using the Innovate Motorsports LC-1, as
shown in the picture:
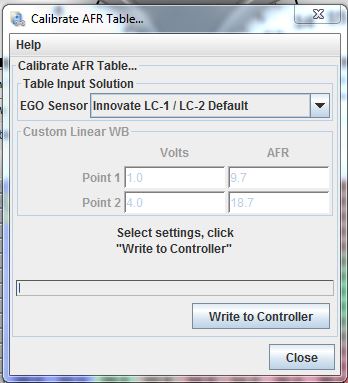
When you have selected your wideband O2 controller from the list, click Write to Controller, then close the window. Then,
re-lock the calibrations so they don't change.
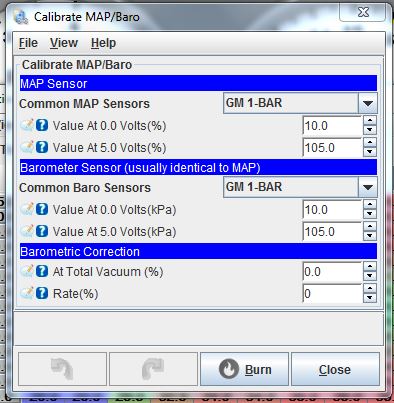
Also under tools, you can click Calibrate MAP/Baro, to set up for the correct MAP sensor. Since I am using the GM 1 Bar sensor,
that is what I selected:
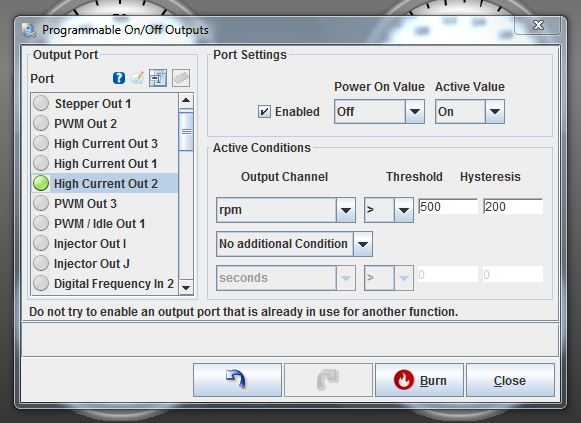
The last thing we are going to do before starting the engine is configure the High Current 2 output, that I am using to control
the electric water pump. Under the Advanced Engine tab, click on Programmable On/Off Outputs. On the left side of this menu
is the output port. Scroll down the list until you find the output that you want to program, in this case High Current Out 2.
On the right side, click Enabled, and make the Power On value OFF, and the Active Value ON. This means that when the ignition key
is on, the output is off, but will turn on when it is active. On the lower right side, you can define active conditions. For the
water pump, I have selected RPM for the output channel, then a "greater than" sign, then 500 RPM for the threshold, and 200 RPM
for hysteresis. The way this is configured now, the electric water pump will not turn on until the engine speed reaches 500
RPM. It will stay on until the engine speed drops below 300 RPM, due to the 200 RPM hysteresis value. Here's a shot of the
screen:
Notice we have not used any additional conditions. They are available; in the drop down box you can specify AND or OR, and then
add additional conditions. For example, with an electric fan, you can do the same thing that you do with the electric water pump,
to keep it from running while the engine is cranking. But you can also add a condition so that it also won't run until the
coolant has reached a certain temperature. This set of parameters might look like this:
RPM > 500, Hysteresis 200
AND
Coolant Temp > 170, Hysteresis 10 degrees
This way, the fans don't come on until the engine is warmed up to temperature, and is running. And if the temperature drops
below 160, the fans automatically shut off.
Despite setting it up this way, you can also bypass these programmable outputs with a mechanical switch. To do this you have to
understand that the outputs on the MS3-Pro are typically current sinking outputs. They are a transistor that acts like a switch,
and connects the output to ground. So, when we wired the water pump earlier, we put a constant 12V to the water pump relay coil
when the ignition switch was on, and connected the other side of the relay coil to the High Current Out 2 wire. With the output
turned off, the "switch" is open, so no electric current can flow, and the relay coil is not energized. As soon as the output
turns on, the "switch" closes, allowing current to flow and energizing the relay coil, which in turn allows voltage to the water
pump.
Now let's say we've just made a pass at the track and have pulled back into the pits, and want to cool down the engine between
rounds. If we wire a toggle switch between High Current Out 2 and ground, and flip the switch, current can then flow through the
relay coil to ground, even if the engine is not running. On my car I have a switch like this on the electric water pump and also
on the fan circuit. I don't use them very often, but they are there if I need them. Most of the time the electric water pump
and electric fans operate automatically, and I don't have to think about them.
One last thing, and that is configuring the dash in Tuner Studio. There are a multitude of different gauge types, gauge styles
and colors and texts available, so you can customize your dash any way you want. Rather than trying to explain this in words,
I've created this short video to show how it works.
https://youtu.be/PW1UdM_4KLQThis is pretty much the whole setup for adding the MS3-Pro into the dyno mule, while still using the MSD distributor for a trigger
and the MSD Digital 6 for spark. Next time we will go through a few things we need to do to start the engine, and then work on
transitioning to the 36-1 toothed wheel.


