This week I needed to get some of the longer lead time components ordered for the car. The first thing I needed to do was to specify the rear end components. I had already positioned the wheels and tires under the car and measured the flange to flange distance I wanted for the wheels. I had also previously purchased some Wilwood brakes for the rear end of this car, so I measured the hat thickness at the axle flange and subtracted twice this distance from the previous flange to flange measurement, to get the axle flange to axle flange dimension. From there I went to the Mark Williams web site and downloaded a copy of their axle ordering form. Knowing the flange to flange dimensions of the axles, this form helps you to calculate the axle and axle housing dimensions.
Looking at the Mark Williams site I also decided to use one of their lightweight spools on this project, and also specify their "Pro-Street" axle housings ends. These ends use a larger Timken bearing than a standard Ford 9" big end axle housing, for better durability on the street. I also decided to go with 40 spline axles for this project, because I'm hoping to run in the low 9s with the naturally aspirated engine. Finally I did some calculations and settled on 4.30 gears for this car. I'm planning on pulling the aluminum Mark Williams case out of my Galaxie, because it is set up with the larger 3.25" ID bearing bores, and using that in this rear end, so I don't need to order a case. I have a spare MW aluminum case with the smaller 3.062" bearing bores that I can swap into the Galaxie to get it going again. Since I'm going to put the little SOHC (510" LOL!) back in the Galaxie, and put the big motor in the new Shelby clone, I figured I'd better use the better case in the Shelby clone too.
After selecting the Mark Williams components, I went to the Currie Enterprises site to decide on the axle housing. The last three rear ends I've done have used Mark Williams components in the Currie axle housing, and have worked out very well. I figured out which Currie axle housing I wanted, and would specify it with no housing ends, since the ends were coming from Mark Williams for the larger Timken bearings. Tuesday on my lunch break I ordered the Mark Williams and Currrie Components
After settling on the rear end components I continued working on developing the overall plan for my '69 Shelby clone. On Monday I ordered the sheet metal I needed from Mustangs Unlimited, and then started doing some more internet research on Tuesday night. As I was looking at some of the different chassis options for the front end I stumbled across the Fatman Fabrications site. Looking through their online catalog I found their front strut conversion kit for '67 to '70 Mustangs. I was immediately very interested in this kit. For one thing, it is a bolt in kit; it comes with a K-member that bolts into the stock lower control arm mounting points. This K-member mounts the tubular lower control arms that come with the kit, plus the steering rack. This means that the factory engine mount locations can be used, along with the factory front subframe rails. The second very attractive part of this kit was that as a strut conversion, there was no upper control arm to get in the way of the headers. Allowing room for a good set of headers was the primary reason why I had decided against a Boss 429 style engine compartment.
The Fatman kit also uses some stock type components to complete the strut installation, including 1994-2004 Mustang spindles and hubs, 1979-1993 Mustang struts, and a 1990-2003 Escort power rack and pinion. I checked on ebay and all of these parts seemed to be readily available at a fairly low cost. On the negative side, I didn't want to run power steering on this car, so I wondered whether a manual Escort rack could be substituted for the power rack. Also, the kit was designed so that the strut upper mounts bolted into the factory shock tower location. I would like to eliminate the factory shock towers to give more room in the engine compartment, so I would have to find another upper mounting point for the strut.
Looking through the race car catalogs at the strut front suspensions, the obvious answer was to tie the upper strut mount to the forward extension of the roll cage that ties into the front frame rails. Thinking about this a little, it seemed like I could move the upper strut mount outboard to attach to the forward extension of the roll cage, and then add a support bar from this mounting point to the cowl, triangulating the whole works like the factory export brace. The only really big question would be moving the upper strut mounting point outboard, and what it would do to the suspension geometry. Obviously this would be modification to the kit, so I'd be on my own for success or failure with this modification.
On Wednesday I gave Fatman Fabrications a call to get some more information on the kit. Regarding the power rack, the person I talked to said that I could run it as a manual rack by just filling it with fluid and connecting the two fluid ports that would normally go to the pump together with some steel line or AN hose. He also said that they used to offer a manual rack for the kit, but for some reason the manual rack was hard to come by, so they had switched to the power rack. I asked a few more questions, and he offered to send me an instruction manual on how the kit was installed, which sounded like it would answer a lot of questions.
In the meantime, I decided to investigate the suspension geometry of a Macpherson strut setup. I learned a little about it from some normal internet searches, but decided that to really answer my questions I would need to make a mathematical model of the strut setup, to understand how it operated when set up normally, and what would change if I moved the upper strut mounting points outboard from the stock Mustang shock tower location.
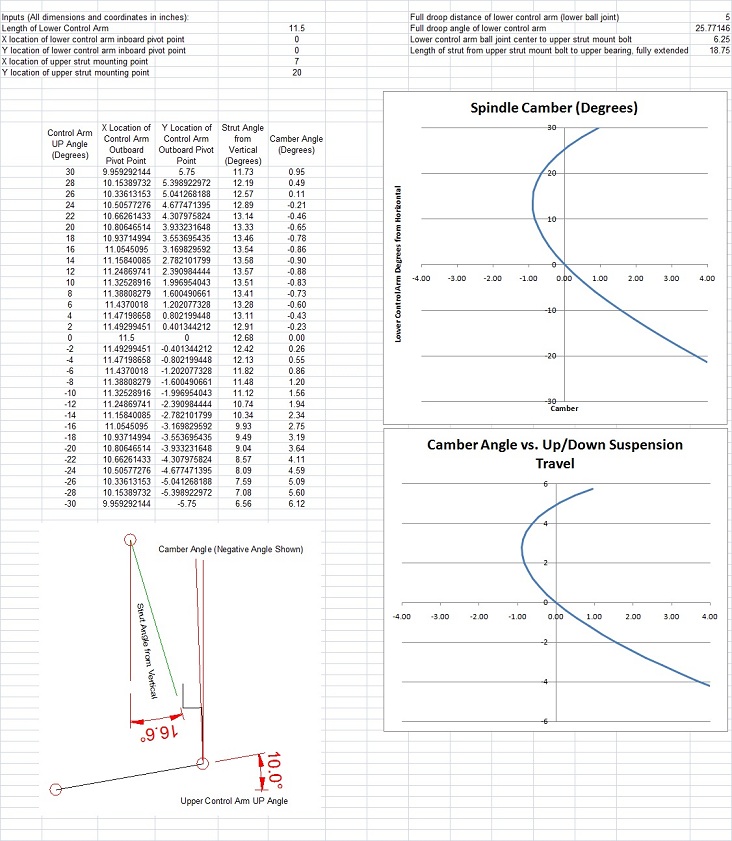
In order to gain this understanding I made a simple two dimensional model in Microsoft Excel, that would calculate the camber change at the wheel through the full range of suspension travel. I made this model as viewed from the front of the car, because moving the struts outboard as I was planning was not going to affect the angle that the struts sloped back at when viewed from the side. This angle sets the caster of the front wheels, and since it was not going to be changed, I didn't expect any change to the caster by making my modification. Also, with the rack and pinion setup optimized for the lower control arm that was contained in the kit, I didn't expect any toe related issues like bump steer. So camber was the primary suspension parameter that I would be altering.
Below is a picture of the Excel spreadsheet with approximately the correct suspension and strut mounting points entered into the formula, and a graph of the camber curve over the suspension travel, in degrees of lower control arm movement and also in inches of up and down wheel movement:
Next I moved the upper strut mounting point outboard by 3", and re-ran the calculation to generate the graphs:
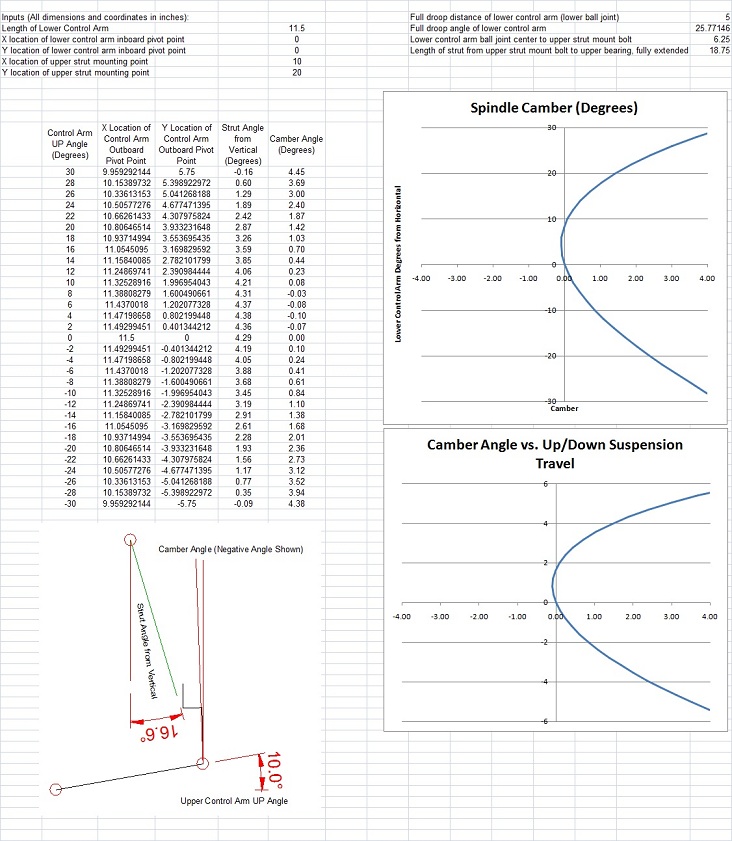
Comparing these two sets of graphs, what was of primary interest was the overall shape of the curve. The camber could be adjusted during the wheel alignment process to be more positive or more negative, essentially allowing me to shift the curve left or right on the graph. So the absolute camber value shown was not as important as how stable the camber value was over the full range of suspension travel.
Bottom line appeared to be that moving the upper strut mounting point outboard would not have a serious effect on the suspension's geometry, provided the car was aligned correctly. In fact, with the upper strut mounting point outboard 3", the camber curve actually looked a little better for a drag race type suspension. The only real challenge appeard to be modifying the bottom of the strut cartridge to allow it to bolt to the spindle at a slightly different angle. In this regard the Fatman kit offered something of an advantage with its use of the 79-93 Mustang struts on the 94-04 Mustang spindles. The brackets on the specified struts were wider than the ears on the spindles, so the Fatman kit included a pair of 1/8" thick spacer plates that sandwiched between the bottom bracket on the strut and the ears on the spindle to allow them to bolt together. I figured that I could just make up a modified set of these spacer plates with an elongated hole, and trim the brackets on the strut cartridge, to allow the strut to tip a little bit to accomodate the revised upper mounting position.
The directions to the Fatman kit arrived on Friday, and looking through the directions I was surprised at everything that had to be done to make this kit work. For example, some substantial modifications had to be made to the Escort steering rack, including putting an extension on one end, a stop on the other, and then cutting the inner tie rods ends so that they were 4 1/2" shorter, and re-threading the ends so that the outer tie rod ends would screw on. The Mustang spindles had to be modified somewhat as well, grinding on the bottom for clearance to the lower ball joint on the new control arms, and cutting off the factory steering arm (the kit came with a steering arm replacement for each spindle that bolts on). Finally, $2000 seemed like a lot of money for the K-member, the lower control arms, and some assorted brackets, but I suppose you are paying for the engineering more than the materials. With the spindles and hubs, struts, and steering rack I figure I'll have about $2500 in this whole setup, and that doesn't include brakes. But it looks like the best solution for my application, and the modifications to the rack and spindles are nothing I can't handle, so I'll probably order the kit next week.
I also spent some time this week thinking about the transmission I want to use in this car. My previous two project cars have used automatics, and I wanted to give some serious consideration this time to using a manual transmission. Part of this is because, like most hot rodders, I find that a manual transmission is a lot more fun to drive. I have manual transmissions in two of my other cars, but they aren't cars I'd ever take to the race track, they are pretty much street only vehicles. One of the things that has always kept me leaning towards automatics in any car that I take to the track is that they are easier on the drivetrain than a stick car would be. For me especially this is important, because up until about a month ago I had never owned a car trailer, preferring to drive my cars to the track, change tires, race, and then drive home. So, if I break at the track, it means a relatively expensive tow 120+ miles back home. (Fortunately, with AAA insurance the first 100 miles are free). But its always
a pain in the neck when this happens, and anything I can do to prevent it is a positive. I've never broken a driveshaft, u-joint, or rear end part using an automatic transmission and footbraking the car at the line, and I doubt I would have been that lucky if I'd been running a manual transmission.
Nevertheless, the appeal of running a stick car has always been there. I take a certain amount of heat from my manual transmission buddies for running an automatic (my friend Joel Nystrom refers to them as "oily, greasy, fluid couplings), and besides I think the car would be more fun to drive and the ET/MPH would be better with the stick. According to some knowledgeable people that I know the state of the art clutch components have now advanced to the point where I could make a simple clutch adjustment at the track and run reliably there, and the just adjust back again for street operation. That was a major concern, but also of some concern was the durability of the transmission itself. I was planning on putting at least 1000 HP to the flywheel, and the transmission needed to be able to take it, and still be streetable.
After talking this week with the technical folks at G-Force, Jerico, and Liberty, I came to the conclusion that it was going to be difficult to make a manual transmission work. They all said that for a transmission that would handle that kind of power, you would need to go with a clutchless style, and these transmissions will pop out of gear on deceleration. This, of course, was no good on the street. All the performance transmissions that were streetable from these companies were limited to around 800 horsepower, and this wasn't going to be enough for me. The only company that offered a streetable transmission that would handle the power requirements I had was Lenco. Lenco makes a streetable version of their race transmission that can handle 1200 horsepower. And even their race transmission is probably streetable enough for me; Larry Larson sure has proven that at Drag Week over the last few years. And I will have to admit that I really, really liked the idea of all those levers coming through the floor; that look was just cool.
Here, though, the Drag Week rules were kind of a discouragement. The rules since 2006 have stated that a Lenco transmission automatically puts your car in the unlimited class. I sure wasn't looking to compete there, at least not with this car. Since one of the primary purposes for building this car was to get back to Drag Week, I had to think about whether I would be happy showing up in the unlimited class with a fairly slim chance to win. The big appeal for me with Drag Week is the opportunity to race a lot in a fairly short time period, and see all my pals from the previous years, but I'd be lying if I said I wasn't serious about having a chance to win. I like winning at Drag Week, especially with an FE against the big block Chevys, the 385 series Fords, and the Chrysler Hemis. Nobody expects much out of the FE when comparing it to those other engines, so when I've won with an FE powered car in the past it has always felt pretty good. After a little soul searching, I reluctantly decided I couldn't go with the Lenco transmission, because of the Drag Week rules.
So, I was stuck with an automatic. Well, at least I know what to expect from one, and I have some experience with them. But here again I faced a dilemma. At Drag Week in 2009 I'd run a C-4 behind my 930 HP SOHC. It ran fine all week and didn't give me any trouble, but after the racing season was over my transmission guy tore it down and found some pretty ugly clutch and wear issues. He figured I only had a few more passes left in that transmission before it gave up. Now, with an upgraded version of the SOHC that I figured would make over 1000 HP, the C-4 looked pretty marginal. Plus, if by some chance I was able to get the twin turbo SOHC ready and installed in the car prior to the racing season, there was no way that the C-4 would hold up.
I faced this same situation with my Mach 1 when I installed the supercharged FE in 2006. No way the C-4 was going to take the power of that engine, so I had reluctantly settled on a Powerglide. I had purchased the Powerglide from the same place where I got my C-4, Performance Automatics. But while the C-4 had been completely trouble free, the Powerglide was not. After installing the Powerglide and running it for a few weeks, it developed a leak at the front that seemed to be impossible to fix. Eventually I took the car to my pal BradFORD (who is the shop foreman at a local auto repair business and has been a master mechanic for 25 years), and he managed to get it fixed, but not without a lot of trouble. The root cause of this leak turned out to be the way that Performance Automatic bolted their FE to Powerglide conversion bellhousing to the transmission. They used the front pump bolts to hold the bellhousing on, and stresses on the bellhousing-transmission case joint would make the front pump gasket fail and cause the leak. As I understand it ATI developed a fix for this problem, designing one of their SFI cases with four ears on each side to bolt to a special bellhousing with bolt holes in this area, and as a result of that Performance Automatics now uses ATI's bellhousing. But that didn't help me in 2007 when I was experiencing these problems.
Further, at Drag Week in 2007, the transmission failed during the test and tune; this was with only about 1200 miles on the trans, and maybe 10 passes at the track. I found a shop near the track called Layne Automotive, where the guy had a lot of experience with racing Powerglides, and also had all the parts in stock. We got the car fixed overnight at this shop so that I could continue at Drag Week in 2007, but the failure in the transmission was probably due to the band being too tight, according to the guy at Layne. After Drag Week 2007 I called Performance Automatics and complained about this, but they basically told me they weren't going to help me. So I'm not buying anything from PA again.
The local guy who built my latest C-4 knows a lot about automatics, and he has been telling me that the ATI Powerglides are really strong, reliable transmissions. Right now, I'm leaning towards one of these for this car, because it would work with either the naturally aspirated SOHC or the twin turbo engine. I have resigned myself to hearing about what a traitor I am from all my Ford friends, and enduring the "Slip-n-Slide" comments. But right now this appears to be the best choice for my combination.
The last thing I did during the evenings this week was to make an inventory of the steel I needed for this project. I needed a piece of 2X3 square steel tubing to cap the end of the back half frame and weld to the car's taillight panel, and also to mount the trailer hitch receiver. I have a special trailer hitch that I did for my Mach 1 that mounts the parachute, so I'm planning on using that at the track, and putting in a regular hitch with a 2 1/16" ball for towing the trailer with the race tires, race fuel, and tools to the track. In addition I needed to get some 1" X 1" square steel tubing for framing the trunk area and also for some use under the hood, and of course I needed the 4130 .083" wall 1 5/8" diameter chrome moly roll cage tubing. Finally, for this project I was going to make a jig to keep the axle housing in alignment when I tacked the ends on, so I selected some 2 1/4" diameter 3/8" wall DOM tubing for the alignment bar. I ordered all the steel from Discount Steel in Minneapolis, and should be able to pick it up next week.
After all this planning I finally got wrenching, and pulled the old factory 9" case out of the Galaxie's original rear end housing, which was sitting unused on the upper level of my shop. After I got it out and cleaned up, I measured the inside diameter of the bearing bores, and went to work on my lathe making a couple of donuts that would fit in these bearings bores, and slide over the 2 1/4" diameter steel tube that I was going to use for a jig. After that I put the Galaxie up on the hoist, and pulled the axles and case out so that when I got the Mark Williams parts I could have the spool and new gears put into the case. After the axles were out I measured the inside diameter of the Mark Williams housing ends on the Galaxie, and then went back to the lathe and made up two more aluminum donuts that would fit inside the housing ends, and fit over the 2" aluminum jig bar. Here's a picture of the jig components (note that this picture was added later, after I received the steel tube):
To use this jig I will bolt the case with the donuts in the bearing bores into the Currie axle housing, slide the 2" diameter bar through, and then position one of the other donuts inside each housing end, and slide them onto the tube. Once I have the housing ends rotated into the correct position, I will tack weld the housing ends to the axle housing, and the jig will ensure that they are on straight.
Next weekend should be fun; I'm looking forward to receiving the steel I ordered and getting going on positioning the backhalf frame under the car, and getting it tack welded into place.


