Author Topic: Low Buck Torque Wrench Calibration  (Read 7065 times)

0 Members and 1 Guest are viewing this topic.

jayb

  • Administrator
  • Hero Member
  • *****
  • Posts: 7405
    • View Profile
    • FE Power
Low Buck Torque Wrench Calibration
« on: March 18, 2012, 01:09:27 PM »
Wreckless Warren's post got me thinking about calibrating my torque wrench.  I'm starting the assembly of my 519" SOHC, and figured it would be a good idea to calibrate my 10 year old wrench before I got down to business on this engine.  I thought that I had some plans for making a torque wrench checker laying around here somewhere, but couldn't find them.  So I did an internet search, and found an even cheaper way to do it.  I will try to explain here.

Basically, this method involves clamping the 1/2" drive stud of the torque wrench in a vise, and adding weights to the handle to check the torque.  You have to do some mathematical calculations to try to get good accuracy, and you need a set of calibrated weights to make this work.  I'm in luck on that, because I already have a set of calibrated weights that I use for checking the torque link on my dyno.  Calibrated weights are not hard to come by; you can use anything, even a jug full of water, as long as you can weigh it accurately.  For my dyno I bought an Olympic weight set from Sears; I figured in addition to using them as calibration weights, maybe I could use them to work out.  Of course, that turned out to be a joke LOL!  But they work great as calibration weights.  I took them to a UPS store that I frequent; they have a state certified scale there that they use for weighing packages.  I brought the weights in one at a time and weighed them with an accuracy of 0.05 pounds on the UPS store scale.  You could go to the post office or a grocery store too; anyplace that charges for some product or service by weight has probably got one.

So, here's how you do it.  First you need to include the weight of the torque wrench itself in the calculation.  You need to know the weight of the wrench, and its balance point, which is called the center of mass.  I have a couple of small scales here for weighing pistons, rods and valves, so I used those scales for this.  My torque wrench weighed 2 pounds 4.6 ounces, or 2.29 pounds.  I put a 1/8" steel plate in my vise, with the edge facing up, and found that the torque wrench balanced at 7 7/8" from the center of the drive stud of the wrench.  So, since we want to calculate in lb-ft, not lb-in, this measurement is converted to feet.  So, with the drive stud of the torque wrench clamped in the vise, the weight of the wrench is applying (7.875/12)*2.29 lb-ft of torque to the drive stud, or 1.50 lb-ft of torque.

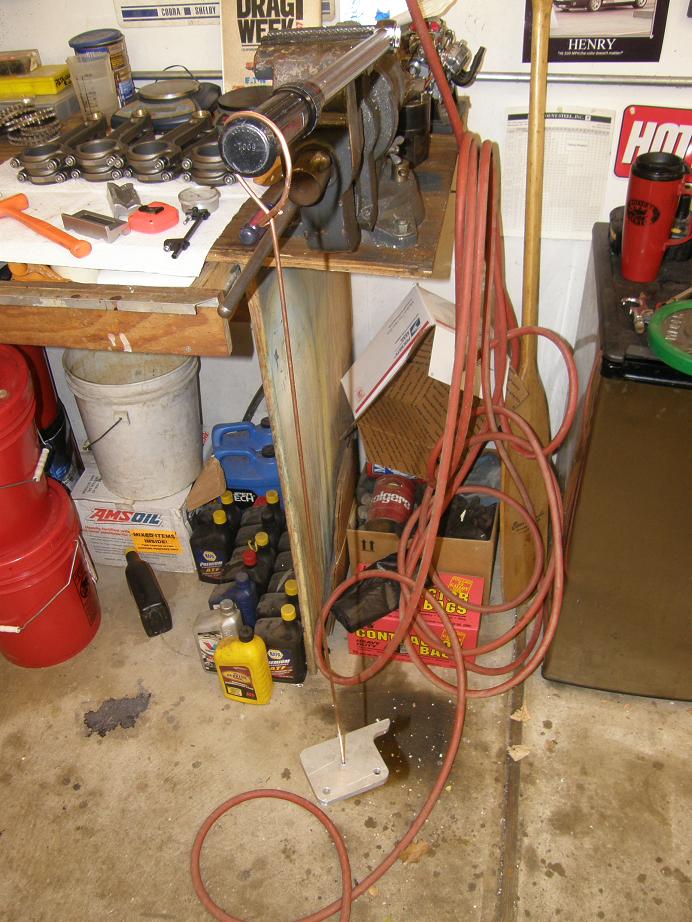
Next you have to make a hanger for the weights.  I did this using a 1/8" steel welding rod, and looping it so that it would hang on the end of the torque wrench.  I was going to position the hanger at the very end of the torque wrench, so I measured the distance from the center of the drive stud to the handle of the wrench where I was going to loop the wire.  This distance was 19", or 1.58 feet.  To hold the weights at the bottom of the welding rod I cut a 1/8" hole in a piece of scrap aluminum I had, put it on the end of the welding rod, added some fender washers, and then welded a 1/4" steel nut on the end of the welding rod.  The loop on the other end of the welding rod is small enough to go through the hole in my weights, so now I had a hanger.  I weighed the hanger on my scale, and it was 8.9 ounces (0.56 pounds).  So, when it was hanging on the end of the torque wrench, it was applying 1.58*0.56 lb-ft of torque, or 0.88 lb-ft of torque.  So, with the weight of the wrench and the hanger, the torque wrench had 2.38 lb-ft of torque being applied to it, as shown in the following photo:


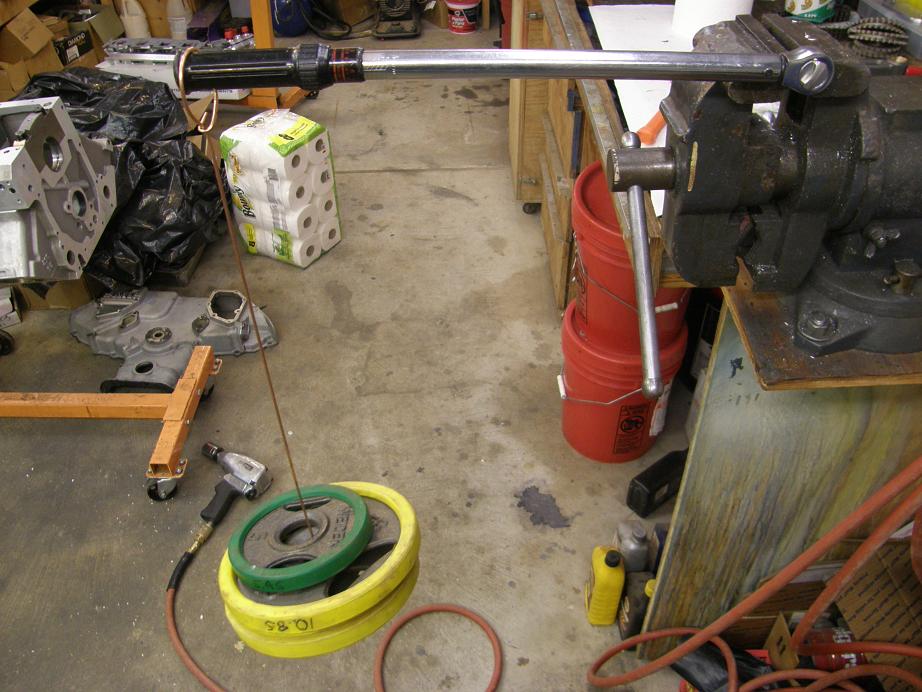
Next I started adding my calibrated weights to this setup.  Each weight has to be multiplied by 1.58, because it is hung at a distance of 1.58 feet from the torque wrench's drive stud.  My torque wrench is a clicker, so if I was adding 40 lb-ft to the wrench, I'd start with the torque wrench set at 35 lb-ft.  When the weight was hung the wrench would click, then I could just lift up on the handle to take some weight off, rotate the handle to the next torque setting, and release the  handle slowly to see if it still clicked.  I would work my way up the torque settings in 1 lb-ft increments on the wrench until I found the first setting that did not click, and then I would use the previous setting  as the value that the torque wrench would read.  Here's another shot of this setup from a different angle, with some weight hanging on the wrench:


I was mostly interested in a torque range of 25 to 125 lb-ft, so I tried to select weights that would get me into this range.  From my research online I found that when most calibration shops calibrate a torque wrench, +/- 4% is acceptable, and +/- 3% is considered very good.  So I created an Excel spreadsheet to record this data and calculate the percentage error of my wrench, to compare with this standard.  It turned out that my wrench was pretty close to correct throughout most of the range of interest.  Here's a couple of graphs from my spreadsheet:


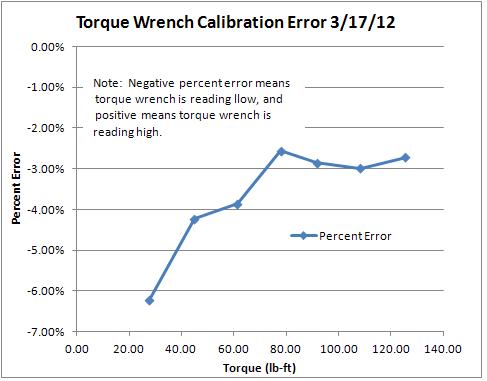
Looks like my wrench is really close up above 50 lb-ft, and the only area of concern is down in the 25 lb-ft range, where the error was around 6%.  My wrench reads consistently low according to this test, so I can compensate for that by subtracting a couple of lb-ft of torque to the torque specifications I'm trying to hit.  Overall I was rather pleased with the results from my ten year old wrench.

Any time you do something like this it is wise to consider potential sources of error.  Seems to me that there could be some measurement error in the distance measurement for the center of mass of the wrench itself, and also the distance measurement from the drive stud to the spot on the handle where the weights are hung.  But I don't think this is much; my wrench has a flared end to it's handle, so I was able to position the hanger pretty accurately each time, just by pushing it up against the flared end of the handle.  So overall, I think my measurements are probably really close, certainly with a couple percent.  Now I have a fair amount of confidence in the torque readings that I'll get when I put that new motor together.

Thought this might be of general interest to anyone assembling an FE with an older torque wrench...
« Last Edit: March 18, 2012, 01:48:34 PM by jayb »
Jay Brown
- 1969 Mach 1, Drag Week 2005 Winner NA/BB, 511" FE (10.60s @ 129); Drag Week 2007 Runner-Up PA/BB, 490" Supercharged FE (9.35 @ 151)
- 1964 Ford Galaxie, Drag Week 2009 Winner Modified NA (9.50s @ 143), 585" SOHC
- 1969 Shelby Clone, Drag Week 2015 Winner Modified NA (Average 8.98 @ 149), 585" SOHC


cammerfe

  • Hero Member
  • *****
  • Posts: 1659
    • View Profile
Re: Low Buck Torque Wrench Calibration
« Reply #1 on: March 19, 2012, 12:00:17 AM »
Jay, a quick glance at a beam-style torque wrench will show you that the handle is on a pivot pin in such a way that the force is all concentrated at the pivot point. Might it be that the CENTER of the handle is the point at which the weight hanger should be placed?

KS

jayb

  • Administrator
  • Hero Member
  • *****
  • Posts: 7405
    • View Profile
    • FE Power
Re: Low Buck Torque Wrench Calibration
« Reply #2 on: March 19, 2012, 12:13:40 AM »
My torque wrench doesn't have a pivot point on the handle, Ken.  I have seen beam style wrenches with that pivot, though, and I'm sure that the pivot point on a beam wrench would be the spot to hang the weights for proper calibration.  On a clicker like mine, there is some internal mechanism that sets the click point, so it shouldn't matter where on the wrench you apply the force.  You would just have to apply more to get the same torque if the force was applied closer to the drive stud of the wrench.
Jay Brown
- 1969 Mach 1, Drag Week 2005 Winner NA/BB, 511" FE (10.60s @ 129); Drag Week 2007 Runner-Up PA/BB, 490" Supercharged FE (9.35 @ 151)
- 1964 Ford Galaxie, Drag Week 2009 Winner Modified NA (9.50s @ 143), 585" SOHC
- 1969 Shelby Clone, Drag Week 2015 Winner Modified NA (Average 8.98 @ 149), 585" SOHC


rcodecj

  • Sr. Member
  • ****
  • Posts: 474
    • View Profile
Re: Low Buck Torque Wrench Calibration
« Reply #3 on: March 19, 2012, 11:27:27 AM »
Great info! I guy could do it himself and save some money.

Hemi Joel

  • Sr. Member
  • ****
  • Posts: 497
    • View Profile
Re: Low Buck Torque Wrench Calibration
« Reply #4 on: March 19, 2012, 01:05:59 PM »
Next time i come over, I'm bringing all my tork wrenches.

Drew Pojedinec

  • Hero Member
  • *****
  • Posts: 2116
    • View Profile
Re: Low Buck Torque Wrench Calibration
« Reply #5 on: March 19, 2012, 01:19:00 PM »
Nice pictures Jay.
We do this pretty regularly offshore to double check our torque wrench.

We don't use the click type wrenches however, Too easy to break in a moving/vibrating shop :-)

TimeWarpF100

  • Hero Member
  • *****
  • Posts: 683
    • View Profile
Re: Low Buck Torque Wrench Calibration
« Reply #6 on: March 23, 2012, 01:19:53 AM »
My torque wrench doesn't have a pivot point on the handle, Ken.  I have seen beam style wrenches with that pivot, though, and I'm sure that the pivot point on a beam wrench would be the spot to hang the weights for proper calibration.  On a clicker like mine, there is some internal mechanism that sets the click point, so it shouldn't matter where on the wrench you apply the force.  You would just have to apply more to get the same torque if the force was applied closer to the drive stud of the wrench.

Good read Jay!  I just had 2 of my torque wrenches back from re-calibration last friday. It took 2wks to get them done. It cost me 240.00 to have them done! Ouch . . . Thought that was extra steep and was expecting a estimate but they just gave me the bill. A new torque wrench purchase was a bunch more for a decent one. At least now I know they are accurate.

machoneman

  • Hero Member
  • *****
  • Posts: 3853
    • View Profile
Re: Low Buck Torque Wrench Calibration
« Reply #7 on: March 23, 2012, 08:57:11 AM »
$240? Yikes! And here the last time I needed certification it was $20! Ouch indeed.
Bob Maag

thatdarncat

  • Hero Member
  • *****
  • Posts: 1866
    • View Profile
Re: Low Buck Torque Wrench Calibration
« Reply #8 on: March 23, 2012, 05:45:16 PM »
Another option, if you're going to be at a NHRA national event you can get your wrench calibrated for free at the ARP trailer on the midway. http://www.nhra.com/blog/nhra-notebook/2011/2/28/arp-again-offering-free-torque-wrench-testing-at-nhra-events/ They've done this the last couple years. I wasn't able to find a current link, but I did find ARP's ad in issue 7 of the National Dragster and they are doing it again this year.
« Last Edit: March 23, 2012, 08:38:25 PM by thatdarncat »
Kevin Rolph

1967 Cougar Drag Car ( under constuction )
1966 7 litre Galaxie
1966 Country Squire 390
1966 Cyclone GT 390
1968 Torino GT 390
1972 Gran Torino wagon
1978 Lincoln Mk V

westcoastgalaxie

  • Jr. Member
  • **
  • Posts: 79
    • View Profile
Re: Low Buck Torque Wrench Calibration
« Reply #9 on: March 26, 2012, 01:01:12 PM »
Jay take a look at the data sheet or owners manual that came with the wrench if you can find it. Most torque wrenchs lose accuracy at the lower and upper ends. Most torque wrenches accuracy is around +/- 4-6%, however they go up to +/- 10-15% at the upper and lower 10-15% range of the scale. So depending on the wrench you may be way off when using the lowest or highest settings. Here at work we aim to use our wrenches in the midrange for the best accuracy. This of course all depends on the manufacture of the wrench and what they specify.

jayb

  • Administrator
  • Hero Member
  • *****
  • Posts: 7405
    • View Profile
    • FE Power
Re: Low Buck Torque Wrench Calibration
« Reply #10 on: March 26, 2012, 02:26:54 PM »
That makes sense, and at the low range anyway your comments fit nicely with my test results.  I don't often use the wrench up at the top end of the spec, but I do set it at 150 lb-ft to tighten the big bolt on the front of the crank, and maybe that reading is off farther than a few percent.  Maybe I'll dig out a few more weights next time I do this and check the wrench at the top end.
Jay Brown
- 1969 Mach 1, Drag Week 2005 Winner NA/BB, 511" FE (10.60s @ 129); Drag Week 2007 Runner-Up PA/BB, 490" Supercharged FE (9.35 @ 151)
- 1964 Ford Galaxie, Drag Week 2009 Winner Modified NA (9.50s @ 143), 585" SOHC
- 1969 Shelby Clone, Drag Week 2015 Winner Modified NA (Average 8.98 @ 149), 585" SOHC