Edit - Sorry, but the last part of this post got cut off by the limits of the forum. I'll post the rest as an update to this thread tomorrow night - Jay
Back in January when I started to think about this year's Drag Week event, I had decided not to write a weekly blog about it
as I have done in the past. All I was trying to get accomplished this year was to get the car back together as it was in 2014,
so I didn't see the point of a weekly progress report. Besides, writing the weekly report takes quite a bit of time, and
with the intake adapters and timing covers taking up my spare time, I really didn't want to commit to it. Hindsight being
20/20, though. I should have done another blog this year. I could not have imagined the wild ride I have been on since March
with this project. This very long post is an attempt to recap the last few months, to show the struggle to get the car to
this year's event. First a little background.
After the Crower rod broke in half at last year's Drag Week test and tune, I had the car back home and the engine apart by the
following Thursday, while Drag Week was still going on. Within a week after that, I had the damaged block at a highly
recommended machine shop in Menagha, Minnesota, about three hours north of me, to see about getting the damaged block repaired,
and the crank at the local crank grinding place to be checked for damage and straightness. Almost immediately I found out that
the crank was good, so that was a relief. The block, though, was another story. The machine shop wasn't immediately sure that
they could commit to salvaging the block. After getting all the sleeves out of the block and cleaning up the damage, they
wanted to spend some time doing some welding, then corrective machining, then more welding, etc, before they were comfortable
saying that the block could be brought back to usable condition. Along the way we decided that we would Hard-Block the block
up to the water pump holes to add strength, in addition to trying to repair the block by welding or some mechanical fastener
repair. In the end, everything was welded, and the machining came out really well; the shop did a great job, and I was very
pleased with their work. However, it wasn't until just before the PRI show in December that they were far enough along to say
for sure that the block could be saved.
I was waiting for that moment, because I didn't want to spend a bunch of money on new sleeves, new pistons, and new rods if the
block couldn't be fixed. So, with the green light from the machine shop I ordered sleeves, rods, and pistons while at the PRI
show in early December. I ordered the sleeves direct from Darton, and after talking to CP and Crower at the show, I had Blair
Patrick get me the pistons and rods. I ended up going with Crower again for the rods, despite the failure that I experienced
last year, because Blair and I both felt that it was kind of a one-off, oddball failure. Also, Crower was able to make up a
slightly heavier duty rod, weighing about 50 grams more than the originals I had last year, which eased my mind a little bit
regarding another beam failure.
Unfortunately, it seems like all the racing parts companies go home from the PRI show and take the rest of the month off;
nothing seems to get done between PRI and the end of the year. Then, right at the start of the new year they are deluged with
new orders from people trying to get ready for the next racing season, so lead times are long. I certainly experienced this
with my parts; the sleeves didn't arrive until February, and the pistons and rods didn't show up until March. By the time
everything got here, it was nearly time to register for Drag Week. I got the parts up to the machine shop in Menagha so they
could keep going on the work, and began thinking about the car.
Blair had been bugging me for quite some time to go smaller on the primary tubes and collectors of my headers. I didn't think
they were that big; they are stepped headers with 2-1/8 to 2-1/4 to 2-3/8 primaries, with a merge collector that has a 3" choke
and a 4" outlet. Pipemax says that at this size, they are too small for a 1000 HP engine, and last year this engine made 970 HP
on the dyno. But at the dyno last summer Mark Dahlquist took one look at the headers and shook his head; he said the tubes were
too big, and the bend radiuses were too tight. He thought I was leaving a bunch of power on the table with the headers I had.
So, while waiting for the machine work to be finished up on the engine, I thought I would build a second set of headers for the
car. I went down in the primary size from 2-1/8" to 2", kept the same stepped design, going to 2-1/8" and then to 2-1/4" into
the collector. I made sure that I used 6" radius bend tubes wherever possible, and only went to 4" radius tubes where
absolutely necessary. The original set had 3.5" or less bend radiuses on all the tubes. Also, I didn't pay a whole lot of
attention to primary length on the new headers, and as a result these headers had slightly longer primaries than the original
set, and there were some significant tube length variations, up to 8". The original headers had all the primaries within an
inch or so of each other.
I had been thinking about this since late in 2014, and had ordered two sets of merge collectors from Blair, one pair with a 4"
outlet and one pair with a 3.5" outlet and a smaller choke (which Blair preferred). Those also took forever to arrive, but they
finally made it in April, so I got going on the headers by dummying in a spare block and my pair of cast iron SOHC heads. It
took me about two weekends to fab up the headers out of some Hooker mandrel bent tubing, and then they went off for coating. I
was ready to go with the headers by the beginning of May.
Blair and Mark had been on me about the headers, but for my part I was concerned about the intake manifold. I had built this
manifold as a traditional sheet metal style intake back in about 2010, but the manifold had been a compromise because of the
space contraints in the car. I knew when I built it that the runners were too short to take advantage of the sonic tuning
effect in the RPM range I was running, but to get the runner length I needed I would have to build either a crossram manifold,
or use banana-shaped runners and raise the plenum a good 3". Raising the plenum that high was out of the question in terms of
fit to the car, and I wasn't sure exactly how I would build a crossram intake, so I went with the shorter runners and the
standard sheet metal intake configuration.
Here's a quick sidebar. I may have told this story before, but in case you missed it, this intake has been referred to as the
"steaming pile" intake since a dyno session in 2011. Prior to building this intake, the last dyno session on this engine had
been in 2009, where it had made 960 horsepower with the Hilborn injector setup. By 2011 I had switched to the sheet metal
intake, and had high hopes for more power.
At that time the engine was still at its original 585" displacement, but had developed water leaks between the bores and the
sleeves, which tended to put water into the oil. This was a result of offset boring the block, done to increase the bore
spacing and run the 4.500" bore. I had broken through the aluminum on three cylinders while offset boring when the block was
new, and had used a sealer called "Seal-All" to plug these leaks when the engine was first together back in 2008. By 2011 the
sealer was failing, so I was using Moroso Ceramic Sealer in the water jacket to try to seal up the engine again. I had
successfully gotten it sealed up, and back on the dyno in the summer of 2011, and my pal Scott Clark had come up for the dyno
session. But the first runs with the new intake were terrible, netting only 780 HP or so. After trying to increase the power
and having no success, Scott said, "Man! That intake is a steaming pile!" After recovering from a bout of laughter, I was
forced to agree, so we tore off the "steaming pile" intake and put the Hilborn setup back on. Guess what? No change in power.
Hmmmm...
We looked and looked, but didn't conclusively find the problem back then. We did see evidence of water leakage in the oil, but
not much. I decided to run the engine anyway, and installed it in the car and took it to Drag Week in 2011. On the drive from
the first track to the second, the leaks got much worse, and after watching the oil pressure go down and the coolant temperature
go up while cruising down the freeway to the second track, and then finding a bunch of water in the oil, Captain Stabbin' and I
threw in the towel. On teardown that year, I found evidence of water leaks everywhere, on the deck and between the sleeves and
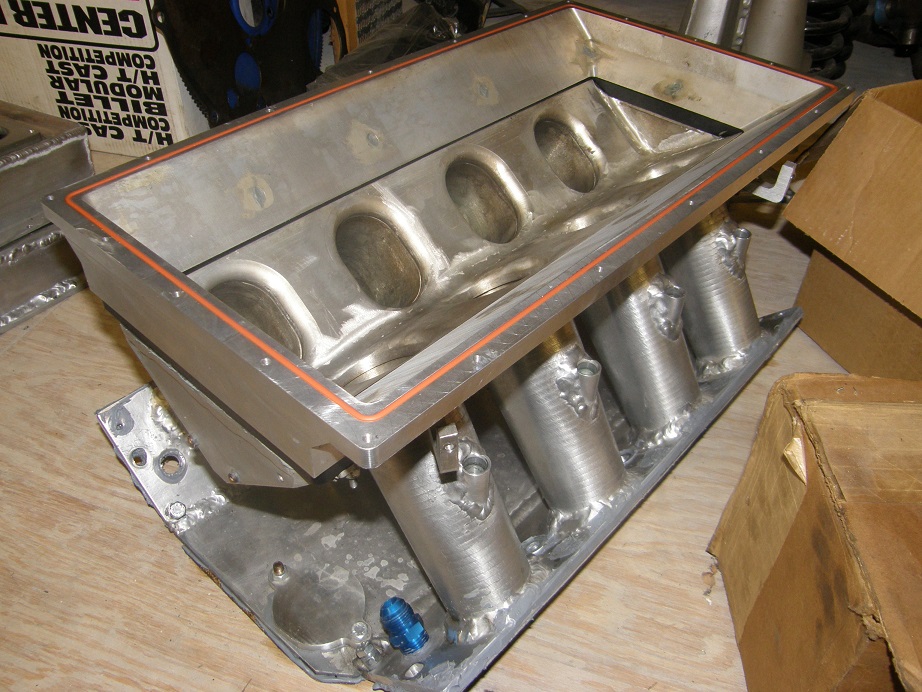
the bores, so I figured I was getting water in the combustion chamber and that must be the power problem that we saw on the dyno. But that explanation never really sat right with me, and then the next year, in 2012, I tried to use the same EFI injectors in my Mach 1 with the high riser, and found that one of them was stuck and would hardly pass any fuel. It finally dawned on me that the injector was probably stuck during the SOHC dyno session in 2011 too, and I was running on 7 cylinders instead of 8. Amazing what you figure out over the long haul. So, feeling that I had found the cause of the power problem, I still had high hopes for the steaming pile intake. Here's a picture of the intake:
After revamping the engine in 2014 with new sleeves (with O-rings to seal the water jacket), the engine was down to 577", and
made 970 HP with the steaming pile intake. Not much better than the Hilborn setup, but still an improvement. Despite the good
numbers, I was pretty sure I was leaving some power on the table. The intake tract was too short, at a total of 10", for my
range of RPM, based on various calculations, including PipeMax and SuperFlow's intake runner formula. Those two agreed that I
should be shooting for an intake tract length of about 13", if I wanted a power peak in the 7000 RPM range. The problem with
the SOHC in this regard is that the intake port is really short, less than 3" on center. This necessitates a much longer
runner in the intake manifold than you normally see, and a conventionally designed sheet metal intake with straight runners
just won't work.
This year, after finishing with the headers at the beginning of May, the short block parts were still not finished, so I began
to think about doing a different intake manifold for the engine too, with longer runners. Due to the hood clearance issues and
the difficulties in fabricating a banana shaped runner, I decided to go to a crossram to get the necessary length. I still had
the same problem that I'd had back in 2010 when I built the first steaming pile intake, which was difficulty in visualizing
exactly how the crossram would go together and fit, but since then I had learned how to use a 3D CAD program. So I designed
my crossram intake in that program to make sure it was going to fit together properly. About the time that I had the intake
designed and was happy with it, I got the short block back from the machine shop, ready for assembly.
This was about mid-May, and even though I only had the design finished, I decided that I really wanted to try to build the
crossram intake, which I had dubbed "Steaming Pile, Part Deux". For the rest of May and most of June, I split my time between
assembling the SOHC, and building the intake. I CNC machined the plenum plates and base plates for the intake, and bought
2-1/2" aluminum round tube for the runners. I put a slight taper in the tubes by cutting a pie shaped section out of the bottom
half of each runner, then squeezing them together with hose clamps before welding, so that I had a 2-1/4" tube at the bottom of
the runner and 2-1/2" at the top. For the original steaming pile intake I had made a welding fixture, so I used that again to
weld up this intake. I had set the weekend of June 27-28 as the dyno weekend, and Scott and Mark were going to come up, same as
last year. But when the big weekend arrived, Steaming Pile Part Deux was still not quite finished up, and I was still getting
the engine hooked up on the dyno when Scott and Mark arrived.
The engine was installed with the original steaming pile intake and the original headers. The plan was to run and tune the
engine with this equipment, and then later Saturday change to the new headers, test both sets of collectors, and look for
improvements. After the dyno session was over on Saturday I was going to complete the welding on Steaming Pile Part Deux, and
install it on the engine. Then on Sunday we would test that intake.
Finally by 4:00 or so on Saturday the 27th we were all hooked up and ready to run. We had some of the normal dyno issues to
contend with, and it took us until 8:00 or so to get the engine starting right, lash the valves hot, check the chain, etc., but
by the end of the day Saturday we were making some good pulls up to 6000 RPM. We were all out of time for dyno runs at that
point (in deference to my neighbors I don't run the dyno after 8:00 PM), but Sunday was looking promising. We were going to
have to alter our plans, and change the headers first on Sunday, and then hopefully swap the intake later in the day. Saturday
night Mark hung around while I was working on the engine and got the welding finished up on the new intake. Mark is a much
better welder than I am, and the intake looked great.
Sunday morning I was out to the shop early, and set the new intake up on my CNC machine to drill and tap the holes for the top
plate, and cut the groove for the O-ring to seal the top. Mark and Scott arrived around 10:00 or so, and we got started running
pulls on the dyno about noon. After some preliminary pulls we got up into the RPM range of interest and the engine made about
the same peak power as last year, around 970 HP, but made quite a bit more average power. Here's a plot of the dyno data, last
year vs. this year:

Despite the power production, the engine just didn't sound right at the top end of the pulls. Also, we had an indication from
the computer that there may be a problem. Scott had brought his 8 O2 sensor setup, and he was running them in closed loop to
control the individual fuel injectors; using this setup you put a target air/fuel ratio into the computer, and the oxygen sensor
in each primary tube detects the air/fuel ratio in that tube, and then the computer adjusts the injector for that cylinder to
hit the desired air fuel ratio. Scott was seeing that cylinder #5 was requiring way, way less fuel than any of the other
cylinders. This indicated it was not using as much air as the other cylinders. Scott thought this might be a valvespring
issue, or something along those lines, so we pulled the left valve cover to investigate. The springs and rockers looked fine
on #5, lash was good, etc. We decided to do a leakdown test, and was I ever surprised to see 70% leakdown on #5! The rest of
the cylinders on the left bank had typical, low leakdown numbers.
Before I even got done checking the leakdown on the remaining cylinders it had dawned on me what the problem was. The #5
cylinder was the one where the rod had broken last year at the Drag Week test and tune. When I had pulled the heads off last
year, I had noticed that the chamber had taken a hit from the piston; there was a little witness mark evident from the contact.
But it had never occurred to me that this may have also led to a bent valve! This year when assembling the engine, I had just
cleaned up the heads and re-installed them; I had never disassembled them and taken them in to have them checked. I was
regretting that oversight now. After the leakdown checks were done, Mark advised me that the best course was to pull the
heads and get them checked. I had to agree; I didn't want to continue running the engine with a potentially bent valve.
We called it a day on the dyno session.
Monday night I tore the engine back down and pulled both heads; I had decided I'd better pull the right head and get it checked
too. Looking at #5 chamber on the left head, I couldn't tell if the valves were bent, but the leakdown checker doesn't lie, so
I figured I just couldn't see it. After getting the heads off, I went around and did an inspection of all the pistons, and I
was shocked to see evidence of piston to valve contact on the intake valve of #4! Where the heck did that come from? I looked
closely at all the other pistons, and no evidence of contact could be found. When I had assembled the engine I had checked
piston to valve clearance on #1 and #5, and figured that was good enough, but apparently not.
The contact on piston #4 was at the very edge of the intake valve relief; it looked like the valve was about 0.020" into the
relief, and the contact was about 0.030" deep. I was really glad that I had pulled the right head to have it checked, otherwise
I would have never seen this problem. Here's a picture of the piston, showing the contact:

On Tuesday I took the heads and some spare valves into R&R Performance to get them checked out. While I was there, Bryan at R&R
took the #5 valves and checked them for straightness. Sure enough, the #5 exhaust valve was very slightly bent, leading to the
leakdown problem. Also, the #4 intake valve was NOT bent, so the hit it had been taking due to the piston to valve clearance
issue was apparently not too bad. The valve may have actually clearanced the piston while I was rotating the engine around on
the stand, before it even got to the dyno, so the contact may have been pretty minor once the engine was running.
On Saturday we had discussed potential reasons for the engine not sounding right at high RPM, and before finding the other
problems we'd concluded that one potential cause could have been that the valve springs needed replacement. I decided that as
long as the engine was apart, I'd go ahead and get new valvesprings to rule out that possibility. I'd had Comp Cams springs in
the engine, but this time I decided to go with a set of PAC springs and retainers, that had about the same specs as the Comp
springs but which were significantly lighter. I ordered them on Monday, for delivery by Friday, when the heads would be ready
for pickup.
When I got the heads back on Friday, I got a clue as to why I had the piston to valve clearance issue on #4. Bryan had noticed
that the threads for the #4 spark plug hole were biased towards the back of the head. In other words, on the #4 spark plug
hole, the threads looked normal towards the back side of the head, but were nearly gone towards the front side. It was kind of
like the tap that tapped that hole had been positioned too far towards the back of the head. I don't know for sure, but I
assume that the spark plug hole tapping was done on the CNC machine that machined the rest of the heads. I know there are
several setups required to machine the heads, and whenever there's a setup, there is the potential for error. It may be that a
setup error existed on this head, and the #4 spark plug tap and #4 valve guide holes were moved towards the rear of the engine
by 0.050" or so. Given that there was insufficient P-V clearance on this chamber and no others, and the plug hole was not
tapped properly while all the others were, this seems like a logical conclusion. Hard to say for sure, though...
By Saturday July 4 I had the heads back from R&R and my new springs, retainers, seats, and locks had arrived from PAC.
Unfortunately, we were hit with a brutal heat wave that weekend that limited the amount of time I could stand to be in the shop.
I don't have air conditioning in my shop, and with temperatures close to 100 and the dew point over 70, I couldn't take more
than an hour at a time before I had to go in the house and cool off. I did manage to get the heads re-assembled with the new
PAC springs on Saturday, and I taped up the area surrounding the #4 piston, covered the rest of the engine with plastic, and
used a cartridge roll to clearance the intake valve relief on the piston so that there wouldn't be any more contact in that
cylinder. On Sunday I spent most of the day cleaning the decks of the block and installing the heads. Since this engine has
non-stock bore spacing it requires custom copper head gaskets, which in turn require a sealer on the deck surface. The silicone
used for this is very difficult to remove, and it took me over an hour with a razor blade and a Scotchbrite pad on each side of
the engine to get the decks ready for installation of the head gaskets and heads. But at least by Sunday evening the heads were
re-assembled and back on the engine.
The heat stayed with us for an extended period, but by the next weekend I had the engine most of the way back together. This
time around I decided to install the Steaming Pile Part Deux intake. I figured that we had enough data on the first steaming
pile manifold from the first dyno session to be able to tell if the new manifold would be an improvement, so I wanted to
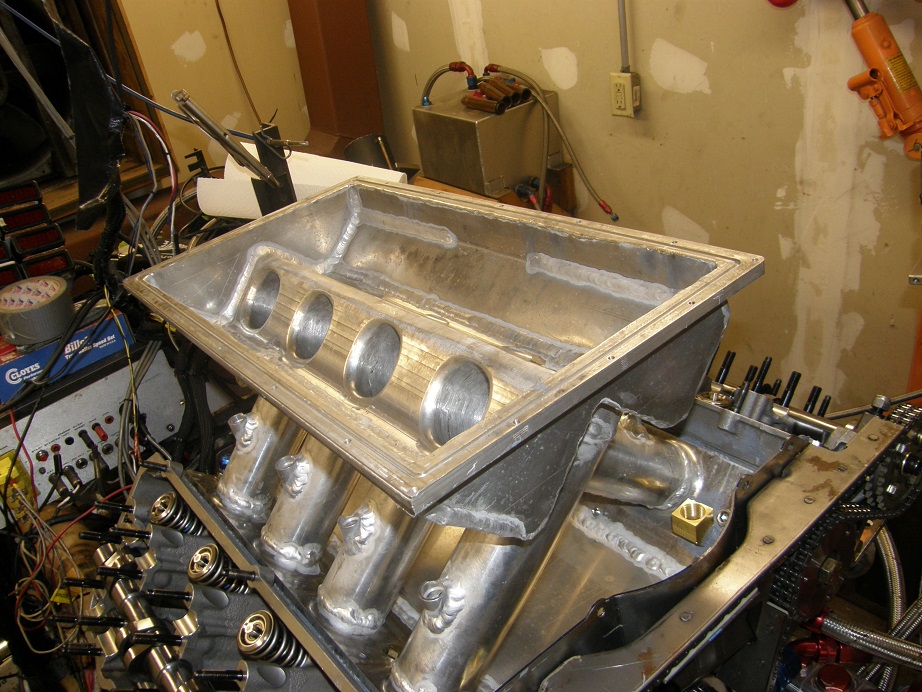
assemble the engine with the new manifold this time, and see how it looked. Here's a picture of the SP2 intake, showing the
crossram configuration and the "W" shaped plenum:
As luck would have it, Scott was again available for a tuning session the weekend of July 18, so we made plans to be running
again on the dyno that weekend.
As usual I was running a little behind, but when Scott arrived at 2:00 on Saturday were were pretty much ready to go. The engine
fired up with no issues, and sounded good. When we got into the RPM band of interest, we saw an immediate, large improvement
in horsepower and torque. At 6000 RPM, which is where my converter stalls, the engine was up nearly 30 horsepower! As we moved
the dyno testing higher in the RPM range, the engine sounded great, and we saw a peak power output of 990 HP on a pull up to
7200 RPM. This was still with the original headers, not the revamped headers that I had built this year, so we were hopeful
that further tuning plus the header swap would get us over 1000 HP on this engine. Here's a plot of the dyno pull we made at
this point:

Looking at this graph, though, I was a little concerned. The last two power points were significantly down from the power peak.
The engine had sounded great during the pull, so I wasn't sure what the issue was here. Sometimes electrical noise can be an
issue on the dyno, and it can make the horsepower and torque curves look a little choppy, but to have two points in a row
significantly down was a little worrisome. I wondered if we had a valve float issue with the new springs, or something like
that. We decided the only thing to do was to run another pull and see if this behavior repeated itself. But when we tried
to start the motor, it made half a turn and stopped. It sounded like the battery on the dyno was going dead, so we stopped
for 20 minutes or so to let it charge.
After the 20 minutes the engine fired up and made the most awful clattering sound you have ever heard. I immediately shut it
off, and at first couldn't believe what I was hearing. I thought that maybe a tool had fallen into the workings of the dyno
or something and was making the noise. As we were looking around at the engine on the dyno, my friend Steve spotted water
dripping out of the #4 header tube! Pretty soon it was a steady stream, and was also draining out of the collector! This was
very, very bad news. I drained the water out of the engine to stop the leak, and then with a certain amount of fear and
trepidation, pulled the right valve cover. It was obvious that the #4 intake valve was bent; there was nearly a quarter inch
of lash between the rocker and the valve tip. Then I put a breaker bar on the front of the engine, and it would only rotate
back and forth 180 degrees before hitting some kind of stop.
My Drag Week plans seemed to go up in smoke right there. Given the piston to valve clearance issue I'd seen when pulling the
right head a few weeks earlier, I figured that somehow I had not sufficiently clearanced the piston. I had test fit the head
on the engine prior to installation, with clay in the intake valve relief, and confirmed that I had clearance, but I figured
that somehow I had done something wrong, or something had changed, and that the valve had hit the piston, bent or broken, and
popped through the head casting into the water jacket. Or, maybe the new valve springs just weren't sufficient to control the
valves, and I'd had a valve float issue where the valve hit the piston, with the same result.
Everyone at the shop was really disappointed, and I began thinking about plan B for Drag Week, which was to bring the Mach 1
instead of the Shelby clone. I had a weekends worth of work to do on the Mach 1 to get it ready, but it would still be good
to go in plenty of time. I wasn't all fired up about bringing that car though; I had been working on my Shelby clone project
for a few years without any significant success, and I wanted to get the engine and car right finally, and prove it out at
Drag Week. But given the situation, and not really knowing why the engine was having this problem, it didn't seem like a
viable option at this point. I decided just to give myself a day to think about the best way to proceed, and went to bed
that night feeling as low as I'd been in quite a while.
Sunday morning July 19 I was back out to the shop, finishing up some intake manifold adapters for a few guys, and trying to get
the place cleaned up a little after the previous few weeks thrash. The SOHC sat on the dyno, looking at me. I hate that ;-)
About 1:00 I just couldn't stand it any more; I had to know what the heck went wrong. So, I decided to tear the engine down.
First thing I did was remove the air bells from the throttle bodies. This is what I saw:

I immediately knew what had happened. Sharp eyes will spot the air cleaner stud present in the front throttle body, but
MISSING in the rear throttle body. I was about 95% sure that the stud had come loose and gone down the #4 intake runner. When
I pulled the top off the intake and looked down the runner with a flashlight, there was the stud, clamped in the intake valve.
Well, this was sure a freak accident. I'd heard of this happening before, but had never experienced it myself. Those studs
had been in the throttle bodies ever since I bought them, had multiple passes down the track, 50-60 pulls on the dyno, over
500 street miles, and were secured in place with a lock nut. How the rear stud had decided to come loose now was beyond me.
Nevertheless, it was my responsibility, and hindsight being 20/20 I should have pulled those studs out of the throttle bodies
before dynoing the engine.
Funny thing was, at the same time I was feeling stupid, I was also very relieved. This issue was not due to some unknown
problem with the engine. It had been running fine, and making great power, before this happened. Maybe I didn't have a piston
to valve contact issue, and maybe the valvesprings were not a problem. Neither problem should have existed, based on the checks
I did while assembling the engine. Knowing that it wasn't a fundamental problem, maybe I could still fix this thing...
I spent the rest of the day Sunday tearing the engine down. When I pulled the right head, I didn't even want to look. When I
did, it was as bad or worse than I thought:
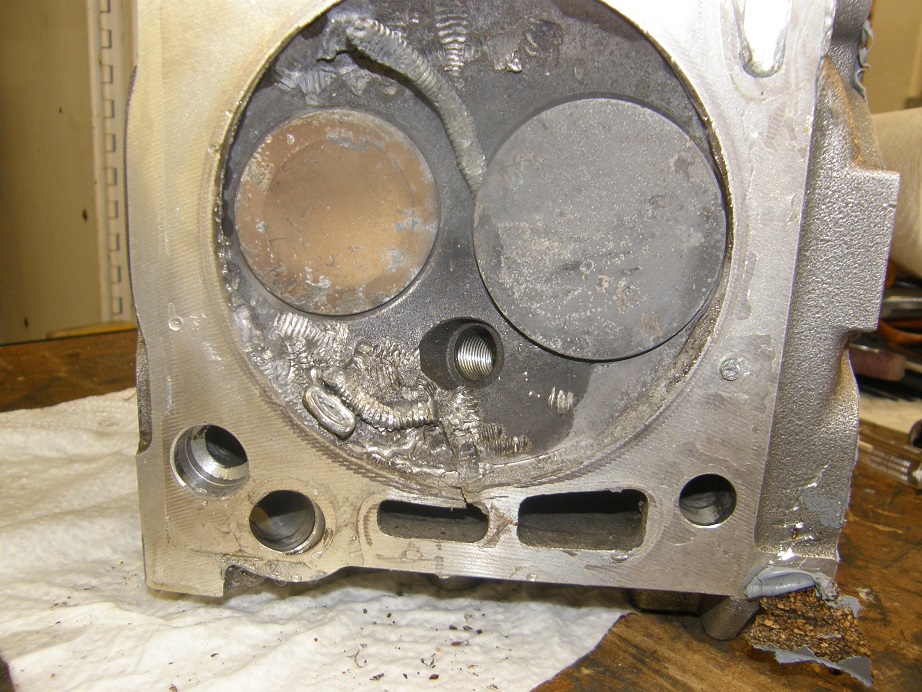
In addition to the obvious carnage in the chamber, it was broken out into the water jacket on the end. This is why the engine
was pouring water out of the #4 header tube.
The big question, though, was the bore. If the cylinder bore got banged up, this engine was done for the year. But upon
inspection I could barely believe how good it looked; it appeared to be in excellent shape, with the exception of one minor
scratch on the side! The piston was totally banged up on top, but on close inspection it was clear there had been no piston
to valve contact where I had found it a few weeks before. So, my clearancing of the piston top had been sufficient, and the
entire problem with the engine could be attributed to the air cleaner stud.
Sunday night I went into overdrive making plans to get the engine back together. I called Blair and told him about the
problems, and asked him to call CP regarding a replacement piston, and Crower about a replacement rod, in case the #4 rod was
bent. He promised to call them on Monday. I made a list of all the parts I would need: head gaskets (custom copper gaskets
are required for this engine), piston, rings(maybe), rod (maybe), valve seats (to be replaced after the head was weld repaired),
timing chain (I didn't want to reuse the long timing chain after the trauma in #4), and a few other small parts. I had spare
valves, which was good because they are a 4 week lead time item. I went to bed Sunday night thinking I might be able to recover
in some reasonable time frame with this engine.
Monday I got word from Blair that I could have a new piston from CP in one week if I was willing to pay an expedite fee, which
I was. Crower, though, was a minimum 6 weeks for a new rod. I hadn't yet pulled the oil pan and the #4 piston and rod out of
the engine, so I wasn't sure if I needed a rod yet. Blair thought that the rod was probably OK, given that the engine had just
run for a few seconds, and at a fairly low speed, and that the air cleaner stud was hardware store type all-thread. But I
needed to check it to be sure. I also called the guy who could weld up the head, Buck at Crow Cast Welding, and he said he'd
be able to do it quickly. On Monday night I got the right head taken apart in preparation for welding; both valves in #4 were
badly bent.
Tuesday after work I ran the head out to the welder. He said it didn't look as bad as he thought it would (!!), and would get
working on it Wednesday morning. That evening I pulled the oil pan, and took out the #4 piston and rod. The top of the piston
was smashed down and squeezed the rings into their grooves, so for sure I was going to have to put new rings in #4. But the rod
bearing looked beautiful; all the graphite coating was still on all parts of the rod bearings, so it didn't look like the rod
had taken much of a hit. I removed the piston and pin from the rod, and the pin also looked good, sliding out of the piston and
the rod with no issues, and no sign of bending.
Wednesday at lunch I ran the rod up to R&R to get it checked for straightness. Bryan put it on the checking fixture and
- oh no - the rod WAS bent! Most of the force on the piston would have been towards the back side of the bore, and this
apparently had been enough to tweak the pin end of the rod just a little. Crap, and the rod was a long lead time item. I
began to think of alternatives to a direct rod replacement. I could use one of the standard Crower billet rods, but the
problem was that they were 50 grams lighter than the rods in the engine. This would leave me with a balance problem. I
might be able to compensate with a heavy pin, but it would have to be really heavy, and since the big end counts twice as
much as the small end when balancing the rod, the ability to do this might be dependent on the relative big end weights.
Later Wednesday I talked to Blair about this, and had him order me the rings that I needed, plus discuss the rod balance
ituation. None of the alternatives sounded good to me. I went to bed on Wednesday night wondering if I'd be able to solve
this problem.
Thursday morning Blair texted me to give him a call right away. As luck would have it, Blair had a rod on the shelf at his
place that was nearly the perfect fit. It was the same style as my rods, and designed for a supercharged engine that was
expected to make 1300 horsepower, so it was nearly identical in weight to my rods. For example, my rods weigh 652 grams on
the big end, and the rod Blair had weighed 650 grams. It was about 10 grams lighter than mine on the small end, but it was
fitted with a bushing for a 0.990" pin, and my pins are 0.927", so rebushing the rod for the smaller pin would add a few grams
too. Blair sent me the rod, and a bushing for R&R to press in, via overnight service.
Thursday afternoon Buck called me, and said the head was welded up already! He had also machined the deck, and had only had
to remove about 0.005" to clean it up. Thursday after work I ran out there to pick it up. He did a really nice job, and it
looked great. Then, Friday, when I got home from work, there was the new connecting rod. Things were starting to come
together.
Over the weekend I was thinking ahead about the car. I wanted to make sure that everything in the car was ready, so that after
the engine was installed the car would be ready to go. When I'd built the new headers, one of the tubes needed to run right
where a roll cage support was located, from the upper right strut mount down to the frame. I'd cut that out but not replaced
it yet, so I took care of that on Saturday.
Then on Sunday, my friend Curt came over with his rigid hone, and we took a few swipes down the #4 cylinder bore, to get it
ready for the new rings. One thing that the hone showed us was that the bore wasn't quite as pristine as I had originally
thought. When the rod bent and cocked the piston a little in the bore, it looked like the bore took an impact in some spots.
This was clear because the rigid hone didn't touch three small spots on the cylinder walls. I talked with Blair about this and
he pointed out that we hadn't had a torque plate installed when we did the honing, and that may have straightened out the walls
a little, but in one spot for sure the wall took a hit and deformed somewhat. I didn't feel that it was enough to cause a
running problem, and the imperfections were down a little from the top of the bore, but I figured I'd probably be down a little
on power in that cylinder.
Monday, I dropped the welded head and the connecting rod and bushing off at R&R. Bryan needed to order seats for the #4
chamber, but he thought he could get them in a hurry, and have everything ready for me by Friday. I still didn't have the new
piston yet, but I told him I'd bring it up just as soon as it came, so it could be pin fitted.
The rings came on Tuesday, the new chain came on Wednesday along with some of the other small parts, but the piston didn't come
until Thursday, after I got home from work. So Friday I ran up to R&R at lunch to pick up the head and rod, and Bryan pin fit
the piston to the pin while I waited. By Friday afternoon, the head was repaired, and the new piston and rod were in house and
ready to install. It was remarkable to me that I had everything I needed to re-assemble the engine only 12 days after the
damage was done.
The weekend of August 1 and 2 I shelved all other projects in order to get the engine back together. By Sunday night I had it
nearly finished, with only the oil pan and valvetrain left to install. And once again, Scott was available the following
weekend to help dyno the engine. It looked like I might yet recover and get this thing to Drag Week.
As I got the engine buttoned up and the weekend approached, doubts began to creep in about the project. What if the crank had
been damaged during the failure? The bearing journal looked good, and everybody who I'd talked to about Crower cranks had
convinced me that I didn't need to worry about it. Plus it withstood a much more severe failure last year without any damage.
But I hadn't checked it, so I was still a little nervous. Or, what if the engine started leaking water again due to the
trauma? All I needed was more water in the oil. I tried to put those thoughts aside as I worked on finishing the assembly of
the engine; we would know quite a bit on Saturday.
At the end of the week I found out from Scott that he had been delayed working on another project, so he would not be able to
attend after all. However, with some software called TeamViewer he would be able to work on the EFI system through an internet
connection to my laptop, from his place in Iowa. That was the next best thing to him being there, so we got that set up and
working on Saturday morning. It ended up taking me until around dinner time on Saturday to get the engine ready to run; most
of the extra time was spent getting the new set of headers assembled. It seemed that they had been tweaked a little during the
coating operation, and didn't want to fit together as well as when I'd sent them off. Finally though, around 5:30 on Saturday
we were ready. The engine fired right up but immediately began puking a bunch of oil out of the dry sump breather. I shut the
engine off immediately to have a look. The oil appeared to have water in it. Ruh-roh...
After draining the oil and water from the engine and dry sump system, and measuring the amount of oil that came out of the pan
and dry sump, it appeared that we had about a quart of water in the oil. I'd had the water in the engine since about noon on
Saturday, with the electric pump running, so I surmised that there was a small internal water leak somewhere that was causing
the problem. The plugs looked good and there was no water in the cylinders, so that was a relief. I pressurized the cooling
system, and listening through the inspection cover opening on the SOHC front cover, I could hear a very, very faint hiss on
the right side. Probably what had happened was that this leak had been dripping water into the engine for 4-5 hours, and we
didn't discover it until the engine fired. At the end of the night Saturday, I pulled the cooling tower off the dyno stand
and installed the radiator and electric fans from the car, in preparation for some Moroso chemical sealant.
Sunday morning I fired the engine up with distilled water in the radiator, and after it warmed up I added the Moroso sealer.
The engine ran fine for 25 minutes at operating temperature, idling around 1100 RPM and staying right around 165 degrees. After
shut down, there was no evidence of water in the oil, so I felt pretty confident that the leak had sealed up. I spent some time
lashing the valves while the engine was hot, and then checked the chain tension, before removing the radiator and electric fans
and replacing them with the dyno's cooling tower. By about 2:00 PM I was ready to start running some dyno pulls. Scott was
online with the EFI system, so we fired the engine up, warmed it to temperature, and then went into the first pull. But the
engine sounded funny, and it was not behaving like it should. I aborted the pull about halfway through and looked at the dyno
data while Scott perused the EFI logs. The engine was running really rich, and was down on power by a tremendous amount. What
the heck was going on now? With the ignition off I hit the starter, and the engine sounded funny on the starter. The way it
sounded was kind of like how these engines sound when a timing chain breaks. That didn't make any sense though, because the
chain was new and I had just set the tension. I went out into the dyno room and pulled the right hand inspection cover, and
sure enough, the chain looked fine. Hmmmm... I pulled the right valve cover, and everything looked good. Everything under
the left valve cover looked good too. Puzzled, I hit the starter again, just briefly, and the crank turned, but the cams didn't
move. More bad news.
Next I looked into the opening from the valve cover down through the timing cover, to observe the primary timing chain. When I
turned the crank by hand with a wrench, the crank moved, but the primary chain did not. Was it possible I had stripped a gear,
or sheared the crank gear key?
I pulled the dry sump drive gear, front pulleys, crank sensor target, and the harmonic balancer. When I pulled out the crank
sleeve I looked in through the hole, but all I could see was the oil slinger, which was still lined up properly with the
crankshaft key, There was nothing to do but take the front cover off the engine for a better look. Sure enough, when I
removed the front cover and then the oil slinger, the crank key had sheared:

I still don't know for sure why this happened, but most likely the key was seriously sheared during the air cleaner stud
incident, and the gear was jammed on the shaft until if finally spun free under the stress of the dyno pull. I had never
taken the oil slinger off the crank when repairing the engine over the previous few weeks, so if the key was damaged I would
have never seen it, and I didn't think to look. When I had timed the cams this time around, they had seemed a little off,
which made sense now with the sheared crank key. The fact that the engine ran fine for 25 minutes at low RPM was remarkable;
the crank gear must have been stuck on the crank pretty hard to run that long without breaking loose.
The really bad news on this was that since this happened with the engine running, there was virtually no doubt that some
valves had hit the pistons and bent. I did a couple leakdown checks on both sides of the engine, and one cylinder showed
40% leakdown, but the other three looked OK. That was actually quite surprising, but I decided I had to pull the heads and
check everything out anyway. I spent the rest of the day and into the evening Sunday tearing down the engine - again. There
was evidence of exhaust valve to piston contact on every piston, and intake valve contact on most of them.

Also, the number 2 cylinder rockers were both stuck on the rocker shaft, and the number 7 exhaust rocker was also stuck.
Probably bent, and mishapen so that the rocker shaft hole was out of round on those rockers.
The only good news was that I had extra valves, and extra rockers, and I could fix this myself without having to wait for anyone
else. My schedule for making it to the track on August 22 was probably out the window, but I could still be ready for Drag Week
if I got the engine back together quickly. My pal Steve (57 Lima Bean on the forum), who is with me at Drag Week this year,
volunteered to come out a couple of nights during the week and help with the gasket scraping and re-assembly. By this time I
was really, really sick and tired of scraping gaskets and cleaning sealing surfaces on this engine, so his help was very
welcome.
After pulling the heads, I set them on the bench and did my normal check of the valve seal. I do this with every new set of
heads that comes back from the machine shop, just to check the work. What this involves is filling the ports, one side at a
time, with isopropyl alcohol, and seeing if the fluid leaks past the valve and seat. If you have a poor valve job, you will
get some seepage there within 15 minutes or so (I once received a set of finished, CNC'd heads from a well known engine builder
that leaked like a sieve during this test). I was expecting to see a bunch of leaky valves, but was surprised to find that
despite the marks on the pistons, none of the ports leaked any alcohol! Relieved, and thinking that I had lucked out and not
bent any valves, I pulled off the valve springs to inspect all the components. All the valves moved freely in the guides, so
that was also good news. However, in most cases where the valve had hit the piston, the valve locks were scarred up where
they contacted the valve. I ended up replacing 11 sets of the valve locks with new ones (again, lucky I had the spares).
The three rockers were damaged for sure, and it seems that they took the brunt of the impact; two out of the three had the
roller end bent. See the picture below, with the good rocker on top, and the bent rocker on the bottom:

When I had pulled the crank gear off the crank, I had watched two small shards of the crank key drop into the oil pan and
through the windage tray. I'd spent an hour trying to fish them out with a magnet and some bent up welding rod, and got one,
but the other was still in there, so I'd had to take the oil pan off. As long as it was off, I took the opportunity to pull
the rod cap on the #4 rod, which was the one that I'd replaced earlier, and check out the bearing. Thankfully, it looked
perfect, so I reinstalled the rod cap and torqued the bolts.
Steve was over on Tuesday night and between the two of us we got the block and the heads cleaned off and ready for installation
of the heads. Wednesday evening I installed the left cylinder head. Installing the heads on this engine is a long, drawn out
process, because of the copper head gaskets and the need for sealer, and also because of the process I go through to try to
extend the life of the copper head gaskets. This is a process that Mike LeFevers (who was at Shelby and contributed to the
original Shelby block design) described to me years ago, to make copper head gaskets live on the street. It involves putting
little circles of nylon thread around all the water jacket openings in the block and heads, which act as O-rings and improve
the seal when the copper gaskets starts work hardening and flexing after multiple heat cycles. I've been doing this on this
engine since I originally built it in 2007, and I've never had a copper head gasket fail.
While I was installing the left head, I missed a phone call from my friend Kurt. He left me a message, which I got late that
evening, which said in effect that he had spoken to Bryan at R&R, and Bryan had said that often a valve spring that is strong
on the seat will pull a bent valve shut. If that was the case, then my isopropyl test was not valid. Crap! If that turned
out to be the case, I'd have to pull the left head that I'd just installed.
Thursday night in the shop I decided to remove all the valves in the right head and check them in my lathe with a dial
indicator. I found four bent exhausts, and one bent intake. They weren't bent by much, between .005" and .020" runout, but
I wasn't going to leave them in there like that. Resigned to the fact that the left head had to come back off, I pulled it and
then checked its valves, and also got 4 bent exhausts. I rounded up my collection of spare valves and only had 5 exhausts that
were ready to install, but I did have some others with a slightly larger head diameter that could be cut down.
I had taken Friday off to get my NHRA mandated physical for my NHRA driver's license, so before I went in for that I dropped the
valves off at R&R so Bryan could cut them down. While I was there he showed me a BBC head that had come in with bent valves.
With the springs on the valves, they were perfectly sealed, but when the springs were removed you could twirl the valves in
the guides and see at least 0.100" of runout! Those valves were badly bent, and still the spring bent them back to seal. The
issue here is that the spring is bending the valve on every cycle, and at some point the valve will fail at the stem and the
head will come off. Ron, the dyno guy at R&R, was also really surprised by this result, but Bryan said he had seen it many
times before. (This behavior calls into question the value of a leakdown test; unless the valve is bent so much that the spring
can't close it, you would never detect a bent valve, and the leakdown check is only going to give you the condition of the
rings. You'd have to put checker springs on the valves in order to get an indication if they were bent. And then why, four
weeks earlier when I had done the leakdown on #5, did I see a 70% leakdown number?? That exhaust valve was not badly bent.
After replacing the valve and reinstallation of the head, leakdown checked fine. More mysteries...)
After my physical I picked up the valves at R&R and went back to the shop. I spent the rest of the day on Friday reassembling
the heads with the new valves. and getting them installed on the engine. On Saturday Steve and Kurt were over to help me get
the engine assembled, which on these motors is no mean feat, but by 7:00 PM on Saturday the front cover and timing setup were
installed, and the oil pan was back on. Saturday night and into Sunday I got the rest of the engine put together, and by 4:00
PM Sunday was ready to run again, only one week after the latest disaster. The engine fired right up and ran fine, albeit
with a fairly high idle. I let it warm up for 15 minutes then shut it down and adjusted the chain tension and lashed all
the valves. The moment of truth was at hand. I ran the first pull from 4000-6000 RPM and the engine sounded a little off,
although it didn't sound like it was missing. I checked the dyno data and it was down 150 HP from where it had been before.
But then I looked at the exhaust temp data, and it was obvious that #2 wasn't firing. This was not at all obvious from the
way the engine sounded, and just reinforced my opinion that the results from the original "steaming pile" dyno session in 2011
were due to a dead hole.
I traced the problem to one of the wires feeding the #2 coil, which had fallen down on the headers and burned through. I
fixed this issue and ran one more 4000-6000 RPM pull, and I was relieved to see that the engine was right back where it started,
making 920 HP at 6000 RPM. It also had picked up power all across the RPM range, up to 15 HP at 5500 RPM, and was running much
leaner than it had before. This was probably attributable to the headers; if they were scavenging the exhaust more efficiently,
more fuel would be required. Also, the smaller primary pipes probably helped at the lower engine speeds. I felt that this
result was very positive, and that the engine would be up on power when the A/F was dialed in.
I called it a night at that point, and lined up Scott for a remote tuning session the next night. Seemed like the first time
in a month that I'd had a good night's sleep!
The next night (Monday), turned out Scott wasn't available after all, so I ran the tests myself. Everything looked good as I
crept cautiously up the RPM range, until I tried a 5100-7100 RPM pull. The engine peaked at 992 HP at 6900 RPM, but then fell
off rapidly at 7100; dyno chart below:
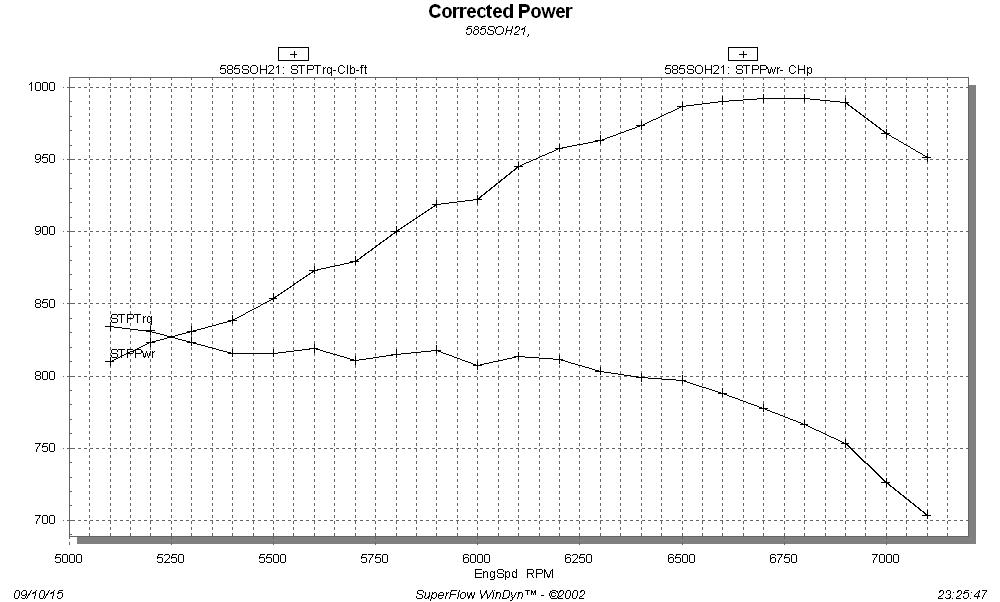
When I see a HP curve like this, I always suspect a valvetrain issue. I didn't want to run the engine any more like this, so I
called it a night on the dyno and began investigating the valvesprings. Last year, with the Comp 26115 springs, same cams, and
same heads, the engine ran to 7500 making the peak power level all the way. I had replaced the valvesprings from last year
after the first dyno session with PAC springs that had the same seat pressure and just slightly less open pressure (about
20 pounds), at least according to the manufacturers data. The PAC springs and retainer combination were also significantly
lighter, so I figured that would compensate for the lower open pressure. And I liked the idea of a little less spring pressure,
thinking of the stress on the long timing chain.
When I first got the PAC springs I measured them on my valve spring tester, and they measured quite a bit lower than the
catalog said they should. But I have a cheap valve spring checker, so I took a couple of the springs into R&R and had Bryan
measure them, and they were right on. So, my valve spring checker measures a little low. Tuesday night I took a spare PAC
spring and a spare Comp spring and measured them on my spring checker, and was surprised to see that the Comp spring measured
quite a bit higher, 255 vs 220 for the PAC on the seat, and 630 vs 560 over the nose. The conclusion I came to was that Comp's
published specs for these springs were really conservative, and the extra spring pressure of the Comp springs was allowing the
engine to rev higher. I got on Summit's web site and ordered a new set of Comp springs for delivery on Wednesday.
Wednesday and Thursday nights I installed the new valvesprings, and re-assembled the engine on Friday night so it was ready to
run. After the engine was back together Friday night it was already 8:00 (past dyno time), so I stayed up and wrote a CNC
program for a plastic 1" plenum spacer for my sheet metal intake. I was still worried about the "W" shape of the plenum and
how that might affect power production, and thought that the spacer might help with that.
Saturday August 22 was finally a good day on the dyno. I had some help from my friends Steve and Kurt, and we managed to run
quite a few tests on the engine with various components. Here is what we found:
- The new valvesprings did not appear to make a major change to the engine's power band, but they seemed to flatten the HP
curve out just a little. But in any case, at 7100 RPM, power starts decreasing on this engine. At this point it was clear
that the power drop-off was intake manifold related, because that was really the only significant change from last year. The
old steaming pile intake had runner lengths tuned for a much higher engine speed (8500 RPM), while the new intake had runner
lengths tuned for 7000 RPM. It seemed that the old intake manifold held the engine up in the higher RPM ranges, at the cost
of power in the 5500-7000 RPM range. Peak power, and average power across the band of interest was much better for the new
intake, despite the fall off at the top end, so that was the intake that was staying on the engine.
- No matter what we did, the engine peaked at 992 HP, and would not budge 1 HP higher than that. Either the cams or the heads
are limiting the power production at that level. I've never cheated my dyno data, but I have to admit I was tempted to add 1%
to the numbers and claim 1000 HP LOL!
- The 1" plenum spacer made no difference in power, anywhere in the RPM range. This was a surprise; we were all betting that
the plenum spacer would offer an improvement. But the HP and torque curves with and without the spacer were right on top of
each other. This was actually good, because without the spacer I had more hood clearance in the car.
- I ran the initial tests with the larger header collector; this collector had a 4" outlet and a 2-3/4" choke. When we
switched to the smaller header collector (3-1/2" outlet, 2-1/2" choke) the engine made identical power up to 7000 RPM, but
improved slightly by 5-7 HP up to 7300 RPM. This was counter-intuitive to me, but the dyno results were clear. This pick-up
of the power curve at the top end also made the power drop-off less dramatic, and HP curve was starting to look a little more
normal.
- The last test we ran was with header extensions. We ran these tests with the exhaust system on the dyno disconnected from
the engine, allowing the exhaust to fill the dyno room and be evacuated by the fan at the end of the room; I wanted to get a
true picture of the sonic tuning effects of the header changes. First, I added 12" collector extensions to both collectors,
and observed no change in power. But I had painted a stripe of yellow paint on the extension, to look for the change in color,
so I could cut the collector extensions off there. I had previously run this engine's specs through Pipemax, and Pipemax said
that the length of the collector from the choke to the end should be about 17". When I checked the length of the collector
from the choke back to the end of the burn marks, I got about 17-1/2". So, I cut the collector extensions off there, and with
the shortened collector extensions the engine again picked up a little more power from 7000-7300, with no loss at the lower
speed ranges. So despite the fact that the Pipemax recommendations for primary pipe diameter were way, way too big, at least
the collector length recommendation was right on, and also consistent with the old racer's trick of cutting the extensions off
at the burn mark. And again, this increase at the top end helped flatten out the HP curve somewhat, making it appear more
normal.
Here's a plot of the best dyno pull from this year's engine (in black), compared with the one from last year (in red):

Looking at this data I decided I'd better gear the car down a little, maybe from 4.56 to 4.29, to take advantage of the lower
power band. This was also going to be easier on the engine, shifting at 7200 instead of 7500, so that was a plus.
We were done on the dyno by 2:30, and Steve and Kurt hung around to help me get the engine off the dyno and into the car by
7:00 PM or so. Later that evening after they'd gone, I got the engine and trans bolted down on the mounts and started the
hookup. My pal JC came over on Sunday to help, and by the end of the night Sunday the dry sump system was installed, the
front suspension was back in the car, the headers were assembled and installed, and the radiator was installed and hooked up.
There was a test and tune the next Saturday on the 29th, and I was going to do my best to make it there. What I really needed
at this point was some track time on the car.
All week I burned the midnight oil getting the car put back together. Got it fired and the hood installed on Thursday night,
and was looking forward to a test drive (and car wash) on Friday night, prior to loading the car on the trailer. But things
didn't go as planned during the day on Friday. I had been waiting all week for an email from NHRA with my new driver's license
attached. I had filled out the form and had the physical at the beginning of August, but they had mailed it back to me because
my doctor had not filled in all the form properly. I'd run it back over to him, had the corrections made, and sent it back,
but still not heard back from NHRA. Tuesday I'd called, and gotten a very rude woman who wouldn't let me talk without
interrupting me to explain how busy she was. Finally she said she had my application and would get the email with my
license sent out by the end of the week. Friday afternoon arrived and I still didn't have an email, so I called back, only
to find out that the NHRA Division 5 office closes at noon on Friday! No driver's licen


