Over the past year I've been helping some friends of mine with a father-son FE project. We finally got it on the dyno this weekend, with pretty good results. It was a typical dyno session, with unanticipated problems that had to be solved, disappointing results at first, and then happiness all around when we finally got the engine working right. Its been a while since I posted one of these blow-by-blow accounts, and there's always something to learn from this stuff, so I thought I would detail it all here.
First, here are some specifications on the engine. It is based on a 0.060" over 391 truck block, and has one of the standard 4.25" stroker kits installed, for 451 cubic inches. The kit uses a Scat crank and rods, and forged pistons whose manufacturer I don't know. Compression ratio is 11:1, and we wanted the engine to run on pump gas, so a fairly large cam was selected. We picked a Comp solid roller, with lobes from their High Energy Street Roller series, #4220 on the intake and #4221 on the exhaust. Lift and duration on the intake is 255@.050" with 0.650" lift, and 262@.050" with 0.650" lift on the exhaust. Advertised duration is 300/308, and the cam is ground with a 112 lobe separation angle, and degreed at 108. We chose Comp 943 springs to use with this cam. Also, a Harlan Sharp roller rocker setup was used, with their rockers shafts, stands, and solid spacers.
The heads are the normal Edelbrock 428CJ heads, and they are essentially stock; no significant porting work was done, and although there is no flow data available for them, I'd be surprised if they flowed more than 270 cfm on the intake. They use the stock Cobra Jet sized valves. The heads are definitely a bottleneck in this combination, and if there had been more money available for the build I think it would have been well spent on a street/strip porting job, to get the intake flow up to 300+cfm. But that can always be done later...
This engine uses one of my intake adapters (#002), and a Weiand tunnel ram for induction. For carbs, the guys selected 450 cfm Holleys. I haven't had great luck with those carbs, so I was a little skeptical on this choice, but they got a good deal on them used, and then had them revamped with a Quick Fuel metering plate in the back, that allows jet changes in the secondaries. So those were the carbs we used.
The engine was finished off with a set of my adapters and a CVR electric water pump, a Milodon 7 quart oil pan, and an MSD distributor. We ran Hooker street headers on the dyno, with the normal 1 3/4" primaries. We got the engine set up on the dyno in a couple hours on Friday night. Here's a picture of it at the end of the day on Saturday, after we swapped on a different pair of carbs:

Saturday morning we were ready to go at 9:00 AM. We filled the engine with water, and, good news, there were no leaks. The same could not be said for the fuel, unfortunately; the back bowl on the rear carb started shooting fuel out of the vent when the pump was turned on. I removed the bowl, and the plastic baffle that goes around the needle and seat assembly on these side hung float bowls was just laying in the bowl, not positioned correctly. It was preventing the float from coming up and compressing the needle against the seat. Apparently the local carb "expert", who had gone through these carbs, had not assembled this correctly. Fortunately it was an easy fix, and after re-assembling the rear bowl the leak was gone.
The engine fired right up when we cranked it, and we set the timing as it warmed up, and varied the load somewhat with the dyno in order to help break in the engine and seat the rings. Since the cam was a roller, there was no need for a cam break-in period, so after running the engine for 10 minutes or so, we shut it off and pulled the valve covers to lash the valves. They were all a little loose, because they had been set at the specs with the engine cold. With aluminum heads, as the engine gets hot the heads expand, increasing the distance between the lifters and the rocker arms, and thereby increasing valve lash.
After getting the lash set to the specs, we started the engine back up and ran a cruise test, just to load the engine in the lower RPM range and see if everything sounded and looked OK. Looking at the cruise test data everything looked pretty good, but there was a disconnect between the dyno's A/F reading and the reading from my wideband O2 sensor; the O2 sensor looked pretty good, but the dyno reading looked lean. I wasn't sure which one to believe at this point, so we decided to run the first dyno pull and look again. We ran the pull from 3000 to 4500 RPM to be conservative. Here's the first dyno sheet:
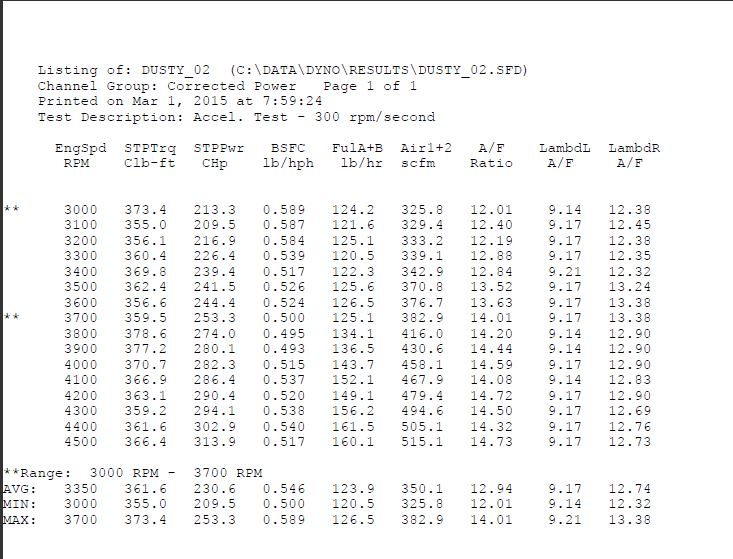
Obviously the horsepower and torque numbers were very disappointing. On the sheet, the left side O2 sensor (LambdL) was not hooked up. The right side O2 sensor was reading in the mid to high 12s, which is just what you wanted to see, but the dyno's A/F numbers looked lean. The engine sounded OK, but not real strong. We decided to double check the timing, and run another pull; the timing was still set at 33 total, and the second pull looked pretty much the same as the first.
Based on the power numbers I was beginning to suspect fuel as the culprit, but we decided to do one more pull and advance the timing a little as a test. On the dyno we were running 110 octane race fuel, which allows you to advance the timing quite a bit past the optimum level and not hurt the engine, so we went to about 38 degrees this time. One thing that we had been noticing about setting the timing was that the distributor was really hard to turn; it was a real fight to get it to move, and then once it did, it didn't move smoothly, so it took us several tries to get the timing where we wanted it. Back in the pull, we actually lost power with the timing change, so it was time to start looking at the jets in the carbs.
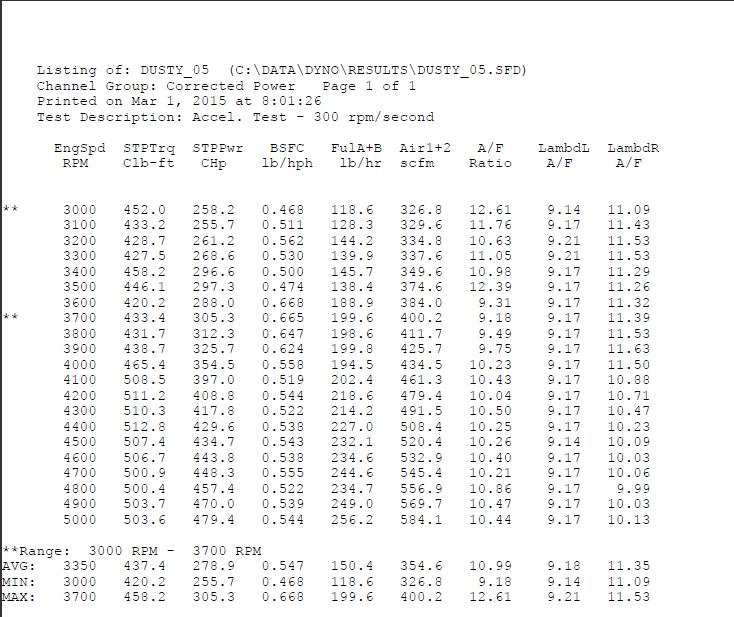
Of course with two carbs its a pain to do the jet changes, but we got started on that and after disassembling the first carb on the primary side, we found it had #59 jets. This just seemed way too small to me. I decided to overkill on the jet sizing just to see what the dyno results looked like, so in one carb we replaced the #59 jets with #68s, and in the other we went to #70s (I only had two of the #68 jets in my box). After re-assembling the engine we started it, and then reset the timing back to the original 33 degrees total, again struggling with the distributor to get the timing set correctly. We ran the pull, and the engine sounded soggy at the low end but better after 4000 RPM. The horsepower and torque numbers were a dramatic improvement, as shown in the sheet below:
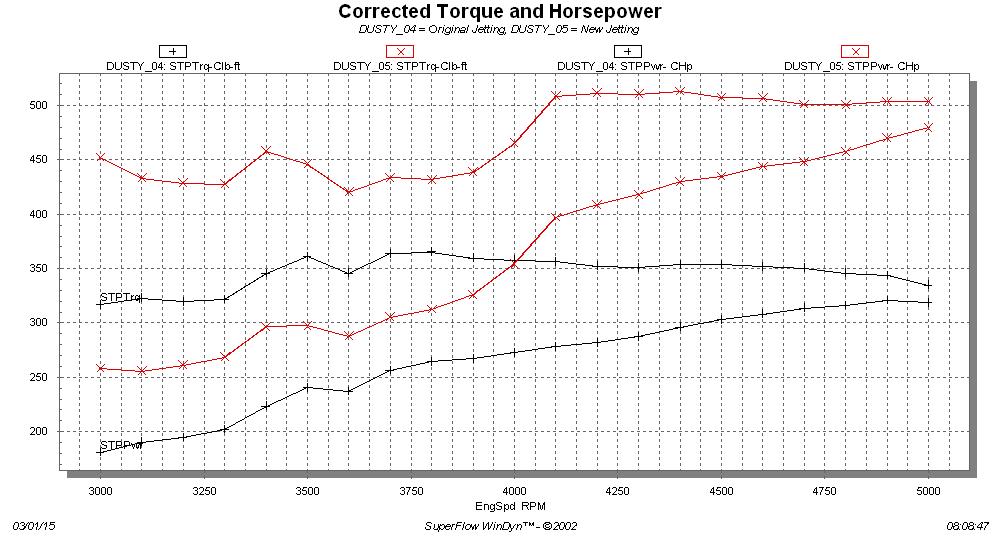
Here's a graph of horsepower and torque, before and after the jet change. Still looking pretty ragged, but a big improvement:
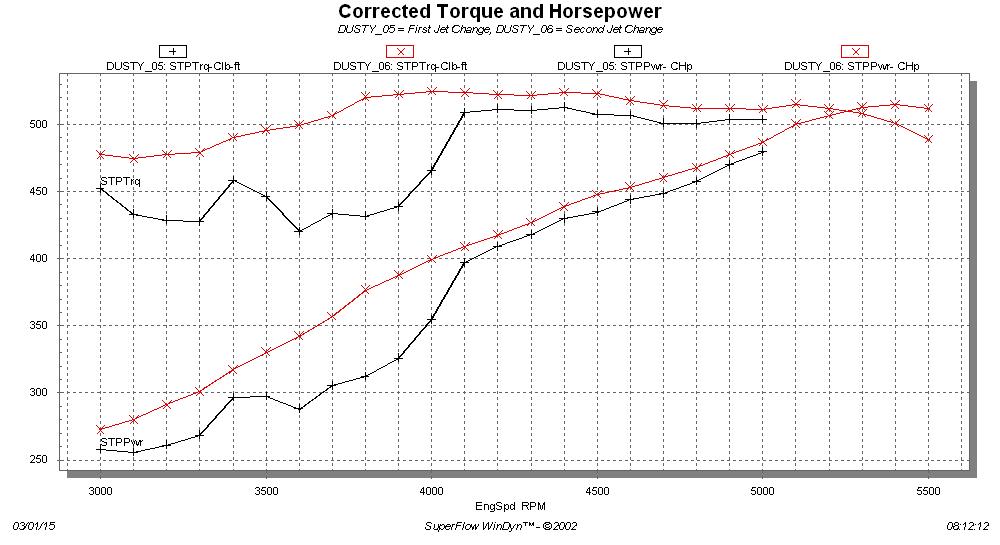
That was a little more like it! But now, according to the dyno A/F numbers, we were running way too rich. We decided to do another jet change, and this time we looked at the secondary side as well as the primary side. The secondaries of the carbs had been fitted with #67 jets. I decided to ignore the power valves in the carbs and square jet them to make it easier, and work with the selection of jets I had on hand. So, we put #64 jets in the primaries of both carbs, and #65 jets in the secondaries. This picked the power up substantially again on the next dyno pull, and we were now pretty close to the optimum 12.5:1 to 13.0:1 A/F range. Here's a comparison chart of the pull with the new jetting, and the previous pull that was pretty rich:
The power levels were finally starting to look like they should. We decided to do one more test of the timing, and again began struggling with turning the distributor. I couldn't help but think that it shouldn't be acting like this; it seemed like the body of the distributor was too large for the hole in the block, to allow it to easily turn. Then I started thinking about the distributor gear itself, and thought to ask whether they had replaced the stock cast iron gear that comes on the MSD distributors with a steel gear, to match the billet steel cam. The question was met with an "Oops!". They had forgotten to do that. Well, now the distributor had to come out, and I was worried that we'd find that the stock cast iron gear had been all torn up, and that there would be a bunch of shavings from that now in the engine.
The distributor was really tight and had to be pried out with a pry bar, but we were all relieved to see that the gear did not appear to be significantly damaged. You could just barely feel the start of a wear line on the gear. It wouldn't have lasted long, but fortunately the amount of material that had worn off was really small, so I don't think it caused the engine any problems. On the barrel of the MSD distributor you could see wear marks, where the body of the distributor was in tight contact with the block, so that was the reason why the distributor turned so hard. I plucked an MSD distributor with a steel gear out of my vast archive of FE parts (

), and installed that one in the engine. My distributor turned easily in the block, so the distributor that the guys have will need to be sanded down a little with an emery cloth before it is reinstalled (after a new steel gear is put on the shaft). That should solve all the problems. Hindsight being 20/20, its a good thing that distributor was tight; otherwise I would have never asked about the gear on the distributor, and it would have worn itself away eventually, potentially damaging the engine.
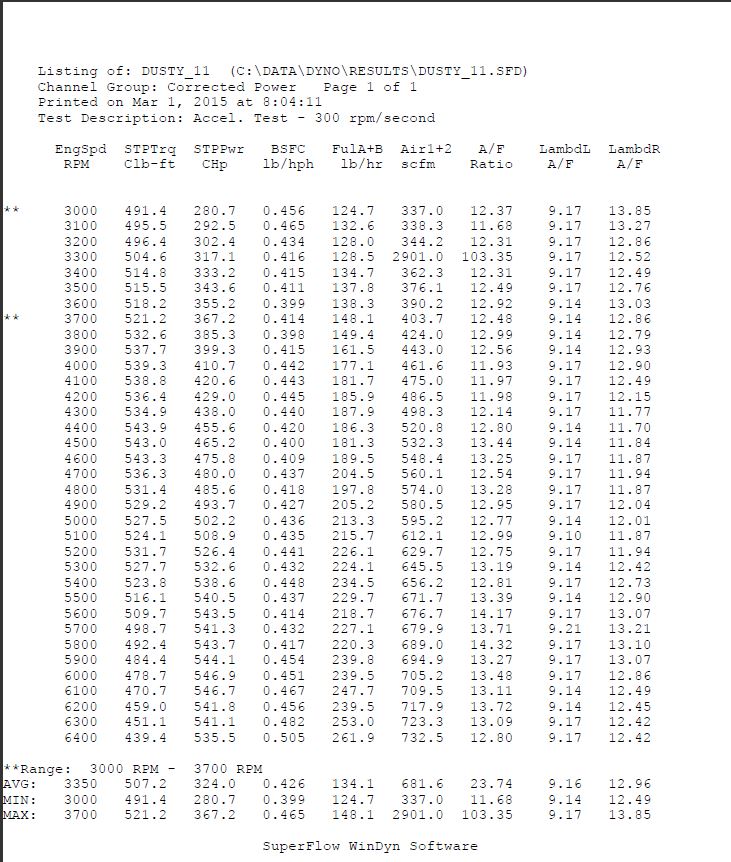
After all that screwing around, we advanced the distributor from 33 to 35 degrees, and got virtually no change in power from the engine on the next pull. We ran one more, to a little higher engine speed; here is the data and a graph of the final pull, with the 450 Holley carbs:

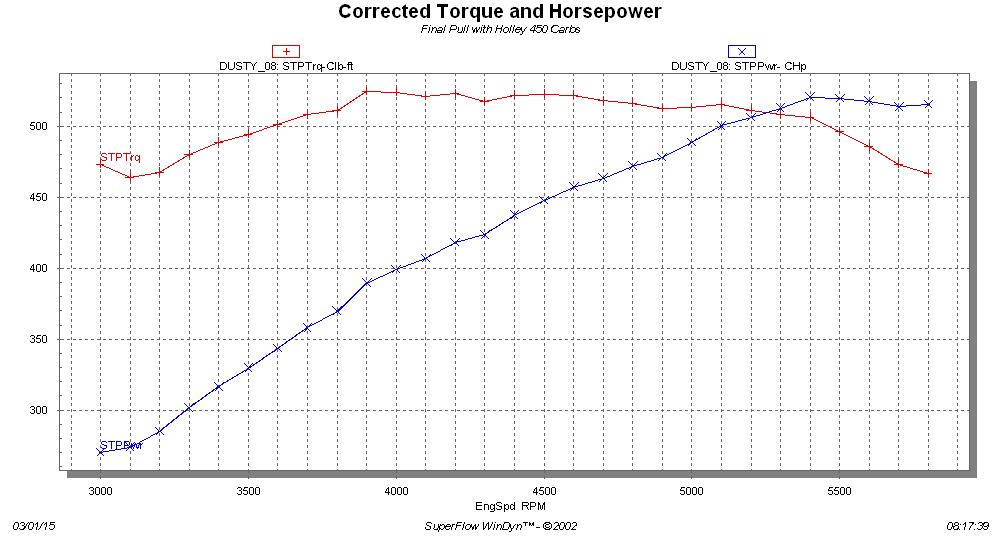
I thought that 520 horsepower and 525 foot pounds of torque wasn't bad, given the heads. And the torque curve was nice and flat, and close to 500 foot pounds even at 3000 RPM. This engine is going to be mated up with an automatic and 3500 stall converter, which should be just about perfect for it. But with that cam I was kind of surprised that the horsepower seemed to be peaking in the 5500 RPM range; I'd figured it would be more like 6000 RPM.
By now it was just after noon, and I'd been telling the guys all day that I thought the engine would make more power with a pair of 660 center squirter Holleys, and I just happened to have a pair of those. So, given that we had a little more time to run the engine, we decided to swap on my carbs. Those carbs are jetted for a lower horsepower engine (my 428CJ, which is around 460 horsepower), but we decided just to bolt them on and run them, and see what happened.
To say that the engine liked the bigger carbs would be an understatment. According to the dyno A/F reading we are running a little lean with these carbs, pretty much as expected, but the engine still picked way up. Also, it seemed to want to run higher in the RPM range than before. We ran a few more pulls, up to 6400 RPM on the last one, and now the engine looked like it was peaking at 6000 RPM, as expected. Here's the dyno sheet, and a comparison graph between the 450 and 660 carbs.

I think that 547 horsepower and 544 foot pounds are really, really impressive numbers given the stock Edelbrock heads. A street/strip porting job on the heads, getting the intake flow up to 300 cfm, would make this an easy 600 HP engine. Even as is, its a great hot street engine. It idled on the dyno between 900 and 1000 RPM with a nice lope, and seemed to have really good throttle response, especially with the 660 carbs. Can't wait to see it in its new home, a '64 Galaxie...


