Author Topic: The Road to Drag Week 2014 - August 3  (Read 19723 times)

0 Members and 1 Guest are viewing this topic.

jayb

  • Administrator
  • Hero Member
  • *****
  • Posts: 7405
    • View Profile
    • FE Power
The Road to Drag Week 2014 - August 3
« on: August 03, 2014, 09:58:22 PM »
Ever just have one of those weekends where it seemed like everything that could go wrong does?  I'm just coming off one of those  :(   In six months I'll read this post and be able to think objectively about it, but tonight all I can do is think of various four letter words...

On Friday I had planned to be at the track, but after finding the major oil leak in the engine last weekend, and not finding any simple solutions by Monday night, that plan went out the window.  Instead, with my day off Friday I resolved to get the leak fixed.  On Thursday I stopped into my friend BradFORD's shop, and my friend Tom lent me some engine oil dye, and also a UV penlight, to help track down the leak.  Thursday night I got under the car and cleaned everything off with solvent so it was nice and oil free.  I also bent the block plate back towards the flywheel somewhat, so that I had at least a very narrow view of the back of the main cap.  (It dawned on me during this process that the portion of the block plate around the main cap isn't really necessary, and I think that the next time I have the block plate out, I will cut this section away).

I dumped the dye in the dry sump tank, then started the engine and ran it for 30 seconds, then shut it off and crawled back under the car to look for any signs of the leak.  After the fourth 30 second run, I saw a drip running down the back of the main cap.  Looking up into the narrow gap between the block plate and the cap though made it difficult to identify the source of the drip.  I thought it might be coming from the junction of the cap and the block, but it was really tough to tell for sure.  I got back in the car and ran it for another 30 seconds, but when I looked again there was just too much oil down there to identify exactly where it was coming from.  This is a very serious oil leak, with 3-4 drips per second coming out at the back of the engine once it gets going.

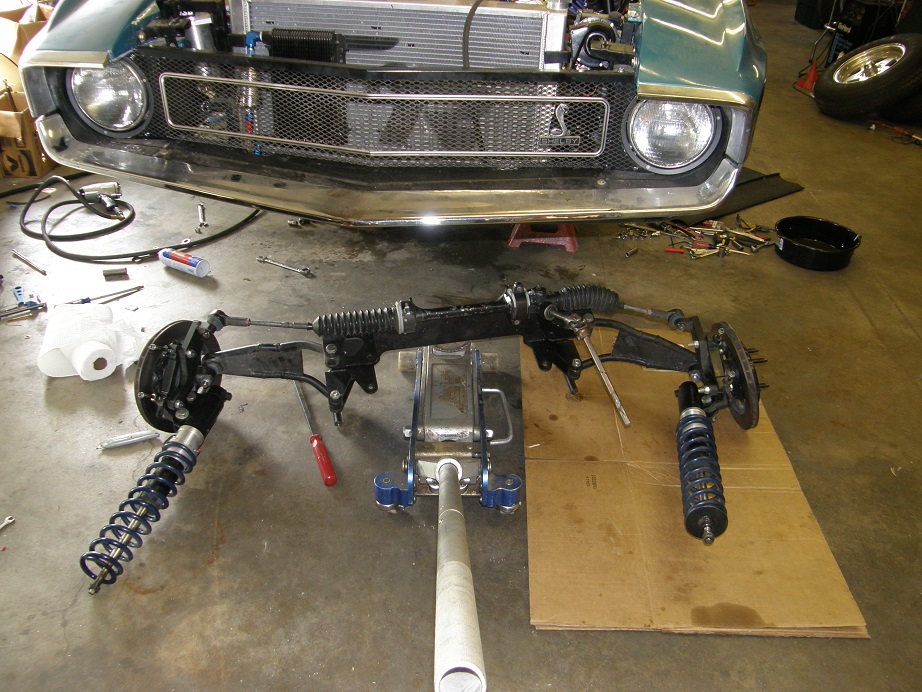
After seeing the drip down the back of the main cap I decided that I had no choice but to replace the rear main seal.  Friday morning I got under the car and started disassembling.  With the front suspension on this car, the entire front suspension assembly has to come out to get at the oil pan.  Here's a picture of the front suspension removed, and sitting out in front of the car:


I drained all the oil out of the dry sump and the pan, and saved it because it was new, and I wanted to re-use it because it had the dye in it, and it would be easier to check for leaks with that oil.  After disconnecting the dry sump lines, I pulled all the pan bolts and removed the pan.  After getting it off I took a look at the gaskets and the engine's oil pan rail, and noticed with some surprise that all along the rail there was evidence of sealer and gasket material stuck to the rail, except between the two oil pan bolts that went into the main cap!  There didn't appear to be a good seal to the gasket at that point.  Maybe this was part of the leak issue?

By this time, laying under the dripping engine and the dry sump lines, I was pretty well soaked in oil; this is always a miserable job.  But as long as I was under there I figured I'd finish the job, so I pulled the two #5 main cap bolts and got ready to pull the cap.  On the Shelby block you have to use a slide hammer to get the caps off, but when I tried to fit my slide hammer it hit the floor; it was too long to use in this position.  I had to cobble up a makeshift slide hammer to get the cap off.  After I had the cap off, I grabbed the top half of the seal with a needlenose pliers; it came out easily.

Finally out from under the car, I inspected the cap and seal closely.  It appeared that I had a good seal along the sides and parting surface of the cap, because there was evidence of sealer in these positions.  The main bearing looked fine, and so did the main seal halves.  No real evidence of a problem here.  Hmmmmm...

I let the engine drip dry for a few hours while I did some other work on the car, and then I started the reassembly process.  I made sure to get the pan rail and windage tray nice and clean, free of old sealer, and then spent some time getting dripped on again to get the pan rail cleaned up.  I put the rear main seal in the normal way this time, and clocked the seal in the block just a little to offset the seal gap from the cap gap.  When I installed the cap I put some sealer on the block surface of the cap, as usual.  This time I had decided to try the side seal method that Ross described in another post, so after torquing the cap I installed the side seals with them lubed up with plenty of sealer, and then drove in the nails.  Seemed like it worked just fine.

Finally I got the pan and windage tray installed, using a pair of SCE gaskets that I had ordered this week.  It had occurred to me while cleaning the pan and windage tray that the area on the main cap where there didn't appear to be sealer and gasket residue was exactly the spot on the Fel-pro oil pan gaskets where they fold it in half for packaging.  Maybe that had something to do with the issue, so the SCE gaskets (which don't come folded) should eliminate that possibility.  By around 11:00 PM on Monday I had the oil pan re-installed.  I decided to let the sealer dry overnight, then hook up the pan and fill the engine with oil for the test in the morning.

Saturday morning I was back out to the shop by 9:00, and was ready to test fire the engine by 10:00.  After firing the engine up I watched for a couple of minutes, and no sign of oil.  Great!  The phone rang, and I answered it and talked for a couple of minutes, then cam back to the car and - oh no - another huge puddle of oil in the same spot as before >:( >:( >:(

Well, crap.  Everything had seemed to go together pretty well; why was it raining oil under the car?  I checked again up top, to make sure that there was no oil leaking from the valve covers, heads, or intake manifold, but it was dry up there.  I cleaned off the area under the back of the engine, and went back in with the UV light after running the engine for a minute or so, and this time I didn't see a drip down the cap, but I did see some that appeared to come from the sides of the cap.  But it was difficult to tell for sure; there just isn't much room up there to see what is really going on.

At this point I decided to call a friend of mine who assembles a lot of FEs, and see if he had any suggestions.  His name is Kurt, and after talking this through with him on the phone he volunteered to come over and take a look.  Once he got there I ran the engine again while Kurt watched from under the car, and he agreed that it looked like the rear main and/or the cap to block interface.  So,  we decided to do it all again  ::)

Sparing the gory details of the oil draining and dissasembly, we finally took the rear main cap off again.  I looked closely at the area where the side seals were, and there appeared to be a good track of sealer there, and also at the cap/block junction; disassembling this I would not have expected to see a leak.  Again the main seals looked fine, and this time there was no evidence of sealer missing at the center of the main cap.  It just did not look like there could be a leak here.

Kurt and I took excruciating pains to make sure that the new top seal went in properly, and that the block and cap were perfectly clean and prepped before installation.  This time I did not clock the seal halves like I usually do, but put them in straight because that's the way Kurt likes to do them.  Also we didn't use side seals; we filled the side seal groove in the cap with black Permatex RTV, and then after the cap was installed Kurt pushed into the cavity with a round punch and forced sealer out between the cap and the block, so that we had a bead of sealer coming out the back.  I've done the same thing in the past, using the side seals to force the sealer out.

Kurt left around 6:00, and after a break I came back out to the shop to put the oil pan and windage tray back on (again >:()  After cleaning everything up (again! >:() I decided I would lay a straight edge across the panand make sure the surface was still flat.  Boy, was I surprised what I found.  The back left corner of the pan rail dipped way down, out of line with the rest of the pan rail by a good 1/8"!  How the heck did that happen?  It wasn't that way when I assembled the engine, that's for sure.  I was left with the conclusion that the heat cycles on the dyno had warped the pan, and when I uninstalled it the warp appeared.

Due to the design of the pan it is not possible to hammer this part of the pan rail into shape, so Saturday night I stuck it on one of  my CNC machines, and started re-machining the pan rail.  Turned out I only needed to take about .090" off to get it all squared up.  I got about half way done and the CNC machine quit; it said it had run out of air.  I checked my compressor, and sure enough the circuit had blown and the compressor was off.  I tried to reset the breaker, but it just kept tripping.  So no air compressor, and I couldn't finish the CNC work on the oil pan.

This pretty much just capped off a rotten day.  Earlier in the day UPS had delivered a package to me.  But the package was one I had shipped to a guy in Connecticut with a 351C intake in it.  They delivered it back to me instead!  I called UPS and they basically said OOPS, drop it back off at the UPS store.  Then halfway through the day my daughter had a personal crisis that required a family conference, with lots of wailing and gnashing of teeth.  When the air compressor quit, I'd had it.  I shut off the lights and went to bed.

Sunday morning I was back out to the shop for more punishment ::)  First I flipped on the air compressor breaker, and it fired right up; I think it is getting sensitive to the heat or something, and just needed some time to cool down.  I spent the next hour finishing off the CNC work on the oil pan; while I was doing this I was thinking about the leak, and if this could have been the cause.  When I first saw this issue I thought, aha!  But now I wasn't so sure; the leak had not appeared to be coming from the area where the pan was warped.  Plus, the bolts should have pulled the pan up into position when it was installed; its not totally rigid in that area.  In any case, making the oil pan rail flat couldn't hurt, so after I got done with that I installed the pan.  During this process though I ran out of my favorite sealer, Ford TA-31.  I rummaged around in my sealer box and found an unopened tube of Loctite grey sealer, which I have used successfully in the past, so I finished off with that.  By 11:30 I had the pan installed.  I went back in the house to grab some lunch and let the sealer dry before test firing the engine.

At 1:30 I went back outside.  First I crawled under the car to make sure the sealer had set up, and was surprised to find that it was still not skinned over.  That was odd.  I read the sealer tube, and it said that it should skin in an hour, and be completely cured in  24 hours.  Hmmmm....   I busied myself with some other tasks on the car, and then at 3:30 I crawled back under the car to check the sealer.  Still wet, and not skinned!  I grabbed my heat gun and hit one section of the oil pan where the sealer was pushed out with heat for a couple of minutes.  The stuff was still not skinned, even after that!

Well, I sure wasn't going to try to fire up the engine with the sealer not drying.  I decided to try an experiment.  I dug a bunch of RTV sealer out of my sealer box, including a couple more tubes of the Loctite stuff, and put some beads on a piece of cardboard:


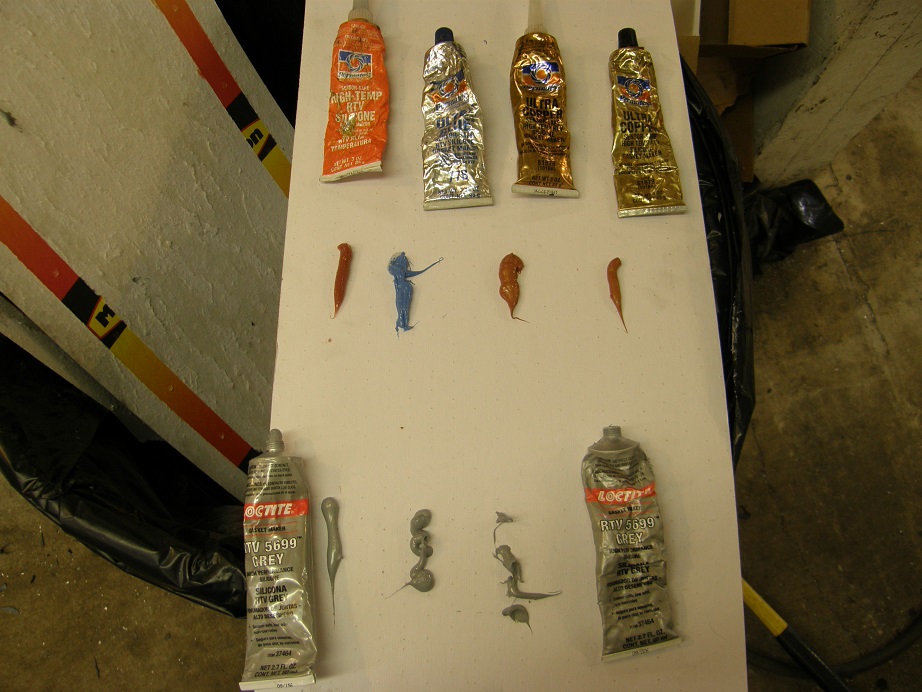
After another hour I checked again.  All three beads from the three different tubes of the Loctite sealer were not skinned, and all four beads from the other four tubes of sealer were nicely skinned over.

So, as I type this, the sealer has still not skinned over, and I haven't yet test fired the engine to see if it still leaks.  I've spent three solid days on this problem, with no resolution yet.  And, frankly, I'm not optimistic about the results of the next test.  In both dis-assembly and re-assembly procedures, I didn't find the smoking gun I was hoping for on the leak.  I'm starting to become pretty convinced that it is coming from the back of the block somewhere, and that next I'm going to have to pull the transmission to look back there.  It could be the cam plug (although I have that held in place with some screws and washers), and it also could be one of the five plugs in the back of the block.  I guess when the sealer finally cures I will find out.  Drag Week starts five weeks from today.  Still waiting to make it to the track...

« Last Edit: August 03, 2014, 11:03:03 PM by jayb »
Jay Brown
- 1969 Mach 1, Drag Week 2005 Winner NA/BB, 511" FE (10.60s @ 129); Drag Week 2007 Runner-Up PA/BB, 490" Supercharged FE (9.35 @ 151)
- 1964 Ford Galaxie, Drag Week 2009 Winner Modified NA (9.50s @ 143), 585" SOHC
- 1969 Shelby Clone, Drag Week 2015 Winner Modified NA (Average 8.98 @ 149), 585" SOHC


WConley

  • Hero Member
  • *****
  • Posts: 1160
  • No longer walking funny!
    • View Profile
Re: The Road to Drag Week 2014 - August 3
« Reply #1 on: August 03, 2014, 10:23:30 PM »
Aww man!  I was cringing when you first mentioned that oil leak.  The only time I ever heard my dad swear was when we had to pull the intake off the Galaxie for the third time - still leaking!

I hope you can resolve this soon.  Sending good wishes your way.


Added:  Angry Cat is angry at your oil for leaking!


- Bill
« Last Edit: August 03, 2014, 10:34:10 PM by WConley »
A careful study of failure will yield the ingredients for success.

Cyclone03

  • Sr. Member
  • ****
  • Posts: 338
    • View Profile
Re: The Road to Drag Week 2014 - August 3
« Reply #2 on: August 03, 2014, 10:34:09 PM »
I've had the oil pan off my Mustang at least 6 times in 4 years to fix "the rear main leak" it's not leaking ,or it is,I have no idea it still leaves a silver dollar spot on the garage floor and keeps the headers, transmission, floor pan ,rear end well lubed.
But I dont have to pass tech in 5 weeks.

Sounds like the transmission is coming out.....
Lance H

Joe-JDC

  • Guest
Re: The Road to Drag Week 2014 - August 3
« Reply #3 on: August 03, 2014, 11:24:47 PM »
If you pull the transmission, then check for cracks in the drainback area of the block where it was drilled for the SOHC drainback passage.  Maybe a thin spot that got dinged when you removed it from the dyno??  I would use teflon paste on those rear oil galley plugs instead of teflon tape, and torque them down extra snug.  Hope you find the leak very obvious when you remove the trans.  Joe-JDC.

Qikbbstang

  • Hero Member
  • *****
  • Posts: 892
    • View Profile
Re: The Road to Drag Week 2014 - August 3
« Reply #4 on: August 03, 2014, 11:58:55 PM »
That is awful I could feel my heart sink as your description went on. The dreaded nightmare of thinking it's fixed and finding it's not. The last one I did was on my John Deere Riding Mower, Finished installing new drive and mower belts, got it down off jack stands, put the tools away and cleaned up. Fired it up, put the mower blades into drive and nothing...When lining up the belt guides I must have knocked the mower belt out of the pulley.  Will say one thing the 2nd time and third time usually go faster from practice/familiarity - you know what tools to reach for!
       Stinks to learn the UV dye did not seem to help at all.

machoneman

  • Hero Member
  • *****
  • Posts: 3853
    • View Profile
Re: The Road to Drag Week 2014 - August 3
« Reply #5 on: August 04, 2014, 06:53:10 AM »
Had the same thought as JDC. Is the block weeping from a thin spot or crack that somehow developed since you last ran the engine. Or, did the plug holes themselves develop a crack from the threaded bosses after some heat-cool cycles?
Bob Maag

KMcCullah

  • Hero Member
  • *****
  • Posts: 733
    • View Profile
Re: The Road to Drag Week 2014 - August 3
« Reply #6 on: August 04, 2014, 07:35:10 AM »
My first hope was that this leak was NOT coming from the back of the block because there's a lot going on back there. Now I'm hoping that it's just a galley plug that's lose and not some crack in a sensitive area.

I wish I was closer Jay. I'd burn a vacation day for the cause.  :-\
Kevin McCullah


My427stang

  • Hero Member
  • *****
  • Posts: 3929
    • View Profile
Re: The Road to Drag Week 2014 - August 3
« Reply #7 on: August 04, 2014, 09:13:19 AM »
NPT fittings can crack alum very easy if overtightened, hope you forgot to tighten one and it backed out or some other simple fix, the alternative would suck.

Any way to run the dry sump to prime and see if it leaks just sitting there a without running it?
---------------------------------
Ross
Bullock's Power Service, LLC
- 70 Fastback Mustang, 489 cid FE, Victor, SEFI, Erson SFT cam, TKO-600 5 speed, 4.11 9 inch.
- 71 F100 shortbed 4x4, 461 cid FE, headers, Victor Pro-flo EFI, Comp Custom HFT cam, 3.50 9 inch

900HP

  • Jr. Member
  • **
  • Posts: 46
    • View Profile
Re: The Road to Drag Week 2014 - August 3
« Reply #8 on: August 04, 2014, 09:17:17 AM »
Jay, that was painful to read.  My weekend wasn't quite as bad as yours but it still sucked.  I had a fresh engine with low oil pressure, pulled it down, couldn't find anything wrong, replaced the pump.  Oil pressure was good, went to the race track with the owner/car and it made a total of 4 laps before the brand-new timing chain broke :P

As far as the sealer issues, there are only 2 sealers I use during engine assembly.

For gaskets, end-rails, uneven surfaces, etc.  I use "the Right Stuff" by Permatex.  It is not silicone per se, it is a rubberized sealer and is very thick.  It requires no skim time and once installed will never, ever leak.  It will also never, ever come apart (It will but the stuff is unreal).  I highly recommend "the Right Stuff" for your oil pan gasket.

For fasteners with straight threads I use Permatex "Ultra-Black" this is a silicone based sealant and is much runnier than "the Right Stuff" so it works better on threaded fasteners.

ScotiaFE

  • Hero Member
  • *****
  • Posts: 1409
  • Howie
    • View Profile
Re: The Road to Drag Week 2014 - August 3
« Reply #9 on: August 04, 2014, 09:39:21 AM »
Tough one Jay. ???

I follow 900's seal moto. Ultra Black and Right Stuff in various locations.

FYI: The FELPRO OS11701D comes in a flat box and is not folded like the 1817. And is the same gasket and cheaper. Go figure.

cobracammer

  • Hero Member
  • *****
  • Posts: 1165
    • View Profile
Re: The Road to Drag Week 2014 - August 3
« Reply #10 on: August 04, 2014, 09:42:50 AM »
Not sure if this would even work, but what about getting a scrap piece of the thinnest gasket material you can find and using 2 precisely cut strips of it to seal off the rear cap mating service?  You would still need a tiny bit of sealer to hold them in place, but sandwiched between the cap and the block, should be leak proof?
Jason
2005 Saleen S281 (427 SOHC 2 X 4 EFI swap), T56 Magnum XL 6 speed, 9" Currie rear with 3.89 Gears

jayb

  • Administrator
  • Hero Member
  • *****
  • Posts: 7405
    • View Profile
    • FE Power
Re: The Road to Drag Week 2014 - August 3
« Reply #11 on: August 04, 2014, 09:46:23 AM »
What kind of chain was it, Mark?  Just curious...

I used the Right Stuff for a lot of years, but I like the Ford TA-31 a little better.  It is about the same consistency as the Right Stuff, and it comes in a caulk tube, which I find easier to use than the pressurized bottles that the Right Stuff comes in.  Sometimes those bottles clogged on me and I'd have to throw them away only half used.  TA-31 is also gray, not black, which looks a little better on the aluminum engines.  I think they are very similar products though...

I checked the sealer again this morning; it has been nearly 24 hours since I put the pan back on, and the Loctite RTV has still not skinned.  This was a brand new, sealed tube, probably 4 years old.  The package doesn't mention a shelf life, but maybe there is one.  I've had really good luck over the years with Loctite products, but this stuff sucks...
Jay Brown
- 1969 Mach 1, Drag Week 2005 Winner NA/BB, 511" FE (10.60s @ 129); Drag Week 2007 Runner-Up PA/BB, 490" Supercharged FE (9.35 @ 151)
- 1964 Ford Galaxie, Drag Week 2009 Winner Modified NA (9.50s @ 143), 585" SOHC
- 1969 Shelby Clone, Drag Week 2015 Winner Modified NA (Average 8.98 @ 149), 585" SOHC


jayb

  • Administrator
  • Hero Member
  • *****
  • Posts: 7405
    • View Profile
    • FE Power
Re: The Road to Drag Week 2014 - August 3
« Reply #12 on: August 04, 2014, 09:48:29 AM »
Not sure if this would even work, but what about getting a scrap piece of the thinnest gasket material you can find and using 2 precisely cut strips of it to seal off the rear cap mating service?  You would still need a tiny bit of sealer to hold them in place, but sandwiched between the cap and the block, should be leak proof?

I think that would throw off the #5 main bearing bore diameter; they are align honed with the caps torqued in place, so adding a spacer like a gasket would throw off the bearing bore diameter.
Jay Brown
- 1969 Mach 1, Drag Week 2005 Winner NA/BB, 511" FE (10.60s @ 129); Drag Week 2007 Runner-Up PA/BB, 490" Supercharged FE (9.35 @ 151)
- 1964 Ford Galaxie, Drag Week 2009 Winner Modified NA (9.50s @ 143), 585" SOHC
- 1969 Shelby Clone, Drag Week 2015 Winner Modified NA (Average 8.98 @ 149), 585" SOHC


900HP

  • Jr. Member
  • **
  • Posts: 46
    • View Profile
Re: The Road to Drag Week 2014 - August 3
« Reply #13 on: August 04, 2014, 10:23:17 AM »
What kind of chain was it, Mark?  Just curious...

it was a 9-keyway billet gear Cloyes with a "usa" chain.  I thought it would be good enough for this application but apparently quality control is gone.  I have a friend of mine that broke 3 in a row early in the season.  Rollmaster German chains for me from now on, it's to expensive just to try and save $40-$50

I used the Right Stuff for a lot of years, but I like the Ford TA-31 a little better.  It is about the same consistency as the Right Stuff, and it comes in a caulk tube, which I find easier to use than the pressurized bottles that the Right Stuff comes in.

the "Right Stuff" comes in caulk tubes too.  Just sayin' ;)

turbohunter

  • Hero Member
  • *****
  • Posts: 2509
    • View Profile
Re: The Road to Drag Week 2014 - August 3
« Reply #14 on: August 04, 2014, 10:26:49 AM »
Jeez Jay, I can only add my good wishes for the future.
I agree that was a gut wrenching read.
I think because we've all had the same experience at some time or another and can feel every turn of the wrench.
A little good luck would be nice. Hope you get it.
Marc
'61 F100 292Y
'66 Mustang Injected 428
'66 Q code Country Squire wagon


drdano

  • Hero Member
  • *****
  • Posts: 537
    • View Profile
Re: The Road to Drag Week 2014 - August 3
« Reply #15 on: August 04, 2014, 10:49:47 AM »
the "Right Stuff" comes in caulk tubes too.  Just sayin' ;)

+1, the pressurized tubes sometimes dont always work as expected.  My two local parts houses don't shelf stock it, but can have me a caulk tube of it within a few hours from their warehouses. 

cammerfe

  • Hero Member
  • *****
  • Posts: 1659
    • View Profile
Re: The Road to Drag Week 2014 - August 3
« Reply #16 on: August 04, 2014, 11:22:03 AM »
FWIW, Roush's Prototype Shop, the place the cup engines are built, uses an epoxy as a sealer when installing NPT plugs in a block. They DON'T leak.
I'm hurtin' for ya!
KS

mmason

  • Full Member
  • ***
  • Posts: 125
    • View Profile
Re: The Road to Drag Week 2014 - August 3
« Reply #17 on: August 04, 2014, 01:12:05 PM »
The Right Stuff comes in grey.
http://www.permatex.com/products-2/product-categories/gasketing/gasket-makers/permatex--the-right-stuff--1-minute-gasket--grey-detail

Also would there be enough room to use a video scope when the engine is running?
« Last Edit: August 04, 2014, 01:56:38 PM by mmason »
Michael Mason

Barry_R

  • Hero Member
  • *****
  • Posts: 1915
    • View Profile
    • Survival Motorsports
Re: The Road to Drag Week 2014 - August 3
« Reply #18 on: August 04, 2014, 03:33:39 PM »
Ouch
Boy have I been there.
I had some silicone that was still unhardened after it ran on the dyno - I had never even thought of checking that after a couple days...there is a definite but unlisted shelf life.

I have a customer who came up with a near brilliant idea for finding rear of block leaks.  I had already driven +/- 4 hours each way to his home twice trying to identify a leak on an otherwise good running original engine.  And I failed both times.  Once I R&R'd the intake.  The second time I tried a pan gasket/rear seal.  Damn thing still leaked.  He ended up spraying FOOT POWDER on the back of the block & running it.  Found a seeping block plug - tight but still wicking.  Not sure if he cured it, but he probably does not think much of me after two failed efforts....  but the spray powder idea was great.

You might need to hang the flywheel and a stock stick bell on the back of the block so you can fire it up to see what's going on.

machoneman

  • Hero Member
  • *****
  • Posts: 3853
    • View Profile
Re: The Road to Drag Week 2014 - August 3
« Reply #19 on: August 04, 2014, 04:25:03 PM »
Now that's a great idea Barry! a Stick 'wheel and watch it spin.
Bob Maag

thatdarncat

  • Hero Member
  • *****
  • Posts: 1866
    • View Profile
Re: The Road to Drag Week 2014 - August 3
« Reply #20 on: August 04, 2014, 04:31:57 PM »
Having faith that you'll solve the leak I'll point out there's a test day at Grove Creek Sat Aug 9th.
Kevin Rolph

1967 Cougar Drag Car ( under constuction )
1966 7 litre Galaxie
1966 Country Squire 390
1966 Cyclone GT 390
1968 Torino GT 390
1972 Gran Torino wagon
1978 Lincoln Mk V

cjetmech

  • Jr. Member
  • **
  • Posts: 90
    • View Profile
Re: The Road to Drag Week 2014 - August 3
« Reply #21 on: August 04, 2014, 04:47:49 PM »
Similar to Barry's Idea , I've used the white aerosol developer that comes in a dye penetrant kit to find leaks. It might be good in that area because you can just spray it up in there once its clean and cover a lot of hard to reach spots. I hope you don't get to discouraged, its gotta be super tough doin all this mostly by yourself.
67 Fairlane GT 428
93 Mustang Coupe 331

XR7

  • Sr. Member
  • ****
  • Posts: 297
    • View Profile
Re: The Road to Drag Week 2014 - August 3
« Reply #22 on: August 04, 2014, 06:17:24 PM »
No need to start it. The trans has to come off first. Take the flywheel off too. Just prime the engine and see where it is coming from. With a dry sump you should be able to spin the pulley with a air ratchet or drill or whatever works to get pressure. With oil pressure the oil is flowing and will show where the leak is without the engine running, especially if it is that big of a leak!

I would suspect a galley plug at the back of the block, but who knows. I now check for leaks back there after fighting this a long time ago. Now every engine I assemble gets primed on the engine stand, without the intake on, and with all the rocker assembly installed. The last engine I did had too much oil to the lifters and had a leak out the back pressure relief valve plug. Found both problems right away doing this.

It is very odd though, that you ran it and had no issues on the dyno. Something happened somewhere for some reason between the dyno and install in the car. I am sure you will find it but it does suck... I hate going backwards, but have been there and done that. Just have to get it done. The schedule is a moving target! I do want to see you get some track time before drag week though. Very important to prove out all the systems, do some testing and tuning to get the car's suspension working, I am sure the engine will run hard, but getting it "hooked up" is a job in itself.
68 Cougar XR7 GT street legal, 9.47@144.53, 3603# at the line, 487 HR center oiler, single carb, Jerico 4 speed, 10.5 tires, stock(er) suspension, all steel full interior

Qikbbstang

  • Hero Member
  • *****
  • Posts: 892
    • View Profile
Years ago I received a case of sealants, lapping compounds, glues, epoxy's etc after I threw a fit to the packager that their silicone failed to set on my boats 460. I say packager because I think silicones are mostly made by one company.  Not sure why but dated virgin tubes of silicone can fail to set---it happened to me.
   It's my understanding that water/moisture set silicone off
« Last Edit: August 04, 2014, 11:14:34 PM by Qikbbstang »

BH107

  • Sr. Member
  • ****
  • Posts: 305
    • View Profile
Re: The Road to Drag Week 2014 - August 3
« Reply #24 on: August 05, 2014, 12:14:41 PM »
That was painful to read...Hope things go better for you this week!

TimeWarpF100

  • Hero Member
  • *****
  • Posts: 683
    • View Profile
Re: The Road to Drag Week 2014 - August 3
« Reply #25 on: August 06, 2014, 12:53:05 AM »
One thing I do not miss every week is a update on your drag week posts.

Sorry to hear about the oil leak.

I also use nothing but the TA-31 Motorcraft sealant it was designed for the 7.3L Diesel
Imagine that the first time since I have owned this 7.3 (143k miles) it does not leak a drop of oil. Harder than a FE to not leak . .

Talking about expiration dates my tube says 5/22/13   Still good though!

After using it I threw the right stuff in the trash
« Last Edit: August 06, 2014, 12:55:23 AM by TimeWarpF100 »

machoneman

  • Hero Member
  • *****
  • Posts: 3853
    • View Profile
Re: The Road to Drag Week 2014 - August 3
« Reply #26 on: August 06, 2014, 06:29:08 AM »
SWAG?

Since the engine is sealed up so well due to the vacuum system, maybe....plumb a fitting of sorts into one orifice and pump in shop air at a regulated low pressure. The pressurized block should then show (maybe?) an air leak at the source that you may hear and then trace. Likely though Jay you have already considered something like this.   
Bob Maag

Cyclone03

  • Sr. Member
  • ****
  • Posts: 338
    • View Profile
Re: The Road to Drag Week 2014 - August 3
« Reply #27 on: August 08, 2014, 11:25:46 AM »
Jay, Do you have a quick update on the Valdez in your garage?
Lance H

jayb

  • Administrator
  • Hero Member
  • *****
  • Posts: 7405
    • View Profile
    • FE Power
Re: The Road to Drag Week 2014 - August 3
« Reply #28 on: August 08, 2014, 09:22:40 PM »
The "Valdez" LOL! I'll have an update on Sunday...
Jay Brown
- 1969 Mach 1, Drag Week 2005 Winner NA/BB, 511" FE (10.60s @ 129); Drag Week 2007 Runner-Up PA/BB, 490" Supercharged FE (9.35 @ 151)
- 1964 Ford Galaxie, Drag Week 2009 Winner Modified NA (9.50s @ 143), 585" SOHC
- 1969 Shelby Clone, Drag Week 2015 Winner Modified NA (Average 8.98 @ 149), 585" SOHC


babybolt

  • Hero Member
  • *****
  • Posts: 516
    • View Profile
Re: The Road to Drag Week 2014 - August 3
« Reply #29 on: August 09, 2014, 07:04:38 PM »
The really high end aluminum blocks don't use NPT plugs anymore.  Like Nascar and IRL, F1, etc.  From what I've seen, some of them use plugs with a o-ring and in other cases they have a tapered section ahead of the straight (non-taped) threads.  Don't know what the names of these new fangled plugs are.  Heck its not uncommon for steel NPT plugs to leak in the back of an iron block.  Some of the Nascar guys used to bolt on a steel plate over top of the cam freeze plug.

Joe-JDC

  • Guest
Re: The Road to Drag Week 2014 - August 3
« Reply #30 on: August 09, 2014, 09:39:12 PM »
A sure fix would be to use aluminum plugs in the aluminum block with liquid teflon.  Same expansion rates with heat build-up.  The steel plugs contract and expand at different rates, causing some of the oil seepage problems in aluminum blocks.  O-rings help, and are supplied by Dart for their aluminum blocks, and Shelby sent a set with my block.  Hope the leakage is simple to fix after all the work and time involved.  Joe-JDC