Author Topic: The Road to Drag Week 2014 - July 20  (Read 19093 times)

0 Members and 1 Guest are viewing this topic.

jayb

  • Administrator
  • Hero Member
  • *****
  • Posts: 7404
    • View Profile
    • FE Power
The Road to Drag Week 2014 - July 20
« on: July 20, 2014, 06:53:53 PM »
Finally getting closer on this project.  Most of the fabrication work is done, and I'm pretty sure that next weekend I'll be able to fire the engine in the car, and maybe take it around the block a few times.  No way I'm going to be able to hit the track next Saturday, though; right now I'm targeting a test and tune the following weekend.

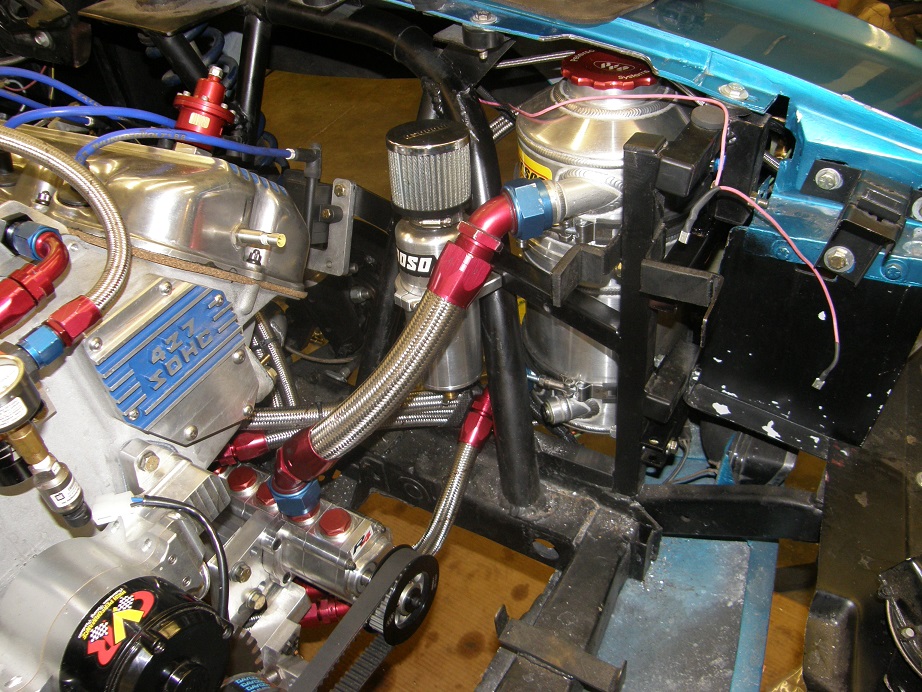
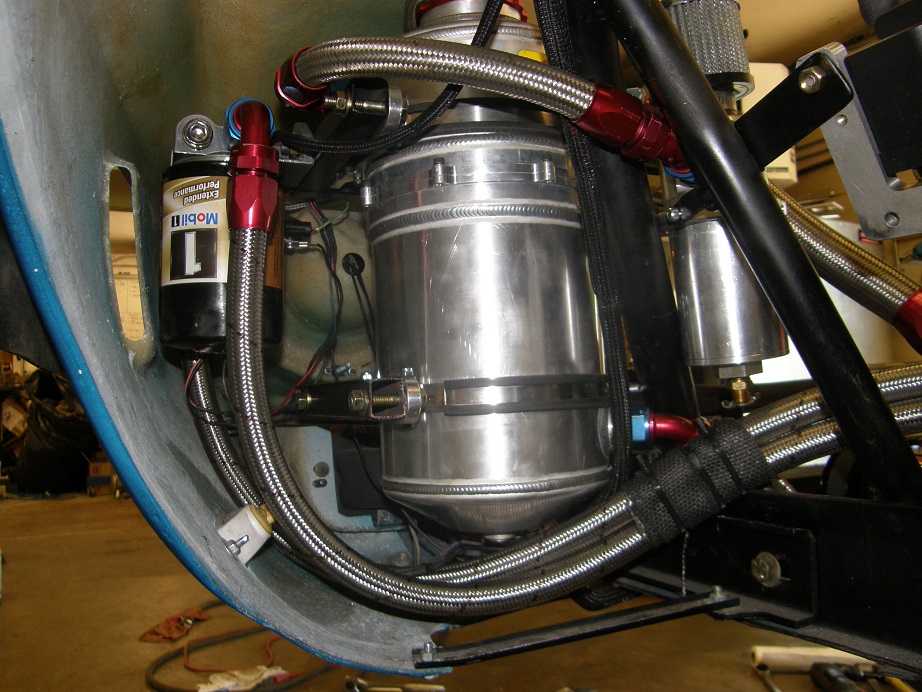
Last week at this time I was puzzling over my oil filter situation.  The remote filter mount is located up under the left side fender, behind the dry sump tank, and where it ended up being positioned was not ideal; the oil filter wanted to scrape against the fiberglass fender as I installed it, and it was still resting against the fender when it was tightened up.  I was looking for a filter that was smaller in diameter than a standard FE filter to solve this problem (you may have seen my post in the technical section), and after getting some suggestions on this I decided to order one of the FL-400 filters, and also one of the Canton cartridge style filters, to see which one I liked better and would fit the easiest.  The filters arrived on Thursday this week, and I have to confess that I didn't really like either one.  The FL-400 filter was even smaller than I had imagined it would be, and I couldn't see myself running one of those on this engine.  The Canton filter would fit and appeared to be the right size, but when I took it apart I was surprised at how small the filter element was inside.  In addition, the Canton filter didn't have a bypass, a feature which I wasn't real comfortable with.  After mulling this over for a while, I reluctantly concluded that I was going to have to take apart the left front of the car again, and modify the brackets that hold the dry sump tank in order to gain clearance for a standard oil filter.

Also during the week this week I struggled somewhat with the differential.  Last week I brought my pumpkin in to my friend BradFORD for an upgrade to pro gears.  He tried to get it assembled for me on Monday this week, but couldn't get the pinion preload right.  I dropped by his shop on Tuesday, and between the two of us, and a call to Mark Williams, we figured out that the spacer that goes between the pinion gears (where the crush sleeve goes in a standard Ford 9") needed to be machined to fit.  I figured I'd just cut it on my lathe and bring it back the next day, so I took it with me.  Brad had a bunch of shims that he could use to fine tune the width, so he instructed me to cut it .040", which was about .020" more than he thought we needed, and he'd make up the difference in shims.  Tuesday night I got that done (I thought...), and dropped the spacer back off with Brad on Wednesday.  But on Thursday evening I got a call from him, saying that it had not been cut enough, and even with no shims the most pinion preload he could get was 5 inch-pounds.  This turned out to be my fault; I had not measured the spacer before chucking it up on the lathe to cut it, and had relied on the lathe dial indicator to make the cut, since it didn't have to be precise.  But my lathe has a fair amount of backlash, and apparently this screwed up the cut, because when Brad measured the spacer he said I'd only taken off about .013".  I was pretty sure I'd taken off more than that, but Brad measured, and I didn't.  I was already at home when I got the call, so on Friday I had to stop by Brad's shop again and pick up the spacer.  I measured it this time  ::) and got it cut this weekend, so hopefully I'll be able to reassemble the rear end sometime this week.

When Friday night rolled around I got going again on the oiling system.  I pulled the dry sump tank and remote filter mount, and tried to figure out where I could squeeze the tank in closer to the engine compartment, to gain clearance for the oil filter.  This task was complicated by the main forward bar extending from the roll cage and down to the factory frame rail, and a couple other 1" square steel tubing bars that support the front of the left fender and the radiator.  Fortunately, I didn't need a whole lot of clearance.  I ended up removing one 1" square steel tube, modifying the brackets to move them inboard about 1/2", and then remaking the bar that was removed.  This took me Friday night and most of day Saturday by the time I had it finished up, with everything mounted back into position and also the dry sump vent tank mounted.  But now I have sufficient clearance to mount a standard oil filter.  Here's some pictures showing the front left corner of the engine compartment, and also under the left front fender where the oil filter bracket is mounted:


Finally finished with all this fabrication work, I spent the remainder of the evening on Saturday plumbing the car.  I ran all the oil lines, the fuel lines, and the coolant lines from the engine to the remote thermostat housing.  At midnight I finished this up, called it quits and went to bed.

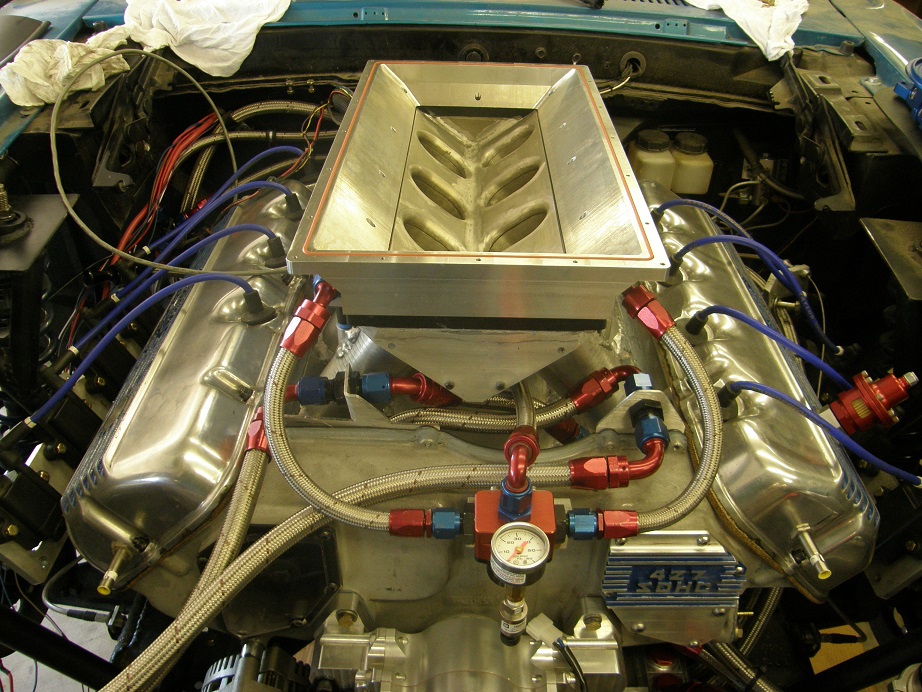
This morning I was looking forward to doing something OTHER than the dry sump system work.  Friday and Saturday nights, while I was working on the dry sump stuff, I also had one of the CNC machines running, cutting out the top for the new upper plenum that I had machined last weekend.  Accufab had come through on the throttle bodies as promised, so those were ready to go.  (I did have to machine the bottom linkage arm off of the Accufab throttle bodies in order to make them fit as low as possible on the plenum top, but this was no big deal.)  Sunday morning I deburred the plenum top and got ready to install the upper plenum and plenum top on the engine.  Here's a couple of pictures of the plenum top:


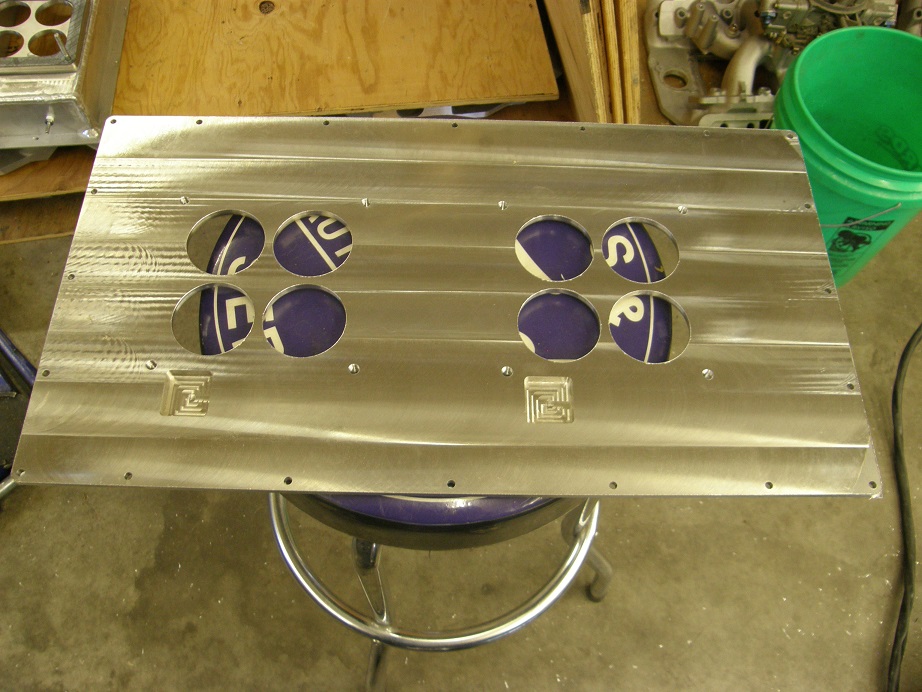
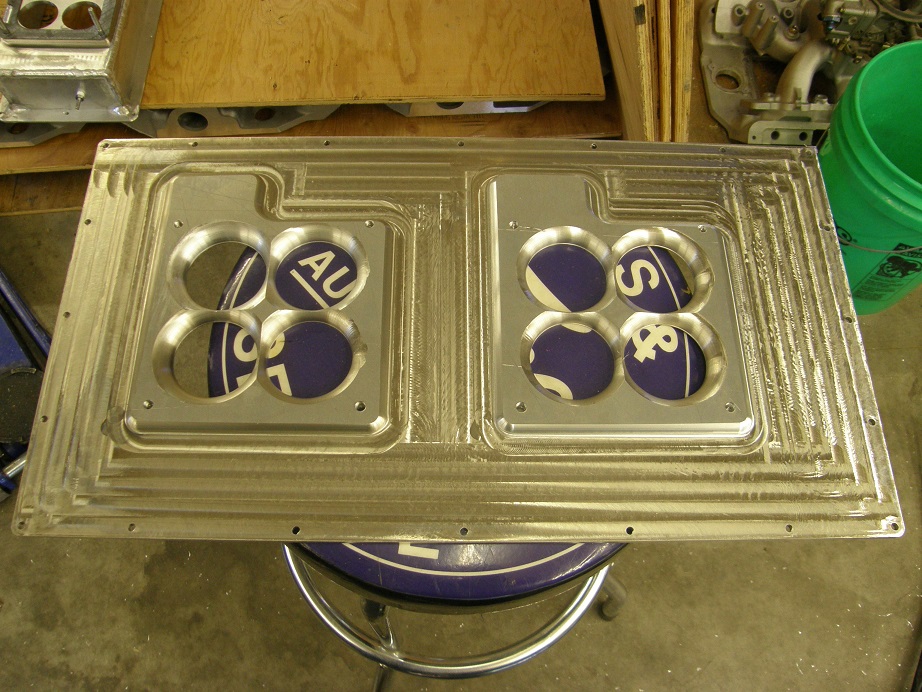
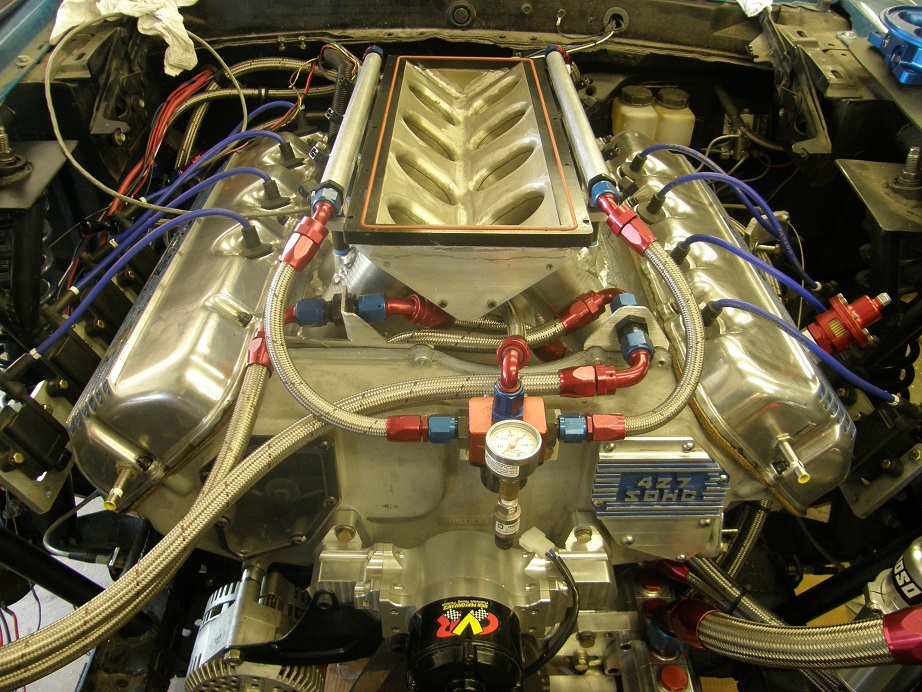
The second picture is the underside of the plenum top.  I removed the upper plenum that I had fabricated for the dyno work, and got ready to install the new upper plenum.  Here's a picture of the engine ready for the upper plenum installation:


Naturally, when I went to install the upper plenum, it didn't fit LOL!  It turned out that the fuel line fittings were too close to the outer walls of the upper plenum.  Glad I had already installed those; otherwise I might have had to take everything back apart again when installing the lines.  Back to the CNC machine with the upper plenum; I relieved the outside wall in four places by about .050", to clear the fuel line fittings.  Back to the car, and this time the upper plenum slide right into place.  After bolting it down and using plenty of Loctite on the screws holding it in position, I cut an O-ring to fit around the top.  Here's a picture of the upper plenum installed:


Next I bolted on the plenum top:


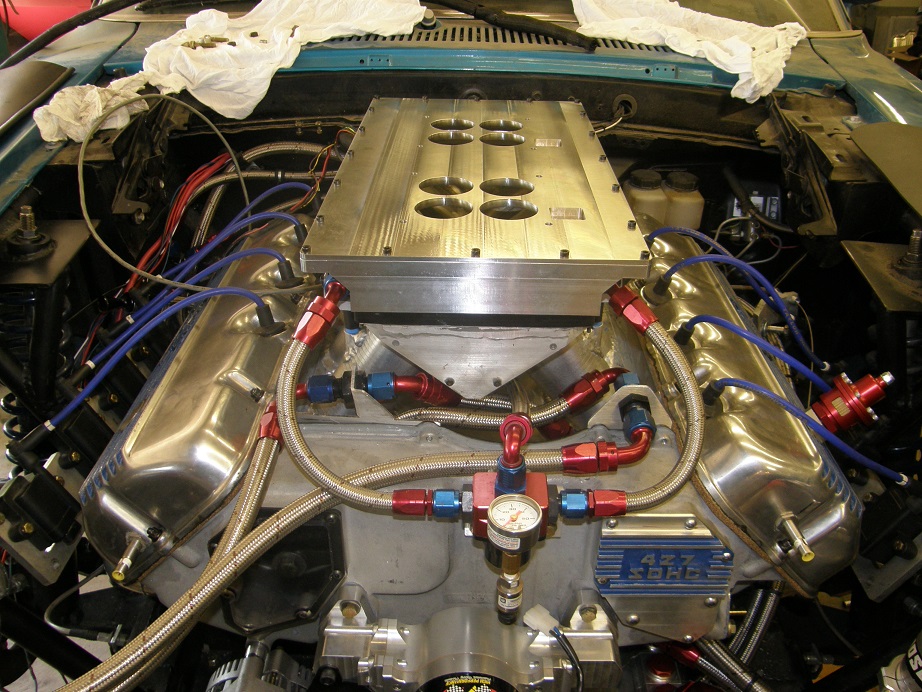
Finally I put some carb studs in the plenum top and installed the Accufab throttle bodies.  Unfortunately, when I tried to open the throttles the linkage interfered with the plenum top.  I had known about this and countersunk a couple of holes into the plenum top for clearance, but I was just off a little bit on the hole locations, and the linkage hit when the throttles were open about 25%.  Back off came the plenum top, and back over to the CNC machine to enlarge the holes.  I checked the throttle linkage clearance while the plenum top was still fixed in the CNC machine vise (something I should have done the first time around), and now I had plenty of clearance.  So, back on went the plenum top, and finally the Accufab throttle bodies were installed:


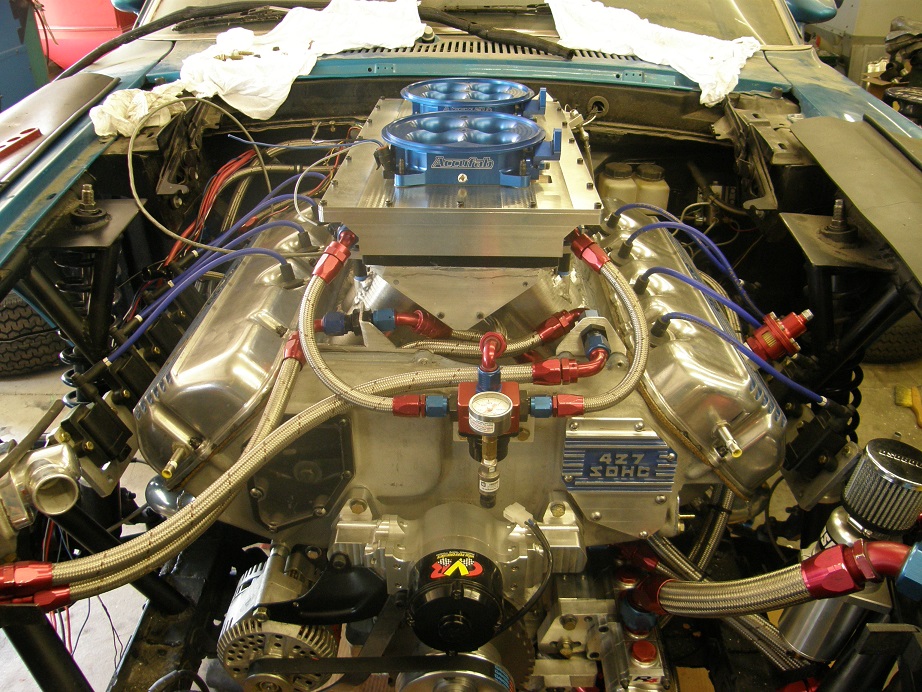
By this time it was early afternoon, but now I was ready to install the hood and see what the clearance situation was like.  With the previously fabricated plenum and the Wilson throttle bodies, the hood would not fit down all the way onto the car.  My new plenum and Accufab throttle bodies reduced the overall engine height by 2", but when I installed the  hood it still wouldn't fit into place.  Turned out that the extra width of the new plenum was hitting some of the original fiberglass in the hood, and fortunately it was underneath the hood scoop, so I just removed the scoop (which is a currently bolted on), and trimmed away the offending section of the hood.  After reinstallation the hood fit fine; here's a picture of the throttle bodies peeking through with the scoop removed:


After re-installing the hood scoop I measured the clearance between the underside of the scoop and the top of the throttle bodies; it was 1 3/4".  I wanted at least 3" of clearance, so I made up some 1 1/4" spacers and bolted the hood scoop back in place, with it spaced up, to check everything.  This looks like enough room over the throttle bodies to me; what do you guys think?


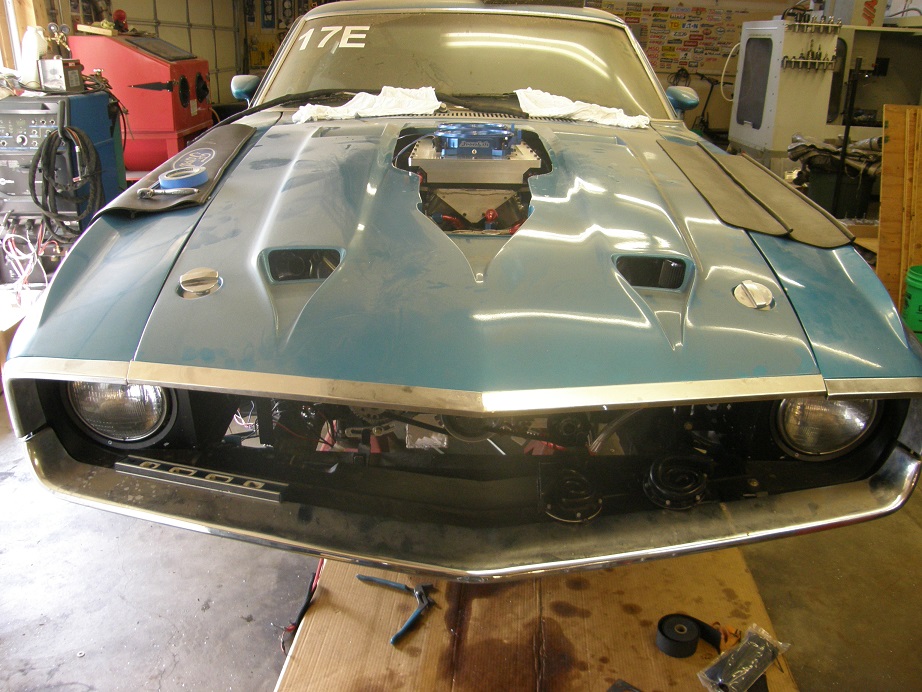
Finally today I installed the radiator, hooked up the electric fans and the trans cooler, and fabricated a lower radiator hose to fit around the dry sump pump and hook up to the CVR water pump.  Then just for grins I temporarily installed the grille.  This thing is finally starting to look like a car:


I still have some fabrication work to do, including making up the throttle linkage and making a plate to seal the scoop to the plenum top.  My pal Steve, who is going with me again this year to Drag Week, is a bodyman extraordinaire; he is taking the hood and the scoop, and will be fiberglassing it together in the raised up position, then getting the bodywork and paint done over the next few weeks.  He has promised me that the bodywork will be finished and the hood in primer in time for me to make it to the track in a couple of weeks.  Other than these items, the time consuming fabrication work on the car is pretty much done.  I did not get to the electrical stuff this weekend, but I'm thinking I can knock that out this week and next Saturday, so Sunday I should be able to start the car, break in the new rear end gears, and maybe go for a hoodless test drive.  I'm looking forward to that!  I'll post another update next weekend.


« Last Edit: July 21, 2014, 01:48:29 PM by jayb »
Jay Brown
- 1969 Mach 1, Drag Week 2005 Winner NA/BB, 511" FE (10.60s @ 129); Drag Week 2007 Runner-Up PA/BB, 490" Supercharged FE (9.35 @ 151)
- 1964 Ford Galaxie, Drag Week 2009 Winner Modified NA (9.50s @ 143), 585" SOHC
- 1969 Shelby Clone, Drag Week 2015 Winner Modified NA (Average 8.98 @ 149), 585" SOHC


cjetmech

  • Jr. Member
  • **
  • Posts: 90
    • View Profile
Re: The Road to Drag Week 2014 - July 20
« Reply #1 on: July 20, 2014, 08:18:15 PM »
Man that whole intake setup you built is a piece of art. What a job. What are you going to run for air filters? Do you have enough clearance for those? And what's the status of the trunk monkey? Do you have him locked up?
67 Fairlane GT 428
93 Mustang Coupe 331

jayb

  • Administrator
  • Hero Member
  • *****
  • Posts: 7404
    • View Profile
    • FE Power
Re: The Road to Drag Week 2014 - July 20
« Reply #2 on: July 20, 2014, 09:34:10 PM »
Thanks.  Air cleaners are still a question mark, but I'm sure I'll end up with some 1 1/2" tall cleaners and a custom base/top.  I may have to machine the point off the throttle arms on the throttle bodies to make them fit, but that's no problem if necessary.

The Trunkus Monkus registered his own car this year.  He was going to run his 33 Plymouth (I think its a 33...) in the Gasser class, but he ran out of time, and now is trying to get his F.A.S.T. 67 GTX running so he can race that in BB/NA.  He has his own thrash going, that's for sure!
Jay Brown
- 1969 Mach 1, Drag Week 2005 Winner NA/BB, 511" FE (10.60s @ 129); Drag Week 2007 Runner-Up PA/BB, 490" Supercharged FE (9.35 @ 151)
- 1964 Ford Galaxie, Drag Week 2009 Winner Modified NA (9.50s @ 143), 585" SOHC
- 1969 Shelby Clone, Drag Week 2015 Winner Modified NA (Average 8.98 @ 149), 585" SOHC


65er

  • Full Member
  • ***
  • Posts: 231
    • View Profile
Re: The Road to Drag Week 2014 - July 20
« Reply #3 on: July 20, 2014, 10:56:00 PM »
Nice work Jay, love to see your progress!

And love seeing what you're machining too.  Good stories about how the stuff you made almost fits, lol. all too familiar with modding my own just-finished stuff..
-Wade

458" Blair Partick stroker/TKO 600 .64 OD/3.89 gears

jayb

  • Administrator
  • Hero Member
  • *****
  • Posts: 7404
    • View Profile
    • FE Power
Re: The Road to Drag Week 2014 - July 20
« Reply #4 on: July 20, 2014, 10:59:49 PM »
Good stories about how the stuff you made almost fits, lol. all too familiar with modding my own just-finished stuff..

That is the real world, all right.  Nothing ever comes out exactly as planned LOL!
Jay Brown
- 1969 Mach 1, Drag Week 2005 Winner NA/BB, 511" FE (10.60s @ 129); Drag Week 2007 Runner-Up PA/BB, 490" Supercharged FE (9.35 @ 151)
- 1964 Ford Galaxie, Drag Week 2009 Winner Modified NA (9.50s @ 143), 585" SOHC
- 1969 Shelby Clone, Drag Week 2015 Winner Modified NA (Average 8.98 @ 149), 585" SOHC


ToddK

  • Sr. Member
  • ****
  • Posts: 437
    • View Profile
Re: The Road to Drag Week 2014 - July 20
« Reply #5 on: July 21, 2014, 06:41:04 AM »
That intake looks great. I hope it works as good as it looks.

Jay, what is the remote thermostat housing you are using? How many and what size are the inlet/outlets?

machoneman

  • Hero Member
  • *****
  • Posts: 3851
    • View Profile
Re: The Road to Drag Week 2014 - July 20
« Reply #6 on: July 21, 2014, 07:35:08 AM »
Trunk Monkey reappears! LOL.

Wow Jay the entire top looks fabulous! I'll nominate it for Engine of the Year!
Bob Maag

jayb

  • Administrator
  • Hero Member
  • *****
  • Posts: 7404
    • View Profile
    • FE Power
Re: The Road to Drag Week 2014 - July 20
« Reply #7 on: July 21, 2014, 09:05:52 AM »
That intake looks great. I hope it works as good as it looks.

Jay, what is the remote thermostat housing you are using? How many and what size are the inlet/outlets?

I think its either a Weiand or Offenhauser remote thermostat housing.  It takes a small block Chev water neck, and has four 3/8" pipe threaded holes for other inlets/outlets.  I'm using two #10 water lines from the motor to the thermostat housing.
Jay Brown
- 1969 Mach 1, Drag Week 2005 Winner NA/BB, 511" FE (10.60s @ 129); Drag Week 2007 Runner-Up PA/BB, 490" Supercharged FE (9.35 @ 151)
- 1964 Ford Galaxie, Drag Week 2009 Winner Modified NA (9.50s @ 143), 585" SOHC
- 1969 Shelby Clone, Drag Week 2015 Winner Modified NA (Average 8.98 @ 149), 585" SOHC


thatdarncat

  • Hero Member
  • *****
  • Posts: 1865
    • View Profile
Kevin Rolph

1967 Cougar Drag Car ( under constuction )
1966 7 litre Galaxie
1966 Country Squire 390
1966 Cyclone GT 390
1968 Torino GT 390
1972 Gran Torino wagon
1978 Lincoln Mk V

jayb

  • Administrator
  • Hero Member
  • *****
  • Posts: 7404
    • View Profile
    • FE Power
Re: The Road to Drag Week 2014 - July 20
« Reply #9 on: July 21, 2014, 10:37:51 AM »
Yep, that's it.
Jay Brown
- 1969 Mach 1, Drag Week 2005 Winner NA/BB, 511" FE (10.60s @ 129); Drag Week 2007 Runner-Up PA/BB, 490" Supercharged FE (9.35 @ 151)
- 1964 Ford Galaxie, Drag Week 2009 Winner Modified NA (9.50s @ 143), 585" SOHC
- 1969 Shelby Clone, Drag Week 2015 Winner Modified NA (Average 8.98 @ 149), 585" SOHC


cammerfe

  • Hero Member
  • *****
  • Posts: 1659
    • View Profile
Re: The Road to Drag Week 2014 - July 20
« Reply #10 on: July 21, 2014, 11:25:07 AM »
I read all this with a great deal of awe. What do you do with your OTHER hand while you're working on the car? :) :) :)

KS

Drew Pojedinec

  • Hero Member
  • *****
  • Posts: 2116
    • View Profile
Re: The Road to Drag Week 2014 - July 20
« Reply #11 on: July 21, 2014, 01:06:28 PM »
Don't have anything useful to say, just wanted to say that the work being done is awesome.
Every time I build something cool it's ugly as hell.  Your engine on the other hand should have velvet ropes around it and some nice lighting.

cjshaker

  • Hero Member
  • *****
  • Posts: 4458
    • View Profile
Re: The Road to Drag Week 2014 - July 20
« Reply #12 on: July 21, 2014, 05:29:49 PM »
I read all this with a great deal of awe. What do you do with your OTHER hand while you're working on the car? :) :) :)

KS

It's tied behind his back...lol

So how does a remote thermostat housing work? How does it get enough heat to it to open?

That alternator bracket cracks me up. It looks original, albeit modified a bit. If it is, it has got to be the ONLY original Ford part left on that entire front end ;D
Doug Smith


'69 R-code Mach 1, 427 MR, 2x4, Jerico, 4.30 Locker
'70 F-350 390
'55 Ford Customline 2dr
'37 Ford Coupe

jayb

  • Administrator
  • Hero Member
  • *****
  • Posts: 7404
    • View Profile
    • FE Power
Re: The Road to Drag Week 2014 - July 20
« Reply #13 on: July 21, 2014, 07:33:21 PM »
Better tied behind my back than "free to do the devil's work" LOL!  That alternator bracket is a Trans-dapt piece for a small block Chevrolet.  I hated to put that on there, but it fit, so oh well...  ;D
Jay Brown
- 1969 Mach 1, Drag Week 2005 Winner NA/BB, 511" FE (10.60s @ 129); Drag Week 2007 Runner-Up PA/BB, 490" Supercharged FE (9.35 @ 151)
- 1964 Ford Galaxie, Drag Week 2009 Winner Modified NA (9.50s @ 143), 585" SOHC
- 1969 Shelby Clone, Drag Week 2015 Winner Modified NA (Average 8.98 @ 149), 585" SOHC


turbohunter

  • Hero Member
  • *****
  • Posts: 2509
    • View Profile
Re: The Road to Drag Week 2014 - July 20
« Reply #14 on: July 21, 2014, 07:43:58 PM »
I hated to put that on there, but it fit, so oh well...  ;D
LOL,God knows I fight with myself all the time on that. :)
Marc
'61 F100 292Y
'66 Mustang Injected 428
'66 Q code Country Squire wagon


Qikbbstang

  • Hero Member
  • *****
  • Posts: 892
    • View Profile
Re: The Road to Drag Week 2014 - July 20
« Reply #15 on: July 22, 2014, 08:11:43 AM »
Jay think about using some "stock" panel type air filters. You can simply make a plastomeric or metal box w/ cut-outs where the filter panels simply plug in where ever they fit  on top and sides etc... Obviously you will not race with the street filters in place, the filters will require minimal flow since there will not be WOT in street trim.
For racing I presume you will simply use some sort of mesh screen to keep pebbles , bugs and low flying buzzards out and inside the scoop things are so tight. Here's one rectangular panel I'm can think of offhand - it's from a Gen1 Lightning:

http://www.framcatalog.com/PartDetailWindow.aspx?b=F&pn=CA6366

cjshaker

  • Hero Member
  • *****
  • Posts: 4458
    • View Profile
Re: The Road to Drag Week 2014 - July 20
« Reply #16 on: July 22, 2014, 09:11:42 AM »
Better tied behind my back than "free to do the devil's work" LOL!

I think that's what the Chevy guys are saying about you anyway...lol

Still curious how the remote thermostat gets enough heated water to open?
Doug Smith


'69 R-code Mach 1, 427 MR, 2x4, Jerico, 4.30 Locker
'70 F-350 390
'55 Ford Customline 2dr
'37 Ford Coupe

Lenz

  • Hero Member
  • *****
  • Posts: 578
    • View Profile
Re: The Road to Drag Week 2014 - July 20
« Reply #17 on: July 22, 2014, 10:29:27 AM »
As usualy Jay, a clinic :).  I'm thinkin' that other hand is probably typing, clearly not the devil's work.  I'm sure that sucker has a secretary to handle the busy work, and he wouldn't share anyway. 

Really looking forward to the finished product and following along on another trip thru drag week.
Len Zielinski
'64 Galaxie 500 445 Toploader
'69 F100 300 stick

jayb

  • Administrator
  • Hero Member
  • *****
  • Posts: 7404
    • View Profile
    • FE Power
Re: The Road to Drag Week 2014 - July 20
« Reply #18 on: July 22, 2014, 11:22:26 AM »

Still curious how the remote thermostat gets enough heated water to open?

There is some circulation because I have a small hole, 1/8" I think, drilled in the thermostat.  I do that whenever I don't run the stock water bypass tube.  Of course, the cammer never had that bypass tube anyway.  So as the engine coolant heats up enough of the heated coolant must get to the thermostat in the housing, and start the process of opening it up.
Jay Brown
- 1969 Mach 1, Drag Week 2005 Winner NA/BB, 511" FE (10.60s @ 129); Drag Week 2007 Runner-Up PA/BB, 490" Supercharged FE (9.35 @ 151)
- 1964 Ford Galaxie, Drag Week 2009 Winner Modified NA (9.50s @ 143), 585" SOHC
- 1969 Shelby Clone, Drag Week 2015 Winner Modified NA (Average 8.98 @ 149), 585" SOHC


cobracammer

  • Hero Member
  • *****
  • Posts: 1165
    • View Profile
Re: The Road to Drag Week 2014 - July 20
« Reply #19 on: July 22, 2014, 12:16:42 PM »
Hey Jay. In bringing back up an older topic, I was doing some reading on a Ford DOHC engine Jon Kasse was working on.  I noticed in the photos that there is a "Hydraulic" chain tensioner.  Thought it would be of interest being from Ford.  Below is a link to the article as well as a picture showing the tensioner.  I know the one that was posted previously was out of a Nissan or Toyota ;)

http://www.popularhotrodding.com/enginemasters/articles/1425_jon_kaases_ford_four_valve_mod_motor/photo_12.html
Jason
2005 Saleen S281 (427 SOHC 2 X 4 EFI swap), T56 Magnum XL 6 speed, 9" Currie rear with 3.89 Gears

TomP

  • Guest
Re: The Road to Drag Week 2014 - July 20
« Reply #20 on: July 23, 2014, 02:15:56 AM »
It'd sure be nice to have it all fit under the hood. I am not convinced you need that much plenum volume but if so the top could be made peaked in the middle (like a house roof) with the front throttle body leaned forward and the rear leaned back towards the cowl. Kinda weird but they only flow air.
 The underside of the hood can be used as an air cleaner lid, glue foam on top to take up any gap. Get filters with an ID that fits the air cleaner ring on the carb and you don't need a base either.

jayb

  • Administrator
  • Hero Member
  • *****
  • Posts: 7404
    • View Profile
    • FE Power
Re: The Road to Drag Week 2014 - July 20
« Reply #21 on: July 23, 2014, 07:35:11 AM »
I'd like it all to fit under the hood too, Tom, but there's no way with that sheet metal intake, even if the plenum volume was reduced to zero.  You still have to have some room over the throttle bodies for the air to get in.  That was one thing that was nice about the Hilborn setup, it could have been made to fit under the hood for the street, and then add taller stacks to get fresh air at the track.
Jay Brown
- 1969 Mach 1, Drag Week 2005 Winner NA/BB, 511" FE (10.60s @ 129); Drag Week 2007 Runner-Up PA/BB, 490" Supercharged FE (9.35 @ 151)
- 1964 Ford Galaxie, Drag Week 2009 Winner Modified NA (9.50s @ 143), 585" SOHC
- 1969 Shelby Clone, Drag Week 2015 Winner Modified NA (Average 8.98 @ 149), 585" SOHC


fe66comet

  • Guest
Re: The Road to Drag Week 2014 - July 20
« Reply #22 on: July 23, 2014, 08:08:21 AM »
Chevy parts are uni parts they even work on garden tractors LOL.

cdmbill2

  • Jr. Member
  • **
  • Posts: 87
    • View Profile
Re: The Road to Drag Week 2014 - July 20
« Reply #23 on: July 25, 2014, 09:13:38 AM »
TomP, the other issue with with oddly shaped inlets and undersized plenum volume is the stack up of compromises which altogether could represent a loss of 5-7% HP, 50-70 on a 1000 hp engine. Even with EFI, cylinder to cylinder balance is affected by both of those design considerations. The information Jay has posted has shown the value of top mount throttle bodies vs. front mount with his original plenum roof design.

Given Drag Week is also about going as quickly as possible five times in five days, we all have to make choices of esthetics vs. performance. Jay has had some of the best looking cars at the event year after year. I can't wait to see the final product in action at Tulsa this year. With right trans and chassis combination and optimized power Jay might be the first small tire N/A car in the 8's.

turbohunter

  • Hero Member
  • *****
  • Posts: 2509
    • View Profile
Re: The Road to Drag Week 2014 - July 20
« Reply #24 on: July 25, 2014, 02:42:42 PM »
Jay might be the first small tire N/A car in the 8's.
Whoa, now that would be sexy 8).
Marc
'61 F100 292Y
'66 Mustang Injected 428
'66 Q code Country Squire wagon


Cyclone03

  • Sr. Member
  • ****
  • Posts: 338
    • View Profile
Re: The Road to Drag Week 2014 - July 20
« Reply #25 on: July 25, 2014, 04:25:22 PM »
A little bird, who I just made up, told me Jays SOHC is WAAAAYYYYYYY down on power this year.
Its struggling to make 600hp , Jay's running this year just for fun, be lucky to run 11.s. Cant even DREAM of 800hp much less 1000. LOL

Remember folks no ET or HP predictions till after DW day 1.
Lance H

jayb

  • Administrator
  • Hero Member
  • *****
  • Posts: 7404
    • View Profile
    • FE Power
Re: The Road to Drag Week 2014 - July 20
« Reply #26 on: July 25, 2014, 06:22:16 PM »
LOL!  No comment... ;D
Jay Brown
- 1969 Mach 1, Drag Week 2005 Winner NA/BB, 511" FE (10.60s @ 129); Drag Week 2007 Runner-Up PA/BB, 490" Supercharged FE (9.35 @ 151)
- 1964 Ford Galaxie, Drag Week 2009 Winner Modified NA (9.50s @ 143), 585" SOHC
- 1969 Shelby Clone, Drag Week 2015 Winner Modified NA (Average 8.98 @ 149), 585" SOHC


cjetmech

  • Jr. Member
  • **
  • Posts: 90
    • View Profile
Re: The Road to Drag Week 2014 - July 20
« Reply #27 on: July 25, 2014, 07:51:05 PM »
I'll bet it does make 600hp..................on a dyne at 12000ft
67 Fairlane GT 428
93 Mustang Coupe 331