Author Topic: The Road to Drag Week 2014 - July 13  (Read 32767 times)

0 Members and 1 Guest are viewing this topic.

jayb

  • Administrator
  • Hero Member
  • *****
  • Posts: 7405
    • View Profile
    • FE Power
The Road to Drag Week 2014 - July 13
« on: July 13, 2014, 08:16:21 PM »
Last Sunday night I had set a schedule for getting to the track in three weeks, and that schedule called for me to be pretty much done with the mechanical work on the car this weekend.  I was going to get the electrical work done by next weekend, and have the car running and driving, so that by the following weekend I could go to the track.  Unfortunately that schedule went out the window almost immediately this week, for a variety of reasons, including lack of availability on the Accufab throttle bodies, and the need for some rear end components to match up with the pro gears I'm installing in the car.  Also, the garden variety stuff I needed to get done to get the car assembled took a lot longer than I expected, so I'm still pretty far from having it put together.  Nevertheless I did get a lot accomplished; just not enough.  I would say at this point that making it to the track on July 26 is questionable, but I will keep plugging away and see what happens.

After doing an inventory of the parts I needed on Sunday night, I made the calls at lunch on Monday to get the rear end components I needed, and the Accufab throttle bodies.  I called Accufab first, and found out that they were out of stock.  After calling a bunch of their distributors I found that none of them had the throttle bodies in stock, so I called Accufab back and placed the order.  They say they will be shipping tomorrow (Monday), but we will see.  Since I wasn't going to have the parts to get the car mechanically completed, I elected not to pay for next day air for the rear end parts that I needed from Mark Williams; those shipped on Monday but did not arrive until Thursday.  Friday at lunch I took all the rear end components over to my pal BradFORD, and he should have the pumpkin ready to go with the pro gears by the middle of this week. 

I also planned to revamp the plenum of my intake to make it lower, but maintain about the same volume by making it wider.  After figuring out exactly what I was going to do on Monday night, Tuesday I ordered a couple of hunks of aluminum plate, one 12" X 22" X 1/2" piece for a new top plate, and one 12" X 22" X 2" piece for the new plenum spacer.  Most of this material is going to be machined away, of course, but I decided to machine it from a solid piece rather than weld some smaller pieces together, because I suck at welding aluminum, and I'm pretty good with the CNC  ;D  The aluminum dealer told me I could pick up the material on Friday.

As usual time was short to work on this project during the week, and Friday night the wife had plans for me, but Saturday morning I got going early.  Last weekend we had just dropped the engine and transmission into place, so the first thing I did was crawl under the car to put the motor mount bolts in.  You'd think this would be relatively painless, but of course it wasn't.  I had purchased new motor mounts for the engine, and apparently the distance between the flanges on the mounts, where they fit over the frame mounts, were significantly smaller than the frame mounts themselves.  The engine was probably up 1/2" over where it needed to be, and the weight of the engine wasn't enough to put the mounts down into position.  I struggled with this for quite a while, and finally ended up using a big C-clamp to pull the mount down into position over the frame mounts.  I had to point the ends of the motor mount bolts and pound them through to get them into place, but finally after about two hours I had the engine bolted down.  Sheesh, what a battle; the only positive thing on this was that the engine was actually sitting a little lower now.

Next I took a little break, and programmed one of the CNC machines to start cutting out my plenum spacer.  Here's a picture of the top side being cut:
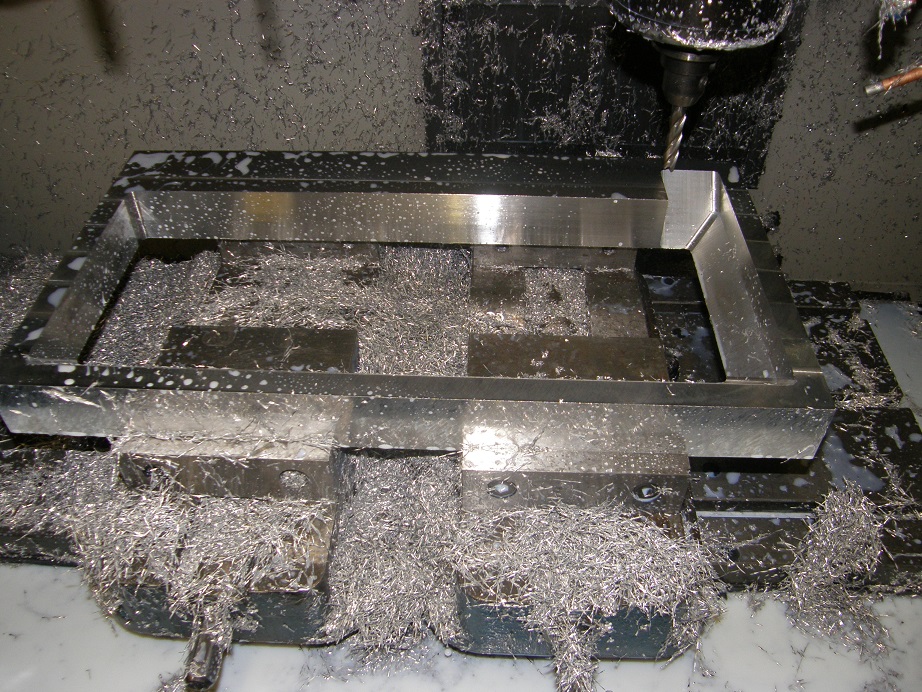


That picture was taken after the center was cut out of the 2" thick plate, and the angled sides of the plenum spacer are being machined.  Sure were a lot of chips from that little project LOL!

After getting the CNC machine running I got back to the car, and the next project, which was to put the steering rack and lower control arm mount up into position.  This one is always a pain on this car, and let me warn anybody who is thinking about a Fat Man Fabrication strut conversion setup for an early Mustang that it is not a good kit, doesn't fit well, moves the wheels inboard 2" without telling you, etc. etc.  There are two big 1/2" through bolts that go through the rack and lower control arm mount, and also go through the original Ford lower control arm mounts on the car.  As you install the bolts you need to put three spacers on each side in place, and there's not a lot of room to work, so you end up doing this kind of blind.  And of course you have to assemble the steering linkage while you are doing this.  Another three hours of horsing around and I finally got this stuff all finished up.  Next up were the headers, which are also a very difficult installation on this car.  The biggest issue is getting the headers themselves to line up with each other and hook together.  There are twelve separate pipe sections on these headers, with tabs holding them together, and as you install them in the car, for some reason they don't like to line up with each other.  They were easy on the dyno, but the car presents a whole new set of problems.  I got the left side done, and a start on the right side, before midnight rolled around and I decided to call it a night.

Sunday the first thing I did was flip the plenum spacer over in the CNC machine so I could machine the bottom side.  This took a while, but finally around 6:00 PM it finished up.  Here's a picture of the completed spacer:
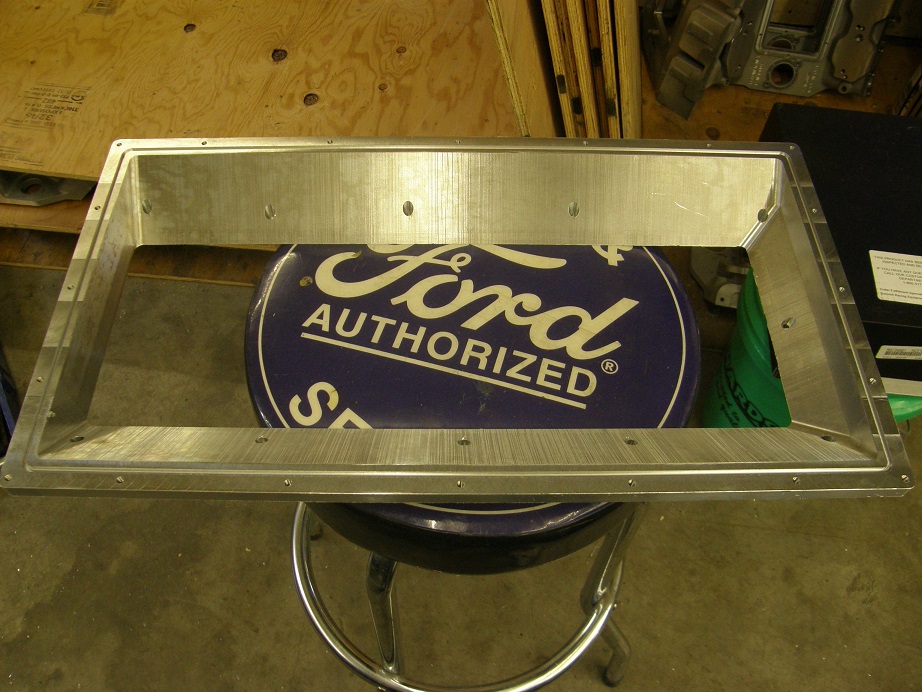


When I get the Accufab throttle bodies, hopefully this week, I can do a drawing and machine the top plate, and then the induction system will be ready to go.

Next I got going on the right side headers, and by noon I had that side finished.  I spent the rest of the day today modifying the front left corner of the car, fabricating a mount to fit the dry sump tank, remote oil filter, and breather can.  This also took a lot longer than I thought (imagine that), but by the end of the day today I had that pretty much under control.  The following picture shows the dry sump tank; behind it out of sight and up under the fender is the remote oil filter adapter.  I still haven't done the mount for the oil catch can, but I know where its going to go and it shouldn't be too tough to get that mount finished up.
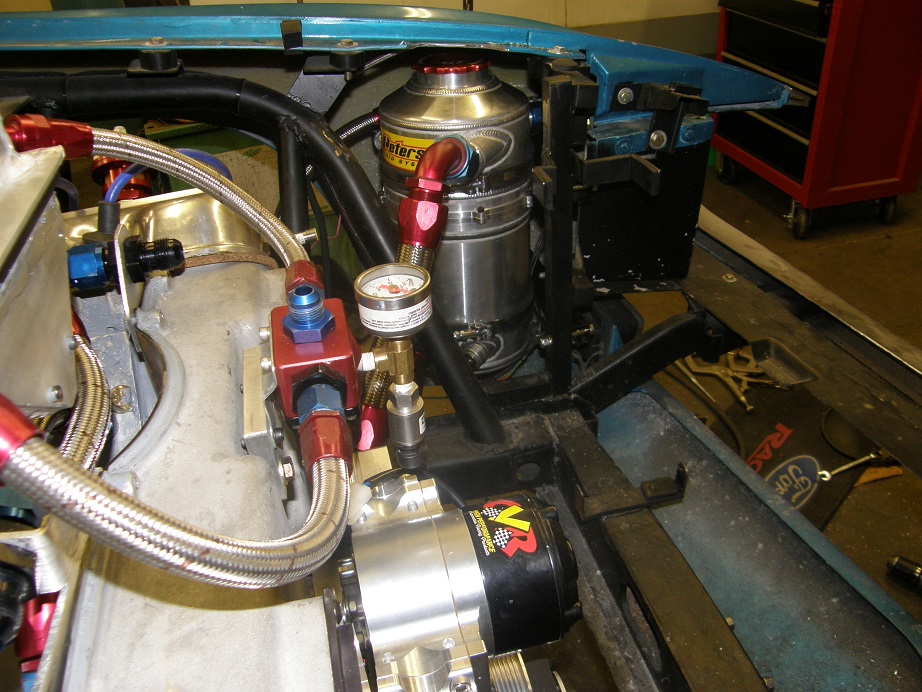


Finally here's a picture of the engine in the car, as it sits right now:
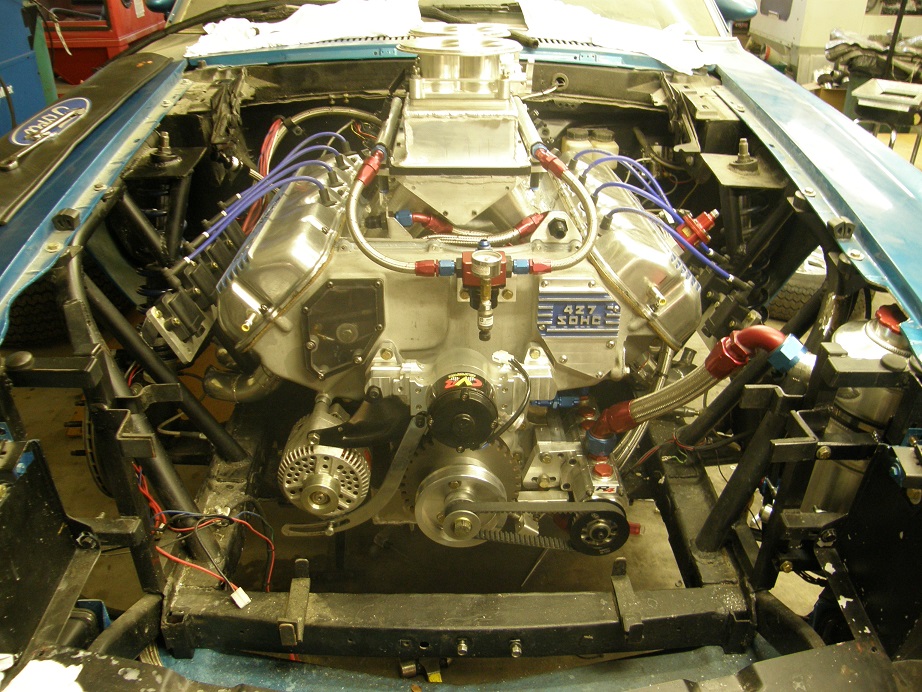


Next week if all the parts come on schedule I should finally have the mechanical work done on the car by Saturday.  This leaves me Sunday to do the wiring, get the car running, etc. etc.  Don't know if I'll make that or not, but I will do my best.  I'll post another update next weekend.
« Last Edit: July 13, 2014, 08:23:01 PM by jayb »
Jay Brown
- 1969 Mach 1, Drag Week 2005 Winner NA/BB, 511" FE (10.60s @ 129); Drag Week 2007 Runner-Up PA/BB, 490" Supercharged FE (9.35 @ 151)
- 1964 Ford Galaxie, Drag Week 2009 Winner Modified NA (9.50s @ 143), 585" SOHC
- 1969 Shelby Clone, Drag Week 2015 Winner Modified NA (Average 8.98 @ 149), 585" SOHC


cjshaker

  • Hero Member
  • *****
  • Posts: 4460
    • View Profile
Re: The Road to Drag Week 2014 - July 13
« Reply #1 on: July 13, 2014, 08:41:31 PM »
Nice to see work being done on the car though.

I have always said, and will always stand by my saying that....when concerning any car project, figure out what it will cost, how much time it will take, then double it. That always seems to come out pretty accurate ::)
Doug Smith


'69 R-code Mach 1, 427 MR, 2x4, Jerico, 4.30 Locker
'70 F-350 390
'55 Ford Customline 2dr
'37 Ford Coupe

turbohunter

  • Hero Member
  • *****
  • Posts: 2509
    • View Profile
Re: The Road to Drag Week 2014 - July 13
« Reply #2 on: July 13, 2014, 09:15:14 PM »
figure out what it will cost, how much time it will take, then double it.

Or triple it :)
Marc
'61 F100 292Y
'66 Mustang Injected 428
'66 Q code Country Squire wagon


427Fastback

  • Hero Member
  • *****
  • Posts: 603
    • View Profile
Re: The Road to Drag Week 2014 - July 13
« Reply #3 on: July 13, 2014, 10:48:28 PM »
Hey Jay...Nice to see it all coming together.Nothing is ever as easy as it seems....Just a observation but I notice that on almost all of your aeroquip/earls lines the fittings are not bottomed out on the nuts.Are you just fitting it all together or am I missing something....Cory
1968 Mustang Fastback...427 MR 5spd (owned since 1977)
1967 Mustang coupe...Trans Am replica
1936 Diamond T 212BD
1990 Grizzly pick-up

jayb

  • Administrator
  • Hero Member
  • *****
  • Posts: 7405
    • View Profile
    • FE Power
Re: The Road to Drag Week 2014 - July 13
« Reply #4 on: July 13, 2014, 10:51:40 PM »
Nope, that's the way they are.  Especially on the big fittings you don't need to bottom them out against the nuts; I've actually broken fittings trying to thread them in all the way. 
Jay Brown
- 1969 Mach 1, Drag Week 2005 Winner NA/BB, 511" FE (10.60s @ 129); Drag Week 2007 Runner-Up PA/BB, 490" Supercharged FE (9.35 @ 151)
- 1964 Ford Galaxie, Drag Week 2009 Winner Modified NA (9.50s @ 143), 585" SOHC
- 1969 Shelby Clone, Drag Week 2015 Winner Modified NA (Average 8.98 @ 149), 585" SOHC


65er

  • Full Member
  • ***
  • Posts: 231
    • View Profile
Re: The Road to Drag Week 2014 - July 13
« Reply #5 on: July 13, 2014, 11:04:41 PM »
Coming right along, great to see that!  Love the plenum spacer  :)
-Wade

458" Blair Partick stroker/TKO 600 .64 OD/3.89 gears

427Fastback

  • Hero Member
  • *****
  • Posts: 603
    • View Profile
Re: The Road to Drag Week 2014 - July 13
« Reply #6 on: July 13, 2014, 11:29:19 PM »
Well I can see that happening as they are made of aluminum.I assemble mine with copper coat anti-sieze on the threads and dip the end of the fitting in oil so it doesn't grab the rubber as its being wound up...Snapping one of would not be nice...

When I was younger (77-87) I spent 10 years assembling (stall built) Pacific logging trucks and from time to time logging trailers.All are hoses were aeroquip and were hand assembled.They were steel fittings and all were dipped in lube before assembly.I built thousands of lines from #4 to 32HP...I learned the art when I was young..

That being said....I did a job a few years ago (15' diam fans) that were assembled with 5/8 aluminum bolts...I did wreck one even with bees wax on it...

Keep up the cool work......we are watching

Cory
1968 Mustang Fastback...427 MR 5spd (owned since 1977)
1967 Mustang coupe...Trans Am replica
1936 Diamond T 212BD
1990 Grizzly pick-up

thatdarncat

  • Hero Member
  • *****
  • Posts: 1866
    • View Profile
Re: The Road to Drag Week 2014 - July 13
« Reply #7 on: July 13, 2014, 11:43:58 PM »
I really like the solution you came up with for the plenum spacer, machining it from 1 piece. I think that's going to look nice.
Kevin Rolph

1967 Cougar Drag Car ( under constuction )
1966 7 litre Galaxie
1966 Country Squire 390
1966 Cyclone GT 390
1968 Torino GT 390
1972 Gran Torino wagon
1978 Lincoln Mk V

My427stang

  • Hero Member
  • *****
  • Posts: 3929
    • View Profile
Re: The Road to Drag Week 2014 - July 13
« Reply #8 on: July 14, 2014, 07:40:48 AM »
Nice, been toying with the idea of adding plenum to mine (although I cannot say that we are directly comparable LOL)..... your testing proves that a dry manifold still needs a properly sized plenum.

Nice work!
---------------------------------
Ross
Bullock's Power Service, LLC
- 70 Fastback Mustang, 489 cid FE, Victor, SEFI, Erson SFT cam, TKO-600 5 speed, 4.11 9 inch.
- 71 F100 shortbed 4x4, 461 cid FE, headers, Victor Pro-flo EFI, Comp Custom HFT cam, 3.50 9 inch

machoneman

  • Hero Member
  • *****
  • Posts: 3853
    • View Profile
Re: The Road to Drag Week 2014 - July 13
« Reply #9 on: July 14, 2014, 08:16:05 AM »
Nice Jay, nice! Hate to think though of the cost of that thick aluminum plate. Lotsa' beer cans, for sure!
Bob Maag

sumfoo1

  • Full Member
  • ***
  • Posts: 116
    • View Profile
Re: The Road to Drag Week 2014 - July 13
« Reply #10 on: July 14, 2014, 08:42:18 AM »
dangit jay... you're messin with my chi...

How much would it cost to convert a standard pond block to a cammer?

(i mean i'm half way done now so i probably won't unless its under 12k or something)

Just thinking about pushing some PSI into the motor that hemi-ish head could help a lot.


jayb

  • Administrator
  • Hero Member
  • *****
  • Posts: 7405
    • View Profile
    • FE Power
Re: The Road to Drag Week 2014 - July 13
« Reply #11 on: July 14, 2014, 12:49:36 PM »
Nice Jay, nice! Hate to think though of the cost of that thick aluminum plate. Lotsa' beer cans, for sure!

The plate cost $135.  I cut the center out of it first, though, so I still have a 6" X 18" X 2" piece I can use for some other project.  I also have two bushel baskets full of chips that I can get $0.35 a pound for LOL!
Jay Brown
- 1969 Mach 1, Drag Week 2005 Winner NA/BB, 511" FE (10.60s @ 129); Drag Week 2007 Runner-Up PA/BB, 490" Supercharged FE (9.35 @ 151)
- 1964 Ford Galaxie, Drag Week 2009 Winner Modified NA (9.50s @ 143), 585" SOHC
- 1969 Shelby Clone, Drag Week 2015 Winner Modified NA (Average 8.98 @ 149), 585" SOHC


jayb

  • Administrator
  • Hero Member
  • *****
  • Posts: 7405
    • View Profile
    • FE Power
Re: The Road to Drag Week 2014 - July 13
« Reply #12 on: July 14, 2014, 01:06:04 PM »
dangit jay... you're messin with my chi...

How much would it cost to convert a standard pond block to a cammer?

(i mean i'm half way done now so i probably won't unless its under 12k or something)

Just thinking about pushing some PSI into the motor that hemi-ish head could help a lot.

The block itself is easy, just plug some oil holes, put a circular plug in the #4 cam bearing hole to redirect oil to the heads, and run external drain lines from the heads.  The other parts are expensive and if you go new aftermarket parts, they are more than $12K.  Don't hold me to these prices, but just as a guesstimate....

- Heads (Pond):  $5500
- Rocker shafts and rocker arms (T&D):  $2600
- Cam Bearings (Pond):  $150
- Cams (Comp):  $850
- Valves (Manley Custom):  $600
- Springs, retainers, locks (Comp):  $500
- Valve Covers (Pond):  $650
- Spark plug tubes:  $150
- Front cover (Pond):  $850
- Backing Plate:  $150
- Timing chain and gear set, stub cam (Munro):  $1000
- Water Pump (Munro):  $500
- Pistons and Rings (Diamond):  $1400
- 2X4 Intake (Pond):  $2500
- Miscellaneous small parts:  $500

You might be able to get a package deal on this stuff from somebody like Barry, Blair, Doug or Brent, but overall you are looking at closer to $20K than $12K...
Jay Brown
- 1969 Mach 1, Drag Week 2005 Winner NA/BB, 511" FE (10.60s @ 129); Drag Week 2007 Runner-Up PA/BB, 490" Supercharged FE (9.35 @ 151)
- 1964 Ford Galaxie, Drag Week 2009 Winner Modified NA (9.50s @ 143), 585" SOHC
- 1969 Shelby Clone, Drag Week 2015 Winner Modified NA (Average 8.98 @ 149), 585" SOHC


R-WEST

  • Full Member
  • ***
  • Posts: 136
    • View Profile
Re: The Road to Drag Week 2014 - July 13
« Reply #13 on: July 14, 2014, 04:15:12 PM »
Quote
You might be able to get a package deal on this stuff from somebody like Barry, Blair, Doug or Brent, but overall you are looking at closer to $20K than $12K...
Hmmmm, a cammer in my pickup truck.... 

Dreamin' here...  8)

HolmanMoodyStroppeVet

  • Guest
Re: The Road to Drag Week 2014 - July 13
« Reply #14 on: July 15, 2014, 01:30:19 AM »
Hi Jay

Nice work and wow, what a thrash huh? It is fun to read all about this and the very best of luck to you this time. I have a good feeling and send you a big thumbs up. 

If I was close by, I'd try to send some pals or get over there to see if we could help you somehow. At least send pizza or something. It seems as if you are doing the work of 2 or 3 guys at times and that is a handful.  That is great that you keep chipping away at the stone and go,go,go.   

I hope that more guys in your neck of the woods can help you get her done and dialed on in if you need some extra arms or legs to meet your dedlines.  Just a few good guys on a race car can be such a force multipier for us. This website seems to be good at that and this is wonderful.

I know that you are going to pull it off and have a blast along the way so thanks again for all that you do. Looks real fast and fun. Kudos and kind regards

Tom

KMcCullah

  • Hero Member
  • *****
  • Posts: 733
    • View Profile
Re: The Road to Drag Week 2014 - July 13
« Reply #15 on: July 15, 2014, 02:22:51 PM »
Jay I'm curious, how do you get the O-rings that you use on all the various things that you make with O-ring grooves?

Kevin McCullah


Qikbbstang

  • Hero Member
  • *****
  • Posts: 892
    • View Profile
WARNING: Fat Man Fabrication strut conversion EARLY MUSTANG
« Reply #16 on: July 15, 2014, 03:35:29 PM »
WARNING: Fat Man Fabrication strut conversion EARLY MUSTANG

I really hate it when "kits" you pay good money for are poorly planned and don't do what they are supposed to do. I take it the moving the wheels inboard is a combined 2" total and not 2" per side = 4" total?         You know most of these Rack & Pinion Kits are simply knowing which and who's parts from the endless automotive aftermarket to throw in the box -- they rarely make much other then small adaptors etc that go into their "kits".


Re:  ..."and the next project, which was to put the steering rack and lower control arm mount up into position.  This one is always a pain on this car, and let me warn anybody who is thinking about a Fat Man Fabrication strut conversion setup for an early Mustang that it is not a good kit, doesn't fit well, moves the wheels inboard 2" without telling you, etc. etc.  There are two big 1/2" through bolts that go through the rack and lower control arm mount, and also go through the original Ford lower control arm mounts on the car.  As you install the bolts you need to put three spacers on each side in place, and there's not a lot of room to work, so you end up doing this kind of blind.  And of course you have to assemble the steering linkage while you are doing this.  Another three hours of horsing around and I finally got this stuff all finished up."

jayb

  • Administrator
  • Hero Member
  • *****
  • Posts: 7405
    • View Profile
    • FE Power
Re: The Road to Drag Week 2014 - July 13
« Reply #17 on: July 15, 2014, 03:51:34 PM »
Jay I'm curious, how do you get the O-rings that you use on all the various things that you make with O-ring grooves?

McMaster Carr has any O-ring you may need, either in a standard size or in O-ring cord stock.  www.mcmaster.com
Jay Brown
- 1969 Mach 1, Drag Week 2005 Winner NA/BB, 511" FE (10.60s @ 129); Drag Week 2007 Runner-Up PA/BB, 490" Supercharged FE (9.35 @ 151)
- 1964 Ford Galaxie, Drag Week 2009 Winner Modified NA (9.50s @ 143), 585" SOHC
- 1969 Shelby Clone, Drag Week 2015 Winner Modified NA (Average 8.98 @ 149), 585" SOHC


jayb

  • Administrator
  • Hero Member
  • *****
  • Posts: 7405
    • View Profile
    • FE Power
Re: WARNING: Fat Man Fabrication strut conversion EARLY MUSTANG
« Reply #18 on: July 15, 2014, 03:57:38 PM »
WARNING: Fat Man Fabrication strut conversion EARLY MUSTANG

I really hate it when "kits" you pay good money for are poorly planned and don't do what they are supposed to do. I take it the moving the wheels inboard is a combined 2" total and not 2" per side = 4" total?       

Believe it or not, that is 2" per side, or 4" total.  When I got the front end mocked up, I couldn't believe it.  I'm sure it was designed to allow really wide tires on the front of the car, but the least they could have done is said something about that in the advertising literature or on the web site.  I ended up cutting their lower control arms and TIG welding a 2" spacer in on each side to get back to the original factory track width.
Jay Brown
- 1969 Mach 1, Drag Week 2005 Winner NA/BB, 511" FE (10.60s @ 129); Drag Week 2007 Runner-Up PA/BB, 490" Supercharged FE (9.35 @ 151)
- 1964 Ford Galaxie, Drag Week 2009 Winner Modified NA (9.50s @ 143), 585" SOHC
- 1969 Shelby Clone, Drag Week 2015 Winner Modified NA (Average 8.98 @ 149), 585" SOHC


68Rcodeman

  • Newbie
  • *
  • Posts: 21
    • View Profile
Re: The Road to Drag Week 2014 - July 13
« Reply #19 on: July 16, 2014, 12:37:11 AM »
Jay, Good luck, Love reading the weeks before and during. Wish I was closer, I would love to help!
                                                                                                  David

TomP

  • Guest
Re: The Road to Drag Week 2014 - July 13
« Reply #20 on: July 23, 2014, 02:30:39 AM »
The rack uses the same bolts as the lower control arms? That seems weird. It sounds like they use a Mustang II track width and a Mustang II rack.

jayb

  • Administrator
  • Hero Member
  • *****
  • Posts: 7405
    • View Profile
    • FE Power
Re: The Road to Drag Week 2014 - July 13
« Reply #21 on: July 23, 2014, 07:30:26 AM »
There is actually a big K-shaped steel plate that bolts up under the car, using the holes for the original lower control arms.  The new lower control arms and the rack are bolted to that plate.  The rack is a Pinto unit if I recall correctly...
Jay Brown
- 1969 Mach 1, Drag Week 2005 Winner NA/BB, 511" FE (10.60s @ 129); Drag Week 2007 Runner-Up PA/BB, 490" Supercharged FE (9.35 @ 151)
- 1964 Ford Galaxie, Drag Week 2009 Winner Modified NA (9.50s @ 143), 585" SOHC
- 1969 Shelby Clone, Drag Week 2015 Winner Modified NA (Average 8.98 @ 149), 585" SOHC


fe66comet

  • Guest
Re: The Road to Drag Week 2014 - July 13
« Reply #22 on: July 23, 2014, 07:54:49 AM »
More or less I am using the same set up for the ranger, I have a Heigd's universal Mustang II K member but haven't bought the arms or rack yet. I am using a 60" track so the rack extensions are required. Everything is supposed to fit right up but you know how that goes LOL

TomP

  • Guest
Re: The Road to Drag Week 2014 - July 13
« Reply #23 on: July 24, 2014, 02:13:22 AM »
60" track in a Ranger? My 87 was 56" track stock and that was kind of wide requiring wheels with lots of backspace.