Author Topic: The Road to Drag Week 2014 - July 6  (Read 12711 times)

0 Members and 1 Guest are viewing this topic.

jayb

  • Administrator
  • Hero Member
  • *****
  • Posts: 7405
    • View Profile
    • FE Power
The Road to Drag Week 2014 - July 6
« on: July 06, 2014, 10:04:46 PM »
The three day holiday weekend really afforded me a great opportunity to make some headway on this project, and I was fortunate enough to take advantage of it, without a lot of family commitments this weekend.  Right now I've caught up some on my original schedule, and it looks like I'm only about three weeks behind.  My original plan was to have the car running and driving this weekend, but now I'm thinking that I'll make my first trip to the track on July 26.  There are another 2 or 3 track days that I can squeeze in before Drag Week after that point, so hopefully this will give me the opportunity to get the car really well sorted.

Once again I was tied up during the week this week, but on Friday morning I got going right away on the engine.  I still had several things I wanted to try on the dyno, primary among them getting the crankcase sealed, and retesting without the 1/2" plenum spacer I had installed last weekend.  The plenum spacer was kind of a head scratcher for me.  Before installation of the plenum spacer, the dyno data had been showing a vacuum in the plenum of up to 0.6 inches.  When I installed the plenum spacer the vacuum during the pull went to zero, but the engine picked up kind of a funny pulsing noise partway through the pull.  It also picked up power.  I was pretty sure that the pulsing noise was induction noise, but I hadn't heard anything quite like it before, so I wanted to run another test, to remove the plenum spacer and see if the noise went away again.  Also this week my new O-rings arrived, which were larger in cross section than the original O-rings; I hoped that they would provide a better vacuum seal around the spark plug tubes for the dry sump system.

Also, over the course of the week I had carefully reviewed all the datalogs from the cam sensors, and had concluded that in all cases, regardless of the sensor and target combination, the right cam was retarding about 3 degrees more than the left cam.  Whether I believed the absolute numbers or not, this phase shift between the two cams seemed pretty consistent, and also dovetailed with my original test data from 2006.  So, after thinking it over I elected to advance the right cam 3 degrees with respect to the left cam.  This put the cams at 105 and 108 for ICL, which was exactly where I had set them when I set the cam timing on the engine stand, before the engine went on the dyno.  It kind of felt like all the cam timing changes I had done were a wasted effort after this, but at least the way I've been setting up the cams on these engines over the last 7 or 8 years has probably been correct.

So on Friday I tore the top end of the engine apart, to advance the right cam 3 degrees, check the timing chain tension, give the valvetrain a very close inspection and reset the lash, etc.  I also removed the Honeywell sensors from the valve covers and replaced them with Cherry sensors, which were the ones I planned to run in the car.  I made sure to seal them with some RTV from the inside, because the Honewell sensors had shown leaks around this area.  Thinking about the crankcase sealing issue I decided to take a new set of cork valve cover gaskets and glue them to the valve covers, to help hold the gasket in place when vacuum was being developed in the crankcase.  I decided to let the sealer dry overnight so that on Saturday morning I could pressurize the crankcase again and check for more leaks.

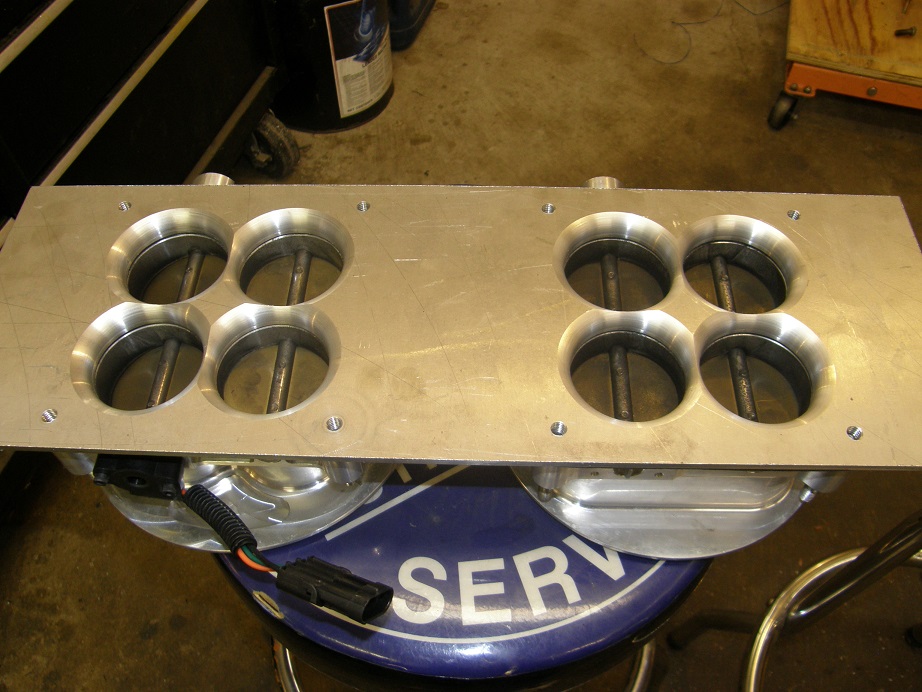
I had still also wanted to run a pair of Dominator throttle bodies on my sheet metal intake, so I spent the rest of the Fourth of July holiday (until the fireworks started at 9:30) working on a new top for the intake.  First I drew up the design for the top in my CAD software, and then wrote the program to machine a piece of 1/2" aluminum plate to the drawing.  While the CNC machine was running I robbed the two Dominator throttle bodies off the high riser in my Mach 1.  Around dinnertime I had the plate finished up; here's a couple of photos, one from underneath (the inside of the plenum), and one from on top showing the throttle bodies bolted in place:


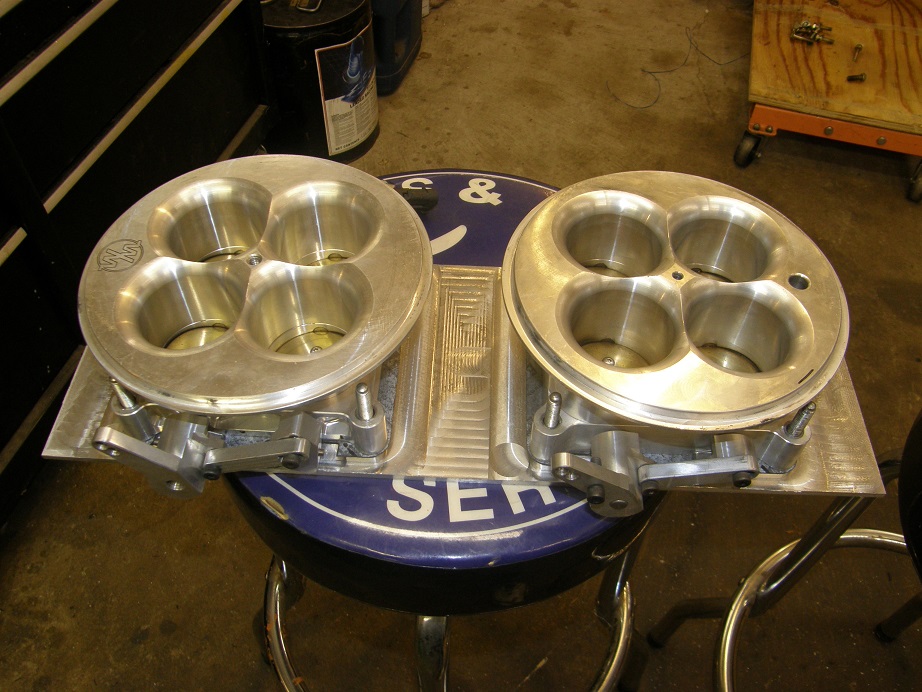
To be honest I didn't really think the Dominator throttle bodies were going to help much, because the 90mm throttle bodies flowed 1100 cfm each, but it was worth a try, especially since I didn't have to buy any parts to try it.  After I got the top done I took some spare 1" X 3" aluminum angle and welded it together into a box that would fit on top of the intake, then welded the top plate in place.  At the end of the day on Friday I was pretty much ready to go with the Dominator parts.

Saturday morning I finished re-assembling the engine on the dyno, without the 1/2" plenum spacer.  Then I ran the pressure check again, putting 5 psi into the crankcase.  I was pleased to see that the leaks around the spark plug tubes were gone, and also that there were no leaks around the cam sensors.  I began checking the rest of the engine over, and then discovered a leak that I hadn't seen last weekend.  This one was between the intake manifold and the head.  Now, on a regular FE I would never have had to worry about this because this junction is covered by the valve cover, but on the cammer of course this is not the case.  I had run a ring of RTV around the ports on either side of the intake gaskets, but as I sprayed a soapy water solution onto the junction between the intake and the heads, I could see that pressurized air was escaping past the gasket and between the ports.  And some of these leaks looked pretty substantial.

I dug out the Ford TA-31 and ran a bead of it along the top of the intake manifold rail and down the sides a little ways to try to get this area sealed up.  I decided I wanted to let this cure for a couple hours before running the engine, so I took care of a few other things in the shop while I waited.  About noon Marc Hunter from the forum came by; he was in Iowa visiting his brother, and had previously arranged to stop up to my place and pick up his FE intake adapter.  He brought his brother Ryan with him, and his dog, named Cammer.  Best name ever for a dog if you ask me LOL!  Ryan owns SCE gaskets and is working on some new FE gaskets, and wanted to show me some of the stuff he was doing and ask a couple of questions.  I told him about some SOHC gasket requirements that I would like to see, including a valve cover gasket that isn't cork, and also gave him one of the old Victor Reinz FE intake gaskets, which were far and away my favorite FE intake gasket until they quit manufacturing them.  Maybe SCE will start making them now.

After a quick tour of the shop and some more technical discussions I got back to working on the engine, while Marc and Ryan hung around waiting for me to be finished so they could see the engine run on the dyno.  I still had to wire up the new Cherry sensors I'd installed in the valve covers, and this took about an hour to finish up.  Finally around 2:00 or so the engine was ready to go.  It fired right up as usual, meaning that I hadn't screwed anything up with the cam sensors (which is always a possibility LOL!).  A couple of minutes into the warm up it dawned on me to look at the crankcase vacuum, and lo and behold, I had close to 10 inches of vacuum running at only about 1500 RPM!  Boy I felt good about that; all the chasing around of the vacuum leaks had paid off.  I was pretty sure that significant crankcase vacuum would improve the power output of the engine, so after the warm-up was complete, I made another 5500-7500 RPM pull.  The first thing I noticed during the pull was that the noise from the previous few pulls was gone; removal of the plenum spacer seemed to have eliminated that sound.  After the pull was over and we looked at the data, sure enough the 0.5 inches of manifold vacuum was back.  So the plenum spacer definitely helped the power output, and caused the new noise.  But on this pull, I was a little disappointed by the power numbers.  It seemed that the crankcase vacuum had not improved power at all!  This was a surprise, given the size of this engine and the low tension rings I'm using.  A review of the data showed that 10 inches of vacuum was all I was getting.  I figured that I could use up to 20" or more, so after talking it over with Marc and Ryan I decided to adjust the vacuum relief valve on the engine to stay shut until a higher vacuum level was reached.   I started the engine to run another pull, but now the crankcase vacuum was reading much lower, maybe only 1-2 inches.  I was confused by all this, but I ran the pull anyway.  Towards the end of the pull some smoke starting coming from the right side of the engine, indicating a valve cover leak.  The engine didn't seem to care, though, and made the same power as the pull before.  After looking at the data we went back out into the dyno room and I checked the valve cover bolts.  Sure enough, some of them were really, really loose.  This is one reason why I would like to see a rubber or composite valve cover gaskets for the SOHC; the cork gaskets get hot, shrink, and then start leaking.  Then, as you tighten down, the same thing happens a few more times.  Finally after you've tightened them a few times the cork splits and you have to ditch the gaskets and start with a new pair.  A better gasket for the valve covers would be a real help for these engines.

After tightening the valve cover bolts the crankcase vacuum came back.  Marc and Ryan had to make the return trip to Iowa; two really nice guys, and it was my pleasure to have them visit.  After they left I took a short break and then went to the next test, which was to install a 1" plenum spacer on the intake.  I figured if a 1/2" spacer was good, maybe a 1" spacer would be better.  I was curious what the engine would sound like with a 1" spacer, but when I ran the test it sounded the same as with no spacer at all, and the power was back down a little, plus the 0.5 inches of vacuum was back in the plenum.  So it seemed like the 1/2" plenum spacer was optimal for this engine. 

At this point, I decided to install the new plenum top with the Dominator throttle bodies.  Here's a picture of the engine with these installed:


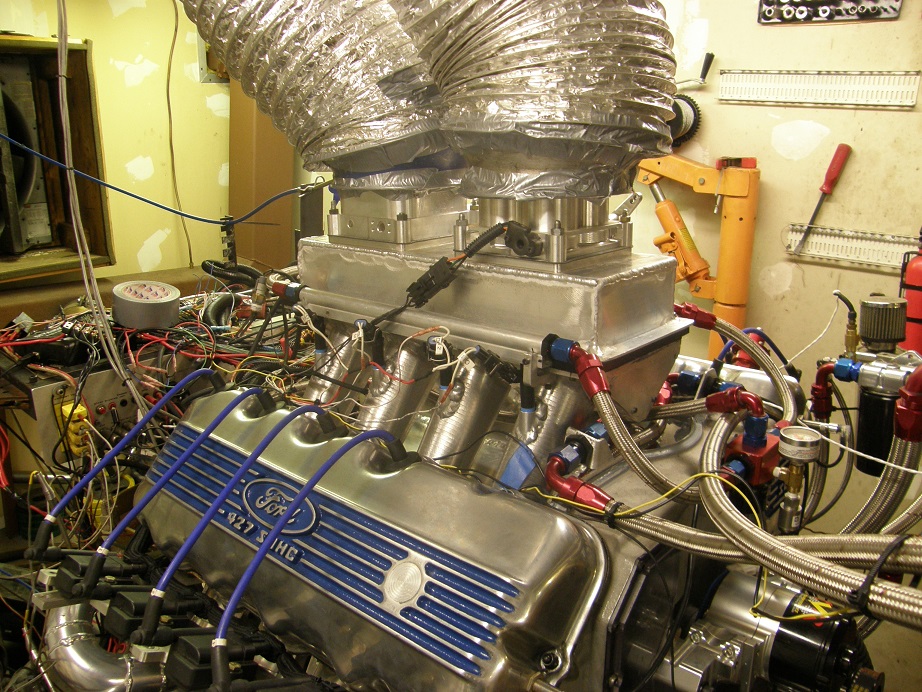
As mentioned previously I didn't hold a whole lot of hope out for this combination, but I thought I would give it a try.  Boy, was I mistaken!  The Dominator throttle bodies picked up a solid 20 horsepower over the entire RPM band, 5500-7500!  A huge, huge power improvement.  Boy, was I happy to see that!

It was getting towards the end of the day Saturday, and I had wanted to run some more experiments with the Dominator throttle bodies by adding some plenum spacers, but I was running out of time to do that.  I decided to jump to my last test.  During all the testing with this engine I was seeing about 0.85 psi in the dyno's exhaust system.  Usually there is power available when there is pressure in the exhaust system; in fact, I documented some of this in the miscellaneous testing section of my book.  So, for the last test I disconnected the exhaust system and ran the headers open in the dyno room.  When I started the engine, I immediately had to put ear protection on; that thing was LOUD.  I ran the pull, and anxiously downloaded the data and...  no improvement.  Nearly identical numbers to the previous pull with the exhaust system connected.

So the dyno results this weekend were all rather surprising to me.  First, no power improvement with vacuum in the crankcase.  Second, a big power improvement with the Dominator throttle bodies.  And finally, no power improvement with open headers over the dyno exhaust system.  I would not have guessed any of these outcomes.  I guess all this shows is that you have to test this stuff to really find out the truth.

Sunday morning I spent working on the car.  It felt pretty good to get my hands back on it; it has been two years since I've really done anything with it.  I got it positioned in the middle of the shop and spent some time pulling the pumpkin, because the car currently has street gears in it and I need to put in a set of pro gears.  Shortly after noon my friend Kevin R came by to give me a hand pulling the engine off the dyno, and putting it in the car.  We attached the engine and transmission together, along with the Gear Vendors overdrive, and had it muscled into place by 4:00.  Here's a photo of the engine in position:


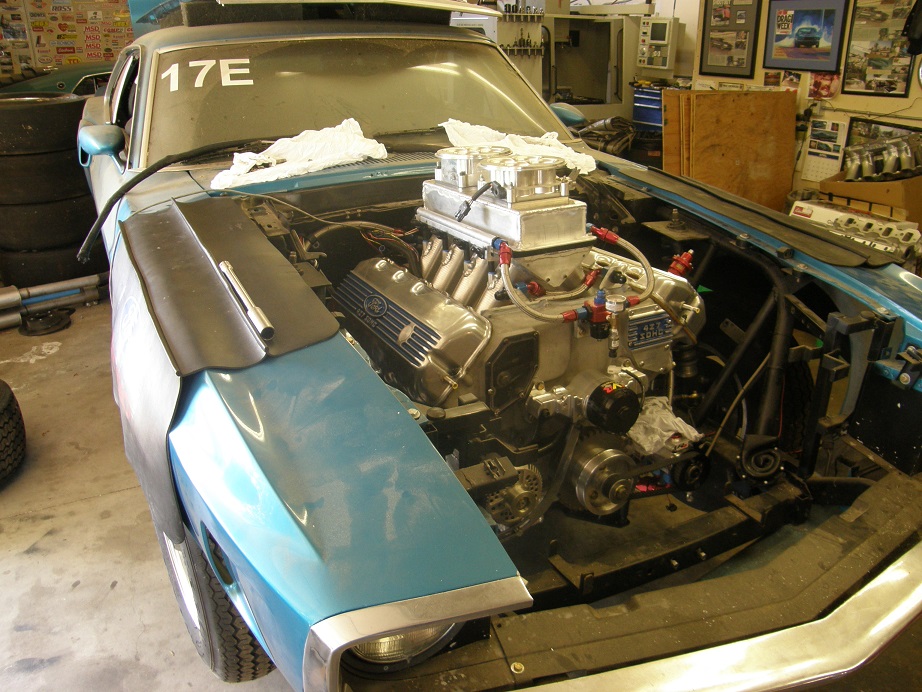
Right away I could see that my hood scoop is too low, but I have some plans to address that, including getting a pair of Accufab Dominator throttle bodies, and reshaping the plenum box to make it wider and shorter, so it has the same volume but a lower profile.  I have a lot of work in front of me on the left front corner of the engine compartment, to fit the dry sump tank and accessories, but I think I can get all this done in the next couple of weeks.  I'm shooting for a test and tune at a local track on July 26; we will see what happens.
Jay Brown
- 1969 Mach 1, Drag Week 2005 Winner NA/BB, 511" FE (10.60s @ 129); Drag Week 2007 Runner-Up PA/BB, 490" Supercharged FE (9.35 @ 151)
- 1964 Ford Galaxie, Drag Week 2009 Winner Modified NA (9.50s @ 143), 585" SOHC
- 1969 Shelby Clone, Drag Week 2015 Winner Modified NA (Average 8.98 @ 149), 585" SOHC


Joe-JDC

  • Guest
Re: The Road to Drag Week 2014 - July 6
« Reply #1 on: July 06, 2014, 10:59:33 PM »
That just plain looks better!  Glad to hear it made an improvement.  Gotta be getting close to the magical number---LOL.  Hope you get everything sorted out in time.  Good luck.  Joe-JDC.

cdmbill2

  • Jr. Member
  • **
  • Posts: 87
    • View Profile
Re: The Road to Drag Week 2014 - July 6
« Reply #2 on: July 07, 2014, 12:20:55 AM »
Looking good Jay. Congrats on getting the cam timing zeroed in and finding power with the twin throttle bodies on top. (Kinda validates my set up too)

With the engine off the dyno you'll be in on road tuning mode, but I think you'll find the engine may respond to a bit of added fuel with the crankcase vacuum working now. It's hard to say for sure, but I've always been able find ET with slight changes in the fuel tables and the spark tables with the engine in the car using the full exhaust set up, or at least the collector extensions in lieu of the full exhaust system. The settings that were optimal without crankcase vacuum won't be with it working correctly. I haven't run a true dry sump like yours so my 'experience' is open to question.

I set my Peterson Wide-vac to 12" maximum due to worries about drying out the wrist pins.

This year I'm committed to running the collector extensions and dumps as the road exhaust is going to be 2.5" tubes and turbo mufflers. Restrictive yes, but much quieter which I'll need with the tin box Fox. And yes that is the same size as the last step in the header primaries!

machoneman

  • Hero Member
  • *****
  • Posts: 3853
    • View Profile
Re: The Road to Drag Week 2014 - July 6
« Reply #3 on: July 07, 2014, 07:30:57 AM »
Amazing the open exhaust didn't really improve power. I wonder if not perhaps having optimized collector length extensions is a partial answer? As you stated, testing is the way to go.
Bob Maag

cobracammer

  • Hero Member
  • *****
  • Posts: 1165
    • View Profile
Re: The Road to Drag Week 2014 - July 6
« Reply #4 on: July 07, 2014, 02:01:06 PM »
Hey Jay,

I was reading through your posts, and see that your Cam timing on this engine ended up at 105 and 108.  I remember the cam timing from the 519" SOHC was 108 (R) and 112 (L).  What are the factors that went into this change?   I am trying understand so I know where to set my timing  ???
Jason
2005 Saleen S281 (427 SOHC 2 X 4 EFI swap), T56 Magnum XL 6 speed, 9" Currie rear with 3.89 Gears

jayb

  • Administrator
  • Hero Member
  • *****
  • Posts: 7405
    • View Profile
    • FE Power
Re: The Road to Drag Week 2014 - July 6
« Reply #5 on: July 07, 2014, 02:08:03 PM »
Hindsight being 20/20, I probably should have set the cam timing on the 519" engine the same as on this engine.  For your engine I'd advance the left cam 3-4 degrees, and advance the right cam 6-7 degrees.  So, take the LSA listed on the cam card, and subtract 3-4 degrees, and this is where I would degree the left cam.  Then subtract another 3 degrees, and that is where I'd degree the right cam.
Jay Brown
- 1969 Mach 1, Drag Week 2005 Winner NA/BB, 511" FE (10.60s @ 129); Drag Week 2007 Runner-Up PA/BB, 490" Supercharged FE (9.35 @ 151)
- 1964 Ford Galaxie, Drag Week 2009 Winner Modified NA (9.50s @ 143), 585" SOHC
- 1969 Shelby Clone, Drag Week 2015 Winner Modified NA (Average 8.98 @ 149), 585" SOHC


jayb

  • Administrator
  • Hero Member
  • *****
  • Posts: 7405
    • View Profile
    • FE Power
Re: The Road to Drag Week 2014 - July 6
« Reply #6 on: July 07, 2014, 02:12:16 PM »
Looking good Jay. Congrats on getting the cam timing zeroed in and finding power with the twin throttle bodies on top. (Kinda validates my set up too)

With the engine off the dyno you'll be in on road tuning mode, but I think you'll find the engine may respond to a bit of added fuel with the crankcase vacuum working now. It's hard to say for sure, but I've always been able find ET with slight changes in the fuel tables and the spark tables with the engine in the car using the full exhaust set up, or at least the collector extensions in lieu of the full exhaust system. The settings that were optimal without crankcase vacuum won't be with it working correctly. I haven't run a true dry sump like yours so my 'experience' is open to question.

I set my Peterson Wide-vac to 12" maximum due to worries about drying out the wrist pins.

This year I'm committed to running the collector extensions and dumps as the road exhaust is going to be 2.5" tubes and turbo mufflers. Restrictive yes, but much quieter which I'll need with the tin box Fox. And yes that is the same size as the last step in the header primaries!

Bill, do you get up to 12" of vacuum going down the road?  When I've run vacuum pumps before on the street they usually don't give full vacuum until you're in the middle of a pass down the track.  I kind of figured that I could set the vacuum level higher, and that it would only reach a level over 10" during a pass, which I think is safe.  Or don't you agree?

Of course, since the most I'm seeing right now is 10", it is currently not an issue for me.

Just called Accufab, credit card in hand, and they are OUT of 4500 throttle bodies  >:( >:( >:(
Jay Brown
- 1969 Mach 1, Drag Week 2005 Winner NA/BB, 511" FE (10.60s @ 129); Drag Week 2007 Runner-Up PA/BB, 490" Supercharged FE (9.35 @ 151)
- 1964 Ford Galaxie, Drag Week 2009 Winner Modified NA (9.50s @ 143), 585" SOHC
- 1969 Shelby Clone, Drag Week 2015 Winner Modified NA (Average 8.98 @ 149), 585" SOHC


cobracammer

  • Hero Member
  • *****
  • Posts: 1165
    • View Profile
Re: The Road to Drag Week 2014 - July 6
« Reply #7 on: July 07, 2014, 02:18:42 PM »
Hindsight being 20/20, I probably should have set the cam timing on the 519" engine the same as on this engine.  For your engine I'd advance the left cam 3-4 degrees, and advance the right cam 6-7 degrees.  So, take the LSA listed on the cam card, and subtract 3-4 degrees, and this is where I would degree the left cam.  Then subtract another 3 degrees, and that is where I'd degree the right cam.

Thanks Jay!  My LCA is 108, so  105 on the left and 102 on the right.  Does that sound about right?
« Last Edit: July 07, 2014, 02:31:45 PM by cobracammer »
Jason
2005 Saleen S281 (427 SOHC 2 X 4 EFI swap), T56 Magnum XL 6 speed, 9" Currie rear with 3.89 Gears

JamesonRacing

  • Sr. Member
  • ****
  • Posts: 361
  • 1966 - What a great year for FOMOCO
    • View Profile
Re: The Road to Drag Week 2014 - July 6
« Reply #8 on: July 07, 2014, 03:19:49 PM »
1966 Fairlane GT, Silver Blue/Black 496/C4 (9.93@133)
1966 Fairlane GT, Nightmist Blue/Black 465/TKO (11.41@122)
1966 Fairlane GTA Conv, Antique Bronze/Black, 418EFI/C6
1966 F250 C/S, Rangoon Red, 445/T19
1965 Falcon Futura 4-door, Turquoise, EF! Z2363/4R70W

jayb

  • Administrator
  • Hero Member
  • *****
  • Posts: 7405
    • View Profile
    • FE Power
Re: The Road to Drag Week 2014 - July 6
« Reply #9 on: July 07, 2014, 03:48:18 PM »
Hindsight being 20/20, I probably should have set the cam timing on the 519" engine the same as on this engine.  For your engine I'd advance the left cam 3-4 degrees, and advance the right cam 6-7 degrees.  So, take the LSA listed on the cam card, and subtract 3-4 degrees, and this is where I would degree the left cam.  Then subtract another 3 degrees, and that is where I'd degree the right cam.

Thanks Jay!  My LCA is 108, so  105 on the left and 102 on the right.  Does that sound about right?

Yes it does.  Make sure you check piston to valve clearance when you get the cams installed!
Jay Brown
- 1969 Mach 1, Drag Week 2005 Winner NA/BB, 511" FE (10.60s @ 129); Drag Week 2007 Runner-Up PA/BB, 490" Supercharged FE (9.35 @ 151)
- 1964 Ford Galaxie, Drag Week 2009 Winner Modified NA (9.50s @ 143), 585" SOHC
- 1969 Shelby Clone, Drag Week 2015 Winner Modified NA (Average 8.98 @ 149), 585" SOHC


cobracammer

  • Hero Member
  • *****
  • Posts: 1165
    • View Profile
Re: The Road to Drag Week 2014 - July 6
« Reply #10 on: July 07, 2014, 04:28:01 PM »
Thanks Jay.  Will do.   ;D
Jason
2005 Saleen S281 (427 SOHC 2 X 4 EFI swap), T56 Magnum XL 6 speed, 9" Currie rear with 3.89 Gears

jayb

  • Administrator
  • Hero Member
  • *****
  • Posts: 7405
    • View Profile
    • FE Power
Re: The Road to Drag Week 2014 - July 6
« Reply #11 on: July 07, 2014, 05:42:43 PM »
These folks may have stock of the parts you need:

http://treperformance.com/i-8187063-accufab-4-barrel-4500-black-throttle-body.html
Thanks David.  I called them, but no luck...
Jay Brown
- 1969 Mach 1, Drag Week 2005 Winner NA/BB, 511" FE (10.60s @ 129); Drag Week 2007 Runner-Up PA/BB, 490" Supercharged FE (9.35 @ 151)
- 1964 Ford Galaxie, Drag Week 2009 Winner Modified NA (9.50s @ 143), 585" SOHC
- 1969 Shelby Clone, Drag Week 2015 Winner Modified NA (Average 8.98 @ 149), 585" SOHC


turbohunter

  • Hero Member
  • *****
  • Posts: 2509
    • View Profile
Re: The Road to Drag Week 2014 - July 6
« Reply #13 on: July 07, 2014, 08:26:25 PM »
Jay
Thanks so much for your hospitality.
Your family is amazing and your set up is to be envied.
My adapter is a beautiful piece. I'm thrilled with it.
Good luck with your tuning. As always, will hang on every word through Drag Week.
I'm quite sure my brother will be in touch.
Thanks again.
Marc
'61 F100 292Y
'66 Mustang Injected 428
'66 Q code Country Squire wagon


fe66comet

  • Guest
Re: The Road to Drag Week 2014 - July 6
« Reply #14 on: July 07, 2014, 09:35:42 PM »
Now is a bad time for finding parts, I waited two months for a Jaz cell without foam. Nothing special just no foam. I imagine high demand injection parts are like pulling teeth to get.

jayb

  • Administrator
  • Hero Member
  • *****
  • Posts: 7405
    • View Profile
    • FE Power
Re: The Road to Drag Week 2014 - July 6
« Reply #15 on: July 07, 2014, 11:10:27 PM »
Jay
Thanks so much for your hospitality.
Your family is amazing and your set up is to be envied.
My adapter is a beautiful piece. I'm thrilled with it.
Good luck with your tuning. As always, will hang on every word through Drag Week.
I'm quite sure my brother will be in touch.
Thanks again.

Marc, it was my pleasure having you and Ryan up; too bad we didn't have time for more bench racing!  I hope we can get together again sometime - Jay
Jay Brown
- 1969 Mach 1, Drag Week 2005 Winner NA/BB, 511" FE (10.60s @ 129); Drag Week 2007 Runner-Up PA/BB, 490" Supercharged FE (9.35 @ 151)
- 1964 Ford Galaxie, Drag Week 2009 Winner Modified NA (9.50s @ 143), 585" SOHC
- 1969 Shelby Clone, Drag Week 2015 Winner Modified NA (Average 8.98 @ 149), 585" SOHC


cdmbill2

  • Jr. Member
  • **
  • Posts: 87
    • View Profile
Re: The Road to Drag Week 2014 - July 6
« Reply #16 on: July 08, 2014, 09:36:33 AM »
Jay:

On the crank case vacuum I only see 12" on track. I know it could go higher as it flattens out when it hits the vacuum break set point at the top of 1st gear. At idle it barely registers on the vacuum side of the analog boost/vacuum guage I use to watch it going down the road, at cruise around 5-6". It's connected to the driver's side valve cover. In 2012 Scott and I added an additional GM style MAP sensor which is plumbed to the passenger side valve cover. It reads prettty much in sync with the analog guage and of course we can data log it. Still shows KPa as i never got around to mapping the conversion for the virtual gauge.

The engine seal issue turned out to be way harder than I expected the first time around and your SOHC is way more complicated my 385.

When given a choice I opted for -10 lines form the VC's as I was told they would have lower velocity and would pull less oil out of the motor. The big shock was the amount of water in the one quart Jaz breather can at the end of a long day of driving. I ended up with two as just one over flowed on the first ten hour day with a lot of humidity. Now I drain them every day at DW.

Bill

jayb

  • Administrator
  • Hero Member
  • *****
  • Posts: 7405
    • View Profile
    • FE Power
Re: The Road to Drag Week 2014 - July 6
« Reply #17 on: July 08, 2014, 10:19:30 AM »
Maybe here?

http://shop.holcombmotorsports.com/ACCUFAB-4500-4-BARRELL-EFI-THROTTLE-BODY-AF-4500-TB.htm;jsessionid=4BA9E1903F94E40B0F8212823C17DAA7.m1plqscsfapp03

No joy with those guys either.  Most of these outfits seem like they advertise the throttle bodies as "in stock", but they don't actually stock them; they get the order and then direct ship from Accufab.  I've called a half dozen places so far and its always the same story.

Accufab says they will have the throttle bodies next Monday, so hopefully I can get them by the end of next week.
Jay Brown
- 1969 Mach 1, Drag Week 2005 Winner NA/BB, 511" FE (10.60s @ 129); Drag Week 2007 Runner-Up PA/BB, 490" Supercharged FE (9.35 @ 151)
- 1964 Ford Galaxie, Drag Week 2009 Winner Modified NA (9.50s @ 143), 585" SOHC
- 1969 Shelby Clone, Drag Week 2015 Winner Modified NA (Average 8.98 @ 149), 585" SOHC


cjetmech

  • Jr. Member
  • **
  • Posts: 90
    • View Profile
Re: The Road to Drag Week 2014 - July 6
« Reply #18 on: July 08, 2014, 11:14:34 AM »
Jay, I went back and browsed the 2011 thread on the build of the Shelby clone and was just wondering how the paint job is holding up. And have you made any changes to the car at all? Specifically the rear suspension. I thought I read that you didn't think that you had enough adjustability to get the IC where you wanted it. Good Luck this year, glad to see that your gonna get some track time before hand.
67 Fairlane GT 428
93 Mustang Coupe 331

jayb

  • Administrator
  • Hero Member
  • *****
  • Posts: 7405
    • View Profile
    • FE Power
Re: The Road to Drag Week 2014 - July 6
« Reply #19 on: July 08, 2014, 11:34:57 AM »
The paint on the fiberglass parts has developed a couple of minor chips, but otherwise it looks OK.  The big issue is the color, which just didn't turn out like it should.  The low solids Omni paint I used gets the blame for that.

When I was going to Drag Week in 2012 (never made it that year) I had lengthened the lower mounts for the lower 4-link bars, so now I think I'm probably OK with the geometry.  Time at the track will tell...
Jay Brown
- 1969 Mach 1, Drag Week 2005 Winner NA/BB, 511" FE (10.60s @ 129); Drag Week 2007 Runner-Up PA/BB, 490" Supercharged FE (9.35 @ 151)
- 1964 Ford Galaxie, Drag Week 2009 Winner Modified NA (9.50s @ 143), 585" SOHC
- 1969 Shelby Clone, Drag Week 2015 Winner Modified NA (Average 8.98 @ 149), 585" SOHC


cjetmech

  • Jr. Member
  • **
  • Posts: 90
    • View Profile
Re: The Road to Drag Week 2014 - July 6
« Reply #20 on: July 09, 2014, 06:20:59 PM »
I remembered that you used Omni, thats why I was asking. I've heard a lot of stories about it not adhering etc etc. Sounds like you made out good (other than the color) for a car painted at home. I think it looks great. And I can't wait to see how this year goes with 2 months worth of testing instead of a last minute thrash! Must feel pretty good. This car's gonna need a chute and wheelie bars!
67 Fairlane GT 428
93 Mustang Coupe 331