Author Topic: Upgrades to my R-code Mach 1...  (Read 43188 times)

0 Members and 1 Guest are viewing this topic.

cjshaker

  • Hero Member
  • *****
  • Posts: 4458
    • View Profile
Upgrades to my R-code Mach 1...
« on: April 10, 2014, 10:50:41 PM »
Decided to change my front and rear suspension on my 427 SO equipped R-code Mach 1 while I had the engine out waiting for a different one....but still another 427 SO. I wanted to get away from the stiff aftermarket coils (620s I think) I had originally put on the car when I restored it. They rode fine with the iron head/block weight of the 427, but there was NO front end rise when you got on it. It would just instantly roll the tires. Of course the BF Goodrocks didn't help ::)

My starting point....


My old coils went right in with a tap from a rubber mallet. I could see that wasn't going to be the case with these. They were quite a bit taller.


My old homemade spring compressor used a plate that went over the shock tower and a threaded rod that dropped through the spring. It worked really well, but the threads had started to strip after a several times use, so I decided to get one of the newer types and save having to make another one. I think I'll make another one like my old one....I did NOT like using the new one. It was a royal pain getting the darn think compressed on the floor enough to get it in the tower!!

Gave me a chance to clean the underside of the chassis and wheel wells while I had everything apart.


Well I'm glad THAT'S over with!! Besides being nervous using the compressor and holding about a ton of compressed force in my hands, when I started to jack the upper A-arm up to hold the spring in place I didn't realize I was taking so much weight off the jack stands (with no engine weight).....and suddenly the car moved and shifted towards me!! I thought for sure it was going to drop off the jacks and right down onto the floor!!! :o  I immediately pushed against it and it stopped. When I looked underneath, the frame rail was sitting on about 1/2" of the outer lip of the stand!! Holy Cow!! I got really lucky there :o

I immediately got the jack under it and repositioned the stands and checked the rears. Won't make THAT mistake again! But got it all back together and everything cleaned up real nice.


Getting the CalTrac rear suspension on was a piece of cake compared to the front springs :)  Again, it gave me a chance to clean everything really well, and again I was surprised at how nicely everything cleaned up. It looked like I had just done the car. The AMK chassis bolt system I had used really was holding up well. All the bolts still had a nice phosphate coating. Along with the DP40 epoxy primer I used on everything, which they quite selling after the government decided it was too "deadly", the chassis still looked like a million dollars....which is just a couple dollars shy of what I have in the car ;D ;D

I really like the quality and fit of the CalTracs. And they have GREAT customer service. After talking with Travis there, he was extremely helpful and a pleasure to talk to. Great people.


So after I had the front and rear suspension done, I couldn't stand it....I had to throw on my rims to check them out. I was nervous about finding a set of rims that I thought looked "old school", but still looked right on a '69. Most people think, and I agree, that Magnums are about the best looking and ONLY correct looking wheels on a '69. But I was just getting tired of having the same look as everybody elses car. I wanted something different....something period looking....something cool. I think they nailed it!! At least I'm happy with them, and that's all that counts ;D

I didn't have the center caps on yet....


I'm really glad I had the rear narrowed 1" on each side because the rims had 1" less backspacing than my Magnums. It put the tires out where they would have originally been. But now I wish I had had it narrowed 2", then it would have that "tucked in" look that I like. But then I would have trouble putting the Magnums back on with 275-65/15s, so I can live with it. It still gives me enough clearance that I don't think rubbing will be an issue.


Still plenty of room too at the front inner section of wheelwell where they always get close. The Magnums were actually a little tight here with the 1" more offset. The M/T ET Street tires I chose are actually about identical in size, so I figured everything would work good. I love it when a plan comes together :)  And that is NOT rust on the bottom. Just dirt that easily washed off and looked good as new again when dried :)


So then I tackled the truck. All new rubber hoses, belts, vacuum lines etc. New front tires after replacing the old split rims with one piece....that I had to track down and drive 60 miles to get :o  Those suckers are getting hard to find in my area! New front shocks, rebuilt the carburetor, rebuilt the distributor, oil change, all filters replaced, new plugs etc. etc. etc. She should be ready make the haul. Of course it never hurts to take along some spares, like alternator, distributor, fuel pump etc. And the cool part is they all work on either of my vehicles. I was laughing with my Dad telling him I could replace just about anything on the side of the road and be back on my way. He said like the days of the old Model T :)
She ain't pretty, but it's darn near bullet proof.


Now I'm just sitting, nitpicking details....waiting on a call from the engine guy....after 4 months :(

« Last Edit: March 05, 2018, 08:32:21 PM by cjshaker »
Doug Smith


'69 R-code Mach 1, 427 MR, 2x4, Jerico, 4.30 Locker
'70 F-350 390
'55 Ford Customline 2dr
'37 Ford Coupe

Lenz

  • Hero Member
  • *****
  • Posts: 578
    • View Profile
Re: Upgrades to my R-code Mach 1...
« Reply #1 on: April 11, 2014, 06:40:06 AM »
Talk about clean underneath :D, great photo essay.  I can sympathize on the spring compressor, first thing I did to the Galaxie was new coils.  I've used my spring compressor maybe a half dozen times, hated it every time.  I pin the coil down with 1 foot, hold with my left hand and ratchet with the right.  All that stored energy has made me plenty uneasy every time (maybe a healthy respect for what can go wrong has kept me alive ::)).

Oh, and I think that truck is downright purty just the way she sits 8).
Len Zielinski
'64 Galaxie 500 445 Toploader
'69 F100 300 stick

fastback 427

  • Sr. Member
  • ****
  • Posts: 442
    • View Profile
Re: Upgrades to my R-code Mach 1...
« Reply #2 on: April 11, 2014, 08:00:26 AM »
Super clean stang doug!!! Like lens said nice pics. When I did my front springs I went to oreilly and bought their rental tool new in box. Much heavier than the one they steel on the shelf. The Cal tracs coupled with those "stickey Mickey's" will not "roll". ;D  With the mono leaf in the back two fat guys can't push my car down so clearance should be good. I know you gotta be itchin to try these mods out! Thumbs up on the wheels too!
Jaime
67 fastback 427 center oiler 428 crank Dove aluminum
top end toploader
67 fairlane gta cross bolted 12:1 390 Dove aluminum top end c6 3600 stall
65 falcon straight axle project
67 mustang coupe project
76 f350 dually 390 mirror 105 4bbl 4spd
74 f100 xlt 390 c6 factory ac

ScotiaFE

  • Hero Member
  • *****
  • Posts: 1409
  • Howie
    • View Profile
Re: Upgrades to my R-code Mach 1...
« Reply #3 on: April 11, 2014, 08:07:32 AM »
Looks Great Doug. Super Clean!
I notice you still have the big bar in place up front.
Your going to want that off for track day.
Love the Hauler too. Putting on a great show Doug.
Best of luck.

Just thinking the last time I put the tall skinny springs in.
Got the engine in all excited and put it down on the tires.
The springs were just not up to the weight. The car settled down way to far.
Another round of spring swapping.
They were tall and skinny just like yours.
Just something to keep in mind the day before track day.  :o
« Last Edit: April 11, 2014, 08:16:53 AM by ScotiaFE »

machoneman

  • Hero Member
  • *****
  • Posts: 3851
    • View Profile
Re: Upgrades to my R-code Mach 1...
« Reply #4 on: April 11, 2014, 08:10:14 AM »
Like the underside a bunch as many skip the hard work needed to get it that way.  Wise to be wary of spring pressure, especially if one is attempted a spring sawp w/o the engine installed!

After reading about the no front end lift at launch.....I do hope you added the OpenTracker rollerized spring perches. Kind'a late now but they do make a big difference in launch and overall handling as well.  The OEM Ford rubber perch design really doesn't rotate on the cross pin well especially as the rubber ages.  Ford originally had designed a steel pin riding in a bronze bushing as depicted in some early pre-production Mustangs but apparently the noise factor had engineering drop it for the current rubber bushed set-up. They should have kept it.

http://www.opentrackerracingproducts.com/rollerperch/
« Last Edit: April 11, 2014, 08:16:47 AM by machoneman »
Bob Maag

cjshaker

  • Hero Member
  • *****
  • Posts: 4458
    • View Profile
Re: Upgrades to my R-code Mach 1...
« Reply #5 on: April 11, 2014, 11:14:03 AM »
Thanks for the kind words guys. I was lucky to buy the car when I was 15 (my first car) when nobody wanted muscle cars. Spent the next 15 years gathering NOS parts for it, back when you could actually easily find NOS parts for them, before starting the 1 1/2 year restoration. Of course I'm pretty sure '69 Machs didn't come with dual 4 427 Sideoilers, but what else are ya gonna do when you've got one laying around? :)

I talked to several guys about the small block springs who have been running them for years on their drag cars and they didn't seem to have issues, so we'll see. Jay runs these same springs on his Mach (although he has an aluminum block and heads) as does Rusty Gillis on his original SS Cobra Jet. One things for sure, my old tower type compressor works MUCH better, so I'll update my old one and use it if need be. Much safer than compressing the spring out of the car!! Sorry Len, it only works on shock tower cars :)

I am going to remove the sway bar and probably leave it off. With a locker and skinnys on the front, corners will be treated with respect...lol. I have a set of opentracker roller perches ordered but they only make them when an order is placed it seems. Don't think I'll have them in time, but with my other compressor, changing them won't be a big deal. Just compress the spring in the tower, unbolt the shock and perch and replace. No taking the spring out.

Despite what it looks like, the car does not get trailered. I just don't drive it in the rain or on stone roads. This will be the first time on a trailer since I was restoring it.
Doug Smith


'69 R-code Mach 1, 427 MR, 2x4, Jerico, 4.30 Locker
'70 F-350 390
'55 Ford Customline 2dr
'37 Ford Coupe

mmason

  • Full Member
  • ***
  • Posts: 125
    • View Profile
Re: Upgrades to my R-code Mach 1...
« Reply #6 on: April 11, 2014, 12:07:09 PM »
You can buy your spring perches here.

http://www.streetortrack.com/Spring-Perches-c-928.html
Michael Mason

SE2839

  • Guest
Re: Upgrades to my R-code Mach 1...
« Reply #7 on: April 11, 2014, 09:55:49 PM »
Cleaner than my dinner plate, very sweet indeed!
« Last Edit: April 11, 2014, 10:07:44 PM by SE2839 »

jayb

  • Administrator
  • Hero Member
  • *****
  • Posts: 7404
    • View Profile
    • FE Power
Re: Upgrades to my R-code Mach 1...
« Reply #8 on: April 12, 2014, 02:35:28 AM »
The car looks beautiful Doug, and I think you hit the nail on the head with the wheels.  That thing is going to look even better going down the track...
Jay Brown
- 1969 Mach 1, Drag Week 2005 Winner NA/BB, 511" FE (10.60s @ 129); Drag Week 2007 Runner-Up PA/BB, 490" Supercharged FE (9.35 @ 151)
- 1964 Ford Galaxie, Drag Week 2009 Winner Modified NA (9.50s @ 143), 585" SOHC
- 1969 Shelby Clone, Drag Week 2015 Winner Modified NA (Average 8.98 @ 149), 585" SOHC


ScotiaFE

  • Hero Member
  • *****
  • Posts: 1409
  • Howie
    • View Profile
Re: Upgrades to my R-code Mach 1...
« Reply #9 on: April 12, 2014, 06:01:18 AM »
I'm not saying don't use the light springs.
Just that not all springs are equal.
The springs I was talking about were bought from some abc company put in and dropped
about 1 1/2" to much for liking. Bought another set from cba company and settled down to about
1/2" to where I was looking for. Now this was more than 10 years ago so I sure all the Mustang parts houses
have all got together and now all springs are an equal standard. ::)

Hopefully all the Fairlane parts houses will get together and make all their parts standard and correct also.  ;D ;D ;D

cjshaker

  • Hero Member
  • *****
  • Posts: 4458
    • View Profile
Re: Upgrades to my R-code Mach 1...
« Reply #10 on: April 12, 2014, 09:32:54 AM »
Howie, I know what you mean about the spring variances. I will just have to wait and see how these sit. I think I should have gone with 28" tall front tires. That would have gained me another inch in the front, but I'll wait and see how it sits when the engine is in.

And Mr. Mason, thanks for the link. I just may have to give them a call and see if they have them in stock.

« Last Edit: March 28, 2019, 01:22:15 PM by cjshaker »
Doug Smith


'69 R-code Mach 1, 427 MR, 2x4, Jerico, 4.30 Locker
'70 F-350 390
'55 Ford Customline 2dr
'37 Ford Coupe

babybolt

  • Hero Member
  • *****
  • Posts: 516
    • View Profile
Re: Upgrades to my R-code Mach 1...
« Reply #11 on: April 12, 2014, 03:59:01 PM »
Hi Doug,

When you bought your ET wheels, did you go through a dealer or directly to ET?

The other Doug

cjshaker

  • Hero Member
  • *****
  • Posts: 4458
    • View Profile
Re: Upgrades to my R-code Mach 1...
« Reply #12 on: April 12, 2014, 07:44:26 PM »
When you bought your ET wheels, did you go through a dealer or directly to ET?

The other Doug

Doug, I bought them through Speedway Motors, but only because the fronts were $50 cheaper each wheel because they didn't have lug nuts and they take a special lug nut and key. Speedway has "garage sale" items that either are missing parts or have flaws on them. These were perfect, just no lug nuts. Then I called ET directly and bought the lug nuts off of them for $20 ($2 each, very reasonable). Saved myself $80 :)

And I have to mention here, when I called ET, they were VERY helpful and friendly to deal with. The first person I talked to actually forgot to send the nuts out, so after a week I called back. That time I think I got the owners wife and she was VERY apologetic and said they had just caught the oversight that morning. She sent them out to me that very day through USPS Priority Mail at their expense. She was very nice. I got them 3 days later. If I ever want ET wheels again I think I will deal with them directly. They will even custom make your wheels if you have special needs like backspacing, lug size etc., as long as it's doable on the casting.

You have to love a company when it's U.S. based and they treat you like you're a priority customer. I got the same treatment at CalTrac. They even told me if I did not like my spring ride height that he would let me try/drive them for over a year and still be able to return them for a different pair. Now THAT'S customer service! This whole venture has somewhat restored my faith in that small businesses still know how to treat a customer....with integrity, quality of workmanship, standing behind their product and outstanding customer service.
Doug Smith


'69 R-code Mach 1, 427 MR, 2x4, Jerico, 4.30 Locker
'70 F-350 390
'55 Ford Customline 2dr
'37 Ford Coupe

fastback 427

  • Sr. Member
  • ****
  • Posts: 442
    • View Profile
Re: Upgrades to my R-code Mach 1...
« Reply #13 on: May 13, 2014, 03:54:00 PM »
Hey Doug, just wondering if you got your engine back yet or if you have an eta?
Jaime
67 fastback 427 center oiler 428 crank Dove aluminum
top end toploader
67 fairlane gta cross bolted 12:1 390 Dove aluminum top end c6 3600 stall
65 falcon straight axle project
67 mustang coupe project
76 f350 dually 390 mirror 105 4bbl 4spd
74 f100 xlt 390 c6 factory ac

cjshaker

  • Hero Member
  • *****
  • Posts: 4458
    • View Profile
Re: Upgrades to my R-code Mach 1...
« Reply #14 on: May 13, 2014, 08:01:48 PM »
Hey Doug, just wondering if you got your engine back yet or if you have an eta?

No, after over 5 months :(


Since I've had plenty of time to nit-pick at the car, I decided to tackle my rim-blow horn switch and a fuel gauge problem that recently showed up. After a few pointers on the rim-blow switch, I installed a new one with very little problem. I had tried that before and ruined a good NOS switch. I was having a little problem at first, using the supplied "popsicle" stick so I looked for something a little better suited to sliding the switch in. Being a guitar player, I found that a guitar pick worked PERFECTLY.. It went smoothly after that! ;D

Here's a picture of how I used it to walk my way around the wheel.


Soooo, with that taken care of, on to the fuel gauge.....

The gauge was not reading steady. It would fluctuate slowly, then not read at all. Typically it's a sender issue, or a wiring problem. So I started doing some checks and everything was checking out ok. Had me a little puzzled, so out came my wiring diagram. At this point I attributed the problem to a reproduction circuit board that I installed when I did the car. It had delaminated in a small area then, so I assumed it got worse and that may have been causing my problem.

So out came the dash and gauge cluster....


After getting frustrated not finding any issues with anything, all grounds cleaned and checked and the circuit board looked ok except for the small delaminated area, I started checking my plug in. After exhausting all checks there, I was down to the gauges, so I checked them. The low voltage gauges that Ford uses should all spec out at about 13 ohms. They all did except for the fuel gauge which read .2 ohms. First time I've ever had an actual gauge go bad on me, so I never thought to check it until I had no place else to go. So anyway, I'm locating a good gauge, replaced the cheap circuit board with a newer, better made one, then my issues should be solved. I hope :)
« Last Edit: March 05, 2018, 08:33:11 PM by cjshaker »
Doug Smith


'69 R-code Mach 1, 427 MR, 2x4, Jerico, 4.30 Locker
'70 F-350 390
'55 Ford Customline 2dr
'37 Ford Coupe

cjshaker

  • Hero Member
  • *****
  • Posts: 4458
    • View Profile
Re: Upgrades to my R-code Mach 1...
« Reply #15 on: July 22, 2014, 09:13:31 PM »
Finally got the engine done and some dyno figures so figured I'd share them and show some progress on the car.

The compression ended up being 10.53 and the best figures came in at 42* degrees timing. That surprised me a bit compared to what I ran on my other engine which also had MR heads and a Ford MR intake and BJ/BK carbs. It was very similar to this one but the cam is much more aggressive in this engine. Idle seemed to come in at about 900-950. It's a good thing it's a 4 speed with 3.89 gears. I'd like to change out to 4.11s but that will have to wait until I can add the Gear Vendors overdrive unit sometime in the next year or two.

Here's the dyno chart and figures. It was actually still climbing at 6000 but not by much, so running it farther was something I didn't want to do since I wasn't able to go with the 2.2 chevy journal size on the factory cross drilled steel crank. Still, with a bit of race gas and the timing at 42, it should go to 6500 pretty cleanly. For the street I'll drop it back to about 40* to stay on the safe side. I have the intake and distributor marked so it's just a matter of lining up the marks.


You can see the cam doesn't really come in till about 3500. The big drop in torque before that was likely due to having to tie the secondaries open on the dyno. You can see the engine was really rich till about 4000 where it could actually use the secondaries. I'll have to tune for that in the car.

Here's a couple shots of the Oregon Cams shaft support system that's on this engine.


I got it home and did some detailing on it and went to put an ATI Super Damper on it and of course the timing is off by 7 degrees, which is a known problem. So I ground the timing pointer to match TDC. Here's a couple shots of the engine and timing adjustment. The angle is off compared to how I'd be looking at it in the car, so it looks like the timing is off a bit.


I got the new Ram flywheel and Ram Power Grip HD clutch installed and the Lakewood bell put back on and got it put back in the car. After getting everything hooked back up I tried the clutch and the pedal feel is not as bad as I expected it to be. In fact it's about the same as the stock clutch in my '09 GT Mustang, which I always thought felt pretty stiff for a factory clutch. I'm used to it, so this one shouldn't be a problem for me. Everything worked real smooth.


When I did the car 12 years ago, I knew the factory MR heads were going to be a tight fit since they don't have the 16 bolt pattern. To help accommodate the heads, I took a rose bud torch head and a 4x4 block of hardwood and a BIG sledge and heated the factory R code shock tower braces cherry red and beat them back against the shock towers. They stuck out a ways from the factory and would have been tight even with the CJ exhaust pattern. It's a darn good thing I had the foresight to do this or they would NOT have fit. As it is now, they "nibble" at the braces, but I can live with that. You can see in these shots where the previous engine kept nibbling at them, but they fit!! ;D ;D


So I've been working pretty steadily the last couple weeks to get things back together. I'm pretty slow at this because I'm too darn picky about stuff on this car ::) I wouldn't normally have to have everything perfect, but I've had this thing since I was 15 and it's always been my dream car since I was a kid, so I tend to go overboard on everything. Here's some shots of the progress as I cleaned and installed everything. I repainted a few things because of the previously mentioned "affliction"...lol


I ditched the Flowmaster 40s that I had on it before because they droned REALLY bad in the car at about 2000-4000 rpm, right where you drive. You couldn't hardly hear anything....except car alarms going off when you drove by ;D ;D
I got a set of Borla Pro XS mufflers which are all stainless and will match my stainless exhaust pretty good. I did a lot of research and listened to a lot of sound samples to choose these. I also have a set of Borlas on my GT Mustang and I really like them, so I know they don't drone and have a really nice tone at any cruise speed but really open up when you get on the throttle without having that nasty rapping sound common with headers and glasspacks. I think that I'm going to like these on this car with the Hooker headers! The car definitely makes an impression on people when it fires up :)


I'm going to try something different with the tailpipes this time. I wasn't happy how they were before with the staggered shock set-up. It gets REALLY tight over the axle and you have to make some sharp bends.

I was also having a problem figuring out how to keep my original oil pressure sending unit and still add my Autometer mechanical  gauge. There just wasn't enough room to add a T fitting without some cobbled connectors which I really didn't like.


And then I had a "DUH" moment. While laying under the car it struck me that the sideoiler galley plugs were the same size as the fitting I needed, so I just took the front one out and ran my braided line directly into the first port. Why I didn't think of that before I don't know ::)  It left just enough room to clear the motor mount with about 1/2" to spare and worked out perfectly.


Tonight I got the front of the engine finished up, radiator, fan, hoses etc hooked up, so I'm ready to put water in it and finish the hookups on the engine and it should be ready to fire. I'm hoping to get it running this weekend. I'll post more when I do. I'm really anxious to get this thing back on the ground and see how it's going to sit and look with the new springs and wheels.

« Last Edit: March 05, 2018, 08:35:19 PM by cjshaker »
Doug Smith


'69 R-code Mach 1, 427 MR, 2x4, Jerico, 4.30 Locker
'70 F-350 390
'55 Ford Customline 2dr
'37 Ford Coupe

jayb

  • Administrator
  • Hero Member
  • *****
  • Posts: 7404
    • View Profile
    • FE Power
Re: Upgrades to my R-code Mach 1...
« Reply #16 on: July 22, 2014, 09:50:02 PM »
Looks great, Doug, that engine should move that car right along.  Post a video when you get it fired up.  I'm hoping to do the same with my Drag Week car this weekend...
Jay Brown
- 1969 Mach 1, Drag Week 2005 Winner NA/BB, 511" FE (10.60s @ 129); Drag Week 2007 Runner-Up PA/BB, 490" Supercharged FE (9.35 @ 151)
- 1964 Ford Galaxie, Drag Week 2009 Winner Modified NA (9.50s @ 143), 585" SOHC
- 1969 Shelby Clone, Drag Week 2015 Winner Modified NA (Average 8.98 @ 149), 585" SOHC


65er

  • Full Member
  • ***
  • Posts: 231
    • View Profile
Re: Upgrades to my R-code Mach 1...
« Reply #17 on: July 22, 2014, 10:45:44 PM »
Dang Doug, the bottom of your car is nicer than the top of mine!  Outstanding  :)
-Wade

458" Blair Partick stroker/TKO 600 .64 OD/3.89 gears

My427stang

  • Hero Member
  • *****
  • Posts: 3929
    • View Profile
Re: Upgrades to my R-code Mach 1...
« Reply #18 on: July 23, 2014, 06:21:20 AM »
Looks great Doug!  Sounds like a rowdy build

You will love those Borlas, at first you may think they are too quiet, but truth is, they bark like hell, you just don't hear the reverb inside.  With no other changes, my car "felt" faster too, but hard to tell if it really helped, seemed to though
---------------------------------
Ross
Bullock's Power Service, LLC
- 70 Fastback Mustang, 489 cid FE, Victor, SEFI, Erson SFT cam, TKO-600 5 speed, 4.11 9 inch.
- 71 F100 shortbed 4x4, 461 cid FE, headers, Victor Pro-flo EFI, Comp Custom HFT cam, 3.50 9 inch

machoneman

  • Hero Member
  • *****
  • Posts: 3851
    • View Profile
Re: Upgrades to my R-code Mach 1...
« Reply #19 on: July 23, 2014, 06:43:51 AM »
Very nice! Your write-up and pics could be a great model for others wanting to post their builds.  :)
Bob Maag

cjshaker

  • Hero Member
  • *****
  • Posts: 4458
    • View Profile
Re: Upgrades to my R-code Mach 1...
« Reply #20 on: July 23, 2014, 07:25:39 AM »
Post a video when you get it fired up.  I'm hoping to do the same with my Drag Week car this weekend...

Jay, I'll do that, but my car will sound like a Chihuahua compared to your wolf  :)

Dang Doug, the bottom of your car is nicer than the top of mine!  Outstanding  :)

Wade, Things just kind of get out of hand when I do something. ::)

Looks great Doug!  Sounds like a rowdy build

You will love those Borlas, at first you may think they are too quiet, but truth is, they bark like hell, you just don't hear the reverb inside.  With no other changes, my car "felt" faster too, but hard to tell if it really helped, seemed to though

Ross, it is a bit rowdy. I thought the Borlas were real quiet on my GT until I had my son drive it. I told him to get on it a little while I stood and watched. I was surprised at just how loud they were. You're right, you really can't tell from inside. And Borlas actually flow better than most of the other brands. A lot better than Flowmasters anyway. They really make a nice product. I'm sold on them and really anxious to try these out!

Very nice! Your write-up and pics could be a great model for others wanting to post their builds.  :)

Bob, I have a few friends with restored Mustangs and muscle cars, but they're all stock and not really into the performance aspect, so you guys are the only ones who "understand", so to speak...lol
Doug Smith


'69 R-code Mach 1, 427 MR, 2x4, Jerico, 4.30 Locker
'70 F-350 390
'55 Ford Customline 2dr
'37 Ford Coupe

ScotiaFE

  • Hero Member
  • *****
  • Posts: 1409
  • Howie
    • View Profile
Re: Upgrades to my R-code Mach 1...
« Reply #21 on: July 23, 2014, 07:29:18 AM »
Looking Great Doug!

I know it's your baby and a real R car and all, but if was moi I would seriously consider a D shaft loop or two.
You know just in case.
Plus your going to need them when you put some real tires on it. ::)

turbohunter

  • Hero Member
  • *****
  • Posts: 2509
    • View Profile
Re: Upgrades to my R-code Mach 1...
« Reply #22 on: July 23, 2014, 07:44:08 AM »
Beautiful car Doug.
Love to see a vid of the start up also.
Marc
'61 F100 292Y
'66 Mustang Injected 428
'66 Q code Country Squire wagon


fastback 427

  • Sr. Member
  • ****
  • Posts: 442
    • View Profile
Re: Upgrades to my R-code Mach 1...
« Reply #23 on: July 23, 2014, 08:31:40 AM »
That car is ridiculously clean! Glad to see you finally get your engine back. Kinda weird seeing blue heads on a build these days, with all the aluminium flying around! Hopefully all goes well for you with no troubles. Maybe the FE Race and Reunion will happen this time around.
Jaime
67 fastback 427 center oiler 428 crank Dove aluminum
top end toploader
67 fairlane gta cross bolted 12:1 390 Dove aluminum top end c6 3600 stall
65 falcon straight axle project
67 mustang coupe project
76 f350 dually 390 mirror 105 4bbl 4spd
74 f100 xlt 390 c6 factory ac

cjshaker

  • Hero Member
  • *****
  • Posts: 4458
    • View Profile
Re: Upgrades to my R-code Mach 1...
« Reply #24 on: July 23, 2014, 10:37:51 AM »
Looking Great Doug!

I know it's your baby and a real R car and all, but if was moi I would seriously consider a D shaft loop or two.
You know just in case.
Plus your going to need them when you put some real tires on it. ::)

Howie, it's already in the works. I'll be coming off the seat bolts with threaded spacers and make a cross brace for the loop. That way no holes are drilled. I have a custom drive shaft with 1350 U-joints but it's not going on the track till the loop is done.

And I agree, fastback, you don't see iron heads on performance builds much anymore. I try to keep this old-school so I'll even ditch the March pulleys soon. The only new tech stuff left then will be the MSD and Autometer tachometer, but I'll keep them for obvious reasons. Having an adjustable rev limiter and shift light with recall is really nice.
Doug Smith


'69 R-code Mach 1, 427 MR, 2x4, Jerico, 4.30 Locker
'70 F-350 390
'55 Ford Customline 2dr
'37 Ford Coupe

lovehamr

  • Full Member
  • ***
  • Posts: 209
    • View Profile
Re: Upgrades to my R-code Mach 1...
« Reply #25 on: July 25, 2014, 08:10:30 AM »
Doug, as others have said the car is stunning!  For me it's also a trip into the past because I had aluminum slots on my first car as well and it was a 70 Mustang.  So I dig the look.  Can't wait to hear it start up through those Borla muffs.

Steve

cjshaker

  • Hero Member
  • *****
  • Posts: 4458
    • View Profile
Re: Upgrades to my R-code Mach 1...
« Reply #26 on: August 03, 2014, 01:35:47 AM »
Finally getting around to posting after a busy couple of weeks. I got the engine in and hooked up without much fuss, filled the filter, cooler and engine with 10 quarts of 15w-40 Rotella, hit the switch and it fired off after just a couple turns.....only to get a loud tinny metal to metal sound. It's amazing how fast you can go from a high to a big low. Talk about a sinking feeling! :( After shutting it off right away I cautiously restarted it several times for about 10 seconds at a time to figure out where the noise was coming from. After narrowing it down to the bellhousing area I felt a LITTLE better that at least it wasn't something in the engine.

I thought it might have been the starter not disengaging, although I wasn't overly optimistic of that being the case because the sound wasn't right, but I took it out anyway. It wasn't the issue, but I did find an issue with the new PowerMaster starter. All Ford starters that I've seen are lightly clearanced on the lower portion of the snout to clear the flywheel, this one wasn't and I  could see where the ring gear was chewing at it.


So after a couple minutes with my die grinder I  made the necessary clearance and put it back in, but the sound was still there. I knew the transmission had to come back out then, so I pulled everything back apart and took it out. It didn't take too long to find the culprit. Evidently the new Ram pressure plate was a little taller than my old one and the bolts and rivet head were just lightly making contact with my throwout arm. Of course being inside the bellhousing made it sound much louder, and more deadly ::) Here's a shot showing the light contact that was happening. Luckily it didn't hurt anything on the pressure plate.


After some advice from DaleP, I realized the factory welded in 1/4" spacer between the Lakewood bell and throwout arm clip could be removed and would give me the space back that I needed. I was worried that I wouldn't be able to get the bell out without pulling the engine and that was something that didn't thrill me very much, but to my surprise I was able to remove it without even loosening my headers! That was a big relief! I got the cutoff wheel, chisel and grinder out and had it removed in about 20 minutes. One thing's for sure, they call these things "bells" for a reason, they resonate like CRAZY when struck! The first time I took the chisel and whacked it with a hammer to break it free after cutting the welds, it rang MY bell! I have an actual antique 20" cast dinner bell and this thing was MUCH louder.

So anyway, after getting it all back together I fired it back up this morning and played with the carbs to get the best idle I could. The oil pressure comes up right away, but when it's warm it only has 25lbs at idle. I like to have more than that, but it immediately comes up with the rpms and goes up to about 70, so I think it's livable. It idles at 850-900 consistently, which isn't bad considering the 264@.050 cam. I wondered how the clutch would act taking off with the lopey idle at that low of an RPM, but to my surprise it was VERY smooth and required hardly any throttle to get it moving. I did a few up and downs in the driveway to test it out and was pretty impressed at how smooth it was. Pedal feel isn't bad either, to me anyway, so I'm pretty happy with that.

I had a few friends stop out and they all loved how it sounded with the Borlas, and I have to say that I'm every bit as happy with the sound as I hoped I would be. I still need to make my tailpipes, so that will mellow it a bit more, but it sounds pretty wicked if you ask me. An old friend who has always been a Ford nut and really got me into performance cars when I was a kid stopped out and he just had a big grin on his face listening to it. And since he's the guy I originally bought this car off of when I was 15 (my first car purchase), that made me pretty happy also. :)

I topped it off with one more addition....


Here's a little video of a startup and some of the exhaust note. I need to get a better video, but you get the idea.

http://youtu.be/ui75pAVo6h8

Now I just need to get the hood back on, the front aligned, finish the tailpipes and finish a couple of other minor jobs and it will be ready to roll. Hopefully I'll have it on the road by next weekend.
« Last Edit: March 05, 2018, 08:36:45 PM by cjshaker »
Doug Smith


'69 R-code Mach 1, 427 MR, 2x4, Jerico, 4.30 Locker
'70 F-350 390
'55 Ford Customline 2dr
'37 Ford Coupe

Bolted to Floor

  • Hero Member
  • *****
  • Posts: 596
    • View Profile
Re: Upgrades to my R-code Mach 1...
« Reply #27 on: August 03, 2014, 08:26:53 AM »
It looks and sounds great.  8)
John D -- 67 Mustang 390 5 speed

BruceS

  • Hero Member
  • *****
  • Posts: 738
    • View Profile
Re: Upgrades to my R-code Mach 1...
« Reply #28 on: August 03, 2014, 08:46:28 AM »
Doug,
Very nice job!  Good wheel choice too.  I'm going to look into those Borlas for the Galaxie... Not at all happy with the Flowmasters on there now.

Thanks for posting!

Bruce
66 Fairlane 500, 347-4V SB stroker, C4
63 Galaxie 500 fastback, 482 SO 4V, Cruise-O-Matic

turbohunter

  • Hero Member
  • *****
  • Posts: 2509
    • View Profile
Re: Upgrades to my R-code Mach 1...
« Reply #29 on: August 03, 2014, 08:57:37 AM »
Very nice Doug.
Liking the Borlas also.
Would you clear up the interference deal for me?
Is that an aftermarket bell housing deal?
Or more specifically a Lakewood deal?
Marc
'61 F100 292Y
'66 Mustang Injected 428
'66 Q code Country Squire wagon


cjshaker

  • Hero Member
  • *****
  • Posts: 4458
    • View Profile
Re: Upgrades to my R-code Mach 1...
« Reply #30 on: August 03, 2014, 11:16:18 AM »
Would you clear up the interference deal for me?
Is that an aftermarket bell housing deal?
Or more specifically a Lakewood deal?

Marc, the issue was just a combination thing. I have a Lakewood bellhousing, an older unit that is at least 30 years old, and I have used 3 different clutch/flywheel combos in it. The first was a OEM type with a little extra holding power, the second was a Centerforce combo, and neither had any issues with fitment or clearance. This third set, a Ram Powergrip HD clutch pack and billet flywheel did. Evidently the pressure plate assembly is slightly taller/thicker than the others I've used. This set the pressure plate slightly out farther, just enough to lightly make contact with my throwout arm. There is an indented area in the arm where it pivots and sits in the clip inside the bellhousing. That raised area was where the pressure plate bolts (not the ones that hold it to the flywheel, but the bolts that hold the pressure plate assembly together) made contact. It was just catching the top edge of the throwout arm. There is a small 1/4" spacer that sits behind that clip that is welded into the bellhousing. It raises the clip up a bit. I simply cut the welds, removed the spacer and ground it flat and reinstalled the clip. I had to grind the bell opening where the arm goes through because it was not square from the factory and the shallow side was close to the arm at full depression. A really simple job overall, it only took about 20 minutes worth of work with the bell out, and it's something I probably should have checked before installation but didn't because I had never had the issue before. I hope that explains it a bit better. I should have taken more detailed pictures to show the issue, but I just wanted to get it done and back together :)

I can still take pictures to show it better if you want. Just let me know.
« Last Edit: August 03, 2014, 11:33:10 AM by cjshaker »
Doug Smith


'69 R-code Mach 1, 427 MR, 2x4, Jerico, 4.30 Locker
'70 F-350 390
'55 Ford Customline 2dr
'37 Ford Coupe

turbohunter

  • Hero Member
  • *****
  • Posts: 2509
    • View Profile
Re: Upgrades to my R-code Mach 1...
« Reply #31 on: August 03, 2014, 06:03:06 PM »
Yeah much better, thanks.
I couldn't visualize how the arm was mounted in the Lakewood housing as I'm just used to OEM styles.
Totally get wanting to get it back together also.
Couple of questions, hope you don't mind.
Is it possible the aluminum flywheel is a bit thicker than steel?
And does not the old Lakewood housings have more room inside than most new ones?
Thanks for your time.
Marc
'61 F100 292Y
'66 Mustang Injected 428
'66 Q code Country Squire wagon


cjshaker

  • Hero Member
  • *****
  • Posts: 4458
    • View Profile
Re: Upgrades to my R-code Mach 1...
« Reply #32 on: August 03, 2014, 09:17:55 PM »
Heck no I don't mind questions. That's what we're all here for.
It's a steel flywheel to help idle and street manners, and to be honest I never measured thickness. My Centerforce flywheel was lighter, but that's typically done with scalloping on the back side, which it was. The Ram didn't seem any thicker from the ring gear out, but clearances were close enough that it wouldn't have taken much. So it may have been the flywheel, the pressure plate or both. But I'm not taking it back apart to measure  ;D

Lakewood bells have always been the same but I think dies wore over the many years of production so fitment issues slowly got worse. Recently, Lakewood quit making them altogether and I'm guessing that's probably the reason why, it's just not a big enough seller to reinvest in. That's just a guess though.
Doug Smith


'69 R-code Mach 1, 427 MR, 2x4, Jerico, 4.30 Locker
'70 F-350 390
'55 Ford Customline 2dr
'37 Ford Coupe

turbohunter

  • Hero Member
  • *****
  • Posts: 2509
    • View Profile
Re: Upgrades to my R-code Mach 1...
« Reply #33 on: August 03, 2014, 09:48:25 PM »
Oops, sorry, had it in my head your new set up was aluminum.
Thanks Doug, really appreciate it.
BTW, you car is awesome. Congratulations.
Marc
'61 F100 292Y
'66 Mustang Injected 428
'66 Q code Country Squire wagon


machoneman

  • Hero Member
  • *****
  • Posts: 3851
    • View Profile
Re: Upgrades to my R-code Mach 1...
« Reply #34 on: August 04, 2014, 09:51:06 AM »
Heck no I don't mind questions. That's what we're all here for.
It's a steel flywheel to help idle and street manners, and to be honest I never measured thickness. My Centerforce flywheel was lighter, but that's typically done with scalloping on the back side, which it was. The Ram didn't seem any thicker from the ring gear out, but clearances were close enough that it wouldn't have taken much. So it may have been the flywheel, the pressure plate or both. But I'm not taking it back apart to measure  ;D

Lakewood bells have always been the same but I think dies wore over the many years of production so fitment issues slowly got worse. Recently, Lakewood quit making them altogether and I'm guessing that's probably the reason why, it's just not a big enough seller to reinvest in. That's just a guess though.

I do think that is correct (worn dies) as I've heard the same elsewhere. The last Lakewood I bought (SBF, not FE) was clearly off even by eye inspection as the right side (passenger) bolt holes definitely shifted to the right (so were the left of course). Upon indexing, I needed to move the bell up and to the left quite a bit (forget how much now). I drilled the centering holes on the bell for the block pins and welded in offset washers to the bell....washers that btw came with the bell!.

Oddly enough, I also could not get my tranny to draw up into the centering hole. Come to find the red paint was so thick it was the problem. Some sanding and voila! No more Lakewood bells for me.   
Bob Maag

cjshaker

  • Hero Member
  • *****
  • Posts: 4458
    • View Profile
Re: Upgrades to my R-code Mach 1...
« Reply #35 on: August 04, 2014, 08:08:19 PM »
Bob, mine being an older one, I've never had many of the problems that others have had. I've checked it on two blocks and never had to center the bell, it was always right on. Also, my tranny snouts have always slid right in to the pilot bearings, so that also tells me that the centering is good. I did initially have the problem of getting a toploader to draw up, but one quick roundy-round with a die grinder and it has always drawn up with just a slight resistance....perfect.

On the other hand, I've heard plenty of guys say they had to fight them to make everything perfect on later ones. But I've heard plenty of those stories with the new Quick Time bells also, along with other issues. So it seems either way you go, it's most likely you'll need to do some work to get them just right. I'd like to find another "old" Lakewood. They seem to have the least amount of issues.
Doug Smith


'69 R-code Mach 1, 427 MR, 2x4, Jerico, 4.30 Locker
'70 F-350 390
'55 Ford Customline 2dr
'37 Ford Coupe

machoneman

  • Hero Member
  • *****
  • Posts: 3851
    • View Profile
Re: Upgrades to my R-code Mach 1...
« Reply #36 on: August 05, 2014, 05:58:57 AM »
Good point. It could be the fact that the SBF bells were hydro-formed in such volume that the dies wore or somehow (more likely) the die locating pins shifted.  'Course they are different dies for the FE and SBF so....

Odd too that long ago nobody, and I mean nobody bothered to index an old Ansen or Lakewood bell. It was bolt it up and go!  And never an issue. So, something has changed over the years for sure.
Bob Maag

cobracammer

  • Hero Member
  • *****
  • Posts: 1165
    • View Profile
Re: Upgrades to my R-code Mach 1...
« Reply #37 on: August 05, 2014, 07:52:39 AM »
I just caught sight of your GT with the Saleen grill in your first photo!  You have a stable of Pony's there!  Very nice Doug.
Jason
2005 Saleen S281 (427 SOHC 2 X 4 EFI swap), T56 Magnum XL 6 speed, 9" Currie rear with 3.89 Gears

cjshaker

  • Hero Member
  • *****
  • Posts: 4458
    • View Profile
Re: Upgrades to my R-code Mach 1...
« Reply #38 on: August 05, 2014, 09:04:24 AM »
I just caught sight of your GT with the Saleen grill in your first photo!  You have a stable of Pony's there!  Very nice Doug.

Yeah, I added the Saleen grille and a Roush rear spoiler along with smoked taillights, front air dam, Borla cat-back, Kooks headers,  CAI with a 93 tune and an MG shifter, which is the cats meow for hitting 3rd in those trannys. I was looking for a Saleen or Roush engine, but couldn't find one locally. The car is a blast to drive, that's what caught my eye about your build, you're taking a pretty fast car and turning it into a monster! I love it ;D
Doug Smith


'69 R-code Mach 1, 427 MR, 2x4, Jerico, 4.30 Locker
'70 F-350 390
'55 Ford Customline 2dr
'37 Ford Coupe

cjshaker

  • Hero Member
  • *****
  • Posts: 4458
    • View Profile
Re: Upgrades to my R-code Mach 1...
« Reply #39 on: October 12, 2014, 03:34:37 AM »
Just wanted to throw up a video of the car since it's being driven pretty regularly now. I just made a 100 mile round trip to a car show a couple of weeks ago and it performed flawlessly, so I'm pretty confident now that I could drive it about anywhere within reason. So far I have over 300 miles on it. After a bunch of tuning, and having to replace the Taylor plug wires due to them failing (switched to Crane Firewire, very nice wires....thanks, Blair), the car runs flawlessly from stoplight to stoplight and around town slow speed, and transitions very well from there up to redline, which I've bumped up to 6400 on the rev-limiter but still shift at 6000. That keeps me from hitting the limiter on the 1-2 shift. The car runs cool....195 is the highest I got it to go on a 95* day with high humidity and slow in-town driving, otherwise it stays put at 180*.

The car really needs more gear. The 3.89s kill it off the line until the revs come up. The stock 3.78 stroke crank needs some revs before it really starts to come alive, but that's the nature of a 427. I have to back off the gas after the wheels start to spin and that kills it for the first 100'. I shifted pretty easily on here, but the toploader and Hurst work very well and I can speed shift pretty easily with this setup. I'll be looking at some lower gears over the winter, along with a Gear Vendors Overdrive. That will really wake the car up more.

After the initial run, at about the 25-30sec mark, you can jump ahead to about the 1:45 mark for a quick drive-by just for a listen to the Borla mufflers.

http://youtu.be/2-eOk3Y3k5A
Doug Smith


'69 R-code Mach 1, 427 MR, 2x4, Jerico, 4.30 Locker
'70 F-350 390
'55 Ford Customline 2dr
'37 Ford Coupe

Lenz

  • Hero Member
  • *****
  • Posts: 578
    • View Profile
Re: Upgrades to my R-code Mach 1...
« Reply #40 on: October 12, 2014, 06:42:11 AM »
I like your test track, that's a nice stretch with a ton of visibility too, and the occasional crown vic is easy to spot :D.  The car sounds strong and the Borlas play a great tune.  About that gear, they never are quite done are they?  Still, looking to move to the GV OD is less daunting than what you were facing earlier this year.  Nicely done 8)
Len Zielinski
'64 Galaxie 500 445 Toploader
'69 F100 300 stick

fastback 427

  • Sr. Member
  • ****
  • Posts: 442
    • View Profile
Re: Upgrades to my R-code Mach 1...
« Reply #41 on: October 12, 2014, 12:31:06 PM »
Looks and sounds great! Looks like the front jumps up pretty good. How does the cal tracks and new tires hook? Hows the ride?
Jaime
67 fastback 427 center oiler 428 crank Dove aluminum
top end toploader
67 fairlane gta cross bolted 12:1 390 Dove aluminum top end c6 3600 stall
65 falcon straight axle project
67 mustang coupe project
76 f350 dually 390 mirror 105 4bbl 4spd
74 f100 xlt 390 c6 factory ac

cjshaker

  • Hero Member
  • *****
  • Posts: 4458
    • View Profile
Re: Upgrades to my R-code Mach 1...
« Reply #42 on: October 12, 2014, 09:38:12 PM »
I like your test track, that's a nice stretch with a ton of visibility too, and the occasional crown vic is easy to spot :D.

Lenz, I'm pretty fortunate to have some really nice, old, deserted highways around my area. Plus a nice new interstate that has practically zero traffic at night and very little during the day. While it was pretty much a waste of tax money, it does prove useful for other purposes 8)

Here's another stretch that has very nice smooth pavement and zero traffic for 2 miles. This is where kids always went to drag race back in my school days.


And here's a pretty cool filling station that was restored back to its former glory and turned into the local Historical Societys building just a few miles from me. Stopped just to get a photo op.


Looks and sounds great! Looks like the front jumps up pretty good. How does the cal tracks and new tires hook? Hows the ride?

The front definitely rises and plants the car better, and the M/T ET Streets hook much better than any other street tires I've had, but as you can see from the video it really needs more gear and traction that only a track can provide. When the tires start to spin I have to let off to keep them from just smoking and that really ruins any "launch". There are better paved roads and with a small burnout it would have done much better, but I was just playing here.

The ride I've had to get used to. The suspension and rear tires really change the characteristics of the car, but nothing drastic and easily adjusted to once you get familiar with it. The rear springs are stiffer and with the front small block springs being much lighter the car will float a bit on uneven roads, but it's very nice and smooth and tractable on good roads. Once under hard acceleration I'm pretty amazed at how stable and responsive the car feels. It really settles down nicely and is very easy to drive through.
« Last Edit: March 05, 2018, 08:37:56 PM by cjshaker »
Doug Smith


'69 R-code Mach 1, 427 MR, 2x4, Jerico, 4.30 Locker
'70 F-350 390
'55 Ford Customline 2dr
'37 Ford Coupe

cobracammer

  • Hero Member
  • *****
  • Posts: 1165
    • View Profile
Re: Upgrades to my R-code Mach 1...
« Reply #43 on: October 13, 2014, 11:08:28 AM »
Slobbering over that sound! ! ! ! :o
Jason
2005 Saleen S281 (427 SOHC 2 X 4 EFI swap), T56 Magnum XL 6 speed, 9" Currie rear with 3.89 Gears

cjshaker

  • Hero Member
  • *****
  • Posts: 4458
    • View Profile
Re: Upgrades to my R-code Mach 1...
« Reply #44 on: November 27, 2014, 08:10:16 PM »
Thought I'd post an old picture I came across and throw up a couple of driving videos just for the fun of it.

Here's an old picture I came across that I hadn't seen in years. I bought the car when I was 15, literally in hundreds of pieces. It took me 3 years to get it together (somewhat) and get it on the road. This was my graduation day. I literally had only gotten it on the road about 1 week prior. Still missing a few parts, but it was DRIVEABLE!! ;D ;D


Here's a short video I took with my phone. I was letting up when I got into 4th because it wasn't the place for a full on boogey.
http://youtu.be/KhXVsk_Tos4

Here's a longer GoPro video, which you can skip to the 3:40 mark if you just want to see the fun part. Just a short cruise showing its idle characteristics and street manners. For a 264@.050 solid cam, it's really manageable and streetable with the lower gearing and 4-spd. Typical bad GoPro sound though.
http://youtu.be/4QCcUptqPIc

Really enjoyed driving it this late summer and managed to get about 300-350 miles on it. The roads have already been salted so it's on jacks now. I'm really hoping to finally make it to the FE Reunion next year.

« Last Edit: March 05, 2018, 08:38:49 PM by cjshaker »
Doug Smith


'69 R-code Mach 1, 427 MR, 2x4, Jerico, 4.30 Locker
'70 F-350 390
'55 Ford Customline 2dr
'37 Ford Coupe

cobracammer

  • Hero Member
  • *****
  • Posts: 1165
    • View Profile
Re: Upgrades to my R-code Mach 1...
« Reply #45 on: November 28, 2014, 03:56:19 PM »
Sweet Mary!  I love the "thumpity" sound on that cam!  and the exhaust makes it all the more sweet.  Congratulations on squeezing in some fun rides before the winter!  Beautiful car
Jason
2005 Saleen S281 (427 SOHC 2 X 4 EFI swap), T56 Magnum XL 6 speed, 9" Currie rear with 3.89 Gears

cjshaker

  • Hero Member
  • *****
  • Posts: 4458
    • View Profile
Re: Upgrades to my R-code Mach 1...
« Reply #46 on: November 30, 2014, 01:34:42 PM »
Thanks, Jason. The sound from the videos really doesn't do it justice. I'm going to buy a small mic to help with the GoPro sound quality and that should make a big difference. The cam IS pretty "thumpity" and draws attention wherever you go :)
Doug Smith


'69 R-code Mach 1, 427 MR, 2x4, Jerico, 4.30 Locker
'70 F-350 390
'55 Ford Customline 2dr
'37 Ford Coupe

cjshaker

  • Hero Member
  • *****
  • Posts: 4458
    • View Profile
Re: Upgrades to my R-code Mach 1...
« Reply #47 on: March 27, 2016, 07:05:04 PM »
In prep for this years Reunion and later, Drag Week, I finally got around to doing something I should have done years ago, adding sub-frame connectors to my Mach 1. I had looked around at all the different types and finally settled on the Tin Man Fabrications connectors. There seems to be advantages and drawbacks to each type, but I felt these would look the most "factory" when completed. Personally, I would have preferred the type that requires cutting a slot through the floor pan and keeping the tubing exactly in-line with the factory rear frame rails, but I didn't want to totally destroy the floorpans, so these are what I settled on. I am happy with the results though.

Here's what they look like after I got them, prepped them and painted them to match the car.


The first thing I did was to raise the car on jack stands as high as I could get it. Then, knowing that my floor is perfectly flat, I carefully measured at each corner of the car, on the frame, and made sure that it was not twisted while in the air. I didn't want to weld it into a twist. Surprisingly, each corner matched the other side perfectly and I didn't have to adjust the height anywhere.

The Tin Man connectors actually slide into the front frame rails about 6". That requires cutting off the rear tab of the front frame rail. It's the only cutting that you have to do, but regardless, once they are welded at the back, they're pretty much permanent anyway. I took my cut-off wheel and chisel and opened up the back while leaving the top portion of the tab. Most guys cut that rear tab completely off, but that leaves a big gap at the top that has to be dealt with since the Tin Mans are 2"x2" and the factory frame rails are more like 2 1/4" x 2 1/2".


They have a 1/4" piece of stock welded to the sides of the front to make up that difference and make them a snug fit along the sides. There's a reason for that. They recommend that you drill 2 holes on each side at 2" and 4" so that you can plug weld the sides and add a lot of torsional strength.

Here's a picture after I got them in and fitted after doing some fine tuning with a die grinder.


And here's a couple pictures after drilling the side holes and dressing the area in prep for welding.


Then I re-fitted them and marked at the rear where the paint needed removed for welding. I had one issue where the rear floorpan plug and screw were keeping the connector from fitting flush with the floorpan. I ground off the tip of the screw and gently persuaded the holes stamped edges a little flatter with a hammer. That was good enough to get a flush fit.

Here's a few pictures of fitting and dressing the rear.


And some pictures of them after being welded and wiping stuff down. Now all I need to do is lightly touch up a couple of places on the welding and then touch up the paint.


By the way, if you're wondering how I dealt with the fuel line right above the plug holes, I found the easiest way to deal with it was to worry about it, think about how to protect them, and then totally forget about it while I was welding.  That seemed to work out quite well. :o :o ::)

I was a little concerned about how low they would hang and if they would be easily noticeable after the installation. When I mocked them up, I stood back a ways and took this picture. Unless you are about 30' away, you can't even see them. They do hang down a bit in the back, which I'm not real keen on, but they won't be all that noticeable unless you're crouching and looking at the bottom.


Overall, I'm pretty happy with them and was able to finish the job in one day, minus the paint touch-up. It would have gone alot quicker if I had a lift. Doing this kind of work on your back, welding overhead, just plain sucks. I'm spoiled with my lift at work, and I really need to get one for my garage! I'm kind of anxious to see how they make the car feel, but while I've got it up in the air I'm going to finish making a front driveshaft loop, and I'm also considering adding a set of exhaust cut-outs. The cut-outs will have to wait until after the Reunion though. I've got too many other things to finish in the meantime, like getting my line-lock on and finishing the truck.

« Last Edit: March 05, 2018, 08:40:17 PM by cjshaker »
Doug Smith


'69 R-code Mach 1, 427 MR, 2x4, Jerico, 4.30 Locker
'70 F-350 390
'55 Ford Customline 2dr
'37 Ford Coupe

turbohunter

  • Hero Member
  • *****
  • Posts: 2509
    • View Profile
Re: Upgrades to my R-code Mach 1...
« Reply #48 on: March 27, 2016, 07:13:26 PM »
Those are indeed pretty darn clean.
I like that they insert into the frame.
Marc
'61 F100 292Y
'66 Mustang Injected 428
'66 Q code Country Squire wagon


427Fastback

  • Hero Member
  • *****
  • Posts: 603
    • View Profile
Re: Upgrades to my R-code Mach 1...
« Reply #49 on: March 28, 2016, 12:17:39 AM »
I put frame connectors in the 68 circa 1988 when the 427 swap was planned and in motion.I felt the difference in body movement inside of 50 feet...Did you feel the difference right away.??
1968 Mustang Fastback...427 MR 5spd (owned since 1977)
1967 Mustang coupe...Trans Am replica
1936 Diamond T 212BD
1990 Grizzly pick-up

My427stang

  • Hero Member
  • *****
  • Posts: 3929
    • View Profile
Re: Upgrades to my R-code Mach 1...
« Reply #50 on: March 28, 2016, 06:07:11 AM »
I put frame connectors in the 68 circa 1988 when the 427 swap was planned and in motion.I felt the difference in body movement inside of 50 feet...Did you feel the difference right away.??

Same here, mine was night and day difference.  In fact, just jacking the car up from the front you could see the difference!
---------------------------------
Ross
Bullock's Power Service, LLC
- 70 Fastback Mustang, 489 cid FE, Victor, SEFI, Erson SFT cam, TKO-600 5 speed, 4.11 9 inch.
- 71 F100 shortbed 4x4, 461 cid FE, headers, Victor Pro-flo EFI, Comp Custom HFT cam, 3.50 9 inch

cjshaker

  • Hero Member
  • *****
  • Posts: 4458
    • View Profile
Re: Upgrades to my R-code Mach 1...
« Reply #51 on: March 28, 2016, 06:45:28 AM »
I just did this yesterday and haven't had a chance to drive it yet since putting them on. I put the wheels on Saturday and changed the oil, then took it for its first spring drive. It will probably be a week or two until I drive it again while I do some more work to it.
Doug Smith


'69 R-code Mach 1, 427 MR, 2x4, Jerico, 4.30 Locker
'70 F-350 390
'55 Ford Customline 2dr
'37 Ford Coupe

machoneman

  • Hero Member
  • *****
  • Posts: 3851
    • View Profile
Re: Upgrades to my R-code Mach 1...
« Reply #52 on: March 28, 2016, 08:08:40 AM »
Nice parts and a nice install. I did the frame connectors long ago on my '70 Mach 1 with pieces from Competition Engineering's (C/E) weld-on square tubes but I like your slip-ins better. And yes, they did vastly tighten up the handling. An export brace and Monte Carlo bar is also highly recommended to really fix things up.

One trick: on a non-connected Stang, jack the car up right under the front's  L or R front strut rod box. Once that side's tire comes off the ground, it'll take another 6" to 8" of lift to get the opposite side's tire to lift off the ground! 

With sub frame connectors, a Monte Carlo bar and export brace.....only 1-2"! 

I also added the shock tower reinforcement plates ala' the OEM Ford Boss 302 Chassis Manual (worth buying) as shown in this link. That and most of the mods shown as well.

http://www.sancospecialties.com/mustang.htm
 
« Last Edit: March 28, 2016, 08:19:44 AM by machoneman »
Bob Maag

My427stang

  • Hero Member
  • *****
  • Posts: 3929
    • View Profile
Re: Upgrades to my R-code Mach 1...
« Reply #53 on: March 28, 2016, 08:09:54 AM »
Doug, do you run a Monte Carlo bar and an export brace?  Those also help tie up the front end significantly

Although, not a big deal for drag racing, as soon as the truck is back together, I am building a bolt on removable cross member between the lower control arm mounting points too.  First benefit is to allow me a single point to jack up the front end, but I also want to tie together the mounting points for strength in the corners.
---------------------------------
Ross
Bullock's Power Service, LLC
- 70 Fastback Mustang, 489 cid FE, Victor, SEFI, Erson SFT cam, TKO-600 5 speed, 4.11 9 inch.
- 71 F100 shortbed 4x4, 461 cid FE, headers, Victor Pro-flo EFI, Comp Custom HFT cam, 3.50 9 inch

cjshaker

  • Hero Member
  • *****
  • Posts: 4458
    • View Profile
Re: Upgrades to my R-code Mach 1...
« Reply #54 on: March 28, 2016, 09:29:57 AM »
Ross, I do have the one piece export brace, but not the Monte Carlo bar. It just gets in the road too much since I like to fiddle with stuff all the time. I could do without the export brace also, but I know the car needs it. My car is certainly not set up for corners, so it's not that big a deal to me. This summer, I plan on adding a 6 point cage, so that will pretty much take care of any remaining flex issues. I'm just trying to figure out a way of doing it without cutting holes in my rear interior panels. Good originals are impossible to find and reproduction ones don't fit worth a crap.

A way to tie the lower arm mounting points together is a great idea for anything that cuts corners. The benefit of a central jacking point would be a big plus also.

Bob, my car is an original R code car, so it already has the extra shock tower bracing.
Doug Smith


'69 R-code Mach 1, 427 MR, 2x4, Jerico, 4.30 Locker
'70 F-350 390
'55 Ford Customline 2dr
'37 Ford Coupe

afret

  • Guest
Re: Upgrades to my R-code Mach 1...
« Reply #55 on: March 28, 2016, 12:39:10 PM »
Great job as usual.   :)

« Last Edit: March 30, 2016, 11:20:15 AM by afret »

427Fastback

  • Hero Member
  • *****
  • Posts: 603
    • View Profile
Re: Upgrades to my R-code Mach 1...
« Reply #56 on: March 28, 2016, 12:56:34 PM »
When I ran the stock suspension in the 68 I did box the lower part of the towers as per the Boss 302 Chassis book.I made my own wrap arounds (69 style) and  welded them in.I also made the lower crossmember that the boss 302 T/A's used.All of this was done in the early 90's..The crossmember is now available from Cobra Auto..
I make my own monte carlo bars and they are adjustable and easily removed to do work..


1968 Mustang Fastback...427 MR 5spd (owned since 1977)
1967 Mustang coupe...Trans Am replica
1936 Diamond T 212BD
1990 Grizzly pick-up

cjshaker

  • Hero Member
  • *****
  • Posts: 4458
    • View Profile
Re: Upgrades to my R-code Mach 1...
« Reply #57 on: March 28, 2016, 02:16:08 PM »
Earl, that is exactly what I had in mind. Since I have the fold-down rear seat, I was going to curve them over the back and make my own rear bottom panel. I can carpet it then and it would look pretty stock. I may just eliminate the rear seat though. It adds a lot of weight and won't serve any purpose once the roll bars are in. Or I could just remove the seating and keep it folded down for a nice flat storage area. Thanks for those pictures.
Doug Smith


'69 R-code Mach 1, 427 MR, 2x4, Jerico, 4.30 Locker
'70 F-350 390
'55 Ford Customline 2dr
'37 Ford Coupe

machoneman

  • Hero Member
  • *****
  • Posts: 3851
    • View Profile
Re: Upgrades to my R-code Mach 1...
« Reply #58 on: March 28, 2016, 03:09:07 PM »
Bob, my car is an original R code car, so it already has the extra shock tower bracing.
[/quote]

Sorry, but I think you misunderstood what I was saying, common for folks who weren't around when Ford factory raced the '69's and 70's in Trans-Am long ago.

The tower braces I'm talking about and are in the link I supplied and aren't anything I believe Ford put on at the factory, R code or not. If you do have an R code with these plates, it's a first as I've never seen any OEM 'Stang with them! 

If fact, Kar Kraft and the Parnelli Jones team added same mid '69 season as they noted outer portion of the towers at their bases was flexing. The simple yet shaped pieces of steel are welded on outside of the engine compartment at the base of the towers at an angle to clear the upper A-arm on rebound. Easy enough to make btw as I did to mine.

http://www2.cougarpartscatalog.com/towerbrace.html

This and some other tricks make it worthwhile to grab a copy of that Boss 302 Chassis Manual.
« Last Edit: March 28, 2016, 03:14:05 PM by machoneman »
Bob Maag

rcodecj

  • Sr. Member
  • ****
  • Posts: 474
    • View Profile
Re: Upgrades to my R-code Mach 1...
« Reply #59 on: March 28, 2016, 03:36:34 PM »
I have those outside braces on my 67.


machoneman

  • Hero Member
  • *****
  • Posts: 3851
    • View Profile
Re: Upgrades to my R-code Mach 1...
« Reply #60 on: March 28, 2016, 03:58:41 PM »
I have those outside braces on my 67.

Yep. me too on the '70 Mach 1. Hey, I'll be the first to say it may be overkill but adding them+subframe connectors+Monte Carlo bar+export brace means we've done everything possible, per the B302 Book, short of a full roll cage to tighten things up!

I also like the piece that ties in the lower A-arm pivot boxes. I had thought a long time ago of making something up (its also on the B302 Book) but forgot about it until now. Maybe I'll cut some metal this summer!   
« Last Edit: April 18, 2016, 09:30:55 PM by machoneman »
Bob Maag

cjshaker

  • Hero Member
  • *****
  • Posts: 4458
    • View Profile
Re: Upgrades to my R-code Mach 1...
« Reply #61 on: March 28, 2016, 04:50:20 PM »
Sorry, Bob, I thought you were referring to the factory shock tower braces. I'm aware of the Trans Am mods that they did back in the day, but I won't be going that route. I just don't think it will be necessary for my street/strip car. If I were doing big wheelies, that may be a different story, but I'm not fond of smashed headers and oil pans :)
Doug Smith


'69 R-code Mach 1, 427 MR, 2x4, Jerico, 4.30 Locker
'70 F-350 390
'55 Ford Customline 2dr
'37 Ford Coupe

Heo

  • Hero Member
  • *****
  • Posts: 3285
    • View Profile
Re: Upgrades to my R-code Mach 1...
« Reply #62 on: March 28, 2016, 06:16:12 PM »
What i have found out working on Mustangs
The ones sold New in Sweden by Ford. Had a tube
crossmember under the engine with ears to bolt
to the pivot points for the lower a arms  and the export bar.
there is a couple one piece export bar and a couple
two piece bars one with welded mounts on the
sprig tower and one thats bolted on top of the tower
My September 64 mustang had the welded mounts
65-66 have torqueboxes from the convertibel
on hardtop cars
But not on private imported cars


The defenition of a Gentleman, is a man that can play the accordion.But dont do it

Heo

  • Hero Member
  • *****
  • Posts: 3285
    • View Profile
Re: Upgrades to my R-code Mach 1...
« Reply #63 on: March 28, 2016, 06:29:52 PM »
I  made those "boss" braces on the outside
of the shock towers for most of my customers
Mustangs  they were often cracked especialy
bigblock cars so i recomended that mod
and the shelby lowering plus  620 lbs "shelby"
springs it was a completly different car to drive


The defenition of a Gentleman, is a man that can play the accordion.But dont do it

Nightmist66

  • Hero Member
  • *****
  • Posts: 1209
    • View Profile
Re: Upgrades to my R-code Mach 1...
« Reply #64 on: March 28, 2016, 08:06:37 PM »
As far as jacking the car goes, there aren't many good places to go on the front of the things. I have this jack adapter from Summit Racing, with very minor modification, it works awesome.

http://www.summitracing.com/parts/sum-918008

Very nice work Doug! I still need to get my subframe connectors in.(sigh)
Jared


66 Fairlane GT 390 - .035" Over 390, Wide Ratio Top Loader, 9" w/spool, 4.86

My427stang

  • Hero Member
  • *****
  • Posts: 3929
    • View Profile
Re: Upgrades to my R-code Mach 1...
« Reply #65 on: March 29, 2016, 06:38:28 AM »
That's a nice little piece, assuming it isn't too tall, price is easy too

As far as jacking though, I don't have a picture for a concept, but my idea is different than the Boss 302 manual.  The B2 manual takes the existing bolt on tube crossmember and adds ears to tie it to the lower control arm bolts.  Good for strength, but not really convenient for jacking and only ties the rear of the lower control arm bolts together (not a big deal, but it is a leverage point)

I though that I would put a flat plat across the inside edge of each lower mount facing each other, then make a bolt on crossmember to tie the two plates together.  t would give you a crossmember that was under the oil pan.  The thing I haven't figured out yet is if there is enough room to have something strong enough without hanging too low.  Last thing I want is a big piece of steel hanging in the breeze, or something too low to get a jack under!

After the truck redo is done and the truck interior, both planned for April, I will get back on the Mustang and play with some ideas.
---------------------------------
Ross
Bullock's Power Service, LLC
- 70 Fastback Mustang, 489 cid FE, Victor, SEFI, Erson SFT cam, TKO-600 5 speed, 4.11 9 inch.
- 71 F100 shortbed 4x4, 461 cid FE, headers, Victor Pro-flo EFI, Comp Custom HFT cam, 3.50 9 inch

cjshaker

  • Hero Member
  • *****
  • Posts: 4458
    • View Profile
Re: Upgrades to my R-code Mach 1...
« Reply #66 on: April 18, 2016, 08:56:50 PM »
Finally getting some non 100% humidity days, I got my butt in gear this weekend and got a lot finished on the car in prep for some racing at the Reunion.

First, something I've wanted to do for a while but kept putting off, I finally made a torque strap for the engine. One reason of course was safety, not wanting to take out the hood, radiator and a bunch of other stuff in the event of a motor mount failure, the other reason, to stop my header bolt from pecking at the shock tower, which amplified inside the car and was annoying. Being factory MR heads, they don't have the side exhaust bolts, and it's readily apparent why Ford needed them in shock tower cars.

Since I don't run a sway bar, I made a bracket to bolt onto the mounting point on the frame. It's perfectly inline with the head, so it was a great spot to make an anchoring point.


Then I welded some rod tubing ends to a piece I made and bolted it to the head and bracket. Hopefully there isn't enough leverage against the bolts to break it. That's the plan anyway ::)


Then I made a driveshaft loop. Something that I should have done LONG ago. I didn't like the generic versions that you could buy, they just look like they're a 1-size-fits-all kind of deal, which they are. I also needed something that hugged the floor a little better since I have my exhaust tucked up kind of high, against the floorpan. A bar that went straight across would have interfered with them. Since I just installed the subframe connectors, it was the perfect place to bolt the mounts to. Here's a shot of the mounting brackets and the loop about 3/4 done.


And here's the finished deal.


I didn't like the way the bottom of the strap came together, it was supposed to overlap more for strength. So after the Reunion, I'll cut that bottom section out and make a smoother bottom loop, overlap it on the sides more, and weld it in. I laid some extra heavy welds for now though, so it'll serve its purpose. I also ordered a Mark Williams driveshaft with 1350's at both ends with their slip yoke. When I was finishing the car, I used a stock yoke with the 1330 and had a local company weld me up a shaft with 1350's to match my rear. The front was always a weak point, and that was not a good thing. The new shaft is chromemoly and should hold up nicely. It's supposed to be here tomorrow. Except for some paint touch-up and my line-lock, the car is done and ready. Until I decide what I want to do next to it ::)
« Last Edit: March 05, 2018, 08:43:09 PM by cjshaker »
Doug Smith


'69 R-code Mach 1, 427 MR, 2x4, Jerico, 4.30 Locker
'70 F-350 390
'55 Ford Customline 2dr
'37 Ford Coupe

machoneman

  • Hero Member
  • *****
  • Posts: 3851
    • View Profile
Re: Upgrades to my R-code Mach 1...
« Reply #67 on: April 18, 2016, 09:34:29 PM »
I'd leave the center section as is. It looks mighty strong if not 100% sexy!  ;D
Bob Maag

cjshaker

  • Hero Member
  • *****
  • Posts: 4458
    • View Profile
Re: Upgrades to my R-code Mach 1...
« Reply #68 on: March 29, 2019, 11:25:04 AM »
Time to resurrect this old thread. Except for the trailer hitch for Drag Week, it's been too long since I've done anything to it.

The hood and bars just came this week. That will keep me busy for a while this year, but I hope to have the trans installed in time for the Reunion. The only thing I have to do to it yet is change the bearing retainer, which I just ordered today. The fiberglass hood from Glasstek is a really nice piece. Thanks to Kevin (thatdarncat) for turning me on to them.

The 8 point roll bar came from S&W Race Cars. I really wanted to try and save some weight since my car is heavy to begin with, so I went with chromoly. Since I can't tig weld, now I have to find someone who can tig it for me, which is turning out to be a bigger pain than I thought it would be. If I would have stuck with mild steel, I could have welded it myself. :(


« Last Edit: March 29, 2019, 11:30:11 AM by cjshaker »
Doug Smith


'69 R-code Mach 1, 427 MR, 2x4, Jerico, 4.30 Locker
'70 F-350 390
'55 Ford Customline 2dr
'37 Ford Coupe

machoneman

  • Hero Member
  • *****
  • Posts: 3851
    • View Profile
Re: Upgrades to my R-code Mach 1...
« Reply #69 on: March 29, 2019, 11:45:37 AM »
So, how much was that nice 'glass hood? Made to use OEM hinges with weaker springs? Not a pure lift-ff is it?

I ask as I broke my engine limiter last Fall and darned if the too-close carb air cleaner stud (my fault) didn't put an nice bump in my OEM steel hood!

Weight? Been told that most that can use the OEM hinges aren't much lighter than the steel hood.

Can get a steelie (no ram air cutout)  for about $350 or so, less shipping. 
Bob Maag

jayb

  • Administrator
  • Hero Member
  • *****
  • Posts: 7404
    • View Profile
    • FE Power
Re: Upgrades to my R-code Mach 1...
« Reply #70 on: March 29, 2019, 01:25:04 PM »
Still a good choice on the chrome moly Doug, that 0.130" wall mild steel DOM tubing is really heavy.  I think I figured a 1/3 weight savings with the chrome moly over the mild steel.  Good luck on the search for a welder.

By the way, do you have a plan for installing it?  You can tack it with gas welds and then get it Tig welded later.  Make sure you put the 1/8" steel plates on the floor, and its a good idea to cut holes in the floor so that once the cage is tack welded it can drop down, so you can weld over the top of the hoop.  Then you just raise the cage back up, slide the 1/8" plates underneath the bar and so they cover the holes in the floor, and weld in place.
« Last Edit: March 29, 2019, 01:27:49 PM by jayb »
Jay Brown
- 1969 Mach 1, Drag Week 2005 Winner NA/BB, 511" FE (10.60s @ 129); Drag Week 2007 Runner-Up PA/BB, 490" Supercharged FE (9.35 @ 151)
- 1964 Ford Galaxie, Drag Week 2009 Winner Modified NA (9.50s @ 143), 585" SOHC
- 1969 Shelby Clone, Drag Week 2015 Winner Modified NA (Average 8.98 @ 149), 585" SOHC


cjshaker

  • Hero Member
  • *****
  • Posts: 4458
    • View Profile
Re: Upgrades to my R-code Mach 1...
« Reply #71 on: March 29, 2019, 02:18:07 PM »
Bob, the hood cost $520, without shipping. It is the bolt on type, and I got light weight springs from Glasstek when I purchased it. The pin on was $360, but I don't like the idea of a pin on if I need to get the hood open fast. Yes, a steel reproduction hood is cheaper, but I could really use the weight savings. I'm not sure of the weight. When I get it home, I'll weigh it. I had it shipped to my friends body shop so that they could put it in their paint "oven". It only goes to 140*, but that is enough to bring any gas bubbles to the surface that might be present in the fiberglass. My friend is pretty experienced in body work, and he has seen that issue before. Then I'll bring it home and start the fitting.

Jay, I will fit it myself and tack it all together. It came with the plates, so I'm covered there. You did bring up something that I've been debating on, and that's whether to cut holes to drop it and weld the top areas. According to the NHRA rule book, in lieu of a full weld, they do allow a 3/4 weld on the top bars as long as a gusset is used. I don't know which way I'll go yet, because I hate the idea of cutting holes in the floor to drop it. But I also don't like the idea of only having a 3/4 weld on the rear bars. I'm hoping that maybe I'll be able to scoot or move the bars enough, after they're tacked to the rear bars, to gain access to the tops for a full weld. Of course the other bars won't be an issue. It's probably not going to be possible, but I guess I'll make that decision when the time comes.
Doug Smith


'69 R-code Mach 1, 427 MR, 2x4, Jerico, 4.30 Locker
'70 F-350 390
'55 Ford Customline 2dr
'37 Ford Coupe

Heo

  • Hero Member
  • *****
  • Posts: 3285
    • View Profile
Re: Upgrades to my R-code Mach 1...
« Reply #72 on: March 29, 2019, 04:46:51 PM »
Doug, Are you using the headliner in the car? I have built a few cages
Some time i removed the headliner while welding. The headliner guy really love
to put it back with the cage in place, but if one give him a few cold ones during
installation he don't mind that much :D. Some time i have wedged the headliner
up with a asbestos sheet. If one use the TIG torch with short rod and just a plug
on the backside you can reach in to pretty cramped places. And there is torches with
a head that you can, how you say? Swivel around in different angles. Some Times
i had put double Glass in the gasweldig goggles just to get the head in a place to
be able to See the weld
Some times i have done like Jay say cut a hole in the floor with a hole saw and
welded the hole shut before installing the plate over it, that's what i would do
today since i had got a lot stiffer with age ;D
« Last Edit: March 29, 2019, 04:48:48 PM by Heo »


The defenition of a Gentleman, is a man that can play the accordion.But dont do it

cjshaker

  • Hero Member
  • *****
  • Posts: 4458
    • View Profile
Re: Upgrades to my R-code Mach 1...
« Reply #73 on: March 29, 2019, 05:26:41 PM »
Heo, I thought about removing the headliner to gain a couple inches there, but because of how the headliner attaches at the back window, the rear glass would have to come out, at least to do it correctly so it didn't come loose.

If I can't wiggle the hoop to get it in a welding position, then I'll just have to drop it through the floor. Seeing as how I have to cut a hole for the shifter anyway, I guess I should just get over it. I gave up the "original" thing when I welded in the subframe connectors. ::)
Doug Smith


'69 R-code Mach 1, 427 MR, 2x4, Jerico, 4.30 Locker
'70 F-350 390
'55 Ford Customline 2dr
'37 Ford Coupe

cjshaker

  • Hero Member
  • *****
  • Posts: 4458
    • View Profile
Re: Upgrades to my R-code Mach 1...
« Reply #74 on: March 29, 2019, 05:36:23 PM »
Weight? Been told that most that can use the OEM hinges aren't much lighter than the steel hood.


Bob, I should have answered this better before. Without a doubt, the hood is at least half the weight of a stock hood. Probably more. I could easily pick it up and move it myself by just grabbing the sides. I would struggle with a stock hood.

While my intake will be heavier, and the roll bar will add significant weight, I'm hoping to offset most of that with aluminum heads, the fiberglass hood and ditching my heater box altogether. The battery is also going to the trunk.
Doug Smith


'69 R-code Mach 1, 427 MR, 2x4, Jerico, 4.30 Locker
'70 F-350 390
'55 Ford Customline 2dr
'37 Ford Coupe

Heo

  • Hero Member
  • *****
  • Posts: 3285
    • View Profile
Re: Upgrades to my R-code Mach 1...
« Reply #75 on: March 29, 2019, 05:50:43 PM »

Doug, now i see you have a 8 point rollbar not a cage, you can probably tip the main hoop forward to weld the
topside of the rear bars before you attatch the side bars


The defenition of a Gentleman, is a man that can play the accordion.But dont do it

machoneman

  • Hero Member
  • *****
  • Posts: 3851
    • View Profile
Re: Upgrades to my R-code Mach 1...
« Reply #76 on: March 29, 2019, 06:10:10 PM »
Weight? Been told that most that can use the OEM hinges aren't much lighter than the steel hood.


Bob, I should have answered this better before. Without a doubt, the hood is at least half the weight of a stock hood. Probably more. I could easily pick it up and move it myself by just grabbing the sides. I would struggle with a stock hood.

While my intake will be heavier, and the roll bar will add significant weight, I'm hoping to offset most of that with aluminum heads, the fiberglass hood and ditching my heater box altogether. The battery is also going to the trunk.

Thanks Doug  as a lighter than stock hood (ugh, they ARE damned heavy!) is what I'm looking for.  Many of the the lift offs are light but often pretty crudely made. Glad to hear too you like the quality.

Btw, I did find an Eleanor-like body panel maker (forget the name, maybe Ring Brothers) who custom makes a true carbon-fiber '70 hood but it was like $1,300 plus shipping! 
« Last Edit: March 30, 2019, 11:46:26 AM by machoneman »
Bob Maag

GJCAT427

  • Hero Member
  • *****
  • Posts: 662
    • View Profile
Re: Upgrades to my R-code Mach 1...
« Reply #77 on: March 30, 2019, 04:53:10 AM »
Hey Doug. You do know a tig welder, Problem is your in west Ohio and I`m in western NY. Garry

cjshaker

  • Hero Member
  • *****
  • Posts: 4458
    • View Profile
Re: Upgrades to my R-code Mach 1...
« Reply #78 on: March 30, 2019, 08:22:45 AM »
Hey Doug. You do know a tig welder, Problem is your in west Ohio and I`m in western NY. Garry

Garry, weren't you talking about taking a long awaited vacation to that tropical paradise, Ohio, this year? The scenery is beautiful. It really has to be seen in person. ;)
Doug Smith


'69 R-code Mach 1, 427 MR, 2x4, Jerico, 4.30 Locker
'70 F-350 390
'55 Ford Customline 2dr
'37 Ford Coupe

Stangman

  • Hero Member
  • *****
  • Posts: 1691
    • View Profile
Re: Upgrades to my R-code Mach 1...
« Reply #79 on: March 30, 2019, 08:51:33 AM »
Not sure if I asked this already but what is the motor upgrade and will that also be in by the reunion.

AlanCasida

  • Hero Member
  • *****
  • Posts: 1099
    • View Profile
Re: Upgrades to my R-code Mach 1...
« Reply #80 on: March 30, 2019, 08:55:03 AM »
Looks you are fixin' to get busy! Good luck. I wish I had gone with just the bar rather than a cage. While the cage is safer on the track they can be more dangerous on the street when you are not wearing a helmet.

cjshaker

  • Hero Member
  • *****
  • Posts: 4458
    • View Profile
Re: Upgrades to my R-code Mach 1...
« Reply #81 on: March 30, 2019, 10:56:41 AM »
Not sure if I asked this already but what is the motor upgrade and will that also be in by the reunion.

Joe, it's going to be roughly 460 ci, based on my SOG block, but it won't be in by the Reunion.

Looks you are fixin' to get busy! Good luck. I wish I had gone with just the bar rather than a cage. While the cage is safer on the track they can be more dangerous on the street when you are not wearing a helmet.

Alan, most likely I'll upgrade to the front hoop and down bars in the near future. I'd prefer to have those custom bent though, because I don't like how many of the pre-bents hang down too low or don't tuck against the dash close enough. I know there are concerns about cages on the street, but a good seat, the 5 point harness and some padding should minimize that risk. You still have the factory short backed seats, and I can definitely see some concern there, but I guess even with good seats, the top hoop would cause concerns. There's always trade-offs for everything you do.
Doug Smith


'69 R-code Mach 1, 427 MR, 2x4, Jerico, 4.30 Locker
'70 F-350 390
'55 Ford Customline 2dr
'37 Ford Coupe

machoneman

  • Hero Member
  • *****
  • Posts: 3851
    • View Profile
Re: Upgrades to my R-code Mach 1...
« Reply #82 on: March 30, 2019, 11:51:48 AM »
More fun stuff for '69-'70 Mustangs. Nothing unchanged here, especially under the carbon fiber hood! Boss '9!

http://www.mustangandfords.com/featured-vehicles/mdmp-1203-1969-ford-mustang-the-carbon-fiber-colt/
Bob Maag

Stangman

  • Hero Member
  • *****
  • Posts: 1691
    • View Profile
Re: Upgrades to my R-code Mach 1...
« Reply #83 on: March 30, 2019, 05:27:55 PM »
Nice Doug keep up the good work

AlanCasida

  • Hero Member
  • *****
  • Posts: 1099
    • View Profile
Re: Upgrades to my R-code Mach 1...
« Reply #84 on: March 30, 2019, 06:55:19 PM »

Alan, most likely I'll upgrade to the front hoop and down bars in the near future. I'd prefer to have those custom bent though, because I don't like how many of the pre-bents hang down too low or don't tuck against the dash close enough. I know there are concerns about cages on the street, but a good seat, the 5 point harness and some padding should minimize that risk. You still have the factory short backed seats, and I can definitely see some concern there, but I guess even with good seats, the top hoop would cause concerns. There's always trade-offs for everything you do.
[/quote]

I know what you mean about the front down bars. I bought the pre-bent kit and installed it myself. When I put it in the doors were only shells with no mechanisms in them. When I finally put the door handles and window mechanisms in them I found I could not roll the windows up/down with the doors closed.  >:( I custom made some shorter window cranks but it is still a pain. 

AlanCasida

  • Hero Member
  • *****
  • Posts: 1099
    • View Profile
Re: Upgrades to my R-code Mach 1...
« Reply #85 on: March 30, 2019, 06:57:30 PM »

Alan, most likely I'll upgrade to the front hoop and down bars in the near future. I'd prefer to have those custom bent though, because I don't like how many of the pre-bents hang down too low or don't tuck against the dash close enough. I know there are concerns about cages on the street, but a good seat, the 5 point harness and some padding should minimize that risk. You still have the factory short backed seats, and I can definitely see some concern there, but I guess even with good seats, the top hoop would cause concerns. There's always trade-offs for everything you do.

I know what you mean about the front down bars. I bought the pre-bent kit and installed it myself. When I put it in the doors were only shells with no mechanisms in them. When I finally put the door handles and window mechanisms in them I found I could not roll the windows up/down with the doors closed.  >:(  . I custom made some shorter window cranks but it is still a pain.
« Last Edit: March 30, 2019, 07:23:19 PM by AlanCasida »

plovett

  • Guest
Re: Upgrades to my R-code Mach 1...
« Reply #86 on: April 05, 2019, 09:57:19 PM »
Might want to remove your front swaybar too, if you haven't already.  Helps weight transfer if you are trying to go fast in the 1/4 mile.

JMO,

paulie


edit:  oops.  After reading all the posts I see you are already doing that.  I haven't had a front sway bar for over a decade.  It helps some, IMO.

« Last Edit: April 05, 2019, 09:59:23 PM by plovett »

cjshaker

  • Hero Member
  • *****
  • Posts: 4458
    • View Profile
Re: Upgrades to my R-code Mach 1...
« Reply #87 on: April 19, 2019, 11:01:25 AM »
Paulie, I missed your post. Yes, I took the front sway bar out several years ago. The car isn't exactly designed for cornering anymore..lol
Doug Smith


'69 R-code Mach 1, 427 MR, 2x4, Jerico, 4.30 Locker
'70 F-350 390
'55 Ford Customline 2dr
'37 Ford Coupe

cjshaker

  • Hero Member
  • *****
  • Posts: 4458
    • View Profile
Re: Upgrades to my R-code Mach 1...
« Reply #88 on: April 19, 2019, 12:05:59 PM »
Well the transmission is in, but not without a few struggles. Been working late pretty much every night, but I think it'll all be ready for the Reunion.

I got the old toploader out and did some verifying of measurements to make sure my old driveshaft would work, although I had to change the yoke to a 32 spline, which is what the Jerico had. I also noticed at that time that the Jerico had a rollerized tailshaft, which I hadn't noticed before. It requires a hardened yoke to handle the needle bearings. Still, I was happy to find that it had that option. I also weighed both transmissions, with shifters, to find out how much less the Jerico set-up weighed. Weights came in at...
Toploader with shifter: 105 lbs
Jerico with shifter: 82 lbs
A savings of 23 lbs is big to me. My car was heavy at 3460 (without the 140 lbs of driver weight), so anyway I can save weight to offset the rollbar is going to be a big plus.

A comparison shot...


I also had to change the front bearing retainer to a standard throwout bearing style, whereas the Jerico had one designed for a hydraulic throwout set-up. It only took me over a week and a half to get the part from Jerico....who had it in stock, but that's another story.  ::)


I started out with concerns that the smallblock pilot snout that was on the Jerico would cause interference in the stock steel crank on installation. That would have stopped everything. I talked to Rory though, and he told me that his trans was a long snout also, but that it didn't cause any issues with his stock crank, then I verified from the forum member I bought it from (BH107), that the trans was indeed used behind an FE. Still having concerns, I did some measuring the best way I could with everything still in the car. I didn't want to remove the bell, clutch and flywheel assembly because time was limited, and working on my back on the floor is not my favorite thing to do. A lift would have made this entire job much easier!!

I measured by using a screwdriver to find the depth from the mounting flat of the bell, to the bottom of the crank hole for the snout. I was careful to only go in as far as the top of the bevel in the crank hole, since it's a drilled hole. Going to the bottom of the hole would have given me a false clearance measurement. Here's how I measured...


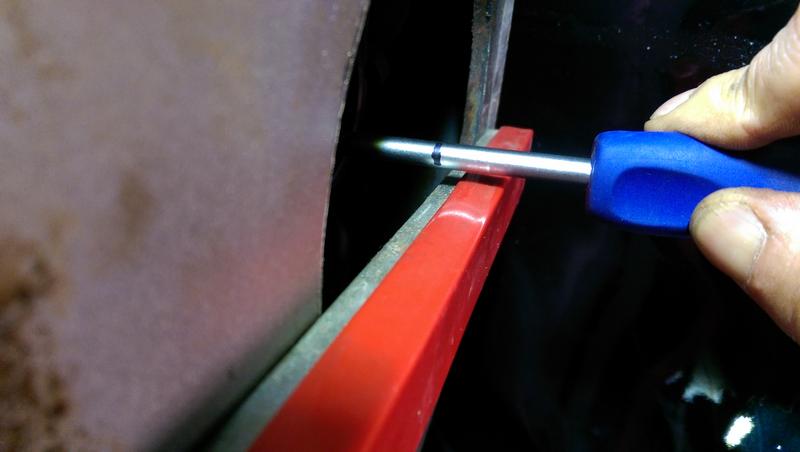
Then I measured to the outside of the pilot bearing, so I knew my input shaft splines would not interfere with that area.


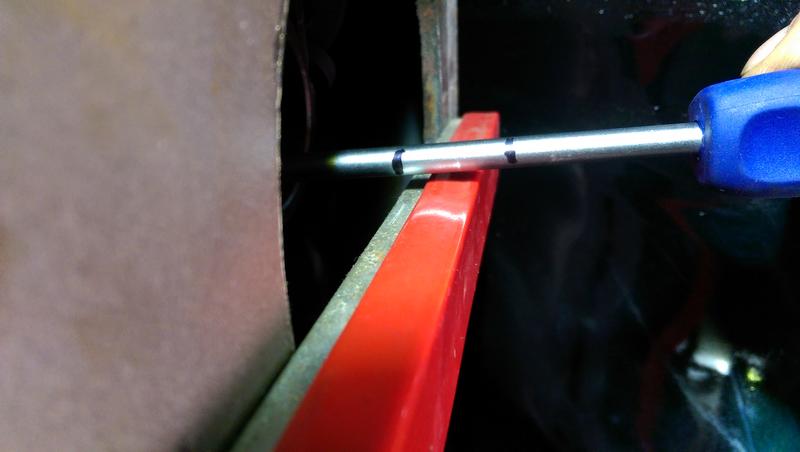
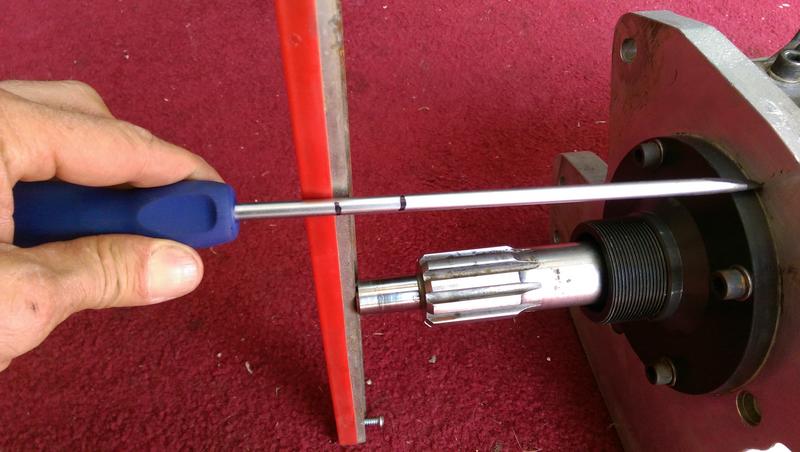
I knew these measurements were "rough" measurements, but it was the best I could come up with because my vernier caliper didn't go deep enough. I was hoping that they would be close enough to give me piece of mind. As it turned out, it appeared that I had plenty of room, so that concern went away. Here I'm comparing my depth marks to the input shaft on the Jerico. This shows the depth to the top of the bevel in the crank hole. Plenty of clearance! And the shaft splines showed even more clearance, so I figured I was good to go...


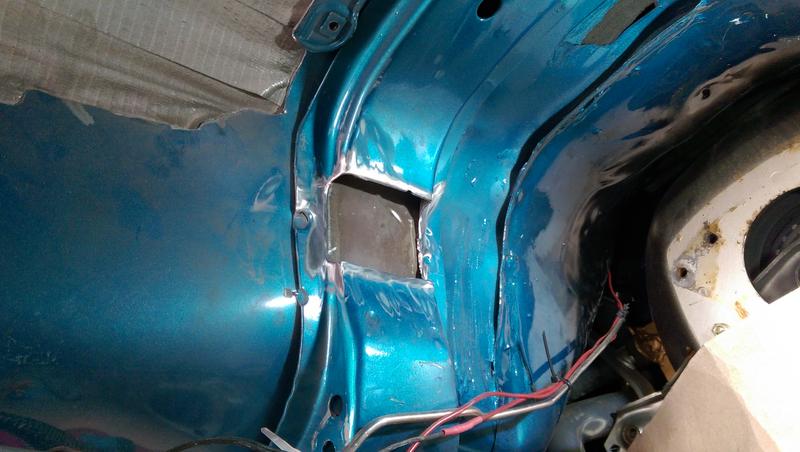
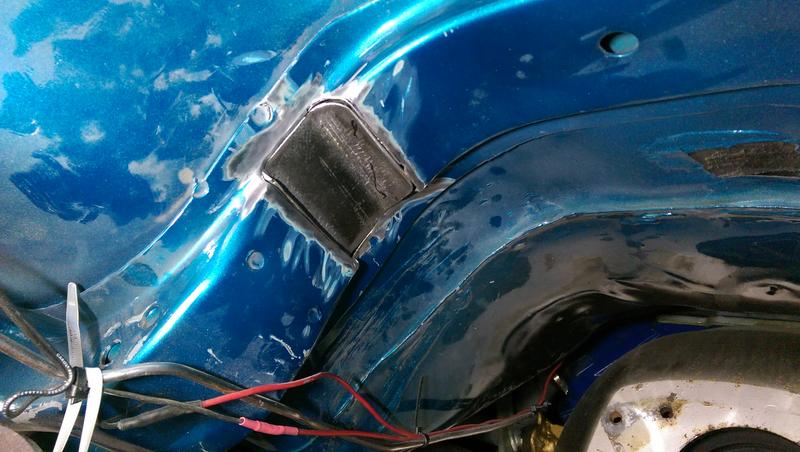
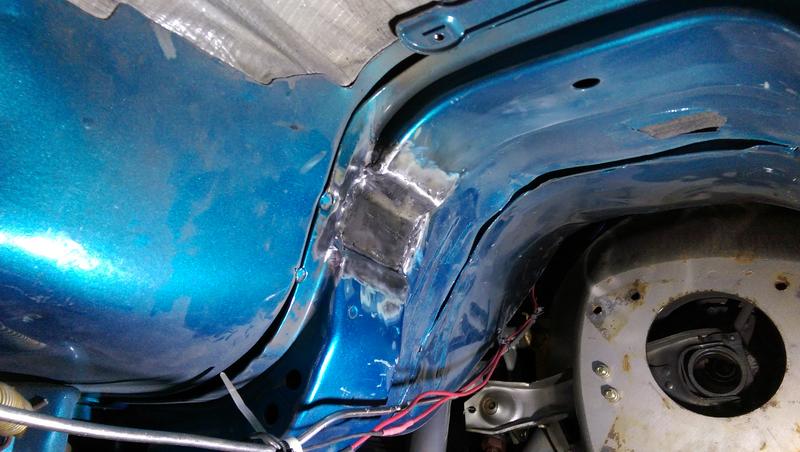
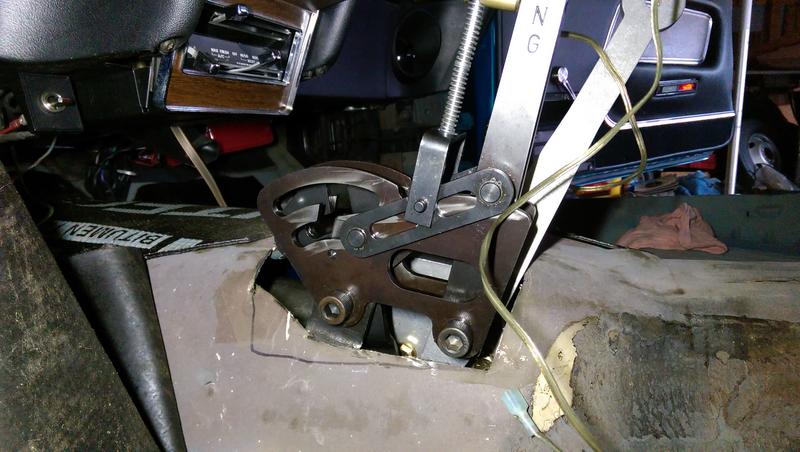
Next came the installation, and I knew I'd have issues with shifter rods and clearance against the tunnel and crossmember. I wasn't wrong. I didn't want to hack a big long area of my tunnel out, so I decided to see if I could gain the clearance needed by just notching my crossmember and and doing a little hammer work on the tunnel. After having the trans in and out about half a dozen times (thank God for that 23 lb weight savings!..lol), I marked where I thought the notch needed to be...


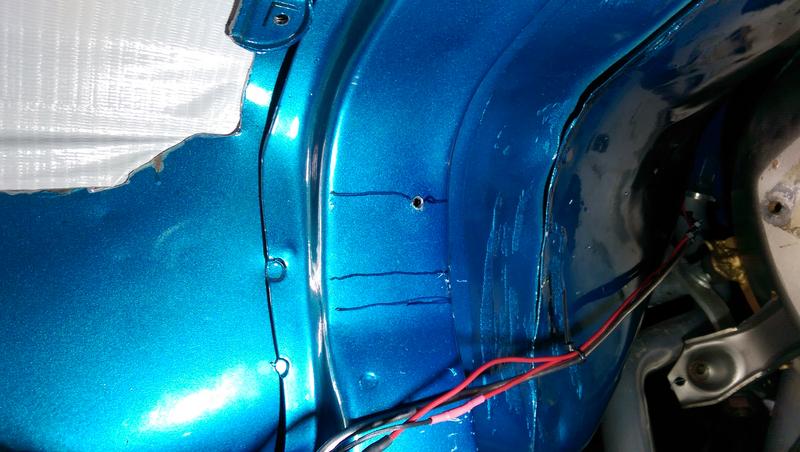
Then proceeded to cut the area out, make a template out of cardboard, then bend/make a piece to fit in the area and weld it back up.


Remember, I was doing all this cutting, grinding and welding while laying on my back, directly underneath the work area which was about 2' above the floor. I think I'd rank this about 1 step above getting my fingernails pulled out with pliers!

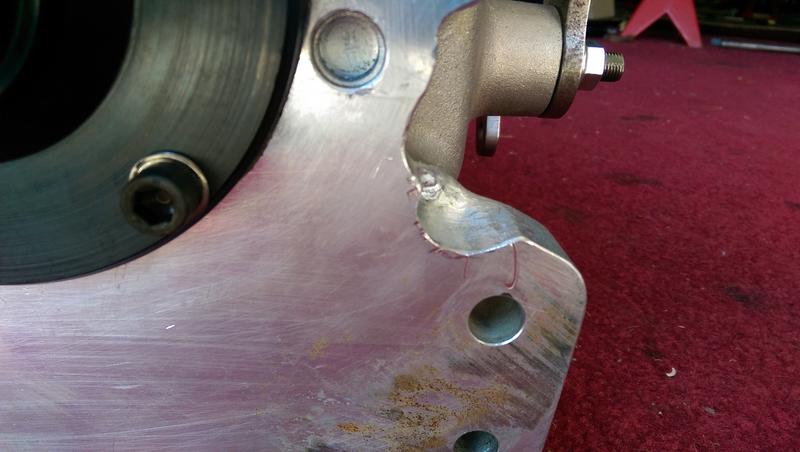
I also discovered that I needed to clearance the trans face to clear the small bolts sticking out of the bellhousing that hold the pivot for my clutch arm. I'm not sure how others got away without doing this, but I couldn't rotate the trans into place to line up with the bell holes without doing this.


After about the 8th time installing the trans ( :P), I finally had it in place for the final time, and appeared to have the clearance I needed for the shifter rods. This shows the clearance I gained, and with the engine being tied down, I don't think movement will be an issue....I hope.


I started the whole job by removing the seats, front carpet, and laying back the back carpet so I could cut the hole for the shifter. While doing all the fitting, I marked and made initial cuts for the shifter, then fine tuned the hole for clearance and rounded everything up to get rid of sharp edges. Everything clears, and the shifter is in place and seems to work fine.


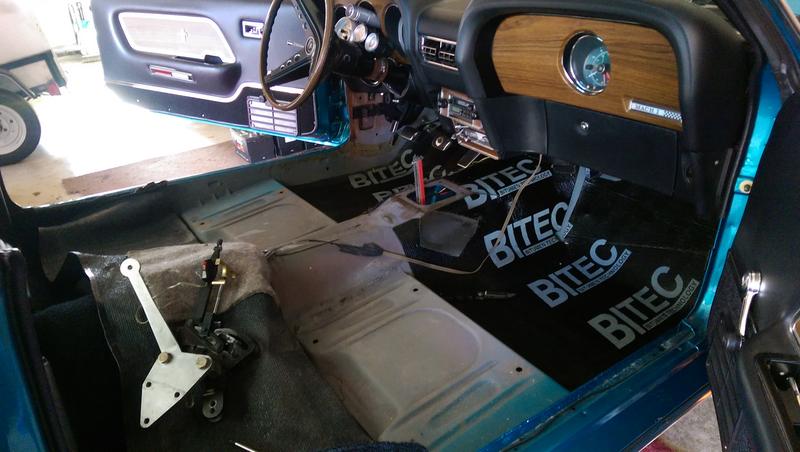
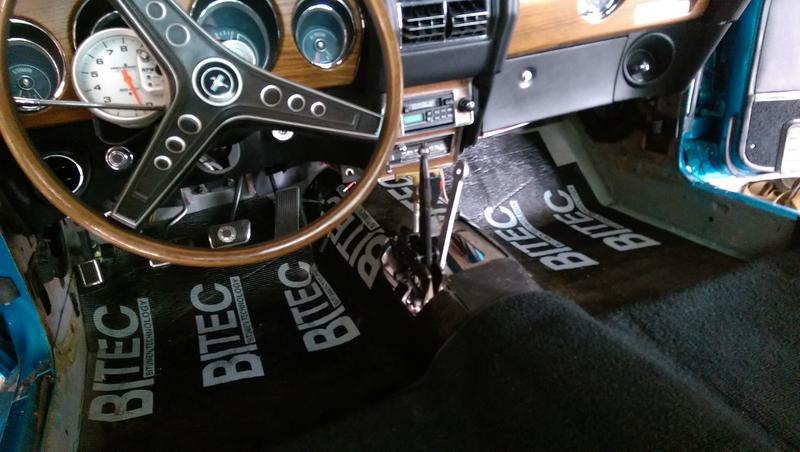
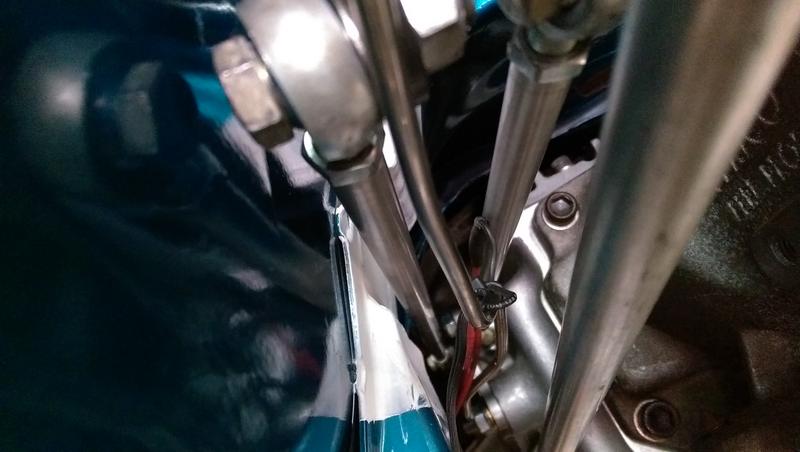
Today, I finished up by re-installing the driveshaft loop, then the driveshaft with the new Strange yoke (Mark Williams was out of the style I needed and wouldn't have them available for another 2 weeks), then laid the carpet back down and trimmed it up and reinstalled my seats and sill plates. I still need to clearance a small spot for the front heim joint for the 3-4 shift rod against the tunnel, but I'll put it on a friends lift to do that because I just can't get enough room for a good swing with the sledge while laying under the car. That should do it for the installation.

Now I just need to finish changing oil, change the plugs and go over some small stuff to make sure everything is working ok, and it should be good for the first passes at the Reunion. With the changes, I'm thinking it should slow me down at least a tenth or two...lol ;D  Now I just need to call the weather guy at Beaver Springs and threaten him to make sure we have some decent weather!

Doug Smith


'69 R-code Mach 1, 427 MR, 2x4, Jerico, 4.30 Locker
'70 F-350 390
'55 Ford Customline 2dr
'37 Ford Coupe

cjshaker

  • Hero Member
  • *****
  • Posts: 4458
    • View Profile
Re: Upgrades to my R-code Mach 1...
« Reply #89 on: April 19, 2019, 12:16:21 PM »
And I'd like to give a big Thank You to forum member Ben (BH107), for turning me on to this transmission. It was one that a friend of his had been running behind an FE Fairlane. Everything was in great shape, and he was awesome to deal with. THANK YOU Ben!!
Doug Smith


'69 R-code Mach 1, 427 MR, 2x4, Jerico, 4.30 Locker
'70 F-350 390
'55 Ford Customline 2dr
'37 Ford Coupe

Bolted to Floor

  • Hero Member
  • *****
  • Posts: 596
    • View Profile
Re: Upgrades to my R-code Mach 1...
« Reply #90 on: April 19, 2019, 05:04:05 PM »
You've been busy.

 Nice work Doug.
John D -- 67 Mustang 390 5 speed

Tommy A

  • Jr. Member
  • **
  • Posts: 61
    • View Profile
Re: Upgrades to my R-code Mach 1...
« Reply #91 on: April 19, 2019, 05:32:41 PM »
Doug, looks great!!!  If I might ask what did you use for underlamit under the carpet, I still need to buy some for my project car and just wondered.. thanks.........Tom

AlanCasida

  • Hero Member
  • *****
  • Posts: 1099
    • View Profile
Re: Upgrades to my R-code Mach 1...
« Reply #92 on: April 19, 2019, 06:46:12 PM »
Lookin' good, Doug! Are you going to run a Gear Vendor in it also?

Stangman

  • Hero Member
  • *****
  • Posts: 1691
    • View Profile
Re: Upgrades to my R-code Mach 1...
« Reply #93 on: April 19, 2019, 07:26:43 PM »
Doug you are going to love that shifter, you can’t miss now!!. Is the tranny the kind that pops out of gear if you get off the gas. I’m having a senior moment syncroless. Oh ya Doug you got 5 days.
« Last Edit: April 19, 2019, 07:32:16 PM by Stangman »

cjshaker

  • Hero Member
  • *****
  • Posts: 4458
    • View Profile
Re: Upgrades to my R-code Mach 1...
« Reply #94 on: April 20, 2019, 01:01:41 AM »
Doug, looks great!!!  If I might ask what did you use for underlamit under the carpet, I still need to buy some for my project car and just wondered.. thanks.........Tom

Tom, to be honest, I don't remember where I got the sound deadener, that was about 20 years ago. I'd probably use Dynamat or something similar now. The stuff I have is heavy matting, and it adds a lot of weight, but I like the 'solid' feel that it gives the car. I have it in the rear, in the doors and on the roof also. I even have some under the front fender tops, to keep rocks from denting the top sides of the fenders from underneath. The carpet has the heavy jute backing also.

Lookin' good, Doug! Are you going to run a Gear Vendor in it also?

Alan, I have the Gear Vendors with the correct tail adapter for the Jerico, just waiting to go in, but I didn't have the time to install it right now. I plan on doing that when it all comes back apart later this summer.

Doug you are going to love that shifter, you can’t miss now!!. Is the tranny the kind that pops out of gear if you get off the gas. I’m having a senior moment syncroless. Oh ya Doug you got 5 days.

Joe, it's a 'clutch assisted' trans, so it stays in gear when you decelerate. It doesn't have synchros, but a small back-cut on the dogs that allows it to catch when you get off the gas. I want to keep it streetable, and a clutchless certainly doesn't fit that bill.

Here you can see the beveled dogs for engagement, but with a small back-cut to catch on deceleration.
Doug Smith


'69 R-code Mach 1, 427 MR, 2x4, Jerico, 4.30 Locker
'70 F-350 390
'55 Ford Customline 2dr
'37 Ford Coupe

Heo

  • Hero Member
  • *****
  • Posts: 3285
    • View Profile
Re: Upgrades to my R-code Mach 1...
« Reply #95 on: April 20, 2019, 06:06:57 AM »
Looking good Doug,  Have you welded in the cage yet?


The defenition of a Gentleman, is a man that can play the accordion.But dont do it

cjshaker

  • Hero Member
  • *****
  • Posts: 4458
    • View Profile
Re: Upgrades to my R-code Mach 1...
« Reply #96 on: April 20, 2019, 10:48:21 AM »
Heo, no, the roll bar will have to wait till later this summer when I pull the drivetrain back out for the new engine. I'll have to pull the entire interior out for the installation. With only 4 days left to work on it till I leave for the Reunion, time is short right now. Haven't even touched the truck or trailer yet.
Doug Smith


'69 R-code Mach 1, 427 MR, 2x4, Jerico, 4.30 Locker
'70 F-350 390
'55 Ford Customline 2dr
'37 Ford Coupe

Heo

  • Hero Member
  • *****
  • Posts: 3285
    • View Profile
Re: Upgrades to my R-code Mach 1...
« Reply #97 on: April 20, 2019, 04:59:12 PM »
Hah sleeping are for old men ;D. I cringe when i see you building
a race car out of your Mustang. And thinking about the rusty hulks
i helped peoples restore back to original in the 80s. But i see your point
you are building it in to what you want to have and thats what one should
do.  Good luck at the reunion How fast can you run without rollbar?


The defenition of a Gentleman, is a man that can play the accordion.But dont do it

jayb

  • Administrator
  • Hero Member
  • *****
  • Posts: 7404
    • View Profile
    • FE Power
Re: Upgrades to my R-code Mach 1...
« Reply #98 on: April 20, 2019, 05:34:53 PM »
Hah sleeping are for old men ;D. I cringe when i see you building
a race car out of your Mustang. And thinking about the rusty hulks
i helped peoples restore back to original in the 80s. But i see your point
you are building it in to what you want to have and thats what one should
do.  Good luck at the reunion How fast can you run without rollbar?

You know what they say, Heo, anybody can restore a car.  It takes a real man to cut one up!  ;D ;D

All kidding aside, in my book, Doug has made his car more valuable with those modifications.  Kudos to you Doug, your car is WAY cooler now...
Jay Brown
- 1969 Mach 1, Drag Week 2005 Winner NA/BB, 511" FE (10.60s @ 129); Drag Week 2007 Runner-Up PA/BB, 490" Supercharged FE (9.35 @ 151)
- 1964 Ford Galaxie, Drag Week 2009 Winner Modified NA (9.50s @ 143), 585" SOHC
- 1969 Shelby Clone, Drag Week 2015 Winner Modified NA (Average 8.98 @ 149), 585" SOHC


Heo

  • Hero Member
  • *****
  • Posts: 3285
    • View Profile
Re: Upgrades to my R-code Mach 1...
« Reply #99 on: April 20, 2019, 06:35:53 PM »
Jay, yes a stock mustang is like.....the other stock mustangs i guess

At least more valuable to Doug, and he is the owner. Its like with stocks
you dont win or loose before you sell them

Its just that i cut out cages repaired trans tunnels after shifters and
clutch explosions put back springtowers  and rear wheelwell openings ;D ;D
and ground of a whole lot of that damned flake paintworks or Tivoli paint
as dad called it
There is still flakes in his  garage 30 years later ;D ;D
So Doug now we are waiting for the flakejob and a sunrice mural on the trunk
and snakes... alot of snakes ;) ;D ;D


P.S And i rode im Dougs Mustang its like a new car D.S
« Last Edit: April 20, 2019, 07:01:03 PM by Heo »


The defenition of a Gentleman, is a man that can play the accordion.But dont do it

cjshaker

  • Hero Member
  • *****
  • Posts: 4458
    • View Profile
Re: Upgrades to my R-code Mach 1...
« Reply #100 on: April 20, 2019, 08:43:42 PM »
The car is more valuable to me, because I'm really having fun with it. I fretted about cutting on it for many years, but that passed when a great friend of mine passed away. That was the guy who I bought the car off of when I was 15, and he was a big influence on me when I was a kid. He was a big Ford nut who had a couple of cool cars, including a '71 Boss 351, and a pretty wicked Cleveland powered '71 Torino, both 4 spd cars. He sold me the car for $250 when he decided to move to Florida. At that point the car was in pieces and had no drivetrain. He had lots of health issues over the years and lost a leg several years ago. He really struggled after that. I had the joy of giving him a ride in the Mustang a few years ago, and then he died from a heart attack a few months later. He was a HUGE drag racing fan, and I did a burnout after his funeral, which upset a few people, but his family and close friends thought it was the best tribute to him ever, knowing that it was the car that he "let get away". He was only 5 years older than me, and I decided then that I wasn't going to fret about it any more; I wanted to enjoy the car and have some fun with it.
RIP Jim Dearth.

Heo, the shifter hole is really the only thing that would require some work to put back, except for the welded in subframe connectors I guess, but those really help the car even in stock form. I thought about cutting back the shock towers, but I won't go that far, I just deal with it being somewhat of a PITA to change plugs..lol  There are so many stock Mustangs out there, I don't think the world will miss just one  ;)  And I can tell you I won't give a damn about value when I'm gone from this Earth, which is the only time this car will leave my hands ;D  After that, my Son can worry about it  ;D
Doug Smith


'69 R-code Mach 1, 427 MR, 2x4, Jerico, 4.30 Locker
'70 F-350 390
'55 Ford Customline 2dr
'37 Ford Coupe

rcodecj

  • Sr. Member
  • ****
  • Posts: 474
    • View Profile
Re: Upgrades to my R-code Mach 1...
« Reply #101 on: April 20, 2019, 10:35:49 PM »
The car is more valuable to me, because I'm really having fun with it. I fretted about cutting on it for many years, but that passed when a great friend of mine passed away. That was the guy who I bought the car off of when I was 15, and he was a big influence on me when I was a kid. He was a big Ford nut who had a couple of cool cars, including a '71 Boss 351, and a pretty wicked Cleveland powered '71 Torino, both 4 spd cars. He sold me the car for $250 when he decided to move to Florida. At that point the car was in pieces and had no drivetrain. He had lots of health issues over the years and lost a leg several years ago. He really struggled after that. I had the joy of giving him a ride in the Mustang a few years ago, and then he died from a heart attack a few months later. He was a HUGE drag racing fan, and I did a burnout after his funeral, which upset a few people, but his family and close friends thought it was the best tribute to him ever, knowing that it was the car that he "let get away". He was only 5 years older than me, and I decided then that I wasn't going to fret about it any more; I wanted to enjoy the car and have some fun with it.
RIP Jim Dearth.

Heo, the shifter hole is really the only thing that would require some work to put back, except for the welded in subframe connectors I guess, but those really help the car even in stock form. I thought about cutting back the shock towers, but I won't go that far, I just deal with it being somewhat of a PITA to change plugs..lol  There are so many stock Mustangs out there, I don't think the world will miss just one  ;)  And I can tell you I won't give a damn about value when I'm gone from this Earth, which is the only time this car will leave my hands ;D  After that, my Son can worry about it  ;D

I wish this site would allow me to give this post a like. So thumbs up I guess.

Heo

  • Hero Member
  • *****
  • Posts: 3285
    • View Profile
Re: Upgrades to my R-code Mach 1...
« Reply #102 on: April 21, 2019, 07:24:46 AM »
Doug, dont get me wrong i like what you do with it. And i have
never looked at  a car for its expected future value ,I came out loosing
everytime i sold anything anyway ;D


The defenition of a Gentleman, is a man that can play the accordion.But dont do it

Stangman

  • Hero Member
  • *****
  • Posts: 1691
    • View Profile
Re: Upgrades to my R-code Mach 1...
« Reply #103 on: April 21, 2019, 10:49:53 AM »
Doug your doing just fine, and car is coming out great. Hey I love the look of the chromed steel wheels on that mustang. Was that yours. My dad had those on his GTO.

cjshaker

  • Hero Member
  • *****
  • Posts: 4458
    • View Profile
Re: Upgrades to my R-code Mach 1...
« Reply #104 on: April 21, 2019, 12:49:35 PM »
Just got back from the first test drive, and all I can say is.....holy crap, I love it!! It changed the whole attitude of the car when getting on it! I should have went to a Long shifter a long time ago. I could tell right away that the car really likes the 3.19 first gear, and that should really help me cut my lousy 60' times down. Easy cruising shifts will take a bit of practice, but I didn't have any issues doing it, and it didn't clank bad at all, at least not like I was expecting. If it wasn't for the fact that Beaver Springs is uphill, I'd be really disappointed if I didn't hit the 11's now, but as it is, I really have no idea how it will affect my ET's.

Heo, I know you didn't mean anything negative about it. No worries. You need to come for a visit again so I can take you for another ride. The car still feels solid and tight, with no rattles. :)

Joe, no that's not my car, although I wish it was. Apparently those loooong ladder bars and extended spring shackles work..lol
Doug Smith


'69 R-code Mach 1, 427 MR, 2x4, Jerico, 4.30 Locker
'70 F-350 390
'55 Ford Customline 2dr
'37 Ford Coupe

Heo

  • Hero Member
  • *****
  • Posts: 3285
    • View Profile
Re: Upgrades to my R-code Mach 1...
« Reply #105 on: April 21, 2019, 01:28:41 PM »
Joe, Are you talking about the blue and silver Shelby i posted?
It was a "Lokal hero". A Shelby with a S.O.H.C pics are from 70-80s sometime.
Was a older guy, Ture Ström who had it he also had a 62-63 T-Bird with a Turbo
FE  long, long before turbo was popular in passenger cars probably in the 70s


The defenition of a Gentleman, is a man that can play the accordion.But dont do it

Heo

  • Hero Member
  • *****
  • Posts: 3285
    • View Profile
Re: Upgrades to my R-code Mach 1...
« Reply #106 on: April 21, 2019, 03:11:08 PM »
Doug, I would love to make a visit and have more time then
last visit


The defenition of a Gentleman, is a man that can play the accordion.But dont do it

Stangman

  • Hero Member
  • *****
  • Posts: 1691
    • View Profile
Re: Upgrades to my R-code Mach 1...
« Reply #107 on: April 21, 2019, 08:31:55 PM »
Doug if I remember correctly you didn’t need much to get into the 11s. I’m gonna be rooting for ya, it’s cool and a good feeling when your hard work pays off. I just wish I could be there.

Joe, Are you talking about the blue and silver Shelby i posted?
It was a "Lokal hero". A Shelby with a S.O.H.C pics are from 70-80s sometime.
Was a older guy, Ture Ström who had it he also had a 62-63 T-Bird with a Turbo
FE  long, long before turbo was popular in passenger cars probably in the 70s

Yes that’s what I was talking about Heo. He made like a split bumper like a Camero.

cjshaker

  • Hero Member
  • *****
  • Posts: 4458
    • View Profile
Re: Upgrades to my R-code Mach 1...
« Reply #108 on: April 21, 2019, 10:09:27 PM »
Doug if I remember correctly you didn’t need much to get into the 11s. I’m gonna be rooting for ya, it’s cool and a good feeling when your hard work pays off. I just wish I could be there.

Despite consistent 115 mph trap speeds, I've only managed a 12.2 (at Drag Week) because of my lousy 60' times. Still having traction issues doesn't help either, so I'm hoping to make some progress there as well. But you know the Beaver is uphill, so not sure how much that will show up.

Why can't you make it this year, Joe?
Doug Smith


'69 R-code Mach 1, 427 MR, 2x4, Jerico, 4.30 Locker
'70 F-350 390
'55 Ford Customline 2dr
'37 Ford Coupe

Stangman

  • Hero Member
  • *****
  • Posts: 1691
    • View Profile
Re: Upgrades to my R-code Mach 1...
« Reply #109 on: April 22, 2019, 06:16:02 AM »
I had posted before but a month ago I hurt my back and my disc is sitting on a nerve and my right leg is numb. I had to go on comp which sucks.
So Im waiting for a surgery date. So I dont think it would look good If I went racing. You never now who is watching. I had got rushed to the hospital the pain was astronomical, the closest thing I could compare it to was I had kidney stones once. So I will have to rely on you guys to keep me informed. (I would appreciate it). But good luck I think you get your 2 tenths just by your RPMs being kept up. I thought you ran a 12.20 at the beaver. You took it for a ride right what do you think??. I also got my BT 2x4 intake on was hoping to sneak into the 10s.
« Last Edit: April 22, 2019, 05:50:45 PM by Stangman »

cjshaker

  • Hero Member
  • *****
  • Posts: 4458
    • View Profile
Re: Upgrades to my R-code Mach 1...
« Reply #110 on: April 22, 2019, 08:35:43 PM »
I had posted before but a month ago I hurt my back and my disc is sitting on a nerve and my right leg is numb. I had to go on comp which sucks.
So Im waiting for a surgery date. So I dont think it would look good If I went racing. You never now who is watching. I had got rushed to the hospital the pain was astronomical, the closest thing I could compare it to was I had kidney stones once. So I will have to rely on you guys to keep me informed. (I would appreciate it). But good luck I think you get your 2 tenths just by your RPMs being kept up. I thought you ran a 12.20 at the beaver. You took it for a ride right what do you think??. I also got my BT 2x4 intake on was hoping to sneak into the 10s.

I remember about your back now. Been pretty scatter brained lately with trying to get stuff done. I hope all goes well with everything. Having a hurt back is the worst injury, because it affects every movement you make. Last year they had a live stream of the Reunion racing at Beaver. Maybe they'll have it again this year and you can watch?

I think the fastest I ever ran at Beaver is a 12.5. I haven't had the best luck there, with shifts or traction. I took it for another drive today, and maybe it's just me, but the car feels much quicker with the 3.19 first gear. It accelerates much better! Of course the cool 60* spring air this morning certainly didn't hurt..lol 

On a side note, I was double clutching today on easy shifts, and it's super quiet with no gear clash. Just like shifting my Dads old unsynchronized '48 F1 truck. That is obviously the way to go when driving this trans on the street.
Doug Smith


'69 R-code Mach 1, 427 MR, 2x4, Jerico, 4.30 Locker
'70 F-350 390
'55 Ford Customline 2dr
'37 Ford Coupe

Stangman

  • Hero Member
  • *****
  • Posts: 1691
    • View Profile
Re: Upgrades to my R-code Mach 1...
« Reply #111 on: April 22, 2019, 09:40:27 PM »
Well there’s a few guys that I’ll be watching you’ll be one of them. Good luck.

JERICOGTX

  • Sr. Member
  • ****
  • Posts: 336
    • View Profile
Re: Upgrades to my R-code Mach 1...
« Reply #112 on: April 26, 2019, 11:07:17 AM »
Looks good Doug. Rule #1 for a Jerico trans. The harder you are on it, the longer it will last... Do NOT lift on gear changes. When driving through the pits, always use second gear only.

What gear ratios did you end up with? Hopefully something like a 3.09 first.

Can't wait to use my Jerico trans again.

Jeff