Author Topic: 545" High Riser Build  (Read 184283 times)

0 Members and 1 Guest are viewing this topic.

Cyclone Joe

  • Full Member
  • ***
  • Posts: 137
  • Joe
    • View Profile
Re: 545" High Riser Build
« Reply #90 on: December 29, 2011, 10:37:40 PM »
Jay,

You're right about the heat issues on a composite intake.  You'd need a high temperature resin, like a cynate ester or BMI/polyimide which are expensive and tough to work with.  The alternative would be a high temperature epoxy which is easy to work with, but again is pricey.  I've thought about making an intake for the FE out of carbon fiber, and while possible, heat has always been the key problem.

Joe

jayb

  • Administrator
  • Hero Member
  • *****
  • Posts: 7406
    • View Profile
    • FE Power
Re: 545" High Riser Build
« Reply #91 on: January 03, 2012, 12:50:30 AM »
More progress on the sheet metal intake over the long New Year's weekend.  It took me longer than I expected to get the plenum plates machined, but after three test plates I finally got it right, so I put the full size stock in the CNC machine and ran the program.  Unfortunately the translation from small test plates to the full size plate revealed an error in the program, and I also made a setup error on the first plate, but it still turned out to be usable.  The second plate came out perfectly; here's a couple of photos:


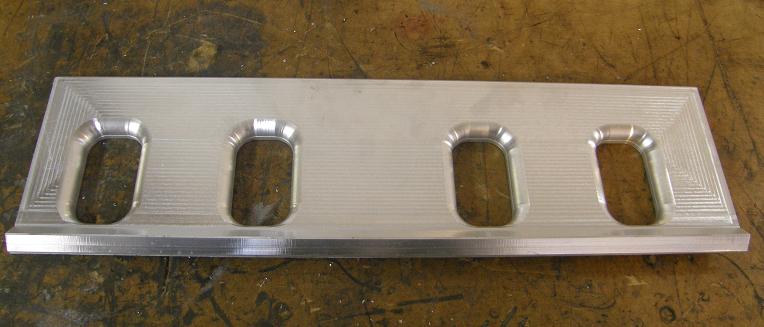
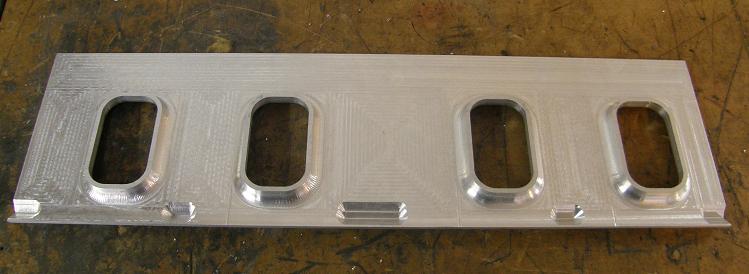
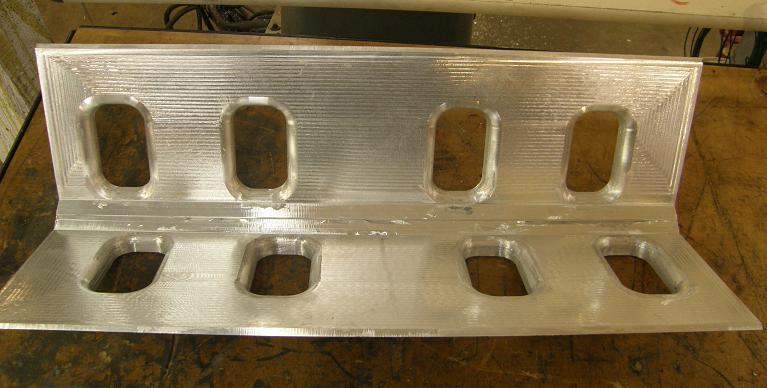
Given the runner length I wanted for the manifold, the plenum had to have a gap between the runners.  Rather than extend the plenum down into a point below the runner entry (which I've been told doesn't work well because fuel tends to puddle in the vee), I machined the plates with a flat bottom that is at the same level as the bottom of the runner.  The CNC program machined almost all of this area, but I had to finish it by hand with an abrasive porting roll in my die grinder.  With the flat bottom, I was able to incorporate some tabs at the bottom of the plenum plates which allowed them to be bolted together.  I figured this would make fixturing the intake for welding much easier.  Here's a couple photos of the plenum halves bolted together:


Once the plenum plates were finished I started on the runners.  Previously I had made some machined aluminum blocks that allowed me to bend the runner shape, half a runner at a time, using 1/8" 5052 aluminum in my hydraulic press.  When I pulled these out of the drawer and measured them, though, I realized that they had not been built using the correct radius for this new manifold design.  So the runners weren't going to match up well with the ports in the corners.  I decided I'd rather make up some new blocks with the correct forms so that the runners would be right.  This wasn't too tough to program into my CNC machine, but in order to make the blocks where the runners were pressed as smooth as possible, I had to take very fine cuts with the tool, every .025" down a 6" length for both the positive and negative forming blocks.  This took a long time on the machine, but finally yesterday the blocks were done.

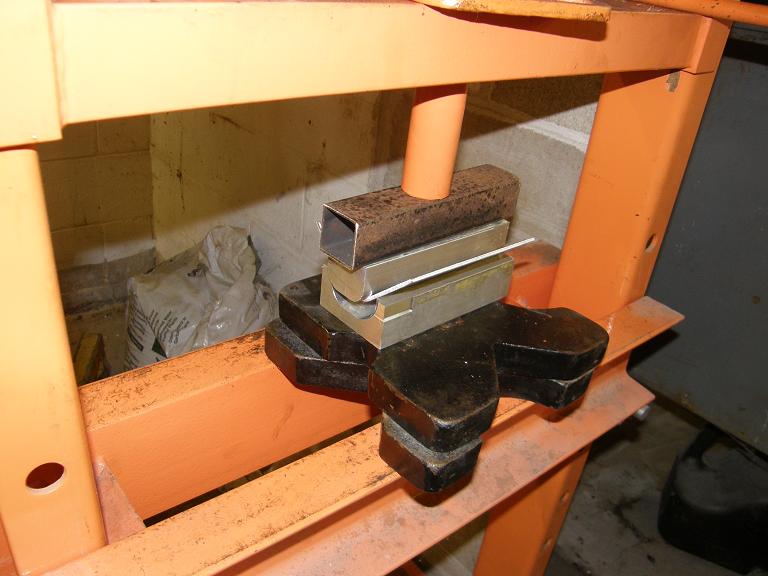
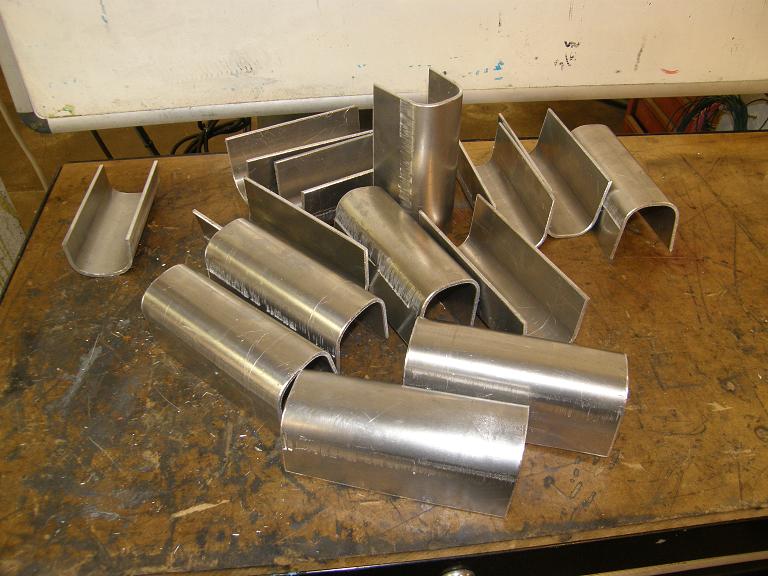
Today I started on the runners themselves.  I had previously cut 16 aluminum squares, 5.5" on a side, out of the 1/8" thick flat 5052 sheet.  One by one I put them in the press with the forms and bent the runner halves into shape.  Here's a picture of one of the runners being bent, and a bunch of them completed and ready to machine sitting on the bench:


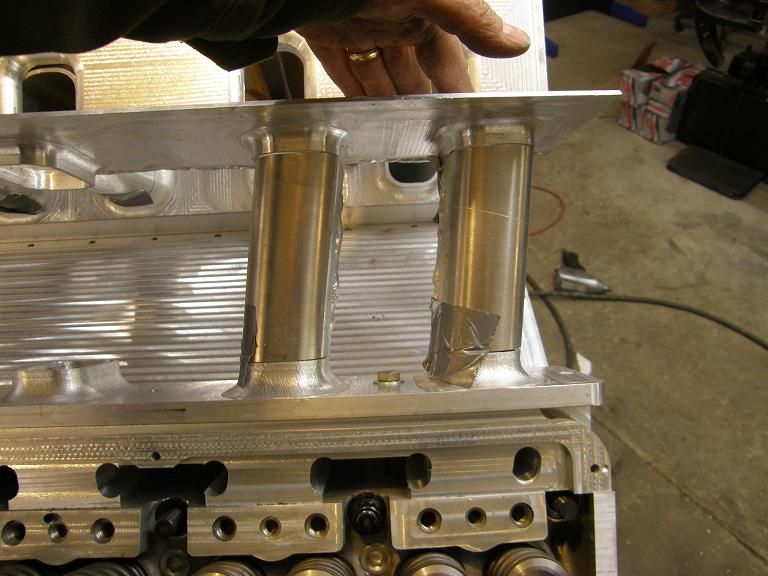
Bending the plates didn't take long, and I had previously decided that the easiest and most consistent way to trim these plates to the correct size would be in the CNC machine.  It didn't take long to write a few little programs to do this, and pretty soon I was machining the bends with the correct angles on the end to keep the runner angle correct with respect to the head port, and also to put a taper on one bend of each pair, to get a slight taper to the runner itself.  I ended up having to write six different programs in order to get all the combinations handled, and in fact I still have four bends to finish the machining on, but this all worked pretty well.  Late this afternoon I stopped work on the CNC and took four of the runners over to the welding bench.  I clamped them together prior to welding and they all fit together real well.  I welded the seams on both sides of each runner, and then took them over to the other manifold parts already mocked up on the engine for a test fit.

The test fit did NOT go well LOL!  I taped the four runners onto the base of the intake, but when I tried to fit the plenum plates on top they were way, way off!  What the heck?  I looked at the setup for 10 minutes, trying to figure out what was wrong, but everything seemed to be right.  The plenum plates just wouldn't fit.  

Finally I pulled up the drawing CAD file that I had made for this intake, and that I was basing all the dimensions off of.  First thing I did was recheck the measurements from front corner to front corner of the engine, where the end rail meets the heads.  I could have kicked myself; the measurement was just about 10.5", but I had drawn it as 11.5" on my drawing!  That was the base dimension for calculating the runner length and designing the plenum, and it was either a measuring error or drawing error on my part that caused the problem.  

Fixing this problem was going to be one of two choices.  I could either shorten the intake runners until the plenum set down in the correct position, or I could section the flat portion of the plenum and remove one inch, so that it would fit down properly on the runners as they were.  I decided to pursue the latter course, because I had messed up the machining on one of the plenum plates anyway, and the part that was messed up was the flat portion.  Plus, I didn't want to reduce the runner length because I had that right about where I wanted to get the manifold to tune at 7500 RPM.  So, I unbolted the two plenum plates and took them over to the bandsaw, and basically cut the middle flat section out of the plates.  Now of course I didn't have bolts holding the plates together, so I took some steel blocks and clamped the plates to them in the correct position, and then welded along the bottom of the seam from the outside of the plenum to stick them together for easier handling.

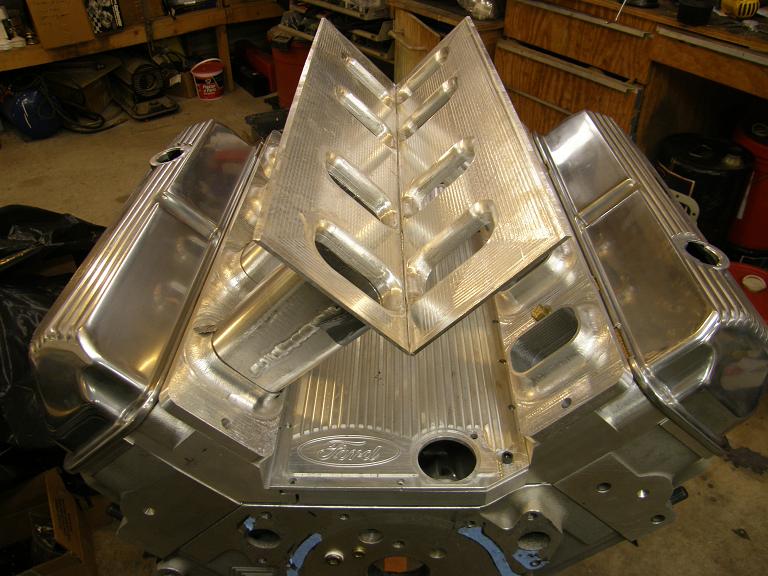
Back at the engine mock up the modified plenum fit just fine, so I taped it in place to get some pictures.  This thing is finally starting to look like a manifold:


This week I should be able to get the remaining four runners machined and welded together, and be ready to tack up the manifold.  Before I do that I have to disassemble the valves from the heads, bolt the plates on, and use a sand roll to smooth out the CNC porting marks  and match the plates up to the ports in the heads.  Then I should be able to tack the whole thing together on the block, before removing it for final welding.  I'm planning on using the tacked up manifold as a guide to make the same sort of steel welding fixture that I made when I built my intake for the big SOHC.  This will make sure that the manifold stays as square as possible during the welding operation.

Despite making pretty good progress on this intake, it is still taking a lot longer than I had originally anticipated.  What a surprise LOL!  Hopefully I can get this thing completed sometime in January, and go on to some of the other engine projects that I need to get finished before spring...

« Last Edit: January 03, 2012, 12:58:12 AM by jayb »
Jay Brown
- 1969 Mach 1, Drag Week 2005 Winner NA/BB, 511" FE (10.60s @ 129); Drag Week 2007 Runner-Up PA/BB, 490" Supercharged FE (9.35 @ 151)
- 1964 Ford Galaxie, Drag Week 2009 Winner Modified NA (9.50s @ 143), 585" SOHC
- 1969 Shelby Clone, Drag Week 2015 Winner Modified NA (Average 8.98 @ 149), 585" SOHC


machoneman

  • Hero Member
  • *****
  • Posts: 3853
    • View Profile
Re: 545" High Riser Build
« Reply #92 on: January 03, 2012, 11:01:55 AM »
After seeing all the work that's involved, even for yet-to-be-finished manifold, one has a better appreciation of why Hogan Racing Manifolds charges $3,700 to $4,000 for their version.

Gotta be a pain as well to line up both ends of the runners and the plenum correctly before welding. It'll be interesting to see your fixtures here as well.


Bob Maag

cammerfe

  • Hero Member
  • *****
  • Posts: 1659
    • View Profile
Re: 545" High Riser Build
« Reply #93 on: January 03, 2012, 01:15:18 PM »
...and by that time breakfast was on the table...    ;D

KS

WConley

  • Hero Member
  • *****
  • Posts: 1160
  • No longer walking funny!
    • View Profile
Re: 545" High Riser Build
« Reply #94 on: January 03, 2012, 06:23:30 PM »
Jay-

I feel your pain on setup errors and programming SNAFU's LOL!  What I don't get is how you're doing as well as you are programming by hand.

Without my CAM package and the ability to simulate my toolpaths on the 3D model, I don't know what I'd do...

Looking good!
A careful study of failure will yield the ingredients for success.

MT63AFX

  • Jr. Member
  • **
  • Posts: 46
    • View Profile
Re: 545" High Riser Build
« Reply #95 on: January 05, 2012, 07:07:47 AM »
Okay now, I'm in, lol. My question concerns how the plenum will be attached and will the runners remain where they're at. I've never really noticed other handmade intakes, but I envision an issue where #1 and #5 being so close that #5 might be suckin' the 'air' out of #1's runner. I'm sure there're more modifications till completion where maybe the plenum box will seperate tgubes' proximity to each other, Rod.

jayb

  • Administrator
  • Hero Member
  • *****
  • Posts: 7406
    • View Profile
    • FE Power
Re: 545" High Riser Build
« Reply #96 on: January 05, 2012, 09:20:11 AM »
Nice to see you here, Rod.  The runners are going to remain as they are, and sucking air from adjacent cylinders is a concern.  This is one reason why I had the plenum plates separated somewhat on the original design, and I would have preferred to keep it that way.  But if I left the plenum as it was, I was going to have to cut the runner size down, and I decided that doing that would hurt the design more than moving the runners together as it is done now.

I think the only two cylinders I'm really concerned about in this case are #1 and #5, because they fire consecutively.  So, they will both be drawing from the plenum at the same time.  Hopefully the plenum will be large enough to support this requirement, and of course there will be a Dominator throttle body directly above these runners feeding them air, which I'm hoping will limit the problems associated with this arrangement.
Jay Brown
- 1969 Mach 1, Drag Week 2005 Winner NA/BB, 511" FE (10.60s @ 129); Drag Week 2007 Runner-Up PA/BB, 490" Supercharged FE (9.35 @ 151)
- 1964 Ford Galaxie, Drag Week 2009 Winner Modified NA (9.50s @ 143), 585" SOHC
- 1969 Shelby Clone, Drag Week 2015 Winner Modified NA (Average 8.98 @ 149), 585" SOHC


Mario428

  • Guest
Re: 545" High Riser Build
« Reply #97 on: January 05, 2012, 12:42:57 PM »
I beleive Barry R knows John Marcella quite well. Would it be worthwhile to ask for a recommendation, from what I have seen from John on yellowbullet he would appreciate the work you are going thru to build an intake and might be willing to answer that question? With no science behind my opinion at all I do think there is a concern with 1 & 5 so close together.
I realize a large plenum may mitigate the problem but when # 1 piston starts coming back up and air is still ramming in #5 is just starting to generate some real vacumn as it starts down the hole.

JMHO   ;D ;D ;D
That and a toonie will buy you a Tim's (may have to be Canadian to catch that  ::) ::) )  ;D

jayb

  • Administrator
  • Hero Member
  • *****
  • Posts: 7406
    • View Profile
    • FE Power
Re: 545" High Riser Build
« Reply #98 on: January 05, 2012, 01:10:27 PM »
Yep, that one flew over my head LOL!  I'm actually going to be talking to Barry in the next day or two, so I'll ask him if he can connect me with John.  But another idea is just to build a second manifold "upper", to test them back to back on the dyno.  Using your approach with the unboltable upper I could probably do that with another week or so of work.  Something to think about...
Jay Brown
- 1969 Mach 1, Drag Week 2005 Winner NA/BB, 511" FE (10.60s @ 129); Drag Week 2007 Runner-Up PA/BB, 490" Supercharged FE (9.35 @ 151)
- 1964 Ford Galaxie, Drag Week 2009 Winner Modified NA (9.50s @ 143), 585" SOHC
- 1969 Shelby Clone, Drag Week 2015 Winner Modified NA (Average 8.98 @ 149), 585" SOHC


machoneman

  • Hero Member
  • *****
  • Posts: 3853
    • View Profile
Re: 545" High Riser Build
« Reply #99 on: January 05, 2012, 01:52:07 PM »
Like Mario, no science behind my opinion but....

I've posted a link showing the stock interior of a BBC plenum (converted to EFI too) and I'll admit to being only familiar with tunnel rams run on BBC/SBC engines (hey, it was long ago..LOL!). But in both cases, the paired intake runners are literally as close as Jay's design and, of course, they also have 2 cylinders that fire in consecutive order w/o any real issues. Yes, the BBC cam makers did invent so to speak the swapped Chevy firing order common now on all-out race BBC and SBC's too for the same reason....better cylinder filling. Yet, the hp gains are alleged to be minimal and some folks have told me it's only on the order of 5-7 hp in at least 600hp engines. Good article too on the how/why although I have zero idea on how many hp a Reher-Morrison Pro Stock engine in the 1,300+ range may gain.

Good to know that another racer maybe be able to shed some light on your efforts before your done.  

http://media.photobucket.com/image/chevy%20rat,%20tunnel%20ram,%20interior/mrn2obelvedere/SideViewIntakeShowingInjectorsandRa.jpg

http://www.precisionenginetech.com/tech-explained/2009/06/03/special-firing-order-camshafts/

So a $2 coin will getcha a donut? How's my Canadian, eh?  
« Last Edit: January 06, 2012, 09:22:02 AM by machoneman »
Bob Maag

Mario428

  • Guest
Re: 545" High Riser Build
« Reply #100 on: January 05, 2012, 03:44:53 PM »


Big difference in the angle of the paired ports, the entrance to the ports on the tunnel ram are flat not facing each other like Jays setup is. The tunnel ram if the throttle bodies bolt on what is show is virtually an individual runner deal, just enough room for some vacumn balance.

Toonie - Canada's $2.00 coin, the $1.00 coin had a loon on it so got called a loonie, so when the $2 came out, toonie
Tim's - Any city or town in Canada has more coffee shops than anything else, most numerous is Tim Horton's. 3000 + in Canada, 600+ in the US
« Last Edit: January 05, 2012, 03:47:32 PM by Mario428 »

machoneman

  • Hero Member
  • *****
  • Posts: 3853
    • View Profile
Re: 545" High Riser Build
« Reply #101 on: January 05, 2012, 04:37:47 PM »
True and for this intake, point taken!

But, I couldn't find quickly some other interior shots of older SBC/BBC tunnel rams made by Weiand and Edel-B that do have the lower edges much closer together, ala' Jay's, than the one I selected and posted.
After some searching, here's a link to what I was thinking about, the old SBC TR-1 from Edel-B that many ran in the days of yore: http://www.gasserhotrods.com/forum/showthread.php?349-Tunnel-Ram-Question

Anyway, it'll be good to hear from Barry's contact if this does actually pose a problem....I'm sure we all hope not but it remains to be seen. If Jay does end up doing two different plenums, it should prove the point. The bad news is I do remember the advent of the sheetmetal intake era (mainly Pro Stock 351C's) where lots of racers spent a lot of time and effort shaping up many variants,, only to find they often lost hp! It is an art for sure in not only runner i.d. and length but plenum shape, volume, etc.


« Last Edit: January 05, 2012, 05:08:51 PM by machoneman »
Bob Maag

cdmbill2

  • Jr. Member
  • **
  • Posts: 87
    • View Profile
Re: 545" High Riser Build
« Reply #102 on: January 05, 2012, 06:21:33 PM »
For another variation on the plenum discussion, this is my TFS A-460 t-ram after porting done by Wilson manifolds. It has the as cast TFS dual Dominator top runing two 2180 CFM Accufab TB's and port EFI. We ran this motor at Drag Week briefly after making 1006 HP on pump gas.

Its mated to a set 3rd gen TFS A460 heads using a custom CNC program developed by Lem Evans and TFS. The 385 firing order is also 15426378, but when we put it on the engine dyno we found lean out issues at certain RPM's with #2 and #7 using eight AFR sensors in the primaries of the dyno headers. TFS says this is typical. So no issues with 5 and 1. Your results may vary.


jayb

  • Administrator
  • Hero Member
  • *****
  • Posts: 7406
    • View Profile
    • FE Power
Re: 545" High Riser Build
« Reply #103 on: January 05, 2012, 10:01:48 PM »
Bill, the inside of your manifold's plenum looks just about the same as what I wanted mine to look like.  Unfortunately the runner length didn't work so I could leave it like that.  Do you know how long your intake runners are?  How long is the port in the head, on a centerline from the port opening to the valve seat, and then how long is the runner in the intake?  I'm curious about the length from plenum to valve, and how it compares to mine.  This dimension on my intake is 13".
Jay Brown
- 1969 Mach 1, Drag Week 2005 Winner NA/BB, 511" FE (10.60s @ 129); Drag Week 2007 Runner-Up PA/BB, 490" Supercharged FE (9.35 @ 151)
- 1964 Ford Galaxie, Drag Week 2009 Winner Modified NA (9.50s @ 143), 585" SOHC
- 1969 Shelby Clone, Drag Week 2015 Winner Modified NA (Average 8.98 @ 149), 585" SOHC


66FAIRLANE

  • Hero Member
  • *****
  • Posts: 558
  • Andy
    • View Profile
Re: 545" High Riser Build
« Reply #104 on: January 05, 2012, 10:30:02 PM »
Wow. Some beautiful work going on there all round. Makes you feel very amatuerish reading through this thread. Well done and good luck.