Author Topic: 545" High Riser Build  (Read 184297 times)

0 Members and 1 Guest are viewing this topic.

jayb

  • Administrator
  • Hero Member
  • *****
  • Posts: 7406
    • View Profile
    • FE Power
Re: 545" High Riser Build
« Reply #15 on: October 23, 2011, 08:15:43 PM »
I pulled the tunnel wedge intake off the wall today, cleaned it up and set it on the engine just to see what it looks like.  All part of the self motivation process  ;D


Today I also started working on the drawings for the sheet metal intake.  Hopefully I'll be finishing the drawings and acquiring the necessary material in the next week or so, and then I can start the machining operations on the port plates.
Jay Brown
- 1969 Mach 1, Drag Week 2005 Winner NA/BB, 511" FE (10.60s @ 129); Drag Week 2007 Runner-Up PA/BB, 490" Supercharged FE (9.35 @ 151)
- 1964 Ford Galaxie, Drag Week 2009 Winner Modified NA (9.50s @ 143), 585" SOHC
- 1969 Shelby Clone, Drag Week 2015 Winner Modified NA (Average 8.98 @ 149), 585" SOHC


ScotiaFE

  • Hero Member
  • *****
  • Posts: 1409
  • Howie
    • View Profile
The T Wedge Looks Awesome.
« Reply #16 on: October 24, 2011, 12:32:57 AM »
The fit looks really good at the corners.
Going Sideways with some BIG Holley's?
I really love that look.
Tricky machine work, but looks wild.

I have some good pics of a sideways setup.

I really want to do a T Wedge on my Geny.
They are just too bad.

jayb

  • Administrator
  • Hero Member
  • *****
  • Posts: 7406
    • View Profile
    • FE Power
Re: 545" High Riser Build
« Reply #17 on: November 06, 2011, 11:34:35 PM »
The most time consuming part of this high riser project is going to be building the sheet metal intake manifold.  I got started on this a few weeks ago by starting the drawing of the port plates.  These are FE-complex, because of the valve cover rail, pushrods, ports, and water jackets running through them.  In addition, I had decided to try kind of a new design approach on this intake, where the runners lined up with the general port direction.  If you look at the intake ports on a LR, MR, or HR FE head, they are all angled towards the center of the block from the port opening in the head.  My HR heads had been opened up to flow the big numbers, but the general "angled in" configuration of the ports was unchanged.  Also, the roof of the port was angled up as it came out of the head also.  I wanted to try to take those angles into account, and build the intake to match.  Here's a picture of the partially finished intake port plate drawing:


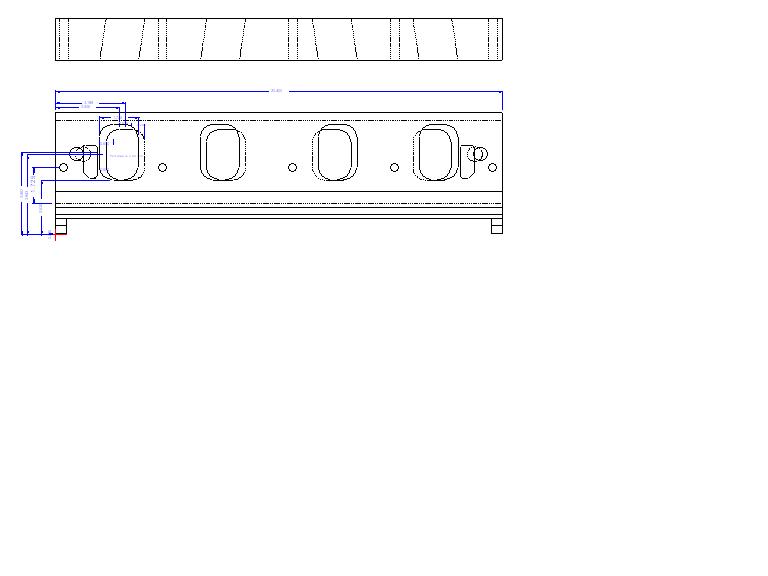
From the drawing you can see the angled ports.  One way to machine these would be to angle the plates on the mill and then just cut a pocket, but there are some subtle curves in the roof and side of the port that I wanted to put in, so this wasn't the ideal solution.  I thought the best way would be to use a special cutting tool, like what you see the CNC head porting guys use, so I could just outline the shape I wanted in 1/8" cross sectional increments and then cut them with the CNC porting cutter.

I found an outfit in Michigan that would manufacture the cutting tool I wanted.  This is definitely the coolest cutter I've ever had:


The ball on the end is 1" in diameter, and the shank is necked down to 3/8" behind the ball, giving me the ability to cut around a corner up to 5/16".  They sure didn't give this piece away at $230, but it is a carbide cutter that the manufacturer will resharpen when required, so I'm thinking of it as an investment  ;D

Last week I purchased the 2" X 6" 6061 aluminum bar that I needed to build the port plates.  (They didn't exactly give this stuff away either LOL!)  I bought enough so that I would have an extra 6" section that I could use to practice on, to get all the machining operations around one of the ports set up.  After I had this piece right I could just copy and mirror the program to do the complete port plate.

I started off drilling the intake bolt holes and a guide hole for the water jacket passage, and then milled a pocket straight down to start the port.  Here's a picture of the plate on the mill:


Next I chucked up my new cutter and spent quite a bit of time programming all the different passes.  There were a total of 17 different outlines that I had to program, but many of them were similar, and I had done the curve work in Excel and generated a list of all the key coordinates that the CNC tool would require there, so most of the programming was just keying in the numbers.  After double checking the whole program, I started up the machine.  Here's a shot of the test plate after the first of the 17 outlines has been cut:


I stopped the program at this point to check some measurements, but everything looked good, so I let 'er rip.  When the whole port was done it looked like a CNC'd cylinder head port, and I was really pleased with the result. 

Next machining step was to set the plate up on a 45 degree angle and cut the bottom of the plate where it will meet the valley plate and end walls of the intake.  The setup presented some indexing challenges, but nothing too difficult.  Here's a picture of the plate on the 45 degree angle table, with the steps in the plate being milled:


The angle milling had to be done on both sides of the plate, and then I chucked it back in the vise to do some of the inital edge milling.  I finally finished this up tonight; here's a picture of the partially finished plate:


Here's a couple more shots of it installed on the engine at cylinder #1:


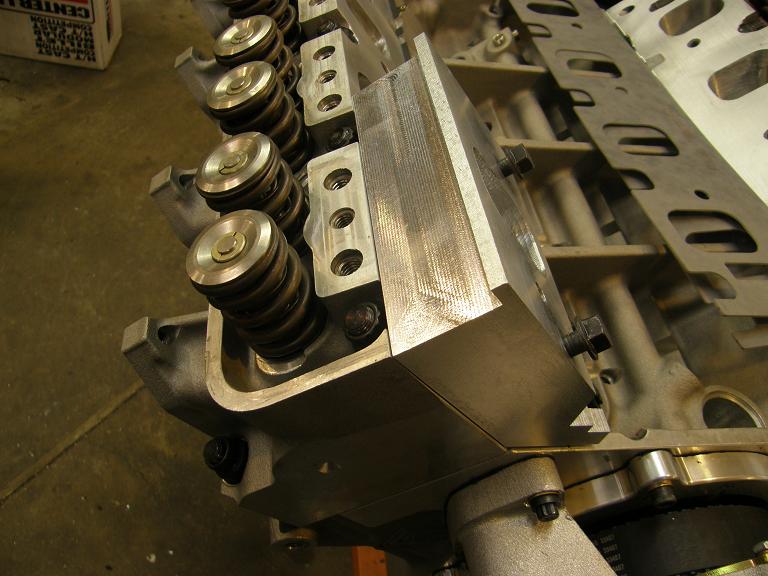
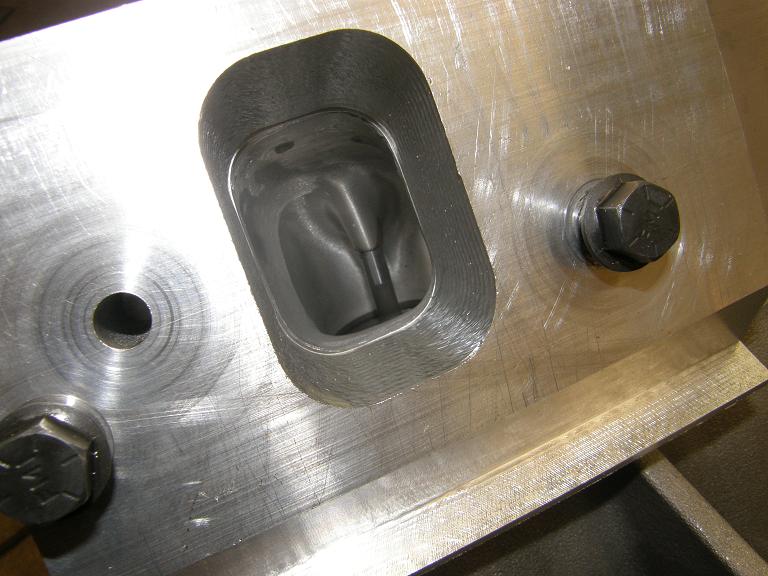
Looking down into the port in the photo above, I like the idea that I can get a sand roll in there before I build the rest of the intake, to get a perfect alignment between each port and the port plate.  I just have to pull the heads and bolt on the plates, and I can get a perfect port match.

Next steps on this test piece will be to mark the pushrod locations and then program the mill to machine those.  After that I'll have to tilt the test plate at a 4 degree angle in order to machine the valve cover rail, and then it will be time to remove as much extraneous material as possible from the plates, to lighten them up.  Once that is finished I can start on the real plates by applying the CNC programs I developed on the test piece.  Hopefully within the next few weeks I'll have these plates finished up, and can start on the runners and plenum of the intake.  I'll post more info as soon as I have some significant progress to report - Jay


Jay Brown
- 1969 Mach 1, Drag Week 2005 Winner NA/BB, 511" FE (10.60s @ 129); Drag Week 2007 Runner-Up PA/BB, 490" Supercharged FE (9.35 @ 151)
- 1964 Ford Galaxie, Drag Week 2009 Winner Modified NA (9.50s @ 143), 585" SOHC
- 1969 Shelby Clone, Drag Week 2015 Winner Modified NA (Average 8.98 @ 149), 585" SOHC


Mario428

  • Guest
Re: 545" High Riser Build
« Reply #18 on: November 07, 2011, 07:25:23 AM »
That is some nice work Jay, I have enough software now I do not do handcoding anymore but I have done a lot of that over the years.
Can remember spending a full week figuring out points in a 2D Cad program and converting to G-Code.

Tell me what controller your machine has and I may be able to tell you a few tricks to decrease your programming when you go to cut the 4 parts in the finished head plate. I assume 2 ports on one end are identical and the other end is a mirror image.
If you have a list of g-codes your machine uses it would help too.

Thought for you, if you put a bolt pattern on your head plate, make another set of flanges and weld your sheet metal runners to that flange. THat way the head plates stay until the heads change and you can play with the intake more as it is a separate part.

Keep up the good work!!!!!!!!!!!!

jayb

  • Administrator
  • Hero Member
  • *****
  • Posts: 7406
    • View Profile
    • FE Power
Re: 545" High Riser Build
« Reply #19 on: November 07, 2011, 10:56:10 AM »
Well, that is an interesting idea about making the remainder of the intake manifold bolt onto the port plates.  One of the things that I liked about using those big thick plates as the start of the intake is that they would not warp too much when I welded the runners to them, so if I did as you suggest then I'd probably be back to having to worry about warped flanges.  I'd also need a second set of intake gaskets.  However, the idea of being able to pop the top of the manifold off for modifications, or maybe even to swap on a whole different top ala Pro/Stock Engineering, is rather attractive.  I'm going to have to give that some thought...

My CNC control is a Milltronics Centurion 5, and it has G codes for changing to five different coordinate systems, and also the mirror and rotate codes.  So my plan for doing the plates will be just to cut port number one, mirror to cut port number four, un-mirror and change coordinate systems to cut port number 2, and then mirror again to cut port number 3.  Thankfully I don't have to work directly in G code; my machine has something they call "conversational programming", where the screen on the control prompts you to enter whatever parameters are required, and then it automatically compiles the G code when the program is completed.  I have found it to be very easy to use, and although its not as nice as having the CAD/CAM software generate the CNC program, it hasn't been too bad for the work I've been doing.  The worst time I had with it was when I did the runners for my SOHC intake, and I had to enter something like 40 different inside toolpaths and 40 different outside toolpaths to machine the runners.  That took a few hours...
Jay Brown
- 1969 Mach 1, Drag Week 2005 Winner NA/BB, 511" FE (10.60s @ 129); Drag Week 2007 Runner-Up PA/BB, 490" Supercharged FE (9.35 @ 151)
- 1964 Ford Galaxie, Drag Week 2009 Winner Modified NA (9.50s @ 143), 585" SOHC
- 1969 Shelby Clone, Drag Week 2015 Winner Modified NA (Average 8.98 @ 149), 585" SOHC


Mario428

  • Guest
Re: 545" High Riser Build
« Reply #20 on: November 07, 2011, 11:03:25 AM »
Well, that is an interesting idea about making the remainder of the intake manifold bolt onto the port plates.  One of the things that I liked about using those big thick plates as the start of the intake is that they would not warp too much when I welded the runners to them, so if I did as you suggest then I'd probably be back to having to worry about warped flanges.  I'd also need a second set of intake gaskets.  However, the idea of being able to pop the top of the manifold off for modifications, or maybe even to swap on a whole different top ala Pro/Stock Engineering, is rather attractive.  I'm going to have to give that some thought...

Put an O-ring groove either in your head plate or the runner flange. If you make the runner flange out of 3/4 or 1 inch thick and machine an extension on to weld to (easier welding to 1/8 wall) then it should not warp too much.

See the weld extensions on my design

Sent you a PM but do not think messaging is working


jayb

  • Administrator
  • Hero Member
  • *****
  • Posts: 7406
    • View Profile
    • FE Power
Re: 545" High Riser Build
« Reply #21 on: November 07, 2011, 02:29:51 PM »
I did get your message, Mario; thankfully that part of the forum software is still operational!
Jay Brown
- 1969 Mach 1, Drag Week 2005 Winner NA/BB, 511" FE (10.60s @ 129); Drag Week 2007 Runner-Up PA/BB, 490" Supercharged FE (9.35 @ 151)
- 1964 Ford Galaxie, Drag Week 2009 Winner Modified NA (9.50s @ 143), 585" SOHC
- 1969 Shelby Clone, Drag Week 2015 Winner Modified NA (Average 8.98 @ 149), 585" SOHC


machoneman

  • Hero Member
  • *****
  • Posts: 3853
    • View Profile
Re: 545" High Riser Build
« Reply #22 on: November 07, 2011, 04:05:05 PM »
Very cool ideas on how-to make that custom intake. Too bad an FE is probably the hardest intake of all engine designs to cobble up!

That $230 for the ball end mill, even though it is pretty big, is amazing. Hopefully you can get lots of use out of it over time!

« Last Edit: November 09, 2011, 04:31:16 PM by machoneman »
Bob Maag

482supersnake

  • Guest
Re: 545" High Riser Build
« Reply #23 on: November 08, 2011, 01:20:09 PM »
Hey Jay check out this companys CF parts. http://www.ozmoengineering.com/index.php?option=com_content&view=article&id=1&Itemid=2 As always cool work. Scott

jayb

  • Administrator
  • Hero Member
  • *****
  • Posts: 7406
    • View Profile
    • FE Power
Re: 545" High Riser Build
« Reply #24 on: November 09, 2011, 12:22:24 PM »
Those are pretty cool, that's for sure.  I have quite a bit of fiberglass work experience myself, and have thought about doing something like that, but it would be a learn from the ground up experience in terms of the underhood requirements for a car.  Their web site says they'll do custom work, but they want you to order 50+ parts, so that's not going to happen.  I'll be sticking with aluminum for now...
Jay Brown
- 1969 Mach 1, Drag Week 2005 Winner NA/BB, 511" FE (10.60s @ 129); Drag Week 2007 Runner-Up PA/BB, 490" Supercharged FE (9.35 @ 151)
- 1964 Ford Galaxie, Drag Week 2009 Winner Modified NA (9.50s @ 143), 585" SOHC
- 1969 Shelby Clone, Drag Week 2015 Winner Modified NA (Average 8.98 @ 149), 585" SOHC


jayb

  • Administrator
  • Hero Member
  • *****
  • Posts: 7406
    • View Profile
    • FE Power
Re: 545" High Riser Build
« Reply #25 on: November 13, 2011, 07:39:08 PM »
Despite a busy schedule I managed to get a little more work done on my high riser project this week.  I chucked the dummy piece back up in my CNC mill and cut the pushrod holes early in the week.  On the drawing I designed the pushrod holes to be oblong, .625" in diameter at the ends, and angled to match the angle of the CNC'd port wall.  I also designed them to be .050" away from breaking into the port itself, and hoped that the pushrods would fit in them without any trouble.

This turned out to be wishful thinking on my part.  The pushrod with the offset rocker fit just fine, but the one going into the non-offset rocker showed significant interference, even when I used it with the offset lifter.  The first photo below shows the interference, and in the second photo you can see that the pushrod is a ways away from being properly seated in the rocker:


I put the part back in the CNC machine, changed a couple of numbers to move the pushrod hole closer to the port, and repeated the process.  After a few tries it became clear that I was going to have to breach the port opening in order to get the pushrod to fit properly, so I bit the bullet and moved the hole over far enough to get the necessary clearance.  I'm not too concerned about this, because since the port in the plate is CNC machined, I'll just move over a couple of the mill tool paths and create a little bump on the finished port where the pushrod has to fit.  But it still kind of sucked having to cut a hole in my nice CNC'd port.  Hopefully that bump I have to put in won't affect the air flow too much.  Here's a couple more pictures of the dummy plate in place with the pushrod in it's proper position:


I'll modify the port program to put in the bump sometime this week.  I'm still thinking about Mario's suggestion to make the intake a two piece affair, with O-rings to seal the top half to the port plates I'm building.  I'm kind of leaning that way at the moment, except that it would require a jig for welding that wouldn't work on a standard FE engine.  I should have another update next weekend.

Jay Brown
- 1969 Mach 1, Drag Week 2005 Winner NA/BB, 511" FE (10.60s @ 129); Drag Week 2007 Runner-Up PA/BB, 490" Supercharged FE (9.35 @ 151)
- 1964 Ford Galaxie, Drag Week 2009 Winner Modified NA (9.50s @ 143), 585" SOHC
- 1969 Shelby Clone, Drag Week 2015 Winner Modified NA (Average 8.98 @ 149), 585" SOHC


ScotiaFE

  • Hero Member
  • *****
  • Posts: 1409
  • Howie
    • View Profile
Re: 545" High Riser Build
« Reply #26 on: November 13, 2011, 08:17:48 PM »
If it's not one thing it's another. Tough break Jay. No pun intended. ::)
I was wondering about the Victor with the brass tubes into the ports.
Did you ever test that on the bench to see if they upset the flow much.
I am still yet to do that to my Victor and have the brass tubes.
Just wondering.

jayb

  • Administrator
  • Hero Member
  • *****
  • Posts: 7406
    • View Profile
    • FE Power
Re: 545" High Riser Build
« Reply #27 on: November 13, 2011, 09:34:07 PM »
I've never done a flow comparison with the brass tubes installed.  I assume the flow would be reduced because the cross sectional area is reduced, but by how much I don't know.

The hole is no big deal at this point because the aluminum plate is just a dummy.  The important thing is that now I know how to modify the cross section to make everything fit.  Would've been nice if I didn't have to go into the port, but oh well... :-\
Jay Brown
- 1969 Mach 1, Drag Week 2005 Winner NA/BB, 511" FE (10.60s @ 129); Drag Week 2007 Runner-Up PA/BB, 490" Supercharged FE (9.35 @ 151)
- 1964 Ford Galaxie, Drag Week 2009 Winner Modified NA (9.50s @ 143), 585" SOHC
- 1969 Shelby Clone, Drag Week 2015 Winner Modified NA (Average 8.98 @ 149), 585" SOHC


ToddK

  • Sr. Member
  • ****
  • Posts: 437
    • View Profile
Re: 545" High Riser Build
« Reply #28 on: November 14, 2011, 12:53:14 AM »
Is it an option for T&D to supply a set of rockers with offset for both the intakes and exhaust?

I'm watching this closely as I can see myself having similar problems when I go to fit my Dove tunnel wedge to my BT HR heads.

machoneman

  • Hero Member
  • *****
  • Posts: 3853
    • View Profile
Re: 545" High Riser Build
« Reply #29 on: November 14, 2011, 11:07:10 AM »
Todd hit the nail on the head. If not T&D, won't some type of Jesel shaft rocker for a BBC, Pontiac, generic GM Pro Stock  or Pro Sportsman head fit with the correct offset? I realize that today's rockers in Pro are in the much higher ratio ranges (2.0+) but perhaps a unfinished blank could be acquired.  
« Last Edit: November 14, 2011, 11:16:54 AM by machoneman »
Bob Maag