After last weekend's engine debacle I was looking forward to getting away from working on the motor this week, and making some progress on the car. Monday I ordered the head gaskets and intake gaskets that I needed to get the engine back together, and with their delivery at least a week away I got back to thrashing on the car Monday night. I had previously finished welding up the aluminum fuel tank for the car; this involved taking a Summit 20 gallon aluminum tank and cutting four inches out of it, to make it 16" long instead of 20 inches long, plus welding a 4" deep sump into the bottom of the tank that I fabricated from a 3 gallon aluminum fuel tank that I had on hand. I'd also had to weld in some different sized aluminum bungs for fittings, to allow connection of the -12 AN line that needed to go into the Aeromotive fuel pump, and the -10 return line. With all this welding on the tank, and my suspect aluminum welding skills, I was a little concerned about leakage, so Monday night I sealed it all up, pressurized it with 5 psi, and shot soapy water solution over all the welds. I figured I might have a couple dozen leaks, but I was very surprised and pleased with myself when I only found two! I guess at least the quality of my aluminum welding is OK, even though it doesn't look that great. I was able to quickly re-weld the leaking areas, and second time through the pressure test the tank passed. Another milestone out of the way.
Tuesday night I had family activities planned, but Wednesday evening I got back to working on the car by test installing the fuel tank, and then adding some welded brackets to the trunk area. I needed to build and install brackets to hold the main electrical shutoff switch in place, plus a bracket to hold the flexible brake line hose that runs from the frame to the axle housing, and another to fasten the differential breather tube to. Joel had previously made the brackets required to mount the Aeromotive fuel pump and filters, so I welded those into place also after dummying the fuel pump and filters into position. After getting all these brackets fabricated and welded in place, I finished off Wednesday night by grinding some of the welds, and then spraying chassis black paint on all the newly welded areas.
Thursday night I was back out to the shop plumbing the brake lines and fittings for the rear axle housing, and running the line up to the front of the car. I also made up a -6 AN line for the differential breather and got it mounted between the axle housing and the frame bracket. Then I mounted the Aeromotive pump and filters, and made up the required AN lines that led from the tank to the pump inlet, the pump outlet to the front of the car, and the return line that goes from the front of the car back to the tank. I got all the lines connected at the back and mounted where I wanted them with hose line brackets, so that now the plumbing from the back of the car up to the engine compartment was essentially finished. I left the shop on Thursday night pleased with my progress, and feeling like the car itself was coming together pretty well.
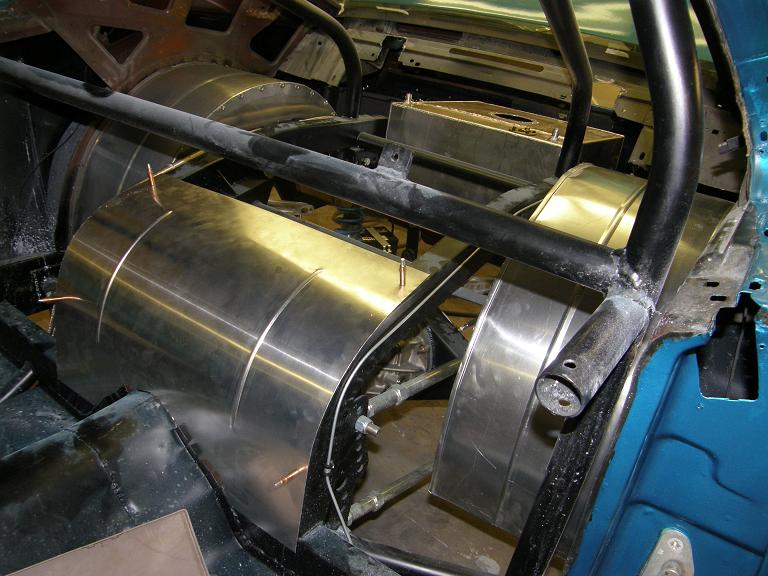
Friday night I started a marathon weekend session on this project. From Friday night at around 6:00 pm until Sunday night at 11:00 PM, I put a total of 29 hours of work into the car. I started on Friday night with the aluminum sheet metal work required due to the back-half frame installation. Of course, every bit of this was custom cut and fit work, but I had purchased an aluminum sheet metal interior kit from S&W race cars that at least gave me a starting point. I had also purchased a couple of 2' X 4' sheets of .040" aluminum to fill in where necessary, and I ended up using every bit of that by Saturday night. Friday night I worked on getting the aluminum wheel tubs that I had previously fabricated installed, and then getting the aluminum center panel that needed to go on the back half frame fitted from the transmission tunnel back to the gas tank. I was planning on using pop rivets to put all of this stuff together, but as it turned out some of the small panels around the gas tank needed to be removable, in order to get the gas tank in and out of the trunk. By the end of the night Friday I had the sheet metal in place with Klecos from the trans tunnel to the tank, and knew what I needed to do from the tank back to the end of the trunk.
Saturday morning I got an early start, and worked primarily inside the trunk of the car, getting all the panels cut and fit into place, with Klecos holding everything together. My pal JC had volunteered to come over and help, and things were going so well by noon that I gave him a call and suggested that he show up around 2:00. I figured he could work on getting the sheet metal in the trunk secured with screws and pop rivets while I finished the sheet metal in the passenger compartment, and then he could work on getting the carpeting installed over the sheet metal while I went on to work on the dash and instrument cluster. I made a trip out to Menards around 1:00 PM to pick up the carpet I wanted; they had some black auto/marine type carpeting that was on sale for 34 cents a square foot, and it only weighed 15 ounces per square yard. I got back with the carpeting and some Super 77 spray adhesive just as JC came into the driveway.
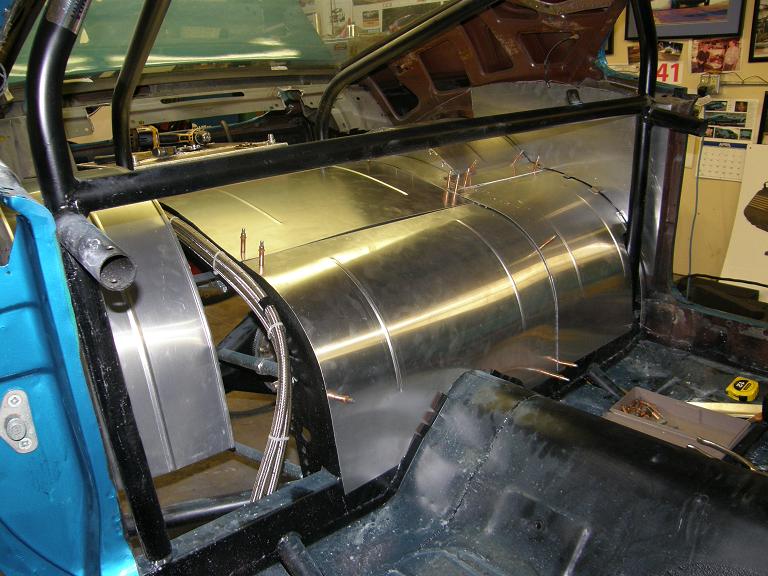
As per plan JC started working on getting the sheet metal in the trunk secured while I started fitting the aluminum panels inside the passenger compartment. Our plan kind of fell apart at this point though, because getting the panels fit in the interior turned out to take a lot longer than I had previously anticipated. I didn't get done with the interior until about 6:00, and it was only held in place by Klecos at this point. My wife and kids were wondering about dinner, and I wanted to get a nice dinner for everybody to thank JC for his help on the car, and also to thank my wife and kids for their patience with me while I spent all weekend thrashing on this project. So, I ordered dinner from a local rib restaurant and went to pick it up, while JC worked on getting all the pop rivets installed in the interior. I was back by 7:00 and we all sat down and had a nice dinner; JC and I were back out to the shop by 7:45. There was one more panel to finish in the interior, the panel that separates the trunk from the interior. We ended up making templates for that panel from some posterboard, and getting the templates fit into place before cutting up the last pieces of aluminum to make up the panels. Finally by 10:00 we were finished, and the aluminum work was done. Here are some photos of the work in process, and the finished aluminum work looking from inside the passenger compartment:
I stayed out in the shop for another hour or so tying up some loose ends, and then called it a night.
Sunday morning at 8:00 I got to work on the instrument panel. On this car the factory dash arrangement is completely removed. I purchased one of those plastic dash covers that can be glued in place over the factory dash to cover up a worn or cracked factory piece, and am using that as the dash pad on the car. What I needed to do was to make up some aluminum panels that fit with the dash cover, to try to maintain at least a semi-stock appearance. I had a plan for doing this in place, and the biggest challenge was going to be the instrument panel, so I started with my CAD program on Sunday morning to make a drawing of what I needed. I figured I would make a split ring that bolted together and would fit in place over the steering column, and then a flat aluminum panel with holes punched in it for the instrument panel itself. The flat aluminum panel would bolt to the ring, and this would make a good start for securing the instrument panel to the car.
After making some initial measurements on the dash cover I cut a cardboard template for the shape I needed, and trimmed it to fit properly inside the dash cover opening. Then I took measurements off this template and transferred them to my CAD drawing. Once I had the outline in the CAD file I measured the Autometer instruments that were going to be installed in the panel and put the holes for them in the CAD file. I added small holes for two blinker lights and one high-beam light, plus a hole for the ignition switch to complete the instrument panel drawing.
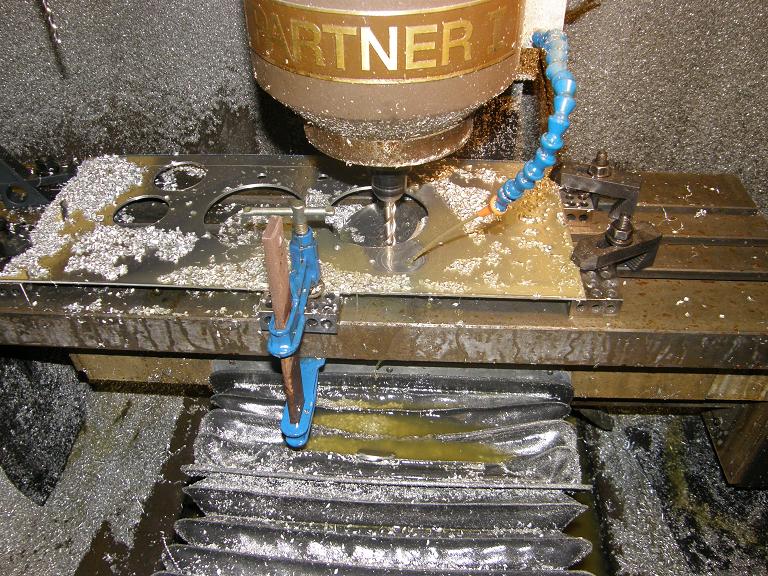
Two years ago, I would have been printing out a full size copy of this drawing, taping the pages together, and using it to trace out the locations of all the holes in the panel and the general outline onto my 1/8" aluminum panel. But now with the CNC machine available it was just a matter of fixturing the panel material on the table, and programming the machine to do the work. I think it actually would have been faster if I had done this manually, but the quality of the job is so much better with the CNC mill that it was really a no brainer to use that. Programming the panel and the split ring to go around the steering column took a while, but by 11:00 AM I had the split ring machined. It took me a half hour or so to pull the vise off the CNC machine and fixture the aluminum panel for the instrument cluster on the table, but shortly after 11:30 I started the CNC program. Here's a photo of the partially cut instrument panel being machined:
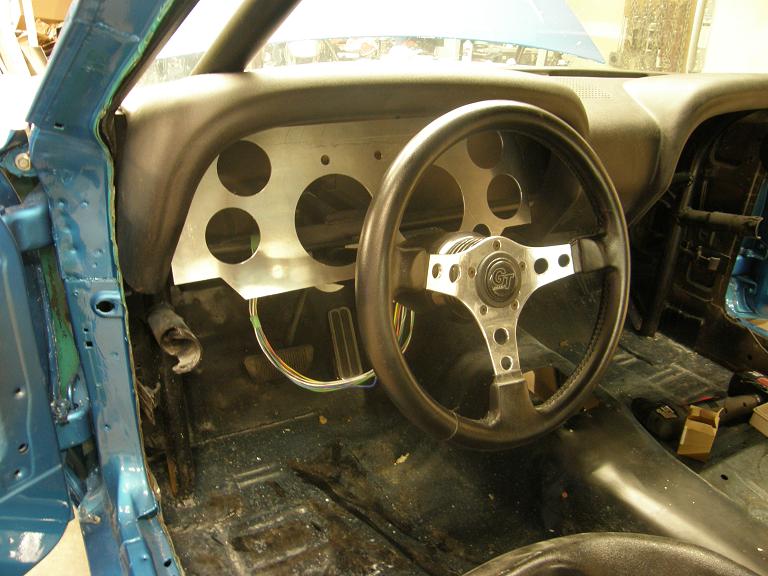
While the CNC machine ran I tapped some holes in the split ring, and drilled a couple of holes that were easier drilled in my drill press rather than having to refixture the split ring at 90 degrees and CNC drill them. I also needed to take an hour or so to help my son with a 4H project; the county fair is coming up this week, and he has built and painted a rocket to enter in the science part of the fair. He needed some help with the final touches on the paint job, so I worked on that with him while the CNC machine was still running. Finally by 2:00 the instrument panel was done on the machine, so I pulled it out of the mill, touched up the edges with a file, and installed it on the steering column with the split ring collar. Here's a photo of the bare instrument panel installed:
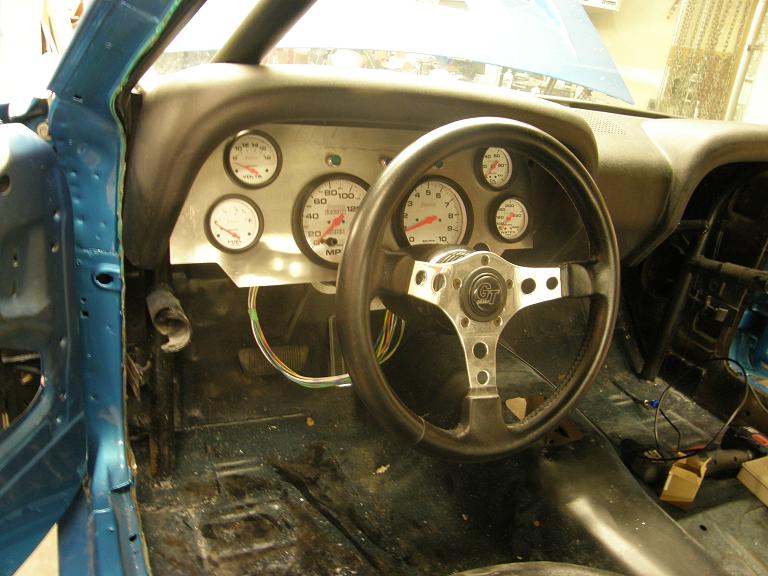
I thought it looked pretty good! It looks even better with the instruments installed:
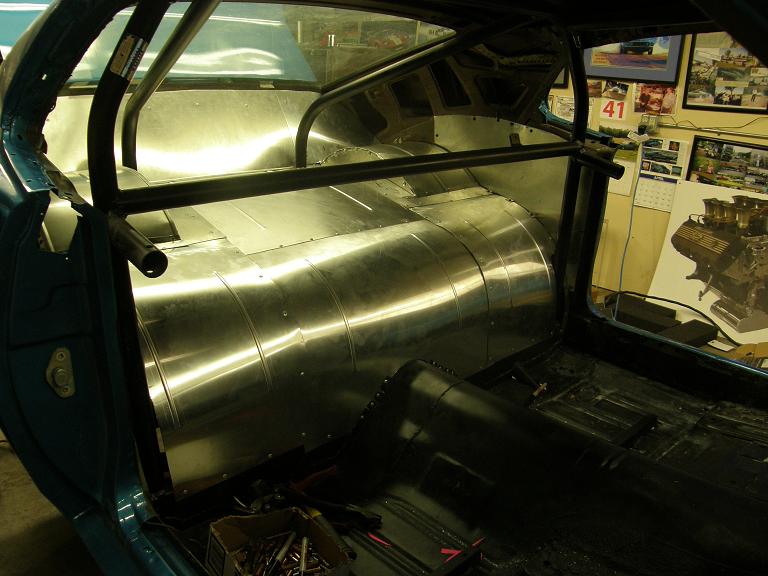
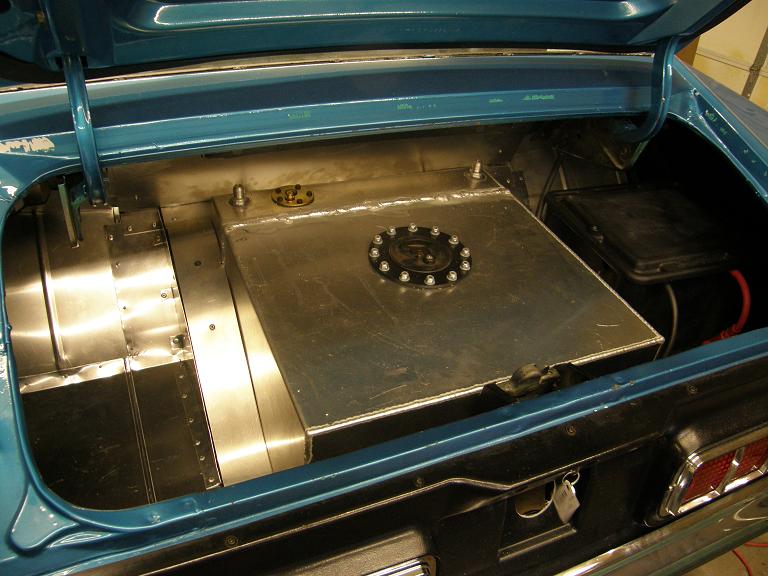
With the instrument panel done I went back to the trunk of the car, because I wanted to get the fuel tank permanently mounted on some rubber feet, plus install the battery box, battery, and shut off switch. My two friends Steve P (F570rd) and Mark M showed up to see the progress on the car while I worked on this stuff. By around 6:00 the trunk was basically together, with the exception of some seam sealer in a few spots and the wiring. Here's a photo looking into the trunk of the car:
Steve and Mark took off, and I went into the house to grab a bite to eat and help my wife with her computer, which somehow had contracted some malware that was causing her all kinds of problems. I was back out to the shop by 7:00, feeling pretty pooped out, but determined to get going on the engine disassembly. I really wasn't looking forward to that, but it had to be done because I needed to get the heads in to be planed this coming week. I was hoping to get the engine entirely disassembled and the heads off, but despite working until 11:00 PM I didn't quite get finished. The front cover is all disassembled and the intake is loose, but I still need to pull the wiring off the injectors, remove the intake, and then pull the nuts on the head studs and pull the heads. I could have stayed up later and got it done Sunday night, but I was just beat by 11:00 PM, and needed to be at work at 7:00 AM Monday, so I called it a night.
By Friday this coming week I should have everything I need to get the engine back together. I have family related plans on Saturday, but Saturday night I should be able to start the reassembly process. I have Monday and Tuesday off next week, so my plan is to get the engine dynoed by Monday the 8th, and put it in the car on Tuesday. If I can get that done, I figure I should still have enough time to complete the wiring and details on the car, and make it to the track at the end of August. I'll post another update next weekend .


