Author Topic: 492" FE Dyno Adventures  (Read 1825 times)

0 Members and 1 Guest are viewing this topic.

jayb

  • Administrator
  • Hero Member
  • *****
  • Posts: 7405
    • View Profile
    • FE Power
492" FE Dyno Adventures
« on: August 19, 2023, 04:39:32 PM »
The moral of this story is that you are never too old to learn  ;D

A little background:  Earlier this summer I finally got my 69 Torino Cobra (or Fairlane Cobra, or just Cobra, take your pick) on the road after paint and interior work.  I was planning to drive it as is this summer but after firing the engine, which had not been run for any significant time since 1976, two problems arose.  The lesser problem was that is smoked.  The greater problem was that the rear main seal was gone, and it pumped out a quart of oil every 60 miles. 

After about a week and half I got tired of smoking out all the nearby vehicles at stop lights and stop signs, and decided I needed to get a motor together for this thing.  I had been planning to repurpose the 492" FE used for the dyno testing in my book for this car.  It had been sitting on the engine stand since 2010, and when I uncovered it and pulled the heads and intake, I was really surprised at how good it looked.  I took a couple of rod caps off and the bearings looked like new.  I reviewed the last dyno results from 2010, and oil pressure had looked good, and no notes on problems, so I decided to just leave the short block together as it was, and rebuild it from there.

Joe Craine had ported a set of Edelbrock heads for me a few years ago, and they were sitting on the shelf and ready to go, so I used them.  I also grabbed a Performer RPM intake, since this was going to be a street only car, and had a couple of sets of Comp Cams solid roller lifters with pin oiling available, plus the set of Erson rockers that I had run on the engine previously.  Amazingly, I also located the original pushrods I had used back then, so those went back in the motor also.  Just needed a cam, and unfortunately due to various delays at Comp it took me five weeks to get one.  It finally came about a week and half ago, so I was able to get the engine together.

My good friend "Wild Bill" Conley happened to be in northern Minnesota visiting relatives this week, so he came down for a day to help with the dyno session.  Thursday afternoon we got the engine installed on the dyno and were ready to go by 6:00 PM or so.  Here's a picture of the engine on the dyno:


First thing I always do with a dyno engine is spin the engine with no fuel and use the timing light to set initial timing.  Unfortunately, the timing light didn't blink.   Hmmmmm....

I had been a little concerned about the ignition system on this engine.  The distributor was an MSD that hadn't been used for years.  Same with the wires, cap, rotor, and also the MSD Digital 6 box and the Blaster coil.  I had new Autolite Racing plugs installed, so I wasn't worried about those.  Bill and I started swapping parts.  We tried a different coil, a different MSD box, and new wire between the MSD box and the distributor, and finally we pulled the distributor itself and replaced it with another MSD unit.  Still no spark.

It was pretty close to 8:00 PM and I don't run the dyno after 8:00 in deference to my neighbors, so we called it for the night and took off to have dinner with my wife.  After dinner of course, we were still thinking about this.  Back in the shop, I was wondering about the MSD box.  It has a red LED when it is powered up with the ignition switch, and the LED was on.  Of course, it also has two big wires coming off it, one for 12V power and one for ground.  I decided to check the power there, and low and behold, zero volts!  Surprised the heck out of me; I figured that with the red LED on, the box had to have power.  But apparently, just the ignition power will light the LED, even if the main power wires are not getting voltage.

We figured out that a fuse on the main power line to the MSD box (that was conveniently out of sight under the dyno stand) had blown.  I replaced the fuse, and the engine started.  Too late to run, but at least we could get it going in the morning.

Before firing the engine yesterday morning we set it back up to the original ignition components, started the engine and started testing.  One thing we saw pretty quickly was that the ignition advance wasn't working, so we just locked the timing and ran that way.  A cruise test determined that we were way fat on fuel, which was not a surprise given the 1000 Holley HP carbs jetting (84/84, with 6.5 power valves in both metering blocks).  We jetted down to 76 in the primaries and then ran the first pull from 3000 to 5000 RPM.

The engine missed and pretty much ran like crap.  I had just rebuilt the carb so I wasn't too worried about that, so it appeared we had an ignition problem after all.  Again we went to swapping parts, changing timing, etc. but were not able to solve the problem.  Unfortunately Bill had to leave late morning, so we called the session off without a resolution.

I thought about this most of yesterday, and got back out to the shop this morning with a couple of ideas.  First I wanted to see the airflow into the engine recorded by the dyno.  This chart confirmed to me that the issue was ignition, because the engine was continuing to pump air despite the fact that the power was falling off:


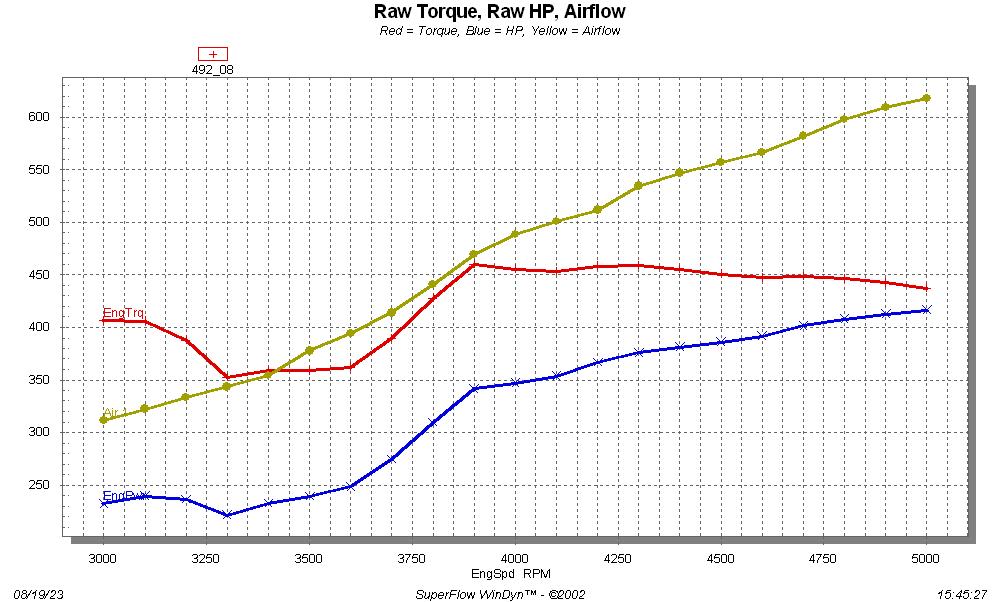
Seemed like something was happening around 3900 RPM that was hurting the power production.  I went through the same steps as we had before, swapping coils, swapping MSD boxes, checking everything.  I thought I had found it when I pulled the distributor cap and tried to measure the resistance between the cap terminals and the contacts in the cap, and got very high resistance.  The contacts in the cap were pretty badly corroded, so I shined them up with some sandpaper and ran another pull, but there was no difference.  I checked the resistance of all the plug wires and got 80-110 ohms each, and about 40 ohms on the coil wire.  I looked at all the plugs and they all looked fine, pretty much brand new.  I was about ready to pull the distributor again when I thought it would be easy to just replace all the plugs and try that once too.

The new plugs were Autolite 3923 Racing plugs.  The old plugs I dug out of the coffee can were Autolite 3924s.  I replaced all the new plugs with the old used plugs, and the engine ran like new.  Here's a plot showing the difference, old used plugs vs the new plugs:


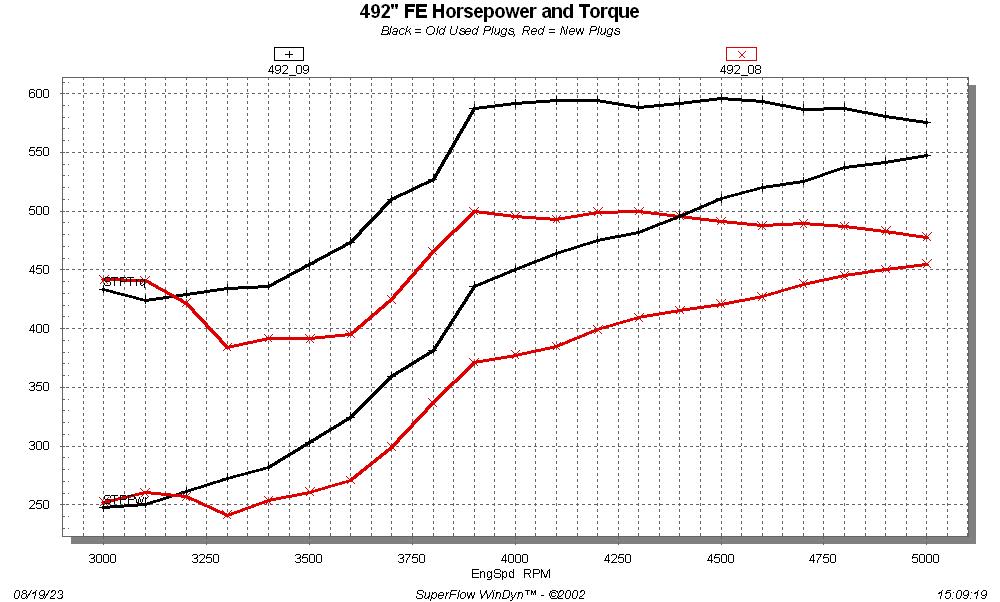
The new plugs were junk??  Looking at the graph, obviously, the plug issue was causing problems much earlier than 3900 RPM.  After running some more dyno tests I took the new plugs and measured their resistance.  The plugs in the #2 through #8 cylinders all measured about 5K Ohms.  The plug that had been in #1 measured 72K Ohms.  Obviously, that plug wasn't firing and the engine was running on 7 cylinders.

I'm not through with this engine yet, still have a ways to go tuning wise.  Right now it is making 596 lb-ft of torque @ 4500 and 580 HP @ 6100.  Compared to how it was outfitted in the dyno testing in the book, the heads are down in flow about 15 cfm on the intake compared to the original heads I used, and the cam is smaller, 256/260 @ .050 compared to the cam used previously, which was 266/272 @ .050.  Compression is down about a quarter point also.  I was hoping to get 600/600 out of this engine, but don't know if I will get there or not.  When I get done with it I will post the info in the Dyno Results section. 

Anyway, lessons learned:  The red LED on an MSD Digital Six does not indicate that the main power is connected, and brand new plugs can be faulty.  Go figure...
Jay Brown
- 1969 Mach 1, Drag Week 2005 Winner NA/BB, 511" FE (10.60s @ 129); Drag Week 2007 Runner-Up PA/BB, 490" Supercharged FE (9.35 @ 151)
- 1964 Ford Galaxie, Drag Week 2009 Winner Modified NA (9.50s @ 143), 585" SOHC
- 1969 Shelby Clone, Drag Week 2015 Winner Modified NA (Average 8.98 @ 149), 585" SOHC


gdaddy01

  • Hero Member
  • *****
  • Posts: 656
    • View Profile
Re: 492" FE Dyno Adventures
« Reply #1 on: August 19, 2023, 05:43:17 PM »
the bad plugs to me are just another example of the world we live in today. new parts sometimes are junk, makes for difficult time for figuring things out. what if you have a paying customer and try to explain this to them why you charged an extra 200 dollars finding the problem.

machoneman

  • Hero Member
  • *****
  • Posts: 3853
    • View Profile
Re: 492" FE Dyno Adventures
« Reply #2 on: August 19, 2023, 07:12:33 PM »
Amazing that plugs that looked good (and I'm sure you inspected them closely) were junk. Interesting note on the MSD light being on but no power. Didn't know that could happen. Thanks.
Bob Maag

hbstang

  • Sr. Member
  • ****
  • Posts: 258
    • View Profile
Re: 492" FE Dyno Adventures
« Reply #3 on: August 19, 2023, 07:15:16 PM »
i am surprised that you are using autolite plugs!i had many of them fail around 2010 and went to ngk and never looked back.

Joe-JDC

  • Hero Member
  • *****
  • Posts: 1490
  • Truth stands on its own merit.
    • View Profile
Re: 492" FE Dyno Adventures
« Reply #4 on: August 19, 2023, 09:30:47 PM »
If that Performer RPM isn't ported or at least gasket matched, the heads flow more than the intake manifold.  At ~320cfm, your heads are capable of 600 horsepower.  Also, a 1" Super Sucker spacer will help make more power with all those accessories working. Glad to see you are back on your engines.   Joe-JDC
Joe-JDC '70GT-500

jayb

  • Administrator
  • Hero Member
  • *****
  • Posts: 7405
    • View Profile
    • FE Power
Re: 492" FE Dyno Adventures
« Reply #5 on: August 19, 2023, 10:39:09 PM »
Joe, I did port the Performer RPM to match the cylinder heads.  The cam is the primary power bottleneck, I think, but I wanted a milder cam in this engine for easier street duty, and also to not stress the toploader any more than necessary - Jay
Jay Brown
- 1969 Mach 1, Drag Week 2005 Winner NA/BB, 511" FE (10.60s @ 129); Drag Week 2007 Runner-Up PA/BB, 490" Supercharged FE (9.35 @ 151)
- 1964 Ford Galaxie, Drag Week 2009 Winner Modified NA (9.50s @ 143), 585" SOHC
- 1969 Shelby Clone, Drag Week 2015 Winner Modified NA (Average 8.98 @ 149), 585" SOHC


blykins

  • Hero Member
  • *****
  • Posts: 4822
    • View Profile
    • Lykins Motorsports
Re: 492" FE Dyno Adventures
« Reply #6 on: August 20, 2023, 05:04:53 AM »
A Super Sucker may get you to 600.  580 turning all the accessories is not bad….you’d gain 13-14 if you unhooked the water pump.

All in all, 580 at 6100 is ddddaaannngerouuslllyyy close to 575 at 6000.  😁
« Last Edit: August 20, 2023, 05:27:58 AM by blykins »
Brent Lykins
Lykins Motorsports
Custom FE Street, Drag Race, Road Race, and Pulling Truck Engines
Custom Roller & Flat Tappet Camshafts
www.lykinsmotorsports.com
brent@lykinsmotorsports.com
www.customfordcams.com
502-759-1431
Instagram:  brentlykinsmotorsports
YouTube:  Lykins Motorsports

MeanGene

  • Sr. Member
  • ****
  • Posts: 450
    • View Profile
Re: 492" FE Dyno Adventures
« Reply #7 on: August 20, 2023, 10:21:32 AM »
I am right in the middle of adding an MSD6A to my test stand, even found some orange wire on epay lol. Just realized that I was forgetting one thing- fuses! I always fire them up with a plain-Jane points distributor to make sure it'll fire if breaking in a flat tappet, and will have a harness ready for the MSD ready for the switch. Also have the little adapter harness for Duraspark to MSD. Thanks for the fuse reminder! Sounds like a sweet street engine

1968galaxie

  • Sr. Member
  • ****
  • Posts: 311
    • View Profile
Re: 492" FE Dyno Adventures
« Reply #8 on: August 20, 2023, 05:47:07 PM »
Very decent results Jay!
I am sure a little tuning will get beyond 600 HP.
I believe your dyno figures are using a conservative/realistic correction factor.
I see some dyno results where CF is way out to lunch, as well as friction factors adding to the dyno printed results.

Looks like a very well done build! Congrats!

randomologist

  • Jr. Member
  • **
  • Posts: 30
    • View Profile
Re: 492" FE Dyno Adventures
« Reply #9 on: August 21, 2023, 12:41:32 PM »
Glad you found the problems. Parts these days are so iffy. One of the biggest problems I had early on was getting a non-faulty thermostat of all things. I felt like I was going crazy, even spending $20 for an all brass Mr Gasket which failed on the second drive. Nothing surprises me anymore. 20 years ago, it was just off-brand remanufactured stuff like starters and alternators which would be bad out of the box. Now, it's everything :/

Barry_R

  • Hero Member
  • *****
  • Posts: 1915
    • View Profile
    • Survival Motorsports
Re: 492" FE Dyno Adventures
« Reply #10 on: August 22, 2023, 06:51:18 AM »
Good catch on the plugs - really like the idea of using airflow to isolate the problem.
Something not possible on a DTS dyno - an advantage of the Superflow that I'd never considered.
Definitely agree on the quality of new stuff - it's lousy, and that is when you can actually get things at all.

Response to a prior response...
Crazy correction factors have been used in published dyno results for many years - folks who post those are either end customers who don't know they are being hustled, or are shop guys working to polish their results.  The latter group won't usually publish the correction factors being used, but they sometimes inadvertently leak out. 

Same is true for dyno calibration.  Theoretically TQ and HP are supposed to cross each other at 5250 RPM.  It's pretty common to see them drift off by 3 - 5 numbers, and probably not worth worrying about for our comparative purposes.  But when you see big offsets it's cluing you into a significant data problem - intentional or accidental.

Inertia and Friction factors are an entirely different thing.  They are buried within the Superflow software, but are more visible and - to an extent - controllable within the DTS software.  I've have been told that DTS added that additional input in order to "equalize" their output data to that of the more well accepted Superflow data for a given engine.  I do know that big changes to the inertia factor input have a very nominal impact on the output data.

I use "torque per cubic inch" as a directional lie detector.  There are definite ranges where things generally fall, and when a combination - especially a mild one - is published well beyond those ranges, one has to squint a bit and maybe bite your tongue to view the data.

I've seen 7-12HP from turning the water pump - plenty of dyno installations just pump the water for easier hook up, and it makes their stuff look a bit better.  The alternator is a surprising small power draw unless running at full load.  Even then it's only a single digit deal.  My prior installation had an alternator mounted to the rear of the dyno, used to keep the battery charged and smooth/normalize the voltage for EFI and ignition stuff - so every pull had an alternator running even though it was not visible from the front.  We full fielded it once and it took about two horsepower.

At the end of the proverbial "day", comparing directional changes from tuning on a given dyno installation is your best guide for comparing performance parts and tuning.  If it gets better - it gets better.


jayb

  • Administrator
  • Hero Member
  • *****
  • Posts: 7405
    • View Profile
    • FE Power
Re: 492" FE Dyno Adventures
« Reply #11 on: August 22, 2023, 10:38:21 AM »
Barry, thanks for those insightful comments.  For what it's worth, the correction factor for the dyno on the day that I ran was 7.5%.  This is based on an air temperature of 78F, barometer of 28.82 inches of mercury, and vapor pressure of 0.51 inches of mercury.  Standard dyno conditions are air temp of 60F, barometer of 29.92, and zero humidity (vapor pressure 0).  All the calculations for the correction factor are shown in my book.  FYI, the highest correction factor I have seen in my dyno in almost 20 years of running is just over 9%.  The lowest, done in the dead of winter on a high pressure day with a temperature below 60F in the shop, was about -1%. 

I was always curious about how the DTS dyno would get the A/F numbers.  Is it O2 sensors only?  The Superflow dynos use built-in flowmeters for the air and the fuel to get the A/F numbers, along with the O2 sensors as a supplement.  Comparing the two numbers is always interesting.  Many times I have seen the dyno A/F number look rich while the O2 number looks lean.  As you tune the engine and it gets closer to ideal, the numbers from the two measurements tend to converge.  In a case like this, I always tune first based on the dyno number, and lean out the engine, and then the O2 number will get richer as the dyno number gets leaner.  Weird, just another reason why I don't always trust the wideband O2 sensors.

In the end, you tune for horsepower.  In some cases, with certain EFI setups in particular, the O2 sensors are all you've got.  If you go one way, and the HP drops, you know you have to go back the other way, regardless of what the O2 sensor says.  Most engines will end up wanting 12.5:1 to 13:1 A/F, but not always.  My big SOHC wanted about 13.4:1 to make peak power.

There's no inertia correction factor on my Superflow 901 dyno.  The acceleration rate of the engine can be set with the dyno controls, so if you want to get a bigger number, you can accelerate the engine more slowly.  This takes less power for accelerating the reciprocating assembly, and as a result more torque will show up in the dyno results.  For what it's worth, I always use 300 RPM/sec on my dyno results. 

Finally, as far as dyno results go, I've seen a few whoppers over the years.  One was from a local friend of mine who went to a very well known engine builder in northern Minnesota, and got a little over 500 HP from his Stock Eliminator 428.  But the car wouldn't run the appropriate number.  He showed me the dyno results, and the barometer reading shown on the dyno results was something like 25 inches!  This was about the elevation of Denver and so was way off, and caused the correction factor to be abnormally large.  Another one was a 400+ inch 351C that made something like 1.57 lb-ft of torque per cubic inch.  That was a big, big number for that engine, and I'd bet that the dyno calibration was off in some way on that one.  But, the customer was happy  ;D
Jay Brown
- 1969 Mach 1, Drag Week 2005 Winner NA/BB, 511" FE (10.60s @ 129); Drag Week 2007 Runner-Up PA/BB, 490" Supercharged FE (9.35 @ 151)
- 1964 Ford Galaxie, Drag Week 2009 Winner Modified NA (9.50s @ 143), 585" SOHC
- 1969 Shelby Clone, Drag Week 2015 Winner Modified NA (Average 8.98 @ 149), 585" SOHC


JERICOGTX

  • Sr. Member
  • ****
  • Posts: 336
    • View Profile
Re: 492" FE Dyno Adventures
« Reply #12 on: August 22, 2023, 11:17:45 AM »
Every Spring, I replace the plugs in my race engine, whether they need it or not. Got bit by that once before. Plugs worked in the fall, and looked perfect in the spring. Didn't work though.

Barry_R

  • Hero Member
  • *****
  • Posts: 1915
    • View Profile
    • Survival Motorsports
Re: 492" FE Dyno Adventures
« Reply #13 on: August 23, 2023, 11:04:35 AM »
On the DTS we are only looking at O2 sensor derived A/F numbers.
They use a fuel flow meter to derive BSFC data.
My fuel meter had died before I ever bought the machine - and since I tuned for HP, looking at plugs and O2 data I never used it.

One thing folks may not realize is that O2 sensors read "oxygen" - not A/F.  A situation that is outside of normal (a serious misfire) will give bad data, and those aftermarket EFI systems that are 100% reliant upon O2 can learn themselves into an undriveable situation.

6667fan

  • Hero Member
  • *****
  • Posts: 719
  • Every Second Counts
    • View Profile
Re: 492" FE Dyno Adventures
« Reply #14 on: August 23, 2023, 10:45:22 PM »
What about dyno tuning where BSFC is the measuring stick? I have been in a shop where the the dyno operator tuned for an efficient BSFC number. The dyno did not have wide band A/F measuring capability. It derived its ratio based on how much air was being pulled into the carb(s) vs fuel usage. I offered to bring in a wide band set up to plumb into their exhaust for comparison. The dyno software showed a leaner A/F than my wide band set up.
JB


67 Fairlane 500
482 cid 636/619.
Tunnel Wedge, Survival EMC CNC heads, Lykins Custom Hydraulic Roller, Ram adjustable clutch, Jerico 4-spd, Strange third member with Detroit Locker, 35 spline axles, 4.86
10.68@125.71 1.56 60’