

31
Dedicated to Building and Racing the Ford FE Engine
News:
SMF - Just Installed!
 Show Posts
This section allows you to view all posts made by this member. Note that you can only see posts made in areas you currently have access to.
32
Member Projects / Re: Putting A Little Pep In My 390's Step
« on: September 11, 2023, 09:41:28 PM »
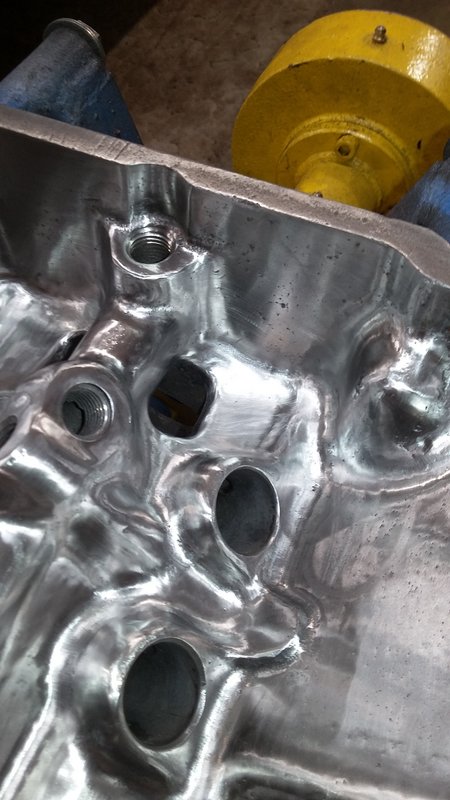
Back to the tunnel wedge......I mocked it up and had to have .030" cut off both intake faces and both valve cover rails needed a trim as well. Lined up pretty well after that.

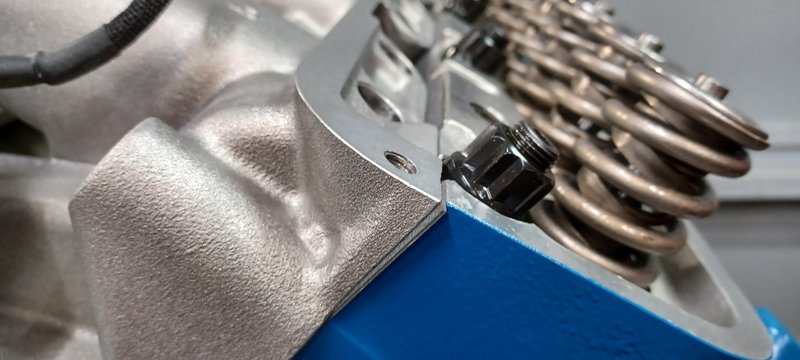

Pushrod holes needed some clearancing.
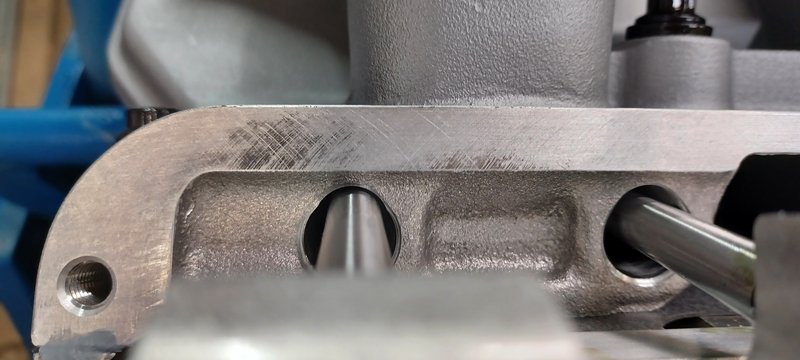
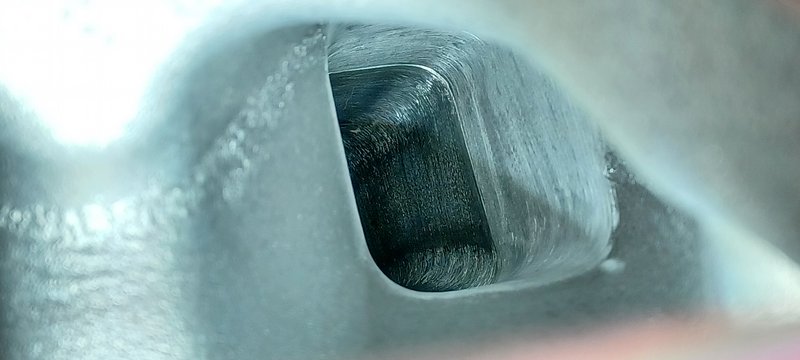
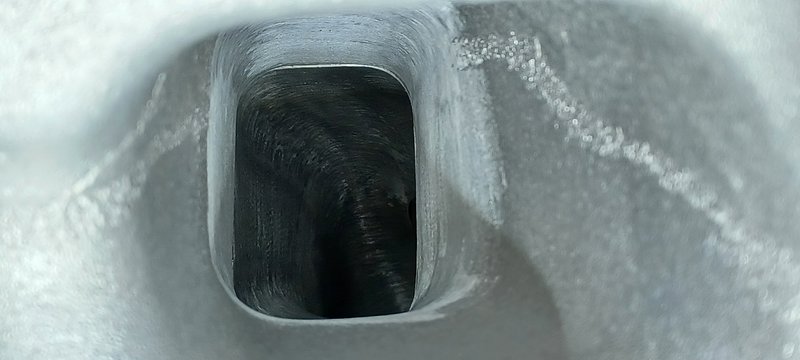
After that, I gave it a port matched to the heads:


Pushrod holes needed some clearancing.
After that, I gave it a port matched to the heads:
33
Member Projects / Re: Putting A Little Pep In My 390's Step
« on: September 11, 2023, 09:32:05 PM »
I also wanted to try something different on the linkage. I got a replacement 2x4 linkage kit and mocked it up. I wasn't quite satisfied how it looked and fit with my fuel regulator and lines, so I decided to try and make something. I have a simple threaded rod with rod ends going to both primaries on the pass. side for 1:1 linkage. Easy. I added nut serts to the linkage arm so I don't have to fiddle with fishing nuts on the back side while servicing.

Now, I had to come up with something to actuate the driver side from the firewall rod. I didn't like the first attempt, so I tried again. I took a piece of secondary bracket that has the slotted hole and trimmed the outside down. I bent a piece of flat stock and welded the two together and smoothed it off. I then welded a 1/4" fine thread Allen bolt from the back side of the lever. Again, so I don't have to fiddle in the car with a nut and bolt. I will have another threaded rod with rod ends that connects the firewall rod the the primary lever. I just have to slide it over the "stud" and install a lock nut. I also had to come up with a solution for a return spring setup. So this is what it looks like:


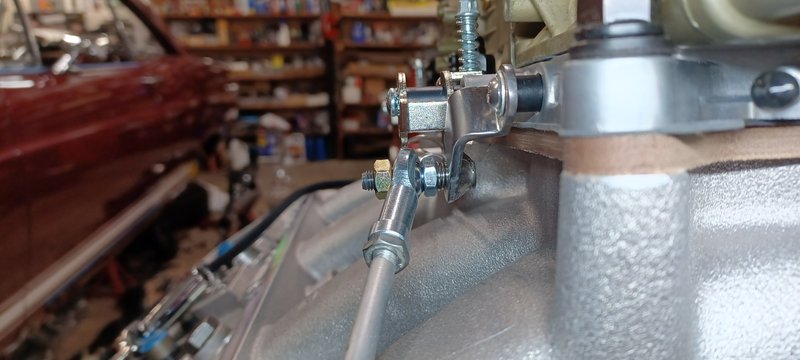
I gave the bracket a more finished look.


Now, I had to come up with something to actuate the driver side from the firewall rod. I didn't like the first attempt, so I tried again. I took a piece of secondary bracket that has the slotted hole and trimmed the outside down. I bent a piece of flat stock and welded the two together and smoothed it off. I then welded a 1/4" fine thread Allen bolt from the back side of the lever. Again, so I don't have to fiddle in the car with a nut and bolt. I will have another threaded rod with rod ends that connects the firewall rod the the primary lever. I just have to slide it over the "stud" and install a lock nut. I also had to come up with a solution for a return spring setup. So this is what it looks like:
I gave the bracket a more finished look.
34
Member Projects / Re: Putting A Little Pep In My 390's Step
« on: September 11, 2023, 09:14:55 PM »
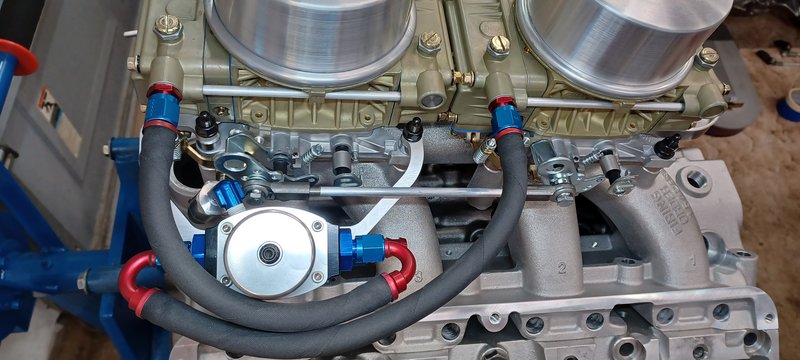
Back-tracking quite a bit, I had gotten the bug early-on to maybe try out a tunnel wedge this time. I had my block back from the machine shop, so I dropped it back in the car and sat a Dove tunnel wedge on that I had. I was hoping to keep everything under the stock GT hood. So I began to mock everything up. Thanks to Ross for the 450 Holley's. They came in handy for mockup. 


Checking for air cleaner clearance...

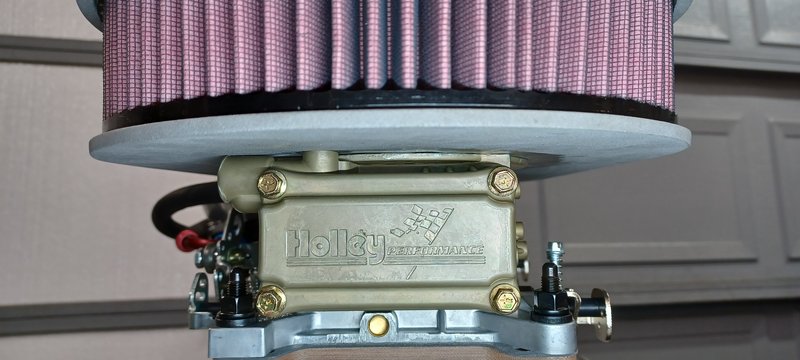
I figured if I ran a 1/4" wood spacer under the carbs and didn't use any base gaskets for the air cleaner base and also cut the stepped flange off on the base of the air cleaner, so the lid is flat on top of the carbs, I could run a 2 1/4" filter. This means poking holes in the base for the needle and seat adjusters.

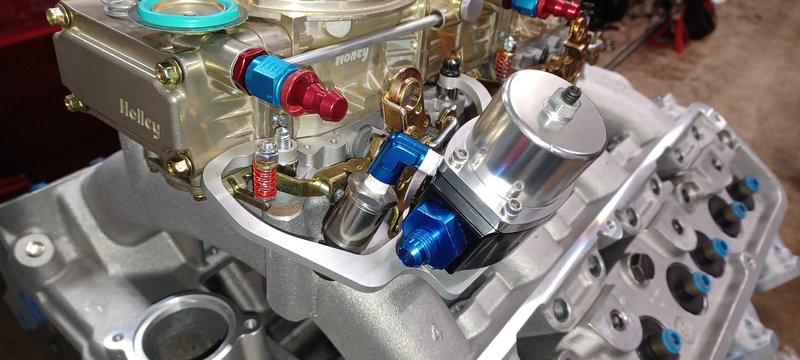
I also tried to lay out the fuel system with the same regulator I had.


After seeing the tunnel wedge might be a go with the clearance, I pulled the trigger on a Trick Flow unit. The Dove tunnel wedge I had I felt was going to be too big for my 390, so that's why I got the Trick Flow. A little comparison with the Dove and TFS. The TFS is a beautiful casting and is definitely a smaller volume than the Dove.


Then, I picked up a new set of carbs and began to figure out the fuel system and linkage.

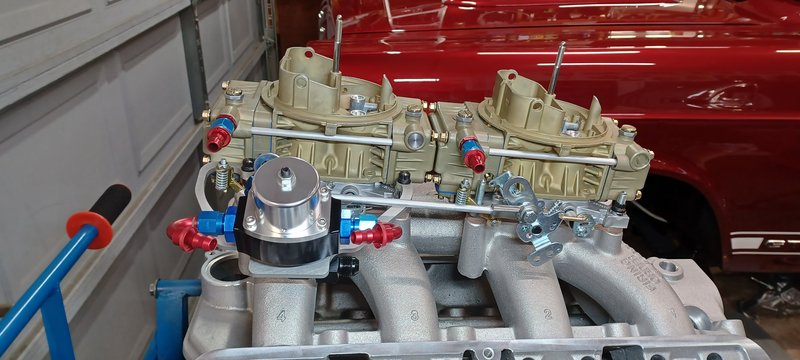
I also had to drill a new hole and tap for my fuel pressure sensor in the regulator. I could've run it to the outside, but having it in by the linkage and under the air cleaner will look much better and be hidden almost completely.


The air cleaner with base trimmed down:
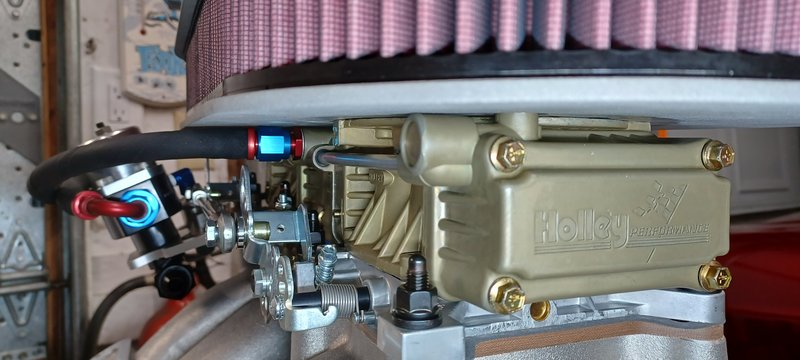


I also noticed the base of the Blue Thunder had oversized holes for the carbs. It is a very loose fit over the carbs. So I got some aluminum square stock and bent it around and fit it in. After I was happy with it, they were welded in place.

Checking for air cleaner clearance...
I figured if I ran a 1/4" wood spacer under the carbs and didn't use any base gaskets for the air cleaner base and also cut the stepped flange off on the base of the air cleaner, so the lid is flat on top of the carbs, I could run a 2 1/4" filter. This means poking holes in the base for the needle and seat adjusters.
I also tried to lay out the fuel system with the same regulator I had.
After seeing the tunnel wedge might be a go with the clearance, I pulled the trigger on a Trick Flow unit. The Dove tunnel wedge I had I felt was going to be too big for my 390, so that's why I got the Trick Flow. A little comparison with the Dove and TFS. The TFS is a beautiful casting and is definitely a smaller volume than the Dove.
Then, I picked up a new set of carbs and began to figure out the fuel system and linkage.
I also had to drill a new hole and tap for my fuel pressure sensor in the regulator. I could've run it to the outside, but having it in by the linkage and under the air cleaner will look much better and be hidden almost completely.
The air cleaner with base trimmed down:
I also noticed the base of the Blue Thunder had oversized holes for the carbs. It is a very loose fit over the carbs. So I got some aluminum square stock and bent it around and fit it in. After I was happy with it, they were welded in place.
35
Member Projects / Re: Putting A Little Pep In My 390's Step
« on: September 11, 2023, 08:38:15 PM »
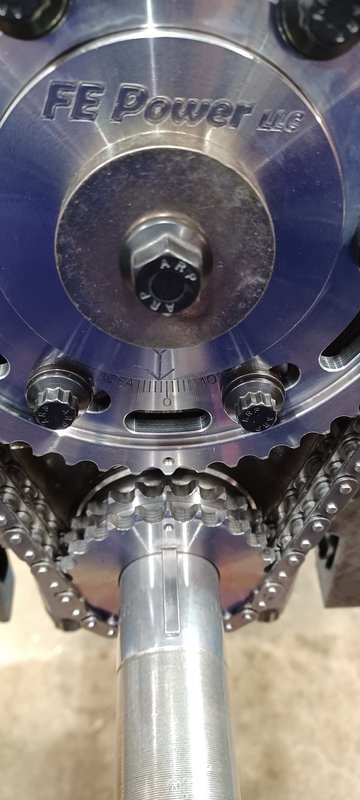
Using Jay's timing set, I started with some grade 9 bolts for the thrust plate and trimmed them to get .020-.025" clearance behind the hub.


Degree-ing the new "unspecified" solid roller that I picked out. Decided against putting the old cam back in. I also added a second dowel pin to the cam and made my own pins out of 5/16" tool steel rod. The camshaft, like the crank, wrist pins, rocker shafts, and a couple other parts, was also REM polished.


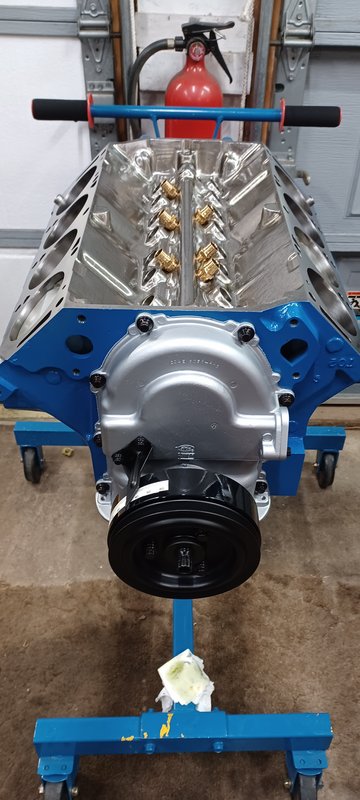
Buttoning up the short block:


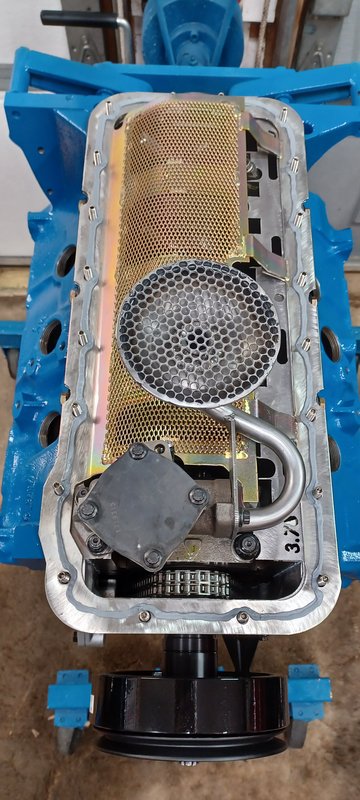
Same windage tray and scraper as before.


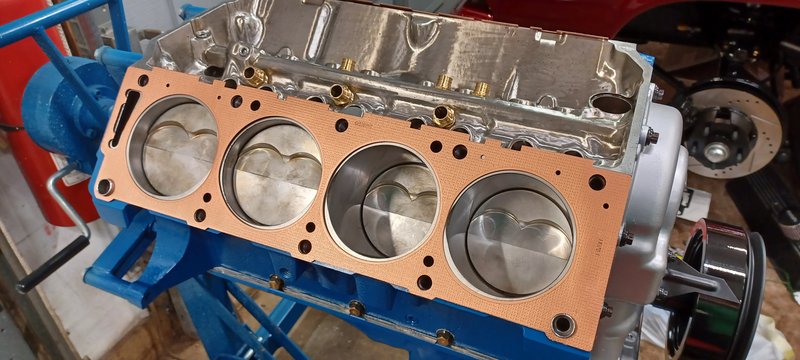
Slapping on the Street Pro Port heads.
Degree-ing the new "unspecified" solid roller that I picked out. Decided against putting the old cam back in. I also added a second dowel pin to the cam and made my own pins out of 5/16" tool steel rod. The camshaft, like the crank, wrist pins, rocker shafts, and a couple other parts, was also REM polished.
Buttoning up the short block:
Same windage tray and scraper as before.
Slapping on the Street Pro Port heads.
36
Member Projects / Re: Putting A Little Pep In My 390's Step
« on: September 11, 2023, 08:19:57 PM »
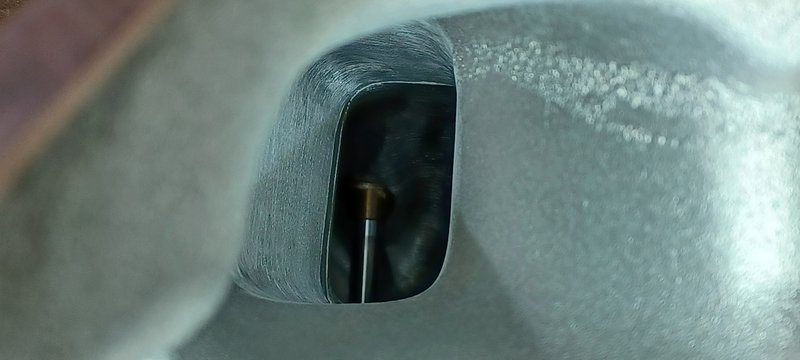
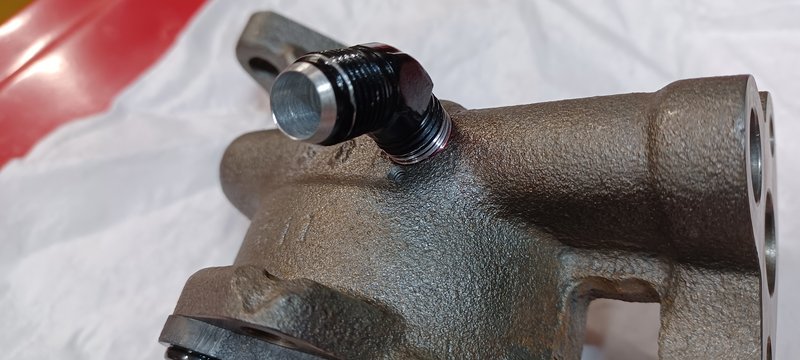
Oil pump was next on the list. I decided to make an external bypass pump myself, since nobody offers one that I'm aware of for an FE. I started on one and didn't like how it was going, so tried again on another pump. I tapped the internal relief hole for a 7/16-20 set screw. I needed to make sure the plug wouldn't move, so I drilled and tapped the outside for a 4-40 cone-tipped set screw and dimpled the screw to accept the cone tip for a positive stop. I figured all I would have to do is drill a hole 90° from the one inside the pump to have the external bypass and have the relief start at the same psi. The set screws are held with red thread locker.


I tapped the external relief hole for 1/4" NPT and used a 45° -6AN fitting to dump back to the pan.
The inlet and inside of the pump were ported to improve flow. The casting is atrocious out of the box. Here's a before and after:


Another point of attention is the mounting flange of the pump. Casting is very uneven. I made a quick tool to spot face the surface.

The pump assembled after coating the gears and inside of housing:


I tapped the external relief hole for 1/4" NPT and used a 45° -6AN fitting to dump back to the pan.
The inlet and inside of the pump were ported to improve flow. The casting is atrocious out of the box. Here's a before and after:
Another point of attention is the mounting flange of the pump. Casting is very uneven. I made a quick tool to spot face the surface.
The pump assembled after coating the gears and inside of housing:
37
Member Projects / Re: Putting A Little Pep In My 390's Step
« on: September 11, 2023, 08:00:36 PM »
I didn't really care for the pickup tube from Milodon that matched the #31130 pan. I like the look of the Moroso, as it has very large radius bends. I thought I could improve on the pickup "box" on the Moroso though. Here's a comparison between the Moroso and the Milodon:


I started my Frankenstein project. I took a factory bell pickup tube and cut it apart:


I cleaned it VERY thoroughly and smashed the flange back down where the screen was sandwiched. I also welded in a washer in the center for a little more strength.

I also made a new screen out of 3/16" holed mesh. I countersunk the holes till the edges just about touch on the inlet side and trimmed to fit the dia. of the bell.

I'm well aware the larger screen will allow possible debris to enter the pump, but I'm willing to take that chance. Plus, I have strong magnets all over. Anyway, I needed to make a new inlet tube for the pickup. I cut the whole box off the Moroso unit and measured the length that I should need for tubing. I grabbed some 3/4" tubing placed it in the vice. First step was to make a nice radius for the entry. So I heated the end of the tubing a found a socket that slid inside the tube and also had a radius that I liked and hammered it home:


I cut the tubing to length and welded it into the bell.

Then I welded the tube to the now modified Moroso piece:
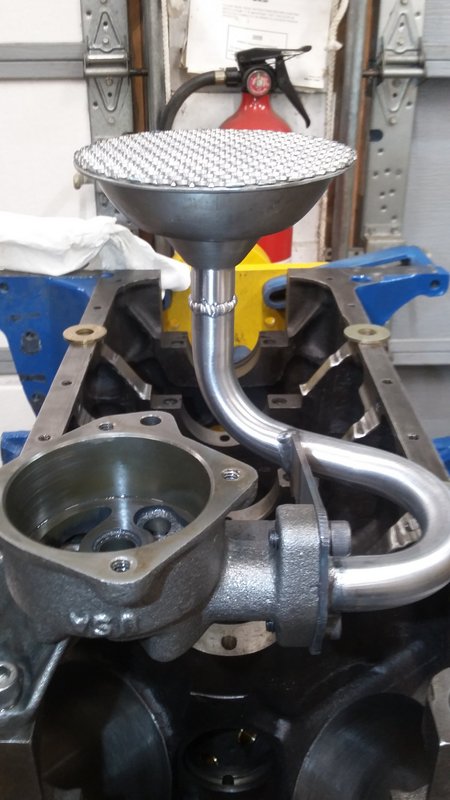

After rechecking fitment, I fully welded the bell to the tube and the screen around the perimeter.
I started my Frankenstein project. I took a factory bell pickup tube and cut it apart:
I cleaned it VERY thoroughly and smashed the flange back down where the screen was sandwiched. I also welded in a washer in the center for a little more strength.
I also made a new screen out of 3/16" holed mesh. I countersunk the holes till the edges just about touch on the inlet side and trimmed to fit the dia. of the bell.
I'm well aware the larger screen will allow possible debris to enter the pump, but I'm willing to take that chance. Plus, I have strong magnets all over. Anyway, I needed to make a new inlet tube for the pickup. I cut the whole box off the Moroso unit and measured the length that I should need for tubing. I grabbed some 3/4" tubing placed it in the vice. First step was to make a nice radius for the entry. So I heated the end of the tubing a found a socket that slid inside the tube and also had a radius that I liked and hammered it home:
I cut the tubing to length and welded it into the bell.
Then I welded the tube to the now modified Moroso piece:
After rechecking fitment, I fully welded the bell to the tube and the screen around the perimeter.
38
Member Projects / Re: Putting A Little Pep In My 390's Step
« on: September 11, 2023, 07:38:42 PM »
I was also debating throwing a set of Molnar rods in to lighten up some more. I acquired a set and at the same time, I came across a deal on a set of used Crower rods. They are at least 100g lighter than the Scat rods I had previously.
The Crower:

I had to have the pin holes honed in the pistons for the slightly larger .990" pins in the Crower rods. My pistons already used a .984" pin, so just a slight hone to the pistons for the new pins to fit. All the main/rod bearings and pin end bushings in the rods were coated. Piston pin bores and skirts were coated on the pistons.
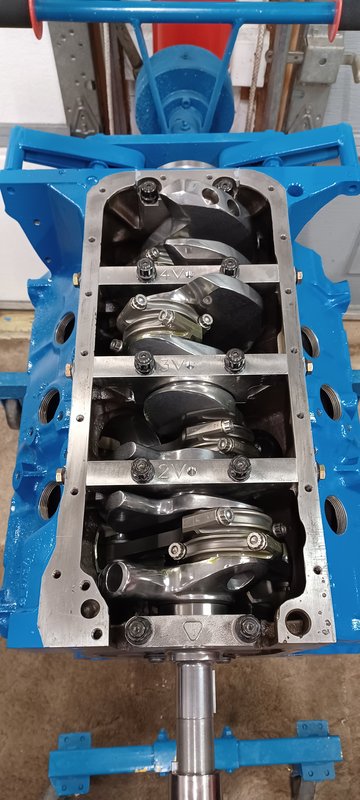
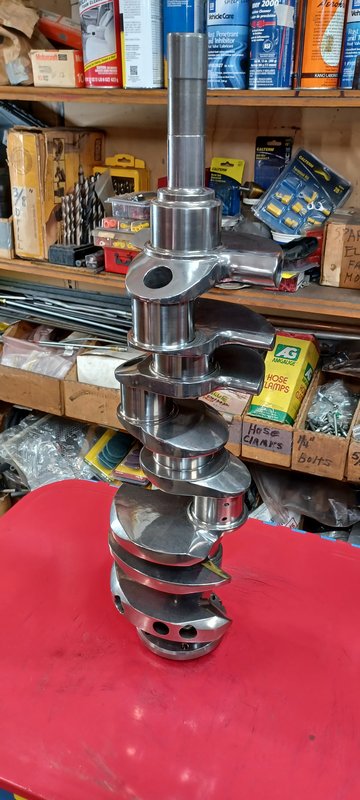
Crank installed and checking thrust:

Slugs and rods installed:

The Crower:
I had to have the pin holes honed in the pistons for the slightly larger .990" pins in the Crower rods. My pistons already used a .984" pin, so just a slight hone to the pistons for the new pins to fit. All the main/rod bearings and pin end bushings in the rods were coated. Piston pin bores and skirts were coated on the pistons.
Crank installed and checking thrust:
Slugs and rods installed:
39
Member Projects / Re: Putting A Little Pep In My 390's Step
« on: September 11, 2023, 07:23:51 PM »
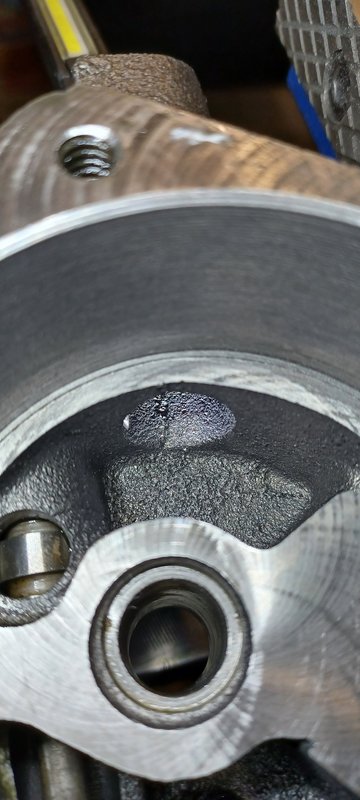
Where to start.........Oh yeah, why the engine came apart to begin with. During the last 50-100 miles I put on in fall of '20, I noticed a little oil showing up in the radiator. No big deal, suck the oil off the top and top off the oil. Well, I also had at the same time a hairline crack at the drain plug bung on the oil pan. So, to fix it I decided to pull the pan and weld it up. After I removed the pan, I looked up and noticed a couple drips of water coming off the #4 main/cam bearing. Now the problem was going the other way.  So, out came the engine for repair....I also noticed the glyptal was questionable in the pan, so I just removed everything. Welded the crack in the pan and added a new drain plug/bung in the rear.
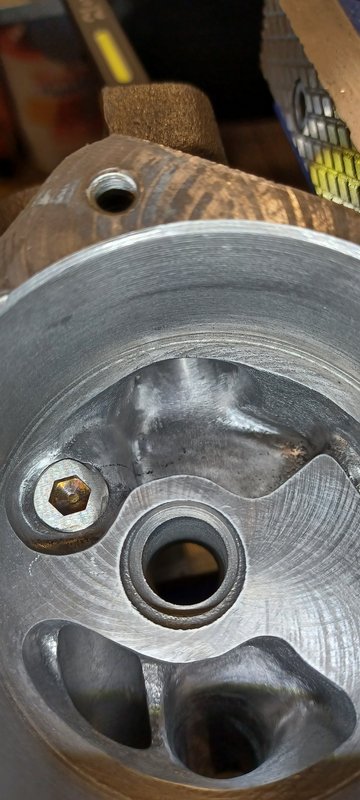
I sleeved the oil passage in the block on both sides and had my machine shop pressure test it with hot water-checked OK. So, more good news, my machinist was checking over the crank and magged it. Thought there was a hairline crack starting on #5 rod journal radius. I wasn't there to see the mag being done, but he does good work and I trust him. I can't see with my eye anything at all, so must be extremely faint. I dug out another spare 390 crank and decided, why not do the things I thought about last time.
I spent a couple minutes and removed all the glyptal inside and smoothed things out:


Here's the new(used) crank as it started after a pass from the magnaflux:


I decided to bull nose and knife edge the counter weights as well as remove all the rough casting. So I started hacking and grinding....


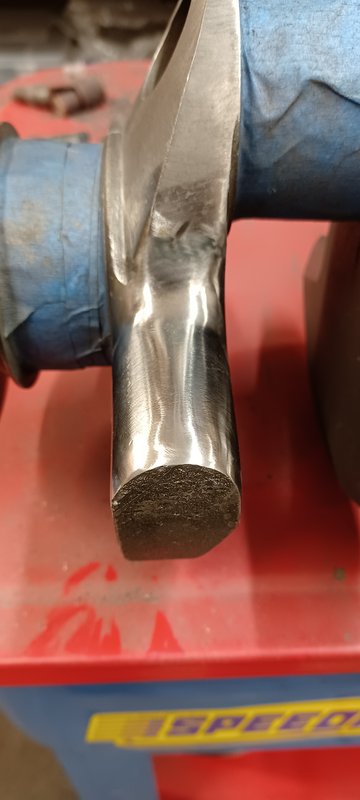
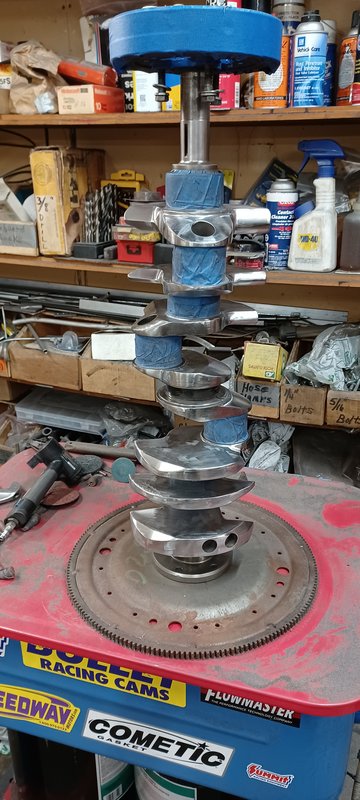
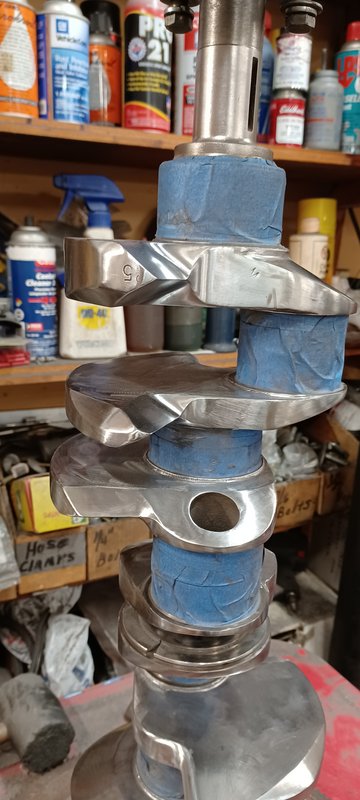

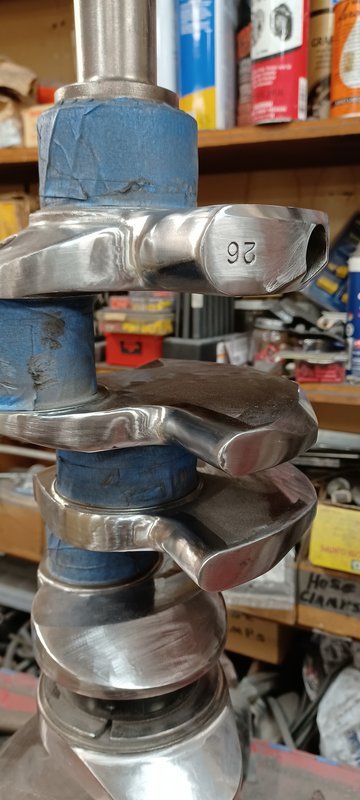

I figured since I was this far, I would take it to a semi-local place to have it cryogenically frozen. This crank was already .010/.010" and needed to go to .020" on mains and .030" on the rods to clean up. So this is what it looked like after it was frozen and machined:


I also had it REM polished. It's my poor boy billet crank.

So, out came the engine for repair....I also noticed the glyptal was questionable in the pan, so I just removed everything. Welded the crack in the pan and added a new drain plug/bung in the rear. I sleeved the oil passage in the block on both sides and had my machine shop pressure test it with hot water-checked OK. So, more good news, my machinist was checking over the crank and magged it. Thought there was a hairline crack starting on #5 rod journal radius. I wasn't there to see the mag being done, but he does good work and I trust him. I can't see with my eye anything at all, so must be extremely faint. I dug out another spare 390 crank and decided, why not do the things I thought about last time.
I spent a couple minutes and removed all the glyptal inside and smoothed things out:
Here's the new(used) crank as it started after a pass from the magnaflux:
I decided to bull nose and knife edge the counter weights as well as remove all the rough casting. So I started hacking and grinding....
I figured since I was this far, I would take it to a semi-local place to have it cryogenically frozen. This crank was already .010/.010" and needed to go to .020" on mains and .030" on the rods to clean up. So this is what it looked like after it was frozen and machined:
I also had it REM polished. It's my poor boy billet crank.
40
Member Projects / Re: Putting A Little Pep In My 390's Step
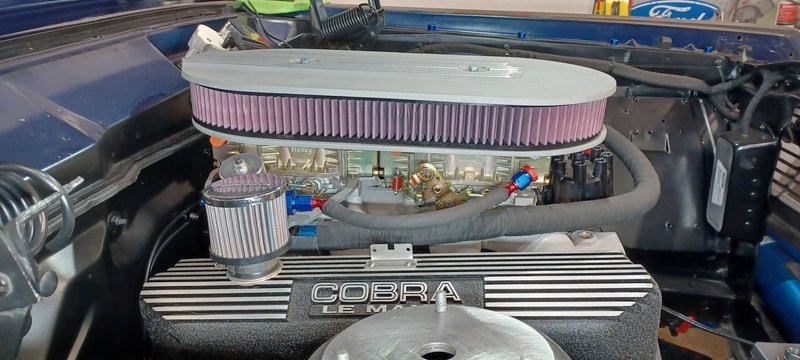
« on: September 10, 2023, 09:39:09 PM »Looks good and sounds healthy, Jared. Is that a BBM head/intake combo?
I hope you have some fun with it.
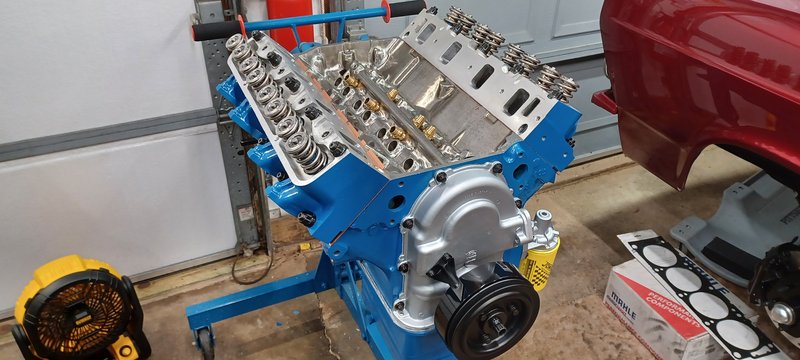
Thanks Doug. The short of it before I dive into a lengthy write-up, is the same street Pro Port heads as before and a new Trick Flow tunnel wedge.
41
Member Projects / Re: Putting A Little Pep In My 390's Step
« on: September 10, 2023, 07:38:31 PM »
Blowing the dust off this old thread. It's been a long, hard road, but after changing my mind several times and waiting on parts for what seems like forever, I have iteration #3 of the dumpster fire 390. Way too much to list right now, but here's a clip of it running today:
https://m.youtube.com/watch?v=ouUFcCn7ARY&pp=ygUZRm9yZCBGRSAzOTAgb24gdGVzdCBzdGFuZA%3D%3D
https://m.youtube.com/watch?v=ouUFcCn7ARY&pp=ygUZRm9yZCBGRSAzOTAgb24gdGVzdCBzdGFuZA%3D%3D
42
FE Technical Forum / Re: Howards cam belt drive
« on: August 26, 2023, 07:57:11 PM »
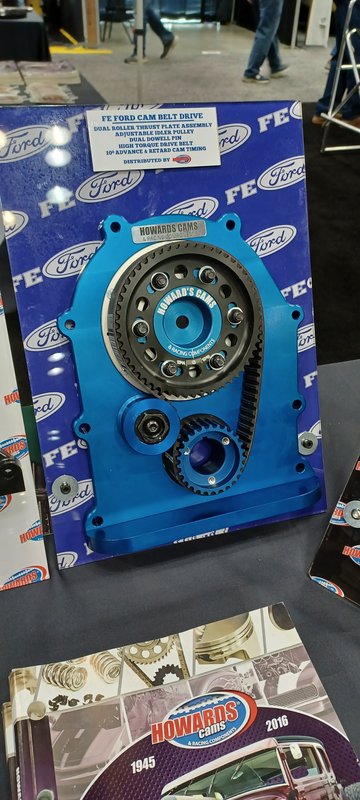
It was on display at PRI when I went in '21. Nice looking piece. Here's a picture I snapped of it:
43
FE Technical Forum / Re: 1/4 oil galley plug.
« on: August 23, 2023, 09:43:11 PM »
As mentioned, you don't need a shorter plug to fit that location. I have been using these from McMaster Carr. This one is a typical 1/4" NPT plug and is .440" thick- https://www.mcmaster.com/6367N14
I also like their "extreme pressure" plugs like this one- https://www.mcmaster.com/4534K42 It is .410" thick and NPTF, but it sits 2-3 threads further in than the other plugs do. So if you have a hole already tapped and/or you can't tap any deeper(shallow hole) and a traditional plug sits 2-3 threads above the surface, this one will sit flush or just below. Just be sure it doesn't go too deep and block any passage behind it.
I also like their "extreme pressure" plugs like this one- https://www.mcmaster.com/4534K42 It is .410" thick and NPTF, but it sits 2-3 threads further in than the other plugs do. So if you have a hole already tapped and/or you can't tap any deeper(shallow hole) and a traditional plug sits 2-3 threads above the surface, this one will sit flush or just below. Just be sure it doesn't go too deep and block any passage behind it.
44
Member Projects / Re: 69 Ranchero R code
« on: August 23, 2023, 09:08:05 PM »
Welcome aboard! Sounds like a fun project. Just to clarify, the valve sizes mentioned are correct? I mean this as politely as possible, but you may want to reconsider those valves and/or heads. I once slapped on an old iron CJ head we have here with 2.250/1.750" valves on my old 4.080" bore 390 block. Block was bare so I could look from underneath while moving the valves by hand. I don't think the exhaust made it hardly .400" lift before smacking the cylinder wall. Even then, it would be terribly shrouded anyhow. I think the max valve sizes I would personally run in a 390 bore is 2.200/1.680" with a minimum of 4.080" bore size. I currently run 2.200/1.650" with a .700" roller in a 4.085" bore. Too large of valve will hurt way more than it will help due to shrouding, even if it "fits".
45
FE Engine Dyno Results / Re: 482" FE Stroker, 582 HP, 581 Torque
« on: August 08, 2023, 07:00:19 AM »Good to see the out-of-the-box TFS heads showing similar hp and more torque than the $$$$$ Pro Port stuff.
Do you have a link for your back to back testing?
I don't have any back-to-back testing with TFS vs. Pro Port, but I was referring to Mike Brunson's discussion up above, where he did a back-to-back test of iron heads, Pro Ports, and TFS heads. The results are up above in his graphs.
No worries, just thought you may have tested some somewhere I missed. Curious which iteration Mike used, there are quite a few options.