Show Posts

This section allows you to view all posts made by this member. Note that you can only see posts made in areas you currently have access to.


Topics - jayb

Pages: 1 ... 4 5 [6] 7 8 ... 25
77
Member Projects / 1969 Torino(?) Cobra Rebuild
« on: June 11, 2018, 04:56:42 PM »
Thanks to FElony I'm not sure what to call this thing, but you get the idea.  Three years ago I purchased this car from a guy who had owned it since 1975; the original thread from my Classifieds post on this car is below:

http://fepower.net/simplemachinesforum/index.php?topic=2795.0

Since then it has just sat here, because I'm still deluged with other projects.  However, recent events have forced me into some work on the car.  This all started because I had a hankering for an enclosed car trailer.  I ended up buying one in mid-April so I could haul a car and some FE Power stuff out to the FE Reunion; no way all the stuff I had would fit in my pickup while hauling a car on my open tandem axle trailer.  But now that I had the enclosed trailer, what to do with the open trailer?  Turns out my friend Steve wanted to buy it, so a couple weeks ago I pulled it out of it's parking spot.  The Cobra was sitting on the trailer, where it had been for about a year.  Like a good FE car, it fired right up when I turned the key.  I backed it off the trailer, hit the brakes and - NOTHING.  I was lucky to slam it into third and pop the clutch to stop it just at the edge of the driveway, before it would have rolled down a decent sized hill.  The car had brakes when I put it on the trailer.  They just don't like to sit, I guess.

My plan was to just pull it into my new enclosed trailer but I wasn't going to try that without the brakes working.  Long ago I had decided that when I went through this car, I'd replace the front Ford discs with Wilwoods, and replace the horrible master cylinder and power booster package on the car with a manual Wilwood master cylinder.  With the car sitting in the driveway, I figured this was as good a time as any to get this done.  So, up on jackstands it went.

The Keystone mags and tires were in terrible shape, and in order to make certain that the Wilwood front disc brake package would fit, I had to decide on wheels before I could specify the brakes.  I thought that American 200S wheels would look good on the car, but when I priced them out I found that they were ridiculously expensive, over $400 per wheel.  However, American offered a one piece version for about $160 for a 15X7.  They looked pretty good on the web site, so I ordered one to see if it looked OK in person, and to be able to measure for brake clearance.  I have to say that when I got the wheel, I was really impressed with it; the quality looked excellent.  Naturally, Made in China was cast into the back side, and I hate that, but to save $1000 over the 200S wheels I'll live with it.  I measured the wheel to figure out which Wilwood front disc kit would work, then got them on order last Friday, along with three more wheels and four tires.

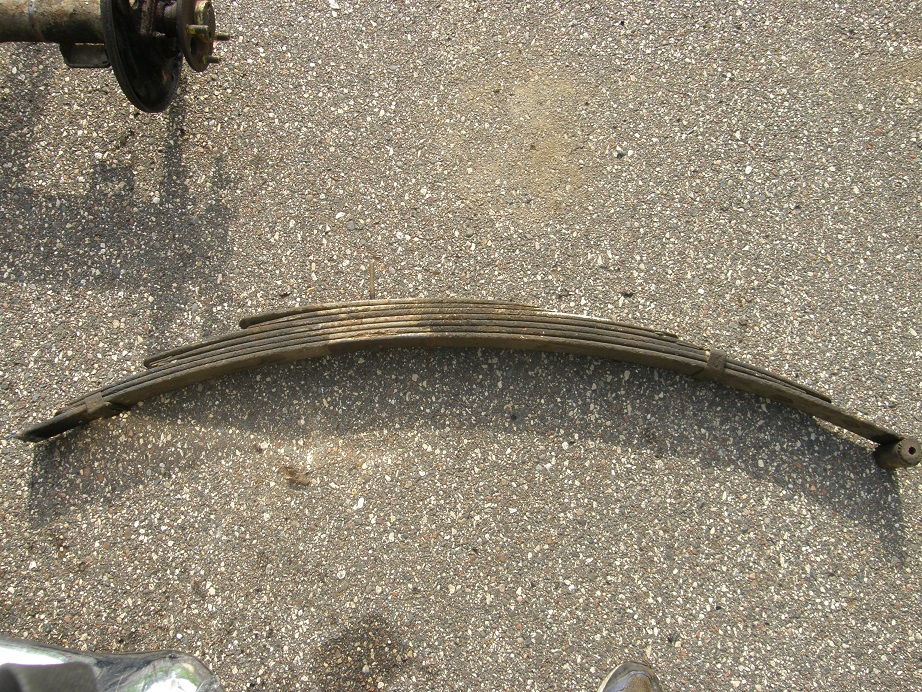
This past weekend I crawled under the car to see what I was in for, regarding the brakes.  In the rear, first thing I noticed was that the flexible brake hose going to the differential was broken in two; apparently since I've had it, this car has never had rear brakes.  I also noticed that the rear leaf springs had seven leaves, and put a post up on this in the technical forum.  Turns out it should only have four leaves, so somebody was monkeying around with the rear springs on this car.  I had planned to do the rear drum brakes at the same time as the fronts, and from the looks of the brake lines they all needed to be replaced, so I planned to do that too.  In the back of the car I decided I'd better pull the drums and see what they looked like.  To my surprise, the drums looked really, really good, and most of the pad was still on the brake shoes, but the rust was pervasive, so I decided to completely revamp the rear brakes also, but keep the drums.  I disassembled the rear drum components and removed the wheel cylinders and lines.  Went to NAPA later that day and ordered all new parts, only about $100 for everything.  Lots cheaper than the front stuff, that's for sure.

Since the leaf springs needed to be replaced I was faced with completely tearing the rear end apart on the car.  What fun  :(  I started with the air shocks, and went into the interior to pull the rear seat so I could get to the upper mount on the left shock.  The troll-hair carpeting that had been installed on the rear deck was staring me right in the face the whole time, and after a few minutes I just couldn't stand it, so I loosed up some of the interior pieces and took it out.  Picture below:


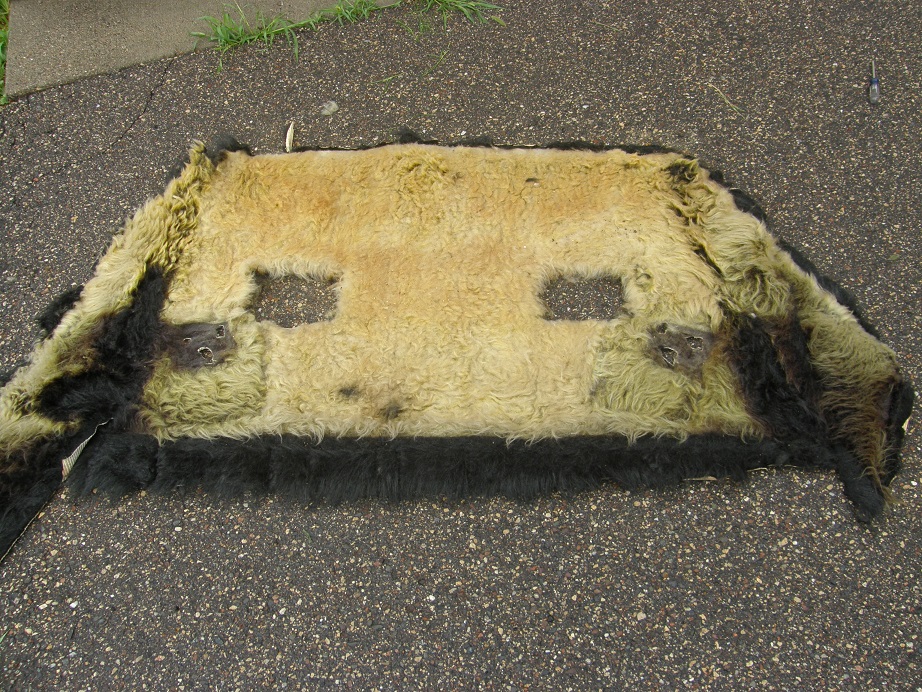
Imagine my surprise when after starting to pull it out I discovered that it had been originally black!  All of the carpet that saw direct sunlight had turned yellowish, but everything covered up was still jet black.  Must have been some pretty cheap stuff.

In order to get the carpeting all the way out I had to remove the two speakers cut into the rear deck.  I figured that these must have been some aftermarket speakers hacked in there, but after I got them out and the carpet removed, I saw that the rear deck cutouts had been done pretty nicely.  I took a closer look at the speakers and sure enough, they had Ford markings:


So now I'm wondering about the speaker grilles; are these Ford also?  Picture below:


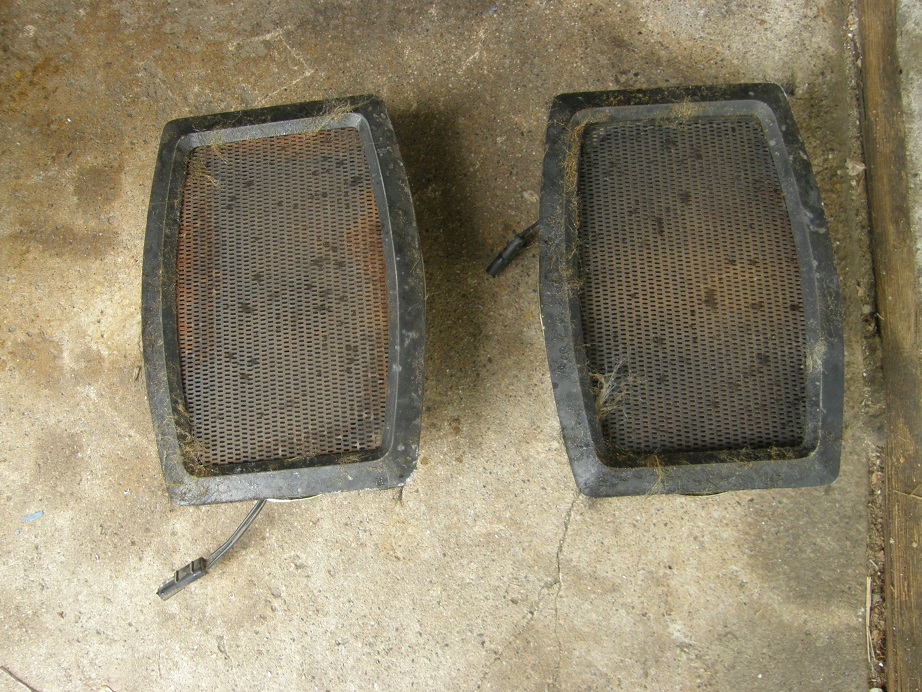
If this was Ford stuff that would be cool, even though the speakers are shot and I'm sure they don't work any more.  Just having the original grilles in the car would be pretty cool.

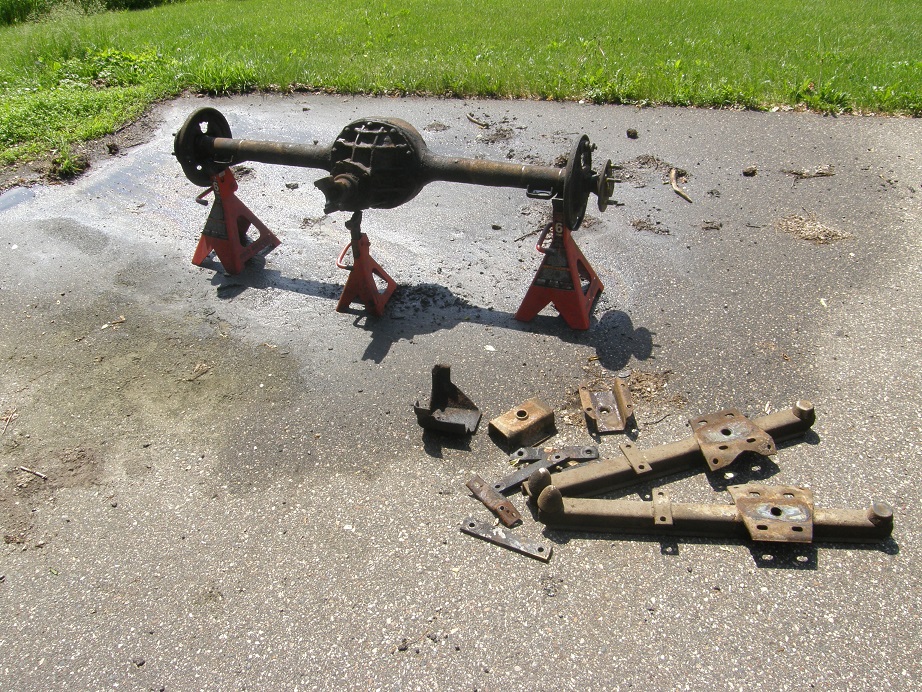
After getting the air shocks out of the car, I pulled the driveshaft and removed the lower bolt from the rear leaf spring shackles, and dropped the back of the leaf springs down.  I had to heat the nuts up with the torch to get them freed up, but after that it wasn't too bad to get the bolts out and drop the back of the leaf springs down.  Next I tried the U-bolts holding the differential in place.  Naturally, they wouldn't budge, so I dug out the heat wrench and cut them off; I wanted to replace the U-bolts anyway because they were pretty rusty.  From the bottom, the traction bars dropped off.  These things are kind of odd, they have a front bumper in the normal position, but also a flat bumper behind the axle.  Anybody ever seen a set like this before?  Who made them?  Picture below:


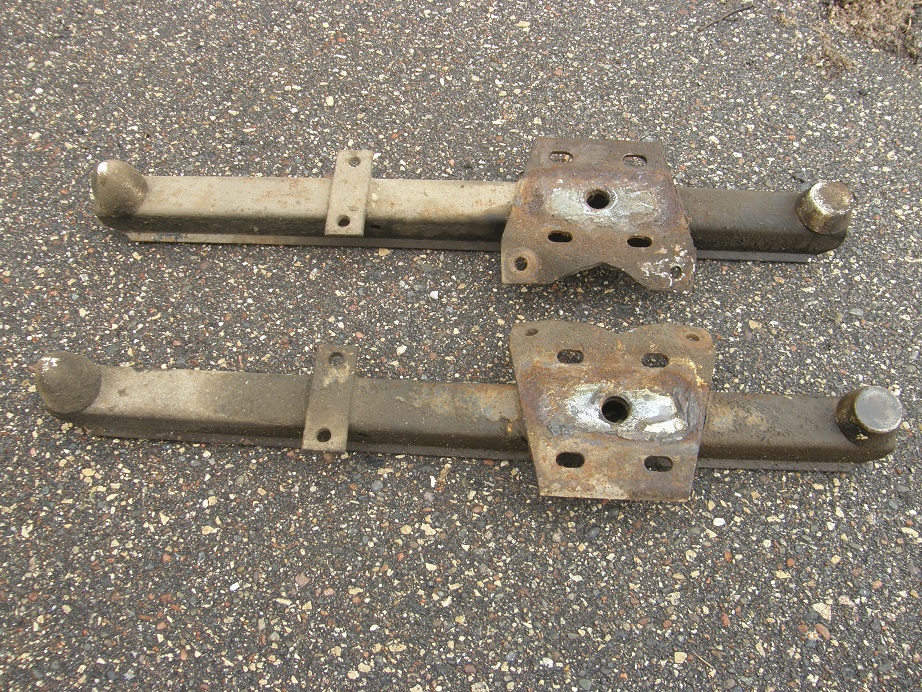
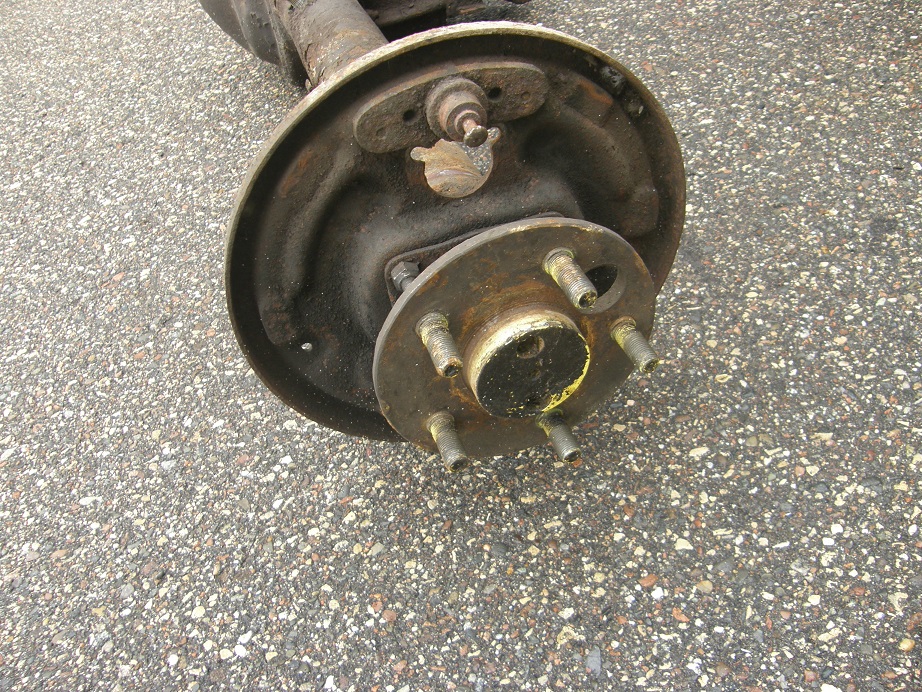
I think I'm going to replace the rubber bumpers and keep the traction bars, because they remind me of how the car probably looked back in the day.  I took the differential out and put it behind the car.  Here's a picture after it has been removed, and also one of the end of the axle showing the three dimples characteristic of 31 spline axles:


Last step was to remove the front bolt of the leaf springs.  One of my favorite jobs  ::)  I started with the driver's side, and heated up the nut to get it loose, but as usual the bolt was frozen to the steel sleeve that it slides through in the front leaf spring bushing, and it wouldn't come out.  To remove it I started by cutting off the spring up at the front eye.  Here's a picture of one of the 7 leaf springs, after the front eye was cut off:


To get the bolt out I ended up cutting a slot through the front spring eye, then rotating it around and cutting a second slot so that the two halves would fall off.  Needless to say I was dealing with a rubber fire all the while, with the gas line inches away on the driver's side.  I kept having to stop and put out the fire, check the gas line to make sure it wasn't too hot, then cut some more with the torch.  After the spring eye fell away I had to cut a little more through a steel sleeve that surrounds the rubber bushing, but is not part of the spring.  Once I cut two slots through that it fell off, and I was able to grab what was left of the rubber bushing and pull it out of the way.  This finally exposed the steel sleeve that was in the middle of the bushing and was frozen to the bolt with rust; I heated it up cherry red then grabbed it with a vise grips and turned the bolt with a ratchet, and it finally came loose so that I could pull the bolt out of the hole.  What a struggle, took about an hour on each side of the car to get the front bolt out.

With the rear suspension completely out of the car, I decided to strip out the interior.  The blue and white shag carpeting in the car's interior was also pretty obnoxious (although not as bad as the troll hair covering the rear deck), and I thought it would be a good idea to see what was underneath it, so I had an idea of how much metal work there was to do on the car.  I figured this would be pretty easy, but of course nothing on a car likes this turns out to be easy.  I decided to unbolt the driver's seat first.  The first two nut snapped right off the studs.  I stopped to think, do I really want to get into this any further, because if I snapped off another one I'd have to repair the seat tracks before I could bolt the seat back into the car and drive it into the trailer, once all the work was done.  After a few minutes of indecision I decided to go for it.  Naturally the third nut snapped off too.  For some reason, the fourth nut came off with no problem, and I pulled the seat out of the car.  On the passenger side it was the same thing, three nuts snapped off but one came off with no trouble.  Go figure.

After removing the door sill trim and the shift boot, I was able to pull the hated blue and white shag carpeting out.  Then I pulled out the factory sound deadening pads, but when I pulled out the one under the driver's seat, I was surprised to see a sheet of paper stuck to the bottom.  I peeled it off, and lo and behold, there was another build sheet:


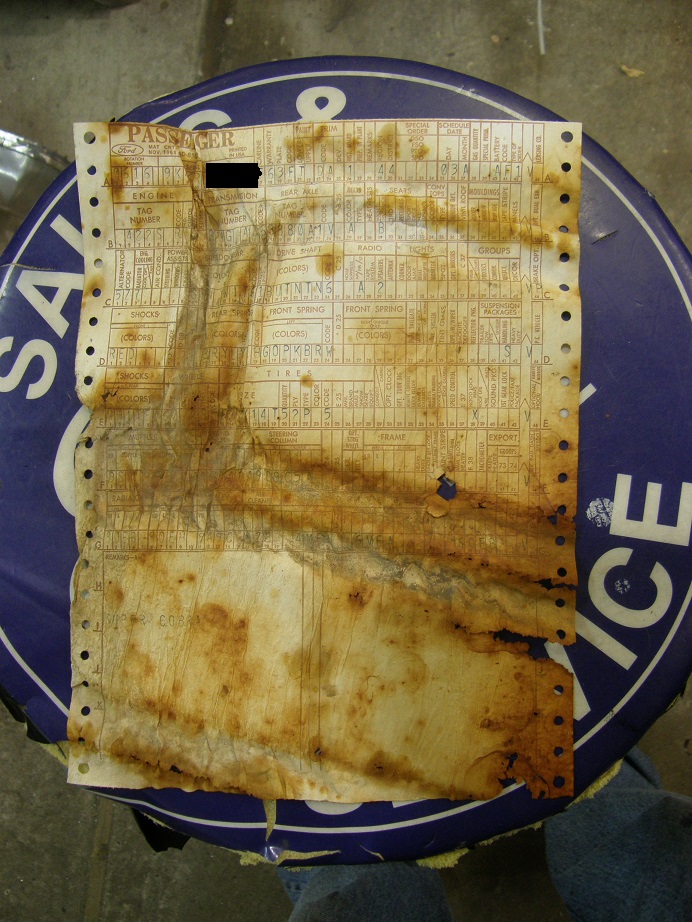
This was a big surprise.  I already had one build sheet for the car, that the previous owner said he'd found in the back seat springs.  I dug out that build sheet and it was the same as the one I'd just uncovered.  I can only conclude that this car was built with the rare dual build sheet option.  A value adder for sure  ;D  As I was looking at the build sheets, I happened to see under the Radio heading, the number "2" in the box labeled speakers.  So, it did make sense that the speakers I took out earlier were factory installed.

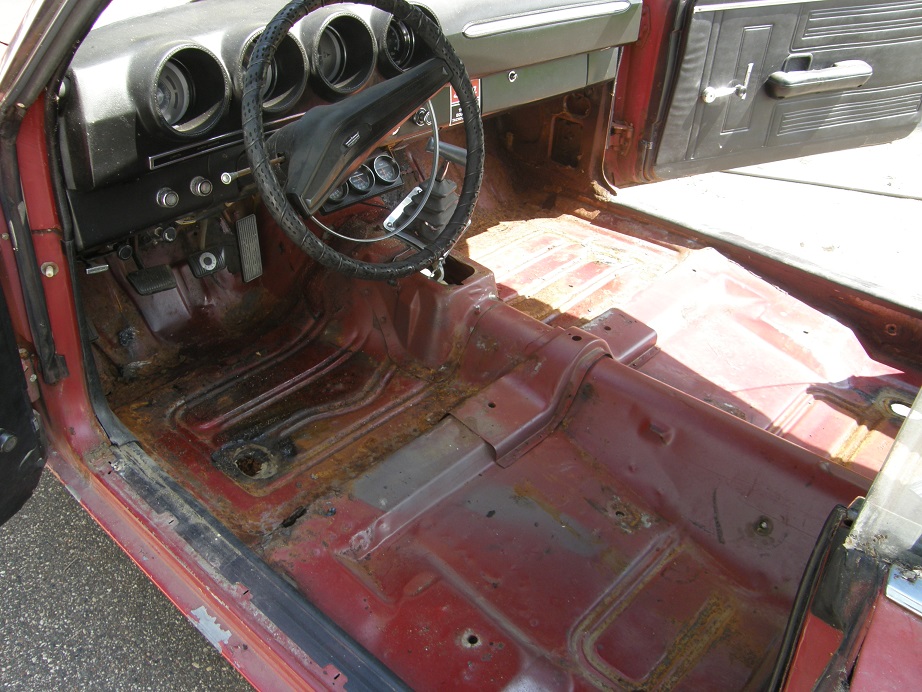
Examining the floorpan of the car it was not as rusty as I feared it might be.  There were rust holes in the seat pan right in front of the outboard front seat mounting hole, on both sides.  Also, there were rust holes on both sides of the floor where the floorpan meets the toe board, on the outboard side.  None of these is a difficult fix, and outside of some rust in the inner and outer rear wheelhouses down towards the bottom, the interior sheet metal  looks pretty solid.  A couple of days with the welder will take care of these issues when the time comes.  Here's a picture of the interior with all the parts removed:


Yesterday I dug out my Harbor Freight sandblaster and picked up some fresh sand, then went to town for a couple hours on the differential and some of the other small parts.  I like to do this with the differential fully assembled so that I don't get any sand inside, then blow it off and take it apart.  Here are some before and after pictures:


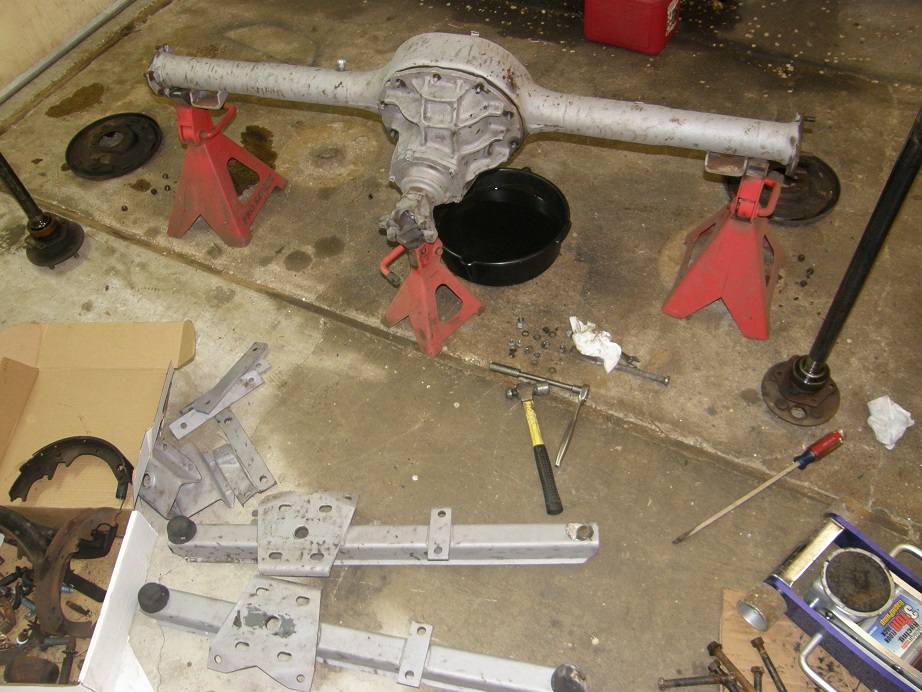
Now that the differential is apart I need to sandblast the drum backing plates, and get the center section out and off to my friend BradFORD.  I have a 31 spline Detroit Locker coming to replace the Traction-Loc unit in the car, and he will set that up for me.  I'm also going to take the driveshaft in for a couple new U-joints and balancing because there is one small ding in the tube, and I want to make sure its straight and won't cause a vibration when I'm driving the car.  All my new parts should be coming this week, so for the next couple days I'll be doing a final cleanup and paint on the blasted parts.  Next weekend I should be able to start getting it all back together.  I'll post another update at that time - Jay

78
I'm currently tearing into the back half of my Torino Cobra to do brakes, clean and paint the axle housing, add new rubber parts, new shocks, etc. etc.  I'm trying to keep this one more or less stock, and want to replace the leaf springs with factory style springs.  Tearing it apart tonight, I was surprised to find that the springs have seven leaves.  Seems like a lot.  Some of the replacement leaf springs I've found online show four leaves for a 69 Torino, but it wouldn't surprise me if the Torino Cobras had more.  But seven??

Anybody know how many leaves were stock in the rear springs of these cars?

79
Vendor Classifieds / Clear Valve Covers
« on: June 02, 2018, 01:13:48 PM »
After my recent limited production run I have a total of 7 of these clear valve covers still available for sale.  The shape of these valve covers is based on the 428CJ cast aluminum valve covers.  Price is $295 per pair, or $150 for a single, plus shipping cost.  If you are interested send me an email (jayb@fepower.net) with your shipping address, or reply with it here, and I will respond with the total cost including shipping.  For payment I accept Paypal, Visa or Mastercard (call me at 952-428-9035), or personal checks.

I am currently testing a baffle arrangement in these covers on my car, which if successful will allow me to add a breather option to these valve covers.  If the setup proves successful over the summer I will make it available in the fall.  If that turns out to be the case, I will offer a retrofit kit for the valve covers listed here, to allow adding a breather.

I am also currently testing the LED lighting for these valve covers on my car.  Also one of my customers is doing the same.  If the LED lighting system proves reliable, I will make that available on the new covers, and make a retrofit kit available for the covers listed here also.

Regarding fitment, I know that these will not fit the new Comp Cams rocker setup.  They also may not fit setups with the Dove end stands, or the T&D race rocker setup.  It may be possible that they would fit those setups with some modification to the bottom rails, but I have not tested that.  These valve covers will fit stock rocker assemblies, the old Comp Cams rockers, Dove rockers, Harlan Sharp rockers and end stands, Precision Oil Pumps rockers, and any setup with the Precision Oil Pumps end stands.  They will also fit the Erson rocker assemblies.  I suspect that they will also fit the T&D street rocker setup, but I have not tested them on that setup.

Pictures of the valve covers are shown below.  Please contact me with any questions.  Thanks, Jay


80
Private Classifieds / 1967 Fairlane, 790 HP, $25K
« on: May 26, 2018, 04:40:42 PM »
I'm posting this for my friend Wally Dochow, please contact him for details.  He is asking $25,000 for the car, which of course is nowhere near what he has in it.  You can see a video of the engine on the dyno, which was done by Barry at Survival Motorsports, at the link below:

https://www.youtube.com/watch?v=3hPTyQykzto


81
Reprinted from the following Google search:

https://www.google.com/search?q=machine+gun+australia&client=firefox-b-1&ei=QtX8WvisC4zHjwTa4ZTwAw&start=10&sa=N&biw=1920&bih=946

OLIVIA CAISLEY
A Thureon Defense machine gun.


A morbidly obese Melbourne man has been jailed for importing “truly terrifying” machine
guns from the US, but dozens of the firearms he smuggled remain on the streets.
Paul Munro, 64, was jailed today for at least six years by Victoria’s County Court for
importing Thureon fully-automatic machine guns and semi-automatic handgun parts
between 2012 and 2016.

Munro decided to illegally import the Thureon machine gun, which can fire up to 1000
rounds per minute, after he went to a gun show in Las Vegas. The mechanic later asked
Thureon Defense owner Andy Huebschmann, based in Wisconsin, to send him the machine
guns hidden in the false base of containers holding engine parts.
Munro also asked Huebschmann to send him triggers that would convert other semiautomatic
guns into fully automatic weapons.

“The Thureon in fully automatic mode is a truly terrifying weapon,” judge Douglas Trapnell
said.
“It has no use other than a mass killing machine and has no place in civil society.”

Munro paid about $US1000 per assault rifle and $US2000 for some of them to have their
serial numbers or identifying marks removed.

Back in Australia, Munro was arrested at Geelong on August 30, 2016 after he set up a deal to
sell 15 firearms for $110,000 to an undercover operative. The mechanic was selling the
Thureon rifles for $15,000 a piece, and charging $5000 for the handguns.

Before Munro was arrested, a local gun dealer warned the mechanic about selling illegal guns
to people he didn’t know.

The dealer advised Munro not to trust people who wanted to do business without a personal
recommendation.

Judge Trapnell said police were yet to recover 40 firearms and firearm parts that Munro
smuggled into Australia, including five Thureon fully automatic machine guns.
Three Thureon machine guns were seized at Caroline Springs, Williamstown and Rockbank
as police charged three men with trafficking a commercial quantity of methamphetamine.
A fourth Thureon weapon was handed in to police as part of a gun amnesty.
Judge Trapnell said Munro ran his “nefarious scheme” to support his lifestyle after various
failed stints in farming and car restoration.

Munro pleaded guilty to four charges of importing firearms and two counts of attempting to
import firearms.

He was sentenced to 10 years and three months in jail. He has already served 617 days in presentence
detention.

82
FE Technical Forum / Great Day at the FE Reunion
« on: April 27, 2018, 09:18:30 PM »
When Kevin and I arrived early this morning it was raining pretty good, but we got the canopies set up so we could keep the display dry and by noon it had cleared out and the racing was starting.  I took some pictures but neglected to bring the cord necessary to download them to my computer, so I will have to post them when I get back.  Kevin has some cell phone shots that he will post as a follow on to this thread.  There was a lot of interest in my 3D printed cylinder heads, which have been updated since the PRI show.  I have three of the 3D printed heads here, with two of them bolted on a fully machined intake adapter.  Also I have a single four intake that is 3D printed and fits the intake adapter, so the whole induction system for this setup is on display.  Also on display is a prototype SOHC head that I am working on with a guy in Australia, along with my SOHC rocker arms.  Plus all the usual intake adapters, timing covers, and some prototype valve cover castings.

I got to spend some time talking with Ohio George today, and he seems to be doing very well.  Also talked for a while with Diamond Jim Brady, who I've never met before.  Of course Tom Posthuma and Rory McNeil were there, and it was great to meet Rory since I'd never met him in person before.  Also chatted some with Blair Patrick and Barry Rabotnick; Barry's trailer is parked right next to mine.  He ran his Torino down the track a couple times but was having trouble getting traction; his MPH numbers were pretty good though.

By the way, Ohio George has a 427 short block for sale that looks to be really, really nice.  Its a standard bore top oiler block with the complete Ford reciprocating assembly, including pistons.  Has all the paint marks you'd find on a virgin shortblock.  George wants $3950 for it.  Anyone who may be interested please send me an email and I'll hook you up with George to discuss.

83
Non-FE Discussion Forum / Trailer Tires
« on: March 18, 2018, 11:15:09 AM »
I'm looking at buying an enclosed car trailer.  Having heard lots of horror stories regarding trailer tires, like changing blown tires at the side of the freeway, etc., I thought I'd do a little research on this.  What I am finding is a whole bunch of conflicting information.  What are your experiences?  What I am hearing so far is summarized below:

- ST type trailer tires have a stiffer sidewall and are rated for heavier loads than passenger car or light truck tires, so they come standard on new trailers.  I've read where they should be replaced every 3-5 years, and you don't ever want to run them under-inflated.   A lot of people seem to hate the ST tires, because they claim they fail easily and early.  There are quite a few reports of these tires failing in about 1000 miles, and I've also read that all of the radial trailer tires are now made in China.  These people will recommend a light truck or passenger car tire rather than an ST trailer tire, say they pull better and last longer. 

- All the new trailers seem to come with 15" wheels and tires, but a couple people I know say that 15" trailer tires are junk, and that I should upgrade to 16" tires because they are much better.

Your thoughts?

84
Non-FE Discussion Forum / More Forums?
« on: March 18, 2018, 09:03:06 AM »
Over the last couple years I've had some requests to add forums to this board covering different types of Ford engines.  I'm really only interested in the FE, and it seems a little odd to me that the FE Power site would host a forum about a different engine, but if others here want to see forums for other types of Ford engines I'd be open to adding them.  The same rules would apply to the other forums as already apply to the existing ones, but different moderators would be running the other forums.  Let me know what you think via the poll above, and any responses to this thread.  Thanks, Jay

85
Member Projects / Visit to Robert Pond's shop
« on: February 27, 2018, 12:55:06 PM »
Yesterday I got back from a short trip to Phoenix, AZ, to visit my Dad.  While I was there I had the opportunity to drive up to Sedona, Arizona, and visit with Robert Pond.  Robert used to be in Riverside California but has recently moved into a beautiful place in Sedona, with stunning views of the surrounding red rock mountains that Sedona is known for.  But of course, the really stunning views were in Robert's shop.

Robert has a collection of beautifully restored and original cars that trace his racing history, starting with the 63 lightweight Galaxie shown in the photos below:


The car is equipped with all the original lightweight equipment, including the aluminum bumper, and like all of Robert's car it is in immaculate condition.  It is equipped with a low riser 427, as were all of the 63 lightweights. 

Sitting next to the 63 is Robert's 64 lightweight Galaxie, photos below:


As you can see this car even has the original window sticker.  Robert also pointed out that this is the only one he's seen with the original vent tubes running from the battery cells out through the floor of the trunk.  The high riser certainly makes a statement in this car's engine compartment. 

Robert's attempt at being open minded came with this 1966 Plymouth Belvedere, equipped with the 426 Hemi: 


Robert told me that as a post car, this car was lighter than the hardtops, but in 1967 Chrysler wanted everyone to switch to the hardtops for racing.  These were heavier and it made no sense to Robert to go to the new car, so it was back to Ford.


Next in line was a 427 Fairlane:


The car pictured below is a Mercury 202 with the 427, of course.


The Boss 429 Mustang pictured below was purchased by Robert in 1974.  He sold it, then bought it back several years later after it had changed hands a couple times. 


The photo below is Robert's 67 Fairlane Stock Eliminator car, formerly a national record holder if I recall correctly:


The Fairlane pictured below will get an SOHC that Robert is currently building:


Finally, Robert owns one of the 50 original Cobra Jet Mustangs that Ford built in 2005.  Robert's is #50:


Robert had a story associated with all these cars, and I can't remember all the details associated with each one, but for example (if memory serves), his 64 lightweight Galaxie has 37 original miles, and the Mercury 202 has only 2000 miles on it.  All of the cars are striking examples of their type.

It was great to be able to spend a couple hours with Robert and look at all these cars.  Makes my collection look pretty lame LOL!  Thanks Robert!

86
FE Technical Forum / Couple of Interesting Ford Intakes
« on: January 18, 2018, 10:49:20 AM »
I'm currently working with a customer who is having me adapt some Ford Racing 351C intakes to my intake adapter.  These are for Yates-style heads, so we are using my #13006 intake adapter for this.  He sent me the intakes to machine to fit on the adapter, and I have been pretty impressed with their appearance. The part numbers on these two intakes are M-9424-BT58 and M-9424-C58.  I'm curious if anyone knows what heads these were designed for, or anything else about them.  The first three pictures below are for the -BT58 manifold, and the last one is of the -C58 manifold.  They are very similar, but they have different part numbers, so I'm wondering if they are for two different types of heads:


Is it possible that the "BT" in the one manifold's part number indicates that it is for a Blue Thunder head?  Since both the intakes have a 4150 carb flange, I wonder if they were designed for use in NASCAR?

The outlet of the ports on these two intakes is pretty small, and they will be requiring some significant porting to match up with the #13006 intake adapter.  However, these manifolds are both also VERY heavy for what they are, so I'm guessing they are designed to allow some serious porting work.  I will be sending them down to Joe Craine along with the adapter for a porting job.  Then, my customer has graciously allowed them to be sent back to me, so that I can test them on my dyno mule when I get it back on the pump in February or March.  I think I'm going to have to use a 4150 to 4500 spacer on these so I can get enough carb on the engine; should be a very interesting test.

87
FE Technical Forum / Potential new Tunnel Port intake
« on: January 02, 2018, 02:14:17 PM »
At the PRI show I met a guy who is manufacturing Pontiac Ram Air V parts.  As some of you may know, that engine is a close cousin to a 427 Tunnel Port, and in fact I was told at the show that after Ford cancelled the tunnel port program, a bunch of the engineers at Ford who worked on it went to Pontiac and were instrumental in developing the Ram Air V.  Anyway, the topic has come up in the past about whether one of these Ram Air V intakes could be made to work on a tunnel port engine, using my tunnel port intake adapter.  The guy at the show is based in Indianapolis and was kind enough to bring me one of his single 4 barrel intakes, and let me take it home to check this out.

Over the new year's weekend I finally got a chance to look at this.  I have one tunnel port intake adapter that is a defect and not usable, because a big end mill came loose during the milling operation and gouged one side of the intake adapter pretty good.  But the intake adapter's basic dimensions were intact, so it was a good candidate for checking to see if this intake would be made to work with the adapter.  One thing that was clear at the show was that the adapter's mounting surfaces would have to be machined down, a lot, to have a chance for success at this.  Also, it looked like the Ram Air V manifold's mating surfaces would have to be machined as well.

Measurements I took over the past couple days showed that I needed to machine the maximum amount off the surfaces of the intake adapter.  So, I took 0.800" off each manifold mounting surface of the adapter so I could see where we were after that.  Here's a picture of this defective adapter, with the manifold mounting surfaces machined:


Of course if I went forward with something like this it would not look so rough, but I needed to machine it this way to see what the problems might be.  I was able to confirm that there was enough material in the intake adapter to allow me to counterbore a hole for the bolts that go into the cylinder head, although special low-head capscrews would probably be required.  One area of concern is the gasket area above the ports; there is only about 0.175" there and I'd feel better if there was more like 0.250".  But at this point, it looked do-able.

Here are a couple pictures of the Ram Air V intake.  You can see how much like a tunnel port it is:


Finally, the picture below shows the intake sitting on the intake adapter:


As I had determined at the show, in this position the manifold does not fit far enough down on the intake adapter; the port openings are actually above the valve cover rail.  The flange of the intake is a little over 0.500" thick, and to make the roof of the ports line up between the intake adapter and the manifold, the flange of the manifold would have to be cut about another 0.325", leaving a flange thickness of only 3/16" or so.  But I think that would be OK; I've seen flanges thinner than that before.  The other issue is the port alignment, which is pretty close but would require either some porting on the intake manifold, or a new port program for the intake adapter to shrink the ports down so that they would match up with the Ram Air V manifold ports.

What do you guys think of this combination?  Would it be worth pursuing?  I don't know what the market is like for the single 4 tunnel port intake manifolds, but it seems like you could get one for less than you'd have into one of my adapters plus this Ram Air V intake with the requisite machining ($779 for the TP intake adapter and ~$700 for the manifold, plus $85 to machine the flanges so it would fit).  You'd also have to make custom intake gaskets, because there's no room for an O-ring seal between the ports of the intake adapter and the manifold.  But if you really wanted to do it, you could...

Any comments welcome - Jay


88
And, of course a happy new year!  It is my great pleasure to host this forum, where so many great FE enthusiasts can connect.

I'll be working hard over the next 12 months to make some new FE-related Christmas presents available over the coming year; stay tuned to the forum for updates - Jay

89
FE Technical Forum / FE Power at the PRI Show
« on: December 06, 2017, 08:46:01 PM »
This year I'm displaying my products at the PRI show in Indianapolis.  Drove all day to the show yesterday and spent most of the day today setting up the booth.  I have a few new products to display at the show, plus the normal parts.  This post is a quick overview of the display and products.

Here's the booth after it has all been set up.  The booth number is 7137:


The photo below shows some of the valve cover prototypes that I have machined recently.  The day before Thanksgiving I finally got some prototype valve cover castings with the surface finish quality that I require.  Its been exasperating that it has taken this long, but I think the foundry has it right now and can deliver good quality castings.  I expect to get the first production order of castings in January.  A couple of the castings have been powder coated, and some have been engraved; I will be offering these options to the folks on my valve cover list when I get the production batch.

Also of note in this photo is a 351C Hilborn EFI setup, which of course bolts onto my intake adapter.  It can be fitted with butterflies up to 2-5/8" diameter.  Since I made over 900 HP with the 2-7/16" butterflies on the Hilborn setup on the SOHC, I'm sure this induction system is capable of those kinds of numbers:


I'm also introducing some new products at the show.  First is the billet intake shown in the two photos below.  Some of you may have seen the red 3D printed version of this intake at the FE Reunion last April.  I now have the machining programs written for this intake and have made my first prototype.  There are a few minor machining errors but overall it looks pretty good I think.  This manifold will bolt onto my standard 13001 intake adapter, or any 351C with stock type heads for that matter.  It uses a Holley LSX top, but I am also considering machining a billet top for this intake.  That would be more expensive, though.  I am currently working on a similar intake to bolt onto my high riser intake adapter.  Once that is finished, probably mid-January, I will be making both these billet intakes, plus my tunnel port billet intake (already shown in the Member Projects thread) available for general sale.  Price on the billet intake for the #13001 will be $1500:


Next on the new product list is a set of SOHC rocker arms.  These are unique in that they replace the needle bearings in the roller wheel with bronze bushings, like the more modern roller lifters.  The rockers are drilled with oil holes so that the bushing is provided with full time pressure oiling.  I have burned up way too many needle bearings in my SOHCs, with the resultant engine damage, and am looking forward to testing these rockers out on my engines.  Assuming they pass muster after a summer of running and next year's Drag Week, I will make them available for sale.  Photos of the rockers are below.  Note that they have a roller tip, so they will require lash caps of varying thicknesses in order to set the lash:


Last, but not least, is the FE Power cylinder head I've been talking about for some time.  The head design is not yet complete; it still needs the water jacket design, and a tweak or two to the intake port.  But, for the most part the basic concept is done.  Below is a picture of the intake port side of the head.  The intake port is nearly the exact same size as a standard FE medium riser port.  However, the port is raised substantially; the floor of the port is about 2" above the deck surface:


With an intake port this high, of course the valve cover rail has to be raised as well.  Way back when I was doing my intake adapter design for the high riser, I was thinking about doing my own cylinder head, so I had the HR intake adapter cast with the valve cover rail over an inch higher than a standard high riser valve cover rail.  Basically, this means I can machine the high riser intake adapter casting to fit these ports, and maintain the standard FE valve cover rail shape, despite the radically raised ports in the heads.  Basically, the valve cover rail is just raised up high enough on the heads and intake to clear the revised intake port.

I plan to make three different intake setups available that will fit this intake adapter.  One will be a billet intake like the one shown previously, another will be a single four spider style intake, and the last will be a crossram style individual runner intake, which I hope to be able to design so that it will fit under the hood of a Mustang, Fairlane, or Torino.  The billet intake and spider intake could be either carbed or EFI, but the crossram IR intake will be EFI only.

Along with the raised ports, they are also straightened, to take the hook out of the normal FE port.  This requires radically offset rocker arms, a 1.4" offset on the intake rockers and a slight 0.1" offset on the exhausts, to clear the intake ports.  The picture below shows the 3D printed rocker assembly.  There are 8 3/8" bolts holding the stands in place to allow for big valve spring pressures, and end stand supports for the shafts of course.  The shafts are normal FE size, but there are no through bolts to weaken the shafts and the oiling holes are positioned differently than stock.   This valvetrain will still oil through the rocker shafts, like the stock oiling system. 


On the exhaust side, the ports are radically redone.  They exit the heads at a 45 degree angle, or straight out  horizontally with the engine in the car.  Obviously, custom headers will be required, and the exhaust will not fit in a shock tower car without some shock tower surgery.  A picture of the exhaust side of the head is shown below:


The chambers, shown in the photos below, are similar to other modern, heart shaped chambers with a centrally located spark plug and plenty of quench area.  Valve spacing is 2.025", and valve sizes are 2.25" on the intake and 1.65" on the exhaust, and valve stems are 5/16".  The valve angle is also decreased to 11 degrees, from the standard FE angle of 13 degrees, and the valves have been moved in the chamber to provide better flow into the cylinder than the stock FE valve position.


Obviously, with such a radical revamp of the basic FE cylinder head, a lot of things on the engine have to change.  If you want to run these heads, you will have to get the heads, the rockers and shafts, the intake adapter, the intake, and new pistons to match the revised valve location.  Plus, you would have to build your own headers, and cut the shock towers if you have a shock tower car.

What's the payoff?  Preliminary flow tests show that with the stock FE port size, the intake port flows 405 cfm at .700" lift, using a 4.25" bore for the cylinder.  The exhaust flows 270 cfm at .700", into a 2" OD header pipe.  The water jackets will be designed so that extensive porting will be possible.  A 500 cfm FE intake port may be possible with this design, after porting.  The photo below shows a 3D print of the ports:


Obviously, I'm a long way from having these available.   But personally, I really want a set  ;D  I plan to finish the design of the water jackets and intake port soon, and then get the intake options designed and 3D printed.  Next step would be to build a billet set of these heads for testing purposes on my 725 HP dyno mule.  I would expect the heads to add 100+ HP over the ported Edelbrocks that are on that engine now.  Assuming that testing all goes well, I will start looking into getting the heads and intakes cast and making a limited quantity available for sale.

I hope I get to see some forum members at the PRI show.  Please stop by and introduce yourselves if you make it to Indy - Jay


Pages: 1 ... 4 5 [6] 7 8 ... 25