Show Posts

This section allows you to view all posts made by this member. Note that you can only see posts made in areas you currently have access to.


Topics - jayb

Pages: 1 ... 14 15 [16] 17 18 ... 25
226
FE Technical Forum / Cool '66 Comet in this month's Car Craft
« on: January 26, 2014, 10:45:47 AM »
There is a beautiful '66 Comet in the April 2014 issue of Car Craft, and the owner (Shawn Carlson) did it right with a strong FE.  According to the magazine article the car runs high nines at 135, and uses a 4.375" bore Shelby block, 4.25" stroker crank, Edelbrock heads ported by Kunz, a Victor and a Dominator, and a big roller cam.  Also uses a Performance Automatics C-4 and 4.56 gears.  The combination is very similar to the 511" engine I went to Drag Week with in 2005, but with deeper gears and probably a bigger cam. 

Anybody know the car/owner, or is he by chance a member here?  I'd love to see some more pictures of that car, and get details on the engine...

227
FE Technical Forum / FE Build at Hot Rod Engine Tech
« on: January 18, 2014, 10:11:09 AM »
John Baechtel at Hot Rod Engine Tech is starting an FE build based on a 390 block.  He is looking for suggestions on the build.  He is pretty much wide open at this point.  The story is on his main page, and there is also a post on his message board under the Traditional Hot Rod Engines section. A link to the Hot Rod Engine Tech web site is below:

http://hotrodenginetech.com/

229
Hope everyone has a great year.  I'm looking forward to finally delivering the intake adapters, and hopefully returning to Drag Week and at least finishing this year LOL!

230
Drag Week 2013 / Jack Miller's Cougar at Drag Week
« on: October 01, 2013, 07:52:31 PM »
Jack sent me this great photo of his 800+ HP Cougar leaving the starting line at Bowling Green this year.  Unfortunately the car had to withdraw after the first day, due to a hole in one of the intake ports spitting water into the engine.  Jack thinks its an easy fix and he'll be back at Drag Week next year.  Really, really cool car...


231
This is the show documenting the big auction in Nebraska of the car collection that the Chevrolet dealer there stuck away in a field over the last 50 years.  Smack dab between the two commentators, on top of a pile of old car parts, is an FE cylinder head!  FEs are everywhere...

232
Drag Week 2013 / '69 Mustang Hits the wall at Drag Week
« on: September 13, 2013, 08:55:49 AM »
Link to the video is below.  I talked to this guy on Monday; he was the one who drove down from Canada and had to change a cam along the way.  His car had run its best ever time on Monday and he was happy as could be.  Too bad about the crash, but it sounds like he is continuing in the competition.

http://blogs.hotrod.com/video-drag-week-2013-competitor-contacts-the-wall-and-presses-on-80191.html#axzz2ebt725n5

233
Drag Week 2013 / Wild In-Car Drag Week Video
« on: September 12, 2013, 11:15:13 AM »
Jeff Lutz's 57 Chevy runs low 7s in Unlimited.  Watch the first video at the link below; the in-car video shows the steering wheel coming off in the middle of the pass!  Unbelievable stuff...

http://bangshift.com/blog/video-1320video-catches-drag-weeks-quickest-run-a-steering-wheel-coming-off-and-more.html

234
Drag Week 2013 / Drag Week Day 1, Beech Bend - Updated
« on: September 10, 2013, 07:03:55 AM »
Unfortunately my string of bad luck at Drag Week has continued this year, and after the first day I'm out of the competition again.  I'm typing this Tuesday morning; Joel and I are in Indianapolis, the Mach 1 is on the trailer, and we are going to go watch the racing at the track today before heading back home.  I will type a more complete blog entry later, but basically what put us out were EFI problems.  First I had issues with the injectors; the car ran dead lean on its first and only pass, and I still don't know what the issue is; I think it must have to do with either the injectors or the EFI box, but I don't know for sure.  Then after the pass, while sitting in the staging lanes, the car developed a bad miss.  We eventually figured out that the left bank of coils was just not firing, but ran out of time yesterday to get the problem debugged and fixed.  We now know that the left bank coils lost 12V power; there are two relays up under the dash that provide power to each bank of coils, and so either one of the relays went bad, or we lost a wire connection, or something like that. 

That's the story in a nutshell; I'll elaborate later.  I still have not been able to find a USB cord that fits my camera, so I still can't post my pictures, but I'll be taking more today and will post them later also.  In my class, I haven't seen the times but I'm guessing Curt Johnson is the leader; he ran a 9.13 yesterday.  No way I was going to be able to match that, so I probably wouldn't have been in a position to win.  But it would have been fun to race at least  >:(

Updated details and pictures are below:

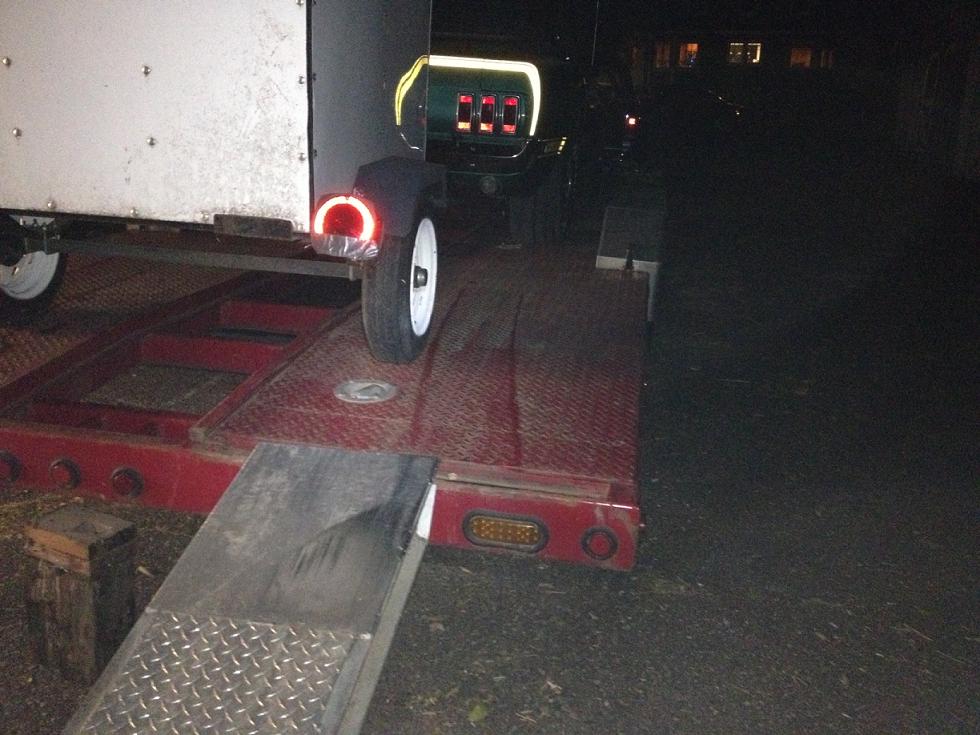
Here are some pictures from Sunday, Drag Week registration day.  But first, here is a photo of a very close shave we had getting the Mach 1 on the trailer last Friday night.  We were loading the car and my little Drag Week trailer together, and the car was 90% up the ramp when the rear wheels spun and it went sideways.  I stopped right away, and Joel hooked up the winch and we pulled the car the rest of the way onto the trailer with that, but looking at the picture you can see how close it was to coming off.  At least two thirds of the right rear tire was off the ramp when the car stopped; that was a close one:


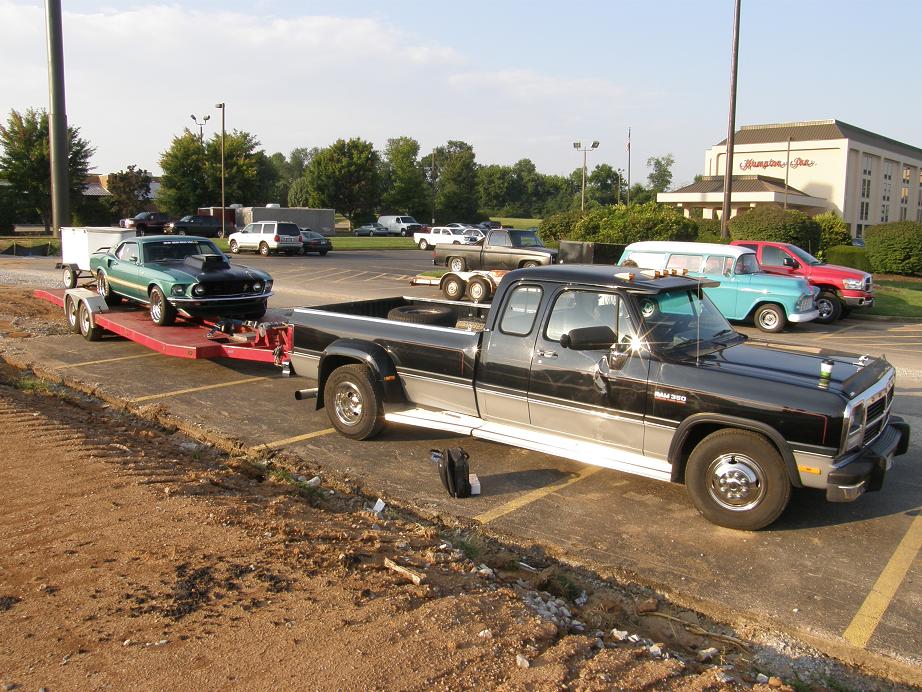
Here's a pic from Sunday morning, in the hotel parking lot prior to leaving for Beech Bend Raceway:


Once at Beech Bend we parked the truck and trailer and got the car off; here I am backing it off the trailer with Mike Moore and Tom Posthuma spotting:


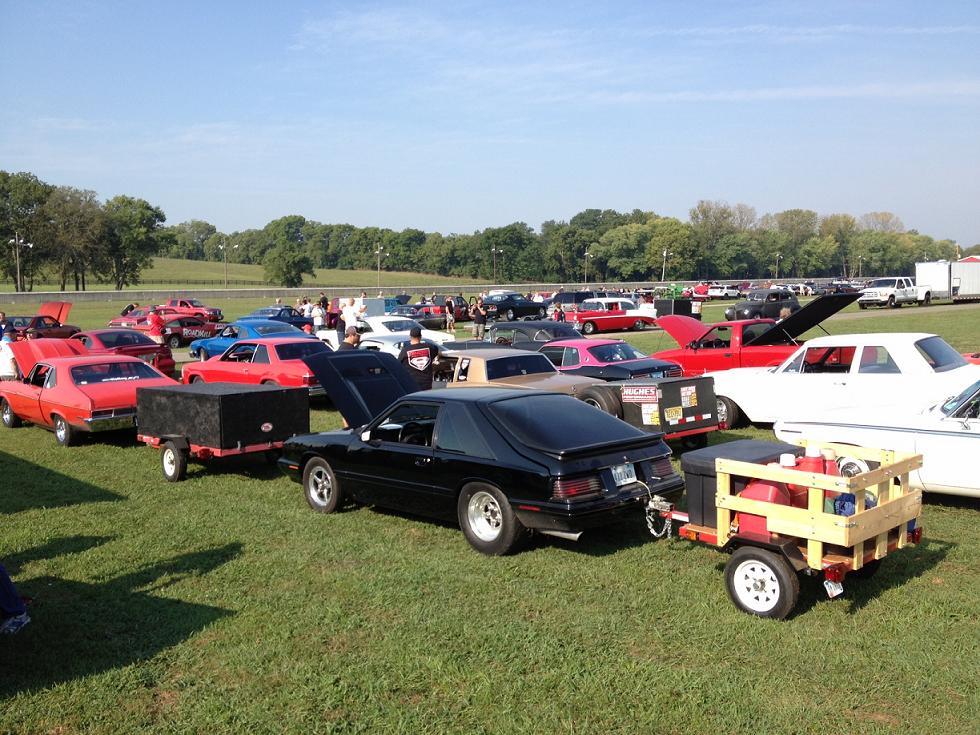
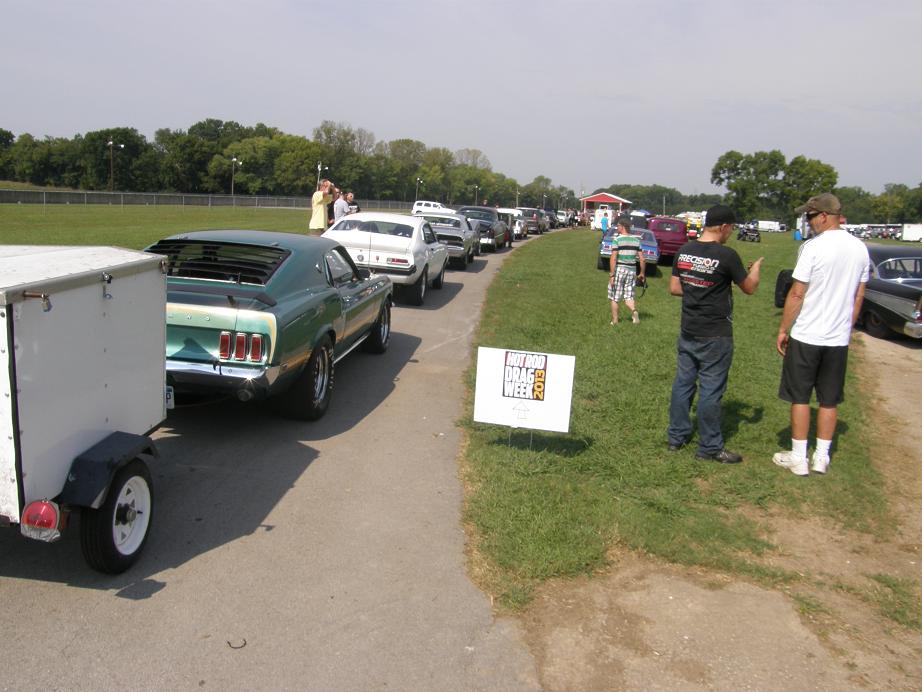
Once off the trailer I pulled the car into the registration line.  It seemed to extend forever.  Here's a couple of pictures:


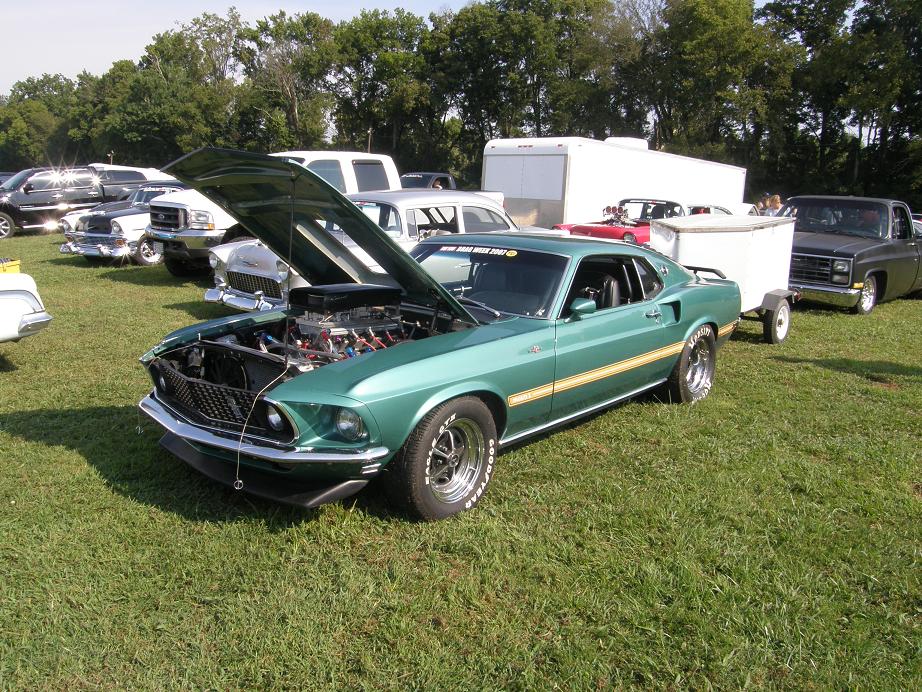
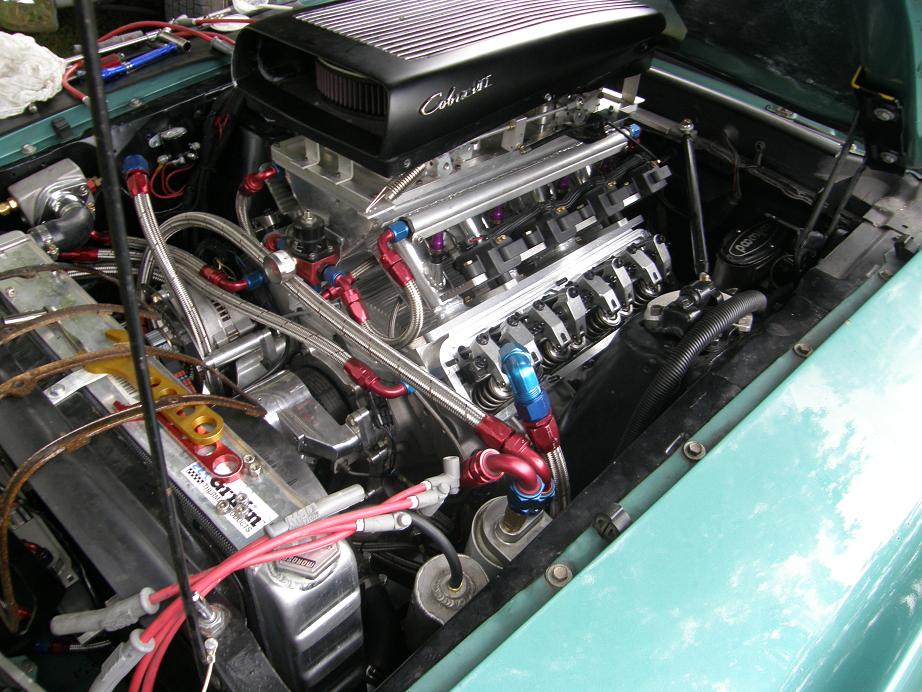
Here's a shot under the hood of the Mach 1 while in the registration line:


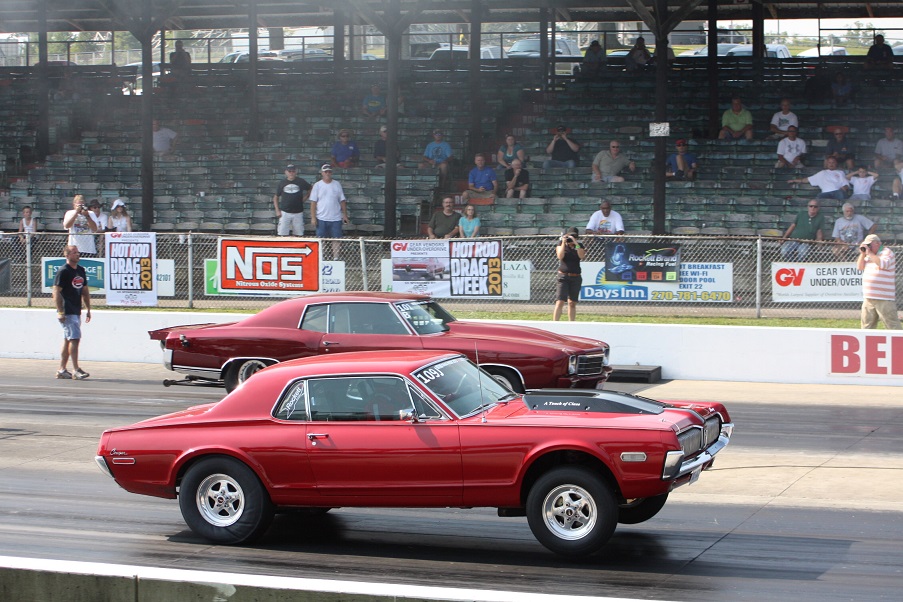
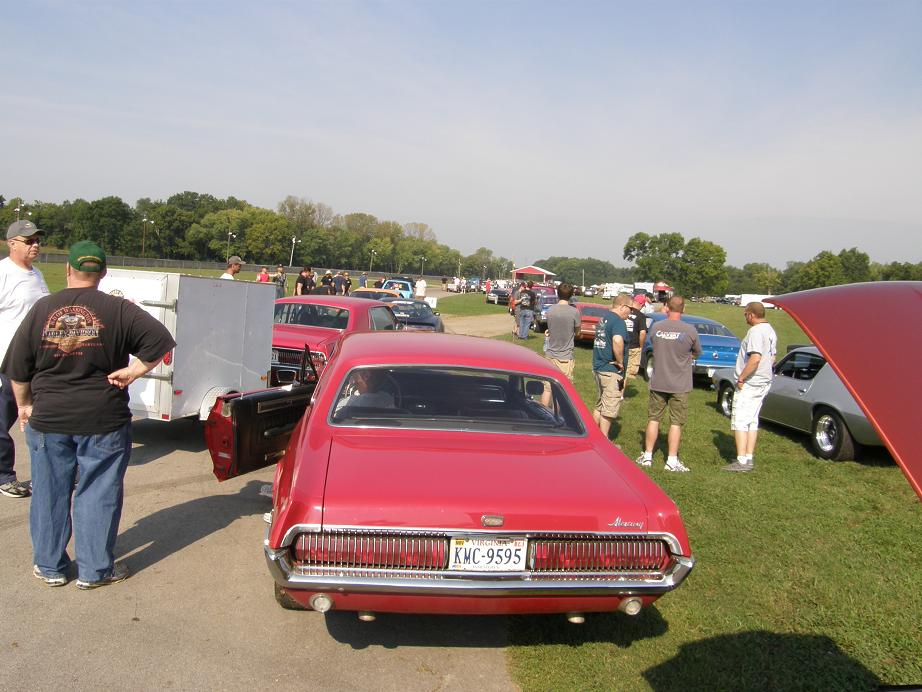
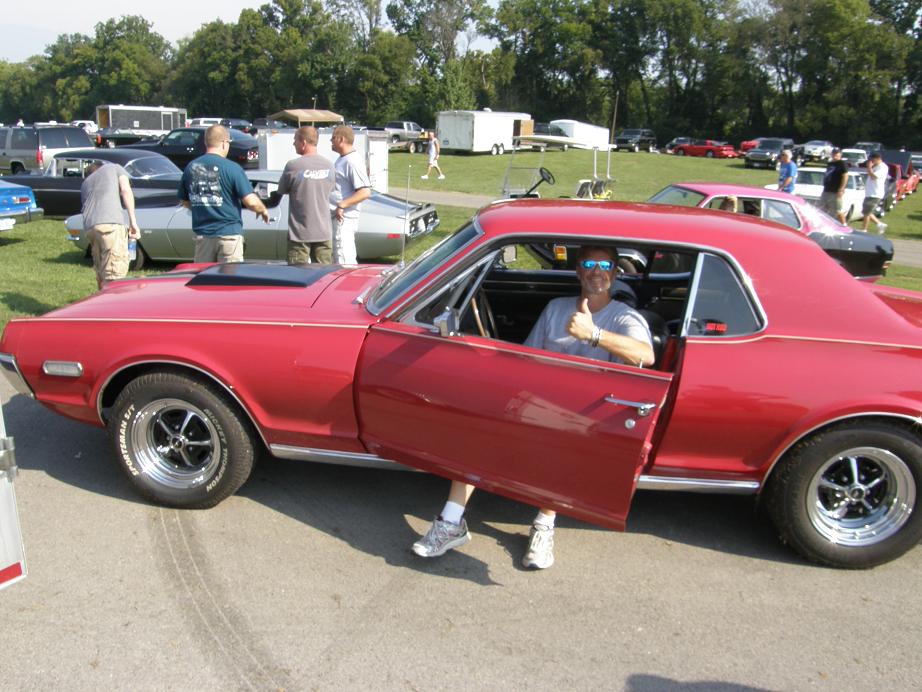
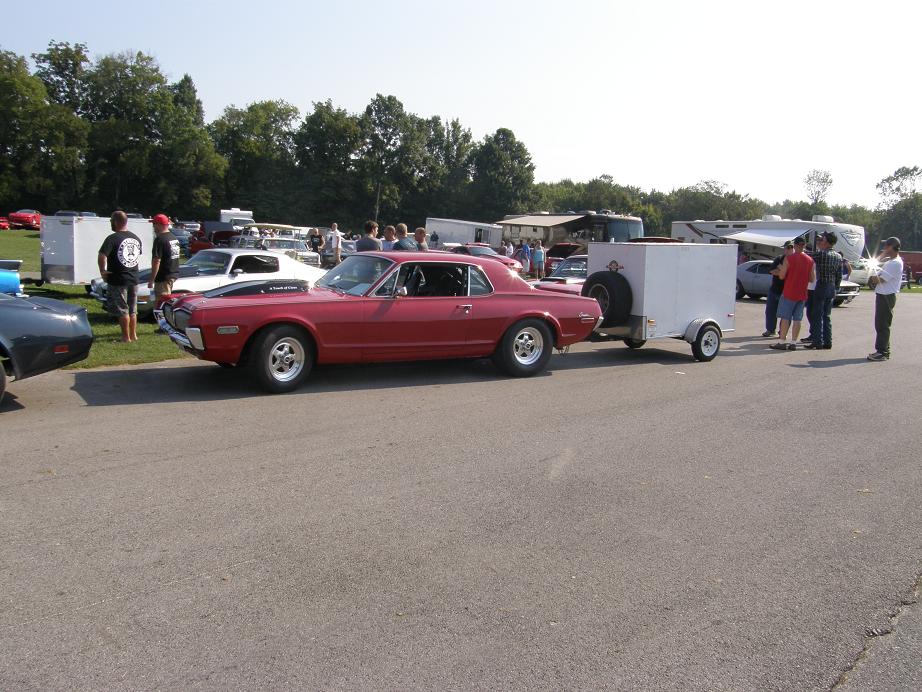
Here's some pictures of Jack Miller's Cougars in the registration line.  They were beautiful cars, both running in my class at the start of the event anyway.  That's Jack at the far left in the first photo, and Eugene in the driver's seat in the second.  Eugene was driving the second car:


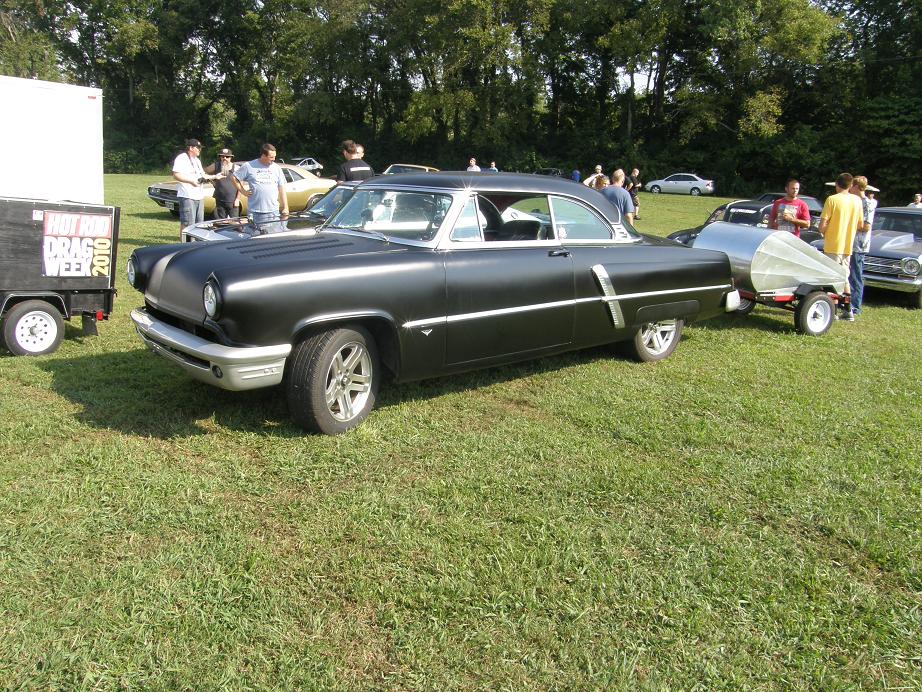
After a few minutes of being in line Larry Warpula and his son Clint pulled in a few cars behind me with their FE powered '53 Lincoln.  Really a good looking car, and a very unique Drag Week trailer, too:


As always, there was a wide variety of cars at the track; that's one of the things that makes Drag Week so interesting.  This thing deserved a couple of photos just for being weird.  It featured five leaf blower in the back of the car, supercharging the engine.  I understand that it was some kind of weird TV show project or something.  Not really my cup of tea, but interesting nonetheless:


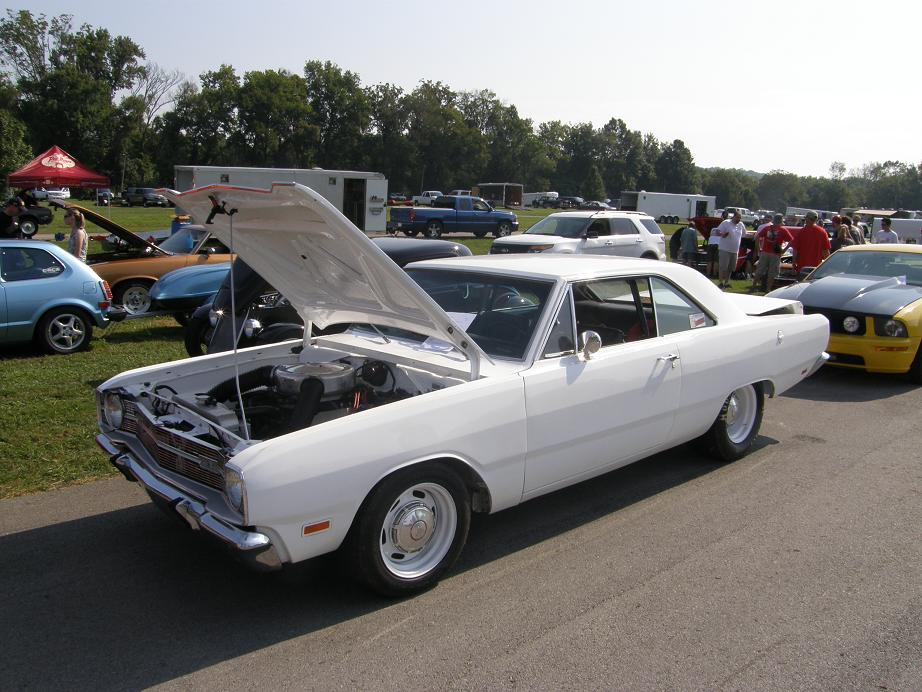
Here's a pic of Mike Crow's Dart.  A very nice, clean small block naturally aspirated car.  I talked to Mike at Indy on Tuesday and he is running low 10s with the car:


Here's another view down the registration line, as I got closer to the tech inspection tent.  I think that's Rick Johnson from Gear Vendors on the far right of the photo:


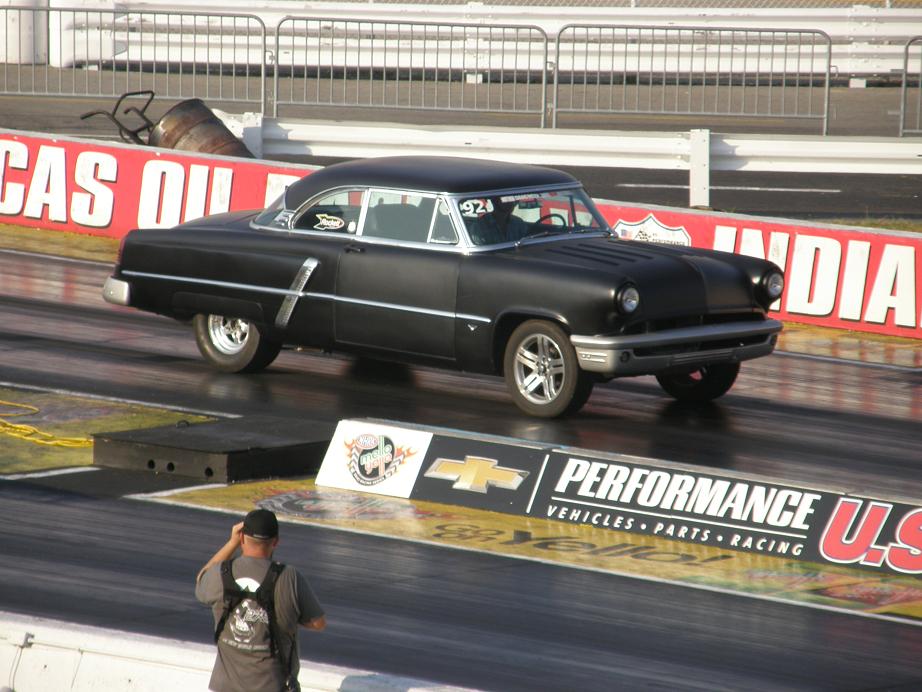
This blown Mercury Marauder has been at several Drag Week events, and the owner/driver continues to improve on the car as time goes by.  I talked to him in the registration line for a while and he is thinking of switching to turbos and doing work on the front suspension.  He seems pretty serious about making the car go faster and faster:


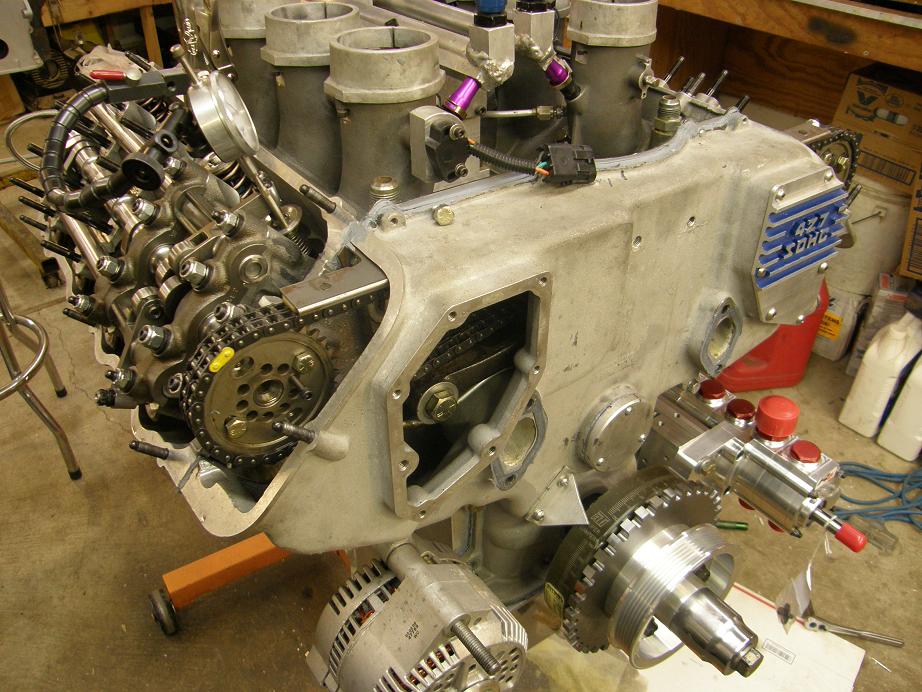
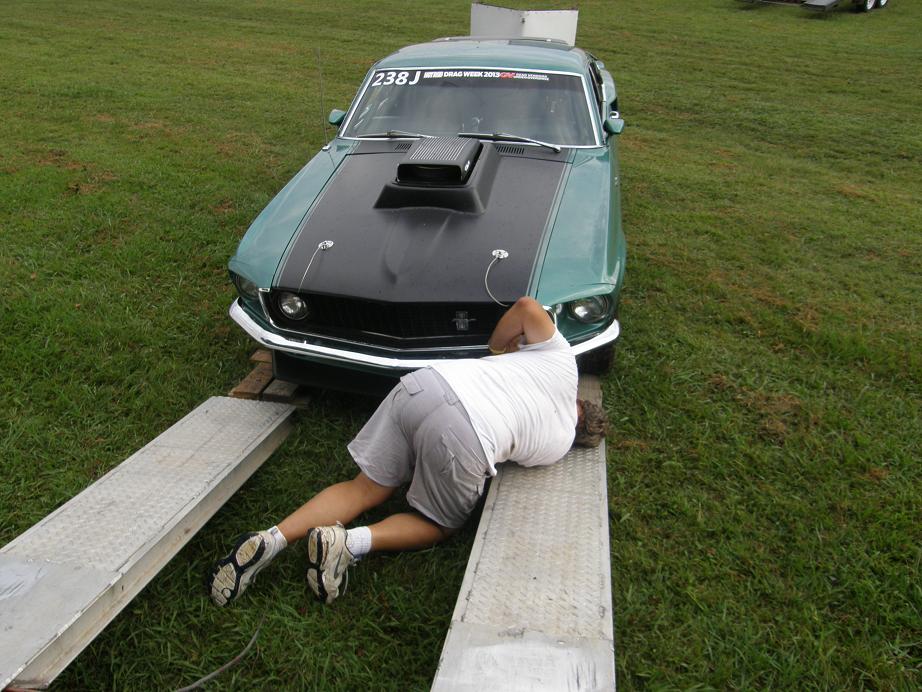
After we finally got through the tech line we pulled the car into the shade to do some work.  Here's a shot of the engine while the pushrod change was going on:


At the end of the day, when we'd finally made it into the event, we got done with all the work on the car and put it back on the trailer for the trip to the hotel.  Here's a shot from up on the trailer; the trunk monkey is doing his thing  ;D


Monday morning we arrived at the track at 8:00 and got the car and trailer unloaded.  At 8:30 the driver's meeting started,
hosted by David Freiburger from Hot Rod.  One of the first orders of business that Freiburger took care of was to place a call
to Larry Larson, winner of the last five Drag Week Unlimited titles.  I heard that Larry was unable to come this year
because of customer commitments with his chassis business, so Freiburger called him in front of the whole crowd of drivers,
and we all screamed "HI LARRY" at Freiburger's cell phone.  It was pretty funny; everybody likes and respects Larry and its
too bad that he didn't make the race this year, because he would have been in a pretty good race.

Freiburger also announced the class count and total number of cars at the event.  It was 230 cars, biggest Drag Week ever.
But, this was still short of the 250 car limit; as expected, there were a bunch of last minute no-shows.  So, in addition to the
19 racers who showed up with no reserved spot and got in (including me), there were an additional 20 spots available!

Freiburger introduced the sponsors, who all got a big round of applause.  The main sponsor this year was Pep Boys speed
shops; I guess they have 100 stores opened nationwide now.  Jack Day from Rockett Brand Racing Fuels was there; Jack has
been a sponsor of every single Drag Week.  Also Rick Johnson from Gear Vendors was there, and I think Rick has been a
sponsor of every Drag Week event too.  Then Keith Turk came up and went over the rules, and finally
turned us loose to go racing.  They were running all the class cars for the first hour and a half, and then the daily driver
cars for the next hour and a half, and then finally an open racing block of time for the last couple hours of the day's
race.

We had pretty much gotten our stuff off the trailer and the trailer parked, but didn't have the car ready to run yet, so
Joel and I worked on that for a half hour or so after the driver's meeting.  By the time I got the Mach 1 into the lanes,
a bunch of cars had already run, and there was a long waiting line in the staging lanes.  Also it was hot out there, at least
95 degrees, and really humid, so the staging lanes were not a pleasant place to be.  Finally after close to an hour I got
within six cars of the front of the line, and put my gear on to get ready to go. 

When I got to the next up position, I started the car to warm it up a little and pushed the datalogging button.  I had worked
hard over the last few weeks to get the datalogging working in the car.  The MS3X EFI system writes the data to a little
SD card that is pushed into the box, and then you pull the card out and plug it into a laptop to read the data.  This  way
you don't have to have a laptop in the car to log the data.  The datalogging LED was blinking so I knew the data was
being recorded.  It was really, really hot in the car; I had to buy a new helmet this year to pass tech, and it had a clear
plastic face shield, and I was sweating so much that my glasses kept sliding down my nose, and I had to try to reach up
underneath the helmet to get them on straight again.  With the five point harness strapped on, the heavy fireproof racing
jacket and pants, the gloves and neckbrace, and the tight confines with the window net and cage in the Mach 1, it was not
a comfortable place to be.  One thing for sure, my Galaxie is a lot more comfortable to race than the Mustang, especially
 in this kind of heat.

Finally they waved me up the starting line, and I checked to be sure that the datalogging LED was still blinking.  My big
concern for this first pass was to get some good A/F data so I could tune the EFI system.  Prior to the event I had changed
out the fuel injectors for some Injector Dynamics units; these injectors came with individual flow test data, and each one is individually
labeled, so you can use the fuel map tables in the MS3X to tune each injector differently.  This way you know that each one
is delivering the same amount of fuel.  I thought that might give me a little power edge, so I made the change to the
injectors, but the downside was that the ID (Injector Dynamics) injectors were a higher flow rate than the old injectors.  There
is a parameter in the fuel injection system called "Required Fuel" that has to be input depending on the size of the fuel
injectors.  There is a calculator in the EFI software that you use to determine the Required Fuel variable, where you input
the size of the engine and the injector's peak flow rate.  From the calculator you get the Required Fuel variable and input
it into the sofware.  I went through this with the new injectors and stuck the value in the software when I installed the
injectors last week.  My EFI guru friend Scott Clark told me that there may be some minor adjustment required to the
Required Fuel variable after this, but nothing major.  So I was going to check the datalog after the first pass for A/F
and then make any adjustments to the Required Fuel variable after that.

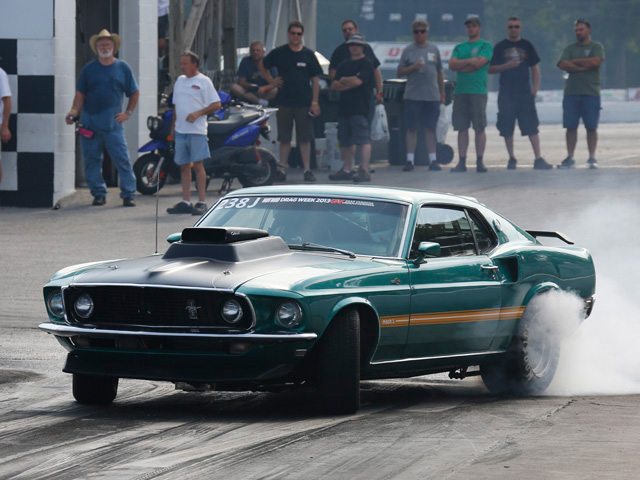
I watched the pair of cars in front of me go down the track and then got the signal to do the burnout.  I pumped up the brakes,
hit the line lock, and spun the tires.  Unfortunately, the car went sideways on the burnout; Hot Rod got a nice picture of it,
but in terms of a decent burnout it sucked:


I had noticed pushing the car around on the trailer and in the pits that one of the brakes was making some noise like it was dragging,
and I suspected as the car went sideways on the burnout that the left front brake just wasn't holding.  Oh well, the purpose of the first
pass was just to get some air/fuel data, so I rolled up to the starting line and staged.  The tree came down and I launched on the last
yellow.  The car spun some one the line but the engine felt strong.  It continued to spin going down the track and I was having some difficulty
keeping it straight.  The shift light flashed and I went to second, but then it flashed again, I pulled the shifter back and - it didn't move.  The car
didn't shift into third, and an instant later I hit the rev limiter and had to let off.  I coasted down the track the rest of the way to a 13 second ET
at 55 MPH.  Not a great start. 

After picking up my time slip I went right back to the staging lanes, parked a little ways back behind the last car,
and started working the shifter back and forth to see what could have gone wrong.  I have a new transmission in the car this year, and needed
to make a new shift lever for it to use the stock Mustang linkage.  I thought that this may have been the problem, but the shifter worked
flawlessly while I was sitting there in the staging lanes.  After a couple of minutes I came to the conclusion that I just hadn't depressed the button
on the stock shifter far enough when I went to do the 2-3 shift.  The valve body in the transmission is a reverse manual, and you start in first gear
in the stock Drive position.  On the 1-2 shift you shift from stock Drive to stock second, and you have to depress the button but pull the shifter back
only to second; its very easy to make a 1-3 shift rather than a 1-2 shift, especially when the car is weaving around on the track and jamming you
back in the seat.  I cheat this by not depressing the button all the way on the 1-2 shift, and this seems to make it easier for me to hit second without
going all the way to third.  But if you are not careful, you can not depress the button enough, and then the shift lever won't move.  I was pretty
sure within five minutes of getting back to the staging lanes that this is what had happened on my 2-3 shift, so I was anxious to try again.

That lazy trunk monkey  (;D) was nowhere to be found, so I called him and had him bring my laptop over to the staging lanes.  I pulled the SD card out of
the MS3X, and once Joel brought me the laptop I fired it up to look at the data.  For some reason the computer had trouble reading the log on the
SD card, and I sat in the pits for 20 minutes trying to get the log to download with no success.  Finally I decided to turn around and drive back to the
pits, to work on the problem there.  But when I turned the key, I got the dreaded starter solenoid rapid clicking.  Out of battery??  Of course at the
track I'd had to start up, run briefly, and stop again to stay in line in the staging lanes, but I thought my battery was in good shape with plenty of
capacity.  Jack Miller was a couple cars behind me and I asked him for a jump but he had a boost box so he just lent me that.  The car started with the
boost, but the engine was running like crap; it seemed like it was missing on at least a couple of cylinders.  What the hell?  I feathered the throttle to
keep the car running, did a U-turn in the staging lanes and went back to the pits.

With the car shut back off I decided to just work on one issue at a time.  It was already past 11:00 AM, and the track was going to close for racing at 2:00,
so I had a limited amount of time to get the car back up and running right again.  I went back to the datalogging instructions for the MS3X, figured out
what I had been doing wrong, and got the data file downloaded off the SD card.  When I looked at the A/F data I was shocked; it said I was running way,
way lean, about 15.9:1 or higher during my pass down the track.  I didn't see how this was possible; I had been very careful about setting up the injectors,
and when driving around on the street last week I'd been seeing A/F numbers in the 13:1 range.  Now I was suddenly very concerned that I'd run the motor
too lean and hurt it. 

Joel and I decided we'd better pull the plugs and look at them, and I wanted to pull the valve covers too to make sure everything
looked OK there.  Within about a half hour we had the valve covers off and checked the valvetrain; all the springs and rockers looked good, which was a
relief.  Next we pulled the plugs one at a time.  On the left bank they all looked dead white; no doubt that the engine was running lean.  On the right bank
they looked slightly better, but not by much.  The good news was that none of the electrodes showed any sign of burning or melting, so I figured the engine
was probably OK.  But I had no explanation for the lean condition, and no explanation for why it was missing.

We re-assembled the engine, and just on a lark I tried to start it.  This time it fired right up, but was still missing terribly.  I had Joel go around the engine on
both sides while I kept it running and he listened for any bad sounds.  Outside of the miss, he didn't hear anything.  With the engine shut back off we
discussed the problem and tried to come up with a diagnosis that made sense.  By this time it was close to 100 degrees at the track and we were both
dripping with sweat; not the ideal situation for trying to debug an engine problem.  Finally we decided to check for spark on all the plug wires.  I restarted
the engine again and Joel went around to each plug wire with the timing light, looking for flashes.  On the right bank he got flashing on all the cylinders, but on
the left bank there was nothing.  So, the engine was running on four cylinders!  No wonder it sounded like crap.  I tried to think of what could be causing this
problem, and the only thing I could come up with was the EFI box.  Was there some issue with that?

I had a spare EFI box, but the one in the car was mounted way up under the dash to keep the wiring out of the way.  I sure regretted that mounting location
now.  I crawled under the dash anyway to unplug the two main wiring connectors from the box and pull them down so I could plug the new box in.  When
I pulled the first connector off, it came apart in my hand. The connector has a two piece metal shell surrounding it, held together with a couple of small bolts, and
one of the bolts was loose while the other one had come completely out.  The shell of the connector was just rattling around on the end of the cable.  I spent a
couple minutes looking at it; could this be the problem?  In the end I concluded that it wasn't; all the wires were still attached to the pins, and there were no exposed
wires that could have grounded on anything to cause the problem.  I pulled the other connector, which was intact, and the MAP line, and plugged everything into
my new MS3X box.  I hooked up the computer to the box and opened the software.

I was met with something like 39 different error messages, mostly relating to the fact that the software on the computer was set up for a certain firmware version, and
the firmware in the new MS3X was different.  The software wanted to know how I wanted to handle all this?  I didn't really have a clue, but I went through all the error
messages and made the best guesses I could, thinking that I would have hooked this box up to the car before the race if I'd have known it was going to go through
all this.  Finally I got through all the warnings and error messages.  I tried to start the car - and got the starter solenoid clicking again.  >:(

By now it was after 1:00 PM.  Joel went off to try to find someone with a battery charger or jump box we could borrow.  After a couple minutes I got back in the car and
tried the starter again.  This time after clicking rapidly for a few seconds it cranked the starter, but the engine didn't fire; seemed like the new EFI box was just not
configured properly to work.  After all the error messages I'd received it was no surprise.  I decided to put everything back together with the old EFI box, which took quite
some time because of how inaccessibly the box was mounted.  About the time I got this done Joel came back with a guy who had a gas powered generator with a
battery charger built in.  We let it run on the battery for 15 minutes and then started the car again, but of course had the same miss as before.

There wasn't much time left to race.  I figured I could hand in the time slip I had to stay in the event, but there was no way I was driving to Indianapolis in the car with
four cylinders not running.  It seemed like there was no option except to drop out.  I was standing there in the pits staring at the car when Keith Turk, the race director,
rolled up on his pit scooter.  "Are you out?", he asked.  "I think so", I said.  Keith said "Oh, OK".

I know Keith pretty well, and he is a funny guy, and I like to give him a hard time.  I said, "Gee Keith, you could at least say you're sorry to hear that or something."  Keith
looks at me, smiles, and says, "Dude - I am NOT that guy."  I just broke out laughing; it was a real day brightener for me.  Joel and I laughed about that all the way to
Indianapolis.

At that point I made the decision to throw in the towel; I wasn't going to run down the track again lean, on four cylinders, and I didn't think I could get the car fixed for the
trip to Indy.  I was going to start putting stuff back in the trailer and getting the car packed up when Eugene, the guy driving Jack Miller's second Cougar, came over. 
Apparently Jack had an engine problem and needed some gaskets, so I walked over to his car to see if I could be of some help.

When I got there Jack had the number 8 plug out, and water was running out of the spark plug hole.  Not a good sight to see.  Jack thinks that this car is capable of running 9s,
but it has Dove heads on it and I have seen this problem with Dove heads before.  However, there was some chance that it was just a head gasket, or maybe an intake
gasket.  Jack was trying to decide what to do, but with an FE in a Cougar with head studs pulling the head to change a head gasket was pretty much out of the question.
Jack didn't have a head gasket anyway.  I offered him my spare intake gasket set, which may have worked on his heads, but he had kind of decided to give it up at that point
and just race the car that Eugene was driving.  So, I went back to the Mach 1 to get it ready to go back on the trailer.

Joel pulled the truck and trailer out of impound and we had everything loaded up by 3:30 or so.  Curt Johnson had stopped by on his way out of the track and told me he ran
a 9.13!  Curt says his car weighs 3000 pounds with him in it, and mine weighs 3600 pounds with me in it.  Hard to compete with such lightweight competition, and I'm pretty
sure that Curt is the odds on winner assuming he can make the drives.  The next race was at Indianapolis and I had a hotel room reserved there, so we
decided that rather than go straight home we would spend the night at Indy, then watch the Drag Week action on Tuesday morning before we headed home. 

On the way back to Indy in the truck I kept thinking about the problems with the car.  It had been over a year since I wired it, but it dawned on me during the drive that each
bank of coils has a relay up under the dash that feeds power to the coil packs.  If that relay had gone out for the left bank of coils, that would explain why there was no spark
on the left side of the engine.  A little later Scott Clark called to see how I was doing, and I told him about my suspicions.  He suggested I just check for power at one of the coil
connectors on the left side when the key was switched on, and that would tell me if power to the coils was the issue.  Joel and I rolled into the hotel around 8:00 and after
dumping our suitcases and laptops in the room, we went back out to check this.  Sure enough, the right side coils had 12V, but the left side coils didn't.  So at least I knew where
to start looking for the miss problem.  Unfortunately, like the EFI box, the coil relays are tucked way up under the dash where they are not really accessible.  I'm going to have
to spend some time changing the wiring around in the Mach 1 to make all that stuff easier to get at.

Tuesday morning Joel and I headed for Lucas Oil Raceway to see the racing action.  Here's a picture of the starting line from the stands:


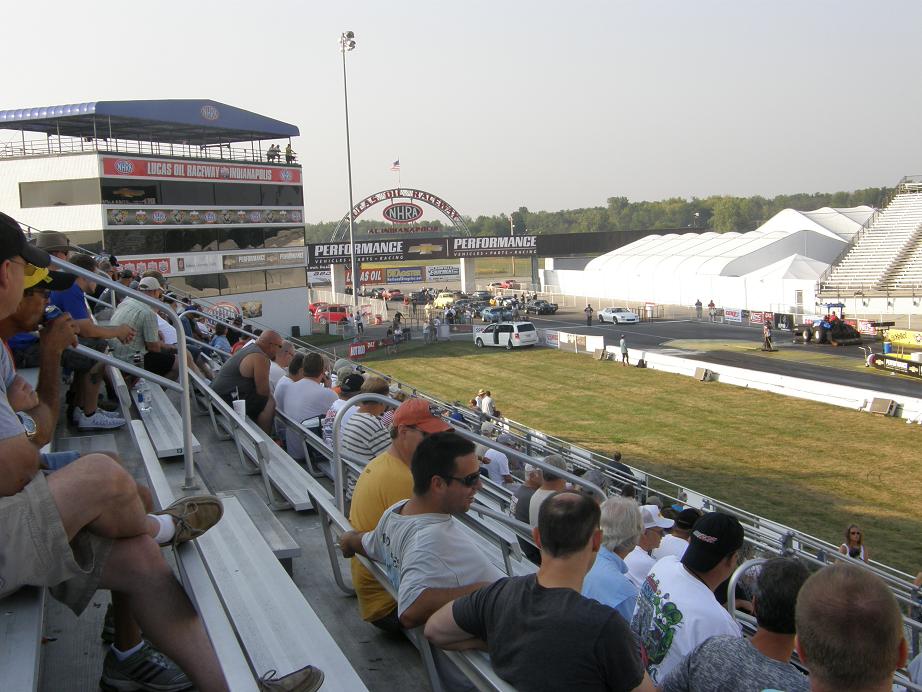
Joel remarked that it is really fun to spectate at Drag Week because you see such a wide variety
of cars running down the track.  On Monday one of the unlimited cars had run a pass in the 6.70s, and he did the same thing on Tuesday; the pass was awesome, and I would have
loved to be rolling down the road behind that guy.  I think those were the fastest passes ever at Drag Week; the car is basically a Pro-Mod Camaro body with turbos and a big block
Chevrolet I think.  On the track you get to see early and late model cars, gassers, imports, you name it.  There were two front engined Corvairs there on Monday that I imagine were
also there Tuesday, although I didn't see them.  Here's a pic of Larry's car on the starting line at Indy:


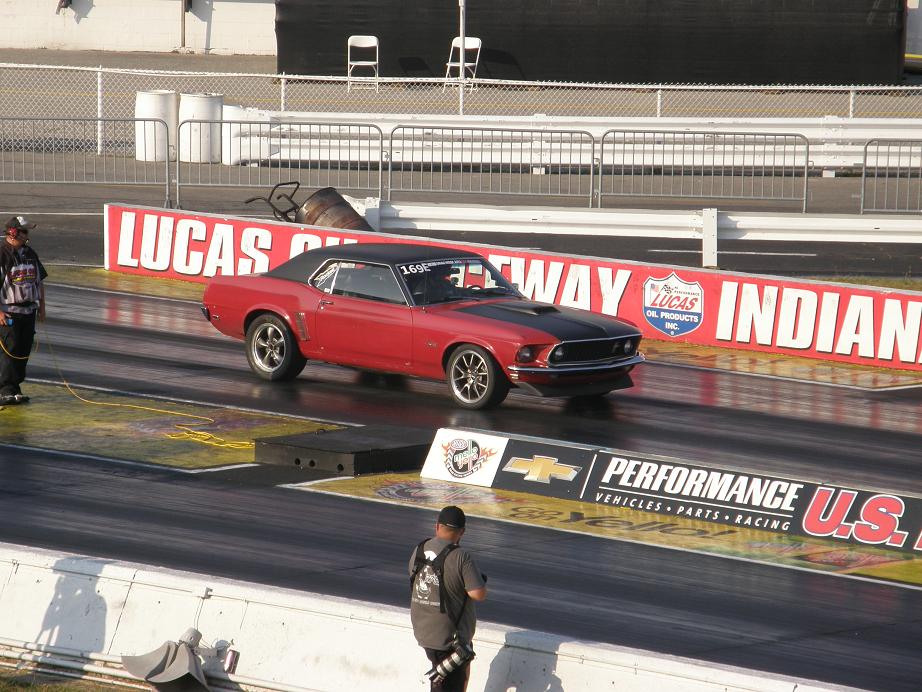
Here's another 69 Mustang running at the track.  This guy was from Canada, and drove down for the event.  On the way he had to change a camshaft LOL!  He got to Beech Bend and
ran an 11.60 something, best time ever for his car.  He was loving life when I talked to him on Monday:


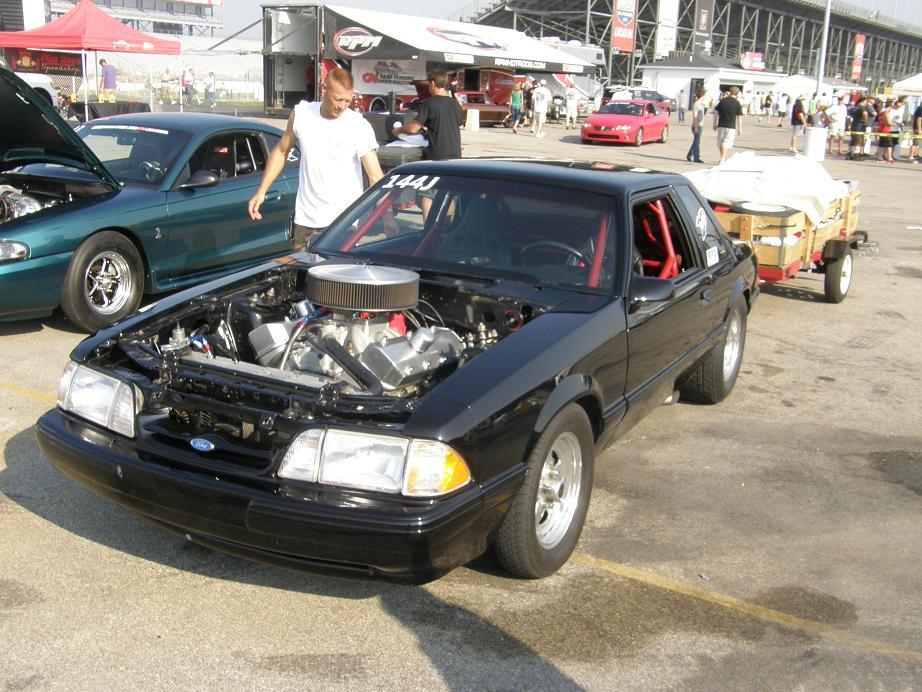
After watching the racing for a while from the stands I spent the rest of the morning wandering the pits and taking pictures.  Here's a picture of Curt Johnson's car, which
ran a 9.10 on Tuesday at Indy.  There was another guy in the class with a mid 9 second Mustang with an LS engine in it, but I guess he changed to Super Street on Monday,
so I think Curt is the only guy in the class running nines.


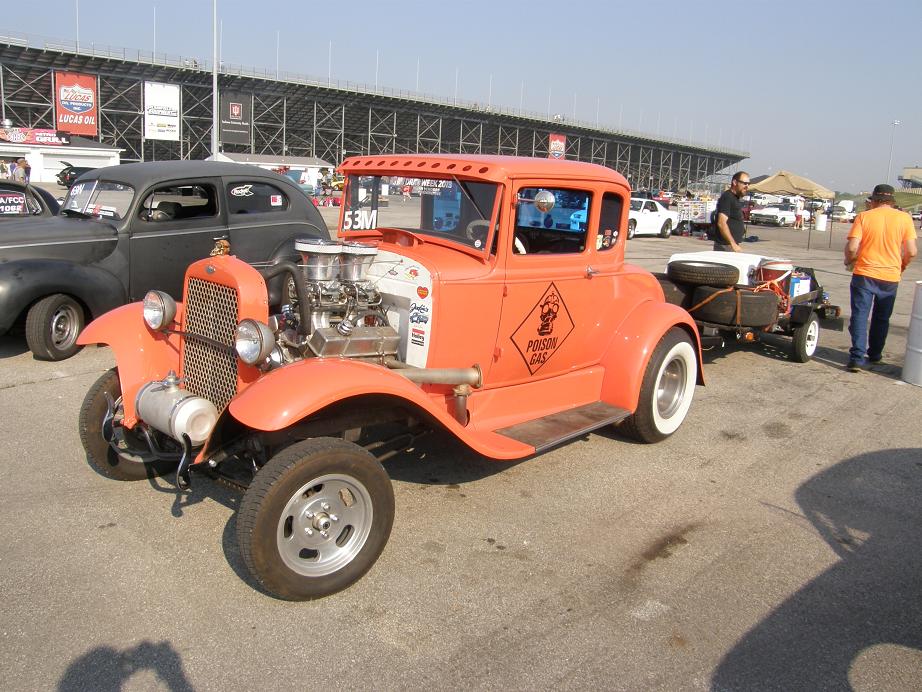
The gasser cars were pretty cool; here's some photos of those:


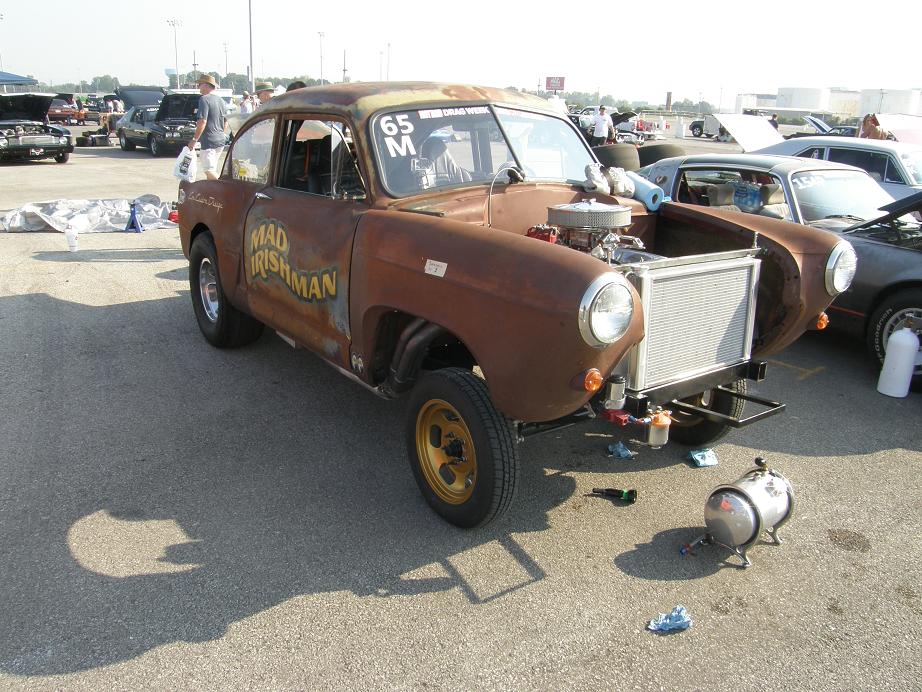
The car that Joel is building is very similar to that last one, so he spent quite a bit of time talking to the owner and asking questions about the front axle and shocks.  There was also
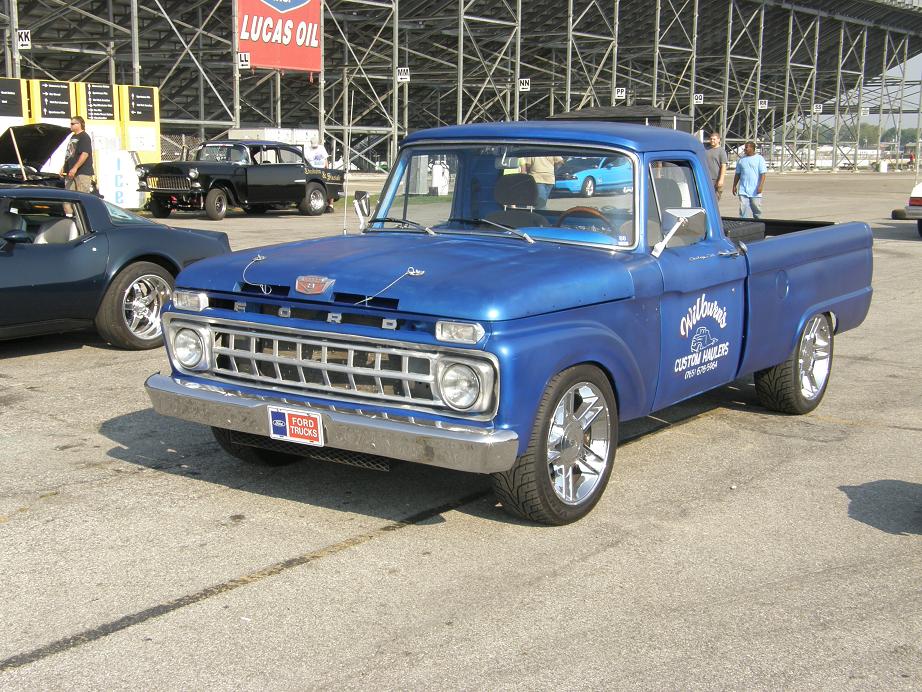
a pretty nice mid 60s Ford pickup in the pits.  I didn't see a number on it so I don't think it was a competitor, but it was worth a photo nonetheless:


I spent a lot of time in the pits talking to Mike Crow and Jeff McConnell about various topics, and also ran into Mike Moore and Tom Posthuma again also.  Finally around 11:30 local
time Joel and I decided to hit the road.  We were walking out of the pits back to the parking lot when this guy comes running up to us; he was with a group of guys running a small
block late model Mustang, and we'd gotten to know them when we were parked next to them during registration.  He'd seen me changing pushrods on Sunday, and knew that
I had T&D rockers.  In his hand he held a broken T&D rocker from his engine and wanted to know if we had any spares.  He followed us back to the trailer and I dug out my spare
rockers, but they were pretty far off from the small block versions, and it was clear that they wouldn't have worked for him.  Too bad, they were nice guys.  I hope they get
something worked out for there car.

Joel and I hit the road and got back to Minneapolis last night.  I'm trying to keep positive on this year; I didn't really break the car, and I got to see all my friends at Drag Week
again, and now I've got a couple of days off to debug the problem.  But despite all that I'd rather be racing in St. Louis today, and running down the road to Memphis
tonight.  I'm going to have to try to get better prepared for the event next year...


235
Drag Week 2013 / Made it to Drag Week 2013!
« on: September 08, 2013, 11:00:18 PM »
I wasn't planning on being here, but tonight I'm sitting in the hotel ready to start racing tomorrow in the event.  Getting here was kind of a strange confluence of circumstances.  Originally when the sign up for DW13 came out I had decided not to attend, because I figured I'd be in the middle of machining intake adapters and I didn't want to interrupt that to make it to the race.  But I had second thoughts almost right away, especially when registration for the event filled up so fast.  There's a lot of great people at this event, and a lot of really cool cars, and I figured I was really going to miss going, just like last year.  After registration for the 250 cars closed, I decided to put my name in on the waiting list.  Turned out I was #73 on the list; I figured I'd never make it with a number like that, so I pretty much gave up on Drag Week 2013 last March.

Fast forward to the beginning of August.  Developing the machining operations for my intake adapter had taken longer than expected, and it did not appear at that point like I would have the first batch of production castings in my hands by the second week in September.  I decided to think more seriously about attending Drag Week.  My Mach 1 was the obvious choice, because it needed the least amount of work to be ready for the event.  Last year, one week before we were going to leave for Drag Week, my pal Joel (aka the Trunk Monkey) was driving the Mach 1 at a local track when the rear end blew out of it.  We scrambled to get a new set of 4.56 pro gears for the car and get them set up in time to reinstall them so it would be ready to go.  But the night before we were going to leave, when we installed the new gears, we found that the transmission had also taken a hit with the gear failure, and it wasn't shifting right or going into park correctly.  So, the Mach 1 was out for Drag Week 2012.  Later that fall I pulled the transmission and acquired a new one from a different builder, but never installed it.  It had been sitting next to the car ever since.

Also at the beginning of August I got an email from Hot Rod, saying that some contestants were starting to drop out, and that the first 11 people on the waiting list had spots.  So I was hopeful that more would drop out and I would get an email saying I was in.  However, the rules for dropping out of the event changed this year; last year you could get a full refund of your entry fee if you dropped out right up to the first day of the event.  This year, only half the entry fee was refundable, and no refunds would be issued after August 15.  The way I read that was that there was little or no motivation for someone who dropped out after August 15 to contact Hot Rod and let them know they weren't coming.  So I really didn't think that there would be a lot of movement on the waiting list after mid August.

Up through the first two weeks of August I continued work on my intake adapters, and finally got one of them on the dyno and ran some tests.  At that point there wasn't much to do except order the first run of production castings and wait for them to be delivered, so I could start machining them.  The foundry said end of September for delivery, so I had some time to start working on the Mach 1.

I had been talking to my pal Joel about attending the event again this year; he had been planning to go himself, but his project car took longer than expected so he was not going to make it.  He volunteered to be trunk monkey again this year if I wanted to go.  Joel figured that given the situation with Hot Rod, there was no way they'd get to my name on the waiting list.  But he also thought that if we just got the car ready and showed up, that we might be able to get in because of some late no-shows.  It kind of made sense to me, too, so we decided by mid-August to go for it.

Working every night on the Mach 1, by the end of August I had the transmission installed and was making some other changes to the car that I hadn't had time for last year, but that it really needed.  These were some modifications to the electrical system to make the EFI system easier to service, some new transmission fluid cooler lines, adding datalogging capabilities to the car, and a change to the cam timing.  Once all this was done I got the car started and running over Labor Day weekend, but when I went for a test drive I found another problem. 

The car has a Peterson wet sump oiling system on it; this is an external pump that looks like a dry sump pump, but it uses a wet sump instead.  It is a three stage pump, with one stage sucking oil from the pan and pressurizing the engine, and the other two stages used as scavenge stages to pull a vacuum on the crankcase.  These two stages come out of the pump and into a catch can where oil vapors are supposed to collect; the can needs to be drained periodically.  However, after my first ten mile cruise in the car on Labor Day weekend, the can completely filled up and overflowed the top, putting a bunch of oil into the engine compartment and making a big mess.

Now I've had to deal with this issue before, and I've called Peterson before about it but basically got the shrugged shoulders and the suggestion to add more baffles in the tubes feeding the vacuum stages of the pump.  I know some people who have run this kind of system on the street with success, so I know it can be done; I just needed to figure out the solution for my car.  So last week I went kind of nuts with the baffles; I welded a 4 inch long tube with two baffles in it on the front of each valve cover, and then welded a third baffle inside the valve cover itself to protect the tube opening.  This took me until Thursday night this week to get done.  Thursday night I went out for another test drive and had the same problem.

(By the way, I have to apologize for the lack of pictures in this post.  I took a bunch of pictures over the last few days with my camera, but here I am in the hotel without the stupid electrical cord to connect the camera to my computer LOL!  Forgot about that one when I packed up Friday night.  I'll try to get a cord tomorrow when we're on the road so I can post some pictures, including some of the engine compartment showing the tubes on the valve covers.)

Well, I didn't relish the idea of driving 1200 miles on Drag Week, stopping every ten miles to drain the catch can.  Thursday night I gave Blair Patrick a call to discuss the situation.  One idea I had already come up with was restricting the oil through the pushrods.  This engine uses pushrod oiling rather than the standard FE oiling to the rocker shafts, because it uses T&D rocker arms.  I had just normal pushrods with the .080" hole in each end, and I knew that Smith Brothers sells pushrods with restrictors built in.  I mentioned to Blair that I was going to go that route and he thought that was a good idea, just in case the valve covers were being flooded with oil and exacerbating the problem with oil in the catch can.  Blair also came up with another good idea; he suggested making the catch can bigger, and putting a drain back tube at the top that fed back down into the dipstick tube in the block.  This way if the catch can tried to overfill on the road, it would just drain the excess oil back into the dipstick tube. 

I had taken Friday this week off of work in order to get packed for the race, but rather than packing I was up at 6:30 AM working on the car.  First I took a second 1 pint catch can, cut the rounded bottom off it, and welded it together to give the can more capacity.  Then I also welded a #8 aluminum fitting bung in the side about an inch from the top, and ran a #8 line down to the oil filter adapter.  Since this setup uses a remote oil filter the adapter is just a plate with pipe threads leading to the holes in the oil filter pad on the block.  The hole in the block that the oil normally comes from with the stock oil pump was unused, of course, because the Peterson pump is external, so rather than using the dipstick tube as a drainback I just took the pipe plug out of the adapter where the oil hole from the stock pump came out of the block, and fed the drain line right into that.  Seemed like a pretty slick deal to me.

By noon I was finished and went out for another test drive.  This time I went longer, but the problem was still there.  When I got back to the shop I tried to figure out what was happening, and concluded that the catch can had not completely filled up, but was still spitting out some oil.  There was an improvement, but not enough.  Friday morning around 10:00 I had taken a break and called Smith Brothers, and ordered another set of pushrods with .020" restrictors in them.  I specified Saturday overnight delivery to the hotel I'd set up in Bowling Green, KY, where Drag Week 2013 was starting.  So, I figured I'd install the pushrods at the track and see if they helped solve this problem.

Joel and I were going to leave on Friday night but with the time I'd spent working on the car, there wasn't enough time to collect all the tools and equipment, spare parts, etc. that I wanted to take with me and hit the road at a reasonable hour.  Joel showed up with the trailer at my place around 8:00 PM, and we spent the time until midnight packing up and getting ready to go.  Saturday morning at 6:00 AM Joel was back, and we hit the road for Bowling Green, KY.

Saturday's trip was basically uneventful, except for some awful roads in Indiana, and we got into the hotel in Bowling Green around 10:00 PM.  Once in Bowling Green we stopped at a gas station to get some 110 octane race gas, and then at a self service car wash to wash the Mach 1 (I hadn't washed it since last year!).  We were crashed in the hotel room by 10:30 after the long drive, with the alarm set at 7:00 to make it to the track early.

This morning we were out of the hotel by 7:45 and at the track by 8:00.  Along with registration and test and tune for Drag Week, Beech Bend Raceway was running the Holley LS Fest, so there were LOADS of cars everywhere.  First guys we bumped into were Mike Moore and Tom Posthuma; it was good seeing them again.  I have to say that coming to meet up with old friends at Drag Week is a real attraction for me, and one reason why I keep coming to the event.  After getting the car off the trailer and into the tech line we ran into Curt Johnson; he is here with a late model Mustang with BBC power.  Joel and I got to know Curt and his friends from Rockford IL back in 2007 and 2009, when we were running in the same class.  As it happens Curt is also running in the same class as me this year, Big Block Naturally Aspirated Street Race, so we'll be seeing a lot of him.  He is a very strong competitor and it will be a lot of fun racing with him again this year.  Next we bumped into Larry Warpula and his son Clint, who were here running Larry's FE powered 53 Lincoln.  We talked with them for a while, and then ran into Jack Miller and his friend Eugene.  Jack ran his twin Paxton supercharged 68 Mustang at Drag Week in 2007 and took second in the Pro Street Power Adder class, but this year he is running in our class with two 68 Cougars, both with FEs.  Jack is driving one and Eugene is driving the other.  It will be great having those guys in our class too.

We kept seeing more and more old friends as the morning wore on; Keith Turk is the race director and he got me going on what to do to about trying to get into the race, even though I wasn't registered yet.  We talked to his wife Tonya about that, and she said to just stay in the tech line and get through tech, and then come back at 3:00 PM and she would let us know if we got in.  Waiting in the tech line takes FOREVER at Drag Week, and we didn't get all the way through until just after noon, but we got to talk to some more Drag Week competitors like Doc McIntyre and Jeff McConnell, who are running daily driver this year in Doc's other Camaro, and Mike Crow who I think is running his Dart in Small Block Naturally Aspirated Street Race.  The list of old friends went on and on, and despite the heat and humidity at the track the morning went by pretty fast catching up with everybody.

Around 12:30 we finally got through tech, and I pulled the Mustang into some shade at the back of the track, under the Beech trees, to change pushrods (which had arrived as scheduled on Saturday at our hotel), change plugs, and do a few other things to the car.  By 3:00 we were almost done, so we went back up to the Hot Rod tent to see if we would make it into the event.  Turns out they weren't ready to tell us yet; more people were still coming through tech.  But right around 4:00 Tonya Turk called out, "Jay, you're in!"  Boy I was happy about that; I hadn't wanted to have driven all the way down to Bowling Green for nothing.  But our gamble paid off, so Joel and I are running Drag Week 2013.

The class we are in is a big one with about 20 cars and a lot of strong competitors, so we'll see how we do.  But at this point I'm just happy to be here, and hoping for better results than 2011, when we had to bail after the first race with engine problems.  I'll try to post another update tomorrow night after the first race, and hopefully with some pictures.  Wish me luck, fellas!


236
Private Classifieds / Weiand 351C tunnel ram - Sold 7/28/14
« on: August 22, 2013, 08:18:15 PM »
A local friend of mine asked me to put his intake manifold up for sale in the classifieds here. This is a Weiand 351C Tunnel Ram, and would work on one of my 13001 intake adapters.  It has been polished at one point.  It needs another four studs (carb studs work) and eight nuts to hold the plenum in place, and also the gaskets between the plenum and the base.  It has some minor yellow staining on the manifold; a closeup of the worst spot is shown in the last photo.  $350 plus shipping; PM or email me with any questions.  Thanks, Jay

Edit:  Price on this intake is reduced, to $300 or best offer.  PM or email me with any questions.  Thanks, Jay


237
Vendor Classifieds / FE Intake Adapters
« on: August 11, 2013, 03:21:54 PM »
FE Intake Adapter Information: 

FE Intake adapters for low riser and medium riser engines are now available from stock.  FE Intake Adapters for high riser and tunnel port engines are also now available, but machined on an as needed basis; lead time for the high riser and tunnel port variants is 2-3 weeks.  In the case of the high riser intakes, many different variations are available, so contact us with your specific requirements.

Please visit the following links for further information or to purchase one of these intake adapters.  Payment can be made with Paypal, Visa or Mastercard, personal checks or money orders:

Low and Medium Riser heads:       http://www.fepower.net/Products/feiamr.html

High Riser heads:         http://www.fepower.net/Products/feiahr.html

Tunnel Port heads:         http://www.fepower.net/Products/feiatp.html

More information on the intake adapters is given below:

- Price:  By way of explanation, there are two separate castings that are used to make the different versions of the intake adapter, the medium riser casting and the high riser casting.  The high riser casting is heavier and more expensive. 

       The standard medium riser adapters use the medium riser casting; the price for any of these adapters
         (part numbers 13000 through 13099) is $569.00

       The high riser casting is used for the later Blue Thunder medium riser heads, and also for all the high riser variants; price for any of these
         adapters (part numbers 13100 through 13199) is $689.00.  If you are purchasing the #13101 high riser manifold that allows the use of a 351C
         intake manifold, you will also require the #13201 port plates; these are machined together with the intake adapter to make the 351C intake
         fit.  Price of the port plates is $125.00, in addition to the price of the intake adapter, for a total cost of $814.00.  If you just want one of the high
         riser castings to use as a base for a sheet metal intake, the port plates are not required.

       Pricing for the tunnel port version of the adapter is $779.00; the tunnel port version starts with the high riser casting, and
         is more expensive than the high riser version because of the added  cost of adding the tubes in the tunnel port adapters.  Also, the
         tunnel port adapters are only available with straight-through ports; after looking at trying to make a 351C intake work with the TP port
         location, it just doesn't look practical without a major bend in the ports.  So the tunnel port adapter would be useful for building a sheet
         metal intake manifold, or possibly for adapting a Pontiac Ram Air V intake to  the FE tunnel port engine.

All these intake adapters include the machined manifold casting, the large machined access cover plate, the smaller machined road draft tube cover plate, O-rings to fit both of these removable plates, the water bypass nipple, and 6 allen head bolts required to install the intake adapter. 

- Terms:   Payment can be made via Paypal, Visa or Mastercard, money order, or personal checks drawn on US banks.  If you send a personal check we will hold the intake adapter for 7 business days prior to shipment.  We ship to US destinations via UPS, and international destinations via the US Postal Service.  If you are outside the US, you are responsible for any duties and taxes due when the intake adapter enters your country.

- Delivery:  The intake adapters will be shipped within 3 days of receiving payment via Paypal or money order, and within 7 days of receiving payment via personal check.  Shipping charges are figured individually for shipment via UPS in the United States, and via USPS for international destinations.

- Returns or Refunds:  We will do our best to ensure the quality of these parts, and work with anyone who is not satisfied or unhappy with this purchase to attempt to rectify the situation.  However, because of the small percentage of people who abuse return and refund policies, FE Power LLC sells these parts AS IS, with no warranty regarding fit and finish, and no returns or refunds available.


- Options:  There are several part numbers of the intake adapters available; see the description and photos below. 

     Part #13001 adapts the standard 351C 4V intake to the FE. 

     Part #13002 has the FE ports coming straight out (rather than curving in to fit the 351C intake), so that a custom intake manifold like a sheet metal intake can be made starting with this intake adapter.

     Part #13003 has a starter hole only machined in each port location, for anyone who wants to do their own porting work on the manifolds. 

     Part #13004 is the same as #13003, except that there are no machined port openings in this adapter.

    Part #13006 is for a Yates style 351C intake, like the Edelbrock 2991 or 2863.

    Part #13101 is the standard part for high riser intakes.  Please note that in order to make a 351C intake manifold work with the high
      riser adapters, a 3/4" spacer plate is required (described below).

    Part #13103 is for the later Blue Thunder Medium Riser cylinder heads and a standard 351C 4V intake.

    Part #13180 is the standard part for the tunnel port intakes. 


For part numbers 13002 through 13004 above FE Power also has available, for $125.00, a pair of 1/2" thick aluminum flanges that bolt to the manifold, and can be used as the starting point for a sheet metal intake.  These flanges seal to the intake adapter with O-rings that are included with the plates.

For the intake adapters designed for use on high riser heads, such as part #13101, a 3/4" spacer plate is available for $125.00/pair that will allow a 351C 4V intake manifold such as an Edelbrock Torker or a Weiand tunnel ram to bolt onto the intake adapter.  These spacer plates are also available with no ports machined, for use as the starting point for a sheet metal intake.  The plates seal to the intake adapter with O-rings that are included with the plates.

For the intake adapters designed for use on the tunnel port heads (part #13180), 3/4" spacer plates are also available for $125.00/pair, for use as a starting point for a sheet metal intake.  These spacer plates have the round tunnel port ports that match up to the intake adapter already machined, and seal to the intake adapter with O-rings.

IMPORTANT - Every 351C intake that we have looked at requires some modification in order to be used with the intake adapter.  The front rail of the 351C intake needs to be cut away so that it doesn't interfere with the water jacket on the intake adapter.  This can be done with a hacksaw and/or a die grinder, or you can ship your manifold to FE Power and we will machine it to fit.  We charge $85 per manifold for this service.  Currently we have programs in place for the 351C Performer RPM, the Edelbrock Torker, and the Weiand tunnel ram.  If you have a different manifold that you want to use, we will be happy to develop the programs to modify it but this will add some time to the process.  Needless to say, modifying a 351C intake manifold to work with this intake adapter will make the manifold unusable on a 351C engine.

Also, the Yates style manifolds must have their flange surfaces machined thinner in order to work with the #13006 intake adapter.  Again we offer this service for $85.00.

Finally, if you have any special options that you would like for your intake adapter, such as a change in pushrod hole size or location, or no pushrod holes at all, we will be happy to try to accommodate your request; email us to discuss.

Please feel free to email us with any questions on these adapters, or post them here if you prefer.  You can contact us via email at jayb@fepower.net

The photos below show the #13001 intake adapter.  The adapter shown in these photos has not yet had the thermostat housing holes or water pump bypass tube hole drilled and tapped, and also does not show the center cover plate and road draft tube cover plate:


The photo below shows the 13003 intake, which is delivered with machined starter port openings:


The photos below show the 13002 intake, which is delivered with FE sized ports coming straight out of the adapter.  The second photo shows the manifold from the side, so you can see the port configuration.  The third photo shows the 13002 intake with the port plates installed.  These plates are available as an extra cost ($125.00) option for this adapter, as a starting point for a sheet metal intake.  The fourth photo shows the plates themselves; on the side of the plate that bolts to the adapter, there are O-rings to seal the ports, so that no gasket is required.  The O-ring grooves are spaced farther away from the inboard side and top of each port, to allow plenty of room for porting.


The photos below show the 13004 intake adapter.  This adapter is delivered with no port openings whatsoever; it is basically a blank canvas for port work.


The photos below show the 13103 intake adapter.  This adapter starts with the high riser casting, and is designed to work with the later style Blue Thunder medium riser heads.  These heads have larger port openings than a standard medium riser head, with the roof of the port raised and the port widened.  The high riser casting is used to make this intake adapter, because the standard medium riser casting does not have enough room above the Blue Thunder ports for a good seal to the intake gasket.  Also, due to the width of the port in the Blue Thunder head, the intake pushrod holes are moved towards the center of the engine by 0.250" on these adapters.  Note that for these adapters some porting work in the roof and the floor of the port will be required for best flow.


238
In this month's Ask Anything column that Jeff Smith answers, there are some interesting comments about running hydraulic roller lifters on a solid roller cam.  The question was can you run hydraulic roller lifters on a solid roller profile.  My take on this has always been that a solid roller lifter profile has a take-up ramp, to take up the lash gradually before the ramp really starts accelerating.  So, with a hydraulic roller where there is no lash, there should be no problem following this ramp and a hydraulic lifter will work on a solid profile.  On the other hand, if you try to run a solid lifter on a hydraulic cam profile (roller or flat tappet), since there is no takeup ramp you will smash the lifter into the lobe and potentially cause lifter damage.

However, in the column Jeff Smith claims almost exactly the opposite case.  He says that after talking to Crane Cams the issue with running a hydraulic roller lifter on a solid lifter profile is that the uneven ramp acceleration rate due to the solid lifter's take-up ramp causes uneven pressure loading in the oil chamber of the hydraulic lifter.  He says that again, according to Crane, this can cause damage to the lifter and even blow them apart. 

Also, he claims that running a solid lifter on a hydraulic cam can be successfully accomplished if you limit the lash on the lifter.  The number they gave is .004" to .006" for the lash.

I'm not sure I'm buying these arguments, but they are interesting in any case.  What do you guys think?

239
FE Technical Forum / Blue Thunder Plenum Modifications
« on: June 16, 2013, 12:54:08 PM »
Note:  I got the email below from Greg S, who was doing some plenum mods to his Blue Thunder intake.  As it happens I have some data on that, and thought this topic may be of general interest, so I posted it here - Jay

Hi Jay, I have your intake comparo and have been pouring over it for months.  I’m building a stroker motor to go in my 68 Mustang.  I’ve been looking for an intake that with fit under the ram air stuff and I settled on the Blue Thunder medium riser intake since it was a consistently good performer, matches the E’bock intake ports and has the closest to the stock CJ setback.  My brother-in-law and I worked over my Blue Thunder intake to fit under my ram air system.  We lowered the carb base 0.275”.  The medium riser BT does not have the exhaust cross-over so I will leave out the 0.28” phenolic spacer.  After cutting the carb base I ended up with a front height of 4.6” as compared to the CJ front base height of 4.405 (including the spacer which I will leave out).  Right now I have a PI intake on it, which has a front base height of 4.65 (including the spacer).  The BT intake will be a touch lower than the combination I’m running now, plus the setback is only 1/8” more than the stock CJ and is 1/8” less than the PI.  All in all this will be a pretty good fit under my ram air, less than 0.2” taller than stock and only 0.125” more set back than stock.  The BTInt4a and BTInt5a images show close ups of the base after the cut.  The minimum carb bolt depth is 0.45” so I should had plenty of thread strength (but probably not enough to lift the engine by the carb pad).  We set up the intake on the milling table using the line at the back base mounting flange and a 1.676” pin in the front locating pin mounting hole. We just used a trial and error method with a plumbers level to determine how long the pin should be (btw, I read/heard that the stock carb base was 7° off level, but our process ended up with 4.8°). The BTInt7a shows the locating pin socket on the bottom of the intake and BTInt6a shows the locating pin we made and the plug we made for the oil filler tube hole.  The plug is 0 .85” tall and 1 3/8” – 0.003”(for clearance).  When I get ready to install the plug I’ll put several center punch divots in the side to tighten up the clearance to a friction fit and coat it with silicone to seal it.  The BTInt3a shows the plug sitting in the hole.

I think I’m pretty happy with how this came out.  This intake will fit ok under any ram air system.  It’s only 1/8” more set back and 0.195” taller than the stock CJ(with spacer).  I think if I was doing it again I would take off 0.375”.  Then everything would be within 1/8”.

I hope this information will prove useful.   I didn’t write this email to brag about what we did , but to get some information.  Cutting down the base decreases the plenum volume that I probably want to restore.  I figured that if anyone had information on what the best plenum modification for the BT would be, it would be you.  So “help Mr. Wizard”.  Do you have any information or images of BT intake plenum modifications?  Would it ok to cut the back side of the plenum divider all the way down to the top of the highest runner?  Got any ideas on this?  Thanks in advance for any help you can give me.

Greg


240
Member Projects / 577" SOHC
« on: May 11, 2013, 04:27:29 PM »
With all the other stuff I've been trying to get done over the last several months (CVR water pump adapters, clear valve covers, FE intake adapter, 4th CNC axis, FE + Tremec TKO in my '68 Mustang driver, etc.) it has been difficult to make time to work on one of my existing car or engine projects.  I had plans to get the Mach 1's engine back out of the car for further development work, and also to get my 69 Shelby clone rewired for a different EFI system, plus put the engine on the dyno (which I ran out of time to do before Drag Week last year).  Finally I concluded that I really couldn't do both of those cars, so I decided to just try to get the Shelby clone together and get some racing in this summer.  About a month ago I pulled the engine back out of the car, having never fired it after installation, and got to work on some of the modifications I had wanted to do before I ran out of time last year.

First on the list was an improved target for the crank sensor, which I've already finished up.  Next was going to a dry sump setup on this engine.  I'm thinking that this will provide a big benefit on this motor because room for the oil plan is limited due to the front suspension arrangement, and with 577 cubic inches this thing could use some crankcase vacuum and reduced windage inside.  I got in touch with Peterson Oiling Systems and after discussing the project with one of their tech guys, I purchase a six stage dry sump pump and one of their drag race oil tanks.  This weekend I've been working on (among other things) getting the pump mounted on the engine.

Here's a couple pictures of the pump.  The 1" thick aluminum plate next to it came as a 6" long plate that bolted to the tabs on the side of the pump.  The idea is that you can machine or cut this plate however necessary to mount it to the engine.  I figured out how I wanted to mount it and machined it into the shape shown in the pictures:


The first three inlets on the bottom of the pump go to pickups in the oil pan.  I'm going to be modifying the pan I've already got for use with the dry sump, so I bought three of Peterson's pickups along with the pump.  The fourth and fifth inlet are also suction inlets, and one of those will go to each cylinder head.  The sixth inlet is for the pumping section, not a scavenging section, and it gets oil from the oil tank.  When I called Peterson I figured I wanted a five stage pump, which is the usual configuration, with three pickups in the pan, one in the valley, and one for the pressure section.  But for the SOHC there really isn't a bunch of oil in the valley, because there aren't any lifters.  All the oil is up in the heads, and drains back down at the rear of the head or the front, into the timing cover.  So we decided it would be best to scavenge the oil in both heads rather than the valley, and so a six stage pump was needed.

I was going to require a remote oil filter with this setup, so I figured I'd use the factory oil filter bracket mounting location to mount the pump.  Of course there are two holes there, one for the passage from the stock oil pump to the filter adapter, and the other from the filter adapter into the block.  I didn't need to use the passage from the stock pump, but I was figuring I could machine a piece of aluminum that would fit up to the passage into the block, and then use an AN fitting on the aluminum piece to get oil from the dry sump pump into the block.  But as I started working on this it dawned on me that since this is a Shelby block, there is a tapped main oil passage coming out of the side of the block already, and I could just feed the oil in there.  So I decided to seal off the oil filter pad completely with the machined piece of aluminum, which made the machining operations a lot easier.  Here's a photo of this machined block bolted in place on the engine; you can see the pipe plug for the main oil gallery right above it:


The three holes towards the front on the flat part of the block are needed to bolt on one more spacer block just to the inside, to move the pump inboard somewhat.  Originally I hadn't planned on this, but when I mounted the pump to the block as shown it hung out to the side of the engine a little too far.  After making this spacer block I bolted everything together; here's a couple of pictures:


Now that I have this assembled I know the spacing between the pump shaft and the crank, so I can order the HTD pulleys and belts I need from Peterson to get the pump hooked up.  Next step will be to pull the pan and start modifying it for use with the dry sump pump.

I've also recently acquired some new cams for this engine.  I've been working with the guys at Comp Cams on a custom grind, because I think even their largest cams are a little small for this engine.  It took several weeks to get this done, but finally the cams arrived on Thursday this week.  Thursday night I set one of them up in the right head, and checked piston to valve clearance and ran a profile on the grind to compare it with my existing cams.  Here's a photo of the checking setup:


These cams will give about 5 more degrees of duration and .030" lift than my current set of cams, at the cost of reducing the base circle size of the cam.  Reducing the size of the base circle is something you never really want to do if you can avoid it, but since my high ratio SOHC rocker arms look like they are a long way off at this point, this was the best I could do to get a little more out of the valvetrain.  We will see how it performs on the dyno, when I get there.  Just to check out the new cams with the existing springs I've got, I'm going to send a test head and cam to Bill Conley so he can wring them out on his Spintron machine.  I'm looking forward to seeing some good video, and hopefully these cams will run to 8000 RPM with the springs I've got.  We will see...

Pages: 1 ... 14 15 [16] 17 18 ... 25