Show Posts

This section allows you to view all posts made by this member. Note that you can only see posts made in areas you currently have access to.


Topics - jayb

Pages: 1 ... 8 9 [10] 11 12 ... 25
136
FE Technical Forum / How to make your own fiberglass bumper
« on: April 07, 2016, 12:14:31 AM »
One of the things I wanted to do to my race car this year is try to lighten it up a little bit.  I've been trying to come up with various small projects to take about 100 pounds total out of the car.  One of the first thoughts was to swap out the bumpers for fiberglass copies.  The front bumper on my car is not available commercially in fiberglass, so I decided to build one in fiberglass.  This is a lot of work for a fairly minimal weight savings, probably only 20 pounds between the bumper and brackets, but that weight is hanging way out in the front of the car, and my car is relatively nose heavy, so I thought it would be a worthwhile project.  Back in my model airplane days I did a lot of work with fiberglass on very large models using multi-piece molds, so this wasn't a particularly difficult project in comparison.

The first thing you have to do is mount the piece you want to duplicate on a parting board.  This is just a flat surface that the part mounts on and seals to, so that the fiberglassing chemicals don't leak all over the place when you lay up the part.  The picture below shows the original bumper, some 2X12s I cut up for support, and a couple of pieces of masonite to form the flat surface:
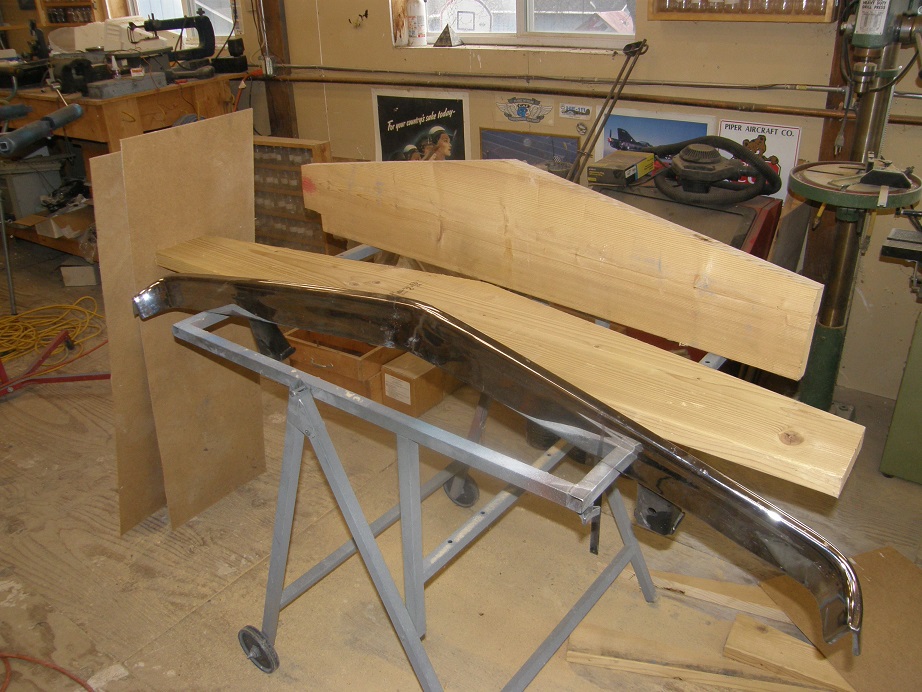


Here's the parting board put together.  The holes in the board are for the brackets that are welded to the bumper.


The bumper is placed on the parting board and bolted in place to some of the wood framework underneath, with the factory brackets:
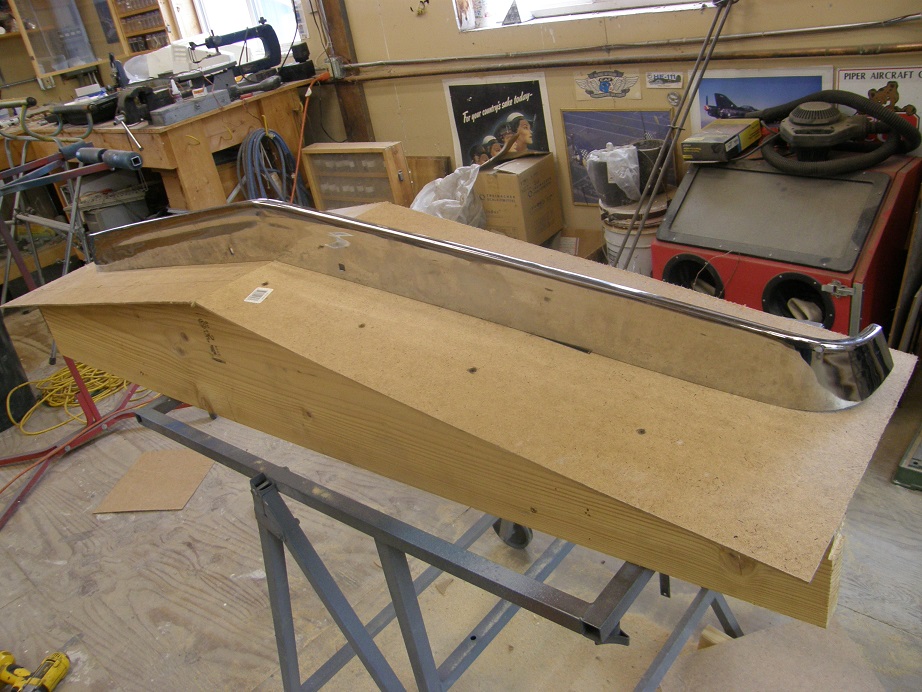


In this case one side of the bumper fit up nicely with the parting board, but the other side had a pretty big gap, as shown in the photo below:
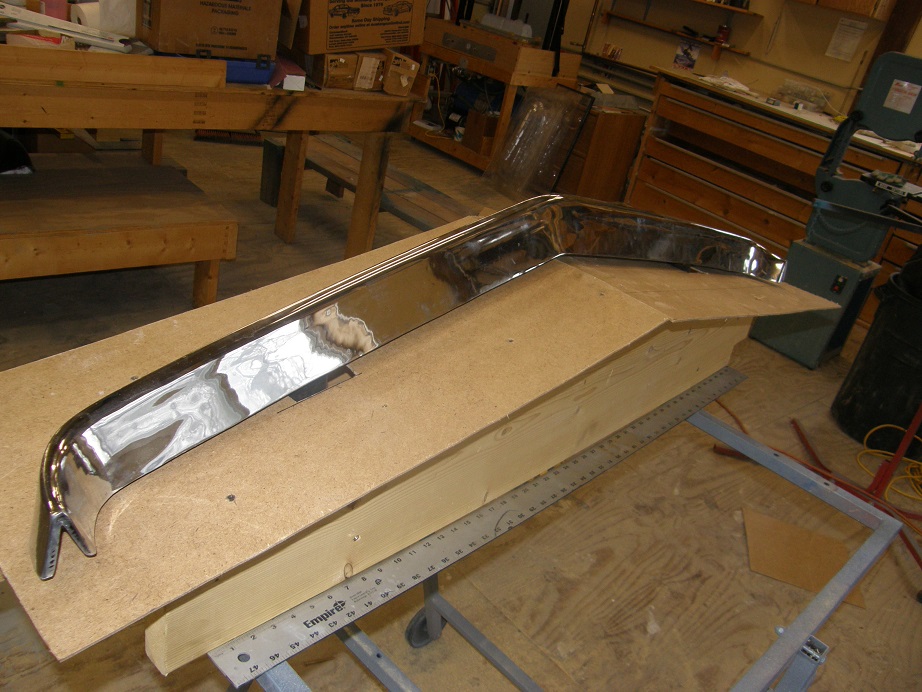


The way to handle this is to build up some masonite on the parting board wherever there are gaps, to minimize any gaps between the bumper and the parting board, as shown in the photo below:
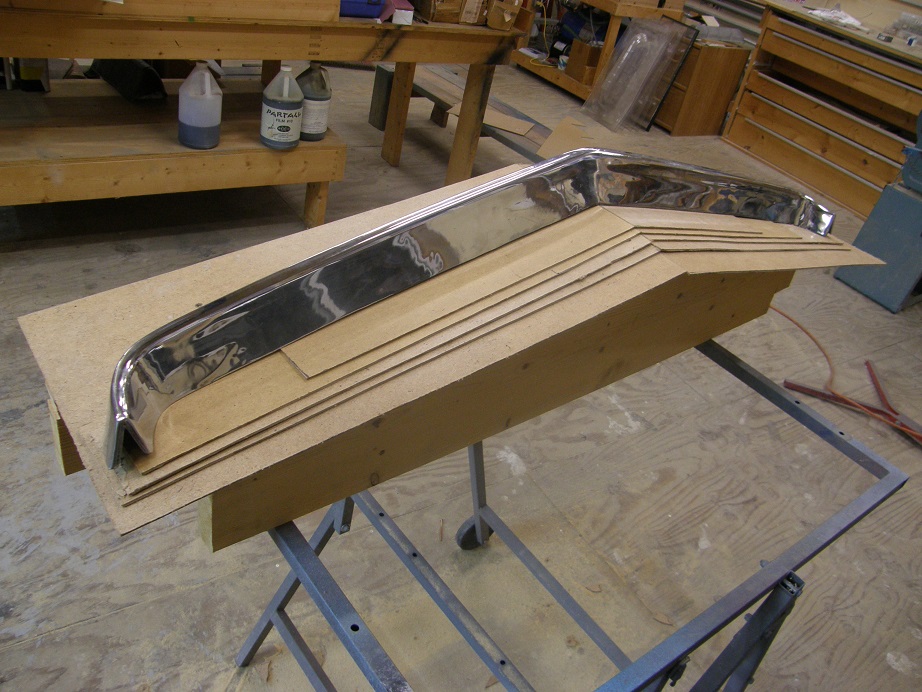


Finally, to get ready to make the mold, you use clay to fill in any remaining gaps between bumper and the parting board, and also between the pieces of masonite:
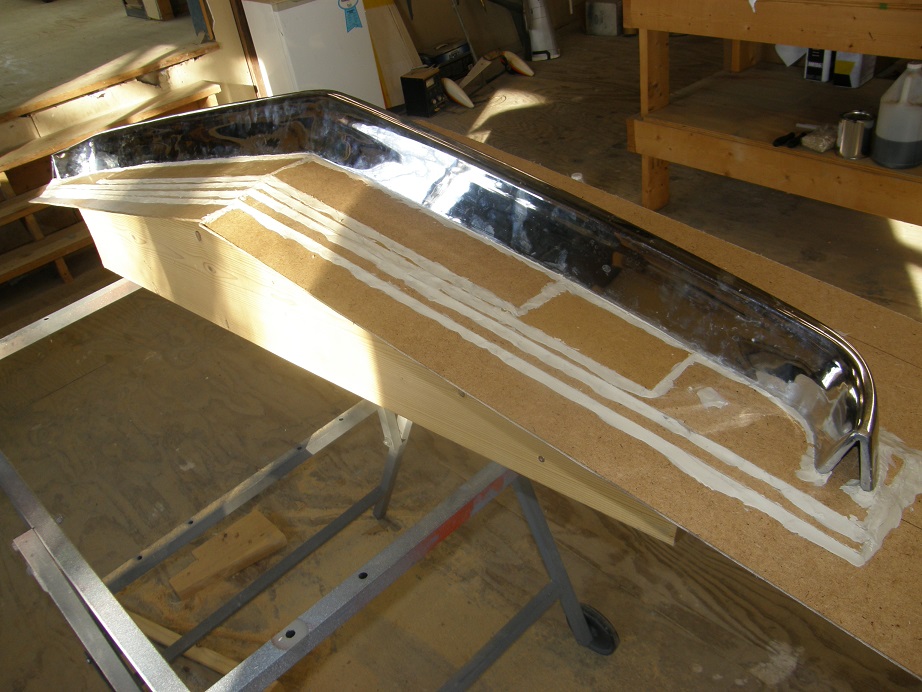


Now that the part you want to duplicate is in the parting board, you have to apply mold release.  This is a two step process.  First, using a wax called Partall #2, you wax the part and the parting board.  You apply the wax just like you are waxing a car; apply, let dry for a few minutes, and then buff.  Three coats are required, with about one hour drying time between each coat.  After the last coat is dry, you spray on a chemical called PVA (Poly Vinyl Alcohol).  This is a water soluble chemical that forms a skin on top of the wax.  You don't put on too much, just mist it on in a couple of light coats, and let it dry.

After the PVA is dry, maybe an hour later, you can start the layup.  First part of the layup is spraying on the gelcoat.  This is a fairly thick polyester product that puts a hard skin on the surface of the mold.  I use tooling gelcoat, which is designed to handle the rigors of pulling many parts from the mold, even though I planned to just make one or two bumpers.  I have a special gun for spraying gelcoat, because it is so thick, but a cheap pressure pot style gun will also work; I used one of those for several years.  The gelcoat has to go on to a thickness of around 20 mils; I have a cheap thickness gauge that you can put into the wet gelcoat that measures its thickness.  If you go too thin, it doesn't want to cure, and if you go too thick, it will tend to wrinkle, so you have to be careful at this point.  The gelcoat is a polyester product and is catalyzed with a chemical called MEKP, which is the same thing used to catalyze polyester resin.  After you catalyzed the gelcoat you have to spray it within 15 or 20 minutes, otherwise it will start to set up in the mixing cup.  The photo below shows the bumper and parting board sprayed with the gelcoat:


Usually within an hour or so the gelcoat will start to set up after spraying.  When you can touch the gelcoat with your finger and no gelcoat transfers to your finger, you are ready to start laying up the fiberglass.  For molds I use fiberglass matte, and cut it into pieces that can be laid up against the part.  Fiberglass matte is basically random fiberglass fibers, rather than cloth, held together with a binder that dissolves in polyester resin.  You mix up a pint or so of polyester resin and MEKP, and using a disposable paintbrush start laying the matte on the part and soaking it with resin.  As the binder breaks down the fiberglass fibers start to stick to the part and parting board.  You cover the whole works with one layer, and then do it again.  I put a total of four layers on this mold, to make it fairly rigid.  Here's a picture of the layup at this point:


Next is a part where timing is somewhat critical; this is trimming the excess matte from the mold.  When the polyester resin starts to set up, it can be easily cut with a utility knife.  However, if you wait too long, no way a knife will cut it, and you will have to use a cutoff wheel to trim the mold outline, which is a pain and will put fiberglass dust all over the shop.  I tend to check the layup every five minutes or so, and just hang around until it will cut easily without tearing.  Here's a picture of the trimmed mold layup:
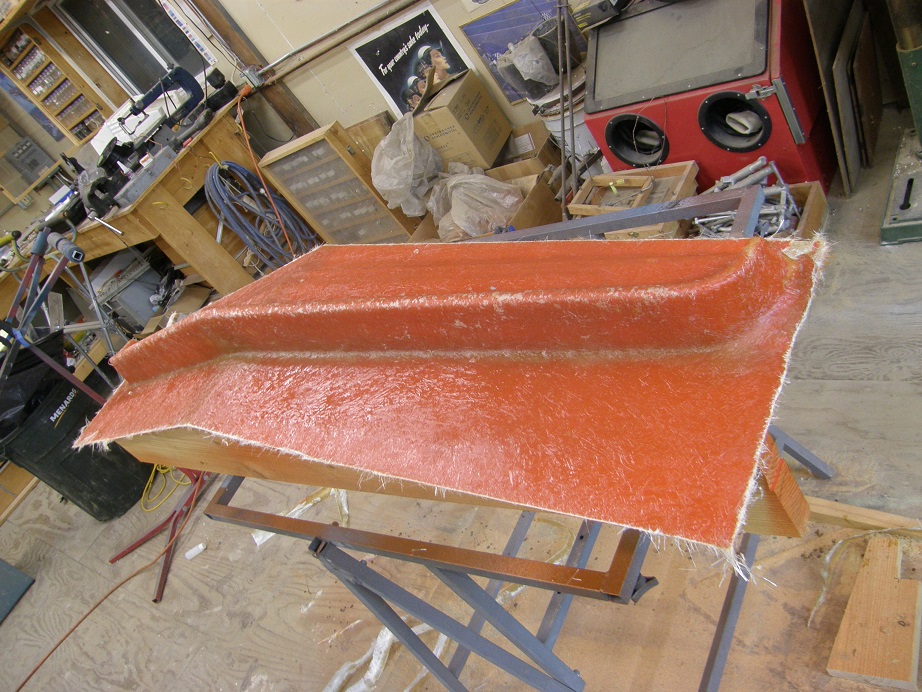


After letting the mold dry for 24 hours, you can pull it off the part.  This is the hardest and most nerve wracking part of the whole process.  The mold will separate from the parting board pretty easily because it is flat, but pulling it off the bumper is a challenge.  I have a bunch of plastic wedges I use to put pressure on the mold, and after half an hour of screwing around it finally released with a loud crack.  I'm always worried about breaking the gelcoat during this step, but usually it comes out OK.  However, if your layup does not have sufficient draft, you may have to break the mold to get it off the part.  Fortunately, this bumper had plent of draft, so the mold came off looking just fine:
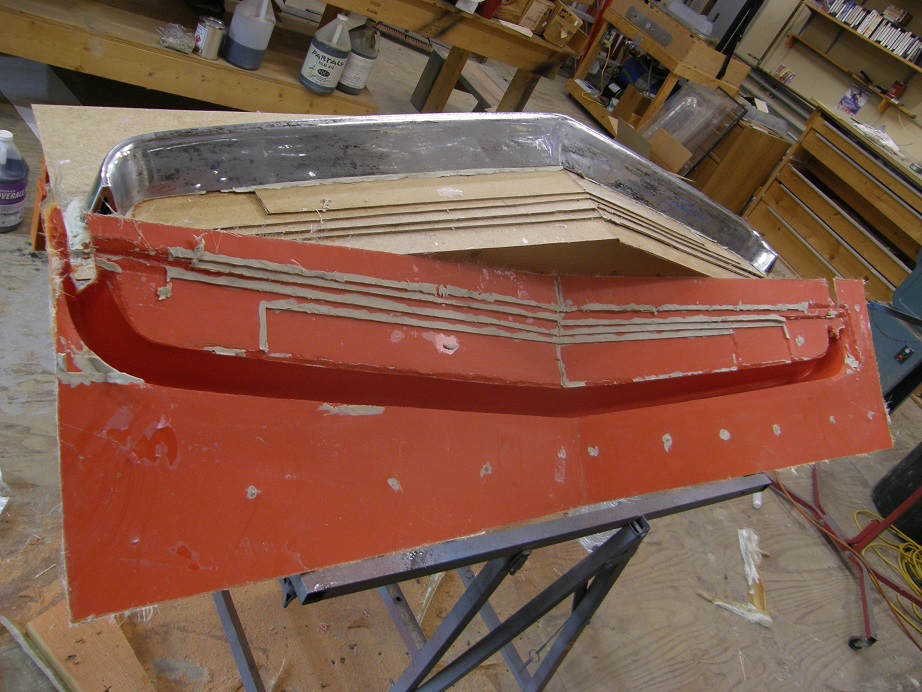


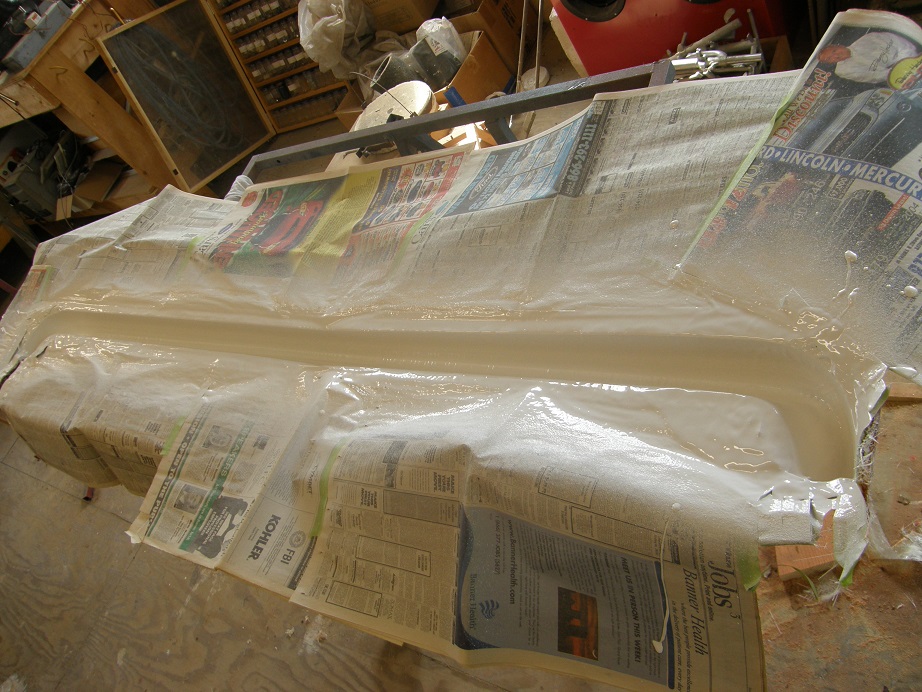
I like to let a mold like this fully cure for a few weeks before trying to pull a part from it, so that's what I did with this one.  After that time had elapsed, I used soap and water to thoroughly clean the mold and prepare it for making a part.  Then, the whole process basically is repeated.  The mold is waxed three times, then sprayed with PVA.  After the PVA is dry, the gelcoat can be sprayed into the mold.  I used regular part gelcoat for the part, which is white.  I also masked off the parts of the mold that weren't going to be the bumper.  Here's a pic of the mold with the gelcoat sprayed:


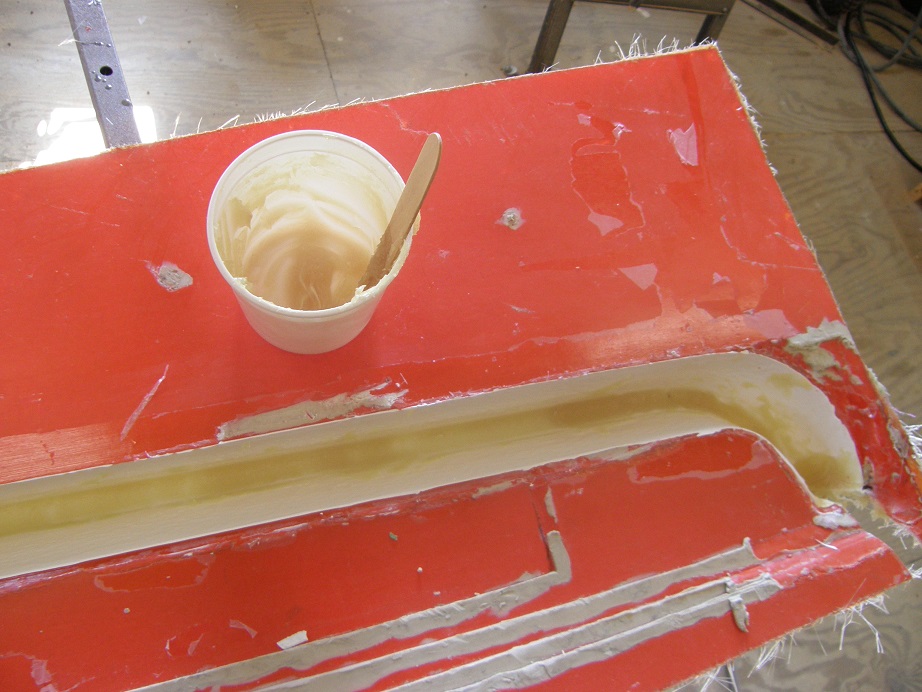
In order to keep the bumper strong yet lightweight, you use fiberglass cloth to lay up the part, not fiberglass matte.  Pound for pound cloth is a lot stronger.  However, cloth is woven together and not attached with a chemical binder, so it doesn't conform into tight corners as well as matte does.  So, in order to take the sharpness out of the corners, you use a dry powder called Cabosil, and mix it with some polyester resin to form a paste.  I use a tongue depressor to fillet all the sharp corners in the mold with this Cabosil paste, to make it easier to lay up the cloth into the mold.  You don't want gelcoat in the mold that is not backed up with some solid material, so the Cabosil addresses this issue.  Here's a picture of the mold after the masking paper has been removed and some of the Cabosil paste has been put into the corners of the mold:


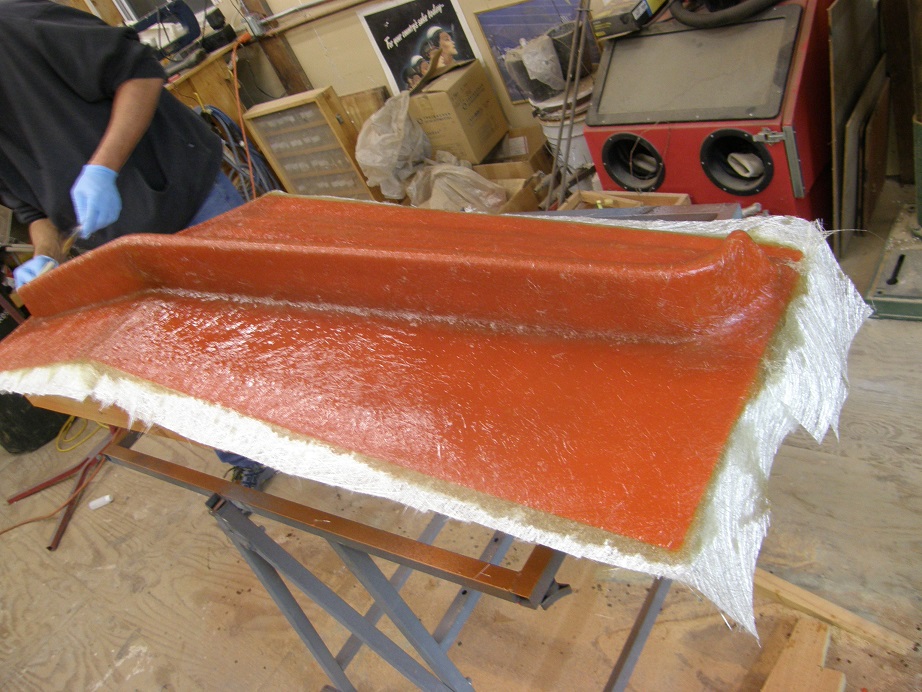
Next you mix up some more polyester resin and MEKP, and after cutting the fiberglass cloth into strips, start laying it up into the mold.  I started with two layers of four ounce cloth, and then finished with two more layers of six ounce cloth.  Its a good idea for strength to put the cloth layers in at different angles, rather than all lined up together, so I laid the first section of cloth in at 45 degrees from the length of the bumper, and the next section along the length, then repeated this with the six ounce cloth.  Here's the layup at this point:


Once again I checked the layup every few minutes to see when it became easy to cut with a knife.  Took about an hour this time before it was ready, then I trimmed the excess fiberglass cloth at the edges of the mold.  I left some cloth at the ends, so I had something to pull on to help get the bumper out of the mold:
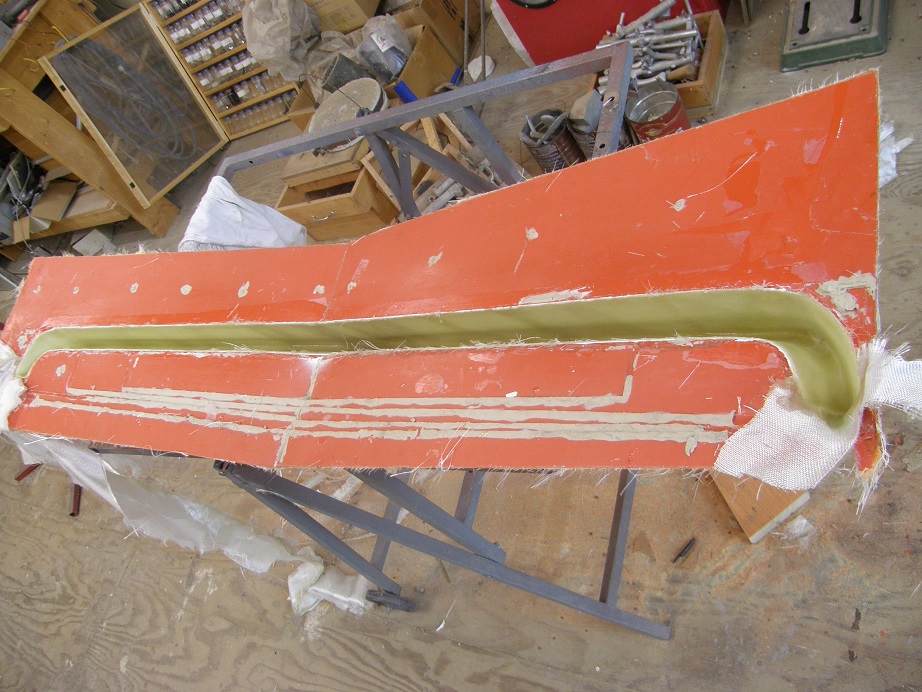


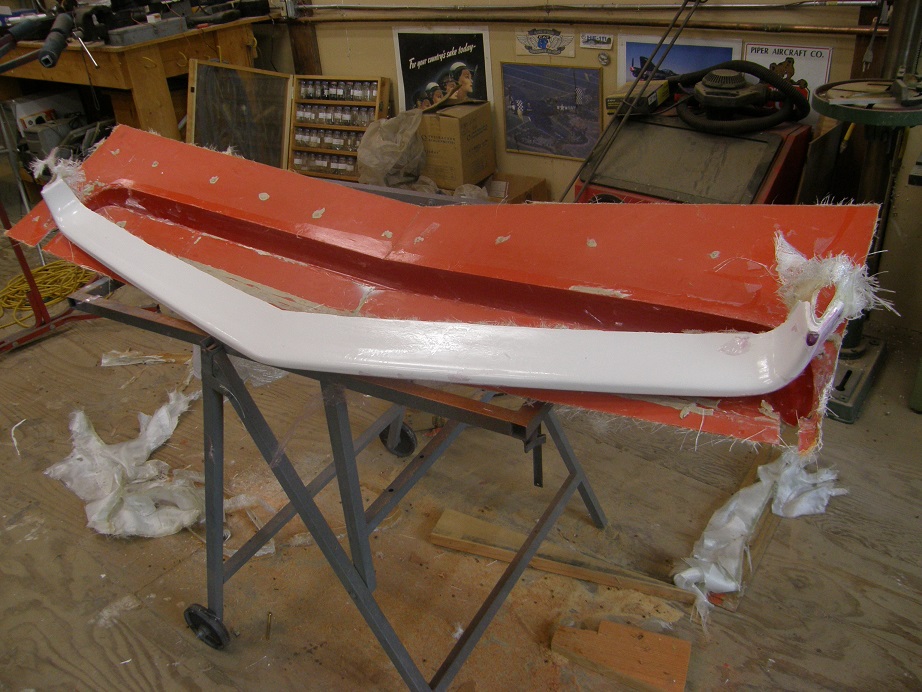
After 24 hours I got to work removing the bumper from the mold.  I used my plastic wedges to work between the mold and the part, to help break it loose, and finally after 20 minutes or so I got one of the ends pulled up, and then the rest of the bumper came out without any trouble.  Here's a picture; the purple residue you see on some parts of the bumper is PVA that is still attached:


From here I have to sand the bumper's edges nice and smooth, clean it up and spray it with some primer, and then figure out how I'm going to mount it to the fiberglass bumper brackets that I got from Crites.  When I've got it successfully mounted on the car, I'm going to pull it off and try one of those spray-chrome products to see if I can make it look as much like chrome as possible.  I also purchased a rear fiberglass bumper from a fiberglass place, so I will try to chrome that one at the same time.  I will report back on my results with the chrome stuff when I have them - Jay

137
Non-FE Discussion Forum / Y-Block Magazine column
« on: March 19, 2016, 04:54:02 PM »
My friend JC writes a column for Y-Block magazine called "Yestertech/The Y Files", and the January/February column covered the Engine Masters contest.  I found it extremely entertaining!  Here are a few excerpts; comments in brackets [] are mine:

"What's this?  A Y-Block on the cover of Hot Rod Magazine?  It's...it's the end of days, swarms of locusts will soon appear, the sky is falling."

"60 plus years in the making.  Yeah, it was extra-citing at first, but was it necessary to point out SIX TIMES [in the Hot Rod article] that Jon Kaase's former Y-Block has a scrub [Chevrolet] intake on it?  Last October Jon was quick to point out that the side-by-each vertical ports is not a scrub invention, Olds, Caddy, Studebaker and Lincoln had them years before the Johnnie-come-lately, me-too, look-alike followed suit.  It would have been a good thing to repeat what Jon said to educate all the slack-jaws out there."

"Ted Eaton's True Blue Y-Block put on an amazing display of power and torque using a common dual plane single four intake, practically off-the-shelf headers,and readily available parts for the rest of the engine.  Royce Brechler bought the Schoenfeld 1.75" stepped to 1.875" headers from Speedway and I welded on the Y-Block flanges.  Piece of cake and very reasonable."

"Ted's Y-Block, without the the sex-change, produced 92% of what "Caitlin - Y" produced and that was with a last minute unfortunate need to use a cam intended for rpm well past the mandated 6,000.  Horsepower per cubic inch:  Ted - 1.497, Jon - 1.460."

Lots more good stuff in that column, and also in the magazine.  In case anyone is interested, Y-Block Magazine has been around for 23 years, US subscriptions are $33.50 for six issues per year, contact yblockmag@yahoo.com for more details.

138
Non-FE Discussion Forum / Bogus emails from admin@fepower.net
« on: March 15, 2016, 08:06:28 AM »
Just wondering if anybody else has received these?  I've received a couple over the last week; apparently some spammer or hacker is spoofing the fepower.net domain name and sending out bogus emails that look like they are coming from admin@fepower.net, with attachments that are probably viruses or malware of some sort.  Please note that the only legitimate email address from fepower.net is mine (jayb@fepower.net), and if you get something from another similar address, it is probably bogus.  Thanks, Jay

139
FE Technical Forum / Driveshaft Speed Sensor
« on: March 13, 2016, 09:16:42 PM »
I'm in the middle of making a few changes to my race car, and thought that this one might interest a few people.  Last year the car was running way to much RPM, about 7700 through the traps during Drag Week, where power peak on the engine is around 6600-6800.  I wanted to bring the RPM down some, so the first step was to change out the 4.29 gears for some 4.11s.  In addition, the street tires I'm running are only 28" in diameter, and with the radiused wheelwells they look just a little small when they are on the car.  So, I'm upgrading to a set of 30" tall tires.

These two changes taken together make it practical for me to drive the car on the street without the Gear Vendors overdrive.  So, along with these changes I decided to remove the GVOD to save some weight, plus add an aluminum driveshaft to save a little more.  The transmission is an ATI Superglide, but when I bolted the normal tailshaft housing onto the trans in place of the GVOD unit, one problem immediately became apparent:  The ATI transmission tailshaft housing has no provision for a speedometer.

With as much street time as this car sees I didn't want to be running around without a speedometer, so I spent a little time investigating my options.  I have a complete set of Autometer gauges in the car, including the speedometer, and when I checked Autometer's web site I found that they had an electronic speedometer available in the same style as my other gauges.  After downloading the directions for the electronic speedo, I figured out that I could use the same kind of magnetic sensor as a pickup for the speedometer as I'm already using for cam and crank sensors on the engine.  So this looked like a pretty good fit.

The byproduct advantage of the whole issue was that I would get a driveshaft speed sensor installed in the car.  This could work with the speedometer, and the output could also be datalogged by my EFI system.  A driveshaft speed sensor is really a nice sensor to have, because it lets you determine if the car is spinning the tires at the track, and also gives good information to help you dial in your clutch or torque converter.  I've been threatening to install one for quite a while now, but there was going to be a lot of fabrication required, so I hadn't gotten it done.  This weekend I decided to do it.

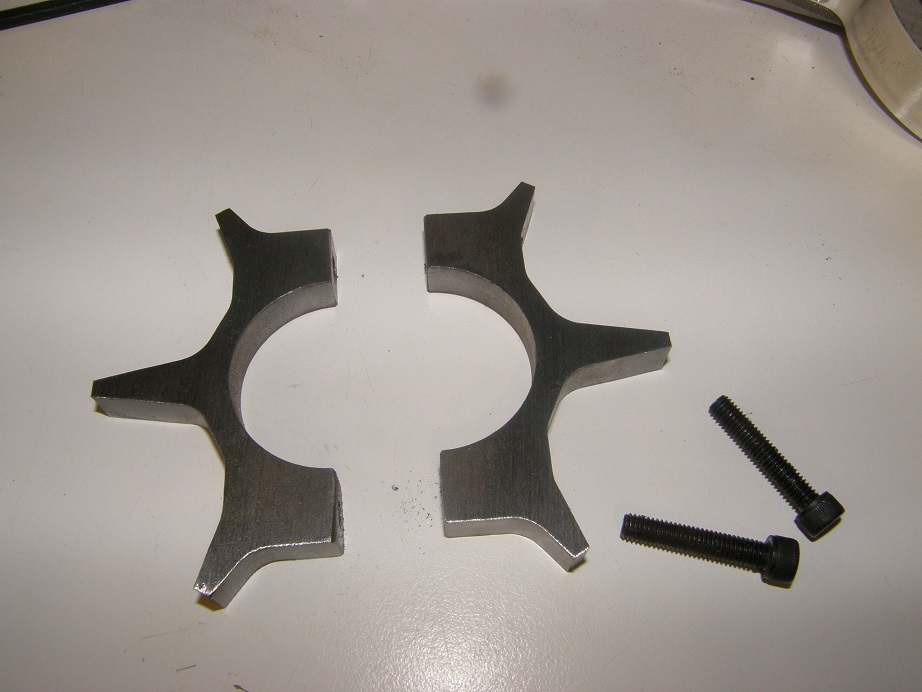
My business background is in magnetic sensors, and I know that the gear or "target" that the sensor has to pick up is critically important for good performance.  The sensors that I'm using, which are Cherry GS1001 Hall effect sensors, give a suggested gear tooth profile in the data sheet, so I used that as a starting point and designed a six tooth gear that would clamp in place around the driveshaft yoke.  I wrote a CNC program to machine the target in two parts, and then after cutting them out of cold rolled steel I drilled and tapped them so they would bolt together around the yoke.  Here's a picture of the target:


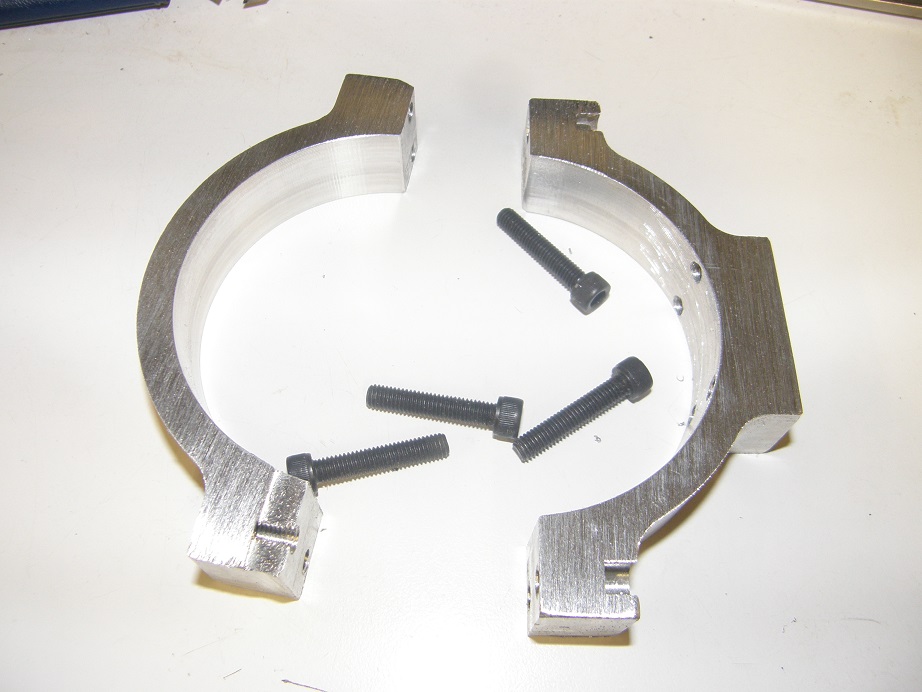
Next I had to design and build a bracket that would hold the sensor.  Attaching it to the chassis didn't make a lot of sense to me, because the transmission mount is rubber, and the air gap between the sensor and the teeth of the target is pretty small, around 0.060".  The logical place to mount the sensor was with a bracket attached to the tailshaft housing of the transmission, and fortunately for me this is a machined section on the ATI Superglide.  I made up a drawing of what I wanted then machined the first part of the bracket out of aluminum.  As often happens with my first time machining programs, a couple of minor machining errors crept in, but the part was still usable; picture below:


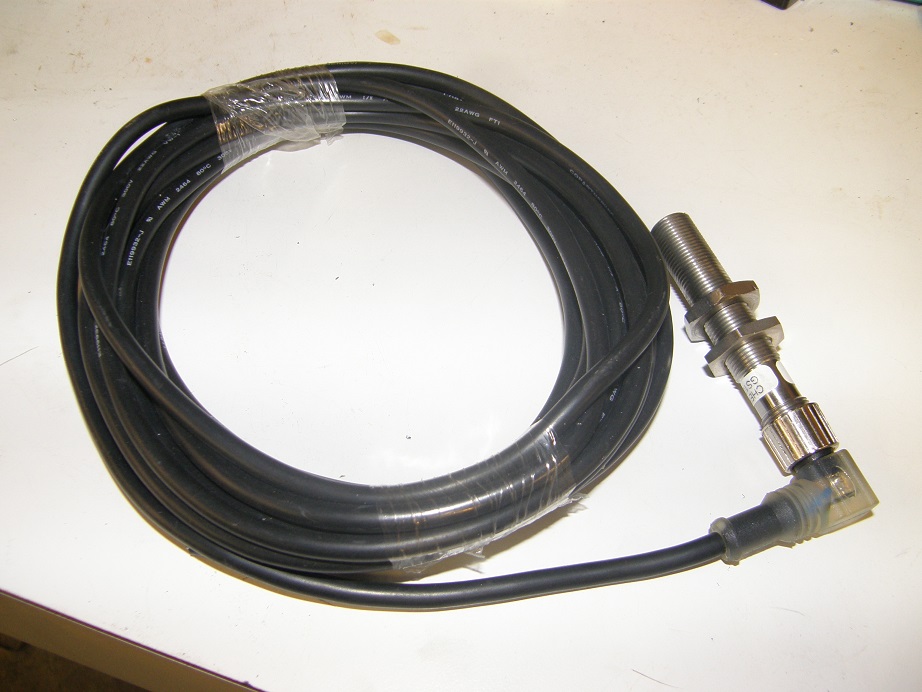
Note the raised portion on one of the bracket halves; I needed to machine another small piece to bolt to that, and hold the sensor.  The sensor and the cable I'm using are shown in the photo below:


I like this sensor because the cable screws onto it; in case of a sensor failure, it can be disconnected from the cable and easily replaced.  Also, the head of the cable has two LEDs built into it.  One is a green LED that indicates the sensor is powered.  The other is a yellow LED that lights up when there is no tooth present in front of the sensor, and goes out when the tooth is present.  This makes it really easy to diagnose any sensor problems (or problems with the cable, for that matter). 

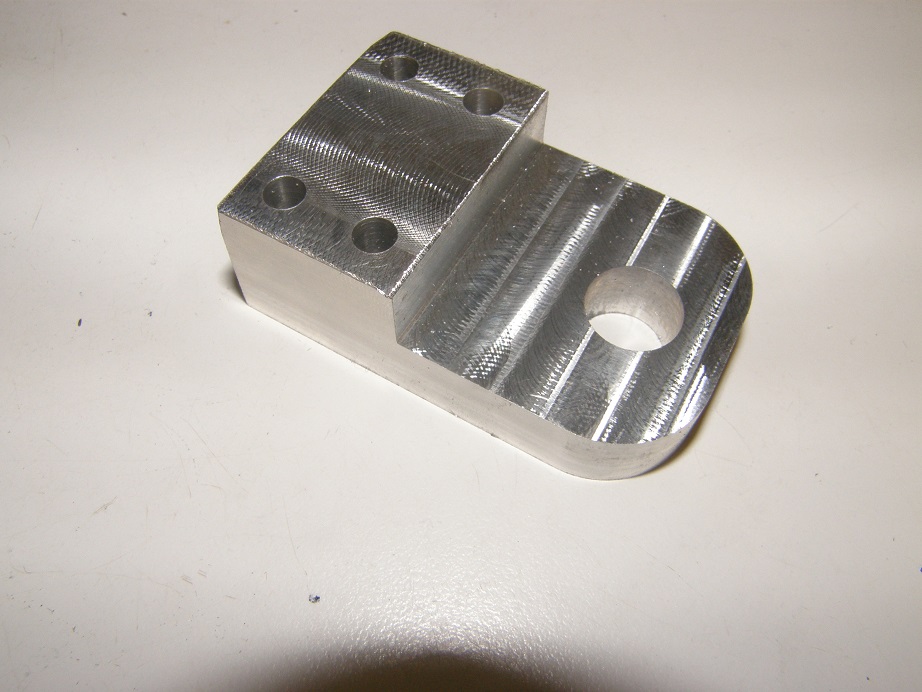
The body of the sensor is 12mm in diameter (about 0.470"), so I designed a bracket that would bolt onto the first one I made, and had a hole in it for mounting the sensor.  Here's a pic:


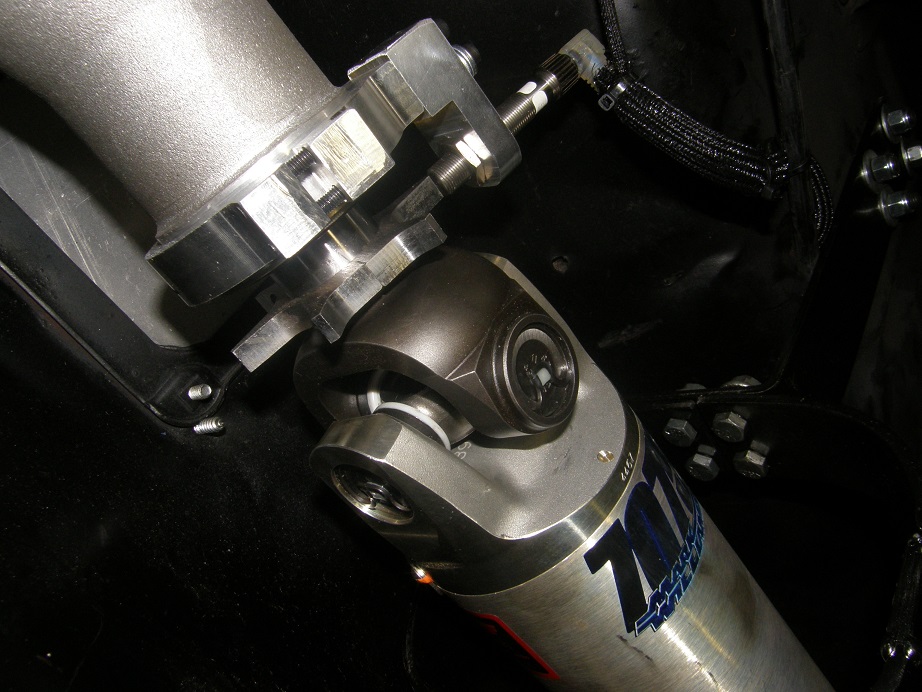
Finally I assembled the whole thing on the car, while adjusting the sensor position for the desired 0.060" airgap.  The mounting appears very solid.  I have not yet wired it up, but I don't expect any issues with making it work.  Here's a picture of the whole thing assembled on the car:


This whole project took about 14 hours over the weekend, and is probably overkill, but I'm confident that it will survive in the vehicle.  I'm anxious to try this setup out in the next month or so, when I start driving the car again.  I will report back with any issues I find - Jay


140
FE Technical Forum / 427 Stroker Article in May Car Craft
« on: February 27, 2016, 09:14:40 AM »
Just got my copy of this magazine and was surprised to see an article on building a 427 stroker!  Kind of an odd build-up, though.  This engine was really optimized for low RPM operation.  They went .050" over on a 427 sideoiler block, and added a Scat 4.25" stroke crank, rods, and JE pistons to get 488 cubic inches.  But they limited the compression ratio to 9.9:1, and went with a pretty small hydraulic roller cam that was comparatively large on the exhaust.  Cam specs listed in the article are 235/249 @ .050", with .577/.561 lift and 107 LSA, installed straight up.  The engine used near stock Edelbrock heads, rather than some high riser heads that they had on hand; the article implied that they may not have had an intake available for the high riser heads.  It also used a PI intake and a Quick Fuel 850 carb, and a Mallory Unilite distributor.

The article claims a nearly unbelievable torque of 676 ft-lbs at a very low 3900 RPM, and only 561 HP at 5100 RPM.  At 3000 RPM this engine is already making 654 ft-lbs.  The peak torque is nearly 1.4 ft-lbs per cube, which is a great number.

I've never built a 427 that is optimized for this sort of low end torque production, so I don't have any direct comparison data to a different engine, but if those numbers are right, that motor is a real stump puller...

141
Despite my best efforts, I have not been able to get the password reset function to work on this forum.  As a result, if you lose or forget your password, the only alternative is to re-register.  Send me an email at jayb@fepower.net, and I will delete your old account and you can re-register with the same username.  Sorry to all for the trouble on this, but I will happily re-register you if you have lost your password - Jay

PS - A lot of folks have mentioned to me that they are not getting the email that says they are registered after I approve their registration.  Not sure if these are ending up in people's SPAM folders or what.  In any case, if you register and haven't heard back for 24 hours, go ahead and try to log on.  Odds are pretty good you have been approved and can log on the forum, regardless of whether or not you receive the email.

142
Non-FE Discussion Forum / Preview of coming non-FE dyno attractions...
« on: January 24, 2016, 10:25:23 PM »
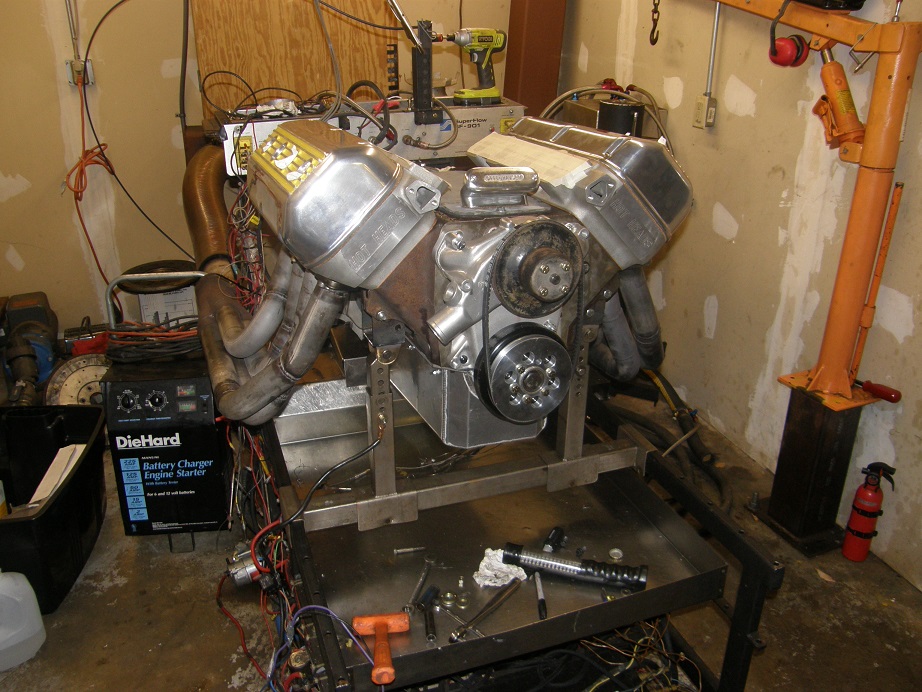
This engine belong to my former trunk monkey, and is slated for his 31 Plymouth Drag Week car.  392 Hemi...


We'll be running this later in the week; I'll post the results when we have them.

143
FE Technical Forum / Coolest induction system video ever!
« on: January 21, 2016, 12:35:54 AM »
This is Jon Kaase with a plexiglass tunnel ram, watching the pulsing and fuel distribution in a race engine. 

https://www.youtube.com/watch?v=7Iq1B-2paCs&feature=youtu.be

144
Drag Week 2015 / Drag Week in the February issue of Hot Rod
« on: December 04, 2015, 01:58:31 PM »
Just got my mitts on the issue.  Start paging through and there is Kevin, sitting against the back of his Shelby playing with his cellphone, right under the editor's column!  Scott Miller's car got a picture, and my car is on two separate pages.  Three FE cars in one issue of Hot Rod!  I'm impressed...

I have to say too that David Kennedy's editorial really hit home with me.  He was making future predictions, and figured that more and more small companies run by hot rodders would start offering performance parts, as 3D printing, CNC machining, etc. become more common.  Sounds vaguely familiar  ;D

145
FE Technical Forum / Engine Masters Started Today!
« on: October 05, 2015, 08:44:06 PM »
It was the Hemi fest today,and Bischoff's entry won with a 700 HP Gen III hemi.

http://www.hotrod.com/events/1510-700hp-gen-iii-takes-the-hemi-crown/

I'm looking forward to seeing how Royce's MEL does, and of course how Barry R's FE does.  Not sure which day Royce runs, but I'm pretty sure Barry runs on Friday.

The format this year, with five separate classes, is a little weird...

146
FE Technical Forum / Talk me into a transmission change...
« on: October 04, 2015, 12:32:15 PM »
I have been giving some consideration to a transmission change in my Shelby clone.  The ATI Powerglide that is in there now was originally purchased for my Galaxie, where I plan to put another SOHC and two turbos to make 1800 HP or so.  The ATI trans is supposed to be good for 2500 horsepower, so it was a good plan for the Galaxie, but is way overkill in the Shelby clone.

When I originally built the Shelby clone, the plan was to go to one of those street Lenco transmissions.  But, at the time they were outlawed at Drag Week in all classes except for Unlimited.  And I had the ATI trans just sitting there, so I bought a converter and put it in the car.  I've been running it there ever since.

In the meantime, I've learned more about Lencos, and have learned to like them a little less.  One thing that I don't like is that I've been told that they use a lot of power.  This makes sense to me because they are a planetary gear setup, and as you go down the track, you are just subtracting more gears.  Its not like a regular manual transmission where you are changing from one gear set to another; each module of a Lenco has a direct drive and an underdrive module, so when you shift the first gear module you might be shifting from a 1.37:1 ratio to a 1:1 ratio.  This means that if you are running a four speed car, at launch you have three gear sets engaged.  When you do the 1-2 shift, you reduce that to two gear sets, the 2-3 shift reduces it one, and the 3-4 shift gives you direct drive.  All the gear sets engaged simultaneously will eat some power.

Yesterday one of the guys who did the machine work on repairing my Shelby block came by for a visit.  He has a 67 Mustang with a 347 Windsor engine that runs mid 10s.  He used to have a G-Force trans in the car, but it kept breaking, so he switched to a Lenco.  (It surprised me that a G-Force trans wouldn't take the power required for a mid 10 second pass).  He said that he didn't see a loss of power when he switched to the Lenco, but he wasn't 100% sure because he didn't have back to back data to say definitively.  I do know that when the Pro-Stock teams switched from Lencos to Libertys they picked up quite a bit, so at least compared to a Liberty the Lenco will eat some power.

He also told me about the issue with Lencos coming out of gear when letting off the throttle, which I didn't know about.  I knew that Libertys did that but I didn't know Lencos did it too.  So, if you are on the track and have to let off for a second your pass is over, driving around the pits and doing the burnout requires some special procedures, etc.  After talking to him about his Lenco for a while, I kind of decided that it was not for me. 

At Drag Week, Joel's trunk monkey Jeff (JericoGTX on the forum) mentioned that Liberty now offers a trans with a synchronized fifth gear, so that in fifth the transmission won't pop out of gear when you let off the throttle.  I haven't been able to find any mention of that on their web site, though.  If that option is available, at least freeway driving would be tolerable with that trans.  But it would still be a pain around town.

A G-Force or a Jerico would be a better solution, but they aren't going to hold up in a 3250 pound, high 8 second car.  I think my only options for a manual trans are the Lenco and the Liberty.  Anybody else know of any other standard transmissions that will take 1000 HP and are streetable?

Next consideration is the clutch.  Mike, the guy from the machine shop who visited yesterday, figures that it takes a whole racing season to really dial in the clutch setup.  You've got preload pressure and centrifugal weights to worry about, you are drilling holes in the scattershield and have the car up in the pits to make adjustments, etc. etc.  This is a problem for me because I just don't know much about modern clutch setups, so I'd be starting at the bottom of the learning curve.  A friend of mine just spent $4K last year trying to figure out the clutch in his stock eliminator car.  Doesn't sound like much fun to me.

As opposed to a manual trans, my ATI trans is trouble free.  I just drive the car, on the street and on the track.  At the track, I'm not constantly shifting gears; one shift at about 400 feet and I'm done.  It is easy, easy, easy, and with so many other things to worry about on the car, its nice to not have to think much about the transmission.

But here's what I don't like about it.  My datalogs from Drag Week say that the engine is turning 7700 RPM through the traps, but at 150 MPH, the driveshaft is only turning 7250 or so.  I am losing 400-500 RPM in the torque converter.  I don't like that one bit >:(  Which is why I'm still thinking about going through the trouble of switching to a manual transmission.
Anybody got any useful suggestions on how to overcome the manual transmission hurdles that I've detailed here?


147
FE Engine Dyno Results / 585" SOHC
« on: September 29, 2015, 08:30:41 PM »
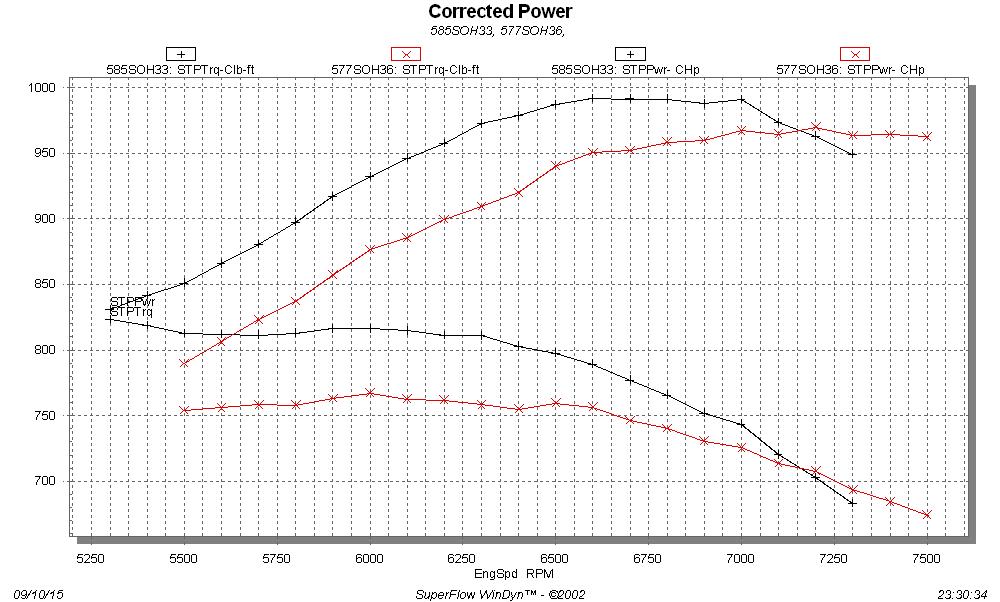
Performance Summary:
      Cubic Inches:   585            Dyno brand:  SuperFlow 901
      Power Adder:    None           Where dynoed:  Jay's garage
      Peak Horsepower: 992 @ 6600
      Peak Torque:  830 @ 5100

Horsepower and Torque Curves:

Note: black curves are for this engine; red curves are for the previous iteration in 2014.


Engine Specifications:
   Block brand, material, finished bore size, other notes:  Shelby aluminum block, offset bored to 4.700" bore spacing, 4.500" finished bore size
     
   Crankshaft brand, cast or forged, stroke, journal size:  Crower billet crank, 4.600" stroke, 2.200" rod journals
     
  Connecting Rods brand, material, center to center distance, end sizes, bolts:  Crower billet rods, 6.700" center to center, 0.927" pin

   Piston brand, material (caster, hypereutectic or forged), dish/dome volume, static CR:  CP custom pistons, 13.4:1 compression ratio

   Main Bearings, Rod Bearings, Cam Bearings brand and size:  Federal Mogul 125M main bearings, Clevite rod bearings

   Piston rings brand, size, other notes:  Total Seal conventional rings, .043" steel top ring, .043" Napier second ring, 3mm 13 pound oil ring

   Oil Pump, pickup, and drive: Stock pump not used, Peterson 6 stage dry sump system

   Oil pan, windage tray, oil filter adapter: Custom aluminum oil pan to work with dry sump, Moroso louvered windage tray

   Camshaft brand, type (hyd/solid, flat tappet or roller), lift and duration (adv and @.050"):  Comp Cams roller cams, single pattern, 288@ .050", 0.739 lift, 114 LSA

   Lifters brand, type:  NA

   Timing chain and timing cover:  Pond timing cover, Munro timing gear and chain set

  Cylinder heads brand, material, port and chamber information:  Aluminum SOHC heads, raised ports, hemispherical chamber, 120cc

  Cylinder head flow in cfm at inches of lift (28" H2O pressure drop):
      Intake               Exhaust

     .100     83          .100   58
     .200    176         .200  134
     .300    280         .300  210
     .400    361         .400  264
     .500    412         .500  306
     .600    434         .600  320
     .700    443         .700  334
     .800    453         .800  344

   Flow bench used, location:  SuperFlow SF-600 bench, R&R Performance

   Intake valve brand, head size, stem size:  Manley custom intake valves, 2.300" head diameter, 11/32 stem

  Exhaust valve brand, head size, stem size: Manley custom exhaust valves, 1.900" head diameter, 11/32 stem
   
  Valve springs brand, part number, specs:  Comp springs, 26115, 255 on the seat, 630 over the nose

   Retainers and locks brand, part number, specs:  Comp titanium retainers, Manley locks

   Rocker arm brand, type (adjustable or non-adj), material, ratio:  T&D adjustable rockers for SOHC

   Rocker shafts and stands, brand, material: Precision Oil Pumps steel SOHC rocker shafts

  Pushrods brand, type, length:  NA

   Valve covers, brand, type:  Aftermarket SOHC aluminum valve covers

   Distributor brand, advance curve information:  NA

  Harmonic balancer brand:  ATI

   Water pump brand, type (mechanical or electric):  CVR electric pump with FE Power adapters

   Intake manifold brand, material, porting information:  Custom sheet metal intake

  Carburetor(s) brand, type:  NA

  Exhaust manifolds or headers brand, type:  Custom built step headers, 2" to 2-1/8" to 2-1/4" primaries, merge collectors to 3-1/2" outlet

  EFI system: Megasquirt MS3X controller, Ford Racing 80# injectors, Aeromotive A1000 fuel pump, DIY Autotune individual coil packs

148
Drag Week 2015 / Four Drag Week Winners
« on: September 28, 2015, 08:53:30 AM »
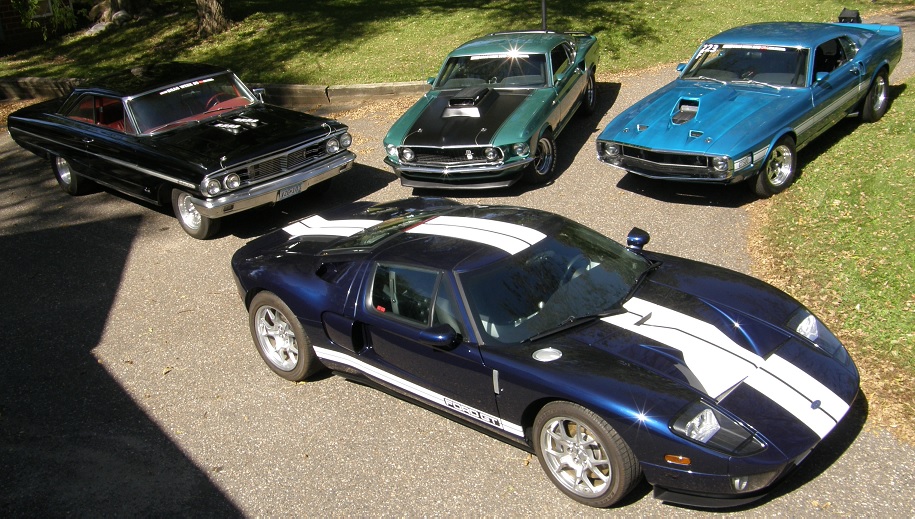
Got a pretty good picture over the weekend of my four Drag Week winning cars; sent a copy in to Hot Rod for potential publication.  I think I may be the only person who has won their class at Drag Week with four different cars, although I'm not 100% sure about that. 


I thought I'd post a picture to "scoop" Hot Rod in case they do publish it; FE Power forum members saw it first  ;D

149
Drag Week 2015 / Drag Week 2015 Day 5, Gateway Motorsports Park
« on: September 20, 2015, 10:38:07 AM »
Friday the racing wasn't scheduled to start until 2:30, and the track didn't open until 11:00, so we took our time in the
 morning and didn't check out of the hotel until 11:30 or so.  It was a 10 mile drive to the track, and I really only had
to make one pass, but despite this I was nervous.  The win had practically fallen into my lap at this point, and it would
be just my luck to have the car break on the last 10 mile drive to the track, or in the staging lanes for the last pass.

Fortunately, the drive to the track went just fine, and we pulled into Gateway around 11:30.  Steve and I got the trailer
pulled off the car, and then people started showing up to look at it.  One guy came up with a 1320 video shirt on and a big,
expensive camera around his neck and introduced himself as a freelance photographer who had been contracted by Car Craft to
do a photo shoot on the car.  I had heard earlier in the week that one of the Mustangs magazines wanted to do a piece on it,
so I told him I'd be ready to do that in a few minutes.  Then Brad Dyer came over; he had come to Gateway to pick up his truck
and trailer.  He gave me a hard time about how dirty the car was, and boy was he ever right!  It really needed a good wash
and polish, but I just hadn't had the time to get that done.  Brad was saying he already had a plan for next year, so it sounds
like we might have another good race next year, if we can both keep from breaking LOL!

I told the photographer I was ready, so he had me pull the car over in front of the grandstands, dirt, water spots, bugs and all,
and took a bunch of pictures of all parts of the car.  While he was shooting we were talking and he mentioned that Rob Kinnan
was the guy who wanted pics of the car!  Well, I know Rob from the first several Drag Week events, when he was editor at Hot Rod.
He's a great guy, and I was really happy to hear that he was interested in the car.  I hope I get to talk to him about it at
some point before the article gets written.

The photo shoot got done around 12:45, so I pulled the car back over by the trailer in the pits, and started getting the car
into race trim.  While I was doing that a bunch of people came by to look at the car, including Bill Fowler, who had been
planning to be running at the tracks with his new Fox body Mustang, but just flat ran out of time getting the car ready at
the very end.  Apparently he has electrical problems with the car and couldn't get them debugged in time to make the race.  For
sure he will be back next year, and he also is planning to run Hot Rod's Drag Weekend, which is happening in several weeks. 
(Maybe Felony will make it there to race him ;D).

Joe Wagner also came up and pretty much spent the rest of the day with us.  I hadn't met Joe before, but he had purchased a couple
of my intake adapters, and he showed me some pictures of two Algon FE fuel injection units that he has.  I wish I'd known about
that before I finished my testing on my book, because it would have been cool to include a test of those units.  Joe offered
them to me for testing purposes the next time I have dyno mule up and running.  Joe stayed all the way to the awards ceremony,
and just before that he helped me and Steve load the car and trailer in the truck, so he was a really big help.

I took my time about getting the car ready to race.  I did most of the work myself, and changed plugs on the car also to ensure
a clean pass.  I was hopeful of another 8 second pass today, but the air was definitely not as good here as it was on Monday;
it was pretty hot and humid.  Just about the time that I had the car ready to go, the announcer called the class cars down to
the staging lanes.  I still had to go over to the track restrooms and change into my racing gear, so I didn't get into the
staging lanes right away, and Steve and I sat in the lanes for at least a half hour before they started moving towards the starting line.
I was still very nervous at this point; each time I turned the key I was worried that the starter would give out, or the
crank sensor wiring would go again, or something like that.  All I had to do to win the race was go faster than about 11.40,
but I was worried about the car dying after 60 feet again, or halfway down the track; if it did, I was going to push it into
neutral and coast past the finish line, in hopes of getting the winning pass.  These thoughts all seem silly now, because in
the end the pass went just fine, but I have seen guys who had their class locked up by the last race fail for some
mechanical or electrical gremlin.  And my car had not exactly been trouble free during the week.

Finally I got to the head of the line.  The track official motioned me up to the burnout box.  The car started fine, so I
breathed a sigh of relief at that, and rolled forward.  I was looking around for a track guy to guide me into the box, but
there wasn't anybody there!  Nobody was paying attention.  I stopped before the burnout box, unsure of what to do.  Steve was
behind the car and wasn't sure what to do either, but Joel's trunk monkey Jeff came forward and guided me into the box, setting
up my burnout.  We all complained later about this; the last thing you need at the track is lack of direction from the track
officials.  I sat in the burnout box for a few seconds, then finally way up by the starting line a track official started waving
at us to do our burnouts.  I did the normal 5500 RPM 1-2 shift burnout with the car, then came forward very carefully, making
sure to put the car back in first gear, set the steering wheel switch for the trans brake, and lining up in the middle of the groove.
I planned to launch the car from a very low speed, probably 2500 RPM, because that's where it had been working pretty well
(flashing the converter at the line seemed to give the best traction).  I rolled forward and lit the pre-stage lights, then the
yellows flashed and I released the brake and mashed the throttle.

The car launched straight and hard; I didn't have to steer at all to keep it going straight down the track.  I was gaining
confidence by the moment.  The shift light flashed and I went to second, and the car stayed straight.  I knew I had it and I
pumped my fist in the interior; it was the winning pass!  Four years of disappointing results were now officially behind me!
The car ran hard through the traps, and I braked for the end of the track and came back down the return road to get the slip. 
The time was 9.05 @ 149; not an 8, but at this point I didn't care.  The nervousness was gone, and I had finished Drag Week.

Back in the pits I unstrapped from the car, pulled out a lawn chair and took a break from the action.  I looked at the time slip
and was kind of surprised to see a fairly slow 1.40 60 foot; the car had felt good on the launch.  But maybe I hadn't left at
the correct engine speed, or the air had affected the car, or something.  Jeff had the launch on video on his camera, and
showed it to me in slow motion; there was no spin, so it wasn't like it hadn't hooked. 

It seemed to be getting hotter all the time, and I'd been pretty uncomfortable in the staging lanes, so I decided just to live
with that pass and not make another try.  I did a quick calculation on the times, and I was still going to be averaging in the
8s for the week, so 9.05 was the number I'd be turning in. 

I sat around in the pits with Steve, Jeff, Alan Casida, Joe, and a few other guys for a while, just soaking it all in.  Alan had
run an 11.90 on his pass, another really good run for that big Galaxie, so he was pretty happy too.  After a while I grabbed my
camera with the picture of the checkpoint from Thursday's drive, and handed in my time slip and showed the picture at the timing
tower.  As I walked back down to the track I saw Keith Turk and flagged him down.  Keith is the race director.  They had
announced earlier in the day that nine competitors had been disqualified from the race on Friday morning, for bypassing the
required route on Thursday and taking the freeway after the checkpoint to get to St. Louis instead!  Apparently somebody had been sitting
on the freeway taking pictures, and the freeway was not part of the route.  Also, some of the people who got DQ'd were class
leaders!  I told Keith that I thought he'd done the right thing to DQ those guys; there is no room for people who can't follow
the rules of the race, IMO.  Keith said it may have been the hardest thing he ever had to do at Drag Week, because he knew some
of the fellows who were disqualified.  But he did the right thing, and in my view saved the integrity of the event.  And, I have
to wonder, how many others DIDN'T get caught...

On the way back to the pits I stopped at the Hot Rod trailer and bought some Drag Week shirts for my wife and kids.  The concession
stand was right there, and I decided I'd have a congratulatory beer.  I called Steve and asked if he wanted one, and of course
he said yes, but Jeff and Alan didn't.  Steve says, "Can I have theirs?"  Classic Drunk Monkey LOL!.  I brought two beers back to the pits.
Joel and Kevin had been called to the lanes, but it was so hot that we didn't want to go sit in the stands, so we just sat in the
pits and listened to the announcer.  Kevin was working pretty hard to improve his times; he really wanted to be in the bracket
race, but he was a few cars out of the cutoff.  He removed his air cleaner on his first pass and picked up almost a tenth.  Then
he tried loosening up his exhaust, but that cost him some time.  He was giving some consideration to removing the back seat to
lighten up the car; not sure if he ended up doing that or not.  By 7:30 or so they were calling for all the daily driver time
slips, so Kevin made one last pass and handed in his best one.  He ended out of the bracket race by a few spots, which is too bad,
because I'll bet he would have done well in the bracket race.

They ran the bracket race at 8:30 and eventually a ten second Chevy II won.  While it was running we put the little trailer in
the back of the pickup, and put the car on the trailer, and got everything packed up.  We made it up to the stands to see the
finals, and then
headed for a big tent at the end of the track for the awards ceremony.  We sat there yacking it up with the other racers for a
while.  Joel had thoughtfully prepared a victory speech for me; Joel loves to put words in my mouth  ::).  He wanted me to thank all
the little people, etc. etc.  What a character.  Earlier in the evening I'd realized that I had left my truck keys at the hotel,
and had asked Joel if he would run me over there in his GTX to pick them up.  He said sure, but then he had gotten one of the
room keys from Steve instead, and gone over to get my keys himself.  As soon as I found that out, I knew he was up to something! 
When we finally got back to our hotel room at 2:30 AM, we found that Joel had turned the air conditioning on full, and it must
have been 45 degrees in there!  Joel is such a mischevious trunk monkey...

They finally started the awards ceremony and we got to hear from the sponsors, and also from the emcee, who was Hot Rod editor
David Kennedy.  He mentioned that back in 2006, he was one of us, running a diesel truck in Daily Driver, and got his ass kicked.
  Joel and I were sitting next to each other, and we looked at each other and immediately had the same thought:  When I got called
up to the front to get my award, I should tell Kennedy that I was the one who kicked his ass in Daily Driver back in 2006!

It was a great thought, and I was sitting there formulating just how I would say this, but they were running behind and had a lot
of awards to give out, and when they called up the racers none of us got a chance to say anything.  Probably for the best LOL!

Finally they came to the overall winner, who was Tom Bailey in his Pro-Mod Camaro.  He ran something like a 6.80 average all week. 
He was slower than Jeff Lutz, who ran a 6.05 on the first day, but Lutz broke, so Bailey took the win.  He got a chance to speak,
and mentioned that his car was not running the way it should, and he was looking forward to getting it dialed in and running again
next year.  Then he said, "I'll be here, and Lutz will be here, and maybe Princess will show up..."  That got a big "OOOOoooooo"
from the audience.  He was referring to Larry Larson, the five time overall winner.  Larry was at the track on the first day, but
didn't enter a car in the race this year.  Larry is not happy with the direction the event is going; he thinks the Pro-Mod style
cars shouldn't be allowed in.  Hot Rod made a new class this year, called Unlimited Steel, just for stock shell cars to compete
in, and last year Larry ran what amounted to a Pro-Mod car with his new truck, which ran a 5 in last year's shootout.  But he
doesn't think cars like that should run in Drag Week, and I think he has a good point.  I was talking with Mike Crow on Thursday
at Cordova; Mike is a multi-time winner in his Cuda and Dart, and feels the same way.  I was kind of put off by Bailey's comment;
I've known Larry Larson since Drag Week 2005, and he is a stand up guy and a great racer.  Tom Bailey has a very fast car, but
he is no Larry Larson, that's for sure.

Halfway through the awards ceremony Steve had disappeared holding his most recent beer cup, which was nearly empty.  When the
ceremony ended, I went out to the pits by my truck, but didn't see him.  I gave him a call and a very sleepy voice answered. 
"Steve, where are you?", I said.  "I'm at the truck".  I went around the other side and there was Steve sitting against one of
the truck tires; he had just crawled out from underneath the truck, and was completely hammered LOL!  Steve takes his celebrations
very seriously.

Joel, Jeff, Kevin and I decided to go out for a late dinner, so Steve and I left the track and I dropped him off at the hotel, reminding
 him what room number we had ;D ;D.  Most of the restaurants were closed, so the rest of us ended up at IHOP and had an early
breakfast, then went back to the hotel to crash.  We finally got there at 2:30 AM.  The end of a great, great day.

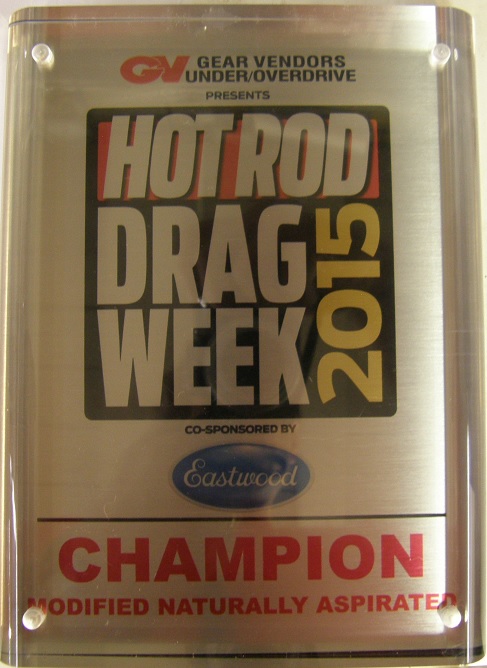
At the awards ceremony they'd given me the plaque in the picture below:


I also received a certificate good for a new set of MSD plug wires of my choice, an NOS lit up clock (my second), and a certificate
 from Gear Vendors worth $1000 off a new overdrive, or $500 in cash.  One thing I was slightly disappointed about was that it
appears that they are no longer giving jackets to the class winners.  I had been hoping for another jacket to add to my collection,
 but it looks like only the overall winner and Spirit of Drag Week winner get them now.  Oh well...

Saturday morning I sat down to write this blog, but my laptop died with some software problem, so I'm writing it at home on Sunday
morning instead.  The trip home was uneventful, but filled with the good feelings that come with a Drag Week win.  I really can't
wait for next year.

Also, I wanted to offer profuse thanks to everyone on this forum for offering encouragement during the week, and posting all those
videos and photos, because I sure haven't had the time this week to get that done.  Its really great to come on the forum and
see that stuff, and it helps keep me going day after day during the event.  I sure hope some of you guys can make it to Drag Week
next year, either as spectators or participants.  As a racer it is really, really hard, and really, really fun and rewarding at the same
time.  I don't know anybody who has ever regretted their participation in the event.  I'm already thinking about next year, and hope
 some of you guys are there too!


150
Drag Week 2015 / Drag Week 2015 Day 4, Cordova Raceway Park
« on: September 18, 2015, 10:50:16 AM »
We were up early at 6:30 on Thursday morning, and headed to the track by 7:30.  Our hotel was quite a ways from the track, so by the time we got there the cars were already running.  Steve and I got the car put into race trim, and I went off to change into my racing clothes to make a pass.  On the way back to the car I heard the announcer make the last call for staging lanes for the class cars, so I had to hustle.  The Street Eliminator cars were already lining up to get ready for the staging lanes, so Steve had to direct traffic to get me out of my pit area and past those cars.  But I made it down to the staging lanes just in time, and started getting strapped in to make a pass.

After Brad had gone on the trailer yesterday, I had looked at the standings in my class and found that I had a big lead.  At this point, to me it looked like an endurance race, so I had decided to get one good pass in and get on the road for the last leg of the road trip.  I got up to the burnout box and did my normal burnout, then staged the car and launched at a fairly low RPM.  Cordova is a hookin' track, and the leave felt good despite the low speed launch.  For some reason, however, I shifted early, not even waiting for the shift light to come on.  I was happy that the car had left clean and straight, and was focusing on keeping it going straight down the track, and shifted before the light came on.  I really don't know why.  In any case, the car ran great through the beams, and the time slip said 9.139 at 148.01, with a 1.33 60 foot time.  I had been hoping for 8s at every track, and I may have got one at Cordova if I hadn't shifted early, but I wasn't going to risk a problem with the car by waiting around for the open track session and trying again. 

Steve and I got the car back in street trim, and I went up to the Hot Rod trailer and turned in my time slip, picking up the directions for the days road trip.  It was 260 miles, which was actually a little less than I thought it might be, so that was good.  There were lots of people at Cordova, just like at Great Lakes, and we talked to quite a few folks while we were working on the car.  Steve Engberg came up to chat; I hadn't seen Steve in quite a few years, probably since 2005 or so.  Steve used to have a 69 Mach 1 very similar to mine, with a 600 HP FE under the hood.  He is also famous for a Boss 429 dyno explosion; he said there is something like 2 million hits on the youtube video.  He is working on another Boss 429 car now, but wants to do an SOHC in the future.  I sure hope he does that; with his car building skills, there's no doubt he would put together a beautiful piece.

We talked a little to Jack and Scott Miller also; Jack's Mustang went out on Tuesday with a burned piston, but Scott's Cougar is running real strong, in second place in Street Race BB/NA behind Curt Johnson's car.  Scott ran a 1.29 60 foot a few tracks ago, with a 9.34 ET I think they said.  That 900 HP FE really moves that car along.

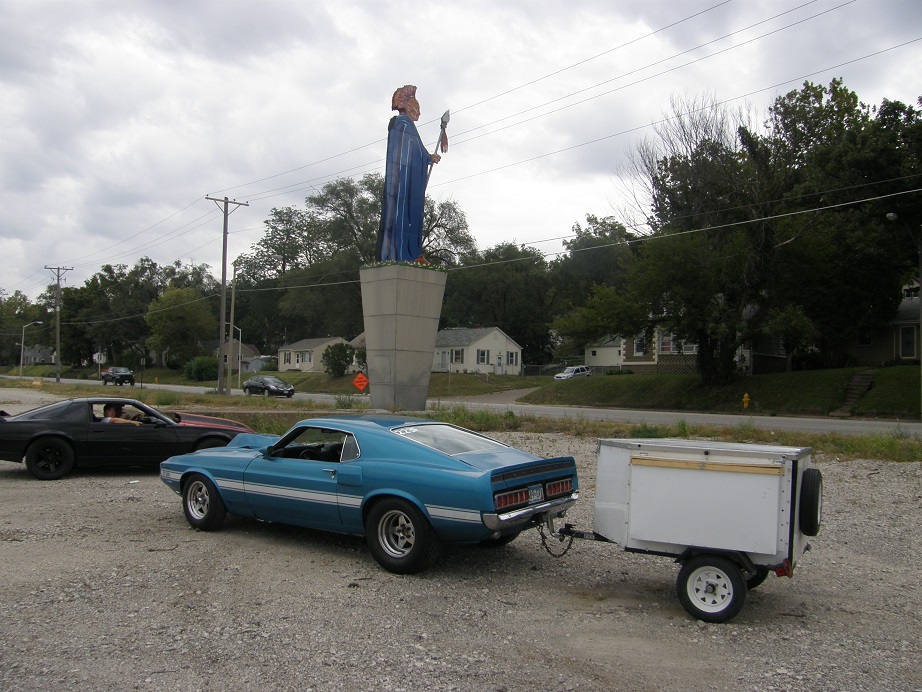
Finally Steve and I were ready to leave; we pulled out of Cordova around 11:00 AM.  We had high hopes of making it to our hotel by 6:00 PM, and headed straight for the first checkpoint, which was only about 35 miles down the road.  Here's a picture of the car at the checkpoint:


The parking lot at the checkpoint was gravel, and there was a big step off the asphalt to get into the parking lot.  The car scraped on the asphalt going into and coming out of the lot.  Three miles down the road, Steve and I began to smell gasoline.  A lot of gasoline.  We found a side street and pulled over; I was afraid we had torn up one of the fuel lines under the car on the parking lot.  Fortunately, looking under the car this was not the case.  We popped the hood and found the problem; the O-ring sealing the top of the #8 fuel injector had pushed out of the fuel rail, and fuel was raining out of the gap.  Fortunately for me the coils and plug wires are outside of the intake manifold, so the risk of a fire was minimal.

For several weeks leading up to Drag Week I had been waffling about buying a set of spare fuel injectors.  These are Ford Racing injectors, 80# per hour units, and as far as I can tell they are only sold in sets of 8.  Finally the week before Drag Week I ordered a set, fearing the nightmare scenario that I would be leading my class and have an injector go out that cost me the race.  I was very happy now that I'd made that decision, because I didn't have a spare injector O-ring.  I pulled one of the new injectors out of the spare parts box and installed it in the car.  When I tightened down the fuel rail and checked it, the leak was gone, and we were back on the road.

Soon it started to drizzle a little as we were going down the road.  Then Steve said, "Why is it raining harder on my side of the car than it is on yours?"  I looked over and water was spraying out of the rear hood vent on Steve's side, soaking the windshield.  I looked down at the temp gauge and it was pegged at 240!  Crap!  I shut the car off immediately and coasted to the side of the road. 

After giving the car a few minutes to cool down, we were finally able to pull off the radiator cap.  The radiator was nearly empty.  I had a gallon of antifreeze in the trailer, but I really didn't want to use it at this point, because straight water cools better.  About this time another Drag Week competitor came by and asked if we needed any help.  This is always the same at Drag Week, competitors helping other competitors.  I asked him if he had any water, and he gave me what was left of a 24 pack of drinking water that he'd brought with him; there were at least 12 or 13 bottles in there.  We thanked him profusely and offered to pay him for it, but he refused to accept anything, wished us luck and went on his way.  Steve and I decided that we would fill the radiator partially up with water, and turn on the electric pump to make sure it was circulating.  When we flipped the switch, we saw no water movement in the radiator.  Had we lost the electric pump?  There was an inline fuse to the pump between the runners of the intake, and I wanted to check to see if that fuse was still intact, but the intake was still too hot to reach in there without burning myself on the runners.  Instead, I put my hand on the pump motor while the ignition switch was on, and felt a vibration; Steve double checked this and felt it too.  The only other thing it could be was a stuck thermostat, but I had drilled bypass holes in the thermostat before installing it, so we should have still seen some water circulating in the radiator, even if the thermostat was stuck. 

We concluded that the water pump impeller had come loose from the pump motor, and was no longer pumping water.  We had to change the pump.  Fortunately I had brought a spare.  Steve and I got to work changing the pump.  By now it was really starting to rain pretty hard, and we were soaked.  Another guy pulled up behind us with his pickup truck.  He turned out to be a local guy interested in the car.  His truck flashers were a big help, because I didn't want to run the battery of my car down by running the flashers for two hours on the side of the road.  The guy got out of his truck with an umbrella and came up to see what was going on.  Right away, I offered him $200 for his umbrella  ;D ;D  I think it was the first laugh we'd had since the car quit. 

With the local guy holding the umbrella Steve and I got the water pump removed.  Here's a picture of the engine at this point:


With the pump removed we could now look inside and see the impeller.  I plugged the pump into the wiring harness, and had Steve flip the ignition on.  Sure enough, the impeller wasn't moving, but I also didn't fell any vibration from the pump motor.  Hmmmmm....  I grabbed the new pump, plugged it in, and it didn't spin either!  Crap, did we pull the water pump for nothing?

I grabbed the DVOM and checked the voltage at the connector with the ignition on.  Zero volts!

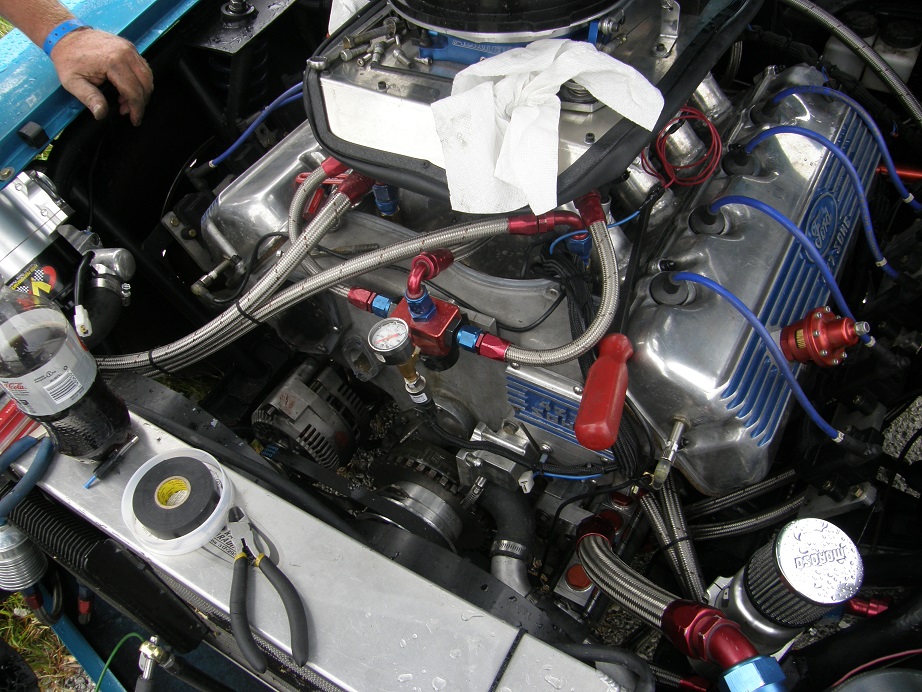
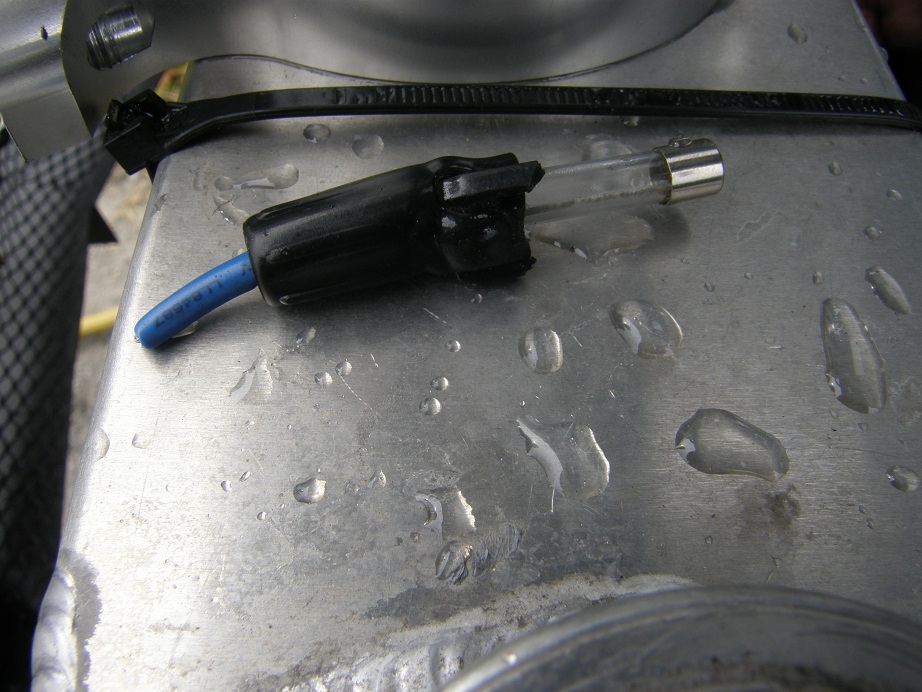
So, now we knew we had pulled the pump for nothing, and had an electrical problem.  The engine had cooled enough so that I could reach in between the intake runners and check the water pump fuse.  I reached in for it, lifted it up, and it came apart in my hand!  It had been sitting on the bottom of the intake, and when I flipped it over the cheap plastic of the fuse holder had melted, and it had separated just enough to break the connection to the water pump.  Here's a picture of the fuse holder:


This failure was related to the problem I'd had on Tuesday this week, with the crank sensor cable and connector.  That wire runs through the same area of the car, between the intake manifold runners.  I'd originally had it installed inside some protective heat shield, and all tie wrapped together.  When I had to pull the crank sensor cable out of the sleeve, I'd had to cut all the tie wraps, and had not tie wrapped the protective sleeve back in place.  Its really hot in there, and cramped for space for your hands, and the engine has to be dead cold before you can do this. 

The fuse holder had flopped out of the protective sleeve, and been burned by the intake heat.  Well, at least now we knew what the problem was.  I dug some wiring out of the trailer, pulled both ends of the water pump wire out between the runners of the intake, and jumpered them together without a fuse.  Then I tie wrapped them to the injector cables to keep the wire off the hot intake surfaces.  We plugged in the water pump, and with the ignition on it spun like crazy.

We spent the next 45 minutes or so re-installing the water pump.  We had saved the water from the engine in the oil drain pan, so we were able to fill it almost all the way up with the saved water.  We used the last few bottles that the Drag Week competitor had given us to top off the radiator.  When I flipped on the ignition switch, we saw all kinds of water flow in the radiator. 

We thanked our local friend for the help he had provided, and told him how to find information on the event on Hot Rod's web site.  I also officially withdrew my offer for his umbrella, because as soon as we got finished with the repair, the rain had stopped  ;D  We got back on the road after this two hour delay, watching the water temp closely.  It came right up to 175 and stayed there; we had now covered about 50 miles of the 260 mile route.

About 25 miles later, the car started to quit.  It would run OK when I gave it throttle, but at 2500 RPM cruise it just didn't want to run.  When the engine would quit and then restart, we could hear the fuel pump making a weird noise.  Sure enough, soon it started knocking a little, like it was running really lean, so I killed the engine and coasted to the side of the road.  I had Steve look at the fuel pressure gauge under the hood while I turned on the key.  It should be about 45 psi, but Steve was seeing wildly varying fuel pressure between 15 and 20 psi, and the pump sounded horrible.  Time to change the fuel pump >:(

I'd lost a fuel pump in my Galaxie during Drag Week 2008, so at least I was well prepared for this eventuality.  I had all the tools and spare parts in hand, and got the pump changed in about half an hour.  Sure enough, with ignition on the fuel pressure was back to normal, so away we went.  We still had nearly 200 miles to go.

Thankfully, the remaining trip was uneventful.  We got into our hotel at 9:30, and went out to dinner with Joel and Jeff.  Kevin rolled in around 11:00 or so; we were all glad to see he'd made it.  Running 1000 miles on the street with 4.56 gears and a spool is quite an accomplishment if you ask me.

Friday (today as I am typing this) the track doesn't open until 11:00, and the racing doesn't start until 2:30, so we all got a bit of necessary sleep last night.  We have 10 miles to go to the track, and I need to make one good pass to lock in the win.  Wish me luck, guys - Jay


Pages: 1 ... 8 9 [10] 11 12 ... 25