Author Topic: Jays Adapter Progress Updates - Installation in 62' TBird  (Read 6537 times)

0 Members and 1 Guest are viewing this topic.

rhinosoft

  • Jr. Member
  • **
  • Posts: 50
    • View Profile
Jays Adapter Progress Updates - Installation in 62' TBird
« on: January 15, 2015, 01:45:59 AM »
HI,

this is my first major posting so please let me know if the images are too large or I missed something.

What you see here is the process of modifying a Cleveland 4V Performer, model # 2665 to fit onto Jay's FE adapter. I used hacksaws, a Dremel and files to cut the manifold, if I had my time again I'd get it done professionally. Not that it looks like shit but its the first time I've butchered a manifold before!

The images below have text descriptions, but what you cannot really see is the manifold runner to #5 is huge and encroaches right over the water crossover tube - it is a bit too close but will work I think. I call it 'El Capitan' http://en.wikipedia.org/wiki/El_Capitan - it is a bitch!

The reason I chose the 2665 was that the ports are very close to being a perfect match to the adapter and I'm sorry to say, pure dumb luck, that's what I ordered and could not return it!

Next step is of course to install it and I will update this post when it's done - might be a month or two since its summer here in Australia and I want to keep car on the road for a while yet.

Enjoy,

Graeme
Melbourne - Australia.

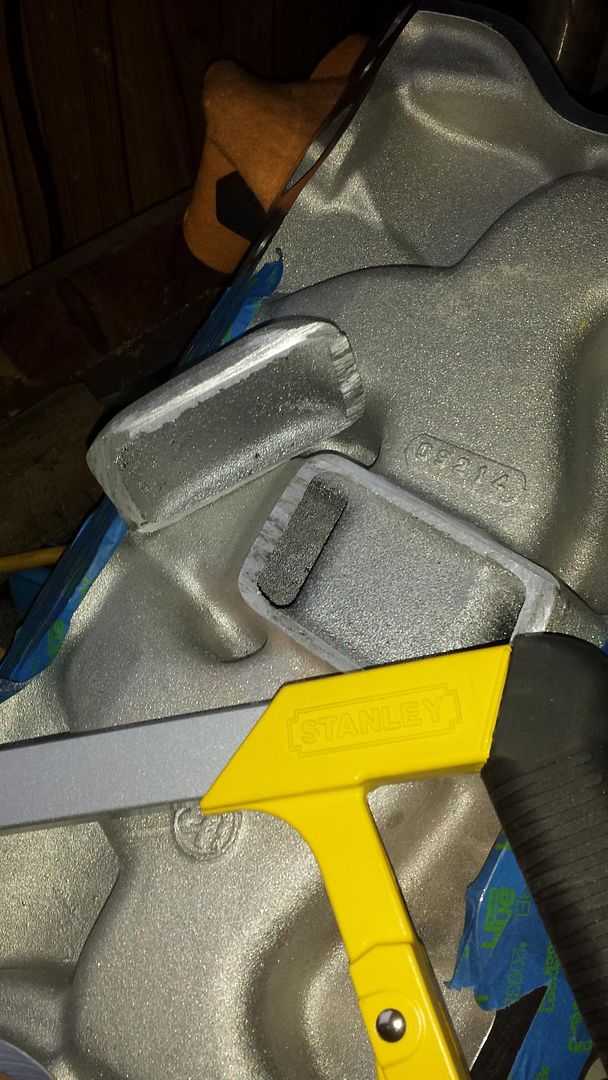
The very first hiccup I found was the heat crossover on the Cleveland manifold would not permit the manifold to even lie down on the adapter. (manifold is backwards, just to see who noticed!!)


So, out with the hacksaw and it’s gone.


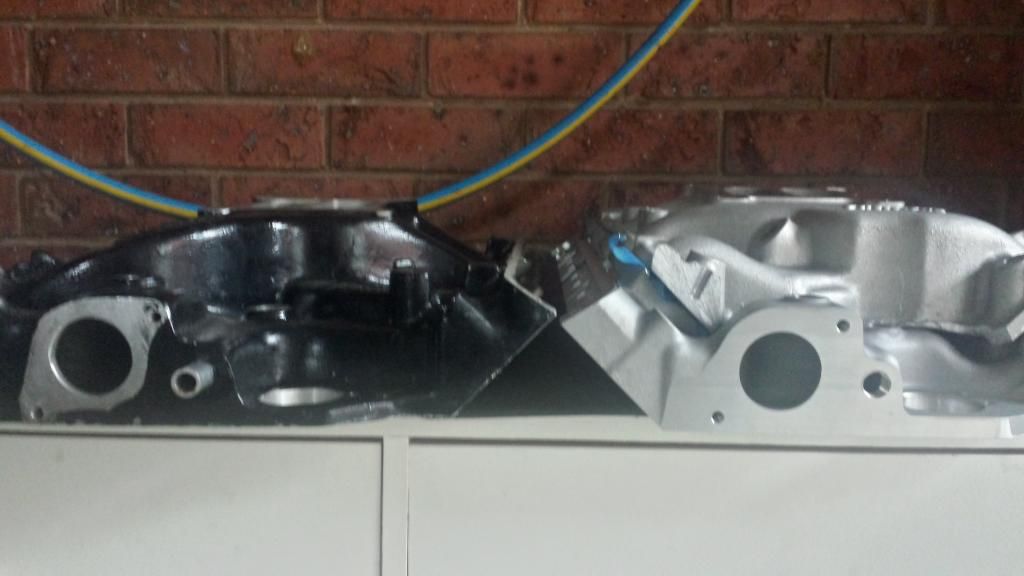
An Edelbrock Performer (not RPM) next to the FE Adapter and the modified intake manifold - I estimate that the Edebrock carb mounting plate is 1/4 lower than the adapter and Cleveland.


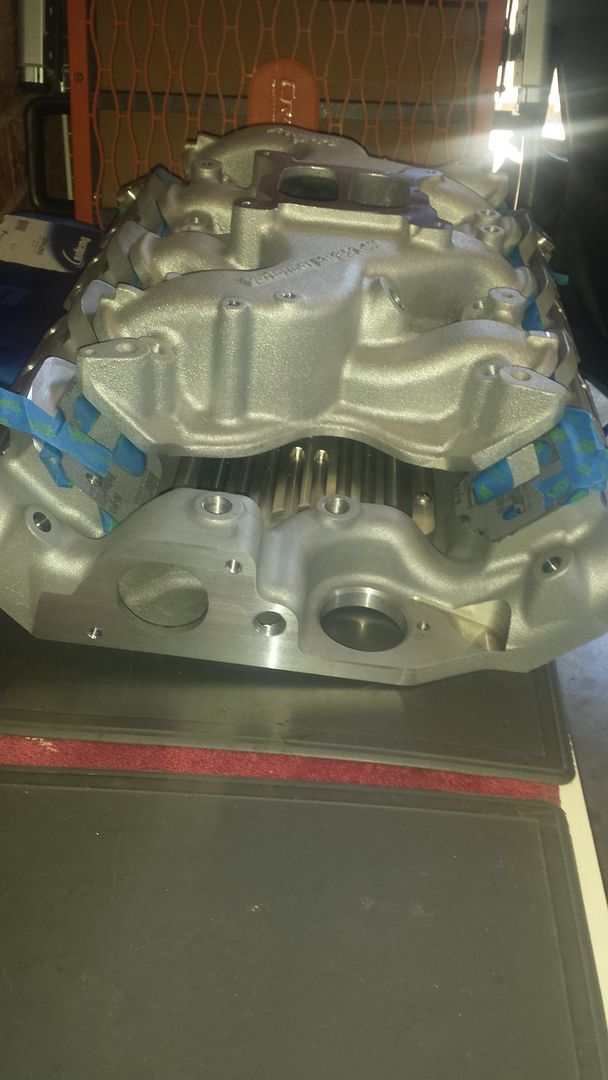
Top down on the manifold after mods and the adapter. Since this image I have cleaned up the cuts and chopped off the corners of the manifold, looks dangerous with those edges.

Of interest is the water temp adapter, this is very close to the distributor base as I mocked it up but it should work with care. The other thing is the clocking of the distributor is critical, it will only rotate maybe 20 degrees before it hits the walls of the intake manifold.


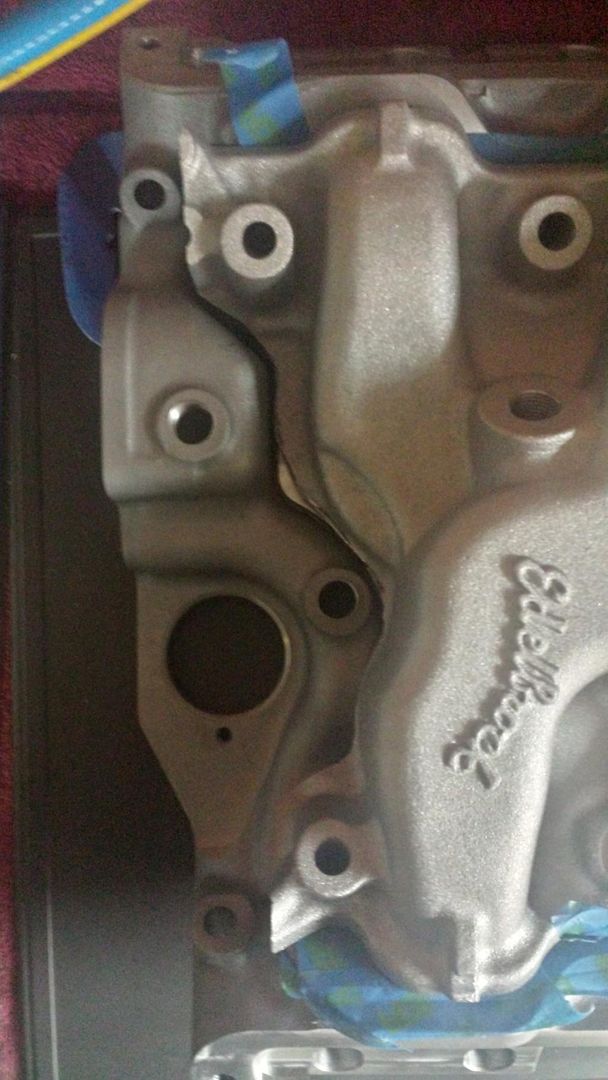
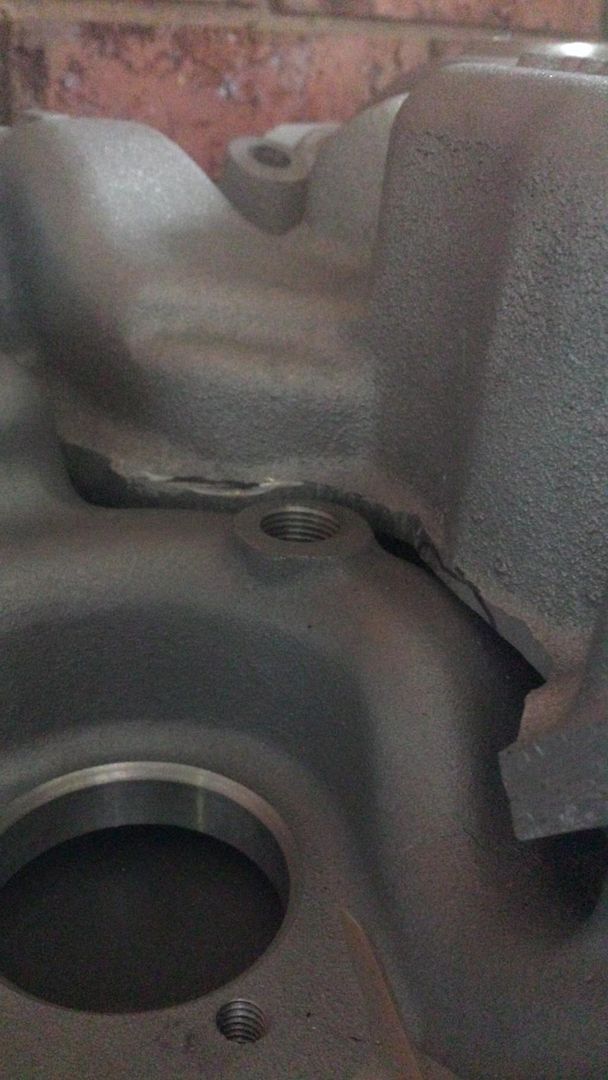
Another item to consider is the lower area of the manifold, to be able to line up the bolt holes the base of the manifold must be massaged and cut away so that it does not touch the top of the adapters water passage. I had about 1/16” of space after all this and the manifold is still looking good, plenty of meat in this area. (the area closest to you with the black marker line)


Here is a side to side view - going to be a close fit in the 62’ Thunderbird


jayb

  • Administrator
  • Hero Member
  • *****
  • Posts: 7406
    • View Profile
    • FE Power
Re: Jays Adapter Progress Updates - Installation in 62' TBird
« Reply #1 on: January 15, 2015, 08:17:06 AM »
Great photos, Graeme.  Glad you got the exhaust crossover situation resolved.
Jay Brown
- 1969 Mach 1, Drag Week 2005 Winner NA/BB, 511" FE (10.60s @ 129); Drag Week 2007 Runner-Up PA/BB, 490" Supercharged FE (9.35 @ 151)
- 1964 Ford Galaxie, Drag Week 2009 Winner Modified NA (9.50s @ 143), 585" SOHC
- 1969 Shelby Clone, Drag Week 2015 Winner Modified NA (Average 8.98 @ 149), 585" SOHC


427Fastback

  • Hero Member
  • *****
  • Posts: 603
    • View Profile
Re: Jays Adapter Progress Updates - Installation in 62' TBird
« Reply #2 on: January 15, 2015, 07:35:19 PM »
Good stuff....after reading this I realize I have been looking at a different edelbrock intake all along..I have been looking at the 7564 Performer air gap.Its ports are different again..They appear to be 50 thou wider and 90 tho shorter than the 2665 Performer...
The air gap would look good with the bottom trimmed out tho.......Cory


1968 Mustang Fastback...427 MR 5spd (owned since 1977)
1967 Mustang coupe...Trans Am replica
1936 Diamond T 212BD
1990 Grizzly pick-up

rhinosoft

  • Jr. Member
  • **
  • Posts: 50
    • View Profile
Re: Jays Adapter Progress Updates - Installation in 62' TBird
« Reply #3 on: January 16, 2015, 06:00:55 AM »
Thanks for the feedback and views guys, if you hadn't guessed I am no mechanic but willing to do something different with my engine! Enjoy all the work you show here and the tips are great.

Next thing is the ports on closer inspection don't quite look right with the recommended FelPro 1228 gasket. Looks ok on the adapter but the manifold itself cannot be ported much without causing problems with leaking. BUT... the manifold dumps into the adapter which is .25" wider all around - what if I cleaned up the adapter and gave it a go, worth a try?

Maybe I will get a gasket for the 2V Cleveland, those ports are much smaller than the 4V version?

Graeme

The adapter here - one side has more metal


The manifold - gasket on backwards!!

jayb

  • Administrator
  • Hero Member
  • *****
  • Posts: 7406
    • View Profile
    • FE Power
Re: Jays Adapter Progress Updates - Installation in 62' TBird
« Reply #4 on: January 16, 2015, 08:23:47 AM »
If I'm seeing this correctly the ports in the manifold are smaller than the ports in the adapter, using the gasket as a reference.  I would suggest making a cardboard template of the ports in the adapter, and matching the manifold ports to that.  I wouldn't recommend opening up both to the gasket size; that is way too big, and will just cause a bulge in the runner cross section when its all assembled.
Jay Brown
- 1969 Mach 1, Drag Week 2005 Winner NA/BB, 511" FE (10.60s @ 129); Drag Week 2007 Runner-Up PA/BB, 490" Supercharged FE (9.35 @ 151)
- 1964 Ford Galaxie, Drag Week 2009 Winner Modified NA (9.50s @ 143), 585" SOHC
- 1969 Shelby Clone, Drag Week 2015 Winner Modified NA (Average 8.98 @ 149), 585" SOHC


Drew Pojedinec

  • Hero Member
  • *****
  • Posts: 2117
    • View Profile
Re: Jays Adapter Progress Updates - Installation in 62' TBird
« Reply #5 on: January 16, 2015, 02:01:39 PM »
*puts on flame suit*

Heck, I'm just excited to see a thread about an intake adapter going on a car instead of ebay  :-)

jayb

  • Administrator
  • Hero Member
  • *****
  • Posts: 7406
    • View Profile
    • FE Power
Re: Jays Adapter Progress Updates - Installation in 62' TBird
« Reply #6 on: January 16, 2015, 03:16:46 PM »
Jay Brown
- 1969 Mach 1, Drag Week 2005 Winner NA/BB, 511" FE (10.60s @ 129); Drag Week 2007 Runner-Up PA/BB, 490" Supercharged FE (9.35 @ 151)
- 1964 Ford Galaxie, Drag Week 2009 Winner Modified NA (9.50s @ 143), 585" SOHC
- 1969 Shelby Clone, Drag Week 2015 Winner Modified NA (Average 8.98 @ 149), 585" SOHC


rhinosoft

  • Jr. Member
  • **
  • Posts: 50
    • View Profile
Re: Jays Adapter Progress Updates - Installation in 62' TBird
« Reply #7 on: March 22, 2015, 11:40:30 PM »
Hi All,

well the radiator sprung a leak so I thought that I may as well install the adapter while waiting for the radiator to be repaired. Note in my images below, I simply mocked up the adapter, manifold, carb and air cleaner to get a feel for how it will work.

It is actually lower than with the RPM manifold and I have an inch or so gap below the hood! Great!! Well I hope so, should be good for low down torque - please give your thoughts.

Some things I've noted is that the water crossover tube from the manifold is going to need a trim, will show that later. Also thank God the Ford tech's managed to keep the accelerator and kick down brackets in the same location as the FE brackets - not ready to put in Lokar cables just yet! The rear breather is going to be a great thing for me, I can take that off and fill with oil rather than through the valve covers a lot faster.

I will check back in a week or so with my findings.

(some fuzzy image there - taken with phone camera...sorry)

Graeme


jayb

  • Administrator
  • Hero Member
  • *****
  • Posts: 7406
    • View Profile
    • FE Power
Re: Jays Adapter Progress Updates - Installation in 62' TBird
« Reply #8 on: March 23, 2015, 08:26:37 AM »
Looks good!  If you need to trim the water jacket passage on the adapter, the casting is about 0.150" to 0.200" thick in that area.  But I think you have more room to trim on the intake, and I would try that first - Jay
Jay Brown
- 1969 Mach 1, Drag Week 2005 Winner NA/BB, 511" FE (10.60s @ 129); Drag Week 2007 Runner-Up PA/BB, 490" Supercharged FE (9.35 @ 151)
- 1964 Ford Galaxie, Drag Week 2009 Winner Modified NA (9.50s @ 143), 585" SOHC
- 1969 Shelby Clone, Drag Week 2015 Winner Modified NA (Average 8.98 @ 149), 585" SOHC


rhinosoft

  • Jr. Member
  • **
  • Posts: 50
    • View Profile
Re: Jays Adapter Progress Updates - Installation in 62' TBird
« Reply #9 on: March 29, 2015, 04:49:37 AM »
Thanks Jay,

did not need to trim anything else, the adapter went on 'ex factory'.

Here is a good look at where I am at now - had family commitments otherwise would have been out and about now.

Some points to note:

  • manifold to water pump tube did not require any trimming, but it is not a straight connection. Should not be an issue though.
  • tightening up the Cleveland manifold (the one here) you can get to all the bolts, same for the adapter with a torque wrench. But it is a long stretch to the rear bolts on the Cleveland.

So, in the coming week I should have everything up and running, will check back later.

Graeme

« Last Edit: March 29, 2015, 04:51:49 AM by rhinosoft »

rhinosoft

  • Jr. Member
  • **
  • Posts: 50
    • View Profile
Re: Jays Adapter Progress Updates - Installation in 62' TBird
« Reply #10 on: May 15, 2016, 04:08:04 AM »
Hi All,

been 12+ months since I've posted about my intake adapter, I had to get it repaired due to a hairline crack and only got time this weekend to start swapping the old with the new.

Refer to my earlier images and I have added a few more here.

Some things to work through:

  • Throttle mechanism sits higher than stock even compared with RPM - what to do?
  • I have decided to put in a Mallory mechanical points distributor with no vacuum and fire from the MSD. (have not seen Faron around for a while - how are you mate?
  • I think everything will be ok, only tightened the adapter bolts to 20l/lb as I was gun shy from last time!
  • Water temp sender is very close to distributor - if I need to go with the old Duraspark not sure how it will go