Author Topic: 519" SOHC Build  (Read 81462 times)

0 Members and 1 Guest are viewing this topic.

Qikbbstang

  • Hero Member
  • *****
  • Posts: 892
    • View Profile
bang for the buck on their motor the MOBIL 1 spin-on filters are impressive. The fact that they are commonly all sold for the same price regardless of part number means you can score the large spin-ons for absurdly cheap money.  Since the dyno operator or even filter user can pay the same money he's going to pay for a standard sized filter and get the big monsters it's pretty much a brainless decision.  That big filter covers all the bases and does not sacrifice anything so during a break-in etc when particle counts are about as high as they ever will be it's handling any flow rate thrown at it and filtering to a state of the art level. It's tossed away and replaced for a mere $10 or so.

babybolt

  • Hero Member
  • *****
  • Posts: 516
    • View Profile
Re: 519" SOHC Build
« Reply #76 on: April 10, 2012, 09:45:16 PM »
Jomar filters, no bypass, 600 psi burst.  Great break-in filter.

http://www.jomarperformance.com/pro-filter.php

dieselgeek

  • Newbie
  • *
  • Posts: 23
    • View Profile
Re: 519" SOHC Build
« Reply #77 on: April 11, 2012, 03:01:43 PM »
I also cobbled up the harness for EMC/dyno work - cut everything apart and de-pinned/removed anything I was not using - like leads for vehicle speed sensors, fan on/off function, multilevel power adder engage. 

Geez, I thought your harness was one of the best looking at the event.  "Cobbled Up" is not how I would have described it!!

We put our ECU on a well isolated mount for the exact same concerns, ours being homemade I worried about shaking apart some fragile components inside.


Barry_R

  • Hero Member
  • *****
  • Posts: 1919
    • View Profile
    • Survival Motorsports
Re: 519" SOHC Build
« Reply #78 on: April 11, 2012, 06:44:27 PM »
I guess it was not THAT bad...but I did have to tighten the sip on connections during dyno testing when I saw we lost cam synch a couple times based on the LEDs.

But if I had Tim do it I'd have been 6 weeks late for the contest.  All the connections would have had high spring tension connectors, and the harness would have had military grade strain reliefs supporting the kevlar outer wraps.  We would have had hydraulically dampened mounting brackets attached to the engine by shouldered stainless steel fasteners within high durometer synthetic bushings.  Power would have been supplied through a secondary regulated battery source using the contest power only as a trigger for relay actuation.  Contacts at Honeywell would have been online to analyze running data and make corrections via satellite uplink. 

If he ever reads this he'll probably kill me....  ::)

machoneman

  • Hero Member
  • *****
  • Posts: 3854
    • View Profile
Re: 519" SOHC Build
« Reply #79 on: April 11, 2012, 07:26:51 PM »
Barry, that is the damned funniest thing I read all day!
Bob Maag

jayb

  • Administrator
  • Hero Member
  • *****
  • Posts: 7411
    • View Profile
    • FE Power
Re: 519" SOHC Build
« Reply #80 on: April 11, 2012, 07:58:12 PM »
If I ever meet Tim I'll make sure to tell him about this web site  ;D  I sure hear you about going overboard on the electrical stuff; I have to hold myself back every now then.  Stripping and crimping would be so much easier than soldering and heat shrinking...
Jay Brown
- 1969 Mach 1, Drag Week 2005 Winner NA/BB, 511" FE (10.60s @ 129); Drag Week 2007 Runner-Up PA/BB, 490" Supercharged FE (9.35 @ 151)
- 1964 Ford Galaxie, Drag Week 2009 Winner Modified NA (9.50s @ 143), 585" SOHC
- 1969 Shelby Clone, Drag Week 2015 Winner Modified NA (Average 8.98 @ 149), 585" SOHC


WConley

  • Hero Member
  • *****
  • Posts: 1163
  • No longer walking funny!
    • View Profile
Re: 519" SOHC Build
« Reply #81 on: April 11, 2012, 11:26:50 PM »
Stripping and crimping is for Chevy guys!   8)

A careful study of failure will yield the ingredients for success.

cdmbill2

  • Jr. Member
  • **
  • Posts: 87
    • View Profile
Re: 519" SOHC Build
« Reply #82 on: April 12, 2012, 12:43:13 PM »
Jay, all this drama is why you're going to like running the Peterson set-up on the 585. I see 75 at start up and it falls to 51-52 PSI when the 15-50 synthetic warms up. After that it doesn't move idle to 7500.

Way back when I ran a conventional in pan Melling I saw more varaition but nothing like you've reported. I vote for the stuck bypass too. I know its a PITA but its better to address that rather band aid it as excessive pressure could show up in a number of inconveinent and potentially damaging ways.

jayb

  • Administrator
  • Hero Member
  • *****
  • Posts: 7411
    • View Profile
    • FE Power
Re: 519" SOHC Build
« Reply #83 on: April 12, 2012, 09:43:55 PM »
Finally got this engine ready to go, I think.  Tuesday night I installed an HP-1 filter and some 10W-30 and that seems to have reduced the peak oil pressure to about 105 psi when the engine is fully warmed up at 4000 RPM.  I'm hoping I can run on the dyno like this, and then wait to pull the oil pump until the engine comes off the dyno next week.  On Tuesday I also decided to order a couple of spare injectors, because while running the engine on the dyno I noticed that cylinders 6 and 7 seemed to be running at a higher exhaust temperature that some of the other cylinders.  I'm thinking that those two injectors may not be working quite right, so a couple of spares will allow me to swap them out and see.  The spare injectors should be here tomorrow.  Wednesday night I decided to try a couple of lower RPM dyno pulls, but the dyno gave me some trouble; the brake wasn't reliably holding the engine.  Sometimes this happens with the dyno, especially if it hasn't been used in a while, and I haven't used it since the beginning of December.  So tonight I pulled all the filters and cleaned them.  In the process I found a cracked check valve on the absorber inlet, so I picked up a replacement tonight at the local home improvement store.  Then I pulled the servo valve and made sure it wasn't stuck or anything.  Finally tonight I brought the engine into a pull and the brake held just fine, so I'm finally ready to make some power starting tomorrow night.  I've also got the day free on Saturday, so if everything goes according to plan I should have plenty of time to get the engine tuned and see what kind of power it will make.  Hopefully I can post some dyno charts and dyno video on Sunday.  Not counting my chickens just yet, though.  This engine has already given me far too much trouble, and something else could go wrong, but I'm hopeful...
Jay Brown
- 1969 Mach 1, Drag Week 2005 Winner NA/BB, 511" FE (10.60s @ 129); Drag Week 2007 Runner-Up PA/BB, 490" Supercharged FE (9.35 @ 151)
- 1964 Ford Galaxie, Drag Week 2009 Winner Modified NA (9.50s @ 143), 585" SOHC
- 1969 Shelby Clone, Drag Week 2015 Winner Modified NA (Average 8.98 @ 149), 585" SOHC


Cyclone03

  • Sr. Member
  • ****
  • Posts: 338
    • View Profile
Re: 519" SOHC Build
« Reply #84 on: April 13, 2012, 10:12:48 AM »
Stripping and crimping is for Chevy guys!   8)

And us USAF Electricians,very few connections are soldered.
« Last Edit: April 13, 2012, 10:14:51 AM by Cyclone03 »
Lance H

WConley

  • Hero Member
  • *****
  • Posts: 1163
  • No longer walking funny!
    • View Profile
Re: 519" SOHC Build
« Reply #85 on: April 13, 2012, 10:19:11 AM »
We're "pulling" for ya Jay!  Here's hoping there are no stray minks skulking around your dyno room. ;)
A careful study of failure will yield the ingredients for success.

cdmbill2

  • Jr. Member
  • **
  • Posts: 87
    • View Profile
Re: 519" SOHC Build
« Reply #86 on: April 13, 2012, 11:40:34 AM »
Jay, RCI where I bought my injectors has a pretty reasonable cleaning and flow checking service. I sent mine back to them in 2010 as I began to get ready for DW 11. Its nice to know exactly what you have as you get graphs for each injector and flow rates at at specified pressures.

I'm sure someone local to you would provide a similar service. Believe it or not I add Chevorn Techron to a tank of gas every three or four months to keep things clean as well as using Chevron gas, which is this part of the world seems to be the safest adn best for EFI cars.

jayb

  • Administrator
  • Hero Member
  • *****
  • Posts: 7411
    • View Profile
    • FE Power
Re: 519" SOHC Build
« Reply #87 on: April 14, 2012, 10:32:38 PM »
Got some preliminary dyno results on this engine today;  it peaked at 864 HP and 698 lb-ft of torque after all the tuning was finished up.  I'm hoping to pick up another 10-15 HP tomorrow with some timing and fuel changes, but for the most part this is the power that the engine is going to make.

Friday night I got home from the usual family activities a little late to be starting a dyno session, and the situation with my fuel injectors was still bugging me, so I decided to take the evening and check out all of my injectors.  I received a package from Summit on Friday with two brand new injectors in it, and in order to test them and compare them with my existing injectors I decided to make a little test fixture.  I took a short section of spare fuel rail, machined it to accomodate fittings and an injector, and then machined a separate piece as a bracket that would hold the injector in place.  Here's a photo:


Then I took my spare fuel pressure regulator and some fittings and attached it to the fuel rail, so that I could hook the test injector up to the fuel pump on the dyno:


I took a spare injector harness and soldered a pushbuton into one of the wires, then put alligator clips on the ends so I could hook it to the battery, then attached the whole setup to the dyno fuel system.  When the fuel pump was on I could energize the injector and look at the spray pattern, so that I knew what to expect from all the injectors.  From there I turned on my precision scale and using an old plastic oil bottle, I weighed the bottle empty, then sprayed fuel into it for exactly 60 seconds, and then weighed it again.  From there I was able to calculate pounds per hour of fuel for the injectors.  After running this test on the two new injectors, I removed the eight old injectors from the motor and ran them too.  I got the following data on the injectors; numbers 9 and 10 are the new injectors:

1:  69.9 lbs/hour
2:  68.2 lbs/hour
3:  71.1 lbs/hour
4:  70.9 lbs/hour
5:  69.2 lbs/hour
6:  70.1 lbs/hour
7:  67.7 lbs/hour
8:  67.5 lbs/hour
9:  67.7 lbs/hour
10:  71.8 lbs/hour

This test made me feel a lot better about the injectors.  They were all in the same ballpark for flow, and despite the fact that they were not being pulsed during this test, I felt that since the new injectors behaved about the same as the old injectors the old injectors were probably working fine.  Looking at the numbers, I threw out the high and low flow rate injectors, and then separated the others into two groups with equal average flow, one for each side of the engine, to try to even up the side to side A/F readings that I would get. 

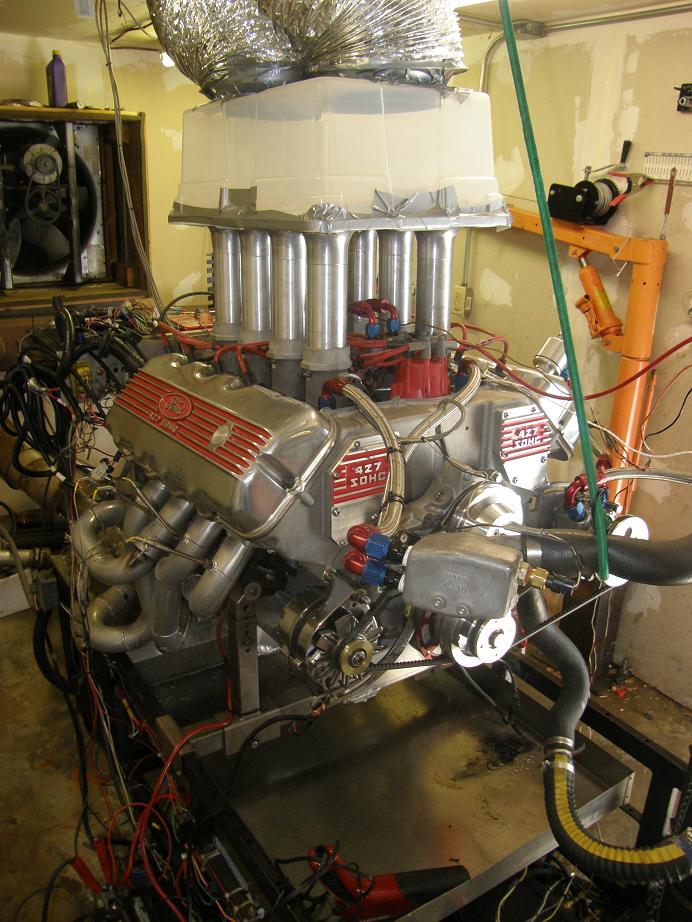
This morning I spent a couple hours making some last minute adjustments and checks to the engine, and also hooking up the air induction system so that the dyno could monitor the engine's air usage.  Here's a photo of the engine at this point:


After this was all finished up I had to make a run to get some more race gas and a new belt for the vacuum pump; I was almost out of adjustment for the existing belt, because it was too long.  When I got back my friend JC (he of the Y-block persuasion  :o) was waiting to give me a hand.  We had a quick bite to eat, and then I got started putting the new belt on.  However, after it was installed I realized that it was bending the brackets that hold the vacuum pump in place and causing a pulley alignment issue when I tightened it sufficiently.  This led to an hour long CNC project, where I built an additional brace for the vacuum pump to address this issue.  Finally, around 1:30 I was ready to run so I fired the engine and let it warm up to an oil temperature of 160F.  This was kind of the moment of truth for the oil pump and oil pressure issue; I had previously decided that if the oil pressure during the run increased past 120 psi I was going to have to pull the pan with the engine on the dyno.  My first checkout pull went from 3000 to 4500 RPM, and the oil pressure peaked at about 108 psi; what a relief!

From there, I started tuning the engine in 500 RPM increments, starting from 3000 to 5000 RPM, then moving to 3500 to 5500, 4000 to 6000, etc.  At the higher speed levels I started seeing a slight drop off in oil pressure on the top end.  Reviewing the crankcase vacuum data in the dyno logs I saw that I was pulling around 15 inches of vacuum at speed, and I suspected that this was causing the oil pressure behavior.  But we didn't know for sure; JC suggested that we film the sight glass I had installed on the side of the oil pan during a pull and watch to see what happened.  I thought that was a pretty good idea, so I set my tripod and camera up on the left side of the engine, looking at the pan, and made the following video:

http://www.youtube.com/watch?v=y28pPcml59U&context=C417ba0cADvjVQa1PpcFO96Jdxl9sme8uDkAMZmmIXxBOxFFaXY6c=

You can see the oil level go up and down before, during, and after the pull, but at no time did the oil level in the pan drop too far down, so I concluded that the vacuum pump was causing the oil pressure behavior, and as long as the oil pressure stayed at a reasonable level I didn't have to worry about it.

We continued tuning the engine and finally ran from 5500-7500 RPM.  The engine made 719 lb-ft of torque at 5600 RPM, and 858 horsepower at 6900 RPM.  I was pretty happy with that; a quick calculation showed that to be 1.65 HP/cubic inch, which is certainly a respectable number.  But the engine was peaking in power too low; the torque converter for the Galaxie has a 6000 RPM stall speed, and I felt that a higher power peak would be more beneficial for running a good number at the track.

Since this is an individual runner intake manifold, one of the things I'd been itching to try was to tune the RPM band by shortening the injector ram tubes.  I decided to give this a try, so with JC's help we pulled all the ram tubes off the intake manifold and cut them down from 9" overall length to 7" overall length.  This took an hour or so, but wasn't that difficult, and by 5:45 we were up and running again.  This time I started at 4000-6000 RPM and worked my way up to 5500-7500.  I had to make some changes to the VE map to add fuel at the upper RPM ranges because the change in ram tube length definitely had an effect.  The torque peak of the engine was shifted about 600 RPM up by the shortened stacks.  In this configuration, average horsepower  from 6000-7500 RPM was up about 13 HP over the longer tubes, so shortening the tubes was definitely a worthwhile exercise.

Here's a graph of the engine's power band from 5500 to 7500 RPM:


Here a graph of the power band from 4000 to 7000 RPM; note that this is two separate dyno pulls merged together, so some of the data points overlap:


Here's a graph showing the best results from 5500-7500 RPM with the two different injector stacks length.  Looking at this data it appears that I got lucky, and adjusted the injector stacks to exactly the right length, because at 6000 RPM the HP curves are at an identical point, but from that point forward the shorter stacks take over.  So, with the 6000 RPM converter cutting the stacks didn't cost me any power; its only a gain.


It is interesting to compare this engine to the original trim of my 585" SOHC.  Compression ratio is the same, heads are the same, cams are the same, and the ignition system and EFI system and injectors are the same.  This is a really instructive comparison of engine sizes, and really points out the differences very clearly.  For the 585" engine, peak HP per cubic inch worked out to 1.60, while with the shorter stacks on the smaller engine, peak HP per cube was 1.66.  So, the smaller engine made more power per cube.  Makes sense; that would be expected.  Also, with the exactly same setup but 65 more cubic inches, the 585" engine peaked at 931 HP, while the 519" engine peaked at 864.  Again, seems to make sense.  Here's a graph showing the 585" engine and the 519" engine together on the same chart.  The differences are really obvious:


Which engine will be faster down the track?  Duh.  You can't beat cubic inches.

Finally, here's a video of one of the last pulls.  I had a lot of trouble with my camera, trying to get it to take a decent video while showing the computer screen in the dyno room, but finally I got some reasonable results.

http://www.youtube.com/watch?v=2ma6-rlv01s

This thing sounds so good at 7500 I'm really tempted to take it to 8000 RPM on Sunday.  But its not going to make any more power if I do that, and if I cut the stacks again I'll start losing power at 6000 RPM, and I don't want to do that either.  Plus, 8000 RPM and a 4.5" stroke crank is 6000 feet per minute piston speed; Yikes!  I might run it to 8000 anyway, just to listen to the freaking thing; it sounds so cool!  If I do I'll post another video.  Nothing like an 8000 RPM SOHC, after all...
« Last Edit: April 15, 2012, 12:36:53 AM by jayb »
Jay Brown
- 1969 Mach 1, Drag Week 2005 Winner NA/BB, 511" FE (10.60s @ 129); Drag Week 2007 Runner-Up PA/BB, 490" Supercharged FE (9.35 @ 151)
- 1964 Ford Galaxie, Drag Week 2009 Winner Modified NA (9.50s @ 143), 585" SOHC
- 1969 Shelby Clone, Drag Week 2015 Winner Modified NA (Average 8.98 @ 149), 585" SOHC


ScotiaFE

  • Hero Member
  • *****
  • Posts: 1409
  • Howie
    • View Profile
Re: 519" SOHC Build
« Reply #88 on: April 15, 2012, 06:49:25 AM »
Love the graphs. They start at the point I'm trying to get to. LOL
The "small SOHC" looks awesome on the pump.
What size diameter are your stacks? I have a set of stacks that I doubt I will ever get around to using.

WConley

  • Hero Member
  • *****
  • Posts: 1163
  • No longer walking funny!
    • View Profile
Re: 519" SOHC Build
« Reply #89 on: April 15, 2012, 09:37:57 AM »
Very nice results!  ;D

I'm glad you're slaying the dragons now in April, as opposed to the waning days of August.  Looks like this thing is going to be a playa'.  Still planning to stick the 519" into the Galaxie and then build up the 585" SOHC for the Shelby clone?
A careful study of failure will yield the ingredients for success.